RSS
 

Posts Tagged ‘Things’

3 Things I Wish I Knew When I Started Photography

26 Jan

There are a some lessons that we all learn the hard way. Trial and error, though equally arduous, are still the two most ingraining teachers any of us will ever have. We often learn more from our failures than our successes. But like Newton tells us, at times we move forward only by hefting ourselves onto the shoulders of giants.

Boldness learn

More than anything, I wish I would have learned a few things sooner. There are so many lessons that would have benefitted me if I had only understood them on the front end of my trip into the photographic unknown.

So, in the spirit of solidarity I will share three things I wish someone would have told me when I started photography. Perhaps there were those who tried but for whatever reason I either couldn’t or wouldn’t understand. Hopefully these hard fought teachings will help you move forward and give you the mentality you need to start creating better images. Here they are in no particular order.

Learning chicago

The type of camera I would need

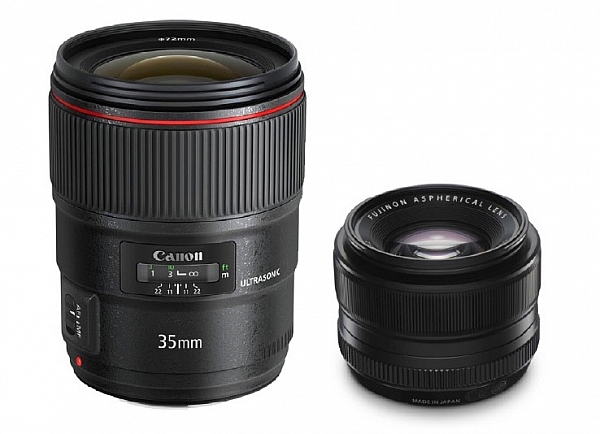
This is a dodgy subject that plagues many who are just starting out, or those who want to get more serious about their photography. I began my journey shooting a 35mm Nikon N65 with a 18-55mm kit lens that I bought when I was 18 years old. It was my first real camera. The late teenager version of me saved his money and paid $ 265 for it but I still felt as though I needed a better camera in order to make better images. That was 15 years ago.

Even then I was under the impression that I would need a “professional camera” in order to be a professional photographer. If you had asked me then, I wouldn’t have been able to even tell you what a “professional camera” actually was.

Camera types

What I wish someone had told me was that the best camera doesn’t exist. The only thing that truly matters is the knowledge to use whatever camera is in your hands to the utmost of its (and your) ability. True, times have changed and imaging technology has advanced alarmingly fast. Some people now earn a living with only the cameras in their smartphones.

The thing to always remember is that most cameras are capable of producing images of astonishing quality when coupled with a proficient user. Whatever camera you might currently have is likely more than enough. Allow your skills to mature and you will know when it’s time to upgrade.

Photography create

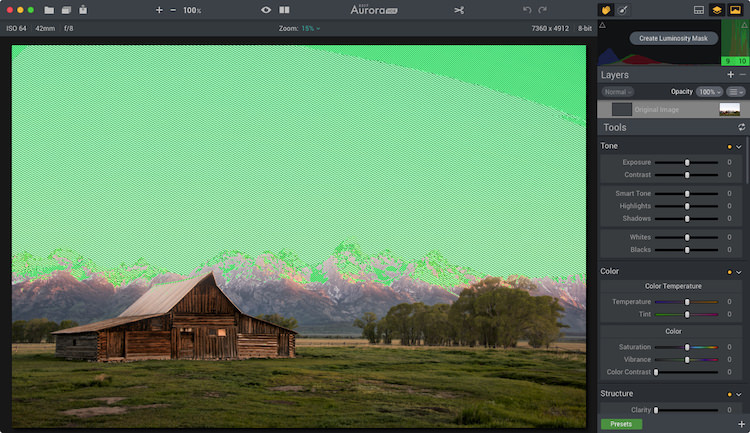
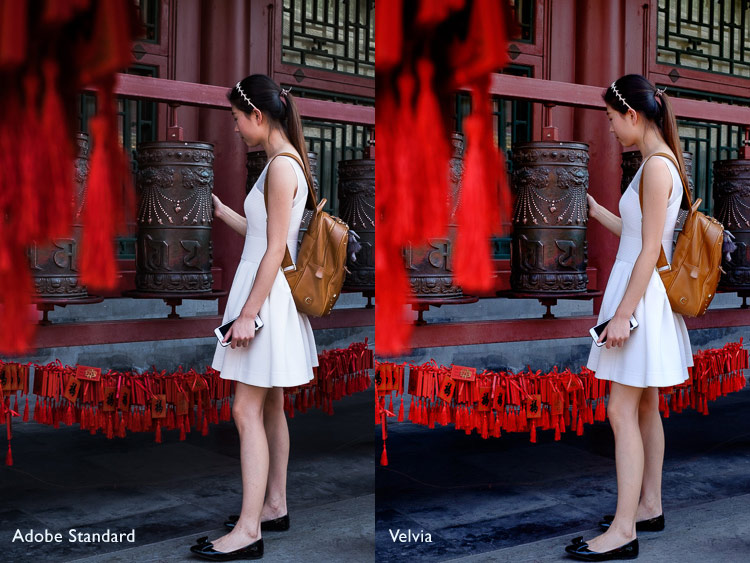
What post-processing is – and what it is not

Before you begin scrolling in horror at the very mention of post-processing let me assure you that this in not a dreaded commentary on what may or may not be considered “Photoshopping.” Instead, we’re going to talk about some misconceptions I had when first beginning to process my images.

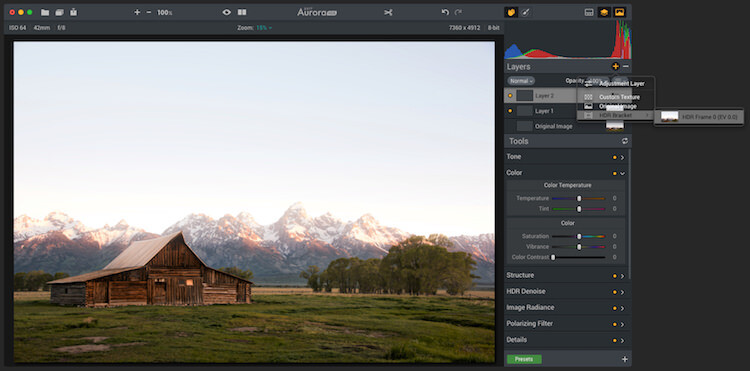
I was under the impression that “getting it right in the camera” was an all encompassing mentality that meant nothing needed to be done after the moment of capture other than showing the image to the world. That is not necessarily true.

What I wish someone had told me was that all photographs, even analog (film), virtually always benefit from some extent of work after the image has been made. The quote which changed my thinking towards post-processing came from none other than Ansel Adams himself:

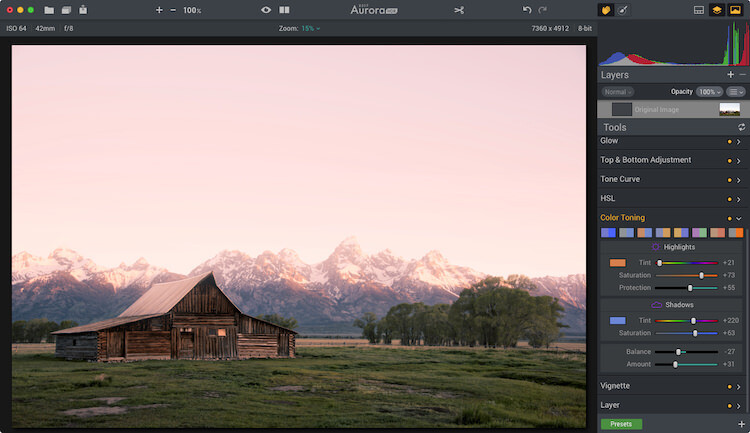
“The negative is the equivalent of the composer’s score, and the print the performance.”

Journey photography

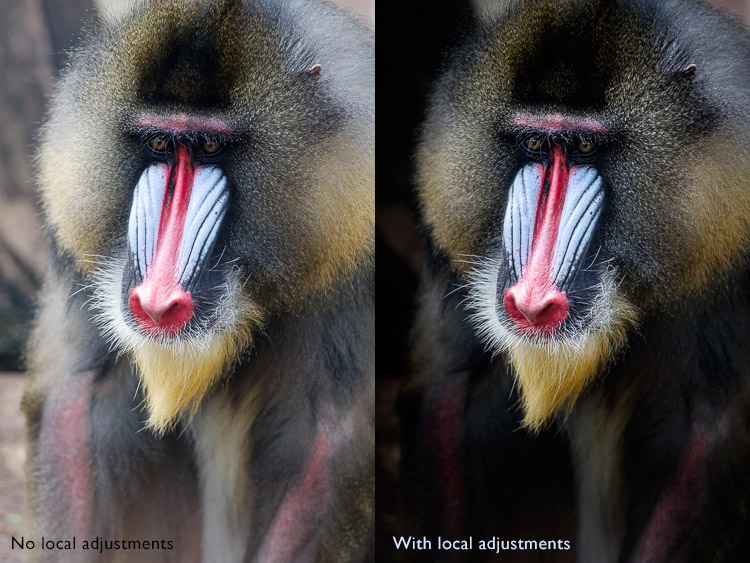
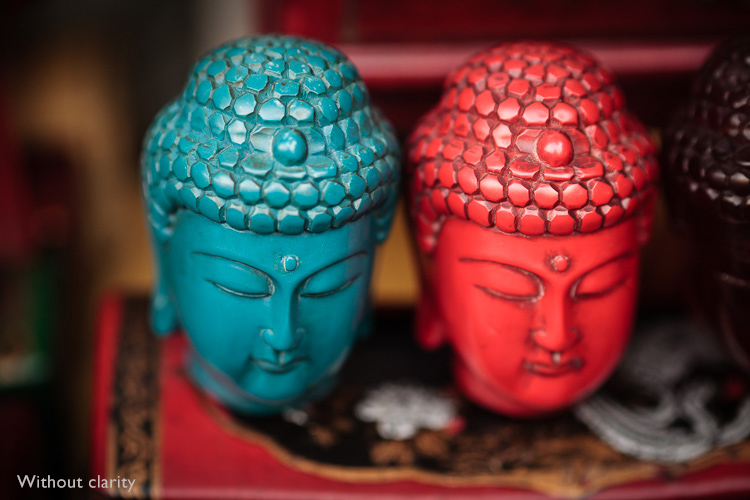
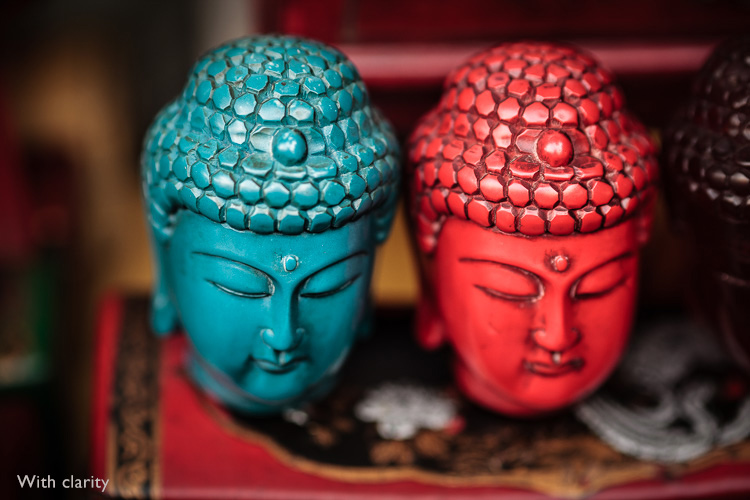
The point Ansel was making is that yes you always want to strive to achieve the best exposure you possibly can in-camera so that you have a more complete representation of the scene in order to manifest a final photograph intermingled with your own creativity. Post-processing is not something to be avoided but rather embraced as a logical second step towards achieving your visualization regardless of what that visualization may be.

Perfection is unattainable

That’s right. No photograph is perfect and very few photographs are ever elevated to the level of fine art, whatever that means. This was an illusion that burdened me during my early days while learning to create photographs. I had an enormous misunderstanding about what actually went into the production of an image both creatively and technically.

One thing that I did know, was that my photographs looked nothing like some of the wonderful images I saw online or in photo magazines. I became discouraged, all the while feeling as if I was doing something completely wrong.

Perfection unattainable

What I wish someone had told me was that even if you labor in photography for the rest of your life, you will never snap a perfect frame. Your photographs will certainly become stronger as you hone your technique and acquire more capable gear, yes. But don’t think that you will ever reach a day when you can say, “Ah, now I’m perfect. All my photographs will be flawless from here on out.” That day will never come.

The craft of photography is a practice in personal evolution. It is a journey of constant learning. So take a breath, relax, and enjoy the process for the beautifully weird trip that it is.

Conclusion

These are just a few of things that I wish someone had told me when I first began making photographs. Do you have any lessons you have learned that could help others? List them in the comments below!

googletag.cmd.push(function() {
tablet_slots.push( googletag.defineSlot( “/1005424/_dPSv4_tab-all-article-bottom_(300×250)”, [300, 250], “pb-ad-78623” ).addService( googletag.pubads() ) ); } );

googletag.cmd.push(function() {
mobile_slots.push( googletag.defineSlot( “/1005424/_dPSv4_mob-all-article-bottom_(300×250)”, [300, 250], “pb-ad-78158” ).addService( googletag.pubads() ) ); } );

The post 3 Things I Wish I Knew When I Started Photography by Adam Welch appeared first on Digital Photography School.


Digital Photography School

 
Comments Off on 3 Things I Wish I Knew When I Started Photography

Posted in Photography


2016 DPReview Readers’ Best Shots: Things

01 Jan

2016 DPReview Readers’ Best Shots: Things

Collembola (Springtail) under a drop of water. Central Park, Burnaby. Sony A6000, Sigma E60mm F2.8, 42mm extension tube. Photo by Don White

Picking your favorite image is never an easy task. Nevertheless, our readers were up to the challenge when we asked them to submit their best shots of 2016. We received a huge number of submissions, and it was no small job picking favorites. We didn’t need the reminder, but it underscored just how talented our readership is. Photos were divided into three categories and we settled on a small selection to feature in each.

This category, ‘things,’ is admittedly a little ambiguous. With apologies to our feathered and furry friends, animals fell into this category, as did just about anything else that isn’t a landscape or a portrait. We tried to include a variety of subjects, and there were many excellent images submitted – check them all out here and here.

A huge thanks to everyone that participated and gave us a chance to see your work!

2016 DPReview Readers’ Best Shots: Things

Brooklyn, N.Y. Olympus E-M1, Lumix G Vario 12-35mm F2.8. Photo by GarySloman

2016 DPReview Readers’ Best Shots: Things

Taken on April 1st 2016 in the evening during the Silverstone 24hr Race. I wasn’t accredited so this was taken through the fence. I used an extremely slow shutter speed to blur the unsightly background and add a sense of movement. Fujifilm X-T10 & XF100-400mm F4.5-5.6 R LM OIS WR. 100mm. Shutter Priority @ 1/15sec. Photo by ChrisH37

2016 DPReview Readers’ Best Shots: Things

Photo was taken in aviashow near Mazeikiai city, Lithuania. Sony Alpha a7R II, Sony FE 70-200mm F4 G OSS. 1/6400sec, 70.0mm, F4, ISO 200. Photo by Razabaitas

2016 DPReview Readers’ Best Shots: Things

A warehouse emergency exit shot in Reze, France, On July 6th this year. Nikon D5500, 16-80mm F2.8-4. Shot at 16mm, ISO 100, F6.3, 1/1600sec. Photo by UneVache

2016 DPReview Readers’ Best Shots: Things

Taken in San Ignacio Lagoon, Baja California, Mexico. In this lagoon a few mother and calf grey whale pairs will come up to the fishermen’s boats to play which normally means getting you wet. I took this shot with a Panasonic FT5 waterproof compact (as I said, you get wet!) which I held over the side as a calf surfaced on its side alongside the boat. The camera was at maximum wide angle. Photo by Chris Ryan

2016 DPReview Readers’ Best Shots: Things

Memories of summer 2016 taken with a Panasonic kit lens 12-32mm on a Olympus Pen E-PL7. Photo by mjdundee

2016 DPReview Readers’ Best Shots: Things

I made this photo during a late-August visit to northern Arizona’s Mormon Lake. This was one of four juvenile red-tailed hawks riding the summer breeze above the east rim overlooking the lake. This one was quite curious and soared in, close, to size me up for a late-day snack. When I got home and started going through the exposures, I was hoping this one didn’t cut off any tail feathers. As it turned out the framing was just about perfect and the result is the uncropped image above.

Nikon D610 with Nikkor 200-500 F5.6E VR at 500mm, F5.6, ISO 1100, 1/2000sec, with +2/3-stop exposure comp. Photo by Bill Ferris

2016 DPReview Readers’ Best Shots: Things

After decades in front of the main Hamburg Art Gallery, this Sculpture has found it’s new place inside the halls. I took this photo with my Canon 6D, a Sigma 24mm art lens. 1/30sec, F8.0, ISO 1000. Photo by moehh

2016 DPReview Readers’ Best Shots: Things

A kind of beetle when it was about to fall off the corner Nikon D90, Nikkor MF 50mm F1.4, Hama closeup filter. 1/20sec, F5.6, ISO 100. Photo by Netmsm

Articles: Digital Photography Review (dpreview.com)

 
Comments Off on 2016 DPReview Readers’ Best Shots: Things

Posted in Uncategorized


10 things I wish I knew when starting my photography business

30 Dec

The moment I bought my first DSLR I knew that photography was my true passion. I didn’t consider myself a professional back then, but I was sure I wanted to become one. Well, the road  turned out a lot longer than I expected. I have learned there’s much more than meets the eye when it comes to the photographer profession. Continue Reading

The post 10 things I wish I knew when starting my photography business appeared first on Photodoto.


Photodoto

 
Comments Off on 10 things I wish I knew when starting my photography business

Posted in Photography


5 Non-HDR Things You Can Do With MacPhun’s Aurora HDR 2017

08 Nov

Yes Aurora HDR was developed for creating HDR photographs. But did you ever think of using it for non-HDR tasks?

You’re in luck because in the next few minutes I’m going to open your eyes to some new ideas. Specifically ideas for using Aurora HDR in your photography workflow without using the term HDR.

What is Aurora HDR?

If you haven’t heard of Aurora HDR, it’s MacPhun’s answer to all the other HDR software out there. Developed in partnership with Trey Ratcliff, Aurora HDR has unique tools which rival even non-HDR software. I look at it as a mix between Photoshop and MacPhun’s Intensify.

But this isn’t about HDR. It’s about anything other than HDR. Before we dig in, know that the software can open a single image just like any other app or plugin. Let’s take a look inside:

scott-wyden-kivowitz_dps_1

Air Force Airmen saluting Air Force One as it takes off.

1. Local Adjustments

Aurora HDR 2017 includes some local adjustment features which you are used to seeing in non-HDR software, like Lightroom or ON1. It includes things like gradient filters, radial filters, and the new Zone System Luminosity Masking. These are all powerful tools to make unique changes to specific areas of a photograph. The beauty is that any edits made to those local areas do not impact any other region of the image.

One local adjustment feature often overlooked is the Top & Bottom Adjustment module. It’s like the gradient tool but has a few sliders specific to this module. It includes things like exposure, warmth, vibrancy, and contrast. Each of which appears twice; once for the top of the frame and once for the bottom of the frame.

Before

Before

After the Top and Bottom Adjustment.

After the Top and Bottom Adjustment.

What makes this even cooler is the quick slider method of changing the gradient smoothing (blend), X or Y axis location of the tool (shift), and the rotation which makes it vertical or horizontal.

Because the standard gradient tool in Aurora HDR 2017 requires you to make adjustments to the mask, having this module makes quick adjustments to a larger local area really quick.

Local adjustments in Aurora HDR 2017

Local adjustments in Aurora HDR 2017

2. Luminosity Masking

Aurora HDR Pro (pre-2017 version) had Luminosity Masking, but it has been improved in the new version.

Luminosity Masking is popular in portrait processing, but it’s also useful for other kinds of photography. What MacPhun did in the new version is to take a page out of Ansel Adam‘s book, by adding the Zone System into the Luminosity masking tool. Now you can create a mask based on specific zones of light. And they made it so simple.

Aurora HDR 2017's Zone System Luminosity Masking.

Aurora HDR 2017’s Zone System Luminosity Masking.

luminosity-masking-before

With the Luminosity Mask applied.

With the Luminosity Mask applied (masking the sky).

3. Advanced Masking

The layers and masking tools in the software are advanced. When you add a layer, you can do it from a single bracket, a blank slate, and other choices. The options enable you to load any amount many brackets you want, and not process them as HDR, but instead do regular masking and editing.

Masking can be implemented using a Wacom Tablet and as a radial or gradient brush, or using the new zone system tool.

adv-masking

This shows both color toning being combined with a brush mask.

4. Color Toning

Aurora has heavy duty color toning (split toning) features built into the software. Like Lightroom, users can choose a color to tone the highlights and shadows individually. But Aurora goes beyond that by adding highlight protection of the color. That way you can be more strategic on how much of the highlights are affected by the toning. You also have saturation control of the color for both highlights and shadows.

Like Lightroom, Aurora provides the ability to adjust the balance of the color tone. To add more or less color in either the highlights or shadows. Of course, there is also an amount slider which enables you to reduce the impact of the color on the complete photo.

Color toning applied.

Color toning applied.

Mask applied to keep the color toning off the roof of the barn and other areas.

Mask applied to keep the color toning off the roof of the barn and other areas.

There are also a variety of preset color toning swatches included, or you can make your own by making an Aurora HDR 2017 preset. When combining color toning with the masking tools you have some incredible color options.

5. Batch Processing

Batch Processing might sound silly to some but think about it for a moment. Imagine you like one of the editing tools in the software, like the color grading tool, and you want to add that to a large volume of photos. With the batch processing tool, you can do that. You would launch the Batch Processor and then choose the preset and settings you want to be used. So if you want color grading, make a preset with it. Simple!

The way MacPhun does it is you can drop a folder of images and pick what preset you want to use on the photos. It will then run through it quickly without you having to do anything.

So Much More

Aurora HDR 2017 is made for HDR photography. I think that’s obvious by its name. But I think it’s important for photographers to understand when a tool can be beneficial, even when it is least expected.

This software has made its way into my regular rotation of post-processing tools. The reason is that when using a tool with a different user experience and features my creativity expands. Doors are opened which were once closed, and I walk away with fun edits of photographs I once didn’t know if I would touch.

scott-wyden-kivowitz_dps_3

Not the end!

If you have made it to the end and wanted one more takeaway, here goes.

My last piece of advice for you is this – go for it and try something new. Even if it’s not this software or the next. If you don’t try, you won’t learn and grow. But really, as a wise green man once said, “Do or do not, there is no try.”

googletag.cmd.push(function() {
tablet_slots.push( googletag.defineSlot( “/1005424/_dPSv4_tab-all-article-bottom_(300×250)”, [300, 250], “pb-ad-78623” ).addService( googletag.pubads() ) ); } );

googletag.cmd.push(function() {
mobile_slots.push( googletag.defineSlot( “/1005424/_dPSv4_mob-all-article-bottom_(300×250)”, [300, 250], “pb-ad-78158” ).addService( googletag.pubads() ) ); } );

The post 5 Non-HDR Things You Can Do With MacPhun’s Aurora HDR 2017 by Scott Wyden Kivowitz appeared first on Digital Photography School.


Digital Photography School

 
Comments Off on 5 Non-HDR Things You Can Do With MacPhun’s Aurora HDR 2017

Posted in Photography


Modified Nikon D5500 keeps things cool for astro-photographers

14 Oct

Italian astrophotography equipment brand PrimaLuceLab is selling a version of the Nikon D5500 that it has adapted for long exposures using a custom cooling system that manages the temperature of the camera’s sensor. The PrimaLuceLab Nikon D5500a Cooled uses dual Peltier cells to create a thermoelectric cooling effect that allows users to maintain the temperature of the sensor and to cool it by as much as 27°C below the ambient air temperature.

Keeping the sensor cool allows long exposures to take place without the sensor heating up and creating image noise. This means very long shutter openings can be used to make images with very little additional noise. Just as importantly, the cooling system can keep the sensor at the same user-specified temperature throughout a shoot so that dark frames don’t have to be made directly after each image – they can be made at the end when the subject has passed.

$ (document).ready(function() { SampleGalleryV2({“containerId”:”embeddedSampleGallery_1400173065″,”galleryId”:”1400173065″,”isEmbeddedWidget”:true,”standalone”:false,”selectedImageIndex”:0,”startInCommentsView”:false,”isMobile”:false}) });

The camera is also fitted with a system that prevents air moisture from condensing on the surface of the cooled sensor. The Anti-Dewing system heats the front filter over the sensor but not the sensor itself. Presenting a warm surface to the air means no moisture gathers. The infrared-cut filter of the Nikon D5500 has been removed and replaced by a filter that allows longer red wave lengths, specifically those beyond the H-alpha line, to pass and be recorded.

Touch sensitive buttons on the rear of the cooling block allow users to control the shutter opening and shutter time as well as set up sequences of different exposures with brackets of up to 900 seconds.

The PrimaLuceLabs Nikon D5500a, which comes with a 4-year warranty, is available now and costs €2190 (about $ 2420).

For more information visit the PrimaLuceLab website.

Articles: Digital Photography Review (dpreview.com)

 
Comments Off on Modified Nikon D5500 keeps things cool for astro-photographers

Posted in Uncategorized


5 Things Newbies Should Know About Getting Started in Photography

01 Sep

Getting started in photography can be quite scary. We all start by investing in a DSLR, and think we are going to take amazing images. In reality it is a bit more difficult, because if it was easy… well everybody would sell prints, quit their day job, and live off photography.

Just like any art, photography has to be learned, and practiced – a lot. It is a trial and error process, we all start at the bottom and build our way up.

5 tips photography 1

If your images do not look like you imagined them, then try a different approach. Just do something. Einstein said that the definition of insanity was doing the same thing over and over and expecting different results.

#1 – Gather information and knowledge

Photography is the best hobby you could have, but it is a lot of hard work. I personally don’t believe in talent. The first tip I can give you is to absorb as much information as possible. How do you do that ? Well you have so many free resources on the internet, the only need to take advantage of it. Since you are reading this, then you’re on the right track.

By resources, I mean articles online, magazines, and YouTube tutorials. You can learn so much in less than 30 minutes. One other tip I can also give is to check multiple resources for the same topic.

5 tips photography 2

Read photography magazines. They have amazing stories and tutorials.

For example you want to learn how take portraits – don’t read or watch only one tutorial. The more you research, the more you will learn, because sometimes one article won’t give you all the answers to your questions, but another article will.

You should also anticipate. What I mean by that, is to learn about it, before trying to do something.

For example, say you want to buy a new DSLR. You should learn how to use it before you actually buy it, read reviews and tutorials. If you are planning a trip to the sea, then learn seascape photography before travelling.

5 tips photography 3

Photography is spending hours and hours on research.

#2 – Try all kinds of photography

This brings me to my second tip: don’t focus on only one type of photography. Of course, if you like portrait photography then do that. What I’m trying to say, is that you should explore all the possibilities, before focusing on only one type of photography. Try to add variation by learning about macro photography, landscapes, portraits, wildlife, etc.

5 tips photography 4

Try super sports car photography. It’s so fun, just protect your ears.

You may be surprised by the results you get, and if you never try, you will never know if you actually like photographing birds or not. From my experience, the more you learn, the more you’ll be able to do things. It’s better knowing how to do five things than only one. Starting photography and only wanting to take portraits is not the right mindset. It’s just like food, if you don’t try new food, you will never know if you like it or not.

#3 – Photography is an investment

The third thing you should know is that photography is a big investment. You will need to buy lenses, camera bodies, tripods, and filters, which will end up being quite expensive. If you are not smart with your decisions, then your bank account can end up in tears.

It may seem confusing when I tell you to try different types of photography, but then warn you about buying too much gear. If you want to try macro photography, don’t buy a macro lens right away. Just buy extension tubes (or close-up filters) until you know if you are serious about macro. They cost a lot less, and increase your focusing distance dramatically.

5 tips photography 5

A very inexpensive $ 30 ND Filter.

For filters, you can buy $ 20 Neutral Density filters for your landscape photography. Of course they won’t have the same quality as the professional ones, but it’s a good place to start.

I started photography with a phone, then moved up to an entry level DSLR, and now I own a full frame camera. But, it took me four years to go from my phone to full frame, so don’t go out and buy the best DSLR ever, find something that will suit where are you starting first.

5 tips photography 6

Phone photography

Make smart decisions, a normal kit lens is enough to get started in landscape photography.

#4 – Post-processing is a good thing

The fourth tip is about post-processing. Most beginner photographers underestimate the power of post-processing. It can make or break an image, that’s why my first point is important. You have to learn and fail in order to succeed – once you learn how to master software like Lightroom and Photoshop, your photography will become more like a process, because you will automatically think about post-production.

5 tips photography 7 5 tips photography 8

For post-production, I also recommend learning about the same topic from different sources. There are a lot of different ways to do the same thing, you just have to find which way works the best for you. It doesn’t matter how you do it, the important thing is the end result.

For example, for dodging and burning an image I prefer using a curves layer with a mask, but that doesn’t mean I don’t know how to dodge and burn using grey layers.

Post-production can be quite scary because there are so many tools, but once you master a certain software, you will be able to work on your worst shots and get the best out of them.

I would say that post-production is almost indispensable. There are a lot of photographers who want natural photography, but that doesn’t exist. Your colours will get interpreted anyway, it’s up to you to decide if you want your camera to do it automatically, or if you want to take control over everything.

5 tips photography 9

Simple snapshot with my own interpretation of colors.

#5 – Good photographers create depth in their images

The last thing you should know is that photography is all about creating depth. There are many ways of creating depth; you can do it with light and contrast, colours, movement, a solid composition, and with depth of field.

You should aim to have at least one of these elements in your images. If you can mix all these elements in one image, then your result will be even better.

With light and contrast you can play around with shadows, and dodging a burning. The main purpose is to have uneven lighting on purpose – try to avoid flat lighting. Some area should be lighter than others, and some darker. You also want to know which lighting conditions will give you the best results. For example, if you like shooting landscapes then you will want to know that you get the best light during the magic hour (blue hour).


Composition is the most important thing, try to use a foreground, middle ground and a background. The rule of thirds is also really useful to frame your subject in a pleasing way.

5 tips photography 10

With colours, the main purpose is to have tones that go together. Always look at your colour palette and see what works best. This is quite difficult to do, but one tip I can give you, is that when the colours do not look good, convert your image to black and white.

For movement, try long exposures, they are a good way to create a surreal images.

The last thing is depth of field. This is very important if you’re taking portraits, the amount of background blur can completely change an image. If you want to learn about it here’s another article I wrote: How to Achieve Background Blur or Bokeh where I explain three easy ways to achieve a nice bokeh.

IMAGE 2

Summary

So if you’re just getting into photography, consider these five things as you begin your journey. Learn everything you can from multiple sources, try different kinds of photography to see what you like, don’t get caught in gear envy, don’t be afraid of post-processing and remember to add depth to make more interesting images.

Are you further along in photography? What other advice would you offer to new photographers? Please share in the comments below.

googletag.cmd.push(function() {
tablet_slots.push( googletag.defineSlot( “/1005424/_dPSv4_tab-all-article-bottom_(300×250)”, [300, 250], “pb-ad-78623” ).addService( googletag.pubads() ) ); } );

googletag.cmd.push(function() {
mobile_slots.push( googletag.defineSlot( “/1005424/_dPSv4_mob-all-article-bottom_(300×250)”, [300, 250], “pb-ad-78158” ).addService( googletag.pubads() ) ); } );

The post 5 Things Newbies Should Know About Getting Started in Photography by Yacine Bessekhouad appeared first on Digital Photography School.


Digital Photography School

 
Comments Off on 5 Things Newbies Should Know About Getting Started in Photography

Posted in Photography


10 Things Nobody Tells Photography Newbies

08 Aug

Every time you read an article or a book, a blog post, or a tutorial, there is always something new to learn about photography. Technology is always moving forward, software being improved, new features and functionality released. Someone has a new technique or tip to share. So many things to learn, yet it is one of the joys of photography as well. Your boundaries are in many ways limitless, it is an artform you can take and develop and make it your own.

Still there were many things on my journey that had to be learned the hard way, as is often the case. There are some fundamental things it took a while to understand, mostly because no one shared these nuggets of information. Maybe they just thought it was so obvious, that everyone would figure it out?

Hopefully these tips from my experiences will help you in your photography journey.

1. Photography is hard to learn

SHILL Article1 buskers

Your camera is a marvel of modern technology and science, with lots of buttons and dials, and all sorts of fancy features. To have control over how it creates your images, you need to learn how to use it with some level of skill. Then there is the art side of the equation; composition, framing, mood, telling a story. So, many new concepts and ideas to learn, both technical and creative.

Dropping $ 3500 on a fancy new DLSR and lens doesn’t make you a capable photographer, any more than buying a set of chef knives makes you a Michelin starred chef. Your camera is a tool, which needs thousands of hours of time invested into learning how to use it. If you aren’t prepared to read books, watch videos, and go out again and again to shoot, then your rate of improvement will be minimal.

2. Photography is an expensive exercise

It starts with the really expensive bits, the camera body and the lens. Before long you will want more lenses. A camera bag is necessary to carry it all. A tripod to hold it still. Filters for long exposure shots. Wireless remotes, flash or other lighting gear, the list goes on. There is always something new and shiny to spend money on.

SHILL Article1 lake pukaki

Don’t forget things like decent footwear and outdoor clothes. Gas and accommodation costs for travelling locally, plus fees to get into parks also need to be accounted for. Travelling overseas is a luxury for many people. Don’t forget insurance too. It all adds up to a lot of money.

3. Camera gear is heavy

Good quality lenses are full of optical quality glass, and as a result they can be quite heavy. By the time you have two or three of them, and a DLSR body and other accessories, your kit can easily weigh 5kg (11 lbs.) or more. The more gear you have, the more you have to carry with you. This is one of the reasons the four thirds (mirrorless) technology is becoming so popular, the cameras (and lenses) are much smaller, and therefore lighter.

4. Having the right gear matters

Long lenses are necessary for wildlife and bird photography. Special gear is needed for astrophotography. For that super close-up shot, a macro lens (or filters) are a must. Studio portrait work means soft-boxes and professional lighting gear. Tripods, filters, wireless remotes etc., it all makes a difference, and having the right gear for the job is important.

SHILL Article1 daisy macro

5. Gear doesn’t matter at all

Composition, framing, creative or artistic imagery, all elements that you, the photographer, bring to the image. It could be shot with your phone or the latest DSLR on the market, but without the creative input, your image may be missing that critical ingredient. Being in the right place at the right time (e.g. sunrise or sunset) or travelling to exotic locations, climbing a mountain, driving for hours to be in just the right spot, these are all things you have to do to capture the image.

Sunrise

Sunrise

Climb a mountain

Climb a mountain

6. It takes a long time to get competent

When you first get your camera gear it’s exciting and fun, so you take lots of pictures. Eventually you may get frustrated at how your images look, compared to those seen online, and one of two things will happen. The most likely outcome is that you give up because it’s too hard. The alternative option is you work even harder at learning your craft, you read more books, maybe join a club, or attend some workshops.

SHILL Article1 bandicoot

Someone clever (quote attributed to Malcolm Gladwell) worked out that it takes 10,000 hours of effort to master a new skill. Ten thousand hours! That’s over a whole year! You have to fit that in around work, sleep, and time with friends or family. That means it could take you years to get good at this.

7. Social Media is not your friend

When you first start sharing your images, your friends and family will like them. That’s because they like you and want good things for you. Getting likes is an instant form of gratification that can be addictive.

The problem with social media is that most of the people viewing your images are not photographers. They cannot give you useful technical advice or critique on your images, the kind to help you improve. If all you want is to get the most likes, then that will have an impact on how you learn and grow as a photographer.

SHILL Article1 cemetary

There are groups and forums online, full of photographers who are often willing to give feedback. But accepting criticism is not something most people are comfortable with, and it can be really challenging. Some people are nicer about it than others too, so you might have to spend some time finding a place that you feel comfortable.

8. If you want a sunrise, you have to get up before the sun does

Yeah it’s easy to read it and nod your head, and go, “Sure, I can do that”. It’s a different story at 4am when your bed is nice and warm, but outside it’s cold and dark. Plus you might have already gotten up 10 times in the last couple of months to go shoot, and none of those mornings paid off.

Want to travel to exotic destinations? You have to save up to be able to afford it, take time off work, maybe travel with non-photographers and have to make some compromises when you travel. That incredible shot in a remote location means you have to hike in, carrying your camera gear, a tent, food, and everything else as well.

Exotic destinations

Exotic destinations

Photography requires a lot of commitment to your craft, learning it, and then going to the places you need, to capture the images you want.

SHILL Article1 CHCH Lightshow

9. Post-processing is just another tool

Little is more divisive in the photography world than the question of post-processing. If you shoot in RAW then it’s necessary to edit the files with some form of software. There are many options available – Photoshop, Lightroom, OnOne, DXO, and the list goes on. Some people prefer the “get it right in camera” and shoot JPG approach instead.

If you do choose to shoot RAW and want to edit your images, that means learning to use the software. Like everything in photography, it isn’t quick or easy to figure out, but once you do learn it, the value it brings to working on your images is valuable. It’s not necessary to spend hours on every image either, with some handy presets or actions, it might only take a couple of minutes for most of them.

SHILL Article1 old farm hut

10. Are you a follower of fashion?

There are noticeable trends and styles in photography, which are in fashion at any given point in time. Astrophotography, long exposure, HDR, silky waterfalls, light painting, and other special effects are all styles seen a lot at the moment. By all means learn from them, there will be valuable skills to obtain, but be careful to keep within aesthetically pleasing limits.

Long exposure

Long exposure

It can be easy to do the same as everyone else, which limits your ability to learn and express yourself. Do you want to travel to an amazing location and stand at the usual viewpoint and capture the same image already taken by thousands of other photographers? If you have time, and there are options for other viewpoints, and it’s safe for you to explore them, consider doing so.

SHILL Article1 dark red rose

Don’t be afraid to try something different, and whatever you do, make sure it gives you images that you are happy to have in your portfolio.

Summary

Some of this will seem perfectly obvious, and some of it you may well disagree with. There may be some uncomfortable ideas in here, or some other things you would have included instead – feel free to share your thoughts in the comment below, as others may well agree with you.

The one thing you can be sure of is that learning anything new is hard work, and the longer you do it, the more there is to learn. There is one more secret to share with you though. If you do the work and keep learning and pushing yourself, it does get better. Once you master the basics and understand your tools, you have a whole new opportunity to have fun and try creative things, experiment with the really cool concepts.

One last final tip – Everybody starts at exactly the same place – at the beginning.

googletag.cmd.push(function() {
tablet_slots.push( googletag.defineSlot( “/1005424/_dPSv4_tab-all-article-bottom_(300×250)”, [300, 250], “pb-ad-78623” ).addService( googletag.pubads() ) ); } );

googletag.cmd.push(function() {
mobile_slots.push( googletag.defineSlot( “/1005424/_dPSv4_mob-all-article-bottom_(300×250)”, [300, 250], “pb-ad-78158” ).addService( googletag.pubads() ) ); } );

The post 10 Things Nobody Tells Photography Newbies by Stacey Hill appeared first on Digital Photography School.


Digital Photography School

 
Comments Off on 10 Things Nobody Tells Photography Newbies

Posted in Photography


8 Things to Consider Before You Buy Your Next Lens

19 Jun
How to buy a camera lens

Prime lenses are best for creating portraits like this one, taken with the aperture set to f/1.2 to blur the background.

Are you thinking of buying a new lens for your camera? Stop, and read this article first.

One of the hardest things to achieve when buying new camera gear is clarity. Why do you need a new lens, how much should you spend, and where does it fit into the big picture of your gear acquisition? Once you are clear on these points, it makes the process of deciding which lens (or lenses) to buy next much easier.

Let’s look at eight things to consider before you buy that new lens:

1. Budget – how much do you have to spend?

Everybody’s budget is different, and the amount of money you have to spend determines which lenses come into consideration. But, no matter what your budget, hold that figure in mind while you read this article. You may see things in a different light afterward.

My approach is to own as few, good quality lenses as possible. In other words – don’t over buy. Keep the big picture in mind. What lenses would you eventually like to own for your camera? How does your next purchase fit into this plan? Ideally, you should have a good idea of which lenses you need, and then you can plan accordingly.

This type of thinking can lead to a big shift in what lenses you decide to buy. For example, a few years ago I became frustrated with the size and weight of my Canon system. I was also thinking ahead to some travel plans I had coming up, and realized it was important to keep my kit as lightweight as possible (hand luggage allowances are very low and strictly enforced in New Zealand airports). That led to the decision to switch to the Fujifilm X-Series system. I now have the lightweight kit required for traveling.

2. APS-C or Full-frame?

Most manufacturers offer both APS-C and full-frame cameras in their ranges. But this makes buying lenses even more confusing.

Let’s say you own an APS-C camera. But at the back of your mind you think you might one day buy a full-frame body. That raises the question – do you buy a lens that works on APS-C bodies only (the advantage being that it is probably smaller and lighter than a lens that would fit a full-frame camera) or one that fits a full-frame body as well (which will probably be larger and more expensive)?

Tricky question to answer, isn’t it? And that’s not even taking into account the difference that sensor makes to the lens’s angle of view.

Ideally, you should decide when you buy your first camera body whether it should be APS-C or full-frame, then stick to the same sensor size in the future. It greatly simplifies the lens buying process, and eliminates a lot of confusion.

How to buy a camera lens

What do these two lenses have in common? They are both 35mm f/1.4 lenses. The Canon one (left) is much bigger than the Fujifilm lens (right) because it is made to fit a full-frame camera. This is a good example of how sensor size, affects lens size.

3. Don’t fall into the focal length trap

The focal length trap is the belief that you need zoom lenses that cover every conceivable focal length. For example, if you start off with an 18-55mm kit lens, then buy a telephoto zoom, you might feel that you need one that starts from 55mm so that you don’t miss out on any focal lengths in between.

This simply is not true. The next point explains the way you should be thinking about lenses.

4. What subjects are you going to photograph?

Continuing with the 18-55mm kit lens example, you may find yourself considering the following second lenses: a 50mm prime as a portrait lens (giving you the benefit of high quality imaging and wide apertures), or a macro lens for taking close-up photos of insects and flowers, or wide-angle zoom for landscape photography, or a super-telephoto for wildlife and sports photography.

The key point here is that lens choice is related to subject. The subject always comes first. Once you know what you are going to photograph, you can choose the best lens (or lenses) for the job. Focal length is a secondary consideration.

In other words, don’t buy a lens because you think you should own it, buy it because you actually need it.

How to buy a camera lens

5. Should you buy a zoom or a prime lens?

The benefit of zoom lenses is convenience. If you are a wedding photographer it is much easier to zoom from a wide-angle to a telephoto when you need to, than it is to change lenses. If you are a landscape photographer it is easier to use a wide-angle zoom to frame the scene precisely, than it is to change prime lenses (or it may not be possible to stand where you need to get the shot).

The benefits of prime lenses are image quality and wider apertures. Compare an 18-55mm kit lens (typical maximum aperture f/5.6) with a 50mm prime with maximum aperture of f/1.4. There’s a four stop difference 16 times more light) between f/1.4 and f5.6, which helps you take photos with blurred backgrounds, and also to shoot in low light conditions, without raising the ISO too much. That’s why a 50mm prime is a better portrait lens than the 18-55mm kit lens (taking us back to the point about lens choice being driven by subject, not focal length).

Some photographers prefer primes, others zooms – thinking about your priorities will help you decide which is best for you.

For example, if you are a landscape photographer who always shoots at f/8, f/11, or f/16 then the wider apertures that prime lenses have are of little use to you, and a zoom may be a better choice.

How to buy a camera lens

Action photos require a telephoto lens and a camera with a good autofocus system capable of tracking moving subjects. A zoom will help you frame the subject accurately.

6. Don’t forget about weight and size

Think about the weight and size of your lenses carefully. After all, you are the one who is going to be carrying them around.

But there is another thing you should also think about when it comes to size, and that is filters. You can save a lot of money on filters by buying smaller lenses. If you’re curious to see how much, do a search for circular polarizing filters and compare the prices of the same filter in 58mm and 77mm sizes. If you need to buy a lot of filters (landscape photographers take note) then you can potentially save hundreds of dollars by buying a smaller (the diameter of the lens or filter size is also smaller) lens.

How to buy a camera lens

Wide-angle zooms are ideal for landscape photos and will help you take photos like this. Bear in mind that smaller lenses also require smaller (and less expensive) filters.

7. Build quality, weather proofing and autofocus

Most manufacturers have inexpensive, middle range, and expensive or high end lenses. Inexpensive lenses may seem like a bargain at the time, but they won’t be built as well as more expensive ones, and they may also have inferior (i.e. slower and noisier) autofocus motors.

At the other end of the scale expensive lenses tend to be built well, use good quality autofocus lenses (i.e. faster and quicker) and may also be weatherproofed (important if you take photos in bad weather or dusty conditions).

Bear these points in mind when considering a lens. Don’t forget to ask how well the lens is built, whether it is weatherproofed, and the speed and quality of the autofocus motor.

How to buy a camera lens

Wide-angle lenses are also helpful for taking photos indoors, where you may not have space to move back to use a longer focal length.

8. Brand name or third party?

You can often save money by buying a third-party lens for your camera, but in my opinion it is best to buy a lens made by your camera’s manufacturer whenever possible. Unless you have a specific reason to buy a third-party lens (usually because the type of lens you need isn’t made by your camera’s manufacturer) then stick with OEM (Original Equipment Manufacturer) lenses. They hold their value better, and autofocus performance is usually superior.

Editor’s note: for a good discussion on that topic, head to: Brand Name Versus Third-Party Photography Gear: Which is better?

How to buy a camera lens

If street and candid photography is your thing, then consider buying smaller lenses to help you take photos like this, without being noticed.

9. Image Stabilization*

An Image Stabilizer is a motor inside the lens, that moves the elements in a way that compensates for the movement created by camera shake. It is given different names by different manufacturers (Nikon, for example, calls it Vibration Reduction). It helps you take photos in low light, using lower ISO settings or smaller apertures, than would otherwise be possible. Lenses with Image Stabilization cost more than their non-stabilized counterparts, so think carefully about whether or not you need it, before paying the extra money.

* Some manufacturers, like Sony and Pentax, build Image Stabilization into the camera body, not the lenses.

Hopefully these points will help you decide which lens to buy next for your camera. If you have any questions about lenses let us know in the comments and I will do my best to answer.


Mastering Lenses

If you want to know more about buying and using lenses then please check out my ebook Mastering Lenses: A Photographer’s Guide to Creating Beautiful Photos With Any Lens.

googletag.cmd.push(function() {
tablet_slots.push( googletag.defineSlot( “/1005424/_dPSv4_tab-all-article-bottom_(300×250)”, [300, 250], “pb-ad-78623” ).addService( googletag.pubads() ) ); } );

googletag.cmd.push(function() {
mobile_slots.push( googletag.defineSlot( “/1005424/_dPSv4_mob-all-article-bottom_(300×250)”, [300, 250], “pb-ad-78158” ).addService( googletag.pubads() ) ); } );

The post 8 Things to Consider Before You Buy Your Next Lens by Andrew S. Gibson appeared first on Digital Photography School.


Digital Photography School

 
Comments Off on 8 Things to Consider Before You Buy Your Next Lens

Posted in Photography


The 6 Most Important Things You Need to Know about Lightroom’s Develop Module

15 May

Lightroom is powerful, but it’s also complex and has a steep learning curve. If you feel overwhelmed by all the options, there’s great value in taking a simple approach and learning to use the tools that are most useful first. Leave the more advanced features until you have more experience.

With that in mind, I’ve put together this list of the six most important things you need to know about Lightroom’s Develop module. Learn these and you will be well on the way to Lightroom mastery.

1. Backup your catalog regularly

This is the most crucial thing to set up, as everything you do to your photos in the Develop module (not to mention metadata changes like Collections, flags and keywords) is stored in the catalog. It would be a disaster to lose your catalog (and consequently all your hard work) to hard drive failure, so you need to make sure that Lightroom is backing it up regularly to an external hard drive.

To do so, go to:

  • For Windows users: Edit > Catalog Settings > Back up catalog
  • For Mac users: Lightroom > Catalog Settings > Back up catalog

I have mine set to: Every time Lightroom exits – some photographers find that Once a week, when exiting Lightroom is enough.

When you exit Lightroom, a dialog window appears that shows you where Lightroom is going to save the backup Catalog. Click Choose to change the location if you need to. Note: this is the only time you can select the destination where the backup will be saved.

Make sure the Test integrity before backing up and Optimize catalog after backing up boxes are both ticked. This slows down the back up process, but it’s worth it because it helps ensure that your catalog remains free from corruption, and is optimized for speed.

Lightroom Develop module

Please note: The Catalog doesn’t contain any of your photos. Backing up your Catalog doesn’t back up your photos, only the information that Lightroom contains about them. Photo backups need to be managed separately.

2. Profile is the most important setting in the Develop module

The Profile menu is tucked away in the Camera Calibration panel, at the bottom of the right-hand panels in the Develop module. The default profile setting is Adobe Standard (circled below). This profile was created specifically for your camera by Adobe. Pick that one for accurate colors.

You will also find the color profile settings specific to your camera (Landscape, Portrait, and so on). You can pick one of these if you prefer the look to Adobe Standard.

Lightroom Develop module

The profile affects both color and contrast, so from a practical point of view it’s important to select the right one, before you start adjusting contrast and white balance in the Basic panel. Get the profile right, and it makes all subsequent processing steps much easier. Get it wrong, and it makes them more difficult.

For example, if you apply a profile intended for landscape photos to a portrait, then you could end up with over-saturated colors and unnatural skin tones. Then you might try and fix that by playing with the Basic panel sliders or other color controls. This approach rarely works, it’s far better to select the most appropriate profile from the start.

These two photos show the difference between the Adobe Standard and Velvia profiles on a Fujifilm X-T1 camera. The Velvia profile saturates colors, the Adobe Standard profile looks more natural.

Lightroom Develop module

3. Use Lens Corrections to correct distortion and eliminate chromatic aberrations

No lens is perfect, and most have at least a little distortion and chromatic aberration. One of the benefits of digital photography is that you can eliminate these in the processing stage, so they are not the problem they once were. Go to the Basic tab in the Lens Correction panel, select Enable Profile Corrections and Remove Chromatic Aberration in order to do so.

Lightroom Develop module

This comparison shows the result on a photo taken with a zoom lens producing barrel distortion.

Lightroom Develop module

Lightroom Develop module

4. You can carry out 80% of your processing in the Basic panel

Once you have selected a Profile, and applied Lens Corrections, you can go to the Basic panel to start making any adjustments required to the photo’s brightness, contrast, and color.

The sliders in the Basic panel are extremely powerful. Take the time to get to know what each one does, and how the settings affect your images. Once you get the hang of these sliders it’s quite possible that you can do all of your global adjustments (those that affect the entire image) here, and not have to touch the Tone Curve or HSL / Color / B&W panels at all.

This photo is a good example. Virtually all the processing was done in the Basic panel, made possible by selecting the most appropriate profile first. The only additional thing I did was add a vignette using the Effects panel.

Lightroom Develop module

My article Steps for Getting Started in the Lightroom Develop Module goes into this in more detail.

5. Learn to use local adjustments wisely

It wasn’t so long ago that many professional photographers would send their negatives to master printers who used dodging, burning, and other fancy darkroom techniques, to create a far better print than the photographer ever could. These local adjustments – those applied to only part of the image, rather than all of it – are often vital for bringing the best out of your Raw files in Lightroom.

Lightroom has three tools for making local adjustments – the Adjustment Brush, Radial Filter and Graduated Filter. They allow you to selectively adjust brightness, contrast, and other tone and color settings. Each tool has its own idiosyncrasies, so take the time to get to know each one in turn.

This example shows the difference that local adjustments make. I used a combination of all three of Lightroom’s tools to turn the image on the left, into the one on the right.

Lightroom Develop module

6. Don’t overlook the Clarity slider

The Clarity slider is extremely useful as both a local, and global adjustment. It’s primary use is to enhance texture, and it does so by increasing edge contrast (the spots where dark and light areas meet). You do have to be careful not to overuse it, but judicious applications of texture enhancement can help bring the best out of any photo. Clarity is also an ideal tool for enhancing black and white images, which often rely on texture to add impact.

The following photos show the effect of adding Clarity. I used the Radial filter to apply Clarity to the Buddha heads to bring out the texture.

Lightroom Develop module

Lightroom Develop module

These six items are not a comprehensive list of what you can do in Lightroom’s Develop module, but they will certainly get you started, and simplify the process of learning to use it.

What do you think are the most important tools to master in the Develop module? Do you agree with my selection? Please let me know in the comments below. And if you want to learn more about Lightroom then please check out my Mastering Lightroom ebooks.

googletag.cmd.push(function() {
tablet_slots.push( googletag.defineSlot( “/1005424/_dPSv4_tab-all-article-bottom_(300×250)”, [300, 250], “pb-ad-78623” ).addService( googletag.pubads() ) ); } );

googletag.cmd.push(function() {
mobile_slots.push( googletag.defineSlot( “/1005424/_dPSv4_mob-all-article-bottom_(300×250)”, [300, 250], “pb-ad-78158” ).addService( googletag.pubads() ) ); } );

The post The 6 Most Important Things You Need to Know about Lightroom’s Develop Module by Andrew S. Gibson appeared first on Digital Photography School.


Digital Photography School

 
Comments Off on The 6 Most Important Things You Need to Know about Lightroom’s Develop Module

Posted in Photography


Swing of Things: Framed Furniture Reveals Hidden Potential

14 May

[ By WebUrbanist in Design & Furniture & Decor. ]

furniture trace

Like door swings on architectural blueprints come to life, these works of metal-framed wood furniture express their embedded potential in physical space.

slideout

furnitureswing

flipdown

The new Trace Collection from Nendo takes the architect’s approach to the next level, physically representing the movements of furniture doors and drawers via three-dimensional frameworks. Their installation was recently featured at the Collective Design Fair in New York.

doubleswing

furniture twist

“Although they may not be visible, we are subconsciously aware of the ‘traces’ of their movements every day,” explains designer Oki Sato. For example, because of that, we do not put a vase in front of a door. It is essential for a person who specializes in space design to be even more aware of this, as they have to portray these ‘traces’ onto drawings.”

swing in motion

furnitureart

furniture swing collection

The visualized actions speak volumes about potential options for opening the various swing, flip and sliding doors in each piece. While the results may not be the most practical furniture, they do cause one to think a bit more about the embedded possibilities of everyday furnishings.

Share on Facebook


[ By WebUrbanist in Design & Furniture & Decor. ]

[ WebUrbanist | Archives | Galleries | Privacy | TOS ]


WebUrbanist

 
Comments Off on Swing of Things: Framed Furniture Reveals Hidden Potential

Posted in Creativity