RSS
 

Posts Tagged ‘Taking’

[MODIFIED] Disk Usage Utility – Display a Directory Tree Representation of What is Taking Up Hard Drive Space

29 Apr

Find out why your hard drive is running out of space by scanning it with TreeSize Free.

TreeSize Free for Windows can help you determine what is taking all your hard drive space by displaying a directory tree. After selecting a drive or folder for scanning by running the application or selecting TreeSize Free from a folder’s right-click menu, you can change options such as displaying a folder’s size, allocated space, usage percent, or file count. File size can be reported in gigabytes, megabytes, kilobytes, or a combination (“automatic units”).

Other features include sorting files and folders by name or size, showing details of each subdirectory inside a directory tree, and performing filters so only certain paths or files are visible. A report can be printed from the results. Options include forcing the application to only use one thread (if you are performing other CPU-intensive tasks simultaneously), displaying or not displaying compressed files and folders in blue, and choosing the gradient colors used in the background of each folder to represent disk usage….

Read more at MalekTips.
New Computer and Technology Help and Tips – MalekTips.Com

 
Comments Off on [MODIFIED] Disk Usage Utility – Display a Directory Tree Representation of What is Taking Up Hard Drive Space

Posted in Technology


In photos: Taking the lid off America’s trash cans

12 Apr

USA_GA_140216_124_fx.jpg

On average, Americans send about half of their waste to landfills. Focused on spreading awareness about this issue, The Glad Products Company sponsored award-winning photojournalist Peter Menzel and writer Faith D’Aluisio’s project called ‘Waste in Focus.’ The photo series looks at what eight families around the U.S. are recycling, composting and sending to landfill. See gallery

News: Digital Photography Review (dpreview.com)

 
Comments Off on In photos: Taking the lid off America’s trash cans

Posted in Uncategorized


Life is too Short to be Taking Photos of Great Subjects in Bad Light

10 Apr

Sometimes the lessons are so basic, they are overlooked. This is one I feel needs to be repeated for new photographers as well as a gentle reminder for those of us with decades of shooting experience.

Peter-West-Carey-_MG_5589

Photography is the process of recording light. It is the same with your eyes, every waking moment of every day you use them. You see subjects around you and mentally are so busy classifying and figuring them out (“What a beautiful red Ferrari! Is it slowing down for a right hand turn?”) that when it comes time to lift a camera to your eye, you forget to stop and think about what is really going on.

You make pictures of light first

Of what are you really taking photos? You are taking photos first and foremost of light. Most of the time it is light reflected off of a subject but sometimes it is of the light source itself (e.g. sunsets, light painting, fireworks, etc.). In the case of the former, you need to remember the subject itself might be interesting, but if the light is ‘bad’ then the subject doesn’t stand a chance.

Let me illustrate by example. These images are of the Olympic Mountain Range in Washington State, where I live part of the time. They are beautiful this time of year, when it’s not raining so much we can’t see them, and when they still have a full coating of snow for contrast. I took the pictures at different times of day of the exact same subject, but the results are different each time.

Sunrise 6:12AM

Sunrise 6:12 a.m.

After Sunrise 7:04AM

After Sunrise 7:04 a.m.

Nearing Mid Day 10:28AM

Nearing Mid Day 10:28 a.m.

An Hour Before Sunset 6:10PM

An Hour Before Sunset 6:10 p.m.

The Morning Before At Sunrise 5:59AM

The Morning Before At Sunrise 5:59 a.m.

Light changes throughout the day

The images were all processed exactly the same and while the color balance naturally changed, what is most dramatic is the change in light and effect it has on the impact of the image.

A great photographer always thinks about light, even when she or he doesn’t have a camera up to their eye. It is light that makes the photo. The great thing about it is there is no ‘perfect’ that need be obtained in this regard. There is simply different light which will impart a different feel to the subject and whether or not you like that light.

What if the light is bad?

Sometimes it is the tone of the light, or the angle, or the intensity, or the temperature. The best practice for taking the best picture possible of a given subject, in my mind, goes something like this, “Wow, that’s a beautiful subject! Does the light work right now?”

This process has stopped me from taking more bad pictures than I can count. This is because I have reviewed thousands of my own crappy images with bad light, but great subjects, that this process has been cemented into my mind.

The next time you are enamored by a fabulous subject, ask yourself, “Is this the best light for this subject?” If not, your photos will be lackluster. If the light is not right, find a time or place where it will be better. If the situation won’t allow for great light, set your camera down and just admire the subject that caught your attention in the first place.

Life is too short to be taking photos of great subjects in bad light.

The post Life is too Short to be Taking Photos of Great Subjects in Bad Light by Peter West Carey appeared first on Digital Photography School.


Digital Photography School

 
Comments Off on Life is too Short to be Taking Photos of Great Subjects in Bad Light

Posted in Photography


Tips for Taking Street Portraits – Lessons Learned in India

26 Mar

On my trip to Rajasthan, India I packed my Canon 400D (Rebel XTi) with two lenses: my Canon EF 70-200mm f/2.8 IS USM (for long and candid photos) and my Canon EF 50mm f/1.8 II (for indoor portraits and low light photos) because I was aiming for portrait on the streets and specially head shots. Here are a few tips for taking street portraits, from my humble experience, and how to approach people before you take you shot.

#1 Always smile

11

You always want to let anyone who sees you with a camera know that you are a cheerful person and therefore they won’t mind being photographed by you. Even if they become angry because you asked, just smile and back off. You need to remember that being a photographer in the street is an image for all photographers in the public eyes.

#2 Avoid using the built-in flash on your camera

A common mistake that most beginners fall into is using the built in flash. For me this is meant only for quick shots of friends or family. But if you want to a portrait with great light, use natural daylight in the shade by making the subject face towards the light not the opposite.

21

#3 Don’t shoot in the sun

The reason is simple, hard light means hard shadows! Normally when you take a portrait for someone in the sun it creates hard shadows under the eyes, which is very bad for a portrait most of the time. Try to draw your subject to the nearest shady area available, or you can use a smooth board (or reflector) to make the light more even on the subject, that is if you dare to do all that with a stranger.

31

#4 Think about the light and shadows

It’s not enough just to take the shot in the shade during the day, away from the sun. You also need to consider how the light and the shadows are becoming on the subject’s face. You can do that by taking a test shot, then reviewing it on your camera screen by looking for the highlights and the shadows. If you don’t know how, practice it at home with your family or friends before going out to the streets.

41

#5 Don’t ask the person to smile

The good portrait comes first from the subject, then from you. So when you ask someone to smile, and they will, it won’t be a natural smile and sometimes it will bad for the shot. So don’t ask and they will reveal their true expression to the camera whether it’s a smile or sadness, sometimes you will be surprised.

51

52

#6 Use a large aperture for a blurry background

One of the key important things in portraiture is to focus on the eyes and blur the background, and sometimes part of the face. It will make a more dramatic and more attractive portrait to the viewer. And it also blur the background so it makes the viewer’s eye go only to the subject’s eye.

61

#7 Think about the background

What lies behind the subject is important, sometimes it’s good to have people in it and sometimes it’s better empty with no one. It really depends on how you intend to show your portrait.

71


Editor’s note: as I was searching Flickr for portrait images for the weekly inspiration collections (Portraits of men – portraits of women, I kept finding Zuhair’s portraits stood out among the rest. So I approached him and asked him to share some tips with us and he was gracious enough to do so. I hope you enjoy his images as much I do. If the eyes are the windows to the soul, I feel Zuhair’s portraits do a great job of showing us his subjects’ souls. 


The post Tips for Taking Street Portraits – Lessons Learned in India by Zuhair A. Al-Traifi appeared first on Digital Photography School.


Digital Photography School

 
Comments Off on Tips for Taking Street Portraits – Lessons Learned in India

Posted in Photography


Tips for Taking Street Portraits – Lessons Learned in India

25 Mar

On my trip to Rajasthan, India I packed my Canon 400D (Rebel XTi) with two lenses: my Canon EF 70-200mm f/2.8 IS USM (for long and candid photos) and my Canon EF 50mm f/1.8 II (for indoor portraits and low light photos) because I was aiming for portrait on the streets and specially head shots. Here are a few tips for taking street portraits, from my humble experience, and how to approach people before you take you shot.

#1 Always smile

11

You always want to let anyone who sees you with a camera know that you are a cheerful person and therefore they won’t mind being photographed by you. Even if they become angry because you asked, just smile and back off. You need to remember that being a photographer in the street is an image for all photographers in the public eyes.

#2 Avoid using the built-in flash on your camera

A common mistake that most beginners fall into is using the built in flash. For me this is meant only for quick shots of friends or family. But if you want to a portrait with great light, use natural daylight in the shade by making the subject face towards the light not the opposite.

21

#3 Don’t shoot in the sun

The reason is simple, hard light means hard shadows! Normally when you take a portrait for someone in the sun it creates hard shadows under the eyes, which is very bad for a portrait most of the time. Try to draw your subject to the nearest shady area available, or you can use a smooth board (or reflector) to make the light more even on the subject, that is if you dare to do all that with a stranger.

31

#4 Think about the light and shadows

It’s not enough just to take the shot in the shade during the day, away from the sun. You also need to consider how the light and the shadows are becoming on the subject’s face. You can do that by taking a test shot, then reviewing it on your camera screen by looking for the highlights and the shadows. If you don’t know how, practice it at home with your family or friends before going out to the streets.

41

#5 Don’t ask the person to smile

The good portrait comes first from the subject, then from you. So when you ask someone to smile, and they will, it won’t be a natural smile and sometimes it will bad for the shot. So don’t ask and they will reveal their true expression to the camera whether it’s a smile or sadness, sometimes you will be surprised.

51

52

#6 Use a large aperture for a blurry background

One of the key important things in portraiture is to focus on the eyes and blur the background, and sometimes part of the face. It will make a more dramatic and more attractive portrait to the viewer. And it also blur the background so it makes the viewer’s eye go only to the subject’s eye.

61

#7 Think about the background

What lies behind the subject is important, sometimes it’s good to have people in it and sometimes it’s better empty with no one. It really depends on how you intend to show your portrait.

71


Editor’s note: as I was searching Flickr for portrait images for the weekly inspiration collections (Portraits of men – portraits of women, I kept finding Zuhair’s portraits stood out among the rest. So I approached him and asked him to share some tips with us and he was gracious enough to do so. I hope you enjoy his images as much I do. If the eyes are the windows to the soul, I feel Zuhair’s portraits do a great job of showing us his subjects’ souls. 


The post Tips for Taking Street Portraits – Lessons Learned in India by Zuhair A. Al-Traifi appeared first on Digital Photography School.


Digital Photography School

 
Comments Off on Tips for Taking Street Portraits – Lessons Learned in India

Posted in Photography


7 Tips for Taking Better Photographs of Cars

04 Mar

Taking photos of cars is such an interesting thing on its own. It’s like science. Every time I shoot a car I learn something from it! I would like to share some basic guidelines to get you started and help you understand this interesting niche in the photography world.

7 Tips for Taking Better Photographs of Cars

1. Shoot at the right time of day

This is by far the most common mistake people make when shooting cars. The best time to shoot will be a few minutes after sunset (or a few minutes before sunrise). Use a tripod and get that perfect soft light on the paint! This photo was taken for TopGear a few minutes before sunrise.

Car photography BMW M135i

2. Be on the lookout for reflections

You must be very careful of what reflects in the car. Have a look around you and look closely at the car and see what reflects on its surface. A car (especially a new shiny one) is like a mirror. Try and have an open space behind you like a field. Try and avoid shooting with buildings or trees behind you. One of the most important things you want to show in your car pictures are the design lines of the car, or as I like to call it, ‘her curves’. Reflections can spoil these curves.

Also be very careful not to have your own reflection in the photo. If you can’t avoid your own reflection its best to put the camera on a tripod, set the timer and move out of the shot. Just look at this photo I took of a dark shiny BMW 428i, behind me was nothing except the horizon. You can clearly see the horizon reflecting in the car.

Car photography tips BMW428i

3. Driving shots

One very easy way to get a cool image, is to shoot the car out of another moving car. (Please be super careful when doing this!) Shoot the car out of your window while driving at 60 km/h (40 miles/h) with a shutter speed of 1/100th of a second.

By doing this you will get some nice movement on the road and on the wheels. You can even decrease the shutter speed some more, but this will increase your chances to sit with unsharp photos afterwards. This Audi S3 was shot before sunset, driving at 70 km/h with a shutter speed of 1/80th of a second.

Car photography tips S3 driving shot

4. Color of the car

All types of paint react differently at different times of the day, with different light. Most colors hate direct sunlight, but some color works really well in direct sunlight. Just look at this baby blue beetle shot in the middle of the day.

Car photography tips beetle

5. Background

Make sure your background suits the car and the theme. Avoid having things in the background that will distract the eye. Things like dustbins, power lines and other cars can kill a picture. For this Aston Martin, I used a simple background . The yellow paint matches the car’s color.

Car photography aston martin

6. Panning for motion blur

A cool way to get some motion in your picture is to stand next to the road and let the car drive past you. Follow the car with your lens in one smooth action and set the shutter speed to 125th of a second. You will be amazed how easy this is! This Ferrari was shot at 125th of a second at 200mm. The car was driving roughly 60 km/h (40 miles/hr)

Car photography tips ferrari

7. Let the car interact with nature

Another way to make the photo speak to you is to make the car interact with its surroundings. Examples of this could be the car making dust, a 4×4 climbing over an obstacle. Look at this Chevrolet Trailblazer climbing over a rock or this G-Class AMG drifting on loose sand!

Car photography tips G AMG

Car photography tips trailblazer

8. Shooting at night

This might sound daunting but you will be amazed how easy and awesome this is! The biggest secret here is to find a spot where it’s completely dark, any streetlights or even a full moon could make life tricky.

When you have found this spot, set the camera up on a tripod. Set your ISO to 100, the shutter speed on 30 seconds and the aperture to f/9.
When the shutter opens take a strong constant light source and walk around the car ‘painting’ the car with your light. A normal household torch (flashlight) works for this.

There are no rules here, paint the car in different ways to get different effects; you will be blown away with the results! Here are some examples of this technique:

Car photography tips Opel Astra

This is an Opel Astra shot next to Table Mountain with Cape Town in the background.

Dodge Charger with the skyline of Detroit City

This is a Dodge Charger with the skyline of Detroit City in the back. This photo took me no longer than 5 minutes to set up and take.

Do you have any other car tips or favourite images you’ve taken of cars? Please share in the comments below.

For more related tips try these:

  • Light Painting Part One – the Photography
  • Showing Speed: Using Panning When Shooting Action
  • 3 Tips for Creating Dramatic Images using Motion
  • Do you pack up and leave after sunset and miss the fun of night photography?

The post 7 Tips for Taking Better Photographs of Cars by Desmond Louw appeared first on Digital Photography School.


Digital Photography School

 
Comments Off on 7 Tips for Taking Better Photographs of Cars

Posted in Photography


Maternity Photography – 7 Tips for Taking Great Shots

29 Sep

In this tutorial Natalie Norton shares 7 great tips for great Maternity Photography.

7 Tips for Creative Maternity Photography

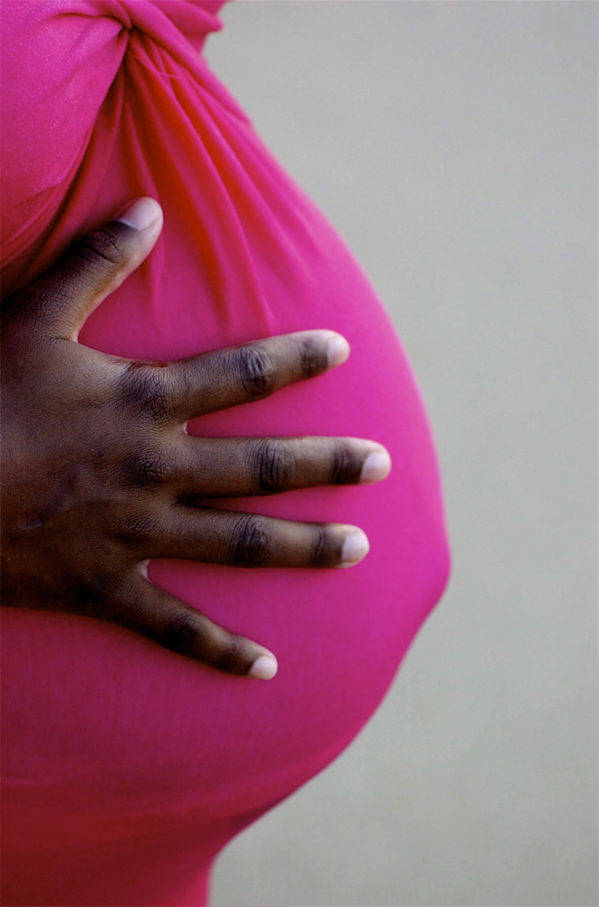
When I first began doing maternity work I made a pledge. A commitment I swore I’d stand by through thick and thin. I promised myself I’d never take “the maternity picture.” You know the one. Daddy’s arms around mommy’s belly with hands affectionately forming… gag… excuse me… a heart. There’s NOTHING wrong with this photo. AT ALL. Calm your rage oh you who just did this exact shot this afternoon.

It’s just that I didn’t want to do the typical maternity image that every mother who’s every had her belly photographed has in one of her 9 baby albums (9 for the first child that is… 1 for the second…a few images in an envelope somewhere for the third… and oh, that poor fourth child, he has to borrow pictures from his brother when he’s highlighted on the bulletin board in Kindergarten). I marched right into that first session ready to stand by my commitment to creativity! I’d no sooner pulled out my camera than mom, all giddy with excitement, said “Woo! Can we do that shot with Daddy’s arms around me and our hands forming a heart over my belly button?!?” I stood by that pledge of mine for a full… well, 2.4 seconds. Of course I did the shot. But guess what? I did a lot of other stuff that she’d never have dreamed of. Guess which image DID NOT get purchased. Belly button heart.

7 Maternity Photography Tips

Here’s 7 tips toward creative maternity photography:

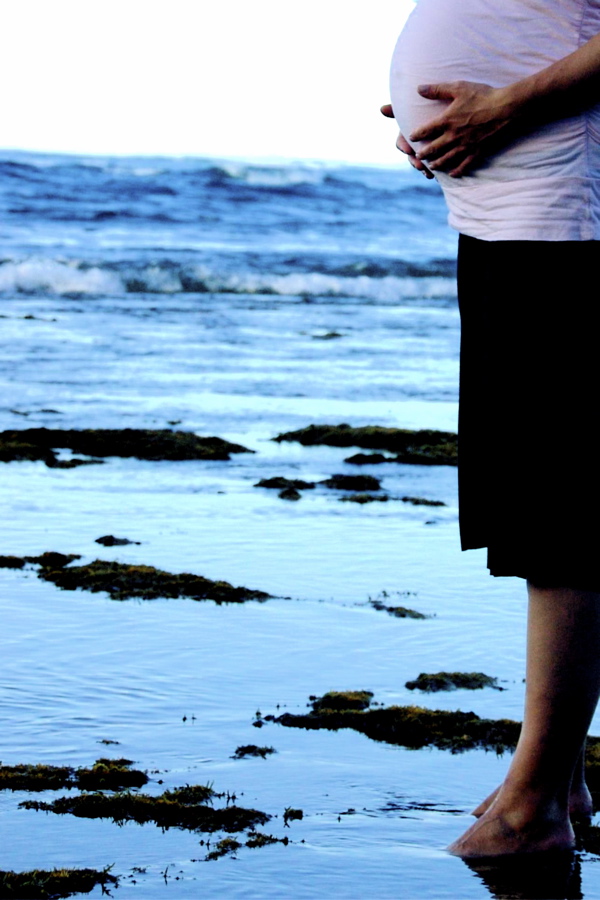
1. The Great Outdoors:

So many maternity sessions are done in studio. I understand the reasons behind this. I’ve been pregnant. 3 times over. I’m not the petite and pretty pregnant. I’m the gal you find wedged between the double doors at The Sizzler. Studio shoots are great because there’s privacy. I can’t argue with that. Particularly if you’re going to do anything in less than a fully clothed state (that’s my PC way of saying naked). But there’s something about being outside. Taking that natural beauty of a woman who’s ready to bring new life into the world and placing her in the majesty of the great outdoors is simply breathtaking.

maternity photography-1

Maternity Photography

2. At Home:

When you shoot a mommy-to-be in her own home she’s comfortable to let go in a way that she may not be otherwise. This is a fantastic reason to hold maternity sessions at home. This is not however why I do it. As a photographer I feel like it’s my responsibility to help my subjects feel comfortable and capable of giving me their best, no matter where we’re shooting. I pride myself on my ability to do this. To me, it’s a HUGE part of my success as a photographer (Uh oh. I feel a post in this regard coming on… check back soon). I shoot maternity sessions at home primarily because it’s wonderful for a couple to have a capture that truly shows what their life was like at the time their baby came to be a part of their family. I’m a second generation photographer so I’ve got some really lovely shots of my sweet momma awaiting my arrival. My favorite however is a simple picture of her standing by my bassinet with her hand on her tummy. I CHERISH it.

maternity photography-2

3. Simplify:

No matter where you shoot, studio, home, outside, 7Eleven, you’ve got to simplify your surroundings. The beauty of a mother anticipating the arrival of her child should be captured in a way that allows the miracle to speak for itself. Pregnancy doesn’t require anything “else” to be present in a photograph to help tell it’s story. Everything in the frame that may not belong will simply serve to distract from the story that’s already being told, naturally. Pay attention to background.

maternity photography-3

4. Help Her Feel Beautiful

Women don’t generally feel very sexy when they’re pregnant. Understandably so, and trust me I connect with this feeling as much as the next gal. But just because an expectant mother doesn’t feel sexy, that doesn’t mean she’s not totally knock out. Bring that out in her. Pull that beauty out of her. A good way to do this is by talking as you shoot. It’s perfectly appropriate to say things like: “That’s beautiful!” “Yes, perfect!” “Oh that’s just LOVELY.” “Pregnancy looks good on you girl!” Whatever works! If you’re a male photographer you’ll need to be careful about what you say in this crazy world of sexual harassment, but you’re even more capable of pulling the beauty out of her than a female photographer. It’s one thing when your girlfriend tells you you’re beautiful, but when your girlfriend’s brother tells you that you’re looking good, you actually believe it. Obviously be careful and be genuine. The success of this tip will depend on your personality, but you can help her help herself. If she feels pretty she’ll look a whole heck of a lot better. It’s that simple.

maternity photography-4

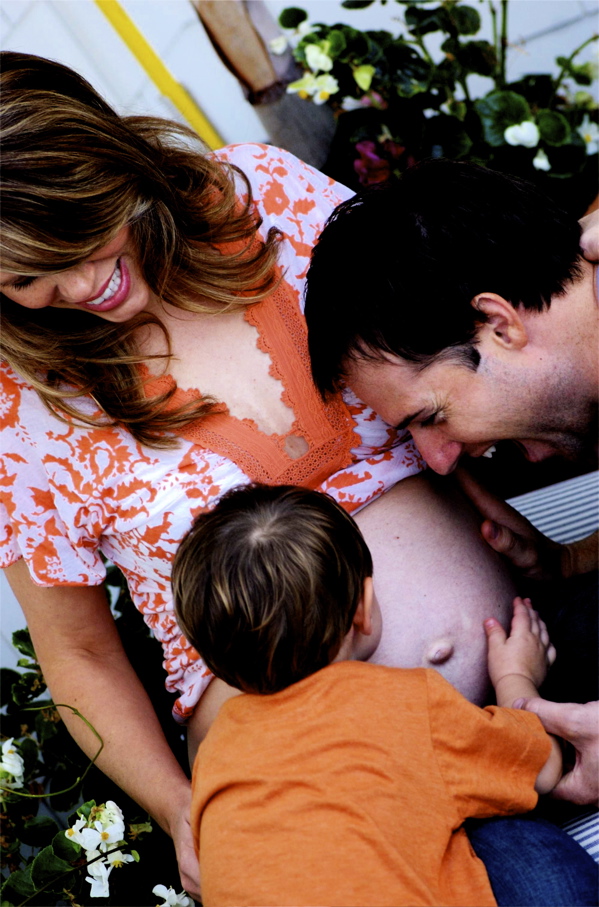
5. Highlight Relationship:

Hopefully new babies are coming into a loving home. I always try to include photographs that highlight the tender relationship between mom and dad, because bringing a child into the world with someone is arguably love in it’s purest form.

maternity photography-5

6. Don’t Forget the Siblings… or the dog for that matter:

Remember that often a baby is coming into an established family unit (not to say that Mom and Dad alone aren’t an “established family unit” but for the sake of my point, go with me on this one). If the siblings are available, make sure to include them in at least a few frames. I have to mention the dog, because I’ve got a sister-in-law who’s dog, Wanda (seriously that’s her name) is her pride and joy. When she and her hubby have kids, you can trust that Wanda will be right there in at least a handful of her maternity photos. She’s as much a part of the family as the next guy.

maternity photography-6

7. Give ‘em Something Different:

Don’t just shoot what’s always been shot. This is a good general rule of photography. I really try to be “consistently inconsistent” (I recently heard another photographer, Nate Kaiser of theimageisfound.com, use this term and I had to pirate it). Let me explain, you’ve got to approach each shoot as it’s own. I’m very committed as a photographer to tailoring each shoot for the subject I’m photographing. Like I said before, this is a good general rule that applies particularly to maternity photography. Even though millions and millions of mothers have given birth to millions and millions of babies for millions and millions of years, a momma-to-be needs to feel like her pregnancy is miraculous, special and sacred, that the things she’s experiencing are unique only to her. Because they are.

maternity photography-7

Happy Shooting!!

Post originally from: Digital Photography Tips.

Check out our more Photography Tips at Photography Tips for Beginners, Portrait Photography Tips and Wedding Photography Tips.

Maternity Photography – 7 Tips for Taking Great Shots


Digital Photography School

 
Comments Off on Maternity Photography – 7 Tips for Taking Great Shots

Posted in Photography


Editorial: Why I can’t stop taking iPhone Panoramas

24 Sep

iphone.png

DPReview editor Barnaby Britton spent his weekend taking pictures on the new Apple iPhone 5s, which among other refinements features a new camera, larger sensor, built-in filter effects and a unique two-color flash. It also offers an improved panorama mode with adaptive ‘live’ metering across the frame. In this short article he explains why even if you don’t have any interest in the new iPhone, you should definitely pay attention to the iPhone 5s’ panorama feature.

News: Digital Photography Review (dpreview.com)

 
Comments Off on Editorial: Why I can’t stop taking iPhone Panoramas

Posted in Uncategorized


Taking Shots of Your Car Like the Hot Ride She Is: Amazing Car Photography Tips 101

18 Sep

Anyone who has tried to shoot a photograph of their new car (or their old, well-loved car after it finally drove through the car wash) knows that a car is difficult to capture. Nevertheless, those of us who have practiced can vouch for this series of tips that I’ve aimed at my neighbor’s Mustang and my own practical Prius. The Continue Reading

The post Taking Shots of Your Car Like the Hot Ride She Is: Amazing Car Photography Tips 101 appeared first on Photodoto.


Photodoto

 
Comments Off on Taking Shots of Your Car Like the Hot Ride She Is: Amazing Car Photography Tips 101

Posted in Photography


Taking Names: Famous Logos Without Their Brand Names

24 Aug

[ By Delana in Design & Graphics & Branding. ]

coke logo

All around the world, people are inundated daily with advertisements hawking everything from soda to furniture to vacations. We’re so used to seeing the ads and logos almost everywhere that we can identify the logos without even seeing them in context. That is the message that artist Dorothy sends with her series “You Took My Name.”

kodak logo

mastercard logo

In the series, the artist removes the company names from well-known logos. It challenges viewers to recognize and identify the brands even when the company names are missing.

burger king logo

heineken logo

Another goal of the series is to change our perspective on logo art. These symbols are the result of hours of work and research, and they can be seen as works of art in their own right.

Share on Facebook


[ By Delana in Design & Graphics & Branding. ]

[ WebUrbanist | Archives | Galleries | Privacy | TOS ]


WebUrbanist

 
Comments Off on Taking Names: Famous Logos Without Their Brand Names

Posted in Creativity