RSS
 

Posts Tagged ‘Taking’

3 Tips for Taking Portraits with a Kit Lens

27 Oct

One of the first things that new photographers often hear is “your kit lens is garbage.” While there are certainly benefits to upgrading your glass as your budget allows, it’s also important to know that there is so much you can do with your kit lens if you understand how to use it to your advantage! In this case, let’s talk about portraits.

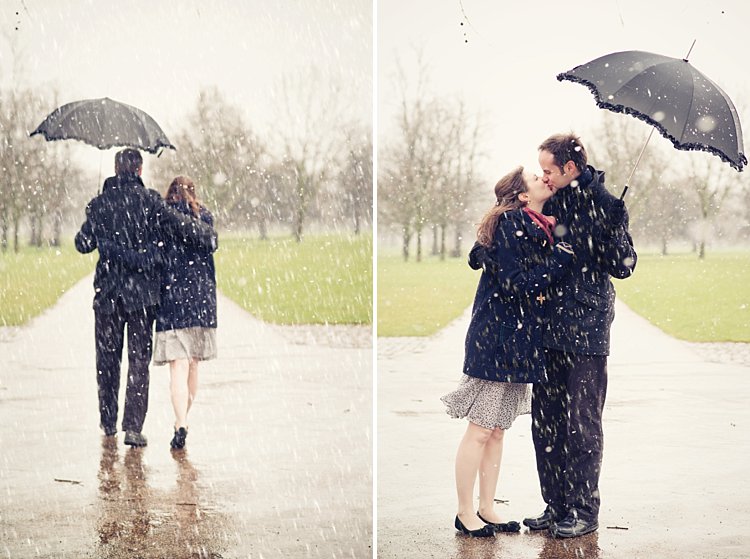
Most photographers quickly upgrade to a 50mm or 85mm prime lens for portraits, and with good reason. These lenses are sharp, and can typically shoot as wide as f/1.4 or f/1.8, which means that it’s easier to achieve that nice blurred background in portraits.

Taking Portraits with a Kit Lens

Canon 50mm lens at f/2.0, 1/160th sec, ISO 100.

If you plan to spend any significant amount of time taking portraits, I would absolutely recommend upgrading to at least a Nifty Fifty lens. When it comes to portraits, I almost always find myself reaching for my 50mm prime lens, and I really do think it’s worth the money. That said, when we’re living in the real world, there are a whole plethora of reasons why you might not upgrade lenses right away. Perhaps it’s a budget issue. Perhaps you’re still trying to decide which type of photography really interests you. Or maybe you just opened the camera box for the first time today and want to have a better understanding of your camera before you purchase anything else. Regardless of the reason, I’ve got good news for you–you can take great portraits with a kit lens!

In this article, we’ll explore a couple of limitations when it comes to taking portraits with a kit lens, as well as some tips for working around those limitations and capturing the best portraits possible with the equipment you already have.

1. Use Depth of Field to your advantage

As I mentioned before, one of the benefits of using a prime lens for portraits is the ability to shoot as wide as f/1.4 or f/1.8 to easily achieve that nice blurry background (called bokeh) in almost any location. Most kit lenses can only shoot as wide as f/3.5 (at 18mm) and f/5.6 (at 55mm) which won’t blur the background as much as new photographers are typically hoping. That is unless they understand that aperture isn’t the only important factor in creating that nice blurry background for portraits.

Taking Portraits with a Kit Lens

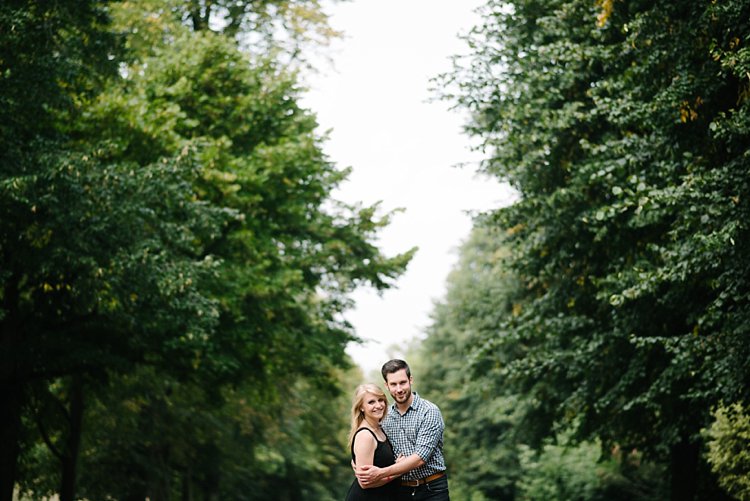
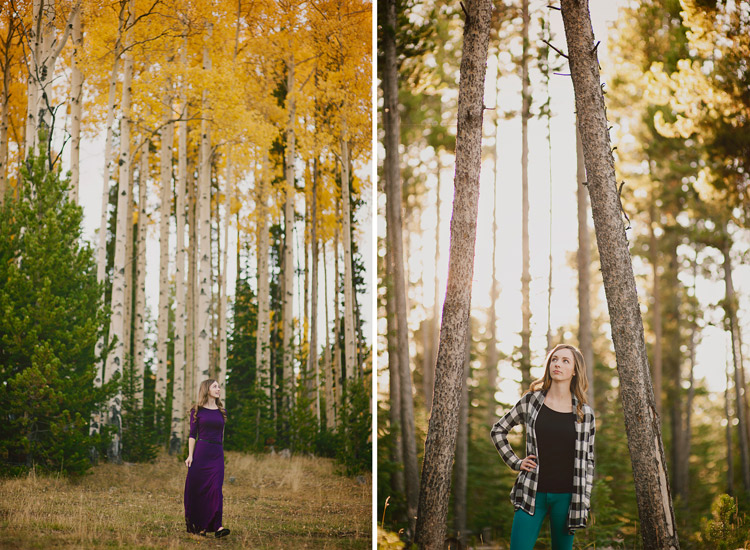
Another key aspect in creating a blurry background is the distance from the subject to the background. The further the subject is from the background, the blurrier the background will be in the photograph.  So, to create the blurry background when using your kit lens, one of the easiest things to do is to position your subject as far away from the background as possible.

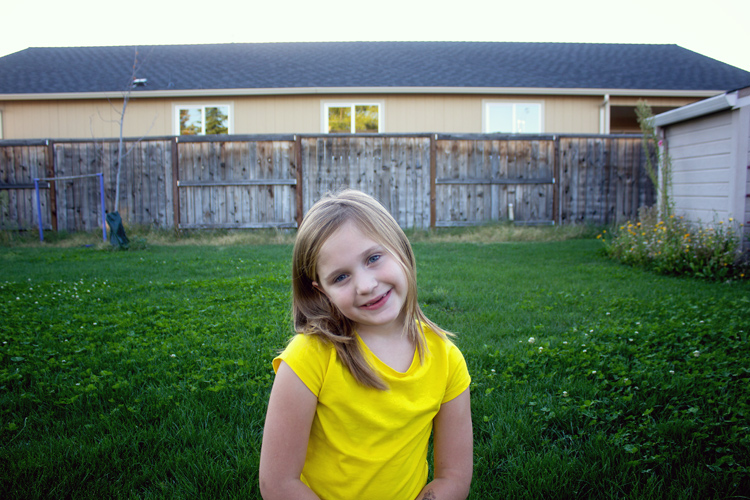
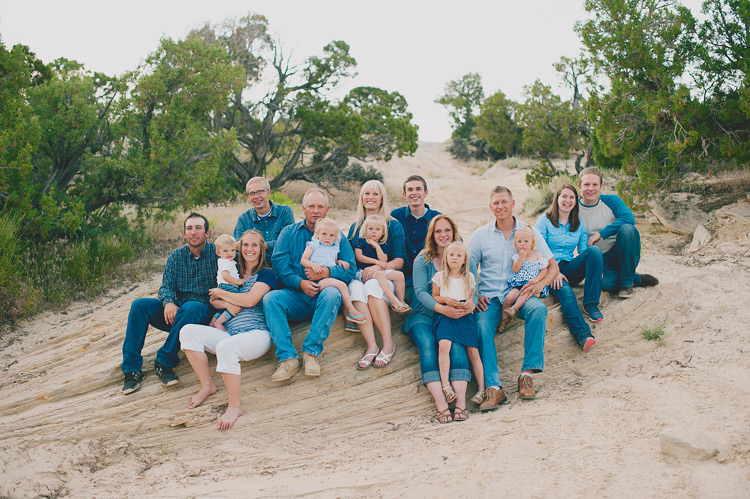
Typically, when I use a 50mm lens to photograph my kids in the backyard, I have them sit on the grass about two or three feet away from our back fence. When using a kit lens, I have them sit about 30 feet away from the fence, as you can see in the image above. Then, I zoom-in to somewhere between 35-55mm, and shoot at the widest aperture the lens will allow for that focal length, in order to produce the most blur in the background possible.

Taking Portraits with a Kit Lens

Canon Kit Lens that came bundled with the Rebel XS. This image was shot at 37mm and f/4.5.

2. Change your perspective

Taking Portraits with a Kit Lens

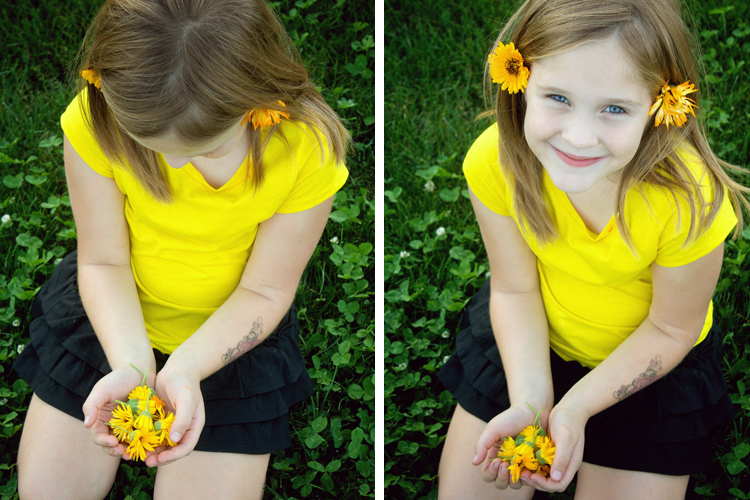
Both images were taken with a kit lens at f/5.6.

If you can’t place your subject far away from the background and/or the background isn’t something you’d like to incorporate into your photograph, another option to consider is to change your perspective. Stand up, and have your subject sit on the ground, photographing them from above. Grass, cement, asphalt, and sand all photograph well from above, and can often be more visually pleasing in a portrait than a background that cannot be blurred as much as you’d like.

Taking Portraits with a Kit Lens

Shot with a kit lens at 55mm, f/5.6.

Bonus Tip: When shooting from above, try converting to black and white! When converted to black and white, grass reads as a dark background that can be a nice contrast for lighter skin tones. Likewise, concrete often reads as a light background that can be a nice contrast for darker skin tones. Converting to black and white when shooting from above can be a great way to work around the inability to blur a background as much as you’d like in portraits.

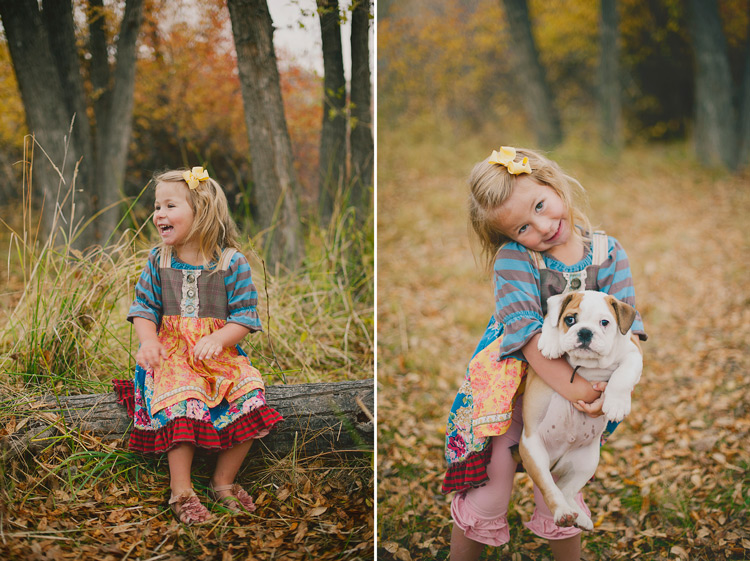
3. Try candid or semi-posed portraits

Taking Portraits with a Kit Lens

Shooting at f/4 or f/5.6 means that more of each image is going to be in focus than it would be if you were shooting at f/1.4 or f/1.8. Rather than consider this a disadvantage, think about the things that are easier to capture at those apertures.

For example, at f/5.6, you have the freedom to capture images with a little more movement without risking a lot of blur from motion. This is a great opportunity to try taking portrait-style images that are candid or semi-posed. Try photographing kids running toward you or siblings mid-hug. Have your subject twirl or jump. Ask mom or dad to tickle their child. Though these images may be slightly different than the head-and-shoulders images that the word “portrait” often brings to mind, they often invoke emotion and movement in a way that is really compelling and valuable in photographs.

Taking Portraits with a Kit Lens

Shooting from a slightly wider angle than just head and shoulders also allows you to incorporate aspects of the surroundings into your images to tell a story. Perhaps it’s a handful of flowers at the park, a bunch of balloons for a child’s birthday, or even an ice cream cone on a hot summer day. The cold hard facts are that the story and emotion make the portrait, not the bokeh in the background.

Using a kit lens in a nutshell

My suggestion to you is to fudge the expectation of head-and-shoulders images when it comes to kit lens portraits. Instead, focus on capturing emotions and telling a story, while getting as close as you reasonably can. If you can move the subject far away from the background in order to create a nice blur, absolutely do so. If you can’t, consider changing your perspective to create a more uniform background that’s reasonably free from distractions so that the viewer will be able to focus solely on your subject.

Taking Portraits with a Kit Lens

Does a kit lens have limitations when it comes to portraiture? Absolutely. However, recognizing the limits of a kit lens when it comes to portrait photography isn’t prohibitive. Rather, it allows you to recognize the situations and applications that will be most effective in creating the images you want with the equipment you already have, and that’s always a good thing!

Do you have a great portrait taken with a kit lens? Please share it in the comments below!

googletag.cmd.push(function() {
tablet_slots.push( googletag.defineSlot( “/1005424/_dPSv4_tab-all-article-bottom_(300×250)”, [300, 250], “pb-ad-78623” ).addService( googletag.pubads() ) ); } );

googletag.cmd.push(function() {
mobile_slots.push( googletag.defineSlot( “/1005424/_dPSv4_mob-all-article-bottom_(300×250)”, [300, 250], “pb-ad-78158” ).addService( googletag.pubads() ) ); } );

The post 3 Tips for Taking Portraits with a Kit Lens by Meredith Clark appeared first on Digital Photography School.


Digital Photography School

 
Comments Off on 3 Tips for Taking Portraits with a Kit Lens

Posted in Photography


Parasitic Art: 11 Installations Taking Over Buildings Like Organic Growths

26 Oct

[ By SA Rogers in Art & Installation & Sound. ]

parasitic-art-1

Some art just can’t be contained, even by the buildings that house it, expanding beyond these constrictions like alien appendages to burst through windows, wrap around columns and slink onto the sidewalks below. Inorganic materials take on the qualities of living things, manifesting as artificial parasitic growths as they cling to the facades of buildings in architectural installations that take on lives of their own.

Hyperbolic Installation by Crystal Wagner, Poland

parasitic-art-2

parasitic-art-3

parasitic-art-4

An alien-like growth wraps itself around the corner facade of a historic building in Lodz, Poland, stretching tentacle-like appendages in shades of vivid pink, blue and purple. The site-specific work by Crystal Wagner is made from woven strips of plastic.

Wood Tentacles by Henrique Oliveira

parasitic-art-wood-4

parasitic-art-wood-3

parasitic-art-wood-2

Wooden forms expand to fill entire interior spaces, taking over light root systems to push through windows and doorways and into the streets, or in one case, to act as a secret system of interior tunnels. Artist Henrique Oliveira of Brazil typically installs his organic sculptures in gallery spaces, but one particular work has it bursting out of the confines of Casa dos Leoes in Porto Alegre.

10,000 Bats on the Nature Concert Hall

parasitic-art-bats

parasitic-art-bats-2

parasitic-art-bats-3

Thousands of bats stream straight out of the front door of the Nature Concert Hall at Zalenieki Manor in Latvia, forming a surreal cloud on its lawn. Architecture firm DJA took inspiration from the unpredictable formations found in nature when assembling the congregation of 10,000 paper bats, which create a tunnel effect when viewed from below.

Vortex by 1024 Architecture, Bordeaux, France

screen-shot-2016-10-25-at-9-36-26-pm

screen-shot-2016-10-25-at-9-37-33-pm

screen-shot-2016-10-25-at-9-36-45-pm

screen-shot-2016-10-25-at-9-37-42-pm

Strips of wood have taken it upon themselves to escape one building and grip the exterior of another, streaming toward it in a manner suggestive of autonomy. ‘Vortex’ is a generative light sculpture by 1024 Architecture almost completely made of scaffolding, installed on the Darwin Ecosystem Project’s green building in Bordeaux, France. “Merging organic materials with new technologies, this hybrid architectural artwork wraps around and embraces the footbridge between the complex’s two buildings, revealing and enhancing the venue’s dynamic energy while working as a live visualizer of energy consumption.”

Biografias by Alicia Martin, Madrid

parasitic-art-books-1

parasitic-art-books-2

parasitic-art-books-3

An ornate second-floor window seems to vomit thousands of books onto the sidewalk below in this installation by artist Alicia Martin, as if they, too, are hoping to escape the building. The effect is enhanced by the movement of the pages as they’re blown by the wind. Martin has created similar site-specific installations in buildings all over her home country of Spain.

Glowing Star in an Unfinished Building by Jun Ong

parasitic-art-star

parasitic-art-star-2

Like some kind of alien life form that started out tiny and suddenly expanded, impaling an entire building upon itself, this five-story star made of light by Jun Ong suggests rapid growth that could not be contained. The artist envisions the LED sculpture as a physical manifestation of a glitch.

Next Page – Click Below to Read More:
Parasitic Art 11 Installations Taking Over Buildings Like Organic Growths

Share on Facebook


[ By SA Rogers in Art & Installation & Sound. ]

[ WebUrbanist | Archives | Galleries | Privacy | TOS ]


WebUrbanist

 
Comments Off on Parasitic Art: 11 Installations Taking Over Buildings Like Organic Growths

Posted in Creativity


Tips for Taking the Torture out of Extended Family Portrait Sessions

04 Oct

I have yet to meet someone who loves getting their picture taken with the whole extended family. The thought of getting all the dramatic aunts, crazy uncles, wild kids, and tired grandparents together and smiling all at the same time seems nearly impossible, and not at all fun. I know of many photographers who refuse to do big family portraits because they can be so unpleasant. I have grown to love big extended family portrait sessions throughout the years. You can too, whether you’re the photographer, or one of the silly cousins getting her photo taken.

Extended Family Portrait Session

Think of big groups as your own family

The first thing that helped me love extended family sessions was the way that I thought of them. Instead of a difficult crazy session, I try to think of them as my own family, and take the photos with love. Let me share a story that may change your mind about extended family sessions too.

A while ago I was asked to add a missing brother to an extended family photo. The entire family had been there when they had the photo taken, except for this one brother who couldn’t get off work. Months later, one of the other brothers tragically passed away. Their most recent family portrait wasn’t complete, and they’d never be able to get a new one.

So, I took this working brother to the same location, took a photo of him, worked him into the photo through the magic of Photoshop. I matched everything the best that I could, so they could have the last most complete family portrait. It made me realize how fragile life is, and how fragile families are. If I have an opportunity to capture a family right now, today, as they are, I’m happy to do it. You never know when or why that portrait may become priceless to them.

Not only are these photos precious and invaluable, but they can be a lot of fun, and not too difficult to pull off. Let me give you some tips to help.

Extended Family Portrait Session

Take charge, be bold, move fast

When you’re working with a big group of people, someone has to be in charge. That person is you, the photographer. This is not a time to be timid and quiet, hoping things will fall into place. As soon as you’re ready to start, get everyone’s attention. Taking charge right away will let them know that you are confident, that you know what you are doing, and that they can trust you. Smile a lot, and if it works for you, throw in some humor. Tell your group that if they will listen to you closely, and do everything you say, that it will be quick, painless, and even fun. Everyone there likes to hear “quick, painless, and fun”, so you’ll have their attention right away.

Don’t take a long time getting everything situated. Have everything scoped out beforehand, and have a firm idea of where and how you will place everyone. Know what order you will be photographing each group, and if you have any stragglers, kindly, but firmly move them toward the picture location. If there are a lot of small children, this is especially imperative. You will lose their interest and patience so quickly, so you need to take advantage of any time when they are even remotely cooperative. You won’t get any good photos when everyone is exhausted and sick of you, so you have to be done before that happens.

Extended Family Portrait Session

Add some personality

With a big group, it seems like you might only have one option – get everyone to look at you, and hope they are smiling. Many clients do want a more traditional family photo, very posed, with everyone looking and smiling. But try giving them a few photos with a little bit of their family’s personality. When you are working with so many people it’s really hard to get a perfect traditional photo anyway. Most of my clients know that isn’t really my style, so they are happy with the more fun, casual photos.

My favorite thing is to ask everyone to hug in to Grandpa and Grandma, or hug someone next to them. Set everyone up for the more formal photo, and once you’ve captured that, just ask them all to hug. Usually it feels silly enough that they start to laugh, and you get genuine laughs and connection.

Extended Family Portrait Session

Try different poses and positions

It can be a challenge to know how to arrange a really big family group. You could easily have four generations in one photo, which can add even more challenges with arrangements. Some families like family photos where they are all squished in together, in one big family group. I’ve had some that want them completely mixed up, where nobody is grouped into separate families. This is okay, but I find that most families like to at least be able to tell which small families within the group belong together. You can do this by just having each family stand next to each other, or you can even put gaps in between each family. I usually do both, so they have options to choose from later.

I usually place Grandpa and Grandma in the center then evenly distribute their children’s families on either side.

Extended Family Portrait Session

My style doesn’t involve a lot of props, so you won’t notice a lot of chairs and stools in my family photos. They are an option if you’d like to create different levels, but it usually takes a lot of time to get that set up, and your subjects lose patience fast. I prefer a more casual, natural look to something that looks very precise and contrived. Sometimes worrying about those extra things can cause a lot of stress for you, and for your families, and make the whole process more of a chore. But feel free to use them if it’s your style and preference.

Extended Family Portrait Session

Find suitable locations

If you want to have some seated photos, look for locations that have places to sit built in. I love rocks, logs, or even park benches. You can also have some people sit on the ground, some kneel, some stand, but again, be careful not to take so long over-posing that you lose their patience.

It can be difficult to find a place that will work for such a large group. Try to find locations with simple backgrounds that don’t detract from the faces. If possible, schedule the session during the early morning or evening, to take advantage of better lighting. Look for places that have large trees or buildings to filter the light. It’s much harder to make difficult lighting situations work with 30 people than it is when you’re just photographing one.

Don’t move around a lot with a large family once you’ve found a good spot. Find one or two good backgrounds, three if they’re really close to each other, and stick with them. This will keep their photo groupings more consistent with each other, and will make the session go much faster and smoother. Try getting 30 people to move quickly over to a different rock, and you’ll see what I mean.

Extended Family Portrait Session

Get all the break-off groupings

Once you’ve photographed the big huge family, it’s time to get all of the little groups. Keep this moving quickly, and be efficient moving from one group to the next. Here’s a list of the different groupings that I do:

  • Entire extended family
  • Grandpa and Grandma (Dad and Mom) alone
  • Dad and Mom with their children (siblings)
  • Dad and Mom with their children and children’s spouses
  • All the siblings
  • The siblings and their spouses
  • Grandpa and Grandma with the grandchildren
  • All the grandchildren
  • The sisters together
  • The brothers together
  • Each separate family

I don’t do every one of these every time. It depends on what the family wants. Also, I know every family is different, and there may not be Mom and Dad, or any grandchildren, etc. This is just to give an idea of how you might break the groupings up.

I try to do the whole family first, and then the smaller groupings. Because it’s hardest to get everyone paying attention and happy for the whole group, you want to get that in when everyone’s fresh. However, sometimes some of the families arrive before others. It’s a great use of time to take the photos of those families while you’re waiting for the entire group to get there. They’ll be happy that they’re finished early, and that they don’t have to sit around doing nothing while they’re waiting for the latecomers.

Extended Family Portrait Session

A few more tips

Remember when you’re working with big families, that letting go of perfection can save you, and them, from a miserable experience. Kids often don’t cooperate, and sometimes some of the family is really grumpy about being there for photos. Do the best you can, and let the rest go. If there are little ones not looking at the camera, or even crying, you are still capturing that family at this moment in time, and giving them a gift. They may end up treasuring the silly faces, and loving the memories of when one grandchild was going through his never-sit-still phase.

Direct the adults

Tell the parents and grandparents to do their best to continue looking at you and smiling, even if you are trying to get their kids’ attention. Many a good photo is ruined by a parent looking down and lecturing their child right at the moment when the child finally does look up and smile. If the adults are picture-ready at all times, then you will have a chance at catching the split second that their kid smiles, and they’ll be smiling too.

Extended Family Portrait Session

Shoot lots of the big group

Take LOTS of photos in a row with the big group. You may think that you have what you need, but then later when you look at the photos full size, you’ll realize that Uncle Bob blinked in every single one. If you take a lot of photos, one right after the other, you can do head swaps later if you need to open some eyes. If they’re taken at approximately the same time, it will be really easy to change the faces, because they’ll be in the same place in every photo.

Love your families

Lastly, remember to love the families you are photographing. They love each other, even through their faults and imperfections, enough to want to preserve a moment in their lives. This photo is so important to at least one person there. Important enough to go through all the hassle of gathering their entire family together in one place at one time. They are trusting you to give them this cherished gift. Consider yourself one of the family for that hour or so, and let your lens capture the love.

googletag.cmd.push(function() {
tablet_slots.push( googletag.defineSlot( “/1005424/_dPSv4_tab-all-article-bottom_(300×250)”, [300, 250], “pb-ad-78623” ).addService( googletag.pubads() ) ); } );

googletag.cmd.push(function() {
mobile_slots.push( googletag.defineSlot( “/1005424/_dPSv4_mob-all-article-bottom_(300×250)”, [300, 250], “pb-ad-78158” ).addService( googletag.pubads() ) ); } );

The post Tips for Taking the Torture out of Extended Family Portrait Sessions by Melinda Smith appeared first on Digital Photography School.


Digital Photography School

 
Comments Off on Tips for Taking the Torture out of Extended Family Portrait Sessions

Posted in Photography


Drone Design: 14 Autonomous Gadgets Taking Tech to New Heights

20 Sep

[ By SA Rogers in Gadgets & Geekery & Technology. ]

drone-design-millennium-falcon-2

Their efficiency in the real world is yet to be established, but if these drone concepts and fully-realized creations are any indication, some of us could be looking at losing our jobs to robots in a range of industries over the net couple decades. From emergency responders to face-recognizing cameras, many of these autonomous flying gadgets take over tasks currently completed by pilots, construction workers, delivery drivers and videographers – but sometimes, they’re just for selfies.

Mercedes-Benz Electric Vision Van with Rooftop Drones

drone-design-mercedes-1

drone-design-ercedes-2

Designed for last-mile delivery in urban and suburban contexts, the all-electric ‘Vision Van’ by Mercedes-Benz is the first of its kind to feature built-in aerial drones that enable multiple package deliveries in a single neighborhood at the same time. This theoretically reduces the number of vehicles in any given residential area and makes the delivery process totally emissions-free. The van also features blue LED lighting on the lower body and slide-out shelving units. It certainly takes windowless vans to another level.

ROAM-e Mini Selfie Drone

drone-design-roam-e

drone-design-roam-e-2

What would have been seen as undeniably dystopian in previous decades is now packaged as a selfie assistance tool. The ROAM-e drone can be programmed with facial recognition technology so it follows you around like a puppy, snapping your photo or streaming live video all the while. Admittedly, the video function could be helpful, standing in for a camera operator in all sorts of settings and going where they can’t go (unless they’re secretly superheroes). The drone can be collapsed and folded to the side of a water bottle an two hours of swappable charging keeps the drone in the air for up to 20 minutes (for longer videos, switch out the battery.)

PowerEgg Drone

drone-design-power-egg

drone-design-power-egg-2

A small egg-shaped device sprouts propellers and turns into a personal camera drone at the push of a button. The PowerEgg by PowerVision is clean, simple and easy to transport, featuring a 360-degree panoramic 4K HD camera, advanced sensors for indoor navigation and real-time, long-range video transmission. You can snag one yourself for $ 1,288.

Drone Ambulance by Argodesign

drone-design-ambulance

drone-design-ambulance-2

Could this Drone Ambulance concept by Argodesign save lives by enabling more flying responders to hit the ground faster than a single helicopter? It’s about the size of a compact car and can land in much smaller areas, and a single pilot can manage an entire fleet of them remotely.

Trident Underwater Drone

drone-design-trident

drone-design-trident-2

Explore bodies of water without ever getting wet thanks to the Trident drone by Berkeley robotics company Openrov. No scuba gear and training is required when you send this portable machine down into the water in your place, and it can dive to a depth of 100 meters, sending live HD video to the surface via a thin buoyant tether. It can be controlled from the surface by a laptop or mobile device. The Trident is set to hit the market in November.

Next Page – Click Below to Read More:
Drone Design 14 Autonomous Gadgets Taking Tech To New Heights

Share on Facebook


[ By SA Rogers in Gadgets & Geekery & Technology. ]

[ WebUrbanist | Archives | Galleries | Privacy | TOS ]


WebUrbanist

 
Comments Off on Drone Design: 14 Autonomous Gadgets Taking Tech to New Heights

Posted in Creativity


3 Tips for Taking Better Motorsport Photos

11 Aug

If you’re a fan of motorsport, then you’ve probably tried to take photo of a race car on the track. It’s not as easy as it looks is it? The high speed nature of motorsport photography tests even the best photographers and cameras. So it takes a special skill set to move your motorsport photos up to the next level.

Taking a photo of a car on track is one thing, but if you’d like to add one or more of the following elements to your photos, you’ll start to create some special images. So make sure you keep these three things in mind next time you are at a race track shooting motorsport: speed, action and emotion.

DPS Panning 001

#1 Speed

One of the biggest things that draws people to motorsport is the speed. If you’d like your photos to stand out, you need to showcase that speed in your photos. The photographic technique for doing this is called panning.

Panning is basically using a slow shutter speed to introduce motion blur into your photos. The easiest way to do this, is to focus on a particular point of the car, and move your camera in a smooth motion in the same direction as the car. This will keep the car nice and sharp, and blur out the background.

I would recommend that you start with a shutter speed of around 1/200th of second. As it takes a lot of practice to get a nice smooth motion. As you improve your technique and grow in confidence, you can progress to slower shutter speeds.

DPS Panning 002

Panning is one of the hardest techniques in photography. It takes a lot of practice to get it right. The slower the shutter speed, the less likely you are to get the car sharp in the photo. But the trade off is a more dramatic the effect when you do get it right.

Just remember that not even the professionals get every shot perfect, though they may not admit it. But once you have mastered the art of panning, you can look to add some more creativity to your shots by panning through objects, or using interesting angles.

DPS Panning 003

#2 Action

Getting a photo of one car on track is great. But those action moments are what really tell the story of the race.

Ideally you want to be on the look out for the moments when two or three cars are jostling for position. Usually in the opening laps of a race. Shots of the race leaders fighting for the lead will give your photographic story more definition.

To capture those actions moments, you will want to position yourself at one of the slower corners of the track. One that encourages passing. To do this you’ll need to be familiar with the venue. Each and every track is different.

DPS Action 001

Photographically, you’ll be looking to use a fast shutter speed to freeze the action. I would recommend using a shutter speed of 1/1000th at a minimum. Although the speed really all depends on how fast the cars are traveling at that section of the track.

Now, since you are freezing the action, you’ll still want to make the cars still look fast. To do this you will need to hide the wheels of the cars. Either shooting the cars directly front on, or from behind. Hiding the lack of motion in the wheels will give the cars a sense of speed, while still showcasing the action.

DPS Action 002

DPS Action 003

#3 Emotion

Motorsport, much like all sports, has high highs and low lows. That is reflected in the emotions you’ll see around the race track.

To complete a photographic story of the race, you’ll need to capture either the fans, teams, or drivers celebrating victory. That could be a victory burnout, it could be driver waving to the crowd, or it could be the team applauding as their driver crosses the checkered flag.

DPS Emotion 001

While the highs are good, the lows also tell an equal part of the story. It could be a crash between two competitors. It could be a driver walking away from his broken down car. These all add up to telling the story of the race.

Unfortunately, it takes a little bit of luck to capture the emotion in motorsport. That’s why these shots are the most rewarding.

Photographically these emotional moments take split second decisions to capture. If you’re photographing a driver doing a burnout, you’ll need to quickly drop the shutter speed to showcase some motion in the wheels. but not so much that the car starts the blur. I’d suggest something along the lines of 1/250th.

For capturing other celebrations, which are often just fleeting moments. I’d recommend a high shutter speed and wide aperture to create shallow depth of field to draw focus to the part of the celebration that tells the best story.

DPS Emotion 002

Summary

If you can keep those three things in mind while you are taking photos trackside, you’ll take your motorsport photos to the next level. Then you’ll really telling the story of an event, instead of just capturing cars on a track.

googletag.cmd.push(function() {
tablet_slots.push( googletag.defineSlot( “/1005424/_dPSv4_tab-all-article-bottom_(300×250)”, [300, 250], “pb-ad-78623” ).addService( googletag.pubads() ) ); } );

googletag.cmd.push(function() {
mobile_slots.push( googletag.defineSlot( “/1005424/_dPSv4_mob-all-article-bottom_(300×250)”, [300, 250], “pb-ad-78158” ).addService( googletag.pubads() ) ); } );

The post 3 Tips for Taking Better Motorsport Photos by Rhys Vandersyde appeared first on Digital Photography School.


Digital Photography School

 
Comments Off on 3 Tips for Taking Better Motorsport Photos

Posted in Photography


Tips for Taking Candid Portraits of People

28 Jul

Get Andrew’s ebook The Candid Portrait at 43% off, now over at Snapndeals, for a limited time only (August 9, 2016 AUS time).

A candid portrait is often defined as one which you take without the subject being aware that you have done so. The idea is to capture a natural moment, that shows the person’s character or something interesting about them.

A candid portrait

Wedding and portrait photographers often strive to capture candid portraits, so do street photographers. It is the latter form of candid portrait photography that I will concentrate on in this article.

I prefer to take candid portraits when I am travelling, it is rare that I do so at home. There is something about the excitement of travelling and seeing a new place with fresh eyes, that makes me want to take photos that capture life in the streets.

The question is, how do you take photos of other people safely when you are travelling, and how do you create evocative images that capture the spirit of that place? Good photos aren’t taken, they are made by the photographer. The following tips will help you create candid portraits.

All the photos in this article were taken while I was traveling, but you’ll find the principles hold true when you are working close to home as well.

1 – Think about your equipment

Part of the craft of photography is selecting the most appropriate tool for the job. There are two approaches you can take here. One is to use a telephoto lens and take photos from distance. You are unlikely to be spotted by your subject, especially if you are quick, but your photos may also have a lack of involvement in the scene as they are taken from some distance away. Having said that, you can use a telephoto lens to create a cinematic look that pulls the background in closer to the subject, or throw it out of focus.

A candid portrait

I took this photo with a 50-150mm Sigma lens. It’s an enormous lens that I no longer own, but it enabled me to take photos like this from a distance, without being noticed.

The second approach is to use a small camera with a small lens, and get in much closer to the action. The idea here is that the small camera gives you the perception that you are less intimidating, than somebody using a large digital SLR and lens setup. You are much more likely to be able to take photos without being noticed, or to be ignored if you are.

A candid portrait

I used a small 35mm lens on a Fujifilm camera to take this photo. The smaller size of this gear lets me get much closer to people than I ever could with the Sigma 50-150mm lens.

The ideal small camera could be a small digital SLR (such as the Canon EOS 100D), a mirrorless camera (such as the Fujifilm X-T1, my personal favorite), a compact camera (like the Ricoh GR II) or a smartphone.

If you are using an interchangeable lens camera, then a prime lens may be a good choice. Primes are usually smaller than zooms, and the wide apertures come in handy in low light.

2 – Slow down and explore

Become an observer of life. Go somewhere interesting and just watch what happens. Every city and town have their own rhythms. The tide of people ebbs and flows as the hours pass by. Where are the most interesting parts of the city? The most picturesque? Where is life lived on the streets?

What are the unique aspects of that city? A photo of somebody taken in front of a shop could be created almost anywhere, but a photo taken with a well known landmark or typical building in the background (such as the Eiffel Tower in Paris, or the Forbidden City in Beijing) has the potential to be much more evocative.

The key is to relax, take things slowly, and enjoy yourself. A small camera helps because it is easier to carry around all day than a large system.

A candid portrait

This photo could only have been taken in Beijing. The ancient buildings in the background are unique to this city.

3 – Enjoy the process

Don’t put too much pressure on yourself. An empty memory card can be as terrifying for a photographer as a blank piece of paper (or empty computer screen) is for a writer.

One way to get started is to take a photo of anything remotely interesting. It doesn’t really matter what it is, but I find that taking the first photo gets my creativity going and puts me in the right frame of mind to start seeing other images. Remember that you are there to enjoy the day, the sights, and the process of exploration and meeting new people, as well as photography.

4 – Don’t be afraid to talk to people

Talk to people, not necessarily only the people that you want to photograph, but anybody, particularly in shops, markets or working in cafes, who may be open to a conversation. You may have to forget about this option if you don’t speak the language. But don’t let that stop you from using non-verbal communication. Smile, and be open and friendly.

Talking to people lets you get to know the area, and the people who live there. Afterwards, you may be able to ask the person you spoke to if you can take a photo of them, or if there is anywhere that is a good place to take photos. Local people often like to make recommendations, especially if they are proud of their city.

If you can’t speak the language don’t let that put you off even rudimentary attempts at communication. Last year in China, I came across a group of men playing a game of Xiangqi (Chinese chess). I stopped to watch, and held up my camera with a questioning look. One of them nodded to say yes, and I took a few photos before saying thank you and moving on. This is my favorite photo from the set.

A candid portrait

5 – Use a wide-angle lens

The beauty of wide-angle lenses is that you can get in close and photograph somebody, without them even being aware that you are doing so. How? Simply place them at the edge of the frame, or on one of the thirds. The camera will point away from them and they may not even be aware that they are being photographed.

As long as you don’t look at them or make eye contact they will think you are photographing whatever is behind them. This works best when there is something interesting there that a tourist would naturally take a photo of.

A candid portrait

I was taking a photo of the church when I noticed the man was about to walk in front of me. The wide-angle focal length (14mm, APS-C camera) meant that he became part of the photo without realizing it.

6 – Find a rich environment

Sometimes all you have to do is find an interesting location, and observe how the local people behave as they pass through. While in Beijing last year, I became fascinated at the different ways that the local people interacted with the city’s historical buildings. All I had to do was wait, observe, and take photos of interesting moments.

A candid portrait

While visiting Prince Gong’s mansion, a historical building in Beijing, I noticed that people like to walk by these Tibetan style prayer wheels. I stayed there for a while and took photos as people passed by. The incongruous message on the woman’s bag adds a little extra to this photo.

7 – Go when the light is beautiful

Beautiful light is key to creating evocative portraits that capture the spirit and atmosphere of a place. You’ll increase your chances of creating beautiful images exponentially by going out when the light is beautiful. That means getting out at the end of the day during the golden hour. There is also lots of potential during dusk, especially with the mix of artificial and natural light that you find in urban environments.

A candid portrait

The orange light cast by tungsten light bulbs adds atmosphere to this photo taken in Xi’an, China.

Can you think of any other tips for taking candid portraits of people in the street? Please let us know in the comments, I’d like to hear your thoughts.

Get Andrew’s ebook The Candid Portrait at 43% off, now over at Snapndeals, for a limited time only (August 9, 2016 AUS time).

googletag.cmd.push(function() {
tablet_slots.push( googletag.defineSlot( “/1005424/_dPSv4_tab-all-article-bottom_(300×250)”, [300, 250], “pb-ad-78623” ).addService( googletag.pubads() ) ); } );

googletag.cmd.push(function() {
mobile_slots.push( googletag.defineSlot( “/1005424/_dPSv4_mob-all-article-bottom_(300×250)”, [300, 250], “pb-ad-78158” ).addService( googletag.pubads() ) ); } );

The post Tips for Taking Candid Portraits of People by Andrew S. Gibson appeared first on Digital Photography School.


Digital Photography School

 
Comments Off on Tips for Taking Candid Portraits of People

Posted in Photography


Tips for Taking More Natural Engagement Portraits

25 Jul

Engagement portrait sessions can be awkward especially for couples who are expected to display their affection publicly and worse, in front of the camera. Often they feel uneasy and don’t know what to do, let alone how to pose. Left to their own devices, especially if they feel they are not naturals in front of the camera, the probability is that they won’t love their photos at the end of the session. They will look back at the session with regret.

3-tips-natural-engagement-sessions_0000

3-tips-natural-engagement-sessions_0002

Your job as the photographer is to avoid the above at all costs. Your main goal is for them up be thrilled with their photos, and delighted with the experience.

The benefits of engagement portraits are many. The couple able to practice in front if the camera before their big day, so they can throw off their inhibitions. But also, and more importantly, it builds trust with you, so that on the day if the wedding they won’t even have to think about how to look good in their photos. Instead they can concentrate on being with their guests and family, and enjoy their day.

3 Tips for natural engagement sessions

3 Tips for natural engagement sessions

Here are my top three tips in making your engagement session a breeze for your couples.

#1 Prepare them

Before the session, send them a guide offering tips on what to wear, what to bring, and how to decide on location. Assure them it’s going to be lighthearted and fun, and that it’s totally okay to laugh at themselves and be silly. Assure them that their photos will look natural, and that you have some secret tips for that to happen.

In the guide I give my couple I ask them to wear layers if it’s winter or autumn, then depending on the weather we can take a layer off and have another look. If there is a changing room nearby then they can bring extra outfits.

3 Tips for natural engagement sessions

I encourage them to choose a couple of props that they both love, be that a picnic basket with a bottle of bubbly, balloons, bikes, books, etc. The aim is to make them feel at ease, using things that they already love and which come naturally to them. Some couples can’t easily think of props. I always suggest a bunch of flowers – they’re timeless and will suit any style.

3 Tips for natural engagement sessions

Regarding locations, suggest choosing something meaningful to them. It could he their rendezvous spot when they were dating, where they got engaged, a spot they both have a great fondness for, or where something memorable happened.

Couples also appreciate if you ask them for their preferences to style, colors, and look. It makes them feel listened to and assures them you are open to their ideas.

3 Tips for natural engagement sessions

3 Tips for natural engagement sessions

#2 Direct them

This may seem opposite to the idea of candid shots and natural-looking photos, but let me tell you a secret. After having photographed numerous engagement sessions in eight years, I can tell you that natural shots are often posed. That’s right they are. Your job is to make the final image look natural, and to do whatever it takes to make that look happen.

Couples don’t know where to place their hands, where to put their weight and how to stand, what to do with their arms, where to look, what expressions to have on their faces, etc. Basically, compositions that look good and natural in front if the camera, even if that were to be a photo where they aren’t looking at the camera, and expressions that you elicit and draw out of them.

3 Tips for natural engagement sessions

3-tips-natural-engagement-sessions_0010
When I direct couples I give them 3 rules:

1. Connection – There always has to be a connection between them, be that a physical one where parts of their bodies are touching, or a non physical one such as gazing at each other, laughing at a shared joke, or thinking of a shared memory. Connections matter and show. The authenticity of your image rests on the depth and strength of the connection between the subjects.

3-tips-natural-engagement-sessions_0017

2. Angles – Try to pose them at angles where you always see a bit of their faces instead of the back of their heads, unless your intention is to capture them from behind. Avoid straight lines, unless that again is your intention. I generally ask them to stand in a V position, at an angle instead of square on, with their weight on one leg so everything isn’t too even, or with a little body twist (for women) for some shape. Get men to not put their full hands in their pockets, just the thumbs instead, otherwise they look like cut off limbs up to their wrists.

Look for triangular and irregular compositions rather than straight and square. This adds interesting lines and dynamic to your images compared to a very flat and static look.

3. Laugh instead of talk – Two things to always avoid: taking photos mid-talk and mid-eat. Instead of talking to each other, ask them to laugh at each other’s silliness, and at how awkward they are feeling. That usually gets them laughing naturally. Getting them to think of special memories always puts a smile on their faces. This is not to say all the photos you take must be smiling ones, but this tip works every time. Laughter makes them warm up and shake off their inhibitions. Always a good trick!

3-tips-natural-engagement-sessions_0012

3-tips-natural-engagement-sessions_0011

#3 Encourage activity

This is where the props come in. An activity breaks the ice instantly, takes their focus off any awkwardness they may be feeling, creates an experience for them, and sets the scene for a memorable shoot.

Activities include having a picnic, popping a bottle of champagne, going on a bike ride, playing the guitar, reading books, having coffee at a favorite cafe or drinks in a favorite pub, going for a stroll by the sea, horse-riding, browsing flea markets, etc. If they can’t think of an activity, as mentioned above, having a bunch of flowers to hold always help. You can focus on posing them in ways that look natural, and making sure that they connect emotionally with lots of laughter and fun moments, like running and jumping, that don’t require props or any special preparation.

If you have a couple who are up for a shoot under any conditions – that’s awesome. You can capture unique photos in extraordinary weather conditions, like during a blizzard in the photos below, or perhaps freezing raindrops using flash, or in a downpour. The possibilities are endless!

3-tips-natural-engagement-sessions_0012

3-tips-natural-engagement-sessions_0012

I hope you find these tips helpful. Do share in the comments below if you have any more tips to add to the list.

googletag.cmd.push(function() {
tablet_slots.push( googletag.defineSlot( “/1005424/_dPSv4_tab-all-article-bottom_(300×250)”, [300, 250], “pb-ad-78623” ).addService( googletag.pubads() ) ); } );

googletag.cmd.push(function() {
mobile_slots.push( googletag.defineSlot( “/1005424/_dPSv4_mob-all-article-bottom_(300×250)”, [300, 250], “pb-ad-78158” ).addService( googletag.pubads() ) ); } );

The post Tips for Taking More Natural Engagement Portraits by Lily Sawyer appeared first on Digital Photography School.


Digital Photography School

 
Comments Off on Tips for Taking More Natural Engagement Portraits

Posted in Photography


5 Tips for Taking Better Portraits in Nature

23 Jul

I can’t get enough of being outside in nature.

I often go out on trail runs with my friends, and we spend most of the run grinning from ear to ear, exclaiming how lucky we are to be here on this earth, and how beautiful every single thing is. I love to go camping with my family, where we set up hammocks in the trees, listen to the birds singing, and the leafy wind sounds as we gaze up into the sky.

900

So it makes perfect sense to me to take photos of people in the great outdoors. Nature elevates the whole photo to something much more interesting than a simple studio backdrop. People are my favorite subjects, and nature is my favorite setting, so I’d love to share a few ideas to help your nature portraits be even more exciting.

1 – Nature’s Colors Can Complement Perfectly

300

Sometimes you may notice that your subject’s hair, eyes, lips, or clothing matches some floral blooms, leaves, sky, or rocks perfectly. Photographing your subject with colors in mind can bring out some of those things beautifully, and make a gorgeous photo. Sometimes the colors may match exactly, or they may be opposite on the color wheel, and make your subject just pop.

For example, if your subject is wearing purple, keep an eye out for yellow leaves. If you are doing your photographs in a place with lots of green, pops of red can really stand out. If your subject has startling blue eyes, use water or the sky to bring out that blue even more. Start paying attention to the colors in your photos, along with composition, light, etc., and your photos will have a whole new dimension to them.

700

2 – Focus on Nature and Let the People Blur into the Background

600

For a new perspective, try focusing your camera on nature in the foreground, and letting the people in the background be out of focus. This is especially effective for photos that feel like you’re getting a glimpse of something private, like a kiss, or a mother with her newborn baby.

You can do this by setting your aperture wide (a low number, for example, between f/1.8 and f/2.8), setting your camera to let you choose the focus point, then making sure your focus point is on the flowers, leaves, or rocks in the foreground. Make sure your subjects are standing far enough behind your foreground, so they will definitely be out of focus. You want it to look like it was done purposely, not like you accidentally missed the focus on your subjects.

3 – Be Playful and Interact With Nature

400

Nature is full of props to make your photos even more fun. You can use logs, rocks, and branches to perch on. You can use leaves or snow for your subject to blow on, or throw, in the air. You can have them walk through a stream, or throw rocks from the bank. Use a flower to tuck in the hair, or to smell. The ideas are endless, and if your subjects are really outdoorsy and they interact with nature regularly, make sure to capture that during your photo session with them.

Be kind to nature around you, though, and try to leave everything the same or better than you found it. Remember that if everyone broke branches, picked a bouquet of wildflowers, or stomped on untouched fragile foliage, there would be nothing left for any of us to enjoy. Tread lightly, pick up any trash, and don’t leave a trace.

200

4 – Dress Mother Nature up a Little Bit

800

You can create a whimsical, unexpected photo, with a few unlikely props. Carefully hanging a chandelier from a tree, or a bench or couch in a field, can be a lot of fun. Try props like a retro typewriter in the middle of a forest, or balloons at the beach. It’s hard to look at a photo with something so playful and fanciful, without smiling.

5 – Make Nature the Star of the Show

100

I love images of beautiful scenes in nature, but I love a photo of a person IN a beautiful scene in nature even more. It shows scale, and adds so much interest to the photo. Your human in the photo may almost be an afterthought, maybe even almost blending in to the scene.

Look for beautiful scenes that would make pretty photos alone, then add your person into the shot. These types of photos work perfectly to print up gigantic and hang up on the wall. Close up photos are fantastic, but sometimes pulling way back, and getting more scenery than person in a photo, is the perfect thing to do.

1000

Summary

I hope these tips give you some ideas to get out and take some portraits in nature.

How have you used nature to enhance your portraits? I’d love to see your nature portrait photos in the comments if you’d like to share.

500

googletag.cmd.push(function() {
tablet_slots.push( googletag.defineSlot( “/1005424/_dPSv4_tab-all-article-bottom_(300×250)”, [300, 250], “pb-ad-78623” ).addService( googletag.pubads() ) ); } );

googletag.cmd.push(function() {
mobile_slots.push( googletag.defineSlot( “/1005424/_dPSv4_mob-all-article-bottom_(300×250)”, [300, 250], “pb-ad-78158” ).addService( googletag.pubads() ) ); } );

The post 5 Tips for Taking Better Portraits in Nature by Melinda Smith appeared first on Digital Photography School.


Digital Photography School

 
Comments Off on 5 Tips for Taking Better Portraits in Nature

Posted in Photography


Photographers Need To Stop Taking Pictures

18 Jul

stop-taking-pictures

Stop taking pictures – OK – I assume that that headline grabbed your attention – and that was what it was designed for.  (I have to say that I’m only half-joking about this – I’ll explain…)   Recently I realized that – that for me as a photographer – one of the most effective and valuable things I could do with my time is NOT taking pictures!  I have to admit it was a bit of a shock when the reality of this started to sink in but now it makes absolute sense to me.


What, you might say – You’re a photographer. What’s going on here?


I’ll explain…  Since you only have a limited amount of time each day you need to prioritise and figure out what actions brings you the “biggest bang for your buck” or the highest lifetime value (you can use the term ROI [Return On Investment] as well).


In our every day we are juggling a lot of roles and I dare to say that most of us are running around “putting out fires” as they flame up instead of working on the really important stuff. The really important stuff are the things that will bring us a lot of value for a limited effort. I’m sure you’ve heard about the 80/20 rule (the Pareto Principle) – this is it!


Photographers – Stop taking pictures #photography #GettingThingsDone
Click To Tweet


Surprisingly taking pictures does NOT bring me the highest life-time value.  Building processes and workflows for my photography brings me the highest lifetime value because once they are in place they run on auto-pilot, automatically.  You spend some time on it but after that the process will just run and run and run…   See what i mean?   Taking pictures gives you some money – but you have to repeat it – over and over again…

productivity-pyramid

And here is the beauty of the whole thing – When you start putting processes and effective workflows in place for your photography you will increase the ROI on your work because the new processes will add  value to what you do – automatically!


IMAGE SOURCE:

Feature image & image 1: courtesy of Per Zennstrom


Fashion Photography Blog

 
Comments Off on Photographers Need To Stop Taking Pictures

Posted in Uncategorized


Six Essential Steps to Taking Great Photographs

05 May

Whether you have been creating photographs for years, or only for few weeks, your goals and dreams are to create great photographs that everyone will admire. You may notice this is not an easy task, and I’m sure that most of the time you experience more disappointments than successes. But don’t worry, I have for you six essential steps that will help you speed up the process, and give you confidence on your journey to these elusive great photographs.

Step 5 - Organise by eva polak

Step 1 – See

Seldom does a photograph succeed because of unusual technique or exotic equipment. Most of the time it succeeds for one simple reason – the photograph was well seen. So, to create great photographs we just need to learn to see better.

Unfortunately this isn’t as easy as it sounds. There’s more to seeing than just looking. It requires time and patience. Begin by concentrating on the objects before you; see how light strikes those objects; see colour, see quality and direction of light, see contrast, see texture, lines,forms and shapes, see details.

The strength of a photograph is directly related to how well, and how carefully you see things around you.

Step 1 - See by eva polak 2 Step 1 - See by eva polak

Step 2 – Feel

Feeling has to do with the emotions generated by a place or subject. Sometimes you need to just sit and absorb your surroundings. Listen to the wind and the birds. Smell the flowers. Feel the rough texture of the trunk you sit on. If you are photographing an animal, watch its movement and behaviour. If you are photographing people, listen to their words, and try to understand their feelings expressed by body language. You can’t photograph the smell of flowers, the sound of birds, or the feelings of a person, but the emotions generated by them can guide you in finding the essence of the scene or subject.

Step 2 - Feel by eva polak 2 Step 2 - Feel by eva polak

Step 3 – Think

This is the most important step in the process. Strong images begin in the mind, not in the camera. Before you begin photographing ask yourself, “Why am I about to take this photo?”

Think about how you will use that sensual input and combine it with your camera, the lighting, and the mood. Is the lighting the best? Would soft, overcast light work better? What about angle of view? High angle? Low angle? Which lens will give the effect you are after? What about shutter speed and aperture?

Answering all these questions is very easy when you have a clear idea of why you want to take an image. Your choices will be completely different when you want to just record your holiday, as opposed to capturing the warm glow cast over the scene by the evening light.

Step 3 - Think by eva polak 2 Step 3 - Think by eva polak

Step 4 – Isolate

Many good shots have been spoiled through poor composition. We tend to concentrate our attention on the subject of a photo, remaining oblivious to what is going on beyond. Make a habit of spending just a second or two before pressing the shutter, checking the viewfinder for any unwanted elements. Get rid of those chaotic objects in the picture. Simplify. Isolate only those elements that convey the message you are trying to express. Emphasize the strong lines, shapes, patterns, textures or colours – but not all of them at once. Be bold and decisive. Ask yourself why. What does it contribute to the overall image? Can you make it stronger by isolating even more? Would you hang that picture on your wall? If not, why not?

Step 4 - Isolate by eva polak Step 4 - Isolate by eva polak_2

Step 5 – Organize

Having isolated carefully, you now need to organize or arrange the elements in the strongest possible way. Where should you place the subject in the frame? In the centre? If so, why? The arrangement may be too boring or static, or on the other hand, it may convey a sense of peacefulness. Or should you put the subject near the edge of the frame? What about the picture orientation itself? You have a choice of creating a vertical or a horizontal image. Which is best for the subject? Vertical orientation tends to emphasize vertical lines or the height of things. Horizontal orientation can give emphasis to sweeping panoramas or the movement of subjects. When you make these choices, always by guided by the message that you are trying to express.

Step 6 - Experiment by eva polak Step 6 - Experiment by eva polak_2

Step 6 – Experiment

Digital photography makes it easy to experiment because you have instant feedback on the LCD screen. Look for new ways to portray familiar subjects. Don’t always photograph the same kinds of scenes in the same ways. Be creative, try different lenses or compositions or angles of view. Play with light. Investigate, explore, observe, evaluate. Don’t be afraid to make mistakes, and above all, have fun!

googletag.cmd.push(function() {
tablet_slots.push( googletag.defineSlot( “/1005424/_dPSv4_tab-all-article-bottom_(300×250)”, [300, 250], “pb-ad-78623” ).addService( googletag.pubads() ) ); } );

googletag.cmd.push(function() {
mobile_slots.push( googletag.defineSlot( “/1005424/_dPSv4_mob-all-article-bottom_(300×250)”, [300, 250], “pb-ad-78158” ).addService( googletag.pubads() ) ); } );

The post Six Essential Steps to Taking Great Photographs by Eva Polak appeared first on Digital Photography School.


Digital Photography School

 
Comments Off on Six Essential Steps to Taking Great Photographs

Posted in Photography