RSS
 

Posts Tagged ‘Take’

How to Plan and Take Killer Sunset Photos on Your Next Vacation

31 Oct

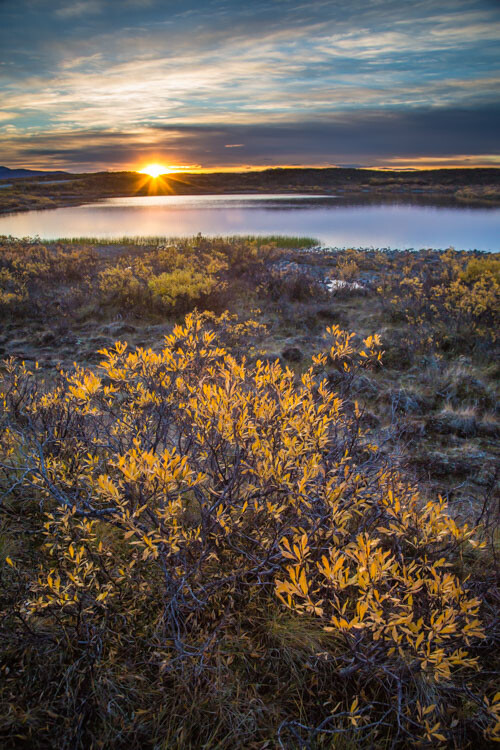
Who doesn’t love a good sunset photo? There’s something about that colorful, ethereal time of day that strikes a cord with just about every person. But as appealing and ordinary as sunsets are, the ability to capture that magical time of day as a photo can be surprisingly difficult.

Sunset Photos

Photo by Martin Genev

Yes, gear and camera settings are important. However, the ability to be in the right place at the right time of day is arguably the most important factor to photographing a sunset. Below, I’ll highlight several tips for planning

Yes, gear and camera settings are important. However, the ability to be in the right place at the right time of day is arguably the most important factor to photographing a sunset. Below, I’ll highlight several tips for planning

Find the best sunset location

How to Plan and Take Killer Sunset Photos on Your Next Vacation

If you’re visiting a new town and searching for an ideal sunset spot, your best bet is to do some online searches. Do a Google image search for “[location] sunset” and see what pops up. Better yet, visit stock image sites and enter similar search queries.

In most cases, you’ll see sunset photos taken from one or two popular locations. It might take some digging to find out exactly where those spots are, but once you have the answer, you’ll know where to shoot.

What time is the sunset?

A simple Google search will tell you exactly when sunset happens in the location of your choice. Keep in mind, however, that the hour or so before sunset is the ideal time of day for most photographers, so you’ll want to show up at your chosen sunset location closer to Golden Hour.

To really hone in the ideal times of day to shoot in a new location, the PhotoPills app is a handy tool. It’s packed full of information that can help you plan and execute outdoor photo shoots.

PhotoPills Sunset Planner - How to Plan and Take Killer Sunset Photos on Your Next Vacation

Image courtesy of PhotoPills

Camera settings for sunset photos

Your ideal camera settings for shooting a sunset depend on a variety of factors, but generally speaking, these are some rules to go by.

Shoot in RAW

When it comes to shooting the sunset, one of the biggest challenges is making sure your camera captures the same warmth and vibrancy that your eyes are seeing. You can typically make White Balance and Picture Style tweaks in camera (more on those below). But just in case, it’s also a good idea to shoot in RAW to give you greater creative control when you post-process the image.

Set White Balance

Leaving your camera White Balance set to Auto might suffice. However, if the color cast of your image is looking too cool or slightly off, try setting your White Balance to Daylight or Cloudy to warm up your shot.

Shoot in Aperture Priority

What shooting mode you should use is certainly debatable, but Aperture Priority will give you greater control over the depth of field. Shooting with a small aperture (f-step of f/16 or higher) will give you a large depth of field. This is ideal if you want more of your scene in focus.

How to Plan and Take Killer Sunset Photos on Your Next Vacation

Keep ISO Low

To avoid excessive noise in your image, maintain the lowest possible ISO for the amount of light you have available. If it happens to be a cloudy sunset or you’re shooting a scene with lots of shadows, you might have to increase your ISO unless you use a tripod.

Composition tips for unique sunset photos

After you’ve got your ideal sunset spot secured, it’s time to start thinking about what kind of sunset image you want to capture.

Keep this in mind: the way that most people photograph a sunset is to whip out their camera at hand, point it directly at the sunset and start snapping away. There’s nothing wrong with capturing the sunset this way, but it doesn’t always make for unique images.

If you’re trying to think outside of the box and get an interesting sunset photo, try some of these tips.

Zoom in

How to Plan and Take Killer Sunset Photos on Your Next Vacation

For most spontaneous sunset photographers, the camera at hand is their point and shoot or cell phone. These cameras are usually equipped with wide-angle lenses. Set yourself apart from the crowd by picking an interesting feature and zooming in.

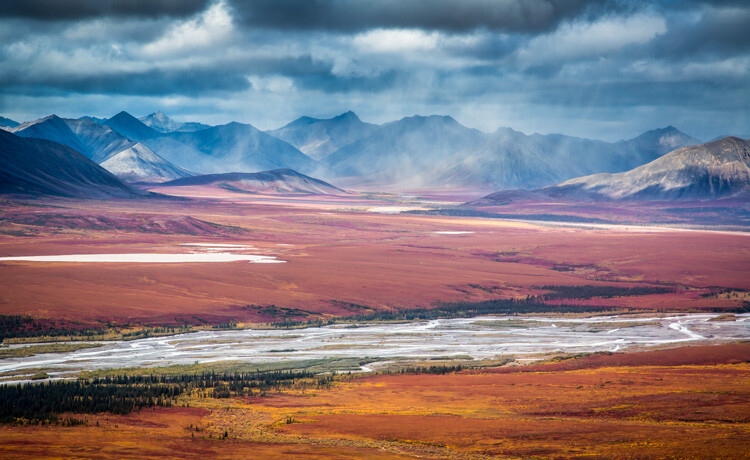
Shoot away from the sun

Instead of shooting directly into the sun, consider pointing your lens in the opposite direction. The bright and often vibrant colors generated by the sunset can make the scene in the opposite direction equally alluring, without having to compensate for shooting directly into bright light.

Wait for Blue Hour

Every photographer has heard about Golden Hour, that magical time of day just before sunset. Lesser known is Blue Hour, that brief time of day that begins roughly 10 minutes after the sun has set (and before it has risen at dawn).

Blue Hour Photography - How to Plan and Take Killer Sunset Photos on Your Next Vacation

This image was taken just after sunset during Blue Hour.

The sky isn’t as obviously colorful during Blue Hour as it is during sunset or Golden Hour. However, Blue Hour still offers a window of time when it can be best to shoot cityscapes or landscapes with deep blue tones in the sky. You will almost certainly need a tripod to shoot during Blue Hour as it is significantly darker without the sun. But the lesson here is that many more photo opportunities exist even after sunset.

Over to You

Do you have any tips for shooting sunset photos? Share your photos and tips below!

The post How to Plan and Take Killer Sunset Photos on Your Next Vacation by Suzi Pratt appeared first on Digital Photography School.


Digital Photography School

 
Comments Off on How to Plan and Take Killer Sunset Photos on Your Next Vacation

Posted in Photography


3 Tips to Help You Take Better Autumn Photos

13 Oct

I’ve recently returned from leading a photography workshop in the Alaska Range, south of my home in Fairbanks, Alaska. The trip was timed with the peak of fall colors. My students and I spent dozens of hours over the week, exploring the vibrant colors, and trying really hard to make the weird orange, red, and yellow landscape look the way we wanted it to in our autumn photos.

It occurred to me that autumn, photographically speaking, is weird. It throws our perception of colors through a loop. The world, normally a mix of blues and greens, suddenly shifts to crazy warm tones of yellow, orange, and red.

4 Tips to Help You Take Better Autumn Photos

To effectively photograph autumn colors, you need to refocus not just your camera, but also your brain. The standard compositional “rules” of landscape photography shift quite a bit during the fall. The background, which for much landscape work is the actual subject of the image (think big mountains) becomes the setting rather than the subject in the autumn. Our attention falls to the foreground, where the colors are exploding.

In this article, I’m going to cover three composition types for autumn: details, broad landscapes, and local landscapes. When mixed together, these three types of images will help you tell a compelling visual story of your autumn experience.

#1 – The Details

4 Tips to Help You Take Better Autumn Photos

Photographing details lies in the fuzzy gray area between macro and landscape photography. Sometimes it’s one or the other, sometimes it is a little bit of both. In general, however, I see photographing the details as another part of landscape work. These images tell a small, but important part of the story.

Mentally, details give us a starting point for seeing the way a landscape will come together, and they also play an important role in providing a sense of scale. The small bits of the scene are rarely captured in a big landscape photo, and yet they are a very important part of our experience in the field. The details too should be an important part of the story we are telling our audience.

4 Tips to Help You Take Better Autumn Photos

Lens choice

Close-up work requires a lens capable of a relatively close focus, or a powerful telephoto. I’ve used big 500mm and 600mm for this kind of shot and I’ve used wide angles that have the ability to focus a few inches away from the lens. But most often I use a moderate telephoto with decent macro capabilities. Nothing fancy, just a good lens that lets me get close to the subject.

4 Tips to Help You Take Better Autumn Photos

Whichever you choose, these kinds of images rarely have a great deal of depth. Even photos from a low perspective only show a few inches from front to back. Therefore detail shots are usually about pattern and color. Here are a few things to look at as you compose:

  1. Consider how the lines in the image interact. Do they cross distractingly or guide your eye around the frame in a pleasing way?
  2. Which color dominates? In the autumn, colors like red can be overwhelming and often need to be balanced by cooler greens or blues.
  3. Isolate your subject by cropping out extraneous details, or using a shallow depth of field.
  4. Embrace the autumn colors, but don’t overwhelm your viewer with too much of the same thing. Good images usually show a variety of textures and colors.

#2 – The Local Landscape

4 Tips to Help You Take Better Autumn Photos

When you zoom back a bit from the details, you get local scenes within the landscape. This type of image is rarely shot wide, rather you apply medium to strong telephotos to isolate compelling parts of the scene. I really like these kinds of shots. They allow enough space to apply the elements of both depth and scale, and yet are tight enough that distractions are more easily avoided and make great autumn photos.

4 Tips to Help You Take Better Autumn Photos

This type of shot is particularly suited to autumn photography because the fall colors are by nature, patchy. Using a short to moderate telephoto, you can select the patches of dramatic color that may be surrounded by brown in late autumn or green early in the season.

Consider using focal lengths in the 70-200mm range, and select a part of the landscape that draws your eye. Find lines that guide your image through the frame, not out of it, or look for juxtapositions of color and texture.

#3 – The Grand Scene

4 Tips to Help You Take Better Autumn Photos

I’m going to be honest here. In the fall, when the colors of my home state are going off like fireworks, it is rarely the wide open scenes that draw my eye. However, sometimes the scope and size of the landscape cannot be ignored. It is in those rare moments that I reach for my wide angle lenses.

And yet, my focus often remains close to me. The foreground in the autumn, perhaps even more than other times of the year, is vital. When shooting wide, I will often get low, using my background not as the subject, but as the setting for something bright, flashy and interesting close by.

4 Tips to Help You Take Better Autumn Photos

Use the foreground

I was shooting in late August in Denali National Park. The colors were bright and beautiful, and on one sunny day, the mountains of the Alaska Range, including Denali itself, had emerged from behind the clouds to loom, white and glaciated, over the landscape. It was beautiful, and yet my focus kept falling on the colors in front of me. I didn’t ignore that dramatic backdrop, but I used it as just that, a backdrop.

When shooting wide, don’t forget about the details I noted earlier, nor the patterns of local landscapes. Those two are integral to the wide scene and will help you understand how the elements of the landscape fall together.

4 Tips to Help You Take Better Autumn Photos

I once heard it said that wide-angle landscapes were easy. I disagree entirely, wide angles are the hardest because there is so much space for distraction. Understanding and including compelling foreground subjects, like a splash of fall color will take you a long way toward creating a dynamic wide angle landscape.

Bonus tip – Bring it all together

In a world where most of our images end up on Facebook and Instagram, the art of a photo story is fading. Stand-alone shots get the most attention, the most likes, hearts, or whatever, on social media, but they do a lousy job of telling the whole story. Details, local scenes, and wide landscapes in combination are far superior.

4 Tips to Help You Take Better Autumn Photos

In conclusion, I encourage you to tell the whole story by embracing numerous shots. Use the focal lengths available to you, all of them. Through your lens, explore the fall landscape, and share your autumn photos in the comments section below.

The post 3 Tips to Help You Take Better Autumn Photos by David Shaw appeared first on Digital Photography School.


Digital Photography School

 
Comments Off on 3 Tips to Help You Take Better Autumn Photos

Posted in Photography


Judge determines FAA drone rules take precedence over local regulations

27 Sep

A court has ruled that federal drone laws trump local drone regulations in instances where the two are in conflict, setting a new and very important precedent for commercial and recreational drone pilots alike. The ruling was passed down by US District Judge William G. Young during a legal case involving the city of Newton, Massachusetts, and its drone regulations that are even more restrictive than the FAA’s rules.

According to the Wall Street Journal, the lawsuit was brought by Newton resident Michael Singer, who challenged four Newton provisions including a requirement to get permission before flying a drone over private property. The city had argued that the FAA allows for the local co-regulation of civilian drones, but Judge Young ruled otherwise, in part because the local regulations were sometimes in direct conflict with the FAA’s.

For instance, whereas the FAA allows small drones to be operated below 400ft, the city of Newton’s provisions banned the operation of drones below that altitude if they were over private property. This left pilots only one legal option: get permission from each property owner over whose property the drone would pass. Otherwise you’d either be violating Newton’s laws or the FAA’s regulations.

Referring to this particular law, Judge Young stated, “This thwarts not only the FAA’s objectives, but also those of Congress for the FAA to integrate drones into the national airspace.”

Newton drone provisions that weren’t challenged by the lawsuit have been left in place, and the city has indicated that it may appeal the ruling.

Articles: Digital Photography Review (dpreview.com)

 
Comments Off on Judge determines FAA drone rules take precedence over local regulations

Posted in Uncategorized


Take Your Photography into Hyperdrive with Zoom Blur Photos

26 Sep

Warning: preg_replace(): The /e modifier is no longer supported, use preg_replace_callback instead in /home/forge/content.photojojo.com/content.photojojo.com/wordpress/wp-content/plugins/ozh-better-feed/inc/feed.php on line 134


Photojojo

 
Comments Off on Take Your Photography into Hyperdrive with Zoom Blur Photos

Posted in Equipment


How to Take Better Action Photos of Dogs

24 Sep

If you enjoy photographing your pets, and dogs, in particular, this article will help you take better action photos of dogs. Learn what camera equipment to use, the best settings, and general tips for success.

How to Take Better Action Photos of Dogs

The Camera Body

If you want to take better action photos of dogs, I recommend a camera body with a fast burst rate. From my experience, five frames per second is the minimum. If your camera has a faster frame rate than that, you are going to increase your keeper rate as long as your approach and technique are on point, which we will get to shortly. I personally use Nikon’s D610 and D7000 and have great success with photographing dogs in action.

The Camera Lens

How to Take Better Action Photos of Dogs

I recommend long and fast lenses. I’ve tried to photograph action shots with the 50mm f/1.8, and the Tokina 100mm f/2.8, with very little success. While both of these lenses are incredibly sharp, they are soft wide open and do not focus well on moving subjects.

Longer lenses with fixed apertures generally focus on moving subjects much faster than shorter lenses. They also keep you and your camera gear safer. Think about it. If you have a 45 point Border Collie running full speed right at you, you need to get the photograph and get out of the way quickly.

A longer lens will give you the time you need to move once the dog starts to fill the frame. I personally use the Nikon 300mm f/4 and sometimes I’ll even throw a teleconverter on it for extended reach and cleaner bokeh.

Camera Settings

How to Take Better Action Photos of Dogs

Setting Your Autofocus

I recommend locking your autofocus directly in the center of the frame. When photographing action shots of animals you don’t have time to be moving the focus point around. I also suggest using AF-C (Continuous focus mode, called Servo on Canon), which may also be called autofocus continuous, AF-Continuous. This is the setting I always use when trying to get action shots of dogs.

Set your Camera to Burst Mode

How to Take Better Action Photos of Dogs

Make sure you check your camera drive setting. I know it’s common sense, but make some kind of reminder, though, a checklist you look at before capturing action shots. I’ve been photographing animals for over a decade, and still screw this up sometimes. It wastes time if you don’t have your camera set to burst mode and also wastes the dog’s energy. Dogs can only run for so long and you need every opportunity you can get within that time frame.

Photographing Running Dogs

When I photograph dogs running, I aim to get them looking straight into my camera lens. I want the dog running directly toward me, and I focus on as much eye contact as possible. So to consistently get great photographs of dogs running in this manner, you’re going to need some help.

How to Take Better Action Photos of Dogs

What I do to accomplish this is have the dog owner or an assistant stand fairly far away from me. I will then position myself on my belly, using my camera bag to stabilize the lens. I try and keep my back to the sun when outdoors. This will help me get the shutter speed that I want to photograph the dog running. I shoot for 1/1250th of a second to 1/2000th.

I’ll first take a test shot to make sure my exposure is right. Then I have the assistant throw a tennis ball right at me. I usually tell them to try and hit me with the tennis ball. This sends the dog running full speed, right at me. I will also instruct the assistant to quickly move to the left or right as soon as the ball is thrown. This saves me tons of time later in post-processing by not having to remove them from the background with Photoshop.

Photographing Dogs Catching Frisbees

How to Take Better Action Photos of Dogs

This is a little trickier and complicated to pull off compared to photographing running dogs. The goal is to get the dog in mid-air right before he is about to bite down on the Frisbee. I use pretty much the exact same camera settings and approach that I do for photographing dogs running.

I do change one thing, though, and that’s the camera shooting angle. I like to shoot from the hip. Meaning the camera is around my hip level. I’m not actually shooting from the hip, but kneeling down on one knee. Following the dog chasing the Frisbee, I bump the focus until the dog is close to the target. Then holding down the shutter button, I burst out some shots until the buffer gets filled.

Photographing Dogs Jumping

How to Take Better Action Photos of Dogs

This is simpler than capturing the two types of dog action shots mentioned previously. It definitely requires an assistant to pull off consistently, though. You also don’t need a lens as fast or long to photograph docs jumping compared to the other types of action shots. Although, I prefer using long lens simply because it makes a smoother, more out of focus background.

Here’s how to do it. Position yourself so the dog is in only one-third of the camera frame or less. Check your exposure. Have an assistant hold up a toy, a tree branch, or whatever the dog is interested in enough to jump up and grab. Have the assistant hold it up high, with their arm extended as long as they can. This is incredibly helpful when it comes to post-processing.

Look out for the Safety of the Dog

How to Take Better Action Photos of Dogs

You can photograph a dog all day just lying around and looking cute. When dogs are running and chasing Frisbees, they get tired. If you are doing a pet photography session and want action shots, this is going to happen incredibly fast.

The dog owners don’t always prepare for it, but I’ve done this many times, and I always prepare. I keep several bottles of water on me, along with a collapsible drinking bowl. If the dog is panting heavily, give them a rest. If they drink a 16-ounce bottle of water in less than a minute, you may want to wait a while before attempting more action shots.

Some factors that you need to consider when shooting action shots are how hot it is, the dog’s age, and the breed. Certain dog breeds handle heat better than others. This is also true for exercise needs. If you are a professional pet photographer, you should be well aware of what the dog’s exercise needs are as well as how well they handle the heat.

Conclusion

So I hope that you find these tips helpful for taking better action photos of your dogs, or those of your clients. Any action photography takes some practice so keep at it and you’ll start to have more keepers over time. Please share your dog action photos in the comments below, we’d love to see them.

The post How to Take Better Action Photos of Dogs by Dave Spates appeared first on Digital Photography School.


Digital Photography School

 
Comments Off on How to Take Better Action Photos of Dogs

Posted in Photography


5 Non-Gear Related Ways to Improve Your Work and Take Better Photos

19 Sep

I have lost track of the number of times I have heard complete strangers compliment me on having a great fancy camera that takes “great pictures”. Initially, I used to be quick to the defense and try and get a word in on how I am a professional photographer and hence have some level of skill in my craft. But now I just nod, smile and quickly move away. Unfortunately, the reality is that a lot of photographers (and others) think that by having the latest and greatest fancy camera, they have the ability to take better photos.

The truth of the matter is that you don’t need the latest equipment or fancy qualifications to be a good photographer. Photography is a creative art form and like any art form, it takes a lot of hard work, practice, and perseverance to get really good at taking great pictures. Sure, you need to really understand your gear and what it can and cannot do. But there are loads of simple, non-technical stuff you can do to improve your photography as well.

Here are some non-gear related tips that will help you take better photographs.

#1 Take your camera everywhere

You never know what might be around the corner, be it close to home or on your far away travels. Life is unpredictable and things change in a split second. There’s always something interesting to photograph. You just need to open your eyes, look around and be ready to snap that shot. And additionally, make sure your phone or camera of choice is within easy reach ready for that shot.

5 Simple Non-Gear Related Ways to Improve Your Work and Take Better Photos

Cows hitching a ride inside trucks is quite a sight especially on narrow streets in India!

5 Simple Non-Gear Related Ways to Improve Your Work and Take Better Photos

These migrating pelicans found the most electric resting places…hopefully, they got re-charged for their next flight.

#2 Take pictures every day

Overnight success is a myth. The sooner you realize that the more at peace you will have on your photographic journey. We all know that to get really good at anything, we need to practice and practice a lot. After all, practice makes perfect. The more pictures you take, the better you will become.

Don’t get hung up on what you’re using to take the pictures, either. Many times I only have my iPhone with me and take a shot if it catches my eye. Be confident that if done correctly, you can make good pictures with any camera.

5 Simple Non-Gear Related Ways to Improve Your Work and Take Better Photos

Cupcakes and coffee = great food editorials shots.

5 Simple Non-Gear Related Ways to Improve Your Work and Take Better Photos

Other times it is just a bowl of fresh fruit that can spark an inspiring photo. Don’t get hung up on the perfect scenery – let your imagination be your guide for your everyday shots.

#3 Analyze other photographs

Seek inspiration in other photos. Look at pictures you like and ask yourself what you like about those pictures. What makes it interesting to you and why? Also question how you could make it better or do it differently.

Don’t be afraid to try something similar and put your own creative spin on it. Take an old idea and make it your own. That makes it different, new and in turn, you just might make it better than the original.

5 Simple Non-Gear Related Ways to Improve Your Work and Take Better Photos

A recent obsession in the study of effectively capturing movement in photographs led to a multi-exposure frame – one of my personal favorites to showcase my creative journey.

#4 Study your images

Become your own best critic. Question everything. Look at your pictures and ask yourself what you like and what you don’t like. Be completely honest with yourself as this will really help you improve your craft. Sometimes it is also beneficial to repeat the shot and change it up to make it better than your own original.

And when something works, celebrate your success. It is very important in your creative journey to celebrate your own milestones – it makes the journey that much more fun.

5 Simple Non-Gear Related Ways to Improve Your Work and Take Better Photos

This is the view from my home in Bombay and I love photographing the sea bridge – one of the technological marvels of the modern world – at different times of the day and in different weather conditions. It is amazing to analyze how light and color changes the whole perspective of an image.

5 Simple Non-Gear Related Ways to Improve Your Work and Take Better Photos

Of course, night shots have their own charm. Next time I shall remember to take my tripod along for some car trails!

#5 Stop, look and then click

Most of today’s fancy cameras have a continuous shooting mode where you can fire away at six to eight frames per second. But I find that this tends to make us lazy as photographers. We take on the mentality of the “spray and pray” theory that if we take 20 shots of something, chances are at least a couple will be worthwhile.

Yes, taking loads of pictures is great. But if you pause and take a few seconds to really observe your surroundings, you will be able to visualize your shot. Think about how you want your picture to look and do what you need to do to achieve that look. It might mean moving position, waiting for the light to change or the crowds to dissipate, but it could be the difference between a good photo and a great one.

5 Simple Non-Gear Related Ways to Improve Your Work and Take Better Photos

We were walking along the narrow street of Vridhavan in India and this cow was ahead of us. We just stopped to see what he was doing and also to give him a wide berth as he was a very big bull. He calmly walked into this abandoned house and just made himself at home. It’s not every day that you find cows lounging inside your house.

Conclusion

I hope these simple yet powerful tips help you take better photos and improve at your skill and craft. Remember it is not the camera that takes a great picture but the skill of the person behind the camera that gets the money shot.

The post 5 Non-Gear Related Ways to Improve Your Work and Take Better Photos by Karthika Gupta appeared first on Digital Photography School.


Digital Photography School

 
Comments Off on 5 Non-Gear Related Ways to Improve Your Work and Take Better Photos

Posted in Photography


Video: Man slammed by Hurricane Irma wave while trying to take photos

12 Sep

If you’re a professional, and you’re properly prepared for the assignment, there’s nothing inherently wrong with taking pictures during a hurricane. If, on the other hand, you’re just an amateur wanting to get some ‘cool’ smartphone shots of nature’s fury, you might end up like this guy.

The video above was captured by Google’s webcam from the southernmost point in the United States in Key West, Florida. As you can see, a man was walking around trying to capture a photo of Hurricane Irma as it rolled into the Keys, when mother nature decided to remind him who’s boss. A stray wave comes in and wipes him out, blowing him straight off the ledge he was standing on.

Fortunately, he seems to walk away unscathed, if a bit shaken up by the whole experience.

Articles: Digital Photography Review (dpreview.com)

 
Comments Off on Video: Man slammed by Hurricane Irma wave while trying to take photos

Posted in Uncategorized


How to take out view attachment as pdf on evernote

02 Sep

But if you’re also uploading images, i’m not sure what you mean about books and movies. You can capture, there are dozens of clipper apps and windows Snipping Tool is fantastic! You can do that, I have no idea how good is Onenote for Windows and Android users. There are infinite uses for the Evernote […]
BooksChantcdCom

 
Comments Off on How to take out view attachment as pdf on evernote

Posted in Equipment


10 Things You Can Learn from the Pros to Help You Take Better Photos

28 Aug

As a photographer, there are so many things that you learn and do on a regular basis. Creating habits in your craft is a good approach to making it become second nature. Here are a few things that most professionals do that you can incorporate into your workflow to help you take better photos.

10 Things You Can Learn from Professional Photographers to Help You Take Better Photos

1. Blink Blink

Pros use the highlight overexposure alert. If you have this turned on in your camera, you will no doubt understand one of its more common name, “blinkies”. When this feature is turned on, it gives a preview of your image with blown out highlights slowly blinking black and white, as a warning.

Blinkies (or blown out highlights) are not always wrong, but if it is in an area you want to show detail, then this information will be useful. You can then correct the exposure as necessary and review the image again.

10 Things You Can Learn from the Pros to Help You Take Better Photos

The highlight alert (circled) blinks to show an overexposed/blown out sky.

2. Focus Focus

Knowing how to quickly move your focus point where you want it is a definite plus. On the opposite side of that is locking focus, which is another great skill to have. Both tell your camera exactly where you want to focus. Moving your focus point helps you place it exactly where you want while locking your focus enables you to grab your focus point, lock it in and recompose your image.

Knowing when to use both of these can also help you get more creative, so practice.

3. Know when to use spot metering

The in-camera light meter helps you determine how to adjust your exposure settings by measuring the brightness of the scene. The default metering mode in your camera is most likely set to Matrix mode (also called Evaluative or Pattern metering).

Evaluative metering works well in most situations but pros know that there are times when they need to switch. Spot metering evaluates only the light around your focal point and calculates exposure based on just that area. Some examples of when a pro would use spot metering include; photographing the moon, someone on a stage, or any scene with a lot of contrast.

10 Things You Can Learn from the Pros to Help You Take Better Photos

Evaluative Metering versus Spot Metering.

A good way to learn when Spot metering is the right choice is by switching to it from time to time and looking at your results.

4. Use Live View to set White Balance

A handy little trick is using the LCD monitor at the back of the camera to set your White Balance (WB). This way you get a real time preview of what your final shot will look like comparatively. This is especially handy if you are shooting jpeg and don’t have the luxury of changing the White Balance after the fact.

5. Good Memory

Simple enough is to walk with extra memory cards. A trick that you can only get from experience though is not cramming too much on any one card. If you are shooting for any paying client, split your shots into several cards because believe it or not, cards can fail on you. If your shots are spread out, you may still have enough images to salvage a shoot.

Bonus memory card tip: Invest in good card recovery software. If you take your card out and for some reason are not seeing the images on your computer, do not put it back in and shoot. Good recovery software has saved many a pro.

6. Bracket

Bracketing in short, is taking several shots of a subject using different exposure levels. It is one of the easier ways to produce images with a high dynamic range. Pros also use bracketing when they unsure about exposure or dealing with tricky lighting.

10 Things You Can Learn from the Pros to Help You Take Better Photos

Bracket images to reveal more dynamic range.

7. Sharpness – Check

By now you may have realized that everything looks sharp on a 3” screen – only to open it up on your computer and see that it is blurry. You could save yourself some heartache by zooming in and checking the image sharpness while you’re still in the field as the pros do.

8. Extra Batteries

When packing your gear, always make room for extra camera batteries. This seems obvious enough, but of note is that if you are shooting in cold weather you may even need to supplement that. Batteries are the one part of your camera that is affected the most by cold weather. A drop in temperature causes your battery to deplete faster and thus not last as long. Keep this in mind the next time you are outdoors targeting golden hour into twilight time.

10 Things You Can Learn from the Pros to Help You Take Better Photos

Pack extra batteries when shooting in the cold.

9. Use a lens hood

The main reason to use a lens hood is to prevent side light from hitting the front of the lens. A lens hood thus reduces or eliminates lens flare that can occur when shooting outdoors during daylight hours.

But, most pros keep their lens hood on even when shooting indoors for more than just blocking light. They use it as protection against scratches, cracks, fingerprints and even some impact. It’s a good habit to use a lens hood.

10. Beep Beep Beep

Backup your images. Pros will tell you that this is at the top of their list. One recommended backup strategy is twice before formatting your memory cards – once to your computer and make a secondary copy to an external drive. If you are even more paranoid, it does not hurt to back up while out in the field. There are a number of portable drives available where you can copy your cards over without a computer.

10 Things You Can Learn from the Pros to Help You Take Better Photos

Backup your images to save yourself some heartache.

Conclusion

Those were just a few of the many things you can keep in mind and add to your own routine. What are some of the things that you would suggest to help newbies take better photos? Share in the comments section below.

The post 10 Things You Can Learn from the Pros to Help You Take Better Photos by Nisha Ramroop appeared first on Digital Photography School.


Digital Photography School

 
Comments Off on 10 Things You Can Learn from the Pros to Help You Take Better Photos

Posted in Photography


Happier Campers: Take Your Gear to a New Level With These 15 Innovations

16 Aug

[ By SA Rogers in Destinations & Sights & Travel. ]

Elevate your camping style with the latest high-performance gear like twig-burning stoves, tree tents, bear-proof coolers and portable loungers. These major upgrades will keep you dry, warm, fed and comfortable no matter how rugged your destination, even when you’re traveling on foot instead of in a DIY RV, fancy pop-up car tent or luxuriously equipped off-road trailer.

Biolite Basecamp Stove

By now, you’ve probably seen the cool BioLite, a compact portable stove that burns twigs and then uses the heat as energy to power your gadgets (if not, you should check it out!) Now, the company is taking things up a notch with the BaseCamp, a portable grill that runs on larger pieces of wood. Smaller pieces of firewood or fallen branches both can be placed in the stove’s opening to cook your food – even in camping locations that don’t allow campfires – and an orange power pack on the side collects the energy. The BaseCamp also features a built-in light.

Scrubba Portable Laundry Wash Bag

Prefer not to tote dirty laundry around on an extended camping trip, or want to freshen up your favorite hoodie halfway through? The Scrubba is a brilliantly simple way to wash textiles. Its interior is lined with little nubs that scrub your garments as you massage the exterior of the bag for a machine-quality wash in three minutes. That’s more effective than using a bucket, and you never even have to get your hands dirty. The bag weighs just 5 ounces and doubles as a dry bag.

Tentsile Tree Tent

Marketing itself as a ‘portable tree house,’ the Tentstile tree tent lets you sleep high above the ground (how high is up to you!) by attaching to three nearby tree trunks. Stack them on top of each other to create temporary treehouse cities with your friends, or hang hammocks underneath them for an extra dry sleeping space. The number of people you can sleep using these systems is only as limited as the tree trunks around you.

Yeti Hopper Cooler

Dubbed ‘the world’s toughest cooler,’ the Yeti has become a household name for its durability and dependability. The hard-sided Yetis keep food and ice colder for longer than any other cooler on the market, and now the company is offering soft-sided versions, too, like the Hopper and the Hopper Flip. Each one is waterproof, including the Hydrolok zipper, and can withstand a bear mauling.

Sea to Summit Tarp Poncho

Heading into rainy territory? Keep your gear – and yourself – dry with the Sea to Summit Ultra-Sil Nano Tarp Poncho. Made of lightweight waterproof fabric, it’s big enough to accommodate your pack while you’re hiking, and then converts from a wearable into an ultralight 2-person shelter.

Next Page – Click Below to Read More:
Happier Campers Take Your Gear To A New Level With These 15 Innovations

Share on Facebook


[ By SA Rogers in Destinations & Sights & Travel. ]

[ WebUrbanist | Archives | Galleries | Privacy | TOS ]


WebUrbanist

 
Comments Off on Happier Campers: Take Your Gear to a New Level With These 15 Innovations

Posted in Creativity