RSS
 

Posts Tagged ‘Take’

Take Your Snapchat Game to the Next Level

06 Aug

Snapchat! That app that has everyone saying either, ‘duh!’ or ‘huh?’

For the huh?-ers, Snapchat’s a photo/video messaging app where you can view a Snap for 10 seconds before poof! It’s gone.

For the duh!-ers: you know Snaps can be outstanding photographic art, right? Right!

So read on to learn tricks for creative “snapsterpieces” that are guaranteed to have all of your friends talking.

(…)
Read the rest of Take Your Snapchat
Game to the Next Level (392 words)


© Taylor for Photojojo, 2015. |
Permalink |
No comment |
Add to
Game to the Next Level”>del.icio.us

Post tags:


Photojojo

 
Comments Off on Take Your Snapchat Game to the Next Level

Posted in Equipment


Take Photos, for Science!

05 Aug

You’re usually out snapping away at flora and fauna, so why not use those photos to help document our world?

Add your nature shots to iNaturalist and help increase the already huge online database of plants, furry creatures and creepy crawlies.

Upload your photo, tag the location and name the organism if you can. No worries if you don’t know the name, iNaturalist is teeming with people eager to help classify.

It’s a cool way to connect with other nature-lovers, learn about the life around you and add your talent to scientific research!

Photo by RJAdams55


© Erin for Photojojo, 2015. |
Permalink |
No comment |
Add to
del.icio.us

Post tags:


Photojojo

 
Comments Off on Take Photos, for Science!

Posted in Equipment


How to Take Great Photographs at the Fairground

02 Jul

Packed with people, bright lights and fast-moving rides, fairgrounds can provide photographers with loads of opportunities to take some colourful and creative images. So, why not grab your camera, head to your nearest fair and try out some of the following ideas for yourself.

Somethingwicked750

When to visit

Fairgrounds can be fun to take pictures of, whether you go in the daytime, or at night. However, with their bright lights, they really come alive once the sun has gone down. My preferred time to arrive is around one hour before sunset, as this allows you to take a look around before it gets dark, and gives you time to plan your shots.

Arriving at this time will also enable you to shoot during the crossover period – the part of the evening where the sun has set, but there is still light and colour in the sky. The deep, dark blue sky provides a striking contrast to the bright, colourful lights and can often look better in photographs than a fully black night sky. In my opinion, this is the optimum time to capture fairgrounds in all their vibrant glory.

What to take with you

Whatever lens you choose to take, there should be some great photo opportunities awaiting you. However, if possible, take a variety of lenses to expand the range of shots you can take. A wide-angle will be useful for capturing the action of fairground rides and a telephoto will enable you to crop closer into details, or people on the rides. The accompanying shots were taken using 24-105mm and 70-200mm lenses. When visiting the fair with friends and family, I have also found it useful to take a 50mm (f/1.8) lens so that I cAN take some pictures of them enjoying themselves.

If you’re planning to capture the fairground rides after sunset you are going to need a tripod due to the slow shutter speeds that you will be using. A remote shutter release will also come in very useful to reduce the risk of blurred images from camera shake.

Photographing fairground rides

Tango750

The most dynamic and exciting photographs of fairground rides aim to convey a sense of speed and movement. Slow shutter speeds are used to capture the colourful trails and patterns created by the fast-moving lights. They’re fun to take, and you can get some dramatic shots relatively easily.

Once you have decided which ride to shoot, fix your camera to your tripod and fit a remote release. (Remember to turn off Image stabilization if your lens has this.) Shutter speed is the most important aspect of getting the correct exposure in this instance, so set your camera to shutter-priority or manual mode. The amount of movement you capture in the image will vary on a number of factors, not least the speed of the ride itself, but a good place to start is with a shutter speed of one second.

Set the ISO to the lowest setting available and the white-balance to Auto, as this should be effective in most situations. (For long-exposure shots such as these, I would recommend shooting in RAW so that you will be able to change the white balance settings during post-processing if necessary.) Autofocus may struggle in low-level light, so manually focus on a part of the ride when it is not moving.

Take a test shot using these settings while the ride is stationary to check the exposure. Pay particular attention to the sky and, if necessary, use exposure compensation. Then, as the ride begins to move, play around with the shutter speed to see what works best. Anything longer than ½ second should produce a decent amount of motion blur and light trails, the effect does depend on the speed of the ride. Keeping the shutter open for a longer time means that you can capture more light trails and patterns – although sometimes this can result in images with messier light trails and a lack of clear, distinct shapes. Ultimately, your choice of shutter speed will depend on the nature of the ride (how fast and how much it moves – vertically, horizontally, diagonally etc.) and your creativity (personal preferences between clean light trails or chaotic swirls of colour).

When composing your shot, give some thought to the angle you are taking it from. Try to get in close and shoot from a low angle, looking up at the ride to minimize distracting backgrounds, but always stay a safe distance from moving rides. Remember to leave enough space in the frame to capture all of the movement so that you don’t inadvertently cut anything off. Spend some time watching how the ride moves before taking a shot. Also, with all the movement going on, try to include a still element in the frame to help ground the image. Signage, fairground stalls, or even (non-moving) spectators can add to the story you are telling in your final image.

Photographing people at fairgrounds

Fairgroundportrait750

Fairgrounds are not just about the rides. By providing great lighting and a fun-filled atmosphere, they’re the ideal place to try out some candid photography. Candid shots of people engaging in activities around the fair will be more interesting than shots of people sitting around doing nothing and often will add an element of story to your image. Also, by being focussed on the activity, your subject is less likely to focus on you taking their photograph. This can produce better candid shots because as soon as a person knows they are being photographed, their natural behaviour tends to disappear quite quickly. Why not take advantage of all the activities on offer at the fair, and try to capture people’s reactions to the action – whether that is trying to win a prize on a fairground stall, eating one of the many sugar-based treats on offer, or even waiting in line for a ride.

When taking candid pictures, set your camera to continuous shooting mode and take a number of shots in quick succession to stand a better chance of perfectly capturing the reaction you want from your subject. Use a wide aperture to let in lots of light. It may also be necessary for you to increase the ISO setting to get the correct exposure. A telephoto lens with a focal length of around 200mm should enable you to capture the (often extreme) reactions of people on fairground rides for some particularly dramatic candid shots.

The lighting at fairgrounds can also be great for illuminating people for some posed shots. Colourful lights can produce great background bokeh for fun portrait shots of friends and family. Simply put, bokeh is created by out-of-focus light so you will need a shallow depth of field. Using a very wide aperture will help, but you will also need to think about the distance between the subject and the light sources (the further away the better) and the distance between the subject and your camera (stand close to the subject and use a reasonably long focal length). There is often enough light available from other sources to fully illuminate the subject, but a flash with a diffuser may also come in handy.

Get creative

Superbowlzoom750

One of the best reasons to take pictures at fairgrounds is that they’re a great place to get really creative as a photographer and experiment with a range of techniques. You can add movement and drama to your images, even when the rides are not moving. For instance, try to create a zoom burst effect in-camera. Use the slow shutter speed settings detailed previously, then manually change the zoom on the lens, while the shutter is open. Experiment with different shutter speeds and staggered zooms; you may be surprised at how the effect changes. For even wilder shots, try the zoom effect on a ride that is moving – to illustrate the type of effects you can achieve, the two shots below show the same moving fairground ride with the zoom burst technique applied to the second image.

Steamup452750

Steamup45zoomburst750

A good way to add an increased sense of speed to a slower ride, such as the dodgem cars or carousel, is to take a panning shot by moving your camera in line with the moving subject during exposure. The aim is to keep the subject (carousel horse) as sharp as possible and the background as blurry as possible. Shoot in shutter-priority mode and select a speed of 1/30th of a second to start. You can then experiment with slower speeds depending on the level of light and the speed of the subject. Make sure to shoot in continuous shooting mode and, if your camera has it, use automatic focus tracking. Press the shutter half way to activate the focus tracking when the subject enters the frame. Lock focus on the subject and, as smoothly as possible, pan your camera to match the movement of the subject and take your shots.

Funfairhorsepanning750

Finally, when leaving the fair, try to capture the fairground lights as part of a wider landscape shot if possible. If the fair is anywhere near water (on a seaside pier, for example) look out for the creative potential of reflected fairground lights.

Have fun!

When taking pictures at the fairground, like at any other busy event, stay safe, keep an eye on your kit and remember to have some fun while you are there!

Geesespectators750

googletag.cmd.push(function() {
tablet_slots.push( googletag.defineSlot( “/1005424/_dPSv4_tab-all-article-bottom_(300×250)”, [300, 250], “pb-ad-78623” ).addService( googletag.pubads() ) ); } );

googletag.cmd.push(function() {
mobile_slots.push( googletag.defineSlot( “/1005424/_dPSv4_mob-all-article-bottom_(300×250)”, [300, 250], “pb-ad-78158” ).addService( googletag.pubads() ) ); } );

The post How to Take Great Photographs at the Fairground by Richard Beech appeared first on Digital Photography School.


Digital Photography School

 
Comments Off on How to Take Great Photographs at the Fairground

Posted in Photography


Take this Picture of the Day Project to Practice and Help You Grow as a Photographer

26 Jun
Sunset

Sunset on Long Beach Island (NJ)

I watched the future football Hall of Fame quarterbacks practicing on the sidelines just before the Super Bowl. Although they had thrown the football perhaps millions of times before, they were practicing their throwing before the big game. They believe in the old (but true) saying, “Practice makes perfect.”

It’s important for us as photographers to continually practice our skills as well. Although we may have pressed the shutter button a million times, we need to be sure that we are always “ready for the big game”. Like the Super Bowl quarterbacks, it is important that we keep practicing our skills; whether we are professionals, aspiring professionals, or enthusiasts.

Why Practice?

Old Barney

Old Barney lighthouse in Barnegat Light, NJ

Although practice does not make perfect (we can practice doing things the wrong way), it does make our techniques more natural, and more permanent. For example, using back-button focus on my camera the first time seemed strange to me, but after practicing it over and over, it become an automatic technique that I use without even thinking about it. It’s a challenge to try turning off your brightly lit LED display on your camera once the theatre is darkened, but with practice it’s an automatic, and easy process.

Practice not only gives us a chance to make our shooting techniques more automatic, it gives us a chance to try new techniques. Practice gives us an opportunity to learn new poses, try a new lenses, or try a new post-processing technique to enhance our photographs before we use them in a client shoot. As a photographer, learning never stops; practice is a good way to try out things with no pressure or fear of failure.

Maybe I’ll Practice Tomorrow

Unless we are full time photographers or we have the luxury of having the time to shoot whenever we want, finding time to practice can be a challenge. Life is busy; there are so many things that need to be done that we are sometimes tempted to say, “Maybe I’ll practice tomorrow.” Sometime we need motivation to force us to make the effort, despite other things that may get in the way, to practice our photography techniques.

Picture of the Day

Clyde

If someone asked me what the biggest thing was that has helped me to improve my photography skills, I would have to say that it was my commitment to what I call the Picture of the Day. A little more than a year ago I started trading photographs that I took with my sister who is a photography enthusiast. Very quickly that practice spread to other family members and friends. Today, I send a new photograph to more than a hundred people every morning. The list continues to grow. But it’s not the number of people that receive the Picture of the Day that is the motivator, it’s the commitment to taking, and sending the picture, that benefits me as a photographer.

Even though my photography business focuses mainly on people (weddings, portraits and events); my Picture of the Day photos may include people, animals, architecture and landscapes. People that receive my Picture of the Day have commented that opening my morning email is like opening a box of chocolates because “you never know what you’re going to get”. Sometimes my pictures are not meant to be works of art, but rather just funny, like the shot of my dog Clyde (above), sitting by the dinner table with his sunglasses on, waiting for dinner. The zoo is always a great place to take pictures, so I make that part of my list of places to shoot.

Jaguar

Jaguar at the Elmwood Park Zoo (Norristown, PA)

Admittedly, I shoot most days, but not every day. I make time during the week to practice shooting; I am committed to take that time despite everything else. I have my camera with me most of the time, and many of my shots are unplanned. I stockpile the shots so that I always have a reserve of pictures to use for my morning emails.

How has the Picture of the Day Helped Me?

My commitment to the Picture of the Day has helped me to grow as a photographer more than anything, including the following:

Kids and Mom

Four month old lion cubs with mom (Philadelphia Zoo)

  • Knowing that I need a new picture every day motivates me to get out and shoot, even if I am not shooting the things that my business is focused on.
  • Knowing that my Picture of the Day needs to be different than all of those that I previously sent out, motivates me to try new techniques and to look at things more creatively. That has helped me to start thinking out-of-the-box and has greatly expanded my composure skills for when I am shooting weddings or portraits for clients.
  • Shooting for the Picture of the Day has given me the opportunity to try and to practice with new lenses and filters, so that when the time comes to use them in a business shoot, I am ready.
  • My Picture of the Day has enabled my business to grow, as people that receive my email every morning are reminded that I am in the photography business. I can’t think of a more effective, less costly marketing tool.
  • Lastly, shooting for my Picture of the Day has been just plain fun!!!

Make the Commitment Today

Nina and Pinta

Nina and Pinta replicas at visit to Viking Village (Barnegat Light, NJ)

If you are not just a picture snapper, but rather, serious about photography – make the commitment to start your own Picture of the Day project today. Like mine, it can start small and grow over time (I had only one person on my list initially.) I sometimes post my Picture of the Day on my personal Facebook page which adds more visibility to my work. This visibility also adds to my list of people that subscribe to my Picture of the Day.

How do you practice your photography?

googletag.cmd.push(function() {
tablet_slots.push( googletag.defineSlot( “/1005424/_dPSv4_tab-all-article-bottom_(300×250)”, [300, 250], “pb-ad-78623” ).addService( googletag.pubads() ) ); } );

googletag.cmd.push(function() {
mobile_slots.push( googletag.defineSlot( “/1005424/_dPSv4_mob-all-article-bottom_(300×250)”, [300, 250], “pb-ad-78158” ).addService( googletag.pubads() ) ); } );

The post Take this Picture of the Day Project to Practice and Help You Grow as a Photographer by Frank Slezak appeared first on Digital Photography School.


Digital Photography School

 
Comments Off on Take this Picture of the Day Project to Practice and Help You Grow as a Photographer

Posted in Photography


5 Tips to Take Less Photos of Everything and Take More Photos That Mean Something

22 Jun

How many photos do you have from a recent holiday, that you just haven’t had time to organize? Or, have you come back from a dream vacation and your photos just don’t seem to match up with your memories? You are not alone, as this is an all too common issue, and both of these questions have their roots in a simple and easy to fix problem.

Take fewer photos, not more!

001A resized2

I mean this literally, but also figuratively. Yes, overall take fewer photos. But, in reality this is a lesson in becoming more conscious of your photography. What is the point of the photo? Why are you clicking the shutter at that moment?

You may have heard many times, that in the era of digital cameras, you can shoot your heart’s desire (a.k.a. until your SD or CF card is full), unlike with film which needed to be developed and only had a limited number of photos on each roll. While that is true, it is not true that more photos equals better photos. Well, you may have also heard that professional photographers shoot hundreds, or thousands, of photos just to get one or several good ones. That is also true, but they are first and foremost shooting with a purpose. Literally shooting less will allow you to discover your point of view, and thus figuratively you will shoot less of everything, and more of something.

Here are five tips on how to take less quantity of photos but more compelling ones

Tell more stories

The story could be your personal story or could be of something else, but most important is that you communicate with your photos. If you are always shooting, you cannot create; you simply react. Creating a balance between creating and reacting will give you storytelling abilities. Be proactive by finding a place with good leading lines and waiting, not by rushing and hoping that one of your clicks is a keeper. Think about a beginning, middle, and an end. This can be easily depicted with shots at different focal lengths like a wide-angle (image above), a close-up (below), and finally a full-frame scene. The process of storytelling is something we have all grown up with – get back to it. Remember, the more simple the story, the more universal it can be.

001B resized2

Close-up gives direction.

001C resized2

Full-frame concludes the events.

Give yourself some time to write (in a travelogue or in a diary)

This gives you an opportunity to reflect, which gives meaning and helps you find purpose. Looking at your own writing helps you realize your patterns day by day, or travel experience by travel experience. Identifying structure will help you select moments and behaviours that lend themselves to your style of photography. You may see yourself getting up late despite your desire to have better golden hour photos, or that you feel more creative in the afternoon so you can set aside time to create your photographic stories when others are resting. You will also love reading what you write in 10 years!

Curb your fleeting feeling

Time is limited and you might just miss the moment. For a photographer, this manifests itself in too many photos, and too little purpose. The reality is you are always going to miss something, you can’t be in two places at the same time, and you definitely can’t turn back the clock. But that doesn’t mean that you must give in to the fleeting feeling. Let the event occur, or the scene develop, and visualize what you want from it. Be selective about your vision and then get it, not all of it. Three meaningful photos outweigh thirty so-so snapshots. You have worked hard for your days off and money saved for leisure; enjoy it and enjoy being productive with your photography.

Create a concept and stick to it. Resist pulling out your camera immediately.

This can be an exercise in patience and restraint. Buildings are not going anywhere, rivers will stay their course, and the coffee shop will always have another interesting customer. Find your concept in a developing scene, whether it is the arches of a building, reflections of the water, or a pair of hearty hands sipping a hot beverage. Know that your vision is attainable. Your concept can be simple or complicated, modern or traditional, but only needs to be defined and pursued by you. Just do it with conviction and don’t measure your concept against others. Go for it!

002A resized2

Creating a concept.

002B resized2

Slight variation of shooting through a window and making it B&W.

002C resized2

Going back to the concept and color to provide continuity.

Philosophically you will never find what you are looking for…

There is an old Chinese proverb that says, “If it will happen, it will no matter your actions; if it will not happen, it will not no matter what you do.”. There are many circumstances which seem to be too peculiar to be a coincidence, and as a photographer these are the moments of pure brilliance. Be present for them; don’t chase after them. There is a whole world of events that are unfolding in front of us at each moment. Your awareness of them is subject to your willingness to be aware of them, not the existence of them.

Photography and traveling have always gone hand in hand. Both have ways of opening up new horizons and being in touch with new possibilities. Both are essential. Spend some time with an ethos of travel, a perspective of photography, and a philosophy of life – and watch your photos tell a story that speaks to the hearts and minds of more than just a few close friends. Instead of having photos sitting unedited, unorganized, and undiscovered; take less photos of everything and take more photos of something. Create a convergence between your photos and your ideas. Less really is more, especially when a photo is worth a thousand words.

googletag.cmd.push(function() {
tablet_slots.push( googletag.defineSlot( “/1005424/_dPSv4_tab-all-article-bottom_(300×250)”, [300, 250], “pb-ad-78623” ).addService( googletag.pubads() ) ); } );

googletag.cmd.push(function() {
mobile_slots.push( googletag.defineSlot( “/1005424/_dPSv4_mob-all-article-bottom_(300×250)”, [300, 250], “pb-ad-78158” ).addService( googletag.pubads() ) ); } );

The post 5 Tips to Take Less Photos of Everything and Take More Photos That Mean Something by Branson Quenzer appeared first on Digital Photography School.


Digital Photography School

 
Comments Off on 5 Tips to Take Less Photos of Everything and Take More Photos That Mean Something

Posted in Photography


Vertical Cities: 12 Towers Take Urban Density to the Skies

18 Jun

[ By Steph in Architecture & Cities & Urbanism. ]

vertical cities singapore futuristic

Taking advantage of virtually endless vertical space within urban centers, entire cities-within-cities could spring up into the skies, packing in thousands of new housing units as well as parks, recreational space, offices, shops and everything else you’d expect to find on a typical block. These 12 residential skyscraper designs build up instead of out, often using staggered or stepped arrangements of stacked modules to maintain air circulation, access to daylight, and views. Rather than creating closed class-based communities, most make their communal spaces open to the public, and reserve the ground level for greenery.

High-Rise High-Density Tropical Living in Singapore
vertical cities singapore futuristic 2

How do you pack 100,000 people into a square kilometer without sacrificing quality of life? WOHA’s entry into a competition to design a vertical city for Singapore devised a greenery-laden ‘lattice city’ made of staggered modules. This porous arrangement ensures that all levels get plenty of fresh air and daylight, free up the ground level for nature reserves and heavy industry, and weave social spaces throughout. The plan was created to be walkable, but large elevators and people movers can zip inhabitants vertically and horizontally as needed.

Stacked Modules in Vancouver

vertical cities geometric extruded 1

vertical cities geometric extruded

vertical cities geometric extruded 3

Conceived for Vancouver, this design by Ole Scheeren is made up of stacked rectilinear modules that poke out of the main tower at various angles, projecting the living spaces outward to mimic the spacious feel of living on the ground and create cantilevered terraces. The aim is to reconnect architecture with the natural and civic environment, encouraging social interaction between inhabitants.

Vertical Village in Singapore by OMA

vertical cities singapore village

vertical cities singapore village 2

Condo units that would take up a lot of space if there were all placed on the ground are instead stacked in hexagonal arrangements for The Interlace, a residential project by Ole Scheeren/OMA. 31 individual six-story blocks come together to create a network of both private living spaces and communal areas, with eight large courtyards and various terraced gardens.

Vertical City in Jakarta

vertical cities jakarta

vertical cities jakarta 2

vertical cities jakarta 3

The city of Jakarta in Indonesia is in need of both higher density housing and green space – but designs like these prove that you don’t have to choose. MVRDV has designed a 400-meter-tall tower called Peruri 88 that integrates housing, offices, retail, a luxury hotel, parking, a mosque, an imax theater and more into what is essentially its own city within the city.

Next Page – Click Below to Read More:
Vertical Cities 12 Towers Take Urban Density To The Skies

Share on Facebook


[ By Steph in Architecture & Cities & Urbanism. ]

[ WebUrbanist | Archives | Galleries | Privacy | TOS ]


WebUrbanist

 
Comments Off on Vertical Cities: 12 Towers Take Urban Density to the Skies

Posted in Creativity


Portrait Posing Tips- How to Help People to Relax and Take Better Photos

11 Jun

Editor’s note: this week we will be featuring a series of articles on posing for portraits. Look for a new one each day. If you miss any make sure you subscribe to our newsletter and you’ll get a reminder of all our articles once a week.

One of the trickiest parts of doing a portrait photo shoot has nothing to do with operating your camera, mastering your lenses, controlling the light, or even dealing with uncontrollable weather. Getting your clients to relax, take it easy, and enjoy themselves during your time with them is just as important as making sure you have all the technical aspects of your equipment figured out.

This is often the key to a successful photo shoot, and yet it’s so easy to get caught up in learning about your camera equipment and buying new gear that many people forget to invest time in developing the human element of a photo session. Portrait posing and how to help your subjects relax is key to taking better people photos.

parent-holding-baby

If this aspect of your craft is not managed properly you could easily find yourself in the middle of a photo session where your clients are confused, agitated, bored, or worst of all, frustrated and angry. Every photographer has their own unique style, but generally speaking if you can get your subjects to get comfortable and relax, you can get more of the photos you (and they) are really looking for. It’s a tricky situation to be sure, and every photo shoot is different, but here are three techniques that may be helpful:

1. Get to know your clients beforehand

At its most basic level taking photos for clients is a simple business transaction wherein they pay you money for a service you provide. But it’s really much more than that: people are inviting you to record a point in their lives that they will hold dear for decades to come. When you order a sandwich or cup of coffee it doesn’t matter who you are, what hobbies you enjoy, what professional goals you have, or whether you woke up on the wrong side of the bed that morning. You hand over some cash, get what you ordered, and go about your day. However, taking portraits is almost the polar opposite because everything matters. A good portrait photographer will strive to capture the essence of the people they are working with, and getting to know them first is a key element of making this happen.

family-sitting

On my website I have three simple questions on my Contact page:

  1. Families: What was the best family vacation you ever went on?
  2. Children: If you could have the perfect birthday party, what would it be like?
  3. High School Seniors: If you had $ 1000 to spend, and a week off from school, what would you do?

The answers to these questions help me understand more about my potential clients, but also send a message to them that they mean more to their photographer than just a pay-check. This helps with any pre-session discussions we might have, as well as the photo shoot itself, because the seeds have already been sown for good conversation and a relaxed atmosphere.

I’m a teacher by trade, having taught in K-12 schools as well as at the college level (in addition to six-week classes for other teachers), and one common thread that I have found among people of all ages, is that most of them just want someone who will listen to and take an interest in them. With this foundation laid, classes are always much more productive for me and my students. So it goes for the photographer as well: if you show your clients that you are interested in them as people, you will find them to be much more cooperative as photography subjects. It might take some time to get to know them before you photograph them, but this will pay off handsomely for you and your clients throughout the entire picture-taking experience.

senior-brick-wall

2. Don’t treat the photo shoot like a photo shoot

I did a photo session recently for a bright, intelligent, outgoing young man who simply did not want to have his picture taken. He was nearing the end of his time in high school and his parents wanted to get some nice photographs before graduation, particularly of him in his cap and gown. He would much rather have been at home playing video games or hanging out with friends, but instead was obliged to spend the late afternoon with me taking photos – a prospect that was about as much fun for him as getting a tooth drilled. How on earth can you possibly get someone like this to relax, have fun, and enjoy a photo shoot? Simple: don’t make it about the photos.

One of the first things I said to this student as I hoisted my camera bag to my shoulder was “What video games are you playing right now?” He immediately relaxed and started telling me about one of his current favorites, which then branched into discussion of what his friends were playing, which then led to a dialogue about the recent school year and even his career goals. All the while I was snapping photos, while giving him subtle directions without interrupting the flow of our conversation. I got more good shots than I ever thought I would, and he enjoyed our time together far more than he had anticipated.

This girl was a bit nervous about having her picture taken so instead we just talked about music. I don't know much about the clarinet, but she was more than happy to tell me about it, and in the process gave me plenty of good photo opportunities.

This girl was a bit nervous about having her picture taken so instead we just talked about music. I don’t know much about the clarinet, but she was more than happy to tell me about it, and in the process gave me plenty of good photo opportunities.

This is just one example, but I have seen the same scenario repeat itself over and over: people tend get nervous and self-conscious when getting their photos taken, so if you want them to relax, have fun, and enjoy the photo shoot, try treating it as an hour of just hanging out. They’ll enjoy it much more and you’ll be surprised at the nice results you can get.

3. Build long-term relationships

When you order a pizza or pick up a tool from the hardware store you’re not looking for any type of lasting personal commitment. It’s merely a simple business transaction that serves a functional purpose, whereas photography is quite the opposite. Because you are dealing with people, and not objects, you should not only get to know your clients and seek to build a rapport with them, but find ways to build a professional relationship with them after money and pictures have changed hands. This won’t necessarily improve a current photo session, but it will pave the way for many successful future sessions while also helping to spread the word to the client’s friends, family, and co-workers about your photography services. A few ideas to try include:

Send a real thank you card

Send a thank-you card to the client (not an email, but a physical handwritten card) a few weeks after they receive their photos. Let them know how much you enjoyed working with them and appreciated their business, which is a good way to build a positive professional relationship that will last for years to come, and help make future photo sessions much more relaxed and enjoyable. You can also slip in a discount for a future photo session, which will give them even more incentive to do business with you again. This is especially important if you work with children or families, as you can easily lay the groundwork for many years of photo sessions by letting them know how much you appreciate them and enjoy working with them.

child-bench-book

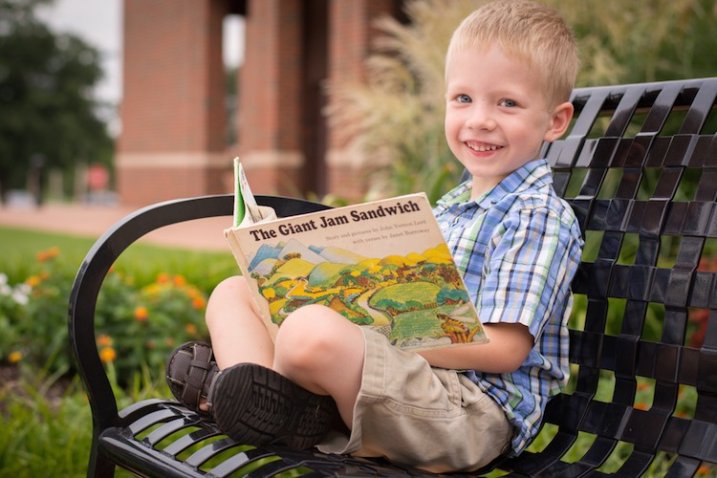
This boy’s parents had such a positive experience on his photo shoot that they asked me to take pictures for their whole family a few months later.

Post about the session on social media

As more clients share their lives online, you can take advantage of the medium to publicly say how much you enjoyed working with a particular client, how good the photos turned out, or how you are already looking forward to a future session. Clients often respond quite positively, and this type of public recognition helps to reaffirm their good opinion of you as a photographer. Note that you will want to get your client’s permission first, and posting about a client on Facebook is not the same as friending a client. I don’t necessarily recommend that, though I know several photographers who do.

Scratch their back, and they’ll scratch yours

Many of your clients (or their parents) are working professionals and would appreciate your patronage as much as you like to have theirs. Remember the father of the cute kid from last week’s session who is a local plumber? Give him a call the next time your sink overflows. What about the upcoming wedding shoot with the couple who owns a local deli? Take your family there the next time you go out to eat. Building these types of professional relationships is a good way to help ensure that future photo sessions are relaxed and comfortable for your clients. They will start to trust you, be at ease around you, take directions from you, and also recommend you to their friends and family. This also sends the message that you are interested in more than just taking pictures, but are an active and supportive member of your local community, which is filled with people who might be looking for a photographer to do their next portrait session!

family-portrait

Getting to know this family, finding out about their interests, and building on experiences from previous photo shoots helped make this session fun and enjoyable for them and much easier for me as a result. The children knew me from their photo session earlier in the year, which not only helped them relax but put the adults at ease too.

These are just three ways to help you get people to relax in your photo sessions, but there are many other ideas as well. What about you? What tips and tricks have you learned over the years to help your clients relax, enjoy themselves, and help you get the best shots you can? Leave your thoughts in the comments below.

googletag.cmd.push(function() {
tablet_slots.push( googletag.defineSlot( “/1005424/_dPSv4_tab-all-article-bottom_(300×250)”, [300, 250], “pb-ad-78623” ).addService( googletag.pubads() ) ); } );

googletag.cmd.push(function() {
mobile_slots.push( googletag.defineSlot( “/1005424/_dPSv4_mob-all-article-bottom_(300×250)”, [300, 250], “pb-ad-78158” ).addService( googletag.pubads() ) ); } );

The post Portrait Posing Tips- How to Help People to Relax and Take Better Photos by Simon Ringsmuth appeared first on Digital Photography School.


Digital Photography School

 
Comments Off on Portrait Posing Tips- How to Help People to Relax and Take Better Photos

Posted in Photography


Take Your Light With You – the Power of Speedlights

10 Jun

Off-camera flash is a huge part of lighting used in photography today. Of course you can’t compare it to studio lighting, but the question is, how close can you get? In this article I will talk about portable lighting, and how to control it with some simple accessories and light modifiers to achieve the big lights look.

As a serious off-camera flash fan, when the Canon 600EX-RT Speedlite was put out on the market, I immediately went out to buy it. I have to say, I love the way it performs and the upgrades it has, compared to its predecessor, the 580EX II. After testing it for a couple of weeks, I started thinking about buying another one so I could take advantage of the built-in radio triggers that are one of the major selling points of these units. But the thing is, they don’t come cheap. After some searching around, I realized that for the price of another Canon 600EX-RT, I could buy two Yongnuo 600EX-RTs plus one ST-E3-RT controller, which are really similar to the Canon units and use the same radio-triggering system. So this is what I ended up with:

01

You can see from the image how similar they look, and the functions and menus are pretty much the same as well. It’s the perfect solution for good equipment on a low budget.

They are a Chinese-made product and I wouldn’t trust them for serious on-camera work as they’re reported to have some overheating and TTL metering problems. But surprisingly, the build quality is much better than I expected, so for the price, I decided to give them a go for off-camera lighting.

You don’t really need three speedlights as a starting point to do off-camera flash. All you need is a simple flash that allows manual power control, a couple of cheap triggers, and you’re in business. This setup is a step forward in the off-camera flash world, as it allows you to control up to five groups of flashes in slave mode, through a master unit in manual or TTL mode.

02

The shooting session you are about to see was my first time trying out this setup, and it was all about getting familiar with the controls and trigger functions, which I found very intuitive and user-friendly. It took place in a high-end car stand with no prior scouting or production. So the idea was to get to the venue and work with what I had; two beautiful models, a great clothing collection, and a few exotic cars.

All the images were made with simple light modifiers like shoot-through umbrellas, softboxes and snoot grids that are simple and fast to assemble, making the job a lot easier if you’re doing it alone. The light stands are the 001B by Manfrotto, which are ultra-compact, and support enough weight to use with speedlights and simple modifiers.

I also carry around some gels for simple colour temperature correction, or for when I want to go crazy with colour and party like it’s the 90s all over again.

03

This image is a good example of how you can achieve a high-end fashion look with this equipment and a simple two-light setup.

04

The ambient light plays an important role in this image and it should always be the starting point. A quick reading with the camera light meter told me that the ambient light was – f/2.8, 1/125th at 100 ISO. So my flash power was set to complement that lighting without overpowering it; a main light with a shoot-through umbrella, and a hair light with a grid.

A lighting ratio of 1:2 is usually a good proportion. The ability to control everything from a master transmitter on top of your camera is priceless, as it allows you to adjust things as you go, without having to constantly move and change settings in the units themselves. This is a great way to keep it simple and effective. When you have control of this basic setup, then you can start to play around with it. Change the light modifiers and add more light sources to fill out different areas in your image. Like the setup used in this second image where the light positioning is similar to the first, but I added a third flash to add a little more light to the background.

05

Besides power and ratio control, the next important thing is to control the direction of your light. One simple way to do that without a modifier is to use the internal zoom control in the flash. In these units it ranges from 20 to 200mm which enables you to control the angle the light is going to reach from a wider to a narrower beam.

You can also use grids, or just make your own snoot or flag with some cardboard, or whatever you have with you that will do the trick. Usually I use black cinefoil which is completely malleable, and allows me to get the shape I want for greater light control.

06

This next image is all about grids, and critical light placement to keep the light focused on the model to allow for a dark background.

07

The trick here is the HSS (high-speed sync) function of these flashes which allows the use of shutter speeds higher than 1/200, freezing fast action movements and blocking the ambient light that would otherwise illuminate some of the background.

The major drawback of off-camera lighting is, of course, the power output these units provide. Even with the powerful guide number of 197′ at ISO 100 and 200mm of the Canon 600EX-RT, which is probably the most powerful on the market in its range, it’s still not enough to compare to a studio strobe.

But that doesn’t mean you can’t cheat. One easy way is to group flashes together and try to squeeze more juice out of them. I use a triple bracket inside a soft box to fake it, and get the look of a more powerful light source.

08

This way you can use different settings on your camera and make the light work your way, giving you more depth of field, for instance.

09

So, how close can you get to studio strobes with off-camera speedlights? Well, pretty darn close if you ask me, as long as you’re able to accept its limitations and just get the most out of it. How do you use your speedlights?

googletag.cmd.push(function() {
tablet_slots.push( googletag.defineSlot( “/1005424/_dPSv4_tab-all-article-bottom_(300×250)”, [300, 250], “pb-ad-78623” ).addService( googletag.pubads() ) ); } );

googletag.cmd.push(function() {
mobile_slots.push( googletag.defineSlot( “/1005424/_dPSv4_mob-all-article-bottom_(300×250)”, [300, 250], “pb-ad-78158” ).addService( googletag.pubads() ) ); } );

The post Take Your Light With You – the Power of Speedlights by Ivo Guimaraes appeared first on Digital Photography School.


Digital Photography School

 
Comments Off on Take Your Light With You – the Power of Speedlights

Posted in Photography


Rotating Condo Tower: Units Take Turns as the Penthouse Suite

28 May

[ By WebUrbanist in Conceptual & Futuristic & Technology. ]

rotating tower design

Spinning structures is not new territory, but shifting units around vertically as well as in horizontal circles is a fresh dimension of novelty with a likewise refreshed sense of purpose – to make housing truly fair for everyone, giving each person some time at (and views from) the top.

rotating tower

future variable unit views

Every since the elevator shifted the top floors from being least to most desirable in cities, real estate prices have reflected the relative values of these spaces. With this alternative arrangement proposed by designer Shin Kuo, each unit would take turns being on top as well as facing each different direction.

future spinning skyscraper condo

A lot of engineering is required to make such a thing work, from detachable infrastructural connections to prescribed times and safety locks for rotation (please keep limbs inside your home!).

Part of what makes the solution so intriguing is that it conceives of architecture like a product of industrial design – something that can be fundamentally improved upon through rethinking even our most basic assumptions.

future residential design diagram

Still, at least one big question remains: given the upfront and ongoing costs of making this whole thing work, who will ultimately be able to live in such a structure, which presents itself with such an egalitarian purpose? It may simply be ahead of its time – if more modular modes of plug-and-play dwelling become the norm, such infrastructure may also come to be more commonplaces (and come down in cost).

Share on Facebook


[ By WebUrbanist in Conceptual & Futuristic & Technology. ]

[ WebUrbanist | Archives | Galleries | Privacy | TOS ]


WebUrbanist

 
Comments Off on Rotating Condo Tower: Units Take Turns as the Penthouse Suite

Posted in Creativity


Flickr Users Unable to Upload Photos All Weekend Long While Flickr Staffers Take the Weekend Off

11 May

Flickr Weekend Upload Problems

Usually I publish photographs to Flickr twice a day, in the morning and in the evening — random batch of 16 photos in the a.m. and in the p.m. This morning I cannot upload a single photo. For the entire weekend I have not been able to batch upload to Flickr at all and have resorted to uploading photos one by one by one with consistent upload failure with each new attempt.

If this were happening at Facebook, it would be the top story on Techmeme — but because it’s just Yahoo and Flickr, it doesn’t get that sort of attention.

It’s not just me that this is happening to. The Flickr Help Forum has been littered with threads all weekend long where users are angry about not being able to upload photos to the site.

Failed to Upload

Cannot Upload Any Photos!
Video upload problems
Consistent upload failures and disconnect errors
Very slow upload speed
Uploadr gives error when attempting to Sign in
UPLOAD Servers speed DOWN to 3 %(max)
Can’t Upload Photos with Mac Yosemite
Upload Problems
Uploading not possible at 2/3 it stops
[BUG] Upload speed
Can’t upload

These are all Flickr discussions in their help forum active over the course of the last 3 hours. If you go back further, you will find that for the entire weekend a large chunk of Flickr users have been able to upload images reliably to Flickr.

Files Not Uploading

While being unable to upload photos to a photo sharing site is a problem, to me the bigger problem is that at a company with Yahoo’s resources not a single Flickr staffer seems to be assigned to review their active and public help forum.

While I get that Flickr staffers deserve a weekend off like everyone else, someone at Flickr should be assigned to the company’s very public help forum 24/7. An acknowledgement from staff that they are aware of the problem and working on it goes a long way — but to leave frustrated users twisting in the wind all weekend long just makes a bad situation that much worse.

This uploading problem is a bad technical problem to deal with I’m sure, but basic customer service should be something that Flickr is capable of given the deep resources of Yahoo behind them. Flickr/Yahoo can and should do better.

The only thing that in any way resembles any source of staff involvement comes from one of the help forum threads where a Flickr staffer who goes by the name “Alex” reportedly claims in response to a service inquiry that everything is fine on his end and that he’s able to upload 100 photos in under 5 seconds.

Even when Flickr was at it’s peak, you cannot upload 100 photos in under 5 seconds. No service on the internet would do such a feat, not Google, not Facebook, nor any other site. The fact that this is allowed to stand as the closest thing to staff response is unfortunate.

Flickr just rolled out a wonderful new version of Flickr this past week. Especially the weekend after a major new effort such as this, Flickr/Yahoo should be watching things closer and be much more responsive to their users. Hopefully Flickr doesn’t now let an entire Monday go by without acknowledging such a disruption to their service.


Thomas Hawk Digital Connection

 
Comments Off on Flickr Users Unable to Upload Photos All Weekend Long While Flickr Staffers Take the Weekend Off

Posted in Photography