RSS
 

Posts Tagged ‘Take’

18 Awe-Inspiring Tips to Take Better Photos

27 Apr

Today all of us play the role of photographers – using small electronic cameras, smartphones or tablets, we document each and every moment of our lives. If you’d like to take better photos and memorize moments in your life in a more professional way, have a look at those 18 key tips. 1. Keep it to the eye level Just Continue Reading

The post 18 Awe-Inspiring Tips to Take Better Photos appeared first on Photodoto.


Photodoto

 
Comments Off on 18 Awe-Inspiring Tips to Take Better Photos

Posted in Photography


R2-D2 Express: Take a Ride on a Real Star Wars-Themed Plane

23 Apr

[ By Steph in Technology & Vehicles & Mods. ]

star wars plane 1

Pretend like you’re on a journey to a galaxy far, far away while aboard a real Star Wars-themed aircraft painted to look like R2-D2 on a Japan-based ANA Airways flight. The R2-D2 Dreamliner aircraft is an officially Star Wars-branded 787-9, the logo writ large across the body of the plane, and is set to take flight for the first time in September 2015.

star wars plane 2

ANA chose R2-D2 not just because the shape happens to be convenient for the nose of a plane, but because the character is “not your typical droid,” they explain. “No matter the challenge, the highly loyal R2-D2 never fails to complete his mission and surprise us with his clever solutions.”

star wars plane 4

Never mind that as passengers on an international flight, most of us would prefer that clever solutions never have to come into play in the first place. The plane’s design is a welcome change from the usual airline logos, and it’ll be fun for unsuspecting onlookers to spot it from the ground.

star wars plane 3

The plane is a promotional tie-in for the upcoming film Star Wars: The Force Awakens, due to hit theaters on December 18th.

Share on Facebook


[ By Steph in Technology & Vehicles & Mods. ]

[ WebUrbanist | Archives | Galleries | Privacy | TOS ]


WebUrbanist

 
Comments Off on R2-D2 Express: Take a Ride on a Real Star Wars-Themed Plane

Posted in Creativity


7 Tips to Take Better Family Photos

02 Apr

Regardless of the type of photographer you are, family photos are among the most important pictures you’ll ever take. Here are some things to keep in mind.

#1 – Make sure the family is prepared

Picture1

Even if it’s a few emails, a phone call, or an in person meeting at a coffee shop, have a consultation with the family at some point before the shoot. Address things like what the family will wear (use a service like Pinterest to create a board for the family to look at for suggestions on how they might dress), what time of day would be the best for them, and what they’re looking to get out of the shoot (i.e., candids, headshots, or a holiday card).

Send out an email a day or two before their appointment with the time, date, and place of the session. Provide a checklist reminding them to make sure the kids are fed and they pack any essentials with them. Depending on the season, your checklist will change (e.g., knit hat reminders in winter and sunscreen and water it the summer). A family shoot will never go perfectly, but by making sure the family is prepared, you can maximize the likelihood that things will go as smoothly as possible.

#2 – Become friends with the kids (bribery is underrated)

Picture2

Young or old, everyone loves little gifts. Stop by the Dollar Store before your next shoot and pick up some bubbles, a baseball, stickers or a tiny stuffed animal. If it’s autumn, stop by a farm market and a grab a small pumpkin. Summer? Grab a bunch of wildflowers. These tiny gestures will take some pressure off the parents, gain you points with the kids, and have the added benefit of making the pictures more fun and interesting. It’s a win – win.

#3 – Let parents play with their kids

This is when the magic happens. If you let the parents be who they are and more importantly, let kids be kids, the pictures will start to fall into your lap. Facial expressions on both the parents and children will be authentic and genuine. Smiles will come more easily, and your job is just to capture the moment.

Picture3

#4 – Provide direction

Don’t be afraid to move the parents around and tell them where they need to be. Even if you’re just casually photographing your neighbor’s family, you’re the professional and people will listen. If a location isn’t working or the light is poor in a certain area, suggest an alternative in a positive way. Say something like, “Why don’t we try moving into that large open shade area by that tree, it will give us a break from this heavy sun”, rather than, “The light is horrible here, let’s move”.

Relying on the parents to direct their kids can make your job a lot easier too. A little boy will listen to his mom who tells him to hug his sister over a stranger that he just met.

Picture4

#5 Make everyone feel comfortable

Most people feel awkward having a camera pointed at them. Keep the conversation positive and periodically tell everyone how great the pictures are looking. You can even show them a few shots along the way. Your enthusiasm and excitement for what you’re seeing will put everyone at ease and make your job much easier.

Picture5

#6 – Improvise

The night before the shoot I’m usually scouring Google for “family photo tips” or pulling the “How to Pose Children” books off my shelf. Preparation is essential. But photographing a family is a mixture of luck and skill, and when you’re in the thick of it and things aren’t going as planned, you’re going to have to improvise. Kids won’t sit still? Pop on a telephoto lens, back off and let them run around a bit. You might be surprised at the photos you get when you’re forced to do what wasn’t planned.

Picture6

#7 – Embrace the outtakes

As photographers we want every photo to be a masterpiece – perfect light, natural expressions, everyone looking at the camera. But sometimes the best photos that you wind up taking are the most ridiculous — a boy with his hand up his nose, a brother embracing his crying sister, or one sibling looking at the other with a crazy face. Don’t stop shooting just because the kids aren’t cooperating for a moment, or the parents are chasing them around. Sometimes these situations can lend to the funniest and most memorable shots.

Picture7

We all wear different hats as photographers. One of these days, you’ll be asked to do family photos. Keep these tips in mind and you’ll be one step ahead.

Please share your comments and any other suggestions below.

googletag.cmd.push(function() {
tablet_slots.push( googletag.defineSlot( “/1005424/_dPSv4_tab-all-article-bottom_(300×250)”, [300, 250], “pb-ad-78623” ).addService( googletag.pubads() ) ); } );

googletag.cmd.push(function() {
mobile_slots.push( googletag.defineSlot( “/1005424/_dPSv4_mob-all-article-bottom_(300×250)”, [300, 250], “pb-ad-78158” ).addService( googletag.pubads() ) ); } );

The post 7 Tips to Take Better Family Photos by Joe Turic appeared first on Digital Photography School.


Digital Photography School

 
Comments Off on 7 Tips to Take Better Family Photos

Posted in Photography


4 Reasons Shooting at Sunrise and Sunset Will Help You Take Better Photos

10 Mar


Tree-2

Perhaps the most important change you can make to improve your photography is to change the time of day you are shooting. It is as simple as that. Photos taken in the middle of the day all have problems that can be avoided if you photograph near sunrise or sunset. Photographers agree on very little, but they all seem to agree that the times around sunrise and sunset are the best for photography. In fact, many photographers go so far as to put their cameras away during the hours between 9 a.m. and 5 p.m.

Getting up at dawn, or hanging around after sunset, is generally not convenient. It is no fun to get up well before sunrise, especially in the summer when sunrise comes early. But if you want to elevate your photography, that is how to do it.

You may have heard all this before, but in this article I will explain why, and show you some of the reasons why sunrise and sunset can help you take better photos.

Schoodic

Reason #1: Avoid harsh contrast

The bright light of the midday sun creates harsh shadows in your photography. Nearly every object within your view will create harsh shadows. Obviously large objects like trees and buildings create such shadows, but it goes at lot further. When photographing a person, for example, you will likely encounter harsh shadows on their faces. Even something as small as grass or leaves will leave unsightly black shadows in your pictures.

Photographing near sunrise or sunset fixes this problem. At those times, the sun’s rays are coming from a more horizontal angle, which means that the rays have to pass through a lot more of the earth’s atmosphere before reaching you.  That makes the light more diffused.

In addition, the times just before sunrise and after sunset don’t involve any direct rays at all. At those times you are dealing only with indirect rays of the sun. You will not have a problem with harsh shadows.


Telluride-2

Reason #2: Maintain tones within your camera’s dynamic range

In all outdoor photography you have to cope with the problem that the sky is invariably brighter than the foreground. Sometimes it is much, much, brighter. If you meter light based on the brightest part of your camera’s view, which is inevitably the sky, the shadows in your picture will end up as pure black. Conversely, if you meter light based on the foreground or shadows in your camera’s view, the brighter portions of your picture will be overexposed or even blown out (pure white).

For pictures taken during the middle of the day, this problem can be exacerbated. That is when the sky is at its brightest. If your foreground is not as bright, you are will have a problem where the scene is beyond the dynamic range of your camera.

When photographing around sunrise or sunset the sky is not quite as bright as it is when the sun is high in the sky. This cuts down the dynamic range your camera has to capture, so it is possible to capture the entire scene in full detail.


WesternLake-2

Reason #3: Avoid the commonplace

You simply cannot take a unique picture by photographing the same places, at the same time, from the same angles as everyone else. If you want your pictures to stand out from the crowd, you need to do something different. Photographing at sunrise and sunset goes part of the way in giving you that something different.

Most people are used to seeing the world as it exists in the middle of the day, they are not used to seeing it at sunrise and sunset. A typical day will have 10 hours of midday lighting, but the sunrise and sunset last only a little while. Further, people often miss them entirely. People are usually sleeping at dawn, or if not, are getting ready for work and not focused on the sky.

By photographing at sunrise and sunset, you are showing your viewers something they don’t see all the time. It avoids the commonplace. It will make your pictures more interesting to your viewers.

Achill

Reason #4: Capture the sky at its most vibrant

People often go to scenic locations to watch the sunrise or the sunset. There is a reason for that: because those are the times when the sky is at its most dramatic. As a photographer, that is the sky that you want to capture.

Skies at sunrise and sunset are full of color. The orange of the sun combines with the blue of the sky and creates interesting colors. When there are clouds in the picture as well, there can be a variety of different colors. Conversely, in the middle of the day, the sky is blue (if you are lucky, otherwise it is grey). By photographing at sunrise and sunset, you can capture those colors in your pictures. To make sure you are capturing the colors at their most vibrant, set your camera to meter off the sky and then underexpose a little bit.

Marina-2


Conclusion

I hope this article explains the advantages of photographing around sunrise and sunset. It is one thing – and perhaps the only thing – that I can guarantee will improve your photography. But one final note to help you maximize the benefit, is that you should not arrive at your location at sunrise and/or leave at sunset. Rather, arrive about 45 minutes before sunrise and hang around at least that long after sunset. These periods when the sky is bright, but the sun is beyond the horizon, sometimes result in more dramatic images than the sunrise/sunset itself. I have often seen people pack up when the sun dips over the horizon, only to miss the most dramatic colors of the day.

I would also encourage you to check out the importance of photographing at these times for yourself. The next time you are on your favorite photo sharing website, look at your most-liked photos. Make a quick note of how many of them were taken at sunrise or sunset. My bet is that it will be a lot of them.

So if you want to take more dramatic and interesting photos, take them at sunrise or sunset. The good news is that it doesn’t cost you anything. You don’t have to buy any special gear. Yet this one change will make more difference than any new camera or lens.

googletag.cmd.push(function() {
tablet_slots.push( googletag.defineSlot( “/1005424/_dPSv4_tab-all-article-bottom_(300×250)”, [300, 250], “pb-ad-78623” ).addService( googletag.pubads() ) ); } );

googletag.cmd.push(function() {
mobile_slots.push( googletag.defineSlot( “/1005424/_dPSv4_mob-all-article-bottom_(300×250)”, [300, 250], “pb-ad-78158” ).addService( googletag.pubads() ) ); } );

The post 4 Reasons Shooting at Sunrise and Sunset Will Help You Take Better Photos by Jim Hamel appeared first on Digital Photography School.


Digital Photography School

 
Comments Off on 4 Reasons Shooting at Sunrise and Sunset Will Help You Take Better Photos

Posted in Photography


How to Take Better Action Photos

25 Feb

141005 Semper Paratus 4022There are many sports photographers. We generally hear about those who specialize in a specific genre of sports photography like motorsport, tennis, golf, or surfing.

If you are just starting out and want to gain some experience and build a portfolio, what can you do to take better action shots?

What separates a true sports photographer from an amateur?

A sports photographer will get the shot they want as they see it, of the action they need to report on, every time. Their ability to pick the correct exposure, composition, focus, and amount of blur in the background comes down to their knowledge and understanding of the elements covered below.

Know your equipment

Your camera, whether it is an entry level or top of the line DLSR, has the ability to take amazing action shots.

You need to take control of your camera so that you get the results that you want from it when you push the button. You will need to adjust the way your camera focuses, allow continuous focus tracking, set the focus point on your camera to be focusing on the right spot, and set your camera to take multiple frames per second. Controlling the shutter speed and aperture so that you can blur the background or freeze action, allowing you to get the shot you envisage.

Understand your sport

Before you even pick up your camera, you really need to understand the sport that you want to capture. You need to know where the action is happening, and when it’s likely to happen. You will also need to know what will make your pictures amazing in the eye of the competitor, or their sponsor, (your customers).

130224 Nostalgia Drags 1454

With motorsports, for example, it may be a spot on the track where accidents happen or a corner that will show the skill level of the driver. You need to know which part of the racetrack the drivers use, and which angle would suit that section of track.

shooting-fast-action-05

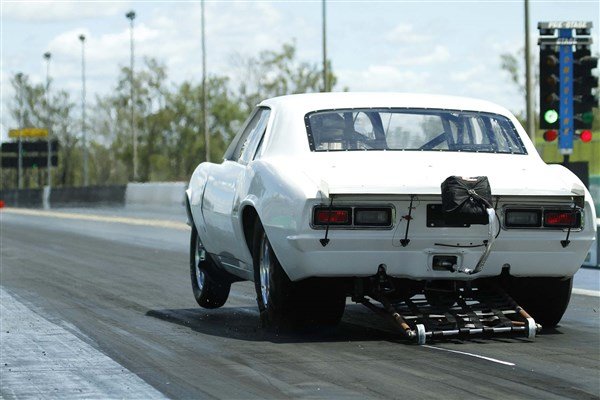
In understanding drag racing, I know that the moment the driver puts his foot down on the green light, the car will lurch forward and the front wheels will lift like this by using a fast shutter speed I have been able to freeze this action.

With surfing, it may be which wave in a set will deliver the best surfing and allow the rider to get the most out of the wave. You must be able to pick out which are the good surfers and which are the amazing surfers, just by seeing how they interact with the waves, how long they will stay up, and if they are doing tricks.

In short, you need to be aware of what is going on where the action is. This allows you to plan your photo so that you can adjust the composition to suit.

Compelling composition

I personally prefer an action shot where the athlete has space to travel into, making sure that he/she is the main focus of the image. With this in mind, picking the correct focus point so that objective is achieved may mean not using the centre focus point. By using a different length lens you can change your composition without having to move to another location. Longer lenses can get you too close to the action, which sometimes means you may miss what is happening around the athlete – so experiment with a few different focal lengths.

Shooting fast action 04

In this image I have used the right most focus point and given the rider room to “ride into” by panning and blurring the background. Thus, I have been able to make the rider stand apart from the crowd.

Make what’s important stand out

By setting your composition, you can then decide if you need to blur the background or make it part of the drama in the shot. You can do this by controlling the shutter speed; slowing it down to blur, speeding it up to freeze, panning with your subject, or by using a large aperture lens and shallow depth of field to blur the background.

Why blur the background at all?

Generally, you need to blur the background to separate the athlete or the subject from the background; ideally, they are the main focus of the shot. With spectator sports, the spectators in the photo may distract the viewer of the photo. By making them out of focus or blurring them with a panning motion, you make the athlete stand out.

Shooting fast action 03

By using a small number aperture I have been able to separate the rider from the crowd.

If you are going to use panning to blur the background, make sure that you have a focal point in the shot that is sharp. That spot needs to be the pivotal place in the photo. If it is an athlete for example, you usually need to make sure their face is sharp. With motorsports it could be one of the sponsor’s logos or the racing number, but could easily be the driver’s helmet. This is important as without one thing in sharp focis, it tends to be more of an abstract art piece than an action shot. As artistic as these blurry pans are, if the sponsors can’t see their logos or the competitors can’t see their faces, you may have a tough time selling the pictures.

Aperture priority versus shutter priority mode

With this in mind, you need to make a decision to either use aperture priority and a large aperture to blur the background, or shutter priority mode and slow down the shutter speed and pan to blur the background. If you are looking to do slow shutter speed panning, make sure you have taken enough sharp frozen images of the event before you practice this. At least that way you will have some images for your portfolio.

Now that you have your camera settings sorted, you need to anticipate when the action is going to happen. This would also include following the path of the athletes as they pass you. If you have set the shutter speed and picked your composition, you lastly need to use tracking focus.

Using continuous focus

Start focusing on your subject BEFORE they are in the right spot for the composition, and continue to keep tracking them after the shot. More unexpected action may happen after, so it’s best to be prepared to photograph it. Knowing how your camera will act, and react, when you push the button with shutter lag (the time between pushing the button and the picture being taken) and multiple frames per second, you can start to follow your subject well before you intend to take the picture. But be ready to shoot at any moment’s notice as the action happens.

130224 Nostalgia Drags 1449

130224 Nostalgia Drags 1454

130224 Nostalgia Drags 1455

130224 Nostalgia Drags 1456

By continuing to shoot after “the shot” I caught the car hitting the ground and the sparks flying even though this was happening quite fast I didn’t use burst mode, instead I took every frame.

Burst mode

If you have the luxury of multiple frames per second, and lots of memory cards to fill, you could follow and just continuously shoot, then cull the images you don’t like. Memory cards are cheap, but is it the best use of your time? Both while at the event and after the event?

Photograph the whole event, not just one aspect

When you are going to an event to take pictures, plan it. Make sure you are aware of where you can stand and how that will affect your pictures. Change your locations to get a mixture of angles. Change your focal length to get a mixture of wide and long shots. Change your shutter speeds to get a mixture of freezing action and blurring the background.

141102 CrossFit SPEED Hells Playground Team 0081

141102 CrossFit SPEED Hells Playground Team 1090_1

141102 CrossFit SPEED Hells Playground Team 0682_1

141102 CrossFit SPEED Hells Playground Team 0275 141102 CrossFit SPEED Hells Playground Team 2822

By using a mixture of vantage spots, you can get some very different angles of the same event.

Step by step checklist:

  • Make sure the camera is set to: Multiple frames per second (as high as it can be), continuous focus, the correct shutter speed or aperture setting
  • Set up your shot compositionally by using different focus points
  • Track your target for as long as you can before you take the picture
  • Keep tracking your subject after you have taken the shot, as there may be more action
  • Use the multiple burst modes sparingly – be decisive about what you want and take one or two shots either side

So what are you waiting for? Get out your manual, make the changes to your settings and take a few risks (with the settings of course) and push yourself to take better action photos.

‘s photography journey started in the late 1990’s when he bought a film camera and started motor sport in the mid 2000’s, published in various car magazines. He enjoyed capturing a mixture of the cars, and people. Contracting to an event company doing school formals, he worked on posing and getting people on side quickly. Building on the above he started No Green Square, teaching you how to get the best out of your camera.

googletag.cmd.push(function() {
tablet_slots.push( googletag.defineSlot( “/1005424/_dPSv4_tab-all-article-bottom_(300×250)”, [300, 250], “pb-ad-78623” ).addService( googletag.pubads() ) ); } );

googletag.cmd.push(function() {
mobile_slots.push( googletag.defineSlot( “/1005424/_dPSv4_mob-all-article-bottom_(300×250)”, [300, 250], “pb-ad-78158” ).addService( googletag.pubads() ) ); } );

The post How to Take Better Action Photos by Michael Coppola appeared first on Digital Photography School.


Digital Photography School

 
Comments Off on How to Take Better Action Photos

Posted in Photography


How to Take Photos of Super Cute Couples

13 Feb

Store shelves are lined with teddy bears, hearts, and a lot of pink stuff. Valentine’s Day is right around the corner!

And with V-Day comes many happy couples whose adorableness is just begging to be captured on camera for all to see and “squee!” over.

Photographing all those pretty pairs of people can be a tad awkward though, so we’ve put together our very best tips to help make the process fun and pain free!

Read on and you’ll be capturing memories sweeter than a heart-shaped box of chocolate.

4 Tips for Photographing Couples

(…)
Read the rest of How to Take Photos of Super Cute Couples (547 words)


© Taylor for Photojojo, 2015. |
Permalink |
No comment |
Add to
del.icio.us

Post tags:


Photojojo

 
Comments Off on How to Take Photos of Super Cute Couples

Posted in Equipment


Invasions: Clouds of White Balloons Take Over Public Spaces

10 Feb

[ By Steph in Art & Installation & Sound. ]

invasion 1

Profusions of white balloons seem to explode from the interiors of houses, squeeze through basketball hoops and hover between the trees in the forest like odd bulbous clouds in this series by artist Charles Pétillon. ‘Invasions’ gives these normally free-floating objects a life of their own with a swarm-like presence within architectural spaces and landscapes.

invasion 3

Each photograph depicts a particular metaphor, making a statement on various topics. ‘Family Memories,’ top, shows the white balloons “symbolizing childhood naivety,” while ‘Play Station 2′ aims to “question the viewer on the uses of games in all forms, their evolution and their influence in society.”

invasion 5

The forest scene, entitled ‘Mutation 2,’ mimics the molecular structure of DNA, placing it in a picturesque environment to symbolize the effect of humans on natural spaces, with our tendency to modify everything to our own uses.

invasion 2

invasion 4

‘Invasions’ brings the balloons to retrofuturistic architecture designed in the late ’70s and early ’80s to examine our visions of the future and how quickly they become obsolete. ‘CO2′ represents the scars we leave upon the world with our lust for objects like cars. The artist sees the balloons as a way to visualize each of these ways in which we thoughtlessly proliferate, invade or evolve.

Share on Facebook


[ By Steph in Art & Installation & Sound. ]

[ WebUrbanist | Archives | Galleries | Privacy | TOS ]


WebUrbanist

 
Comments Off on Invasions: Clouds of White Balloons Take Over Public Spaces

Posted in Creativity


3 Simple Ways to Take Better Photos on Your Next Trip

04 Feb

I love to travel. To me, nothing compares to living on the road and waking up to new places every day. All the different photographs I’ve made during my journeys are the most rewarding part of it all.

Making photos while traveling or on vacation has a special quality because you’re seeing your subjects often for the first time. Travel also presents unique challenges, though – unfamiliar landscape, climate, and culture can easily throw you off. However, it is those very things that can also make beautiful, one-of-a-kind photographs!

Bay of Fundy, New Brunswick

Bay of Fundy, New Brunswick

When travelling to new places, you want to create photos that express the way you feel about the place. You also want to make unique images that are unlike anyone else’s. The sense of wonder you feel when seeing beautiful places for the first time can easily translate into the images that you make with these three simple tips to help you take better photos.

1. Plan, plan, plan

Once you decide where you’re going, read up on the area and educate yourself about the place and what kind of conditions you can expect. What will the weather be like? Are there any special events taking place? Will the flowers be blooming? If you’re traveling internationally, is there a language barrier? If so, try to learn a few key words and carry a phrase book with you. No matter where in the world you go, locals are always more helpful when you make an effort to speak to them in their own language – even if it’s just a few words.

Find out what else is around that you might be able to see during your visit. If you’re photographing nature, you can find great locations by studying maps. Photography websites and forums are full of advice and examples of interesting places to shoot. Learning about the location’s history and culture will also help direct you to unique and interesting subjects.

Sanibel Island, Florida

Sanibel Island, Florida

Find out as much as you can about the places and subjects you’ll be photographing, so you can prepare for them. For instance, if you’re going to be shooting in the desert, near the ocean, or in very cold, wet, or humid environments, you’ll know to bring protective gear to shield your camera from damage caused by moisture, salt, and sand. If you expect temperatures lower than -10c or higher than 40c, extra batteries will be needed as they drain quickly at extreme temperatures. You might consider renting a particular type of lens that is perfect for your subject like a super-telephoto or a tilt-shift. You’ll also need to know what sort of clothes to wear for the weather.

Big Bend National Park, Texas

Big Bend National Park, Texas

2. Don’t let your gear drag you down

No matter where you’re headed, there are some things you’ll need no matter what. When packing your gear, make a checklist to ensure you don’t forget anything important. It should include:

  1. Your main camera
  2. A backup camera
  3. A normal focal length lens (around ~50mm)
  4. A long focal length lens (~100mm or more)
  5. A wide-angle lens (~35mm or less)
  6. Your favourite, most-used lens
  7. A polarizing filter
  8. A battery charger
  9. Spare batteries and memory cards, and a place to backup images (computer, external drive, the cloud)
  10. A lens cloth and/or air blower to keep your equipment clean
  11. A comfortable camera bag – preferably one that doesn’t stand out as a camera bag to avoid making yourself a target for thieves.
  12. A good, sturdy, but lightweight tripod. Many manufacturers such as Manfrotto, Giottos, and Benro (among others) make special travel tripods that are made of strong, light carbon fibre and fold up into a small carrying case.
Strathcona Provincial Park, British Columbia

Strathcona Provincial Park, British Columbia

Be selective with your packing. Don’t bring things you probably won’t use because camera bags can get very heavy, very fast. Use lightweight luggage and never check your camera bag, since checked luggage can be mishandled or lost. If you are flying, check the size and weight restrictions of carry-on luggage so you don’t get an unwelcome surprise at the airport. If you leave your home country, purchase travel insurance that will cover your precious equipment from loss, damage, or theft while abroad.

3. Seek the unique

When traveling, try to avoid the mass-marketed tours and biggest attractions. Not only are they full of people that get in the way of your shot, but they’re also full of people getting almost the exact same photos that you are. Instead, search for places that are beautiful but overlooked. You may be able to find this information online, but the best way is to be open and talk directly to the people who live there – start with your hotel staff, be friendly, and ask locals where the most beautiful places are that most people don’t see.

Goblin Valley State Park, Utah

Goblin Valley State Park, Utah

This can even start when booking your accommodations – instead of staying in a generic chain hotel, look for places with more character such as cabins, villas, or bed and breakfasts. Or, if you’re like me, you can find an RV site right in the midst of the beauty to call home base. This way, the place you spend the most time can present its own photographic opportunities.

Remember to give yourself time to experience the place before you start photographing. Give yourself a chance to find out what is special about the place first, and then try to convey that in your images. If you are photographing something common like a famous monument or national park, try to find a new perspective.

Joshua Tree National Park, California

Joshua Tree National Park, California

It’s easy to become overwhelmed by the exotic nature of new places. But always remember that good light is a photographer’s best friend. A new place may look fascinating to you in the middle of the day, but it will look magical during good light.

googletag.cmd.push(function() {
tablet_slots.push( googletag.defineSlot( “/1005424/_dPSv4_tab-all-article-bottom_(300×250)”, [300, 250], “pb-ad-78623” ).addService( googletag.pubads() ) ); } );

googletag.cmd.push(function() {
mobile_slots.push( googletag.defineSlot( “/1005424/_dPSv4_mob-all-article-bottom_(300×250)”, [300, 250], “pb-ad-78158” ).addService( googletag.pubads() ) ); } );

The post 3 Simple Ways to Take Better Photos on Your Next Trip by Anne McKinnell appeared first on Digital Photography School.


Digital Photography School

 
Comments Off on 3 Simple Ways to Take Better Photos on Your Next Trip

Posted in Photography


How To Take Awesome Instant Portraits

15 Jan
Extra photos for bloggers: 1, 2, 3

Reason #2654 why instant cameras are the coolest thing since sliced artisanal bread: portraits, baby!

Keep these tricks up your sleeve next time you’re photographing your friend/nanna/cat/batman figure to give your portraits a bit of POW!

Embrace instant and give your digital camera a rest, like, this instant.


Learn How To Take Awesome Instant Portraits

WHY IT’S COOL

Your portraits can not only be enjoyed instantly, they’ll have some serious attitude.

IDEA 1: EXPOSE LOOOOOOONGER

beforeLong exposures are really fun to play with. You can paint with light, or capture movement. Or both.

Ask your subject to wave fairy lights in front of their face while keeping the shutter open to capture it all.


IDEA 2: BLUR, YES SIR

beforeFor a surreal look, throw out all the rules and set the focus to short distance when photographing from a long distance, or visa versa.

Because sometimes a hint at something is better than the real thing.


IDEA 3: EMBELLISH

beforeGive your portraits a personal touch and another dimension by painting over it with nail polish or glitter glue.

Who says more isn’t more?


IDEA 4: DOUBLE UP

beforeGive your portraits some texture by turning on your camera’s multiple exposure function, and take a photo of a pattern (graffiti, flowers or even wallpaper work really well) before taking a photo of your subject.

This technique takes a lot of experimentation and always give an interesting result!

GRAB YOURSELF AN INSTANT CAM!

beforeLimited Edition Polaroid SX-70

Calling all nostalgia lovers! This guy is the original instant camera, made only up until 1977 and hand restored to perfect condition just for you.

Lomo Instant Camera

Lomography your thang? The Lomo Instant comes with three additional lenses (fisheye, portrait and close up) and gives you a bunch of creative controls including those sexy long exposures, multiple exposures, manual aperture and gel filters for color flash, if you please.

Instax Mini 8 Camera

Ahh simple pleasures. The classic does one thing: take instant photos. And it does it with a smile on it’s little camera face every time. Just load film, point, shoot and collect your credit card sized photo.

Instax 90 Neo Classic Instant Camera

The wiser, more distinguished sibling of the classic Instax Mini Cam, this sexy beast let’s you play with double exposures, long exposures, adjustable shooting modes and wait for it…a self timer. SELF PORTRAITS OMG!

Instax Wide 300

Instax Mini too…mini for you? Go wide! This is your guy if you want all the features of the classic Instax Mini, but think your mug deserves a larger canvas.

TAKING IT FURTHER

  • Chances are that you will end up with a couple of dud shots but be sure to hang on to them. Just cut out the photos with a craft knife, leaving only the frame. Now hold it in front of your subject’s face for a meta touch.
  • Or what about putting an actual instant photo within another? Then again and again. How deep can you go?
  • Turn your camera upside down or tilt diagonally, get down low or shoot from right above.

© Erika for Photojojo, 2015. |
Permalink |
No comment |
Add to
del.icio.us

Post tags:


Photojojo

 
Comments Off on How To Take Awesome Instant Portraits

Posted in Equipment


Shooting Winter Wonderland: How to Take Great Snow Images

14 Jan

Shoot what you love. The Amazing Images Will Follow. That’s my motto. Above, you can see a shot of my daughters, Zoe and Tenley, on their first day of snow ever. Zoe wanted to hold the snow in her hands and blow it, Tenley agreed, and just as Zoe was blowing, Tenley reached up and whitewashed her face with the Continue Reading

The post Shooting Winter Wonderland: How to Take Great Snow Images appeared first on Photodoto.


Photodoto

 
Comments Off on Shooting Winter Wonderland: How to Take Great Snow Images

Posted in Photography