RSS
 

Posts Tagged ‘Take’

How to Take Low-Key Head Shots

20 Apr

When talking about head shots, there are so many different types of lighting and styles, that there almost seem to be no hard and fast rules on how to take good ones. There are the basic lighting patterns for portraits that are applicable to head shots. The most commonly used lighting for head-shots is often the clean, classic corporate look; generally speaking a bright background and even lighting. The type of head shot also depends on what it’s for, or if there are prescribed guidelines which must be adhered to.

moody-headshots-tutorial_0012

Typical head shots: two light basic setup

This article will show you how you can take more low-key head shots. By tweaking a few things in your setup and settings, starting from the commonly used lighting setup, you can achieve darker lighting and a moody look, while still looking very professional.

moody-headshots-tutorial-photography

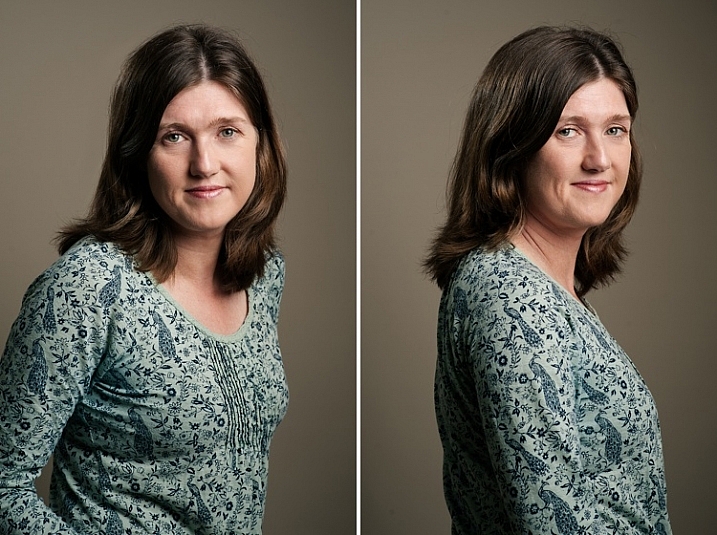
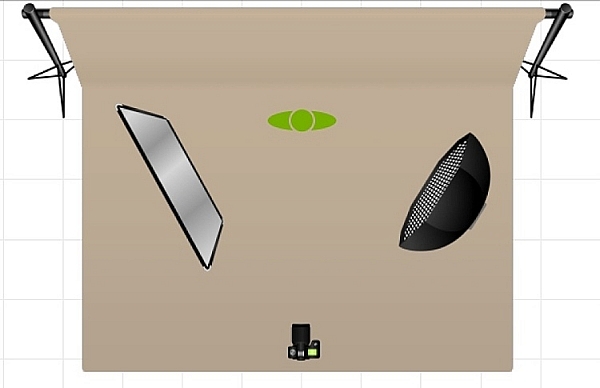
The setup for this one is a light beige background, with a strobe attached on a gridded octabox as the main light, positioned 45 degrees to the subject. Opposite the the main light is a speedlight with a snoot, set up on a stand. The speedlight reduces any shadows on the background which may be cast by the main light, and also provides a hair light and a little backlight. A typical camera setting would be ISO 100, between f/2.8 – f/5.6 and a shutter speed of 1/125 – 1/200 (make sure you don’t go faster that your camera’s sync speed). Of course you adjust the power of the strobe, but the typical look is plenty of light, and pretty brightly illuminated faces (not much or deep shadows).

moody-headshots-tutorial-photography

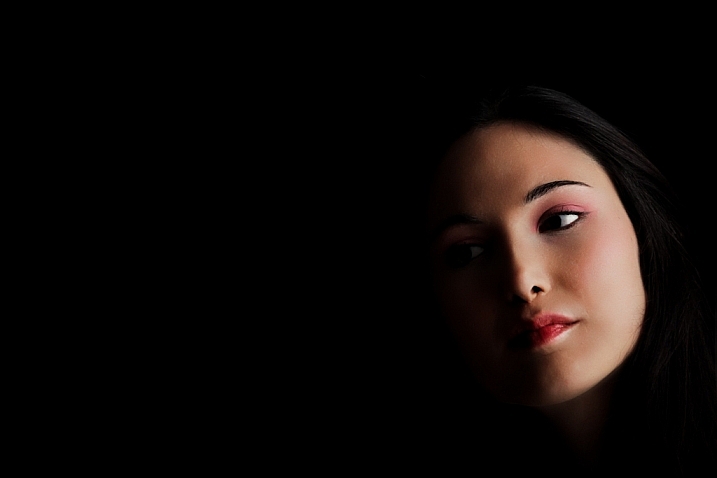
Normal head-shots have the face more brightly and fully lit, with less shadows. If you want a more dramatic low-key head-shot you can play around with using more shadows and contrast on the face and a darker background. Try split lighting or Rembrandt style which both have more shadow.

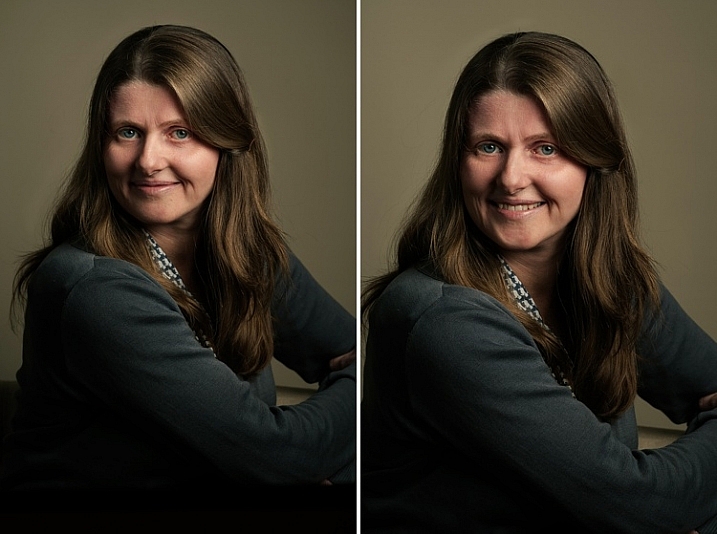
By stopping down to f/10, which is what I did on the photos above, still using exactly the same setup, you can cut out a huge amount of the main light, the background will be darker (less light will get to it), and there will be more shadows on the faces. You will have a more low-key look and feel to the image too, softer but with some light and shadow. However, this is still not low-key enough!

moody-headshots-tutorial-photography

Low-key head shots: one light

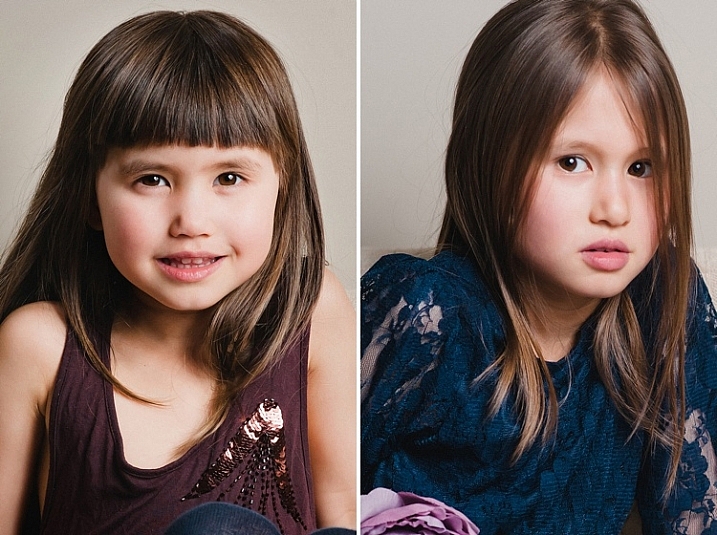
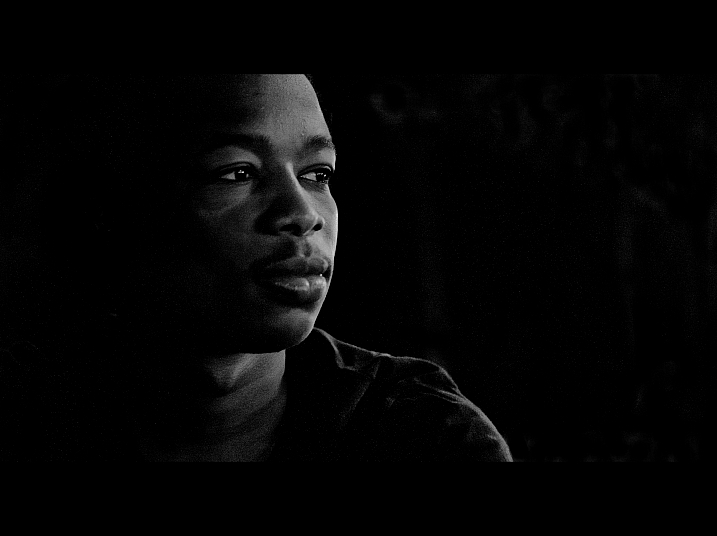
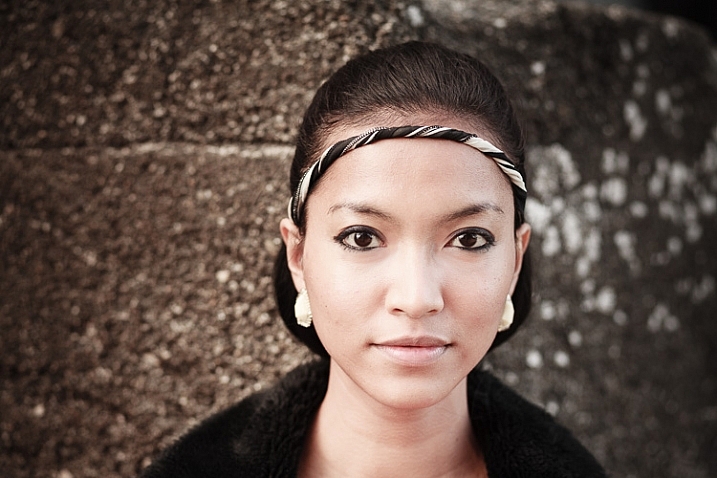
Tweak the lighting setup further by removing the hair light, replacing it with a silver reflector (on the face), and stopping down to f/11 you will be cutting out more light. Now there is only one light, and any light that hits the reflector will bounce light back on the subject’s face. Remember, that the main light is gridded so there is not much spill at all. The background is so much darker, the catchlights are still visible on the eyes, but there are no more hotspots on the face. There is a lot more shadow on the unlit side, and no hair light. The result is almost painterly, as you can see below.

moody-headshots-tutorial-photography

More shadows in this Rembrandt lighting pattern produce a more low-key result.

Low-key head shots: natural light and speedlight

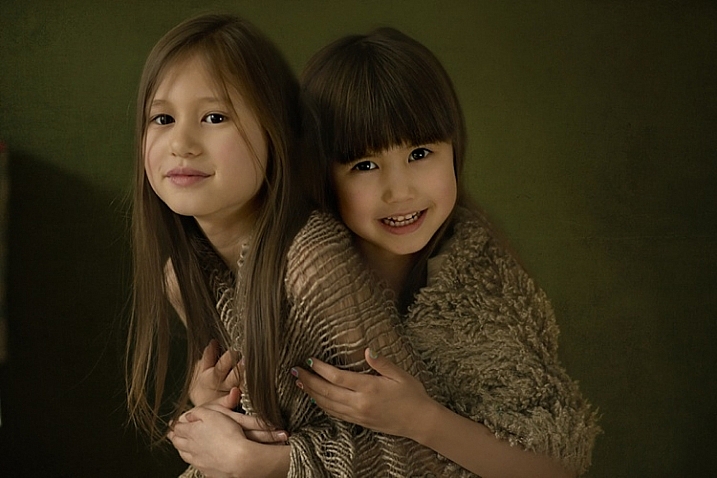
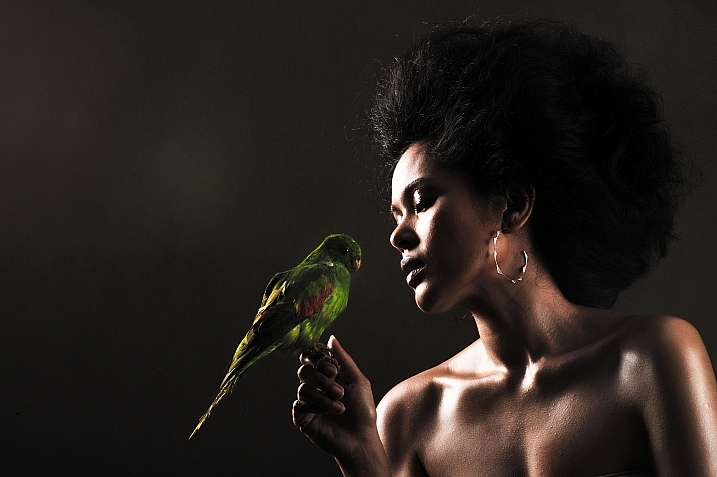
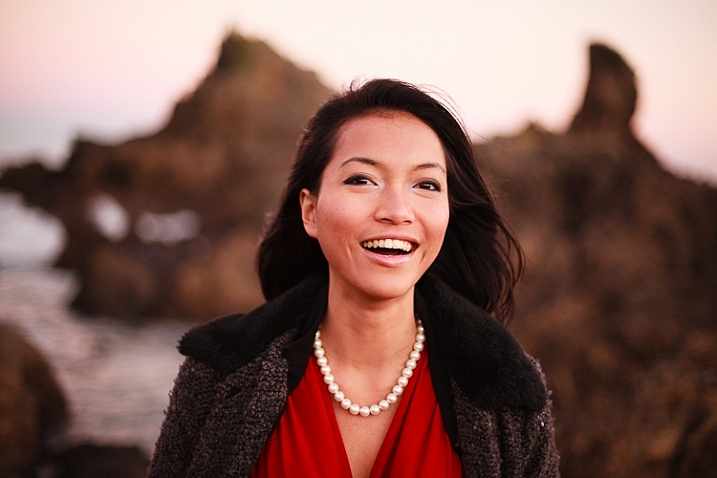
I wanted to see if I could achieve this painterly look for head-shots by removing the strobe as the main light, and replacing it with a window light. The setup below shows the window light on camera left, and a speedlight, bounced into a silver reflector, as a secondary light on camera right. I also changed the background to dark green.

moody-headshots-tutorial-photography

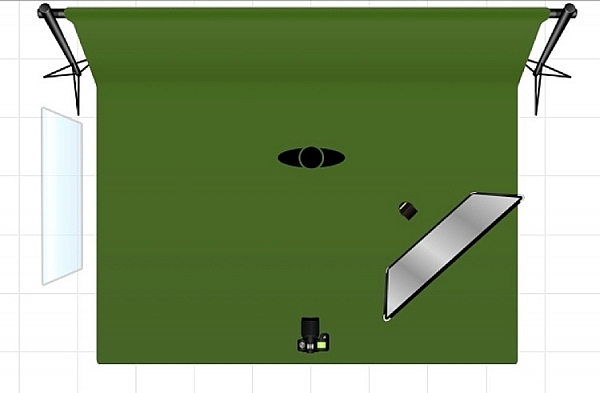
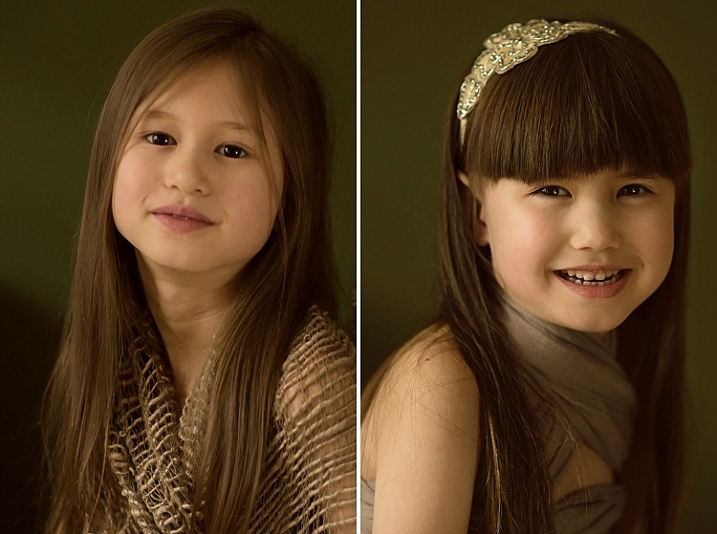
The results below show two catchlights on the eyes from the window and reflector; the lighting is flatter (less contrast or ratio) but the mood is soft and painterly. If you want deeper shadows use a white reflector instead of silver, or take it away entirely.

The portrait at the top of this article was taken using this setup. The lesson here is that by making small tweaks to your lighting setup you are able to achieve different looks for your images. Don’t be afraid to experiment.

moody-headshots-tutorial-photography

Here are a few examples of really moody low-key head shots I found on Flickr to give you some ideas to make your own:
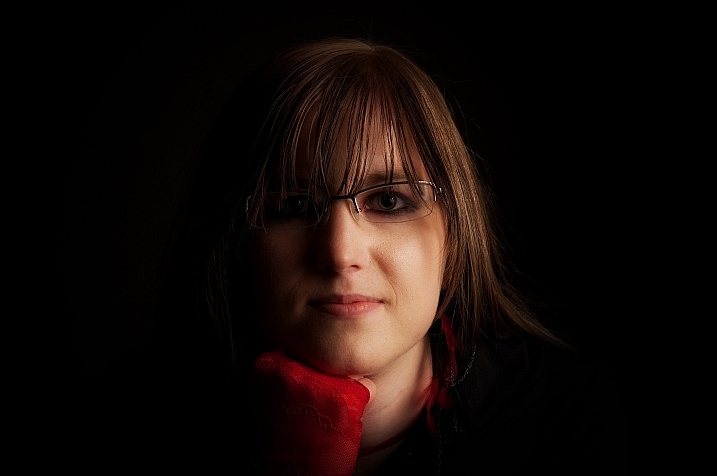
Scott Butner

By Scott Butner

Al Ibrahim

By Al Ibrahim

Stephen Poff

By Stephen Poff

Stefano Corso

By Stefano Corso

Jason Tan

By Jason Tan

Do you have any tips in getting moody low-key head shots and portraits? Please share them here.

People photography week

This week on dPS we’re featuring articles all about different kinds of people photography including portrait, event and travel photography. This is the first of the bunch, watch for more people photography articles over the next few days.

googletag.cmd.push(function() {
tablet_slots.push( googletag.defineSlot( “/1005424/_dPSv4_tab-all-article-bottom_(300×250)”, [300, 250], “pb-ad-78623” ).addService( googletag.pubads() ) ); } );

googletag.cmd.push(function() {
mobile_slots.push( googletag.defineSlot( “/1005424/_dPSv4_mob-all-article-bottom_(300×250)”, [300, 250], “pb-ad-78158” ).addService( googletag.pubads() ) ); } );

The post How to Take Low-Key Head Shots by Lily Sawyer appeared first on Digital Photography School.


Digital Photography School

 
Comments Off on How to Take Low-Key Head Shots

Posted in Photography


5 Tips to Take Better Sunset Photos – and Why Not to Photograph the Sunset Directly

31 Mar

As a landscape photographer, I participate in many online groups, and I also teach classes where I get the opportunity to see less experienced photographers’ work. I often see some very good work, but many times I also see missed opportunities. Newer photographers just getting started photographing landscapes often times become so enamored by the colors in the sky, that they neglect other areas of the image. I often see images with weak, underexposed foregrounds, and poor compositions that keep them from being good photos and relegates them to being just pretty snapshots.

Sunset in the background with a starburst

Don’t get the wrong idea. I often photograph at sunrise or sunset. But, the sun or sky is rarely the subject of the photo. It may be an element in the image, but the subject is generally something else. In many ways, it can be more difficult to make a great image at sunset or sunrise, because there is a tendency to be drawn to the pretty colors in the sky. But as photographers, we really need to pay attention to the other elements in the image to ensure we’re creating a complete composition. So below are a few tips to help improve your sunset or sunrise photos.

1- Put the sun in the background

This tip is the most obvious. Sunsets make great backgrounds, but rarely do they make great subjects. You need to find a good foreground. The gorgeous colors in the sky can be so vibrant that they really allow us to see our surroundings differently. The play of light and shadow over objects in the foreground, due to that great directional light given off when the sun is lower in the sky, helps create interest that might not be there in the middle of the day when the sun is higher.

A sunrise in the background adds interest

The best way to do this is to find something of interest right in front of you. Use a wide angle lens, such as the 16-35mm or something around that range, zoom out to as wide as you can, and put your foreground object a few feet in front of you. Stop down and set your aperture to f/11 or smaller, and focus on your foreground object to ensure that it’s sharp. If you want to add some extra interest, try stopping your lens down as far as you can. This will help create a starburst where the sun is, which will add a little extra interest in your scene.

One thing to keep in mind, is that the exposure for your foreground subject and the background exposure, are likely going to be very different. You have a few options here. The first would be to expose once for the foreground, and once for the background, and then blend them together in Photoshop. A great article on blending exposures is 5 Easy Steps To Exposure Blending for High Contrast Landscapes. Next, and generally my preferred method, is to use a graduated neutral density filter to try and darken the bright sky in the background, so that it is more balanced with the foreground subject. Read Using Graduated Neutral Density Filters for Landscape Photography for more on ND Grads.  The last, and easiest option, is to create a silhouette of the foreground objects, while properly exposing the colorful sky and sun in the background.  This works best with a singular object with a distinctive form, such as a bridge, a tree, a distinctive building, or a person in a distinctive pose.

2 – Photograph with the sun at your side

Photograph with the sun at the side

In this case, the sun itself won’t be in your scene at all. The magic of sunsets or sunrises is the soft, warm, directional light they offer. This light can create tremendous light and shadow play within the scene, making textures in your foreground especially desirable. Rocks, logs, trees, grasses, and undulations or patterns on the ground, will create interesting shadows and highlights that draw your viewer’s eye into the scene. In this case, it’s often best to put the sun to your side, so that it rakes across the scene, letting the shadows and highlights play from one side to the other.

Use-Textures-To-Catch-light

With a scene like this, a polarizing filter may help as well, as they are most effective when the camera is aimed 90° from the sun. This will help deepen blue areas of the sky, enhance other colors, and reduce any haze that may be in the scene. You may need to make some choices about exposure, if the contrast between highlight and shadow in the foreground is too great. A graduated neutral density filter can help keep the sky under control if it is still too bright against the foreground.

3 – Keep the sun at your back

Put the sun behind you

At sunrise or sunset, that soft warm light that I mentioned as being great from the side, is also great from behind you. This will help create a soft frontal light on your scene, illuminating all of the details. This is likely to be the easiest exposure of the three situations, in that the light will be very even, with no bright highlight or deep shadow areas in the scene. You’ll likely get soft, warm pastel colors if there are any clouds or haze in the sky to reflect the sun’s light.

Be careful when composing your image, as the sun behind you will cast a long shadow, and you may end up with your own shadow in the photo. To minimize this, try crouching down low, and setting your tripod as low as possible to help shorten the shadow. Also, if using filters for longer exposures, on DSLRs with optical viewfinders, the sun can enter the camera from the rear, affecting your exposure. Take care to cover your viewfinder in these instances.

Sun-At-Your-Back

4 – Arrive early, stay late

You’ll want to get there early for sunrise. The color in the sky can start half an hour, or more, before the sun actually rises, with clouds first showing subtle traces of pink and purple before the red, orange, and yellows appear as the sun breaks the horizon. You’ll want to be set up and ready when that happens, which means trekking through the dark to your location. Advance scouting can be helpful for this.

Stay Late

The same is true at sunset, but in reverse. Just because the sun has gone down, doesn’t mean that the show is over. Generally speaking, the sky will continue to light up, and colors will continue to change for about 30 minutes after the sun goes down. Many photographers have packed up and gone before this happens. Patience will reward you with more subtle color changes, such as reds going to purples and blues, rather than the vibrant yellows and oranges you get during the initial phases of the sunset.

5 – Shoot RAW

More than any other time to shoot, sunset or sunrise creates dramatic colors and fantastic play between light and shadow. Because of that, it can be difficult to try and capture the detail in the shadows or highlights, depending on which way you bias your exposure. A RAW file contains much more information than a JPEG, which will allow you to bring out the details in shadow and highlight areas that may be lost if shooting JPEG files. In addition, shooting RAW files allows you to adjust your white balance in processing to give you better control over the overall tone of the image.

For more on processing RAW files, check out Understanding the Basic Sliders in Adobe Camera RAW, and for more on why you might want to consider photographing in the RAW format, see 5 Reasons To Shoot Your Landscape Images in RAW.

What’s your favorite sunrise or sunset photography tip? Please post your tips and images in the comments below!

googletag.cmd.push(function() {
tablet_slots.push( googletag.defineSlot( “/1005424/_dPSv4_tab-all-article-bottom_(300×250)”, [300, 250], “pb-ad-78623” ).addService( googletag.pubads() ) ); } );

googletag.cmd.push(function() {
mobile_slots.push( googletag.defineSlot( “/1005424/_dPSv4_mob-all-article-bottom_(300×250)”, [300, 250], “pb-ad-78158” ).addService( googletag.pubads() ) ); } );

The post 5 Tips to Take Better Sunset Photos – and Why Not to Photograph the Sunset Directly by Rick Berk appeared first on Digital Photography School.


Digital Photography School

 
Comments Off on 5 Tips to Take Better Sunset Photos – and Why Not to Photograph the Sunset Directly

Posted in Photography


How to Use Exposure Compensation to Take Control of Your Exposure

15 Feb

Chicago-River-2016-01-02
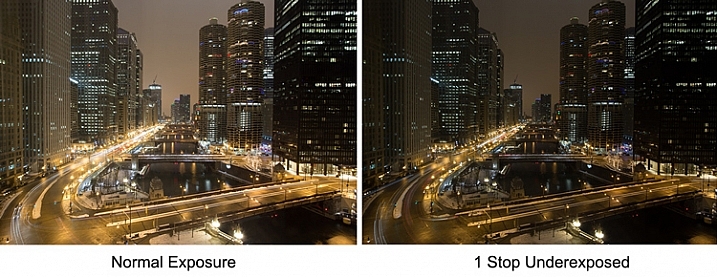
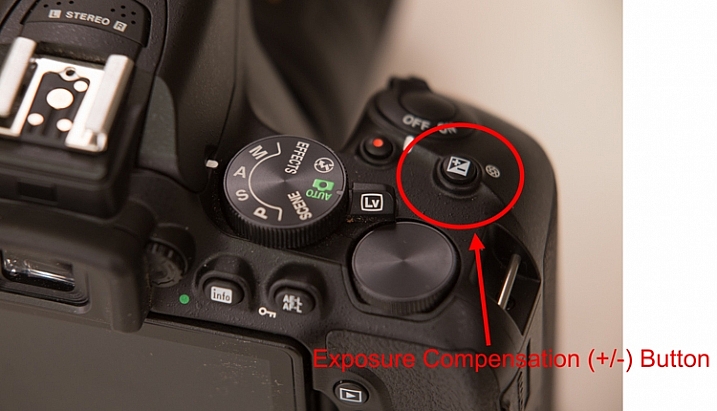
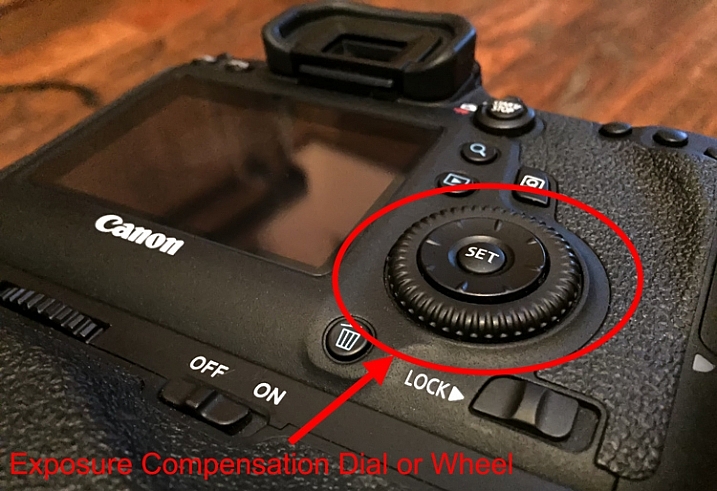
You don’t have to shoot in Manual mode to take complete control over the exposure process.

When you use shooting modes other than Manual, the camera will set at least one of the three exposure controls (shutter speed, aperture, and/or ISO) for you. However, your camera provides you with an override called exposure compensation. It gives you the ability to change the camera’s exposure values from something other than what the camera automatically sets for you. In this article, I will show you how to use it to get the exposure you want every time.

When should you use Exposure Compensation?

First, let’s back up and talk about when you might want to use exposure compensation. You may wonder why you’d want to change anything, if your camera is already determining the proper exposure level.

The first reason is that your camera’s meter can be fooled by some of the conditions you face. The meter operates by looking at the tones in its view, then averaging them out. Basically, the manufacturers have determined that most scenes will average out to a middle grey tone, often referred to as 18% grey. Therefore, if the tones in your frame are darker than this middle grey tone, the meter will show that there is not enough light for a proper exposure, and therefore the meter thinks your picture will be underexposed. Conversely, if the tones in your frame are lighter than middle grey, the meter will show that there is too much light for a proper exposure and it thinks your photo will be overexposed. A lot of the time the camera meter is right, but sometimes it is not.

Some situations are supposed to be brighter than middle grey. A classic example is a photograph taken of a snowy scene. Your camera’s meter will assume that all that white snowy scene should be grey, and will therefore choose exposure settings that underexpose the image. Obviously you don’t want that. Here is an example, the picture to the left was taken strictly by the camera’s meter, and the picture to the right overexposed by one stop according to the camera’s meter:

A snowy scene frequently confuses your camera's meter. To the left is a shot taken at normal exposure. To the right is one taken after adding in a stop of exposure compensation (overexposure).

A snowy scene frequently confuses your camera’s meter. To the left, is a shot taken at normal exposure. To the right, is one taken after adding in a stop of exposure compensation (overexposure).

Another example is night photography, where the darkness of the scene should result in dark tones in your picture. The camera’s meter won’t recognize this though, and will tell you to brighten up the picture. Using exposure compensation will allow you to take control, and set a proper exposure.

As an example, check out the pictures below. In the picture on the left, taken at normal exposure as per the camera’s meter, it brightened the night scene and it looks a little washed out. To the right is an underexposed (according to the meter) image that more closely resembles the actual conditions of the scene.

Night-Comp

The camera’s meter (and even the histogram) tells you that the normal exposure is correct (see below). But the reason the camera thinks the normal exposure is correct, is that it that the average of the tones closely approximates middle grey. However, the underexposed image actually more closely captures the reality of the situation.

Histogram-Comp

Another reason you may want to use exposure compensation is that you simply don’t like the “correct” exposure. You may want to darken the scene to add some mood or drama, or you may want to brighten things up. Photography is ultimately an artistic endeavor, and is highly subjective, so exposure compensation gives you a tool to put that to work.

Finally, if you subscribe to the theory that you should expose to the right, exposure compensation will allow you to do so in camera modes other than Manual. If you are unfamiliar with this concept, expose to the right means that you slightly overexpose your images so that most of the tones appear on the right side of the histogram (without clipping anything). You later reduce the tones in post-processing and this can sometimes result in slightly better image quality. The overexposure happens by using exposure compensation.

How Exposure Compensation Works

Now that you know what exposure compensation is, how do you use it? In most cases, your camera will have a little button with a +/- on it. That is the button you press to change the exposure compensation. While pressing that button, turn the main dial of your camera right or left (by main dial, I am referring to the dial on the top right of your camera, usually next to the shutter release button). That will change the exposure compensation. Turning the dial one way will reduce the exposure, and the other way increases it. Each click of the dial will usually change exposure settings by 1/3 of a stop.

PlusMinusButton

If you have a higher-end DSLR, then your camera will have a second dial or wheel on the back of the camera. Those cameras will usually not have the +/- button, but that second dial will be used to change the exposure compensation settings. The advantage is that you can just turn that dial with your right thumb without needing to press any buttons.

Wheel

Exposure Compensation in Different Camera Modes

So what does exposure compensation actually do? You know that it changes the exposure, but how does it do so? By changing the aperture? Or the shutter speed? Or both?

The answer is that it depends on what mode you have your camera in. I will explain what is going on for each of the camera modes:

  • Aperture Priority Mode – In Aperture Priority mode, exposure compensation changes the shutter speed. Remember that in this mode, you set the aperture and the camera sets a corresponding shutter speed. If you change the Aperture, your camera just sets another corresponding shutter speed, and there is no change in the exposure level. Exposure compensation gives you the ability to change the shutter speed (and the overall exposure value) while staying at the same aperture you originally set.
  • Shutter Priority – In Shutter Priority mode, exposure compensation changes the size of your aperture. It is basically the reverse of Aperture Priority mode. You set a shutter speed, and the camera sets a corresponding aperture. Exposure compensation therefore changes the exposure by allowing you to change that aperture size.
  • Program – In Program mode (P on your mode dial), exposure compensation changes the shutter speed. At least that’s what happened on the cameras I tested. It is possible that yours works differently, or that you can change it in the menu. As with so many things, this is a good excuse to pull out your camera’s user manual and go through it.

What about Manual and Automatic modes? These don’t have exposure compensation. In Manual mode, the camera does not set an exposure value for you in the first place, you set everything yourself. Whenever you change the aperture or the shutter speed, you are changing the exposure value. In Automatic mode, there is no exposure compensation because you have no control over exposure – the camera does everything for you. That is one of the reasons why you should never use this mode.

Exposure-Compensation

Here we see the back of the camera before and after applying one stop of exposure compensation. In the example to the left, the camera shows a normal exposure with a shutter speed of 1/500 of a second. In the example to the right, the shutter speed is reduced by 1 stop to 1/1000 of a second, and the meter reading reflects that.

Exposure Bracketing

While talking about exposure compensation, there is a related topic that you might find useful as well. It is Auto Exposure Bracketing (AEB, or just bracketing). It is where you set your camera to take multiple pictures in a row with the first at normal exposure, the next one(s) underexposed, and the final one(s) overexposed (if you have Canon it may look more like this:  underexposed>normal>overexposed, you can also change the order on a Nikon if you go to your menu settings).

When you enable the feature in your camera’s menu, you set the amount of under and overexposure. The camera will take three to five pictures in rapid succession (depending on your camera, if you shoot Canon you have to also set your drive mode to high speed burst). In a way, this accomplishes the same thing as exposure compensation, because you are dialling in a certain amount of underexposure or overexposure.

Bracket

Why would you want to do this? Several reasons. Usually it comes into play when there is a wide divergence of tones in the image. Using a little blending later, you can use the brightest tones from the underexposed image and the darkest tones from the overexposed image. In addition, if you are ever going to use any high dynamic range processing on your images, you should have multiple images to work with. Finally, you might just think of it as “exposure insurance” for important shots to make sure that you have nailed the exposure.

Conclusion

We all want to be able to take complete control over the exposure process, but not all of us want to work in Manual mode. When you work in a mode like Aperture Priority mode, the camera offers you a lot of benefits – speed being the main one. By adding exposure compensation to your process, you can get the speed of other modes, along with the control of manual.

If you haven’t used exposure compensation before, give it a try. If you are familiar with it, chime in below with your own tips and experiences.

googletag.cmd.push(function() {
tablet_slots.push( googletag.defineSlot( “/1005424/_dPSv4_tab-all-article-bottom_(300×250)”, [300, 250], “pb-ad-78623” ).addService( googletag.pubads() ) ); } );

googletag.cmd.push(function() {
mobile_slots.push( googletag.defineSlot( “/1005424/_dPSv4_mob-all-article-bottom_(300×250)”, [300, 250], “pb-ad-78158” ).addService( googletag.pubads() ) ); } );

The post How to Use Exposure Compensation to Take Control of Your Exposure by Jim Hamel appeared first on Digital Photography School.


Digital Photography School

 
Comments Off on How to Use Exposure Compensation to Take Control of Your Exposure

Posted in Photography


How to Take Care of Your Camera in Cold Weather

11 Feb

Mid-day, mid-winter, Alaska light. It just doesn't get any better.

Where I live, it gets cold. Not your “Brrr, I need to put on a sweater” kind of cold, but genuine, bone-chilling, spit-freezes-before-it hits-the-ground, kind of cold. Here in Fairbanks, Alaska, winter temperatures regularly drop far into the negatives, and yearly we suffer through snaps that send the mercury plummeting to -40F (-40C).

You’d think that in such conditions I wouldn’t want to step outside, let alone take photos, but you’d be wrong. Winter light, what few hours there is of it, is absolutely beautiful. That sweet, crisp glow can pull me from the deepest funk, and lure me out with a camera in hand. During many long winter nights, the aurora borealis dances overhead, and that too can draw me from my cozy cabin, into the snowy forest to make images. On the days I made the two images below, it was seriously cold, but that light, yep, that light will get me outside.

Low winter sun, and frosted birches near Fairbanks, Alaska. AK-FAI-Winter-sun-112172-17

To venture out in those temperatures, you’ve got to be prepared. You need the right clothes to stay warm, and you’ve got to make sure your camera equipment is ready too.

Forget about fashion

To shot the aurora during mid-winter in Alaska you need to dress warm!

To shot the aurora during mid-winter in Alaska, you need to dress warm!

You’ve got to dress right. It doesn’t matter what the light is doing, if you get frost-bite on your fingers, and can’t operate the camera. When dressed in my winter-photo clothing, I feel a bit like an onion, wrapped in layer upon layer. From inside to outside my system goes like this: long underwear, fleece or wool sweater and pants, down or synthetic vest, 800 fill down jacket with hood, windproof Thinsulate pants, two pairs of thick wool socks topped by expedition quality winter boots, a musher’s style hat complete with ear flaps, a balaclava or face mask, and thin nimble gloves with a pair of expedition overmitts dangling from wrist straps. Last, I’ll often throw a couple of chemical hand-warmers into my jacket pockets. When temperatures drop to -40F, it’s best not to mess around.

Two of my clients on an aurora photography tour, dressed for the weather.

Two of my clients on an aurora photography tour, properly dressed for the weather.

The author's well-worn NEOS overboots.

The author’s well-worn NEOS insulated overboots.

Stay Charged

The fluctuations of electricity mean that a cold battery cannot kick out the same amount of electricity as a warm battery. This means that on a brutally cold day, your camera or flash batteries will last only a small fraction of the time they normally would at room temperature. It’s a problem easily solved by carrying a spare battery or two.

A backup battery will let you swap out the cold, dead one in your camera, but there is a hitch: the spares should not be kept in your camera bag, but in an inside jacket pocket. That way they are warm when they go into the camera. When the dead battery warms back up in your pocket (with the help of the aforementioned chemical hand warmers) it will be ready to use for a while again. I find I can shoot at extremely cold temperatures for the better part of day by cycling two batteries back and forth from my pocket to my camera. Though this will vary a lot, depending on how power-hungry your camera is.

AK-FAI-Aurora-111154-35.jpg

Avoiding Bad Breath

The cold comes with other risks, one in particular, can ruin your day of photography, and that is – watch your breath. I mean it. A mistimed, warm, humid, breath will condense on your lens, resulting in a layer of milky frost on the glass. It doesn’t matter how much money you spend on your lenses, no amount of sharpness will make up for that kind of damage. Wiping at it, usually just smudges it more, and defrosting it inside (see below), can take hours. Watch where you breathe, if you turn your camera around to check lens settings, don’t exhale. I also usually wear a neck gaiter or balaclava that I pull up over my mouth and nose. So with your mouth covered, your breath is directed up, where it frosts on your eyelashes instead of your camera.

This is what happens if you accidentally breathe on your lens during a cold weather shoot.

This is what happens if you accidentally breathe on your lens during a cold weather shoot.

Lens Caps Exist for a Reason

Breath is the usual culprit of fogged lenses, but when shooting at night, there is always the chance that natural frost will form. To avoid this, use your lens cap when you aren’t shooting. If you are walking from one location to another, taking a break, or searching for a new composition, put the cap back on your lens. When I’m out shooting the aurora at night, my cap is on my lens, even if I’m just walking a short distance to a new shooting location.

AK-Interior-Whites-103193-8

Back Indoors

Last, and perhaps most importantly, is the return indoors. You know how on a hot day, your cold beer glass gathers condensation? Ever watched how those drips can form and run down the bottle, pooling in a messy ring on the hard-wood table? Imagine that happening to your camera gear. It can, and it will. When you step back indoors to take a break, warm up, or finish up for the day, place your camera and lenses into an airtight bag.

A properly bagged and sealed camera, ready to be taken back indoors after a cold outdoor shoot.

A properly bagged and sealed camera, ready to be taken back indoors after a cold outdoor shoot.

Ziplocks are good, but I favor light-weight roll-top dry bags like those used by boaters to keep their gear dry. These are tough, reusable, and work like a charm. Once sealed up tight in a ziplock or dry bag, condensation can’t form on your gear. Just let your camera warm up to room temperature before you pull it out.

AK-NoatakPreserve-KellyRiver-1083-491

The cold scares a lot of photographers, and make no mistake, a frigid, mid-winter Alaskan night is nothing to mess around with. But with a few precautions – warm clothes, spare batteries, avoiding frost, and protecting against condensation – you can take advantage of the stellar beauty of crisp, clear, days and nights like this one.

googletag.cmd.push(function() {
tablet_slots.push( googletag.defineSlot( “/1005424/_dPSv4_tab-all-article-bottom_(300×250)”, [300, 250], “pb-ad-78623” ).addService( googletag.pubads() ) ); } );

googletag.cmd.push(function() {
mobile_slots.push( googletag.defineSlot( “/1005424/_dPSv4_mob-all-article-bottom_(300×250)”, [300, 250], “pb-ad-78158” ).addService( googletag.pubads() ) ); } );

The post How to Take Care of Your Camera in Cold Weather by David Shaw appeared first on Digital Photography School.


Digital Photography School

 
Comments Off on How to Take Care of Your Camera in Cold Weather

Posted in Photography


Game Changers: How to Take Your Photography to the Next Level

05 Feb

The other day, one of the students I was mentoring asked me a really interesting question, “How do I take my photography to the next level?” The conversation that followed was the inspiration for this article.

Photograph subjects and experiences that you love, in a way that is unique to you

Air 39

“The artist sees what others only catch a glimpse of.” – Leonardo da Vinci

When you photograph the things you love, you will always be excited and inspired. If you are excited and inspired by something, you are naturally going to want to spend more time doing it. The more time you spend doing something, the better you become at it.

I spent the first half of my career focusing on fashion photography, because I thought that was what I should be doing. I was okay as a fashion shooter, but to be 100 percent honest, I never really got the whole fashion world, and it didn’t consume me like it does the best fashion photographers in the world. The photographers who excel in this genre live and breathe fashion; some of them are fashion.

It wasn’t until I started to focus more on portraits, and travel lifestyle photography, that I really fell head over heels in love with photography. I’d finally found my “thing”! I could happily shoot portraits or travel lifestyle images all day long. I felt energized, and on a high after each shoot. I was always exhausted after shooting fashion.

Are you photographing the things you really love? Is this work making you feel excited and energized, or depleted and flat?

The way we see and experience life is something that is unique to each of us. If you want to take your photography to the next level, focus on photographing the things that matter to you, in your own world, and in a way that is unique to you. This is the one thing that will set you apart from all the other photographers.

Passion, not perfection

Contender final 1

If passion and perfection had an arm wrestle, passion would win every time. Why? Because the thing that makes photography great, is the way it makes us feel. If there is no passion in an image, and it doesn’t inspire a reaction, then it’s just a snapshot.

If you want to take your work to the next level, show your passion for your work.

Given a choice to shoot a photo that was technically brilliant, sharp, correctly exposed, and perfectly composed, yet void of emotion – or an image that was a bit rough around the edges, slightly soft, grainy, with a few blown highlights but captured the feeling – I would choose the latter every time.

Don’t just focus on what something looks like, focus on how it feels.

Technique, not gear

Gear 05

Michael Schumacher is the best F1 driver in history. If he were to challenge me to a race, and I drove a Ferrari and he drove a 1981 Toyota Corolla, he would still win. Why?

Schumacher is a master, who has spent years driving. He knows how to drive fast, and take corners at high speed, without rolling the car. He would probably lap me three times before I’d even had a chance to get out of third gear. In the wrong hands, the best gear in the world is useless, if you don’t know how to drive it.

So many photographers get hung up on the notion that having the right gear will make them better photographers. While it’s true that the right gear will give you a better quality image, it’s not going to guarantee that you will be a better photographer.

Instead of worrying about the gear, focus on the technique. It’s what you do every day that makes you great; not what you use every day. Dedicating as few as thirty minutes a day to your photography, every day, will do more to improve your skills and develop your style than owning all the high end gear in the world.

Learn to peel potatoes before you cook a soufflé

Last supper

Fat Tony & Co/Nine Network Australia

During the first few years that I was building my photography business, I had a night job working as a cook in an Italian restaurant. When you train to become a cook, you must master a task before you are allowed to move on to the next one. The first task each apprentice cook must master is peeling potatoes. Then they move on to the salads, entrees, pasta, steaks, and seafood. The last thing I was taught to cook was one of the most technically difficult dishes, the soufflé.

The photographer who attempts a complicated studio shoot right after buying his or her first camera, is like the apprentice cook who walks into a kitchen and insists on cooking a soufflé on their first day.

Taking a stepped approach to learning, will take your photography to the next level much faster than trying to learn it all at once. Many photographers will try complicated shooting or lighting styles, then become frustrated because their images are not working out the way they had hoped.

Master peeling potatoes first. It’s definitely a game changer!

FOG11FS 166

Ask for help

Putting their work out there, is something that many photographers struggle with. Yet, seeking and implementing constructive criticism is one of the fastest ways to take your photography up a few notches.

The fear of ridicule or criticism prevents some from sharing their work. This is really sad, because many of the fears people may have are imagined. FEAR is an acronym for False Evidence Appearing Real, it’s our mind trying to keep us small. When you create beautiful art, and you don’t share it with the world, you deny so many people the opportunity to experience beauty.

If you are ever in doubt, take Mother Nature as an example of best practices for artists. Every day she puts her work out there – sunset, sunrise, storms, sunshine, and rainbows. Some are absolutely spectacular. Other times, her art can be mediocre, yet she puts her work out there every day for us to enjoy.

Other ways you can ask for help:

  • Join a photography group
  • Find a mentor
  • Attend a workshop where your work can be critiqued by an expert whose work you respect

Confidence

Ecove Hyde15 2977

“Whether you think you can, or you think you can’t–you’re right.” Henry Ford

You can read books, take courses, and listen to podcasts until the cows come home. But if you don’t have self-confidence, it will be very difficult to take your work to the next level.

Confidence is knowing that you’ve done the hard work and put in the hours, and can now turn up and nail the shot.

Many photographers and artists really struggle with confidence. It may be due to old programming from a lifetime of being told they weren’t good enough, of having the people they spend the most time with not offering enough support, or a hundred other reasons, all of which undermine a person’s self-esteem.

Look for ways to improve your self-confidence. Spend more time with people who value and respect what you do. Find ways you can get rid of destructive self-talk.

The good news is that self-confidence can be trained, just like a muscle in the gym. Gaining self-confidence and self-belief is, by far, a major game changer. It will help take your photography to the next level.

Do you have a strategy that I might have missed? What techniques have you used to take your work to the next level? I’d love to hear your thoughts.

All images: Copyright Gina Milicia


fastflash_bookIf you want to learn more about using flash for creating portraits, pick up Gina’s brand new dPS ebook: Fast Flash for Portrait Perfection. Now on sale for an introductory price for a limited time only.

googletag.cmd.push(function() {
tablet_slots.push( googletag.defineSlot( “/1005424/_dPSv4_tab-all-article-bottom_(300×250)”, [300, 250], “pb-ad-78623” ).addService( googletag.pubads() ) ); } );

googletag.cmd.push(function() {
mobile_slots.push( googletag.defineSlot( “/1005424/_dPSv4_mob-all-article-bottom_(300×250)”, [300, 250], “pb-ad-78158” ).addService( googletag.pubads() ) ); } );

The post Game Changers: How to Take Your Photography to the Next Level by Gina Milicia appeared first on Digital Photography School.


Digital Photography School

 
Comments Off on Game Changers: How to Take Your Photography to the Next Level

Posted in Photography


How well do you know the Lightroom interface? Take this quiz and find out

03 Jan

lightroom interface quiz lead image

When you’re new to Lightroom there are lots of things about the Lightroom interface that contribute to its steep learning curve. Most Lightroom users can tell you a story or two of being caught by items appearing, or disappearing, without warning. With experience these are minor inconveniences, but when you are new to Lightroom, they can be overwhelming. So, just how much do you know about the Lightroom interface? Take this quiz and find out:

Question #1

What is this and how do you get it back if it disappears?
Lightroom Interface Quiz - image for question 1

Answer:

That is the Toolbar, and you can display or hide it by pressing the letter T on your keyboard. You can also choose View > Hide Toolbar or View > Show Toolbar depending on whether it is currently visible or not. There is a toolbar in every module in Lightroom.

Question #2

When you used Lightroom recently, you recall seeing small indicators like this in the bottom right corner of some of your images. What are they and how do you get them back if they’re not showing in grid view?

Lightroom Interface Quiz - image for question 2

Answer:

These are Thumbnail Badges, and they indicate whether or not an image has been cropped, has develop presets, keywords added, and so on. In the Library module pressing the letter J will toggle through a number of options for your grid view, two of which include thumbnail badges.

Question #3

Most panels show filled in triangles like the one on the left (below), but one of the panels has a triangles like the one on the right (also below). Why is it different?

Lightroom interface quiz - image for question 3

Answer:

The second panel on the right is set to what is called Solo Mode. When this option is enabled, and you click to open any of the panels, all other panels will close automatically (essentially leaving only one opened at a time). The Navigator and the Histogram are exceptions to this rule and they operate independently of Solo Mode. To enable or disable Solo Mode, right click on the name of any panel (the actual word not the triangle) and choose Solo Mode from the options given (see below).

Lightroom interface quiz - image for question 3

Question #4

This is the Develop module and the Basic panel is missing. What has happened and how do you get it back?

Lightroom interface quiz - image for question 4

Answer:

Any panel can be enabled or disabled in Lightroom. If you’re missing a panel, right click another panel in that same sidebar to display the panel list. Any panel name without a checkmark isn’t visible, so to make it visible, just click the panel name.

Lightroom interface quiz - image for question 4

Question #5

This is the list of Lightroom modules. A module is missing, what is it and how do you get it back?

Lightroom interface quiz - image for question 5

Answer:

The Develop module is missing. You get it back the same way as you would a missing panel, right click any of the module names to show a list of modules. Any that do not have checkmarks beside them are not visible. Select that one to display it.

Lightroom interface quiz - image for question 5

Question #6

There used to be a panel here in Lightroom just above the thumbnails in grid view in the Library module. It’s disappeared. What is it, and how would you get it back?

Lightroom interface quiz - image for question 6

Answer:

This is the Filter bar, and you can display or hide it by pressing the Backslash key (\). You can also display or hide it by choosing View > Show Filter Bar.

Lightroom interface quiz - image for question 6

Question #7

Here just above the filmstrip you recall that at one stage you saw Star, Flag and Color options, but they now seem to be missing. How do you get them back?

Lightroom interface quiz - image for question 7

Answer:

Click the word Filter and the filters will reappear. Click Filter again and they will disappear.

Lightroom interface quiz - image for question 7

Question #8

What is this called and how can you get rid of it or choose what information is showing?

Lightroom interface quiz - image for question 8

Answer:

This is the Loupe Info Overlay and you can display and hide it by pressing the I key on your keyboard. There are three states for this: Info Overlay 1, Info Overlay 2, and turning it off entirely. To edit what information is displayed click CMD+J (Control+J on a PC) or go to:  View > View Options.

Question #9

This is the right hand corner of the Lightroom screen and the controls for Maximize, Minimize and Close are all missing, as are all the Lightroom menus on the left of the window. How do you get them back?

Lightroom interface quiz - image for question 9

Answer:

To redisplay the Lightroom menu and the Windows controls press Shift + F. This is a toggle switch which displays and hides full screen mode. There are three states for full screen mode so press Shift + F repeatedly until the Lightroom menu and the Window controls reappear.

Question #10

Here, in the Develop module, you don’t see any stars on the toolbar when you are viewing this image at full size. The stars only appear on the toolbar when you are in Grid view. Where did they go and how can you get them back?

Lightroom interface quiz - image for question 10

Answer:

The toolbar in the Develop module has two states, one for the Grid View, and one for the Loupe (single image) View. To display and hide the various options on either toolbar, switch to that view, and click the arrow in the far right of the toolbar to display the options available in that view. Click any unchecked option to display it on that toolbar, likewise you can click any checked options that you want to hide.

Lightroom interface quiz - image for question 10

If you got 10 out of 10 on this quiz, well done! You have a good understanding of the basics of the Lightroom interface.

If you missed any of these questions, hopefully you’ve learned something about using Lightroom that you did not know before.

googletag.cmd.push(function() {
tablet_slots.push( googletag.defineSlot( “/1005424/_dPSv4_tab-all-article-bottom_(300×250)”, [300, 250], “pb-ad-78623” ).addService( googletag.pubads() ) ); } );

googletag.cmd.push(function() {
mobile_slots.push( googletag.defineSlot( “/1005424/_dPSv4_mob-all-article-bottom_(300×250)”, [300, 250], “pb-ad-78158” ).addService( googletag.pubads() ) ); } );

The post How well do you know the Lightroom interface? Take this quiz and find out by Helen Bradley appeared first on Digital Photography School.


Digital Photography School

 
Comments Off on How well do you know the Lightroom interface? Take this quiz and find out

Posted in Photography


Take your Composition & Lighting Skills to the Next Level with this 70% Off Deal

18 Dec

It’s time for day 6 of our 12 Deals of Christmas and this one is from our good friends at Photography Concentrate who have two fantastic eBooks for you to choose from (and a great offer when you pick them both up).

Concentrate ebooks

Incredibly Important Composition Skills

Are you ready to unlock your superpowers in composition and gain real skills that you’ll use in every single shot you take?

Save 60% on this ebook and video guide from Photography Concentrate (and get a bonus Printable Field Guide and 7 bonus teaching videos)!

Fantastic Fundamental Light Skills

When you understand why light looks and behaves the way it does, you’ll know how to control and change it to suit your creative vision – and take better photos.

Save 60% today on this comprehensive guide (and get a bonus Printable Field Guide)!

Bundle Them Together

Grab both Incredibly Important Composition Skills and Fantastic Fundamental Light Skills in this amazing combo deal (with all the bonuses mentioned above).

A HUGE 70% OFF for 24 hours only!

googletag.cmd.push(function() {
tablet_slots.push( googletag.defineSlot( “/1005424/_dPSv4_tab-all-article-bottom_(300×250)”, [300, 250], “pb-ad-78623” ).addService( googletag.pubads() ) ); } );

googletag.cmd.push(function() {
mobile_slots.push( googletag.defineSlot( “/1005424/_dPSv4_mob-all-article-bottom_(300×250)”, [300, 250], “pb-ad-78158” ).addService( googletag.pubads() ) ); } );

The post Take your Composition & Lighting Skills to the Next Level with this 70% Off Deal by Darren Rowse appeared first on Digital Photography School.


Digital Photography School

 
Comments Off on Take your Composition & Lighting Skills to the Next Level with this 70% Off Deal

Posted in Photography


Using Emotions to Take Storytelling Images

25 Nov

A forgotten woman and her daughter – tips for storytelling

If you travel to remote places you will be sure to get extraordinary photos. Be brave, take a risk, and allow the warm winds of far off places take you on a journey you won’t forget. I’m always looking for opportunities that allow me to visit people and places that are off the usual tourist trail. I travel with an open mind and heart, and am often rewarded by meeting extraordinary people in the most unlikely places.

51K1433

My interest is photographing landscapes and portraits. I especially look for people that are indigenous to the countries and the remote areas I visit. Their faces and traditional dress tell the stories of their ancestors, and I want to capture these people before they are no longer able to live as their forebears.

Traveling along the rough, dusty roads on the border between India and Pakistan you are immediately reminded of just how volatile these two countries still are. You take a great risk to visit these regions where many armed soldiers are seen in camps, at river crossings, and in long convoys of trucks as they continually patrol, ready to defend their respective countries.

Have patience and wait for opportunities

If you are able to travel in this area during October you will be rewarded with the magnificent autumn colors on display throughout the countryside. My intention was to capture these colors in all their glory, and photograph the natural beauty of the landscape. However, I arrived a little too early. I had a choice: I could stay and wait another week or two, or I could return home. I decided to stay and take the opportunity to have some time to relax, and see what other stories might present themselves.

It was the last day of my visit and I decided to take a walk, as I often do, to see if I could find a story by keeping an open mind, and a keen eye while I strolled.

51K1389

I knew that in the next few days, this area would be totally cut off for six months during winter. I was feeling a bit low as I hadn’t taken any photos that I felt were of any substance. As I walked I noticed a lady sitting in the window of a very humble wooden house. She looked very sad and I felt drawn to go and speak to her.

Note: To shoot in this region you need permissions and local guide, which I had. My first image of the story has shows me shooting from outside of her house. Next to me were people of that village and my local interpreter. She was watching me shoot from above. My objective was to talk to her and cheer her up. 

Image 1

51K1366

Allow the story to unfold and follow your instincts

As soon as I entered the house I thought why not test my new camera in this low light. Once inside, I’m sure you would get the same shock I did. In one corner was a small fire for cooking. The rest of the room was dirty and in complete disarray. Upon seeing me enter, she looked quite stunned, and started to use sign language – I realized she couldn’t speak or hear. I also had a feeling she was mentally challenged, so I thought I would give up the idea of taking some portraits of her. She was trying to talk and constantly moving her body.

Image 2

I smiled and sat opposite her trying to show her my camera. I wanted to explain that I was a photographer so she wouldn’t be scared of me. Normally most of the strangers in this area are suspected militants, or a threat. As I tried to communicate with her, she continuously tried to sign violence and killing, which she must have experienced since birth. In sign language I tried asking her if I could photograph her, unfortunately it was my first try with sign language and she did not understand. Something inside me pushed me to take a few shots and leave. Somehow I managed to take some photos despite feeling low after spending time with her.

Image 4

L1000775

Then her mother walked inside the house and told me the story of her daughter. She was deaf, and mentally challenged since childhood. They were living a very difficult life and there was nobody else in family. I listened and took one shot as she broke down. All I could do was put my hand in my pocket and give her whatever cash I had.

Image 5

Look for the emotion parts of the story

When I left the house I felt heavy hearted. I looked back and saw the daughter smile as she was looking out from her window, and I smiled back at her. I clicked the picture as a memory and it turned out to be the best photo I had taken on this visit. If you keep an open mind and follow your instincts you may well find a story such as this.

Image 6

As I drove back her powerful smile did not leave my mind. I kept thinking about her, she had left an impression.

Review

Look at your images after you take them as I did. It’s only then that you will realize how powerful they are.

Her smile started growing on me and I thought that perhaps I had made a small difference to her life. Her smile was so genuine. Even before arriving back home I decided to write about, and share her story. This story provoked my thoughts, altered my ego, and forced me to approach everyone with her story, whether they are my admirers or critics. I wanted to let the world know of her existence and those like her, as you will when you take those rare and unique photos and experience what I did. There are many such people on this earth for whom life is a day-to-day existence and there are only fleeting moments of happiness.

Take a risk and go for it

So… be brave, take a risk, and allow the warm winds of far off places take you on a journey you won’t forget. Trust me you won’t regret it!

Do you have any images that you took that inspire you and tell a story? Please share them in the comments below.

googletag.cmd.push(function() {
tablet_slots.push( googletag.defineSlot( “/1005424/_dPSv4_tab-all-article-bottom_(300×250)”, [300, 250], “pb-ad-78623” ).addService( googletag.pubads() ) ); } );

googletag.cmd.push(function() {
mobile_slots.push( googletag.defineSlot( “/1005424/_dPSv4_mob-all-article-bottom_(300×250)”, [300, 250], “pb-ad-78158” ).addService( googletag.pubads() ) ); } );

The post Using Emotions to Take Storytelling Images by Aarief appeared first on Digital Photography School.


Digital Photography School

 
Comments Off on Using Emotions to Take Storytelling Images

Posted in Photography


How to Take Control of Aperture and Create Stronger Photos

14 Nov

aperture and composition

The focal length of the lens you use, combined with the aperture setting, determines how the camera sees whatever you point it at. This has profound implications for composition. Let’s look at them one by one.

Selective focus and bokeh

Selective focus occurs when you focus on your subject, and use a wide aperture to make the background go out of focus. Bokeh is the blurred parts of your photo. It originates from the Japanese word boke, and has come into use because we don’t have a word in English for it.

aperture and composition

This photo shows both selective focus and bokeh. I focused on the model’s eyes, and selected an aperture of f/1.4, to blur the background as much as possible.

There are several factors that affect bokeh.

1. Aperture

The wider the aperture, the less depth-of-field there is, and the more bokeh you get. Photographers that like to use selective focus buy prime lenses, as they have often wider maximum aperture settings than zooms.

But, you can still obtain nice bokeh with zooms, if you pay attention to the following points.

2. Camera to subject distance

The closer you are to the subject the less depth-of-field there is. This is a useful tip if you have a zoom lens with a limited maximum aperture (such as an 18-55mm f/3.5-5.6 kit lens). Just set the focal length to longest available setting, the aperture to its widest setting, and move in as close as you can. You’ll be surprised by what you can achieve.

aperture and composition

This photo was taken with an 18-55mm kit lens set to 55mm and f/5.6, the widest available aperture at that focal length. It’s not nearly as close to how little depth-of-field there would be if I had used an 50mm prime lens at f/1.4 – but it’s still enough to blur the background.

3. Subject to background distance

The more distance there is between subject and background, the more out of focus the background will get, at any given aperture setting.

4. Quality of light

Light affects bokeh. Soft light (like that on an overcast day) produces smooth, even bokeh. Sunlight or reflections, create a different type of bokeh with more texture.

aperture and composition

I took this photo on an overcast day. The bokeh is very smooth.

aperture and composition

I took this photo in the early evening. The artificial lights reflecting from the shiny objects in the background have created a different type of bokeh.

5. The aperture blades of the lens

The more blades the lens has, the rounder the shape of the aperture, and the smoother the quality of the bokeh. Less expensive lenses tend to have fewer aperture blades, and may not produce the same quality of bokeh as better ones.

6. Other optical characteristics of the lens

Some lenses, such as the Helios 58mm f/2 lens, used to take the photo below, have optical characteristics (or more likely, flaws) that produce a certain type of bokeh. Lensbaby is a company that makes lenses that produce a specific type of bokeh.

Aperture and composition

f/2.8 on a prime lens

I’ve singled this aperture setting out because it hits a sweet spot when it comes to composition, especially for portraits.

If you have a normal or short telephoto prime lens, and use the widest aperture setting (generally f/1.2, f/1.4 or f/1.8) then the depth-of-field is very narrow indeed. Sometimes that works really well, but other times you need a little more depth-of-field to create a stronger image. It’s like any technique – overuse it and it becomes a gimmick.

The solution is to mix it up a little by using aperture settings like f/2, f/2.8, and f/4. You’ll still get a narrow depth-of-field and create some beautiful bokeh, but a little more of your subject will be in focus.

Using f/2.8 (or thereabouts) shows subtlety, restraint, and maturity.

aperture and composition

I took this photo with an 85mm lens (full-frame) at f/2.8. The depth-of-field is still shallow enough to blur the background nicely.

The middle apertures

Now we get into the middling apertures, those from around f/4 or f/5.6, to f/8, depending on your lens.

The effect of these apertures depends on the focal length of your lens and how close you are to your subject. For example, you could use a super telephoto lens (300mm plus) and shoot from farther away from your subject to create images with shallow depth-of-field at f/5.6, or get the entire scene in focus at the same aperture with a wide-angle lens (35mm and less) if you focus on the right spot and are much closer to your subject.

These middle apertures represent the transition between photos where some of the image is out of focus, to those where everything is in focus.

You can still use selective focus at these apertures (although perhaps not with wide-angles), although the effect is much gentler than with the widest aperture settings of your lens. Use these apertures when you want good depth-of-field but don’t mind if the background is out of focus a little.

aperture and composition

I used an aperture of f/4.5 for this photo. The depth-of-field is sufficient to get the man, the statue, and the wooden baskets in focus. The background is unimportant and doesn’t need to be in focus.

The smaller apertures

These are the ones you use when you need everything within the frame to be sharp, like with landscape photography. This can be anything from f/8 on a wide-angle lens, to f/11 or f/16 on longer focal lengths. With telephotos and macro lenses you can stop down to f/16 and still not get everything in focus.

The thing you need to be aware of here is diffraction. When the aperture gets too small, the light passing through it spreads out, and softens the image. Thanks to diffraction, images taken at f/22 are usually visibly softer overall, than those taken at f/8 or f/11. Noticeable diffraction may start at f/16 or f/22 on a full-frame camera, and around f/11 on an APS-C camera.

aperture and composition

An aperture of f/11 ensured everything in this photo, taken with a 14mm lens (APS-C), was in focus.

Take control

Every time you take a photo you should be thinking about what the optimum aperture is for the composition you want to make. Do you want to open the aperture and throw the background out of focus? Do you want to stop down and get as much as possible in focus? Or somewhere in between?

What aperture settings do you like to use with your photos? Do you use a Lensbaby or other lens that gives a certain bokeh effect? Please let us know in the comments – I’d love to hear your thoughts and see your images.

This week on dPS we’re featuring a series of articles about composition. Many different elements and ways to compose images for more impact. Check out the ones we’ve done so far:

  • Using Framing for More Effective Compositions
  • 7 Tips to Improve Your Skyline Photos
  • 33 Images that Exemplify Compositional Elements
  • Weekly Photography Challenge – Composition Craziness

Mastering Composition ebookMastering Composition

My new ebook Mastering Composition will help you learn to see and compose photos better. It takes you on a journey beyond the rule of thirds, exploring the principles of composition you need to understand in order to make beautiful imag

googletag.cmd.push(function() {
tablet_slots.push( googletag.defineSlot( “/1005424/_dPSv4_tab-all-article-bottom_(300×250)”, [300, 250], “pb-ad-78623” ).addService( googletag.pubads() ) ); } );

googletag.cmd.push(function() {
mobile_slots.push( googletag.defineSlot( “/1005424/_dPSv4_mob-all-article-bottom_(300×250)”, [300, 250], “pb-ad-78158” ).addService( googletag.pubads() ) ); } );

The post How to Take Control of Aperture and Create Stronger Photos by Andrew S. Gibson appeared first on Digital Photography School.


Digital Photography School

 
Comments Off on How to Take Control of Aperture and Create Stronger Photos

Posted in Photography


5 Tips to Help You Take More Natural Looking Portraits

09 Nov

You’ve probably seen those beautiful portraits where couples are embracing, and laughing naturally off-camera, or two children are skipping up the beautiful country lane-way, bathed in the most perfect light. Everything in the image looks flawless, yet it still seems like the photographer just happened to be walking past at the exact right moment to capture the perfect shot.

So why is it when I try and capture those perfect candid moments someone always has their eyes closed, hair is covering half of their face, or the lighting is wrong, or worse still an unsuspecting passerby in bright pink sweat pants walks through the background of the shot.

Lifestyle 2

In this image I gave each model one action to repeat over and over, to achieve a natural candid feel. (The Footy Show cast – image courtesy Nine Network Australia)

Getting realistic and natural looking shots can be really tricky. If I set up the shot, and try and direct certain poses and reactions, the shots can look really stiff and contrived. If I try and get people to laugh on cue, it tends to look fake.

I can always leave it to chance in the hope that the people I’m working with do something worth photographing but this isn’t always an option. So what’s the best way to get people to look natural on camera? Here are my five favorite and most successful techniques to help you take more natural looking portraits:

1. Check your mood

People tend to mirror, and reflect the mood of the photographer, so if you are having a bad day or feeling grumpy, then your models are going to pick up on that vibe. If you want happy and excited looking expressions, then you need to have that vibe yourself. If you are not feeling it before the shoot, for whatever reason (stuff happens right?) then do whatever it takes to put yourself in a good mood. Listen to a funny podcast on the commute in, call a friend who makes you laugh, read funny stuff. Eat half a jar of Nutella (don’t judge me).

WW14 192

2. If you want people to laugh genuinely, then give them something to laugh about

I’m constantly wisecracking through the shoot, and ever ready to capture the expressions as the joke hits. The best way to do this is to set up your models in the position you want them, start with serious poses, and then throw in a funny remark between frames.

You don’t even need to be that funny for this technique to work. You only really need two or three good jokes, or lines, that will crack a group of people up. I’ve been using the same lines for years and they still work. The important part is that you make them your own, and it’s something you would say, or feel comfortable saying.

3. Laugh with people

GB MEL14 750 Lifestyle 3

To get this image of the Dalton family (above) I actually just started laughing with them. Laughing with your models is infectious. I felt a bit embarrassed doing it at the start, but soon discovered it was totally worth the genuine laughs, and reactions I got. (The Dalton Family/Foxtel)

Another great trick to make models laugh is I actually ask my models to laugh, and will start laughing with them. This always starts out really awkward, everyone laughs uncomfortably, and at first they are laughing at me. But, after a while, everyone is laughing with me, and I’m always able to capture some genuine and beautiful laughing shots.

4. Give each person something to repeat

Lifestyle 4

In this image, I gave each of the girls a specific action and eye-line, while they walked toward my camera. The client wanted a fun, positive, natural-looking shot. If this sort of image is left to chance, all the girls end up looking in the same direction, or have the wrong facial expression.

Try and give everyone in the group a set of actions to repeat as you shoot. This makes it easier to control the group, and keep the shape of the shot you are trying to get. I find I have greater success when I give each model only one action to repeat, and a direction to look toward.

An example of the direction I gave for the girls walking above would be:

  • Girl A (use their real names or course!): Walk towards me, look into the camera and smile at me like you’ve just seen your best friend
  • Girl B: Walk towards camera and smile over at girl A
  • Girl C: Tell a story, and gesture with your hands and look over at girl B
  • Girl D: Laugh to yourself and walk towards camera

5. Keep talking, coaxing, encouraging, directing

People perceive silence from a photographer as a sign that you are unhappy with what they are doing.

PPTS Women 0035 PPTS Men 0026W

What’s your favorite technique for getting natural looking portraits? Do you have any great tricks we could all try? I’d love to hear about them. Please share any others in the comments below as well as your images of natural looking portraits you’re proud of.

googletag.cmd.push(function() {
tablet_slots.push( googletag.defineSlot( “/1005424/_dPSv4_tab-all-article-bottom_(300×250)”, [300, 250], “pb-ad-78623” ).addService( googletag.pubads() ) ); } );

googletag.cmd.push(function() {
mobile_slots.push( googletag.defineSlot( “/1005424/_dPSv4_mob-all-article-bottom_(300×250)”, [300, 250], “pb-ad-78158” ).addService( googletag.pubads() ) ); } );

The post 5 Tips to Help You Take More Natural Looking Portraits by Gina Milicia appeared first on Digital Photography School.


Digital Photography School

 
Comments Off on 5 Tips to Help You Take More Natural Looking Portraits

Posted in Photography