RSS
 

Posts Tagged ‘Source’

Open source Lightroom plugin Focus Point Viewer highlights active focus points

05 Jan

Joshua Musselwhite, an underwater photographer and software developer, has launched a free, open source Adobe Lightroom plugin called Focus Point Viewer. With this plugin, Lightroom users can view the active focus point of their photos, a feature similar to the one offered by now-defunct plugin Show Focus Points. 

Musselwhite details his new software on Reddit’s photography subreddit, where he explains that Focus Point Viewer was created as a way to easily see whether the focus points in his underwater images were the ones he had intended to use. The software is currently only mapped for his camera, a Nikon D7200, but because it is made freely available anyone can take the time to map the plugin to their own camera.

Explaining how to perform the mapping, Musselwhite said:

You’ll need to map each of the focus points. The best way I knew how to was take 51 photos at each focus point and determine the x,y pixel location for each from the top left using photoshop. I searched and searched for a focus point map for my camera but couldn’t find any … The process is a little time consuming, but it only takes a couple of hours, and is described how in the README file in Github.

The Github README file with the full explanation can be viewed here, and the entire project is available here. Musselwhite has also shared a small gallery showing both the focus points in action and the metadata submenu.

Via: PetaPixel

Articles: Digital Photography Review (dpreview.com)

 
Comments Off on Open source Lightroom plugin Focus Point Viewer highlights active focus points

Posted in Uncategorized


Facebook’s open source Surround 360 captures 3D-360 video at up to 8K

13 Apr

$ (document).ready(function() { SampleGalleryV2({“containerId”:”embeddedSampleGallery_7094366011″,”galleryId”:”7094366011″,”isEmbeddedWidget”:true,”standalone”:false,”selectedImageIndex”:0,”startInCommentsView”:false,”isMobile”:false}) });

Facebook has introduced the Surround 360, which captures 3D, 360 degree video using a total of 17 cameras and can output resolutions of up to 8K per eye. Unusually, Facebook will be making both the camera and processing software open source to give developers the opportunity to improve both.

The Surround 360 itself features 17 synchronized cameras: 14 horizontal, a fisheye on top and two more on the bottom. Each camera has a global shutter (which eliminates rolling shutter) and has been designed for long periods of operation without overheating. Raw Bayer data is captured, which is later processed in the stitching software. All 17 cameras are bolted onto an aluminum chassis so everything stays in place.

Facebook says it has used Point Grey industrial cameras in the Surround 360, which hints at the use of Sony 2nd generation Pregius CMOS sensors with global shutters. The lenses used are 7mm F2.4 lenses designed for up to 1″-type sensors, which could even mean the use of the latest Sony IMX253 or IMX255 chips. If that’s the case, then these lenses are roughly equivalent to 19mm.

With incredible amounts of data coming from all of those cameras Facebook uses a Linux-based PC with a RAID 5 SSD array that shares the writing out across eight drives simultaneously. The company has made controlling the camera rig easy, via a web-based interface that allows users to adjust shutter speed, exposure, frame rate and gain.

The stitching software uses the concept of optical flow to resolve disparities between what pairs of cameras can see. The company says this method is ‘mathematically trickier’ than traditional systems, but yields better results. The end results are 3D/360 videos which can be output at 4K, 6K or 8K per eye. Videos can be viewed on Oculus Rift and Gear VR headsets using Facebook’s Dynamic Streaming codec. Videos can also be output and shared on Facebook and other websites.

A big part of the Surround 360’s story is that Facebook is opening up both the camera blueprints and processing software to developers, stating that ‘we know there are ideas we haven’t explored’ and ‘we know from experience that a broader community can move things forward faster than we can.’ The company says that the design and code will be on GitHub this summer.

More technical information can be found on Facebook’s developer site, while consumer-friendly info about the camera can be found here.

Articles: Digital Photography Review (dpreview.com)

 
Comments Off on Facebook’s open source Surround 360 captures 3D-360 video at up to 8K

Posted in Uncategorized


How to Create Dynamic Images with an LED as Your Only Light Source

02 Feb

With a limited budget it’s easy to feel limited by your gear (or lack of gear I should say) but with time, and experimentation, you can discover ways to use the gear you have now, to make compelling images. In this tutorial you will be given a few pointers on how you can use just one LED light to make beautiful and dynamic images.

Equipment

For this tutorial you will need:

Intro image 1

  • An LED light. The light used here is a Neewer CN-126 LED Video Light which was bought on Amazon for under $ 35.
  • A DLSR – Canon, Sony, or any other brand is suitable. I used a Canon 5D Mark II.
  • A tripod or stable surface.

Direct light

Let’s start with the easiest setup: Placing your LED light directly on top of your camera, or on a light stand directly in front of your subject, may seem fairly basic. On its own, it can create a standard, flatly, lit image, which may not seem very exciting to your viewer. However, placing an item that has an interesting pattern or shape directly between your light and your subject can give a unique and creative result.

You can, for example, place a lace tablecloth between your LED light and your model/subject. Playing around with the fabric’s distance from the light, causes the pattern’s shadow to change size, and sometimes even shape. Adjust the distance and placement of your fabric (or other item) until you find a combination that works for you.

DL image 1

DL image 2

DL image 3

For the image above, I used my 50mm lens with an ISO of 2000, and my exposure set manually with shutter speed at 1/50th and aperture at f/1.4. My LED light was adjusted to medium brightness.

You can also use movement to add interest to your image as shown below. A slow shutter speed along with quick movements can make your images a real conversation piece. Try experimenting with moving your body, or an object like a colourful scarf or umbrella in your image.

DL image 4

Side light

Taking your LED off-camera, and placing it at an angle to your subject is another easy way to create a beautiful image with this simple setup. Keep your LED light setting between low and medium, and angle it at roughly 45 degrees from your subject, can give a nice soft light cascade across your image.

SL image 1

If you try placing your LED light directly to the right, or left, of your subject, you will get a pretty cool effect as well. This placement creates an interesting shape in the natural shadow your subject makes. In the image below, the LED is propped up at eye level, on a bookshelf to my left. The angle of the light, coupled with a delicate pose, created an image that was both compelling, and visually interesting. Camera settings for this image were ISO 1600, f/3.2 and 1/160th of a second with a 50mm lens.

SL image 2

Playing around with overlays and textures in Photoshop can further enhance your photo.

SL image 3

Backlight and overhead light

For small objects you can do a simple backlight setup, using your LED light. If you place a sheet of white letter sized printing paper directly over your LED light, and place your subject directly on top of it, the result is pretty interesting. When using this method try to choose a subject that you think would have an interesting silhouette. You can also try items that are slightly translucent and may possibly glow when back lit. Try capturing your final image by shooting from an overhead angle, but don’t be afraid to experiment with other camera positions as well.

BL image 1

BL image 2

Interesting images can also be created by putting your LED light directly above your subject. In the first image below, the light was angled slightly above the rose. This created a nice, softly angled, light effect that gave the rose a different dimension.

OL image 1

Coupling the overhead LED placement with interesting poses gives really striking results. Posing your subject with their face turned upward, in the direction of the light, for example, creates some really nice shadows along the contours of the face. Some creative editing in Photoshop resulted in these final images.

OL image 2

OL image 3

With this simple tool and a little imagination, you can create dynamic, visually appealing images for your portfolio. The key here is to experiment, play and have fun.

Let me know other creative ways you have used an LED light to add interest to your photography in the comments below.

googletag.cmd.push(function() {
tablet_slots.push( googletag.defineSlot( “/1005424/_dPSv4_tab-all-article-bottom_(300×250)”, [300, 250], “pb-ad-78623” ).addService( googletag.pubads() ) ); } );

googletag.cmd.push(function() {
mobile_slots.push( googletag.defineSlot( “/1005424/_dPSv4_mob-all-article-bottom_(300×250)”, [300, 250], “pb-ad-78158” ).addService( googletag.pubads() ) ); } );

The post How to Create Dynamic Images with an LED as Your Only Light Source by Tricia Bent appeared first on Digital Photography School.


Digital Photography School

 
Comments Off on How to Create Dynamic Images with an LED as Your Only Light Source

Posted in Photography


How to Use Your Tablet or SmartPhone as a Light Source for Photography

23 Jul

In the early 90s I was just a kid, and I remember watching a VHS tape about photography lighting with the great Dean Collins. I was truly amazed with the way things were arranged in the studio and how he placed the light. This was magic to me, and Dean Collins was the magician.

I watched it over and over, trying to find the little tricks behind everything he was doing. Since that day, every time I see a picture, I try to understand how it was done and how the light was placed, the quality of the light, the reflections, and the shadows it casts. What I’ve learned along the way is that a lot of the commercial images you see are done with some really simple lighting setups, and not in the big studios with the big production sets that you might imagine.

The next image is an example.

01

This image might look like a complicated and high-end lighting setup, but in fact, the only light sources used here were simply a tablet and a smartphone.

02

This is a typical light painting image, where the camera is placed on a tripod and the image shot at ISO 50, f/5.6 and a 4 second exposure time. I used the lowest ISO so I could make the image as clean and noiseless as possible. F/5.6 was the chosen aperture to give me the depth of field effect I was looking for, and after a couple of test shots, I realized that 4 seconds was the correct exposure time for the light I was using. It also gave me a comfortable time-frame in which I could move the light around and create the desired effect. An infrared remote shutter release was used to avoid touching the camera and keep it as steady as possible.

Light painting is a technique I use a lot in my work. I used to do it mostly with small lanterns and led light panels, but I realized that a tablet screen light and a smartphone camera led light are fantastic tools to use as light sources in this type of images. There are a few apps that can help to control what shows up on the screen, and transform your device into a mean light-painting machine, but you don’t really need them.

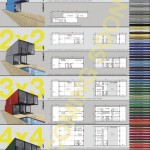
What I’ve done is to create my own masks in Photoshop which I have in my iPad Mini Retina’s camera roll to use when I need. Here are some examples of masks I’ve created.

03

These masks control the shape and colour on the screen, and the brightness can be easily controlled in the device’s screen definitions.

I took some readings with a colour meter. The iPad screen is around 5,500k and the iPhone camera LED light is around 6,500k, so it’s easy to adjust your camera to match the light source’s colour temperature or use different colours on the device’s monitor to create colour effects in the image.

The light from these screens is usually soft; you can make it even softer with some tracing paper in front of the screen and you can control the spread of light with some black card flags.

In this case I was holding the device by hand and moving it around, but you can buy cheap tablet and phone holders with ¼” thread connectors that can be mounted onto tripods, magic arms or even handles that make it easier to hold.

This particular image could have been done with only one exposure, but I decided to take it a bit further with a composition of three images with three different types of light.

04

04a

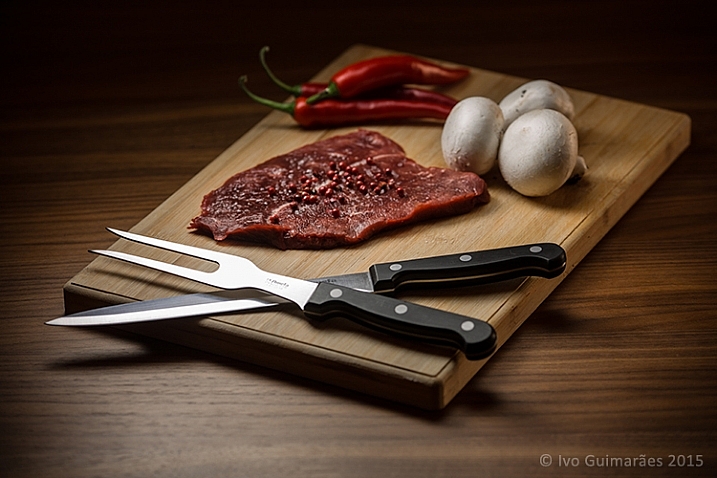
The first image (above) was created with perfect light on the knife and fork, with the iPad positioned at an angle, and with a white screen for a nice light reflection.

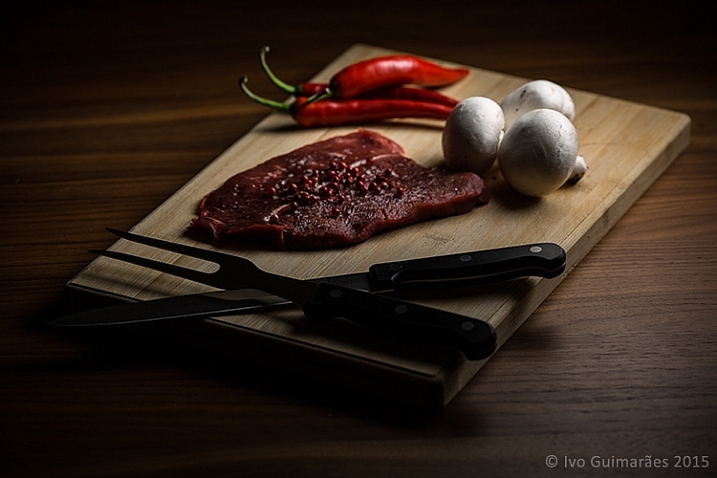
The second image (below) has the perfect light on the steak, chilies and mushrooms, with a circular faded mask on the iPad screen.

04b

The third image (below) gives a vignette effect and some dramatic light with the LED camera light of the iPhone which is a much harder (smaller) light and therefore casts harder shadows.

04c

Now it’s just a matter of composing the final image in Photoshop using the best that each of these images has to offer.

05

The idea here is to stack the three images and use layer masks to show the good light spots and hide the bad ones. Here is a closer look at the layers with associated masks for each one.

06

These lighting and composition techniques are not exactly new. This was done long before Photoshop and digital photography were around. Film with multiple exposures or darkroom masking techniques were used with similar effects a long time ago. Nowadays, things are just a lot easier with the digital advent, but the fact is that the basics and references are still there, and understanding this puts you on the right path to be a better photographer.

Have you tried this technique before? Give it a go and post any comments or questions you have below.

googletag.cmd.push(function() {
tablet_slots.push( googletag.defineSlot( “/1005424/_dPSv4_tab-all-article-bottom_(300×250)”, [300, 250], “pb-ad-78623” ).addService( googletag.pubads() ) ); } );

googletag.cmd.push(function() {
mobile_slots.push( googletag.defineSlot( “/1005424/_dPSv4_mob-all-article-bottom_(300×250)”, [300, 250], “pb-ad-78158” ).addService( googletag.pubads() ) ); } );

The post How to Use Your Tablet or SmartPhone as a Light Source for Photography by Ivo Guimaraes appeared first on Digital Photography School.


Digital Photography School

 
Comments Off on How to Use Your Tablet or SmartPhone as a Light Source for Photography

Posted in Photography


Sunshine: My Favorite Light Source

11 Mar

w170

I’m a minimalist gal when it comes to most things, and photography equipment is no exception. I know that some people love equipment and gear; the more the better. But when I think about lugging lights, reflectors, and flashes around, my creativity takes a nosedive. My favorite light source, hands down, is the sun. In the words of John Denver, sunshine on my shoulder makes me happy!

I’d love to share some dos (because who likes to be told what NOT to do?) to help you harness the power of the giant lamp in the sky. Hopefully you’ll gain a new appreciation for this natural light source, whether or not you hate lugging equipment around like I do.

The sun is unique

One thing I love about the sun is that it is never the same. Although having an unpredictable light source can be a big challenge, I love that every day, every shoot, every photo, is unique and special. I couldn’t recreate any given day’s exact lighting even if I wanted to. Some days everything works together like magic, and I call that a gift.

DO pay attention to how the light falls on your subject’s face

w500

I see many amateur photographers take photos like the one above, with harsh light and shadows on the face. Most of the time they are paying more attention to a pretty background than the lighting. If the sunlight is very bright, such as midday, or early afternoon, this can be a big problem.

Sunlight is a beautiful light source, but you have to work with it, and position your subject in the correct place, since try as you might, you’re not going to be able to move the sun (unless you want to wait a couple of hours, and let it move itself).

DO try backlighting

w152

This means that the sun is behind your subject, facing you. This method of using the sun is my absolute favorite, because it makes your subject just glow. There are a few things to keep in mind as you try backlighting:

  • DO use backlighting at any time of day. You get different effects backlighting with the sun in different positions. It’s an effective tool to use even when the light is harsh, since it softens the light on your subject’s face, and helps them not to squint. It’s also an ideal tool to use when the sun is low, golden, and gorgeous.
  • DO move yourself around. Slight differences in angles can make a big difference in the look you get. I like to have the sun behind and slightly to the side of my subject (as you can see in the photo above). If the sun is directly facing your camera, you may get flare in your lens that can totally wipe out your subject. You can get beautiful lens flare effects if you find a spot somewhere in between the two. Experiment to find exactly the look you are going for.

w174

  • DO use poles, trunks, bushes, or whatever is there to manipulate the light to your advantage. If the sun is positioned behind leafy trees, you can create beautiful soft bokeh. The trees filter the light a bit so it isn’t so harsh, and you get beautiful warm, soft, lighting. You can position yourself where the sun is partially behind a trunk or pole off to the side, which will cut some of the harshness and glare in your lens. The trunk doesn’t need to be in your photo, it’s just working as an assistant for you.
  • DO pay attention to the clothes YOU are wearing. Try wearing light/white tops as the photographer, and avoid wearing bright colors. It may seem strange that it matters what the photographer is wearing, but when the sun is reflecting off your chest, it can cast colors onto your subject that you weren’t intending, and put odd colored highlights in their eyes.

w162

  • DO use your subjects and your own body to work with the sun. You can position yourself so the sun is directly behind your subject, so your subject filters the light a bit and cuts the glare in your lens. This can create a beautiful glow, or a starburst effect. Sometimes if there is just a little too much glare on my lens, I hold my hand off to the side of my lens (not in the photo) and achieve just the amount of sun flare that I want, without all the washed out glare.

DO experiment with the sun directly lighting your subject

w198

There are lots of great advantages to this type of lighting, including the beautiful sky captured in the photo. When you backlight, your sky is usually washed out in order to have your subjects properly exposed. You can add a sky in post-processing, but when you shoot with the sun behind you, and toward your subjects, you can expose for both at the same time. A few more tips for front lighting using the sun:

  • DO keep in mind that it is usually hard for people not to squint when they are looking into the sun. If it’s a particularly bright day, you may have to have your subjects looking away from the sun. Some people are extra sensitive to light, and you may not be able to use front lighting unless the sun is really low in the sky, almost ready to set. Squinting eyes aren’t very attractive, neither are watery eyes and scrunched up faces.

w149

  • DO use front lighting when you want a dark background. If you position your subject near the opening of a shed or garage, the background will fall into darkness, since you have your exposure set for the bright subject in the front.
  • DO use front lighting for drama, and for high key photography, but be careful that you don’t lose too much dimension and end up with flat images.

DO use the sun for beautiful portraits

w167

When the light is soft, either when it’s almost down, or with a few clouds over it, you can light your subject from the side to get dimension. You can get dramatic moody portraits, soft flattering portraits, fun happy portraits…the sky is the limit!

DO become a light watcher

I can’t talk to someone without noticing how the light falls on their face. I look at how shadows fall at different times of the day. I study the quality of the light constantly, and take photographs with my mind all day long. The more you know about how the sun works, and how you can work with the sun, the better your photos will get.

Lastly – just one little don’t

DON’T be discouraged if the sun is hiding behind clouds. If you’re lucky, they’re thin clouds, and you can still harness a bit of that magical sunny glow. If it’s overcast, just remember that you’re still using the sun as your light source, and be grateful for the ease of using the whole sky as a giant soft light. Don’t forget; in the words of Annie, the sun will come out tomorrow!

googletag.cmd.push(function() {
tablet_slots.push( googletag.defineSlot( “/1005424/_dPSv4_tab-all-article-bottom_(300×250)”, [300, 250], “pb-ad-78623” ).addService( googletag.pubads() ) ); } );

googletag.cmd.push(function() {
mobile_slots.push( googletag.defineSlot( “/1005424/_dPSv4_mob-all-article-bottom_(300×250)”, [300, 250], “pb-ad-78158” ).addService( googletag.pubads() ) ); } );

The post Sunshine: My Favorite Light Source by Melinda Smith appeared first on Digital Photography School.


Digital Photography School

 
Comments Off on Sunshine: My Favorite Light Source

Posted in Photography


Monterey Bay Aquarium uses GoPro to create new open source research camera

27 Jan

The Monterey Bay Aquarium Research Institute has created an open source camera system for use underwater to aid in research projects. The rig is composed of a GoPro camera and other easily sourced components, and is cheaper than commercially available oceanographic camera systems. Learn more

Articles: Digital Photography Review (dpreview.com)

 
Comments Off on Monterey Bay Aquarium uses GoPro to create new open source research camera

Posted in Uncategorized


Open Source Homes: 6 Free Plans Put High-End Design in Reach

21 Jan

[ By WebUrbanist in Architecture & Houses & Residential. ]

free open source houseboat

Rendering luxury-class house designs accessible to the public is just part of the beauty of Paperhouses, an endeavor to raise the quality of free house plans and and explore the potentials for architecture to be as open as technology can be. As with Wikihouse, anyone is welcome to download and begin construction on any of the uploaded homes without paying an architect fee.

open source houseboat system

The latest submission to Paperhouses is a houseboat by Carl Turner Architects composed of prefab parts and design to move freely in narrow urban waterways and allow for expansion in ever-more-crowded European capitals.

open source modular house

As with other homes in the database, this one is intended to be flexible, able to be adapted to different conditions and clients. While intended to float, the modular construction allows the design to be built on land with equal ease while an adjustable pallet of colors and materials allow it to be individualized by each builder or owner.

open winter cold house

open house private sky

open house urban context

Our Private Sky by Florian Busch Architects is part of the same initiative but approaches modularity through the idea of privacy and views. The primary focus of the structure is upward, while variable windows can be added, moved or removed depending upon its context.

open source modular blocks

open source free plan

open house plan layout

The Module House by Tatiana Bilbao is based on series of same-sized blocks that can be arranged and oriented depending on the layout of a site and desired directions relative to the sun, featuring concrete walls and cantilevers to balance daylight and shade.

Next Page – Click Below to Read More:
Open Source Homes 6 Free Plans Put High End Design In Reach

Share on Facebook


[ By WebUrbanist in Architecture & Houses & Residential. ]

[ WebUrbanist | Archives | Galleries | Privacy | TOS ]


WebUrbanist

 
Comments Off on Open Source Homes: 6 Free Plans Put High-End Design in Reach

Posted in Creativity


How To Source Locations For Portraits In Your Own Town

20 Nov

I’ve noticed that a lot of articles on scouting locations focus on travel — we have a wonderful one on this website listing 100 amazing places to shoot. That is, however, not actionable advice for everyone. Some photographers can’t afford to travel regularly, some aren’t interested in it, and some simply focus on a different type of photography. For that Continue Reading

The post How To Source Locations For Portraits In Your Own Town appeared first on Photodoto.


Photodoto

 
Comments Off on How To Source Locations For Portraits In Your Own Town

Posted in Photography


Free to Forge: Open Source 3D-Printed Metal Mesh Furniture

23 May

[ By WebUrbanist in Gadgets & Geekery & Technology. ]

3d printed metal bench

Completed by a robot programmed to extrude material in midair, the world’s first fully 3D-printed metal furniture shows off a fresh range of possibilities for creating intricate structures and complex shapes on demand.

dragon bench design details

Employing Autodesk and an MX3D machine, Dutch designer Joris Laarman created the Dragon Bench (above) and other pieces (below) that illustrate the rich potential of metals using additives to harden as they are deployed.

mx3d robot machine

With this industrial robot [and] advanced welding machine we are able to print with metals, such as steel, stainless steel, aluminium, bronze or copper without the need for support-structures. By adding small amounts of molten metal at a time, we are able to print lines [horizontal, vertical and spiral] in mid air. The combination robot/welding is driven by different types of software that work closely together. This will eventually have to end up in a user friendly interface that allows the user to print directly from CAD.”

3d printed exhibit design

3d open source maker

3d printed chair series

Within this series, currently on display at Friedman Benda gallery in New York City, are a set of organic (also 3D-printed) polyurethane chairs and table. Puzzle-piece parts are made first, costing around $ 50 – the components are assembled into a finished whole. The plans for these are also going to be made available online as free resources for anyone who wants to make their own – an easier, less material-dependent entry point for someone without access to their own metal-printing robot (at least as of yet).

mx3d demo example

bench

The potential of this technology extends well beyond stand-alone objects – components for cars, buildings or other infrastructure could be generated using the same machines and techniques. Meanwhile, when it comes one-off custom works of either art or design, three-dimensional complexity is suddenly a much lower hurdle to overcome.

Share on Facebook


[ By WebUrbanist in Gadgets & Geekery & Technology. ]

[ WebUrbanist | Archives | Galleries | Privacy | TOS ]


WebUrbanist

 
Comments Off on Free to Forge: Open Source 3D-Printed Metal Mesh Furniture

Posted in Creativity


Open source Lux camera is a DIY project for ambitious photographers

17 Jan

11554619543_d263eb6afc_b.jpg

Kevin Kadooka’s Lux is an experiment in DIY camera building. With a waist-level viewfinder, it accepts 120 roll film. Rather than borrowing parts from old cameras as he’s done in previous projects, Kevin’s Lux camera is comprised of off-the shelf parts. All of its construction specifications are available to enterprising individuals looking to build their own. Click through to learn more

News: Digital Photography Review (dpreview.com)

 
Comments Off on Open source Lux camera is a DIY project for ambitious photographers

Posted in Uncategorized