Timelapse photography can be mesmerizing with the right subject. We chose the new lighting system brightening San Francisco’s Bay Bridge for our timelapse app experiments using an iPhone 5. The bridge is lit by 25,000 LEDs to create eye-catching displays controlled by several Mac Minis mounted inside the structure. As mobile phone cameras grow in quality and the storage capacity of these devices increase, it’s possible to make a decent sequence with just what’s in your pocket, plus a small tripod. Learn which apps we liked best at connect.dpreview.com.
Today I thought it might be fun to share a little exercise that we feature in our Natural Light eBook (by Mitchell Kanashkevich) – both because it gives you a taste for the content but also because I think it’s a useful exercise to do to help you understand light and photograph portraits using it.
This exercise is particularly useful because one of the differences in shooting with natural light as opposed to artificial light is that with artificial light you’re able to ‘direct’ the light (by moving lights around your subject and changing how much those lights output).
When it comes to working with natural light we need to learn to direct ourselves and/or the subject in relation to the light source.
Rather than moving lights around… it is us (and the subject) that may need to be moved.
The exercise is simple:
Find a room with a window allowing fairly bright diffused (indirect) light.
Get your subject to move to different spots in relation to the window. Move around with the subject, take photos, and pay attention to what effect the movement of both of you has on the way that light makes the subject look.
For the eBook Mitchell did this exercise with his nephew. Below are the images and corresponding diagrams of where the subject was in relation to the window and below are descriptions of the shots, EXIF information and what Mitchell did and what impact that had on the shot.
1. The subject is turned at approximately 45° towards the window.
Result: A very smooth progression of light to dark tones.
EXIF: 16-35@35mm, f/2.8, 1/125s, ISO 2000
2. Subject is at 90° or parallel to the window.
Result: Very harsh contrast between the side of the face close to the window and the side further away from the window.
EXIF: 16-35@35mm, f/2.8, 1/200s, ISO 500
3. The subject is at 90°, parallel to the window, with his head turned towards it.
Result: Light still works the same way, but instead of one side of the face being dark, the face is well lit and it is the back of my nephew’s head which is dark.
EXIF: 16-35@35mm, f/2.8, 1/125s, ISO 500
Mitchell also notes: Having a light source such as a window also gives you control over the intensity of light. The further away you are from the light source, the less intense it is. Less
intensity also means less contrast between light and dark.
I did this exercise recently with a family member and was fascinated with the results and was also reminded what an incredible variety of styles of shots that you can achieve – all in the one setting but by simply changing up where you position yourself and your subject.
Give the exercise a go and let us know how you go!
Get more exercises and teaching like this from Mitchell in his Natural Light eBook.
Post originally from: Digital Photography Tips.
Check out our more Photography Tips at Photography Tips for Beginners, Portrait Photography Tips and Wedding Photography Tips.
A Simple Exercise on Working with Natural Light in Portraits
Fact: most people on the planet—including roughly two-thirds of Americans—do not have a passport.
Without a passport, you won't be traveling internationally any time soon. And even if you have no immediate travel plans, just having a passport is kinda like having a muscle car at a red light. You won't always squeal tires when the light turns green, but you know you could.
If you have never held a passport before, it's a neat feeling when it arrives in the mail. For perhaps the first time, you feel like a citizen of the world. Merely having the possibility of international travel is better than not having a passport and being guaranteed you can't go.
Even better, unlike your crappy driver's license or student I.D. mugshot, your passport photo is something you can control. So if you are gonna be a jet-set traveler, you may as well look good doing it.
New Years means three things: dancing, champagne, and lots of photos to record the blurry memories.
If it weren’t for your trusty flash, those photos would turn out just as blurry!
Have no fear fellow party monsters because we’ve put together a guide to flash photography guaranteed to keep your photos sharp as a tack and shiny as a disco ball.
Check out these 7 simple tips, and by midnight we’ll have you ready to kiss blurry goodbye.
7 Simple Tips for Great Flash Photos
p.s. We’re having our first ever sale today in the shop! Hurry on over before we change our minds 😉
Why it’s Cool:
Flash tends to get a bad rap.
Many people associate it with dark shadows and washed out colors.
In a perfect world we could use ambient light all the time, but nobody wants to miss capturing the party just because the light’s gone low.
In this guide we’ll show you how flash can help avoid motion blur, balance for unusual lighting, fill in dark shadows, accentuate movement, and offer tons of creative control.
And what’s awesome is that when done just right flash looks really good!
In fact, most people won’t even be able to tell you’re using it.
Diffuse the Situation – Flash Diffusers
Direct flash can be over-bright, harsh, and create some nasty shadows.
But, flash diffusers help soften the light from your flash by either shooting it through some transparent material or bouncing it off a reflective surface.
We like the Lightsphere from Gary Fong for even soft light, and The Flash Bender and Diffuser when you want a little more creative control with your lighting.
For this shot, we angled our flash slightly backwards so that light popped forward through the diffuser to shine on our subject and also kicked off the wall behind us to spread our light evenly.
Glitter Bomb – Using flash to Freeze Action
When the ball drops, don’t drop the ball with blurry pics, use your flash to freeze the action!
To take advantage of flash’s action grabbing potential, make sure you set a minimum shutter speed of at least 1/60th of a second.
Because of a fancy rule called the inverse square law (which basically says the power of your flash doesn’t travel very far), you will want to get as close to your subject as possible.
A wide angle lens will help capture your entire scene.
We took this shot at 1/250th of a second, f/4, and ISO 1000, fast enough to keep background light from messing up our freeze.
Also, a super wide 21mm focal length helped keep the camera close and still squeeze it all in.
Ghosts in the Night – Using Slow Sync
The slow sync setting leaves your shutter open longer, and lets your camera pick up the ambient light in your surroundings.
This helps keep color natural instead of just picking up the light from your flash which is tinted a little blue.
Slow sync can open a pandora’s box of possibilities, from light painting with sparklers to incorporating background movement into the mix.
Our example was shot using rear curtain sync option.
This means the shutter will open, gathering ambient light and allowing anything moving to blur, and then right before the shutter is about to close the flash will fire, freezing the action.
If we had used first curtain sync instead, the flash would’ve fired as soon as the shutter opened and then stayed open to gather light.
Notice the ghostly light passing through our subjects, and the glowing trails of their movement.
Flash Filterz – Using Colored Gels
Coloring doesn’t have to stop when you outgrow your 24 pack of Crayolas.
Flash filters are super easy to use and can be a fun way to add creativity to your shots.
Using flash filter can also help balance for ambient lighting conditions.
For instance, a yellow flash filter balances for the amber tint of candlelight.
We used a couple filters from The Universal Flash Filter Kit for this shot.
To use these filters, simply snap the included rubber band around your flash head and attach the colored gels.
Cranking up the saturation in your settings will make these guys shine, and for extra creative points try combining flash filters with double exposures.
Bounce House – Bouncing Flash
Bouncing is a technique for diffusing the light from your flash.
Instead of pointing your flash directly at your subject, you tilt your camera’s flash so it bounces off another surface such as the ceiling, which illuminates your subject with the reflected light.
Bouncing flash keeps your subjects from looking like a deer in headlights, and gives you super creative powers.
For this technique, imagine you are playing a giant game of light pinball.
Aim your flash forward, backwards, or to the side, to bounce your ball of light off different surfaces and at different angles, creating unique looks and eliminating harsh shadows.
For this shot, the flash was angled up and just a little forward so that the light bounced off the ceiling just in front our subject and filtered down onto her face.
Off Roading – Using Flash off Camera
With this technique, you’ll be taking your flash on safari with an off camera excursion.
You will need an external flash unit for this one. If you don’t already have one, this flash from Sigma can be picked up for a pretty good price and is made for all major camera manufacturers.
Many external flashes can be triggered wirelessly by the pop up flash built into your camera.
To do this, simply set your flash into slave mode, set your camera’s flash as the master commander (Muhahaha), and make sure they are on the same channel.
You can set your camera’s built in flash just to trigger the external flash unit or to fire along with it.
This shot was created with the flash pointed straight at the camera and placed behind the disco ball. When fired, it created shiny sparkles and consequently reminded us of our middle school dances.
Off camera flash can also be used to fill in dark shadows and balance for other light sources that are striking your subject.
I Can See Your Halo – Using Ring Flash
Round pupils, round face, portraits were just made for circular flash!
Ring flashes attach around your lens and light up like a big glowing halo for glitzy circular catch lights in the eyes.
We used The Ring Flash Adapter for our example, which attaches to the flash you already have saving you some solid buckeroos.
To use the Ring Flash Adapter, you will probably need to turn up the exposure compensation on your flash as it works by bouncing light down a mirrored tube.
We found between +1.3 and +2 stops worked best for a nice bright exposure.
Taking it Further
Head outside and try a flash portrait at sunset.
Get wet with some water drop photos.
Can’t afford a fancy diffuser? Print this bounce card for free!
Create a DIY square ring flash.
Head over to Joann Fabrics and pick up some cloth backgrounds for a New Years photo shoot. Right now Crushed Panne Velvet is on sale! (FYI, they totes didn’t pay us to say that. It’s just rad.)
Related posts:
Alternative Prom Photography — Ideas & Tips for Truly Great Prom Photos Extra photos for bloggers: 1, 2, 3 Prom photo-ops have traditionally come in…
Halloween Photo Tips — Our Ghoulish Guide to Scary Snaps How can you not love a holiday that encourages you…
The Pop-Up Flash Bounce – Perfect Lighting with Your Camera’s Own Flash! Your pop-up flash’s measly spurt of light and shadowy results…
Many factors play a part in image sharpness, not the least of which is the lens. Most of us who ever pick up a camera judge our images, at least in part, on overall sharpness. Before you go out and plunk down some hard earned cash on that top of the line pro-level lens you’ve been drooling over, think about these steps you can take with the lenses you already own to get sharper images.
Pay attention to the basics. Hold the camera properly. Your right hand should grip the camera with your finger ready to press the shutter button. Your left hand should cradle the lens. Tuck your elbows firmly against your side. Press the eye cup of the camera firmly against your head. This three-point stance stabilizes the camera and holds it steadier than holding the camera out and away from your face, with your arms extended.
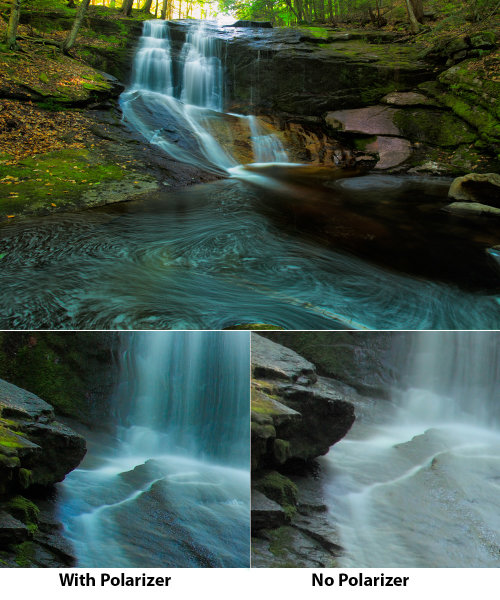
Use a polarizing filter. Polarizers are famous for darkening blue skies on sunny days, but they are just as useful in other situations. In misty or hazy situations, polarizers can help cut through that haze. Haze has the effect of softening an image, so using a polarizer to eliminate the haze enhances sharpness. So don’t hesitate to put the polarizer on your lens, even when darkening a blue sky isn’t the reason.
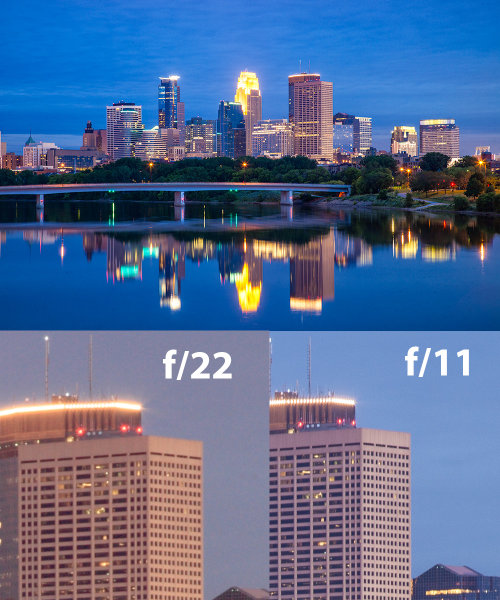
Use the “sweet spot” of your lenses. Most lenses are at their sharpest when stopped down 2 or 3 stops from maximum aperture. However, even if for depth of field reasons it’s not possible to stop down that far, closing the aperture 1/3 to 2/3 of a stop will still increase sharpness. By the same token, when a lot of depth of field is required, shooting one or two stops open from minimum aperture will provide the best sharpness. This is because at minimum aperture, lenses begin to exhibit diffraction. Diffraction happens when light is forced through a small hole, and begins to disperse. At larger apertures, this light is a small percentage of the total light hitting the sensor. At smaller apertures, this diffracted light is a much greater percentage of the total light hitting the sensor. Diffracted light causes images to appear softer. By shooting at f/16, rather than say, f/22, you can minimize diffraction and thus get sharper images.
The above finished and edited image was shot at f/11. Beneath are two crops. The crop on the left shows the same scene, shot a few moments later at f/22. The crop on the right is from the same file as the completed image, shot at f/11, but unedited. In the shot at f/22, you can clearly see the effects of diffraction, as the windows on the building are just not as sharp as those shot at f/11.
Select the AF point you want to use, and put it where you want to focus. Many photographers I talk to like touse the center AF point and use the “Focus and Recompose” method of focusing to create their images. Unfortunately, while easier in many ways, this method can contribute to less sharp photos. This is especially apparent when shooting at wider apertures and depth of field is shallower. When you do this, the focal plane shifts, moving it away from where you originally focused. It’s not a big deal when shooting at smaller apertures, but when shooting near wide open, it will be noticable. A better technique is to choose the AF point nearest where you want the sharpest focus. This reduces focal plane shift, thus keeping the sharpest focus where you want it in your photo.
When using zoom lenses, focus at the focal length you plan to shoot at. In the past, in the manual focus days, lenses were parfocal, meaning that you could zoom the lens and the focus would stay the same. Many of today’s lenses, however, are not parfocal. So changing the focal length by zooming causes focus drift, and the lens is no longer focused where it was before it was zoomed. The better bet is to zoom the lens where you want it for your composition, and then focus the lens.
There is obviously much more to getting sharper images, but these five basic tips are a good start to keeping your images sharp.
Post originally from: Digital Photography Tips.
Check out our more Photography Tips at Photography Tips for Beginners, Portrait Photography Tips and Wedding Photography Tips.
Let’s be honest whether it is coming up with portrait posing ideas, photographing the stars, or avoiding danger in the field we all have a common goal here – gain more knowledge and put it to use in our photography – but there comes a time when we must be our own teachers.
We must venture out away from the tutorials, the guidebooks and those YouTube videos to simply do something for ourselves, without fear, and without guidance. Just with the knowledge that we already have in our heads. My friend, that is what this question is all about.
What Happens When I Do This?
If I had not tried something different, something out of my comfort zone, I wouldn’t have been able to capture this photograph. I was attempting to create an HDR composite, but I wanted to see if I could create one with me in the frame. I’d never done this, I hadn’t even attempted it, so I just set my camera up to capture the brackets, put it on a timer, and walked into where I thought would be a good place to stand. However, while the camera was still taking the shots, I left the scene before the shutter had closed for the final time, and thus – a ghostly figure.
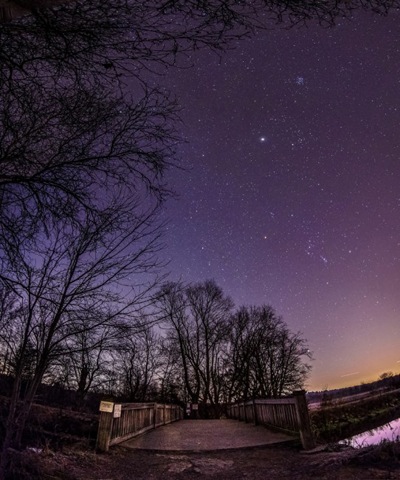
Another example is this photograph of the night sky. It actually consists of four separate landscape orientated images stitched together to create a vertical panorama with a fisheye like effect to boot. I talk in a bit more detail about how I created this vertical panoramic image on my own site, but if you’re listening to the message of this post, you probably shouldn’t have clicked on that link .
It Takes Courage
Tutorials and guides make life easy. Follow the steps and you’ve got a great photograph, but is it original?
It takes courage to be able to do this style of learning and even more so to share your photographs with the world. You have to accept the fact that you’re going to make mistakes, you’re going to feel like you’ve wasted some time, and you’re going to have people tell you that you’ve done it all wrong, but to that I say all this is part of a good learning process.
Don’t Stop With Taking the Photo
Apply this no-holds-bars-experimentation-attitude to all aspects of photography and yes, maybe even to life as well.
Whether you’re using Instagram or Photoshop to edit your photographs asking, what happens if I do this?, is key to creating something different. Sure there’s a lot more to experiment with in the latter, but if you’re always using the same filter and the same blur effect in Instagram are you really learning anything?
What Do You Think?
Is it more important to get out in the field and forget the books once you’ve got the basic knowledge or should you stay up-to-date with all the knowledge that’s being shared on the web every-single-day and miss the possible shot of a lifetime?
John Davenport is an enthusiastic amateur photographer and blogger who shares daily photos on his site Phogropathy. You can also find him on Facebook and Twitter.
Post originally from: Digital Photography Tips.
Check out our more Photography Tips at Photography Tips for Beginners, Portrait Photography Tips and Wedding Photography Tips.
Become a Better Photographer By Asking One Simple Question
[ By Delana in Conceptual & Futuristic & Technology. ]
Street lights are a ubiquitous part of the urban landscape – so much so that most of us hardly notice their presence at all. What would happen if improving the aesthetics, functionality and environmental footprint of street lights suddenly became a priority? A few forward-thinking designers would have a head start. These concepts for improved street lights may just be the lights that guide us in the coming years.
Solar Trees
(images via: Ross Lovegrove)
Taking streetlights off of the sometimes-unpredictable electricity grid is a priority for many designers. Ross Lovegrove created the Solar Tree, an LED-lit fixture that relies on the power of the sun to illuminate the streets. The array of up to ten leaf-like photovoltaic (PV) structures soaks up solar energy during the day and stores it in integrated batteries. When the built-in light detectors sense that the sun has set, the lights flip on, using much less power than traditional street lamps.
Flowlight
(images via: Shane Molloy)
The Flowlight uses an incredibly powerful natural force to light the way: tides. Designer Shane Molloy used the tidal river called the River Sur as the basis for his design, which would light up piers and other waterside areas. A water turbine-equipped arm dips down from each light into the water, gathering energy from the movement of the waves. The arm floats higher or lower depending on the position of the tide, ensuring that it never misses an opportunity to build up some more energy for lighting the path after dark.
sTREEt
(images via: Kibisi)
Utilizing a brand new kind of network or grid, the sTREEt concept would connect neighborhoods through a series of “urban furniture” pieces. The central part of the plan is the “mother tree,” a tall structure outfitted with lots of solar panels. The big “tree” feeds energy to smaller structures all throughout a neighborhood. These smaller modular structures feature changeable configurations which can be set up as just street lights or street lights with advertising space, convenient seating, or even fun swings.
EnergyMe
(images via: Dido Studio)
Would you donate your gym time for the good of the city you live in? That’s what the designers of the EnergyMe street light concept would like all of us to do. In order to keep the street lights on, the EnergyMe system requires citizens to walk, run, push, pull and pedal their way to fitness. The energy spent on working out is translated into power for street lights. The concept not only cuts down on the environmental impact of street lighting, but encourages everyone to get out and exercise.
Urban Green Energy Renewable Street Lamps
(image via: UGE)
As a commercially-available product, the renewable street lamp from Urban Green Energy has already proven that off-grid lighting is possible. The dual-powered street lights utilize both wind and solar energy to power lights that illuminate streets, parking lots and walking paths. The built-in battery keeps each light going for 3-5 days in the event that the sun doesn’t shine and the wind doesn’t blow. As an added incentive to businesses looking to add this type of eco-friendly light to their properties, the street lights also include ample advertising space.
Windtulip
(images via: Yanko Design)
Designer Mebrure Oral shakes off the usual stereotypes about ugly wind turbines with the Windtulip design. Meant to look like a sleek piece of urban art, the Windtulip is actually a covert energy-producing turbine. Its top spins with the wind all day, every day, charging the internal battery. When the sun goes down the efficient LEDs light up to illuminate the cityscape.
Dial4Light
(images via: Dial4Light)
Dial4Light is a German startup company that doesn’t want to change the way street lights look – just the way they work. Rather than keeping all of the lights in any given city on all night, their concept lets users tell the lights when they are needed.Citizens call a special phone number to turn on the street lights in a particular zone that they will be traveling through. The system has been implemented in several German towns already and is not without controversy, particularly since some localities require users to pay for the privilege of using street lighting.
Energy Seed
(images via: Yanko Design)
When you use up the batteries in a favorite gadget, the chances are very good that there is still at least a little power left in them. The Energy Seed street lighting concept from designers Sungwoo Park and Sunhee Kim would use those leftover bits of power to light city streets and sidewalks at night. Each light is “planted” in a pot with little round battery receptacles in the top. Users plop their old batteries in and the device (either through magic or some sort of unexplained mechanism) turns the leftover juice into illumination. Obviously this concept would need to be refined and expanded significantly before it could be introduced as an actual product, but the idea of using every last bit of stored energy is an appealing one.
Sunflower Street Lights
(images via: Tuvie)
A very straightforward and easily understandable design, the Sunflower street light from designer Riis Ros simply uses solar power rather than grid power to light up its surroundings. The “petals” of the sunflower feature PV panels on top and lights on the bottom, spread out in an array that does indeed resemble a flower. Entire gardens of these solar-powered flowers could one day light up towns and cities around the world.
Intellistreets
(image via: Intellistreets)
Perhaps the most controversial street light since towns changed from gas to electric lamps, the Intellistreets light is much more than just a light in the dark. It also features speakers, digital signs, a dual band transceiver, an emergency alert system, and a camera. It is, understandably, this last part that makes some people wonder whether this next-generation street light will be used to spy on citizens in the near future. The Intellistreets lamps were already introduced in parts of Michigan in 2011; according to city officials, they will help cities save money by using less energy and only operating when needed.
Want More? Click for Great Related Content on WebUrbanist:
Dial4Light: Turning Street Lights On Via Mobile Phone
A groundbreaking cost-cutting, energy-saving program in Germany called Dial4Light requires pedestrians to activate street lights using their cell phones.
5 Comments – Click Here to Read More »»
Stop, Look and Love: 8 Redesigns of Classic Traffic Lights
The instantly-recognizable traffic light has been a standard sight on streets around the world for generations, but these designs aim to improve on a classic.
9 Comments – Click Here to Read More »»
[ By Delana in Conceptual & Futuristic & Technology. ]
Part of the attraction of food is the way it looks, so making sure your images exude the correct colours associated with the product. Before you begin shooting always take a white balance reading from a grey card if you have one or if you’re using a compact set the White Balance to a preset that matches the lighting environment you are shooting in.
2. Look for the Best Light
The best light for shooting food is soft and even, which is why a lot of it is shot in studios with large softboxes. But if don’t have expensive studio equipment to hand, position food in front of a clean window for the same effect, or if it’s a particularly bright day and you are getting shadows on your captures, veil the window with a white sheet or net to diffuse the rays or simply move the food further from the light source to diffuse its brightness. Alternatively if the weather is fair, consider pitching up outside and shooting alfresco to add another element of interest to the frame.
3. Background
If you’re using a plate or work surface as the backdrop for your shoot, make sure it’s clean, tidy and no smudges of food plague the periphery. After shooting your first shot, zoom in during playback to be sure you haven’t missed anything that will result in hours of Photoshop cloning post-shoot. The backdrop and setting you use can ultimately enhance the message you want to achieve, so use this to compliment the food rather than detract from it; for example a wooden chopping board suggests rustic, an outdoor table says al fresco, square plates suggest minimalism, etc. Typically white backdrops carry connotations of image stock sites, so don’t be afraid to inject colour into the background using coloured sheets or card if item is small enough, for an added element of interest. When choosing the backdrop use a colour that compliments that of the food or reflects the vibe you want to portray, as darker colours can often influence thoughts of comfort and warmth, whereas lighter, brighter colours dictate ideas of freshness and frivolity.
4. Composition
Consider what makes the food look appealing and find a way to sell that feature. A wide aperture works well on products that are presented in rows or clusters and are easily identifiable such as; cupcakes, biscuits, and sweets etc. If the product is small and plentiful, such as coffee beans or nuts for instance, consider cropping in close to fill the entire frame. Also consider your angle to add interest and sense of depth, scale and perspective. Make the most of interesting patterns and shapes by highlighting this as the focus. Including props to present the product can work well to convey a sense of scale or action, such as ladles, bowls, scales, pestle and mortar, or for drinks consider decorating the glass or backdrop with the fruit or flavours used in the ingredients.
5. Action
As well as photographing the finished article there is a lot to be said for in-progress recipe shots that show food actually being prepared. Consider shots that feature motion such as chopping, blending, frying, rising in the oven etc and using a longer exposure to convey the sense of motion and speed. But don’t forget the tripod!
Post originally from: Digital Photography Tips.
Check out our more Photography Tips at Photography Tips for Beginners, Portrait Photography Tips and Wedding Photography Tips.
Food photography – 5 simple ways to get stronger shot
In this case, a reflector was used at camera left, but a neutral colored wall would work just as well. The flash bounces off the reflector, the rear wall picks up some light, and the ceiling picks up some more, illuminating the top of the hair.
Everyone who ever picks up a camera at one point or another finds themselves pointing it at another person. But unless you walk around with a lighting kit in your back pocket, you have to make do with what you have. If you’re lucky that means you have a speedlite in your bag. If not, there are other ways to light your subjects and get a pleasing portrait.
Let’s start with the best case scenario- you have a speedlite on your camera with a swivel head. This gives you the flexibility of TTL exposure, as well as the ability to bounce the flash and avoid the ugliness of direct flash. Bouncing flash simply means that the flash head is aimed at a surface and the light is reflected back onto your subject. This softens the light coming from the flash head, and makes it a much more pleasing light source. The ability to bounce the flash is huge, because a variety of looks can be achieved simply by repositioning the flash head and the surface the light is bouncing off of. Walls and ceilings are generally pretty easy to bounce off of, but something smaller, such as a reflector, or a piece of white oak tag will work equally well. The important thing about the surface being used for bouncing is that the color be neutral, such as white or gray.
Positioning the subject in a corner of the room will allow you to use one light to create multiple light sources. The flash can be aimed at the wall to the side, and angled up to the ceiling to provide a hair light. In addition, the wall being used as the background will provide some back lighting. This will create soft shadows on the unlit side of your subject. It’s important to be sure your subject’s face is turned towards the bouncing surface so they are properly illuminated by the light.
Placing a reflector at waist level and bouncing the flash into the ceiling creates a soft glamor lighting effect. It’s actually a double bounce: once off the ceiling, and then off the reflector.
Another variation on this setup that works well for women and creates a glamor lighting look, is to place a reflector at your subject’s waist. Bounce the flash directly off the ceiling and have the reflector kick light back up into the subject’s face.
Postioning the softbox to camera left created a soft light that flattered Mary’s facial structure. I positioned her in the shade of a tree, so the flash was sure to be the main light on her, while the background was lit by sunlight.
The next step with a flash is to get it off camera. All of the major SLR makers offer some sort of wireless flash control. Again, a bare flash tends to not be the best light source. Flash in general is a harsh, unflattering light source. To soften the light, a modifier is needed.
There are all kinds of modifiers available on the market. Softboxes are great for portraits because the light is softened, directional, and there is no spill. Umbrellas are great for softening and directing the light, but you get more spill, meaning it’s harder to control what the light does and does not hit. The basic rule of thumb is, the larger the light source, the softer the light. So a larger soft box will nicely soften the light and wrap it around your subject, creating soft shadows as well.
The important thing when lighting with a softbox is that the light must hit the mask of the face, either from the softbox or via a reflector. If the face is in shadow, or if features of the face cast unflattering shadows, the portrait is going to be unsuccessful. Generally, positioning the light slightly above and off to the side of the subject will produce the best light.
A softbox positioned behind and to the side of the subject, while a reflector is positioned directly opposite to create a two-light effect.
If you happen to be outdoors, the available daylight works wonders for filling the background as you mix available light with flash. Position your subject in shade, and light them with a flash and modifier of choice, such as a softbox. Allow the available light to fill the background, and even create a hairlight. Indoors, you can create dramatic low-key lighting using one light in a softbox. Add a reflector, and now you have a two light setup. The softbox as the main light can be used as a rim light or hair light, and position the reflector so that it bounces light back into your subject’s face. You’re simply playing angles here, so watch where the light hits and bounce it back to your subject’s face.
This portrait was made using a household lamp with a 75 watt bulb, with a sheer curtain to soften the light. It’s important when using a household lamp to adjust your white balance properly, as the bulbs can range in color from more greenish to yellow.
Now, what if you’re caught without a flash? Simple. Any light source will do. With today’s DSLRs, higher ISO’s mean greater flexibility in terms of light. A simple household lamp with a shade can even be a good portrait light. The important thing again is to watch how the light is falling on your subject. You may need to manipulate the lamp’s position, or the subject’s position in relation to the lamp. If the shade dims the light too much, remove the shade, and find another way to modify the light. It could be as simple as rigging a sheer curtain in front of the lamp to create a scrim.
A single softbox will create more dramatic lighting. In this case, a large, 50 inch softbox was used creating a soft, dramatic light.
The bottom line is, no matter what, as long as you have light, you have the ability to make a great photo. The key is simply being able to see the light, play the angles, and think outside the box when necessary.
Post originally from: Digital Photography Tips.
Check out our more Photography Tips at Photography Tips for Beginners, Portrait Photography Tips and Wedding Photography Tips.


 Flash tends to get a bad rap.
  Direct flash can be over-bright, harsh, and create some nasty shadows.
  When the ball drops, don’t drop the ball with blurry pics, use your flash to freeze the action!
  The slow sync setting leaves your shutter open longer, and lets your camera pick up the ambient light in your surroundings.
  Coloring doesn’t have to stop when you outgrow your 24 pack of Crayolas.
 Bouncing is a technique for diffusing the light from your flash.
 With this technique, you’ll be taking your flash on safari with an off camera excursion.
 Round pupils, round face, portraits were just made for circular flash!


 Part of the attraction of food is the way it looks, so making sure your images exude the correct colours associated with the product. Before you begin shooting always take a white balance reading from a grey card if you have one or if you’re using a compact set the White Balance to a preset that matches the lighting environment you are shooting in.


You must be logged in to post a comment.