RSS
 

Posts Tagged ‘Simple’

6 Simple Resolutions for a More Photogenic 2016

04 Jan

It’s a new year, which means a fresh start on some new goals.

If you’re anything like us (and we know you are!) you’re already thinking about making major photography strides in 2016.

So join us in some challenges this year, we promise to keep ’em simple and fun!
(…)
Read the rest of 6 Simple Resolutions for a More Photogenic 2016 (442 words)


© Erin for Photojojo, 2016. |
Permalink |
No comment |
Add to
del.icio.us

Post tags:


Photojojo

 
Comments Off on 6 Simple Resolutions for a More Photogenic 2016

Posted in Equipment


Astrophotography Made Simple

27 Oct

There may not be a more challenging subject matter for photographers than astrophotography. When I first began making photographs, I had an elusive and challenging goal which was to make a photograph of the moon.

Moon

13 years later (has it really been that long?) I think back and smile at how impossible capturing that photograph of the night sky seemed to me at the time. Back then, the idea of making an image that captured the moon or the stars, and even a galaxy, seemed impossible. I assumed the images would require an expensive camera or some kind of magical photo gear. I couldn’t have been more wrong. In reality, you probably have everything you need to get started in astrophotography right now!

Astrophotography is simply a name for the realm of photography which images astronomical objects and the night sky itself. The moon, stars, constellations, galaxies, and even the sun, are all considered astronomical objects. In this article, you’ll learn just how easy it is to make great single exposure photographs of the wonders to be found in the expanses of the night sky.

You will only need some basic photographic gear and a small dose of patience. Complicated image stacking software and astronomically priced lenses and professional cameras not required. Now let’s get started!

Cade's Cove Moon

GEAR

Let’s talk about some of the bare bones gear that you will need in order to make your astro photos.

1 – A camera capable of shooting in full manual mode

You need to be able to control as many variables as possible, so shooting in Manual Mode is essential. Bulb capability is a plus, but not required. Bulb mode means that the exposure begins when you open the shutter and continues until you choose to end it by closing the shutter. Bulb mode is a setting which is now available on even the most budget friendly dSLR’s and mirrorless cameras (even some point and shoots have it).

2 – The fastest (largest aperture) lens you have in your bag

Fast Lens

Wide angle lenses are sometimes viewed as the only focal length to use for astrophotography, but that is most definitely not true. The key to solid astrophotography is to use a lens which can let in the most light. These lenses will be rated with a small f-number and are often prime (fixed focal length). While wide angle lenses will give you a sweeping vista of the sky, don’t count out your medium-telephoto lenses.

3 – A solid tripod

Tripod

You simply cannot escape the fact that a reliably sturdy tripod is the foundation on which all strong astrophotographs are built. Unwanted motion is your enemy. You will need a tripod that can support the weight of your camera and keep it completely motionless. Also, the mount on which the camera physically attaches will play a key role in the outcome of your images. Low quality ball-head mounts can sometimes drift under the weight of your camera during long exposures, so keep that in mind as well when choosing your tripod head.

4 – A microfiber lens cloth

Cloth

You will have your lens tilted upward for many of your shots, so settling dew can become a problem, especially in the summer months. Be sure to pack at least one clean micro-fibre lens cloth to wipe off any moisture which can accumulate on your lens’ front element during long exposures. This is a small piece of gear that can make or break your photo outing.

5 – Optional remote shutter release

Unless you are shooting in Bulb mode, a remote shutter release in not necessary. However, it makes your shooting a little easier, and helps to ensure less camera shake. When not using a remote, set your shutter release on the 2-second timer so that you will not shake the camera by pressing the shutter button.

Camera settings

Now that you know what gear you will need, let’s look at how to go about making your astrophotographs.

Shutter speed

Without a doubt, the biggest question about astrophotography is, “How long should I expose my image?” The answer depends on what kind of photograph are you planning to make. The night sky is dynamic. Everything we see is moving, although it may not appear that way to our eyes. I often relate making photos of the night sky to making photos of water. If you want motion blur (star trails) you will need a longer exposure time. If you want to freeze motion (constellations and galaxies) you will need a shorter exposure time.

Startrail Trees

In my experience, the sweet spot for obtaining workable images of stars and the Milky Way without star trails, is around 15-20 seconds depending on the ISO and aperture (more on that shortly) settings. While there are of course no absolute formulas, a good guideline is called the 600 Rule. It is very similar to the reciprocity rule used for avoiding camera shake during hand-held shooting.

The 600 Rule states that to reduce celestial motion blur, the exposure time should be no longer than the equivalent of 600 divided by a given focal length. Meaning that the maximum shutter time in order to reduce star streaking for a 50mm lens would be 12 seconds (600 / 50 = 12), for a 14mm focal length it would be 42 seconds (600 / 14 = 42), and for a 24mm focal length it would be 25 seconds (600/24). This rule is based on full-frame digital image sensors and will keep star trailing less than 8 pixels wide. If you’re shooting an APS-C(cropped sensor) camera, try using 400 instead of 600 in order to obtain similar results.

The important thing to understand about shutter speed as it relates to astrophotography is that, just as in any other type of photography, longer shutter speeds will result with increased motion blur.

Reflection

Aperture

Aperture controls how much light is allowed to enter your camera, and in astrophotography the more light you have to work with, the better your images will be. Shoot your scene at the widest aperture possible. Keep in mind though, that all lenses have ideal apertures, and opening a lens all the way up (largest aperture) often affects overall sharpness. That being said, using a large aperture is almost always desirable, because it allows in the maximum amount of light, which will make your stars brighter and small celestial details more visible.

I shoot the majority of my astrophotography from f/1.8 down to f/3.5 and even f/4. Remember too, that with a wider aperture, precise focusing becomes very important due to the decreased depth of field. Manual focusing is very useful. If your camera has a focus magnification option, use it to zoom in on pinpoint stars or the moon, so that you can obtain the sharpest focus possible. Don’t rely on the infinity focus markings on your lens (they are often not accurate).

ISO settings

Selecting the ISO for your astrophotography is an exercise in compromise. High ISOs are better for shooting in low light conditions, but will also result in more grain and noise in your final photograph. Finding a comfortable medium can be difficult. Shoot with the highest ISO that you feel gives you the least amount of noise, but still allows you to use your desired shutter and aperture settings.

Mother Moon

Most cameras now have high ISO noise reduction built into the their on-board software. I find it is almost always helpful to turn this function off – stay with me here. The reason being, is that image post-processing software today almost always does a better job of reducing noise than does in-camera high ISO noise reduction, which can sometimes reduce contrast and image sharpness. I highly recommend that you experiment with your particular camera and find out what you prefer for your own needs.

Shoot RAW

You may have heard the benefits of shooting in RAW format. In astrophotography, shooting your images in RAW format becomes extremely helpful. The extra information gathered from these larger files will add a huge amount of dynamic range, which will allow you to process the images to a greater degree. Noise reduction will also work more effectively when coupled with the RAW image format.

Tips to make your astrophotography stand out

Incorporate external elements within the scene

Milky Way Fire

While the objects found in the night sky are incredibly beautiful on their own, adding additional points of interest will often make your astrophotography even stronger. Add reference points such as trees or buildings. Look for a elements that bring harmony within the composition, and flow well with your astrological subject.

Light pollution can be useful

Boat Trail

While dark skies are certainly ideal for astrophotography, don’t feel that that all external light sources are a bad thing. Sometimes having city lights, or other luminance, interact with your scene can heighten the impact of your composition and add contrast within the image.

Experiment with color

Red Galaxy

Astrophotography loves color. Don’t be afraid to increase, and manipulate saturation and hues in your post-processing workflow. Experimenting with colors will make your photograph a piece of personal art, rather than just a representation. Still, it is advisable not to over process your images so much that you lose detail, and/or make the entire image gaudy and unrealistic (which of course is very subjective). As always, less can sometimes be more.

Astrophotography is challenging, fun, rewarding, and educational. Making images of the heavens is a great way to develop your skills as a photographer, while at the same time producing beautiful images of things that most people may not have noticed before. Today, cameras and imaging software make it easy for us to make great photographs of the night sky. The information you have read here will put you well on the way to producing exciting astrophotos. Shoot for the moon!

googletag.cmd.push(function() {
tablet_slots.push( googletag.defineSlot( “/1005424/_dPSv4_tab-all-article-bottom_(300×250)”, [300, 250], “pb-ad-78623” ).addService( googletag.pubads() ) ); } );

googletag.cmd.push(function() {
mobile_slots.push( googletag.defineSlot( “/1005424/_dPSv4_mob-all-article-bottom_(300×250)”, [300, 250], “pb-ad-78158” ).addService( googletag.pubads() ) ); } );

The post Astrophotography Made Simple by Adam Welch appeared first on Digital Photography School.


Digital Photography School

 
Comments Off on Astrophotography Made Simple

Posted in Photography


3 Simple Steps to Make Your Skies Pop in Lightroom

08 Sep

2-for-1 special

As part of Landscape Photography Week here on dPS, we’re offering TWO for the price of ONE on our best-selling Living & Loving Landscape Photography ebooks!

Click here to take advantage of this offer.


Photo of Monument Valley: Example of sky enhancement with Lightroom.

You take a photograph of a scene that includes a beautiful blue sky with puffy white clouds. You look at your LCD after taking the photo only to see that the sky your camera captured is not what you see in front of you. Instead, your camera captured a washed-out-looking sky with little or no detail. It looks overexposed. What to do?

You could take another picture, reducing the exposure so that the sky looks better. But if you do that, the foreground will be underexposed and maybe even black. So what now?

There is good news here, and it is that Lightroom can fix this problem easily and incredibly quickly. In fact, there are three quick steps you can take in Lightroom that will each dramatically improve the daytime sky in your pictures. They are all dead simple. You can do any one of the steps, or do all three together. Even if your sky already looks pretty good, and you just want a minor enhancement, these steps will help.

Photo of Big Sur: Example of sky enhancement using Lightroom

1. Darken the Blues

The first move you should make is to darken the blue tones in your image. This is simple to do in the HSL/Color/B&W panel in Lightroom’s Develop module. There you will see a number of sliders that control individual colors. You can adjust the hue, the amount of saturation, or the luminance of these colors. Use the sliders – specifically the  blue slider – to affect only the blue tones in the image and reduce the brightness of those tones. Just find the slider marked Blue, make sure that the panel is set to change Luminosity, and pull the slider to the left. There is no set amount or range of values for this change, it will just depend on each picture.

HSL/Color/B&W panel in Lightroom's Develop Module

If you need more punch to the blues, change the setting above to saturation, and push the Blue slider to the right. This will increase the saturation of the blues in your image. For our purposes here, what is important to know, is that increasing the saturation of the blues will make the luminosity adjustment you just made have even more bite.

You should see a dramatic improvement in your sky, just with this one move. Sometimes it is all you need to do. But for additional improvements, read on.

Note: be careful not to go too far. Pulling one color to extremes can cause banding (separation of the colors into stripes, not a smooth transition) or image degrading. 

Photo taken from Seven Mile Bridge in the Florida Keys: Example of sky enhancement using Lightroom

2. Control the Highlights

It might have surprised you that our first move was not to tone down the highlights of the image. After all, that is where the problem lies. The sky is so bright that there is little detail in it, and a reduction in the highlights will target those tones and add detail.

Highlights control in Basic panel of Lightroom's develop module

But recall that part of what makes a sky look great is deep rich blue tones combined with bright white clouds. If you crank down the highlights, yes, you will add detail to the clouds, but you will push the tones of the blues and whites together so that there will not be the strong contrast you want. That’s why we started with darkening the blue tones.

If there is already sufficient detail in your clouds, you do not need to do anything further. In fact, sometimes you may want to increase the Whites or the Highlights to create more contrast between the blue sky and white clouds.

Other times, however, your sky will still be too bright and the clouds will lack detail. In that case, it is time to tone down the brightest portions of the image to add some detail. Do that by pulling down the highlights of your image. You want to do just enough that you add detail in the sky, but not so much that your clouds turn grey. Let the histogram be your guide. Pull the Highlights slider to the left until any spike on the right side of your histogram moves to the left (use the Alt/Option button to see where the highlights are clipped). At the same time, you should be adding detail to your sky.

Photo of Lighthouse on Sanibel Island, Florida: Example of sky enhancement using Lightroom

3. Add a Blue Tint to the Sky

At this point, your sky should be looking very good. In fact, in most cases, the two moves above should be all you need. If you have a particularly flat and lifeless sky, however, you may need to break out the big guns. That means adding a tint to your sky.

To do this, you will need to employ the Adjustment Brush (actually, you can use the Adjustment Brush for either of the two steps above, but you usually won’t need to). Click on the Adjustment Brush, then when the sliders for the brush appear, go to the White Balance ones at the top. Move the Temp slider to the left, which will increase the amount of blue in the image.

Adjustment brush and tint controls in Basic panel of Lightroom's develop module

Before you apply the brush to the sky, there is one important thing you need to check. Make sure the “Auto Mask” box at the bottom of the Adjustment Brush panel is checked. Doing so will limit the brush to the sky only. Once that is checked, go ahead and brush in the effect where you want it.

When you are done, you can adjust the effect by moving the blue slider (or any other sliders you might want to change). When you close the Adjustment Brush, the sky should be blue and look much better.

Photo of the Portland Head Light: Example of sky enhancement using Lightroom

Application

The old adage about “getting it right in-camera” still applies. Try to get your skies looking as good as possible in the field with proper exposure techniques. Further, if you have a polarizing filter, that will make midday skies look much better. You might also employ a graduated neutral density filter to tone down the sky and make it even with the foreground.

When these techniques won’t work, however, Lightroom can make your skies look dramatically better. Of course, you could also use blending or HDR techniques, but these can appear surreal and involve much more work. The same goes for a wholesale sky replacement.

So next time, use Lightroom to achieve the desired effect simply. You can use these steps along with your normal workflow to make your photos look even better.


Here on dPS this is landscape week – here is list of what we’ve covered so far. Watch for a new article (or two) on landscape photography daily for the next day or so.

  • 6 Tips for Better Low-Light Landscape Photography
  • Landscape Photography and the Human Element
  • 5 Ways a Telephoto Lens Can Improve Your Landscape Photography
  • Landscape Photography from the Side of the Road
  • 32 Majestic Landscape Photos to Inspire Your Wanderlust
  • Weekly Photography Challenge – Landscape
  • Landscape Photography – Shooting the Same Location Through the Seasons
  • How to Solve 5 Composition Conundrums Faced by Landscape Photographers
  • 6 Tips for Creating More Captivating Landscape Photographs
  • Tips for Getting Started with Urban Landscape Photography

googletag.cmd.push(function() {
tablet_slots.push( googletag.defineSlot( “/1005424/_dPSv4_tab-all-article-bottom_(300×250)”, [300, 250], “pb-ad-78623” ).addService( googletag.pubads() ) ); } );

googletag.cmd.push(function() {
mobile_slots.push( googletag.defineSlot( “/1005424/_dPSv4_mob-all-article-bottom_(300×250)”, [300, 250], “pb-ad-78158” ).addService( googletag.pubads() ) ); } );

The post 3 Simple Steps to Make Your Skies Pop in Lightroom by Jim Hamel appeared first on Digital Photography School.


Digital Photography School

 
Comments Off on 3 Simple Steps to Make Your Skies Pop in Lightroom

Posted in Photography


5 Simple Ways to Create Expressive Photos in Black and White

14 Aug

Can you visualize the world around you in black and white? It’s not easy to do at first with an array bright colors competing for your attention. Look a little closer however, and you may recognize the broad potential for expressive imagery. Of course, not every situation lends itself to this artistic style. There are however, certain characteristics you can look for, to identify the best opportunities.

1) Embrace High Contrast

A subject with dark shadows and bright highlights would not be ideal for a color photograph. In fact, it’s one of the reasons techniques like HDR have become so popular. Yet, for black and white photography, this type of high contrast light can be extremely effective. The harsh mid-afternoon sun is no longer a detriment, but an enhancement. This is a major shift in the way one thinks about exposure. To help recognize these chances, look beyond what is immediately evident and pre-visualize the scene in grayscale. A scene you passed on, in color may prove quite dramatic in black and white.

As is always the case in all good art, rules are meant to be broken. The same is true with black and white exposures. You have even more flexibility as shadows can be inky black, and highlights can clip the histogram while retaining the image’s visual appeal. To maximize the dynamic range of the camera, use the “ETTR” technique (expose to the right). Rather than a muddy exposure, you’ll enjoy the crisp contrast of the full tonal range.

2) Simplify with Shape and Form

In the absence of color, shapes and patterns become more pronounced. Lighter tones will stand out boldly when placed in front of a darker area. This is an effective way emphasize the important parts of a subject while minimizing distractions. To compose this way, think about the process of subtraction. What can you remove from the image that’s not essential to the story? As you simplify, the design of the photo will get stronger.

Even something as simple as a shadow on the ground can be used creatively. To the human eye, detail is evident in the pavement, but with a camera they can be rendered as inky black. This may be a very different style of seeing for you. To practice, I recommend taking a photo hike in which you search for nothing but shadows. You may be pleasantly surprised by how many interesting shots you’ll find.

3) Details Tell a Story

It’s been said that a person’s eyes are the windows to their soul. Their character however, can often be revealed in their hands. In black and white, the subtle details that often go unnoticed become more evident. Wrinkles and texture, for example, benefit from a deeper more textured appearance. This method is especially effective when using flat or overhead light. Typically this direct light would be undesirable, but in grayscale it can be preferable to that of a softer, diffused quality light.

4) Imagine a Mood

Blue skies are often used to symbolize happiness. You’ll see this pattern in magazine ads, television commercials, and even movies. Black and white images however, are associated with a different variety of moods. The precise emotion is ultimately up to the viewer, but a few common themes include solitude, contemplation, and pensiveness. Photographers of all genres can work with these traits to effectively portray their vision.

Use your imagination to visualize the mood you want an image to have. A great place to start is to study some of the masters. While Ansel Adams’ landscapes in black and white are very well known, go further in your research. For example, look at the emotion in Edward Weston’s famous “Pepper No. 30”. Another fine representation of this medium is “White Sands, New Mexico” by Ernst Haas. Of course the list goes on, but these are a good place to start. A visit to a local library will undoubtedly prove inspirational as you may discover work by artists you are not yet familiar with.

5) Dark Spaces and Silhouettes

Subjects that linger in darkness are sometimes more compelling than well-lit scenes. Using black and white photography, you have the ability to show the world in a completely different way. Instead of eliminating the shadowy areas, use them to your advantage. An empty space can actually be an effective method of composition. This type of artistic exposure is more edgy than a literal interpretation.

Take a look through your own catalog of images. There will likely be a number of photos that could be quite dramatic as a black and white. As you convert them from color, experiment with different post production filters to see how it impacts the scene. For example, a blue filter may lighten the sky dramatically, whereas a yellow filter will make it darker. If you’re looking for even greater control, there are a number of excellent plugins available. One of my favorites is Exposure by Alien Skin as it offers nearly endless customization. More terrific options include software by Nik, Topaz, and OnOne.

Editor’s Note: This is the first article in a week full of features on black and white photography. Look for another one later today and daily over the next week.

googletag.cmd.push(function() {
tablet_slots.push( googletag.defineSlot( “/1005424/_dPSv4_tab-all-article-bottom_(300×250)”, [300, 250], “pb-ad-78623” ).addService( googletag.pubads() ) ); } );

googletag.cmd.push(function() {
mobile_slots.push( googletag.defineSlot( “/1005424/_dPSv4_mob-all-article-bottom_(300×250)”, [300, 250], “pb-ad-78158” ).addService( googletag.pubads() ) ); } );

The post 5 Simple Ways to Create Expressive Photos in Black and White by Chris Corradino appeared first on Digital Photography School.


Digital Photography School

 
Comments Off on 5 Simple Ways to Create Expressive Photos in Black and White

Posted in Photography


5 Simple Tips for Mastering Outdoor Photography

08 Aug

While it is relatively easy to go outside and just “point and shoot,” there are better ways to take pictures in the great outdoors. Snapping photos in the outdoors rather than indoors brings a whole new list of considerations to deal with. From the weight of your pack to the eventual downpour, there are certain preparations you can take before Continue Reading

The post 5 Simple Tips for Mastering Outdoor Photography appeared first on Photodoto.


Photodoto

 
Comments Off on 5 Simple Tips for Mastering Outdoor Photography

Posted in Photography


How To Shoot Fashion Shows Easily With These 6 Simple Tips

21 Jul

How To Shoot Fashion Shows

Hi there FashionPhotographyBlog.com readers, today we have a special guest joining us. Based in the Netherlands, Sander Van Leeuwen, has worked in fashion and commercial photography as well as film. He’s also been a loyal follower of FPBlog for many years now and had taken the time to write to us in a response to an article we had previously posted on how to shoot fashion shows.


We thought what he wrote was so insightful and it listed factors that the original post oversaw, that we decided that it would benefit a lot of you who may be trying to shoot fashion shows for the first time and not quite sure what to expect of the experience. We have invited Sander Van Leeuwen to share with us his 6 simple tips that can make shooting through the commotion of a fashion show just a little bit easier by being prepared for the experience.


We do want to want to make a disclaimer though before we start, and remind everyone that fashion shows are live events, and can be, by nature, a stressful affair. Like in wedding photography, if you miss the moment, you miss the moment. There is no going back!  The buzzing environment of fashion shows may not be everyone’s cup of tea, (perhaps not even for Sander) though some people thrive in these kind of situations. We just want you to be prepared, so you can be on your game and not miss those moments photographing powerful shots of the models on the runway. Take it away, Sander!


Hi folks, actually it’s kind of stupid that a lot of camera people (were) shooting the same show… the craziness during a show I did (the Amsterdam International Fashion Week 2009)… It was my first big show. I actually liked some of the parts (the parties and being with a lot of famous people (and) designers), but I hated the actual shooting, since it was kind of stressful. My experience:


1. Professional shows have good light: especially with the good high ISO performance, nowadays this is not an issue.


2. 70-200 mm is a good range. The only thing is most of the time you can’t shoot full body on the turn. But with 200 mm you can shoot nice full body shots during the whole runway and you can make some nice close ups of accessories.


3. DON’T USE FLASH! With a lot of photographers the chance is big you’re ruining someone else s picture with your flash, or someone else is ruining yours. Good organizations even officially forbid to use flash (if not other photographers will look at you (like) they are going to kill you).


4. A monopod is a must have. It happens that there is very little space and you can stand steady between all other photographers.


5. Take a bottle of water with you since waiting can be really make you tired and thirsty.


6. If it’s a multiple show even, try to make friends with some of the photographers so you can help each other when this is needed (save good spots for example) and you can have a nice chat while waiting… Did I mentioned waiting already? 😉


I hope this helps some photographers a little!


Kind Regards, Sander

Savale.nl


Did you find these tips useful? Please share this post on social media if you did 🙂


Also, if you have your own tips not covered in this list, please write them in the comments box. We will love to hear what tips you have.


Lastly, if you would like to be featured as a guest writer like Sander Van Leeuwen did, do send us a message and get in touch with us. We would like to hear from you. For more details on how to contribute to FashionPhotographyBlog.com click here –> CONTRIBUTE TO FPBLOG HERE


Fashion Photography Blog

 
Comments Off on How To Shoot Fashion Shows Easily With These 6 Simple Tips

Posted in Uncategorized


Simple Yet Effective Marketing Efforts to Get New Clients (and Tools)

20 Jul

After you have set up your business, made a business plan, created an attractive portfolio, and did a lot of other things, the most challenging part is still: “how to get clients”. What do you need to do to get the right people to see your website? How do you make them want to buy your services and products? These Continue Reading

The post Simple Yet Effective Marketing Efforts to Get New Clients (and Tools) appeared first on Photodoto.


Photodoto

 
Comments Off on Simple Yet Effective Marketing Efforts to Get New Clients (and Tools)

Posted in Photography


Pet Photography: 5 Simple Tips for Animal Photographers

14 Jul

For armature or professional photographers who use their skill for weddings, portraits, engagement, maternity or any other popular family photography, adding “pet photography” to your business card can be an added rise in business for you. How can a family photo be complete without Fido in the picture? Doing pet photography, or just understanding how to photograph a pet for Continue Reading

The post Pet Photography: 5 Simple Tips for Animal Photographers appeared first on Photodoto.


Photodoto

 
Comments Off on Pet Photography: 5 Simple Tips for Animal Photographers

Posted in Photography


Make 3D Wiggle GifsIn 3 Simple Steps!

04 Jun

Worms wiggle. Your toes wiggle. And hey, gifs wiggle, too!

Or at least they can. And when they do, they look three-dimensional. How cool is that?

Now that Facebook is allowing gifs (whee!), we wanna use that new found power to post lots of 3D photos in the form of fun wiggle gifs! And we’re gonna show you how easy it to make ‘em in just three steps.

This fun spin on the classic stereograph will have you fondly remembering the old days of photography, while also marveling at just how far we’ve come!

Give Your Gifs the Gift of Dance 
(…)
Read the rest of Make 3D Wiggle Gifs
In 3 Simple Steps! (702 words)


© Taylor for Photojojo, 2015. |
Permalink |
No comment |
Add to
In 3 Simple Steps!”>del.icio.us

Post tags:


Photojojo

 
Comments Off on Make 3D Wiggle GifsIn 3 Simple Steps!

Posted in Equipment


Seeing in Depth of Field: A Simple Understanding of Aperture

18 May

Photography can be simply defined as: painting with light.

When you are painting with light, you are creating a story in a split second. That’s what photography is all about. Technically, your camera is measuring the light in the scene, and you are telling it how much of that light you want to use to create a properly exposed image. This becomes your story.

There are three main settings used to control that light; Shutter Speed, ISO and my favorite, Aperture. Each of these settings has its own individual way of measuring light. When all three are balanced correctly, you create a proper exposure.

1 Aperture Range 3265

Though each of these three settings measures light, they also have unique characteristics that create artistic qualities in your photographs. By understanding them, you have control over the full story you want to tell.

Shutter speed captures movement or freezes it. ISO helps control how sensitive your camera is to the available light in a scene. Finally, the aperture creates depth of field. This is where the real story comes from; it is with aperture that you control what is in focus, and what is out of focus.

As a photographer, how do you decide what you want your viewer to focus on? How do you create a story? That’s what aperture is all about, and that’s why I love it.

WHERE IS IT AND WHAT DOES IT DO?

Aperture is located in your lens, not in the camera body. The lens opening expands and contracts to control light. By selecting a specific aperture size, you are telling the lens how much light you want to hit, and register on, the sensor.

It is very similar to how the human eye works. Your pupils expand and contract based on the available light in the scene. Like when you first walk into a dark movie theater. At first you can’t see, then your eyes adjust. Your pupils expand, allowing your eyes to see as much light as possible in the dark room.

Again, when you go outside on a sunny day, at first it’s too bright to see. Your pupils adjust by contracting, letting in less light. Your lens aperture works the same way. Changing aperture settings is like your pupils dilating or contracting.

The size of a lens aperture is measured in what we call f-stops (fractional stops). Just like all settings on a camera, there is a general range.

2 aperture range2

The numbers aren’t necessarily important to memorize. What’s important is to see the range in the settings. Here is the trick; the smaller the f-stop number (like f/1.8), the larger the aperture opening. This means more light will enter through your lens at once, and vice versa. The larger the f-stop number (e.g. f/22), the smaller the aperture opening, and less light will enter your lens.

Think of these f-stops as fractions. Just replace the F with the number one. 1/4 of a pie is much more than 1/16 of a pie.

A quick note: Not all lenses are built the same. Different lenses have different apertures. Some lenses have a wider range and some have less. Standard lens will range from F3.5–F22. Specialty lenses go as low as F1.2 or more. See: What the Numbers on your Lens Mean for more on this.

SEEING IN DEPTH OF FIELD

Here is where it gets fun. While measuring light, when the lens expands and contracts, it also measures depth of field. Again, your eyes do the same thing!

As you look at the screen to read this, these words are mostly in focus to your eyes. In your peripherals, you can see other things, but they aren’t in focus.

Notice, your hands on the keyboard, they are in the foreground, and perhaps a bookshelf is in background. You can see them but they are not in focus. You are seeing in depth of field.

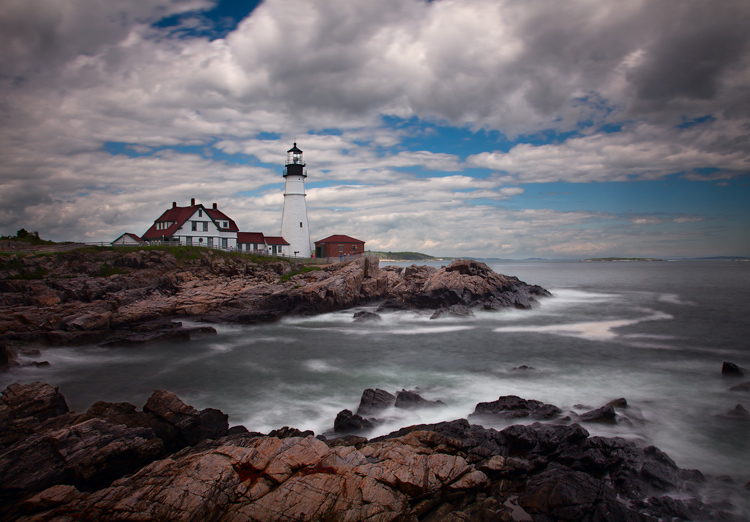
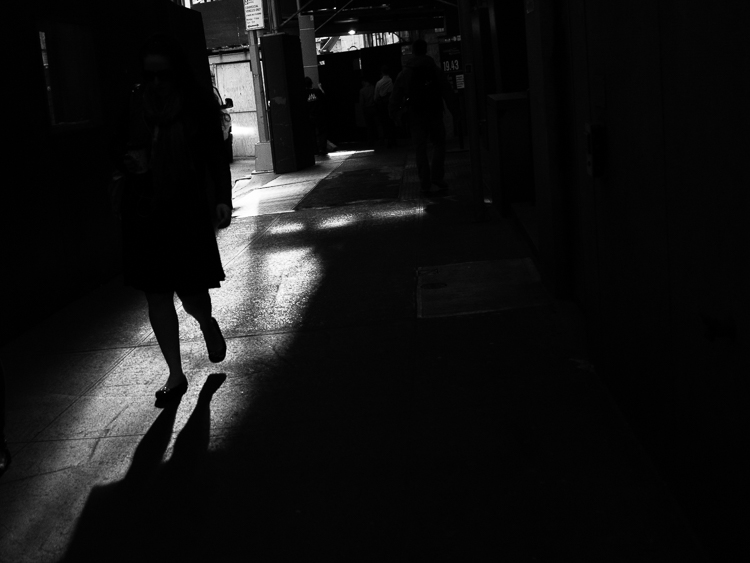
A great photograph does just that. It captures a foreground, a mid-ground and background. By setting your aperture you are controlling which of these areas is in focus. It is all based on your intention, your story.

DEFINING DEPTH OF FIELD

With your camera’s focal point (that little square in the middle of your viewfinder), you focus on a particular part of the scene. This point becomes the sharpest part of your image. There is an area in front of that point in focus, and an area behind it in focus as well. The distance from front to back that is acceptable focus is considered your depth of field. You decide what is acceptable by choosing a specific aperture size.

3-Uluwatu-Monkey-8427

This is a story about a monkey on a cliff. The bushes in the foreground and the temple on the cliff in the background are out of focus. They are out of the depth of field. This brings your attention to the focal point; the monkey in the middle (no pun intended).

Remember, the lower the f-stop number, the bigger the opening, the more light comes through the lens. This means less of your scene is in focus and you have a shallow depth of field. The opposite is also true. The larger the f-stop number, the smaller the opening, the less light comes through the lens. In this case, more of your scene is in focus and you have a greater depth of field.

Simply put, the larger the f-stop number, the more will be in focus. The smaller the f-stop number, the less well be in focus.

A DEEPER LOOK AT DEPTH OF FIELD

As you lock your camera’s focal point on a specific spot, that spot creates a focal plane. Everything that is the same distance away from the lens is on the same focal plane, and will be in focus.

4 focal plane explained

At a shallow depth of field (low number), the focal plane is very thin. As your depth of field becomes greater (high number), the focal plane becomes deeper.

Here is the same scene photographed with different aperture settings. Notice that the depth of field changes how much of the image is in focus.

5 aperture example

At f/2.2 only the sunglasses are in focus. At f/5.6 the hat is also in focus. By using f/8.0 you can start to make out the trees in the background. Finally, at f/22 everything in the image is in focus.

Which one tells the best story? You as the photographer, get to decide.

PRACTICE TIPS AND TRICKS

Now that you’ve got a good grasp on the basics, it’s time to play! Here are some great tips to start your practice.

Set your camera to Aperture Priority mode. You will have full control of the aperture, without having to worry about proper exposure. This way you can just focus on depth of field. It’s a great way to fully understand what your lens is doing as you change your aperture settings.

Pick a subject or scene, and stick with it. Photograph your scene from many different angles. Choose different parts of the scene to focus on using the full range of aperture settings.

Use these guidelines to capturing depth of field in different scenarios:

6 Aperture Range 9748

When shooting single subjects, like a portrait of a child, it is best to use a lower f-stop like f/1.2-f/2.8. Creating a shallower depth of field brings attention to the subject’s face, which is always most important in a portrait.

7 Aperture Range 2145

When shooting a small group of people (2-5), choose an aperture of f/4-f/8. This, being a slightly deeper depth of field, guarantees that everyone in the group will be in focus.

8 Aperture Range 6150

Any time you have a wide-open scene, for instance a landscape, and you want all of that landscape in focus, choose a setting above f/10.

These are just guidelines. Photography is a form of art. Be creative, and remember, it’s all about telling a story.

What story do you want to tell? Share your images here and show how you’ve used depth of field to create a great story.

All Images in this article are © 2015 Danielle Werner and DEW Imagery & Design

Bio

Danielle Werner is a free-spirited photographer, designer and retoucher, on an endless journey around the world. She is also a passionate writer and educator who teaches photography workshops wherever she goes. Read Danielle’s inspirational travel stories at LiveWonderful.com, and check out more of her adventure and lifestyle photography at DEW Imagery & Design. You can also connect with her via:

https://twitter.com/ImageryDEW

https://www.facebook.com/livewonderfulblog

googletag.cmd.push(function() {
tablet_slots.push( googletag.defineSlot( “/1005424/_dPSv4_tab-all-article-bottom_(300×250)”, [300, 250], “pb-ad-78623” ).addService( googletag.pubads() ) ); } );

googletag.cmd.push(function() {
mobile_slots.push( googletag.defineSlot( “/1005424/_dPSv4_mob-all-article-bottom_(300×250)”, [300, 250], “pb-ad-78158” ).addService( googletag.pubads() ) ); } );

The post Seeing in Depth of Field: A Simple Understanding of Aperture by Danielle Werner appeared first on Digital Photography School.


Digital Photography School

 
Comments Off on Seeing in Depth of Field: A Simple Understanding of Aperture

Posted in Photography