RSS
 

Posts Tagged ‘shot’

How to capture a classic perfume product shot with a single speedlight

27 Jan

Dustin Dolby, the photographer behind the workphlo YouTube channel, is great at breaking down product photography into the simplest possible bits. By using Photoshop to mask together multiple exposures, he’s able to capture professional looking product photos using extremely minimal gear.

In his latest episode, he shows how a single speedlight and some reflecting material can be used to capture a professional-looking photograph of perfume. What’s more, the exercise of capturing these exposures helps explain some basic lighting tenets when shooting products:

Lighting a perfume bottle in a studio setting, requires the photographer to understand the angles the light is coming from. The substance of a few key lighting techniques can be boiled down into a few tips. Backlighting is a great way to show the volume of a translucent object, which couples nicely with frontal lighting.

Here’s a look at the high-res final render, composited from a few different exposures you see him capture in the video above:

Photo by Dustin Dolby/workphlo, used with permission.

As Dustin explains in the video, you can do a lot more here—both compositionally and with different lighting techniques if you really want to have some fun—but this tutorial is more about explaining the basics and capturing a “classic” perfume shot with very little gear.

Check out the full tutorial up top, and if you want to see more of Dustin’s ‘workphlo,’ head over to his YouTube channel or follow him on Instagram and Facebook.

Articles: Digital Photography Review (dpreview.com)

 
Comments Off on How to capture a classic perfume product shot with a single speedlight

Posted in Uncategorized


Structure: Moving 4K close-ups shot at up to 1000x magnification

18 Jan

District 7 Media owner Drew Geraci recently published a short film titled “Structure” that takes viewers on an up-close journey inside everyday objects. The video was shot with a Sony A9 camera, as well as an AmScope Microscope with a camera attachment, Kessler Second Shooter control unit with a Stepper Motor, and Manfrotto Lykos Lights.

Geraci uploaded the video to Vimeo, where he explains that “Structure” presents organic objects magnified up to 1000x. Those objects include a variety of fruit, bell pepper seeds, mushrooms, carbonated water, soap bubbles, beet leaf, and more.

Everything was shot in 4K using the Sony A9, according to Geraci’s video description, where he explains that the process took place over 30 days, after which the shots were edited into the two minute video using Adobe Premiere Pro CC 2018 and After Effects CC 2018. In describing the inspiration for “Structure,” Geraci said:

It all started with a single shot—a small frozen snowflake I captured using a 100mm macro lens. I’ve shot plenty of macro photography in the past, but for some reason this image ignited my imagination and passion to shoot. So I did what any sane person would do—bought a microscope with camera capabilities and started to shoot everyday objects at 1000x+ magnifications.

Articles: Digital Photography Review (dpreview.com)

 
Comments Off on Structure: Moving 4K close-ups shot at up to 1000x magnification

Posted in Uncategorized


Canon accidentally shared a composite photo shot with a Fuji all over social media

15 Jan

Well… this is awkward. Fstoppers has caught Canon Italy and Canon Spain sharing a photo to all of their social media accounts—Facebook, Twitter, and Instagram—the majority of which wasn’t even taken with a Canon camera. In fact, it was shot using a Fuji X-T1, by popular landscape and travel photographer Elia Locardi.

You can compare the two photos for yourself below, but there is little doubt that large parts of Elia’s photograph were used to create the one Canon shared:

The original photo, captured by Elia Locardi. Used with permission.
The image Canon Italy and Canon Spain have shared all over social media.

As you can see the entire sky, parts of the water, and some foreground elements as well were lifted directly from Elia’s original. In fact, as Fstoppers points out, there’s even a few-pixel-sized bird in Elia’s photo that was copied directly into the new shot.

We spoke to Elia this morning, and he told us that after a bit of sleuthing he was actually able to uncover the source of the image: a royalty free photograph on Unsplash that was allegedly taken in October of 2017 with a Canon 1D Mark IV. Elia has asked that we not “out” the photographer, but you can see the EXIF data in this screenshot:

From there, it doesn’t take an advanced degree to figure out what happened. A social media team at Canon Europe took to Unsplash to find a royalty free picture to share. They probably searched for “Canon 1D Mark IV” and “Italy,” and when they stumbled across this shot they had no idea that it was, in fact, not a single image but a composite of (at least) two photos… one of which was taken with a Fujifilm camera.

It’s embarrassing, sure, but probably an honest mistake. As of this writing, the post is still live on Canon Italia and Canon Estana’s Facebook and Instagram accounts, but we don’t expect that to last much longer as this story gains traction in the blogosphere.

The photo as seen on the Canon Italia Instagram account this morning.

We’ve reached out to Canon for comment, and will update this post if and when we hear back.

Articles: Digital Photography Review (dpreview.com)

 
Comments Off on Canon accidentally shared a composite photo shot with a Fuji all over social media

Posted in Uncategorized


SLC-2L-02: Two-Speedlight Daylight Group Shot

10 Jan

Using speedlights without softening modifiers greatly expands your outdoor working range. And it does so enough that you can easily light a large group photo with a small, portable gear pack.

Today, we'll walk through how to do that, along with a few tips to tweak and improve your results.Read more »
Strobist

 
Comments Off on SLC-2L-02: Two-Speedlight Daylight Group Shot

Posted in Photography


Behind the scenes of ‘PARALLAX’ – shot with the Sony Cyber-shot RX0

26 Dec
PARALLAX was directed by Philip Edsel. Director of Photography: Peter Longno. Producer & BTS: Moyo Oyelola. Choreography: Jacob Jonas. Dancers: Nick Walton & Joy Isabella Brown of Jacob Jonas The Company. Music: “Into” by Aten Rays.

Sony’s new Cyber-shot RX0 is a tiny, rugged action camera capable of full HD slow-motion capture and external 4K recording. Unlike most cameras in its class, the RX0 offers a large 1 inch sensor and an option to record video in the S-Log profile, making it more versatile when imported into professional editing suites, and more easily compatible with professional video workflows.

Filmmaker Philip Edsel has been working with the RX0 (or rather, with a lot of RX0s…) for a while. His new piece, PARALLAX, was shot entirely using RX0 cameras alongside a variety of different peripherals, including a ‘bullet time’ rig. We spoke to him recently about the challenges – and unique opportunities – he encountered when shooting with the RX0.


What kind of challenges do you face when filming athletes?

When working with athletes for a film like this, our number one concern is safety. Having athletes perform crazy flips and jumps repetitively can most certainly be dangerous if you’re not taking the proper precautions. Thankfully our athletes were super talented and always landed their movements with ease. After that, the challenge was just capturing those movements in a way that did them justice.

What kind of gear would normally be considered appropriate or industry standard for a piece like PARALLAX?

This type of film would normally be shot on a cinema camera – something like an Arri Alexa or RED. If it was a personal project of mine, I would shoot it on my Sony A7S II or A7R III. Cine cameras come with a lot of baggage though – cages, rigging, external batteries, monitors, hard drives, etc.

$ (document).ready(function() { SampleGalleryV2({“containerId”:”embeddedSampleGallery_6238151081″,”galleryId”:”6238151081″,”isEmbeddedWidget”:true,”selectedImageIndex”:0,”isMobile”:false}) });

What is your most important criteria when it comes to choosing the gear to shoot a piece like this?

The two most important criteria for shooting this film were quality and versatility. The quality of footage from the Cyber-shot RX0 was surprising. We shot 4K externally and when we were just handheld or shooting slow-motion, we shot HD. Always in S-Log, which really made the most of the dynamic range of its sensor.

As far as versatility goes, we needed a camera that could be nimble enough to take on any of the crazy ideas I threw at it.

We had 10 cameras running pretty much non-stop, and no extra batteries

What limitations did shooting with the Cyber-shot RX0 place on you?

We weren’t really limited by the RX0. If anything, it was the opposite – we were enabled to pursue all sorts of non-traditional angles and shot ideas. The only challenge that was specific to this production was battery life. We had ten cameras running pretty much non-stop, and no extra batteries. The batteries in the RX0 are small because the camera itself if so compact, which presented a bit of an issue at first.

Our solution was just to rig up a small external USB battery, and shoot while the camera was charging. We didn’t have a problem at all after that.

What did the RX0 allow you to do that a more conventional rig wouldn’t?

For this project we used the camera in just about every way I could think of. It was handheld, stabilized on a gimbal, crammed into tight corners and small spaces, used underwater in the ocean, and in an 8-camera ‘Bullet Time’ rig.

I don’t know of any other camera that would have allowed us to do all of that. We would have needed different cameras for different scenarios, or been restricted to more traditional angles and shot ideas. This camera’s size allowed us to be as versatile and creative as our athletes.


Behind the scenes of PARALLAX

Can you describe your shooting and editing workflow?

All of this footage was shot in S-Log. My Director of Photography Peter Longno did most of the organizing and sorting of the footage, which with ten cameras, was a lot of work. The bullet time footage had to be lined up and synced. I had a camera shooting time-lapse stills using an external intervalometer, and those timelapses had to be sequenced.

I wanted the edits to reflect the wildly versatile uses of the camera

The edit took quite a while because we had a ton of footage, and we wanted to make sure the pacing of the film not only matched the soundtrack, but also created an energy that did justice to the talent and the product. I wanted the edits to reflect the wildly versatile uses of the camera.

Once the edit was finished, Peter brought the project into DaVinci Resolve, where we graded the Log footage. After it was graded, Peter brought the footage back into Adobe Premiere to add some of the glitching and composite effects.

What is the biggest technical advancement that you’ve seen during your career as a filmmaker?

If you told anyone even five years ago about the Sony RX0 or A9, they would have laughed at you. If I always use a brand new camera in the same way I could have used a camera five, ten, or twenty years ago, then I’m not really taking advantage of the innovation that’s happened in the meantime.

It’s inspiring to me because I try to use the advancements in technology as motivation to advance the art I create.


This is sponsored content, supported by Sony. What does this mean?

Articles: Digital Photography Review (dpreview.com)

 
Comments Off on Behind the scenes of ‘PARALLAX’ – shot with the Sony Cyber-shot RX0

Posted in Uncategorized


Photojournalist Andrew Grimm sues Ohio deputy who shot him

21 Dec

In September, New Carlisle News photographer Andrew Grimm was shot by Clark County Sheriff’s Deputy Jacob Shaw when the officer mistook Grimm’s camera for a firearm. The incident, which was captured by Shaw’s body camera, happened while Grimm was setting up his equipment to photograph Shaw, who was in the middle of a traffic stop.

The body camera footage shows Grimm, who was shot in the chest and grazed in the shoulder, telling Shaw that he had both flashed his car lights and waved in order to alert the deputy to his presence. Shaw, who knew Grimm, was recorded by his camera saying, “Andy, I’m sorry, brother. Listen, dude, you pulled that out like a gun out of the back of the Jeep. I thought it was a freaking gun, Andy.”

Shaw reportedly failed to provide Grimm with any warnings before opening fire, which is said to have happened within seconds of Shaw exiting his cruiser. As reported at the time, the Ohio Bureau of Criminal Investigation opened an investigation into the matter.

Though Grimm had said shortly after the shooting that he hadn’t wanted Shaw to lose his job, the photographer and his wife, plus KBA News, have since filed a lawsuit against the Clark County Board of County Commissioners, the City of New Carlisle, Ohio, and Sheriff’s Deputy Jacob Shaw. The lawsuit accuses Deputy Shaw of violating Grimm’s civil rights and using excessive force, seeking at least $ 75,000 in damages for a variety of claims.

Since the shooting, the lawsuit claims Grimm experiences both psychological and physical issues, including nervousness when around law enforcement officers, disturbed sleep, anxiety, and headaches. It also accuses the local Sheriff’s Office of having “ratified” Shaw’s actions by allowing him to return to work—despite the ongoing Ohio Bureau of Criminal Investigation probe, Deputy Shaw has been given role in the Clark County Jail—and that the Sheriff’s Office failed to properly train and supervise Shaw.

The suit was filed in the Ohio Southern District Court in Cincinnati with Judge Timothy S. Black presiding.

Articles: Digital Photography Review (dpreview.com)

 
Comments Off on Photojournalist Andrew Grimm sues Ohio deputy who shot him

Posted in Uncategorized


Kodak’s new Mini Shot 10MP camera prints tiny instant photos

07 Dec

Kodak expanded its instant product lineup today with the launch of the new Kodak Mini Shot Instant 10MP camera: a point-and-shoot digital model that produces credit card-sized color prints on 4Pass Photo Paper. The Mini Shot Instant—which is offered in black, yellow and white colors—also features Bluetooth connectivity for transferring images to an iOS or Android device running the Kodak MINI Shot companion app.

With the Kodak MINI Shot App, users can make minor edits to their images before printing them, including applying filters and stickers, cropping, and using card templates. Image previews are possible in-camera, as well, via the Mini Shot Instant’s 1.7-inch LCD viewfinder. The camera offers gamma color control, auto focus, white balance, and exposure control.

$ (document).ready(function() { SampleGalleryV2({“containerId”:”embeddedSampleGallery_3016677073″,”galleryId”:”3016677073″,”isEmbeddedWidget”:true,”standalone”:false,”selectedImageIndex”:0,”isMobile”:false}) });

Users have two photo paper sizes to choose from: rectangular 2.1 x 3.4-inch and square 2.1 x 2.1-inch with adhesive backing. The 4Pass Photo Paper is available in packs of up to 50 (for $ 35), and the camera is sold with an 8-pack all-in-one print cartridge. The Kodak Mini Shot Instant is available from Amazon now for $ 100 USD.

Press Release

Kodak Expands Its Instant Print Camera Offerings with New KODAK Mini Shot Instant Camera

High-quality, instant print photo gratification meets Android and iOS compatibility plus Bluetooth connectivity.

SUWON, South Korea & EDISON, N.J. – Today, Prinics Co., Ltd announced the availability of the new KODAK Mini Shot Instant Print Camera through its North American distributor C+A Global. Expanding upon its instant print product line, the new KODAK Mini Shot point-and-shoot camera combines high-quality, instant-print color photos with digital conveniences such as color controls, filter effects and Bluetooth connectivity, making it the ideal all-in-one solution for picture taking and photo editing.

Furthermore, not only can these photographs be instantly shared with family and friends in that same high print quality expected from Kodak, these photographs can likewise be digitally shared instantly across social media platforms.

There is a resurgence for ‘instant-print’ photography, and the demand for affordable and versatile products is massive,” states Jeff Clarke, CEO, Kodak. “The release of the KODAK Mini Shot and recent launch of the KODAK PRINTOMATIC Cameras are a continuation of Kodak’s commitment to instant printing and represent just the beginning of the Instant Print Solutions Kodak plans to bring to market. We are fully committed to growing a diverse product portfolio and investing in the instant photography business.”

Real Ink. In an instant.

High-quality image processing and printing is at the core of Kodak’s DNA and remains to be the key differentiator in its expanding Instant Print photography product portfolio, which includes the KODAK Mini Shot Instant Print Camera, KODAK PRINTOMATIC Instant Print Camera, and KODAK Photo Printer Dock and Photo Printer Mini Wi-Fi connected printers.

The KODAK Mini Shot Instant Print Camera leverages 4Pass printing technology, also known as dye-sublimation, resulting in beautiful, high-quality prints. It features the world’s smallest 4Pass all-in-one cartridge for carrying convenience.

Snap, Connect, Enhance, Print, Share

The KODAK Mini Shot Instant Print Camera is a must-have accessory for anyone looking to make memories that last, whether it’s by sharing printed photos immediately or posting them to an Instagram feed. It’s the fun of snapping photos on an instant print camera combined with the ability to digitally edit and enhance images, then share from one person to another or with the entire world – or all of the above. With Bluetooth connectivity, users can save and transfer images to a smart device for further editing with the complimentary KODAK Mini Shot App, which features a variety of filters, cropping options, stickers, card templates and more. Through the App, anyone’s smartphone can now be used as a remote shutter for those must-have group shots, or as an extended library of photos that can be sent to the KODAK Mini Shot for instant printing.

KODAK Mini Shot Camera Highlights and Benefits:

  • Maximum resolution 10-megapixel camera
  • 1.7” LCD Viewfinder for viewing photos before they’re printed
  • Auto Focus, Exposure, White Balance, Gamma Color Control
  • Bluetooth connectivity
  • Compatible with iOS and Android devices
  • Complimentary KODAK Mini Shot App for adding filters and effects
  • Normal and photo border printing
  • Print credit card-sized (2.1”x3.4”) or square (2.1”x2.1”) adhesive-backed photos
  • Extra protective layer preserves image quality and color integrity
  • High-quality waterproof, fingerprint-proof photo prints
  • All-in-one ink and paper cartridge
  • Available in black, white or yellow

Pricing and Availability

The KODAK Mini Shot Instant Print Camera is available today for $ 99.99 USD on Amazon. The camera includes a Micro USB cable, a Quick Start Guide, and an 8-pack all-in-one 4Pass photo print cartridge.

The 4Pass Photo Paper comes in 20 (2.1”x3.4”), 30 (2.1”x3.4”) and 50 (2.1”x3.4”) packs or as an adhesive-backed 20 (2.1”x2.1”) pack, and is sold separately. More information is available at https://www.amazon.com/dp/B077BF7KG7.

Articles: Digital Photography Review (dpreview.com)

 
Comments Off on Kodak’s new Mini Shot 10MP camera prints tiny instant photos

Posted in Uncategorized


Watch Drew Geraci’s latest time-lapse masterpiece, shot with Sony a7R III

27 Nov

Drew Geraci is a master of time-lapse photography. His work has taken him all over the world, and his client list contains some of the biggest names in sports and entertainment. Even if you don’t know his name, if you’ve ever watched ‘House of Cards’ on Netflix, you’ve seen his work.

Drew has been using a Sony a7R III for some time, and prior to its official launch last month he spent some time in New Zealand, to see what the new camera could do. We caught up with him recently to ask about his inspirations, workflow, and tips for successful time-lapse photography.


What first got you interested in time-lapses?

The real reason I became interested in time-lapse photography wasn’t because of anything ultra profound or mind-blowing. It was because someone I looked up to (as a pro-photographer) looked at my early time-lapse work and told me that it was, bluntly, garbage.

Since that day I’ve channeled that negative energy into something positive, which has lead me down an incredibly successful career path which I’ve very thankful for.

Why would/should you shoot a scene using timelapse techniques rather than a conventional single exposure?

Timelapse tells a story that a single frame or even series of video frames can’t. The passage of time is something that you can’t really ‘see’ normally, and this is why timelapse photography is so useful – it showcases short or long passages of time which can show the grandness of an event or place in a unique way. Timelapses always seem to dazzle and amaze audiences.

How is the process of planning a timelapse shoot different to a conventional landscape shooting session?

Planning a time-lapse shoot can be quite difficult depending on where and when you want to film. You have to think of all of the elements of motion that will be in your scene and how light will effect the scene over time. There are so many random variables that most photographers/videographers don’t have to worry about, but for time-lapse it’s different.

You really have to be aware of your scene, to an even higher degree than normal. You need to make sure there you account for things that could destroy your shot like birds, people, or lights. You have to work all of this out before you start shooting.

What’s the single most important factor to consider when making timelapse movies?

For me personally, it’s about creating something that’s going to wow your audience and keep them entertained for the few seconds or minutes that you get their attention. I want to shoot scenes that are unique, vibrant, and invoke some type of emotion to really draw the viewer in.

Music is key as well. Selecting the wrong music can be fatal. As a case in point, there’s an M83 song that has been used so many times now on timelapse videos that it’s getting ridiculous. I always try to find something original to use instead of mainstream music.

What does your workflow look like when planning and shooting a time-lapse movie?

The workflow is chaos. It usually consists of a shot list, scouting notes and it’s all subject to change when I get to the location. I make sure (most of the time) to do a 2-3 day scout visit to each location before the actual shooting occurs. This gives me a better idea of what to expect when I shoot it for real. I look at the lighting, the atmosphere, and all of the elements of motion, because I want my shots to be as dynamic as possible.

What was your big break?

For me, my big break was the title sequence of Netflix’s House of Cards. I had lunch with David Fincher to discuss a new project and it turned out to the the intro to his new show. Completing that sequence was a fun and grueling 6 months of shooting but the end result is something that 100’s of millions of people have viewed – which is quite humbling.

I’ve had some other big name clients before this, like the NFL and Apple, but shooting the intro to House of Cards pushed things over the top. It’s fun being known as the guy who shot the intro to a now iconic (and infamous ) show but I want to continue pushing boundaries and exploring new techniques to keep things fresh.

How do you control the camera trigger when you’re shooting?

My personal preference is a manual, external intervalometer because it provides the fastest method for setup and shooting. Internal intervalometers are great, but they can be limited and awkward to use – especially if you have to adjust the interval or number of shots. I use the JJC micro-USB – it’s cheap, and it’s reliable.

Can you give us 3 top tips for photographers planning on getting into timelapse shooting?

  1. Turn off anything automatic on your camera (Auto WB, ISO, Aperture, Shutter… even stabilization – turn it off!)
  2. If you’re not using a manual aperture lens, make sure to “lens twist” or detach your lens from the body, just enough so the connectors that send data aren’t touching. This will ensure that the aperture blades don’t change position from exposure to exposure and it will reduce the amount of flicker in your footage substantially.
  3. Always shoot Raw!

Articles: Digital Photography Review (dpreview.com)

 
Comments Off on Watch Drew Geraci’s latest time-lapse masterpiece, shot with Sony a7R III

Posted in Uncategorized


Cinematic 4K footage shot with the Apple iPhone X

10 Nov

Matteo Bertoli, a California-based cinematographer, got a chance to try out the iPhone X’s video capabilities in Kauai and has just published the results. And before you ask – Bertoli states that it was all shot handheld.

“I DID NOT use any lenses, accessories, tripods or sliders. Everything was shot handheld, the only thing I had on the phone was the silicon case, that’s it. Also I DID NOT use Filmic Pro. Everything was done with the native camera app. Shot in 4K at 24fps,” he states on YouTube.

Bertoli did grade the footage in Davinci Resolve 14. He also stays that, impressively, most of the video was shot using the telephoto camera. The secondary camera module’s inclusion of OIS and a brighter F2.4 aperture means it’s more useful for these kinds of applications.

Take a look at the footage above and let us know what you think in the comments.

Articles: Digital Photography Review (dpreview.com)

 
Comments Off on Cinematic 4K footage shot with the Apple iPhone X

Posted in Uncategorized


Getting Your Priorities Straight – A Guide to Selecting Your Shot Priority

11 Oct

A major goal when starting out in photography is to get off Auto mode and onto the semi-automatic Aperture and Shutter Priority modes. Is it daunting at first? It can be, but I promise that wrestling creative control away from your camera and into your hands is one of the first and greatest joys of digital photography.

I teach people that a deeper reason exists for the name priority mode. The obvious one is you’re prioritizing control of shutter speed or aperture and surrendering control of the other. But also, you can teach yourself to base this decision on your shot priority.

Getting Your Priorities Straight – A Guide to Selecting Your Shot Priority

Flag dancers in Liberty Square – Taipei, Taiwan. Shot priority: Freeze motion. Shutter speed: 1/500th.

This article identifies four major shot priorities: to freeze motion, to imply motion, to create a shallow depth of field, and to create a deep depth of field. The goal is to get you to ask which of these is your priority for your next shot and then to select the appropriate mode and settings to achieve that.

Shutter Priority Mode

Shutter priority mode is marked with an “S” on Nikon and Sony cameras and “Tv” on Canon mode dials. Like your eyelid, the shutter opens and closes to expose the camera sensor to light. Through selecting this mode, you can choose how long it opens.

With Shutter Priority mode, you’re prioritizing shutter speed as the crucial element for the image you want to take. Your camera will then select a corresponding aperture to create a correct exposure. It is the mode to use when your priority is either freezing motion or implying motion.

Getting Your Priorities Straight – A Guide to Selecting Your Shot Priority

Traditional dance performance at Haemi Fortress, South Korea. Priority: Freeze motion. Shutter speed: 1/1000.

Priority #1 – To freeze motion

Much of the time when shooting, you require sharp images in crisp focus. Shutter speed is the most critical factor affecting image sharpness; however, requiring image sharpness isn’t a fully-fledged shot priority. Here, we’re talking about freezing fast motion.

Select this mode to freeze action in sports fast-moving water in landscapes, and other fast motion. For example, a runner could be frozen with a shutter speed of 1/500th of a second, whereas motorsports might require 1/2000th or faster.

Getting Your Priorities Straight – A Guide to Selecting Your Shot Priority

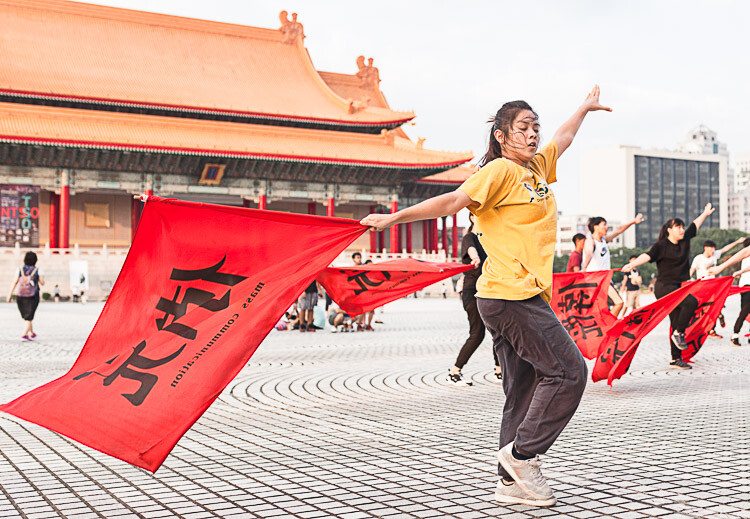
For this image of flag dancers in Taipei’s Liberty Square, I selected a shutter speed of 1/800th to freeze the motion. As well as freezing the dancer, the fast shutter speed also froze the flag and ensured the writing was crisp and legible.

Getting Your Priorities Straight – A Guide to Selecting Your Shot Priority

At the ghats by the River Ganges in Varanasi, India’s holiest city, I saw a procession of ladies heading downstairs and a cow heading up towards them. The animal looked ready to charge at them! I had just been shooting a game of cricket so my camera was already set to 1/1000th in Shutter Priority mode. I began shooting as the cow charged at the last two women before veering away. The cow and the women’s facial expressions were frozen, preserving a fleeting moment.

Priority #2 – To imply motion

Using Shutter Priority mode, implying motion is a beautiful effect that you can easily apply to your images. Everything from slight motion blurs to light trails to dreamy water effects are possible with a variety of moving subjects.

Imagine that you’re shooting handheld street photography and you chance upon a pair of dancing street performers. You decide you want people viewing your images later to be able to get a sense of the action, so choose to imply motion as your shot priority. Because a shutter speed of 1/500th would freeze the performers, you could try 1/250th and work down from there until the desired motion blur is achieved.

Getting Your Priorities Straight – A Guide to Selecting Your Shot Priority

While working as a tour photographer in South Korea, I was tasked with capturing tourists prepare green tea leaves. To imply motion, I took a sample shot at 1/50th and then worked down until I achieved this blur. This image was 0.4 seconds – admittedly pushing the acceptable limits of handheld photography – but thanks to my lens’s image stabilization and steady hands, I ended up with this interesting shot.

Now imagine you’re on the rooftop of a tall building at nighttime and you have a tripod. Because of the added stability a tripod allows, you can open up your shutter for significantly longer. Through selecting the right settings, you can achieve crisp backgrounds, blurred subjects, and light trails that build on top of each other.

Getting Your Priorities Straight – A Guide to Selecting Your Shot Priority

A nighttime cityscape of Seoul’s Han River and Namsan Tower featuring blurred white and red light trails. I used a shutter speed of 15 seconds to allow the light from numerous cars to reach my sensor, accumulating into long streaks of light in the final image. No golden rule exists for the number of seconds, so just enjoy experimenting.

Aperture Priority Mode

Aperture Priority mode is marked with an “A” on Nikon and Sony cameras and “Av” on Canon dials. Like an iris in a human eye, aperture represents the hole that opens to expose the camera sensor to light. Through selecting this mode, you can choose how wide or narrow to open the aperture. The lower the f-number, the wider the hole. Controlling aperture is mainly used to affect what is known as depth of field.

You’ve seen portraits where the subject is in crisp focus but the background is beautifully blurry; this is called a shallow depth of field. Also, you’ve seen fantastic landscapes that are in sharp focus throughout the image from front to back; this is a deep depth of field.

Through selecting Aperture Priority mode, you’re marking aperture as the crucial element for the image you want to take. Your camera will then select a corresponding shutter speed to create a correct exposure. It is the mode to use when your priorities are creating either a deep or shallow depth of field.

Getting Your Priorities Straight – A Guide to Selecting Your Shot Priority

Stall owner at the Mother’s Market in Imphal – Manipur, India. Priority: Shallow depth of field. Aperture selected: f/2.0.

Priority #3 – To create a shallow depth of field

As a travel photographer specializing in portraits, creating a shallow depth of field is often my priority. This allows me to have my photo subject (i.e., a person’s face, and more specifically their eyes) in crisp focus, while the background melts away in a dreamlike blur. To achieve this effect, you want to select a low aperture value.

If you’re shooting with a kit lens, the lowest value available to you might be f/3.5. However, with a fixed focal length lens (prime), this will be lower, making this type of lens perfect for portrait photography. Let’s take a look at the two example images below.

Getting Your Priorities Straight – A Guide to Selecting Your Shot Priority

A Hindu lady showing her devotion during the Ganga Aarti ceremony – Varansi, India. When I’m out meeting people and taking portraits, I make sure my Sigma 35mm 1.4 Art lens is on my camera body. The aperture selected for this shot was f/1.4, ensuring a beautifully blurry background.

Getting Your Priorities Straight – A Guide to Selecting Your Shot Priority

A resident of Houtong Cat Village – Northern Taiwan. Aperture selected: f/2.8. This is a great example of shallow depth of field. The front of the cat’s paws are blurred and so is the back of its body. There is just a thin focal plane in sharp focus. The lower the aperture value selected, the thinner this slice of the focal plane becomes. For this shot, I spot focused on the cat’s left eye, ensuring that this was the sharpest spot of the image.

Priority #4 – To create a deep depth of field

By contrast, a deep depth of field enables front to back sharpness throughout an image, making it the shot priority to select for landscape photos. If the lowest aperture values provide the thinnest focal planes and the blurriest backgrounds, then surely the highest aperture values provide the best landscape settings, right? Wrong. Your lens may be capable of f/22 but please don’t select it.

The highest aperture values can create image distortion. I recommend not going above f/16 for landscape photography with a tripod, and not going above f/11 handheld. A solid choice for handheld landscapes is actually f/8 because it provides a mid to deep depth of field while enabling a lower ISO and faster shutter speed for a sharper image.

Getting Your Priorities Straight – A Guide to Selecting Your Shot Priority

Beautiful Itsukushima Shrine at Miyajima, one of “The Three Views of Japan” – Hiroshima Prefecture. A higher aperture value creates a narrower hole through which light reaches your sensor. A deep depth of field is one of the main effects, which in landscape photos creates front to back sharpness. For this image, I selected an aperture of f/7.1 and spot focused on the pool of water in the foreground.

Getting Your Priorities Straight – A Guide to Selecting Your Shot Priority

On the road to “Zero Point”, the end of the road heading north in the Sikkimese Himalayas, and looking back toward Yumthang Valley – Sikkim, India. This is a simple handheld landscape shot, for which I selected f/8 because my shot priority was a deep depth of field.

Conclusion

Remember these four major shot priorities and put them into practice using the Aperture and Shutter priority modes. Don’t forget to share your work and comments below.

The post Getting Your Priorities Straight – A Guide to Selecting Your Shot Priority by Ben McKechnie appeared first on Digital Photography School.


Digital Photography School

 
Comments Off on Getting Your Priorities Straight – A Guide to Selecting Your Shot Priority

Posted in Photography