Got this today and saved the unboxing for you!
Video Rating: 4 / 5
On this episode we review the Nikon P500 and why it just may be the perfect sub-DSLR camera! Equipment used in this video: Nikon P500 – amzn.to
Video Rating: 4 / 5
Got this today and saved the unboxing for you!
Video Rating: 4 / 5
On this episode we review the Nikon P500 and why it just may be the perfect sub-DSLR camera! Equipment used in this video: Nikon P500 – amzn.to
Video Rating: 4 / 5
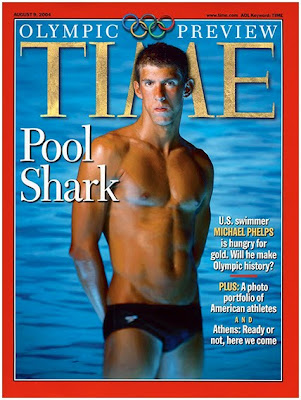
To understand the impact this photo had on me when it first came out, you kinda have to get into the head of a Baltimore Sun photographer during the run-up to the 2004 Summer Olympics.
For one thing, this is the only photo which has ever made me shout the F-word in a supermarket checkout line. So yeah, I have been waiting a long time for this BTS.
Oh, and if that weren't enough, there are two more Gregory Heisler vids inside, too… Read more »
Strobist
The Classic White Infinity Backdrop
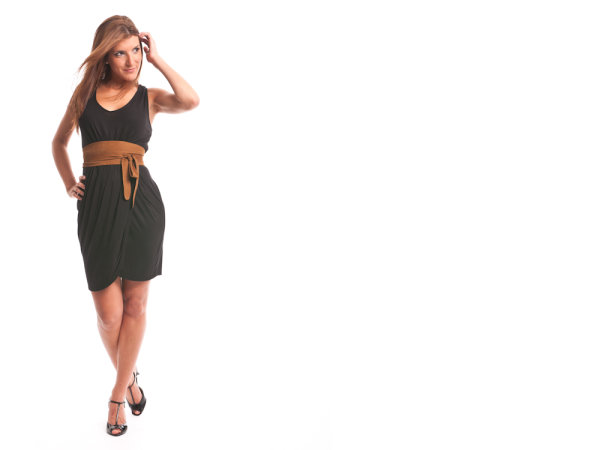
In my last post about studio photography (the killer clamshell) I covered a simple two light setup for achieving a gorgeous soft beauty look. This time I thought it might be fun to cover something a bit more general purpose and for this there cannot be anything better than the ever classic white infinity setup.
The All Can Do Lighting Setup
There is a reason why pretty much every major fashion or lifestyle magazine makes good use of a white backdrop and that reason is simplicity. Not only is this lighting arrangement incredibly easy to achieve but it also delivers sharp, detailed portraits with a beautifully clean and uniform background and most importantly no visible seams or edges. Aesthetics aside its also great for beginners to try as if done correctly provides a large and consistent zone in which to place your subject, allowing you to concentrate less on the position of your lights and more on placing and posing your model.
Families, pets, models, products the white infinity background is probably one of the most versatile setups going and to help you get started here is my approach to nailing this fantastic lighting arrangement:
Disclaimer
Ok, confession time. The images and steps below are 100% genuine and therefore its going to be pretty obvious that I screwed up my exposure during this shoot. Before you hit the big red ‘X’ at the top of your browser .. I can explain. I basically had about 10 minutes to set everything up and 30 mins to take the shots before my studio rental was over. Because I was in a rush I failed to spot that a large portion of the floor area was under exposed (by about a stop). I promise I don’t do this all the time and if you don’t believe me check please feel free to check out the studio section of my portfolio site. Hopefully by showing you my mistakes you will avoid them in the future.
Equipment
This lighting setup requires three lights and is best achieved using studio strobes as opposed to speed lights given the extra power needed to blow out the background. As I have said before, hiring a studio is a cheap and very effective way to get access to this kind of equipment, making this shot all the easier to achieve. If you do decide to do this at home however I would definitely recommend spending a little bit of money on a decent quality background paper, you can use a fabric backdrop but in my experience this will absorb much more light making the exposure more difficult than a non fabric setup. Its also important that you have a background which is long enough to span both the back wall and floor of your shooting space.
For this setup you will need:
The Lighting Setup
The important thing to achieve is a background that is both evenly exposed and completely blown out (i.e. solid white). The ideal result is to have a background that is twice as bright as your subject, the trick here being the ratio of light as opposed to absolute values.
Typically I will set the exposure for my subject using an aperture of around f8. Therefore if we want to achieve a background which is twice as bright we need to expose the background at an aperture which is one stop smaller than that used for the subject.
Just in case this doesn’t make complete sense, changing the aperture by one stop will either halve or double the available light. Therefore if when we meter the background we use an aperture which is one stop smaller than the subject, when we open this back up again to take the final shots the background will now be twice as bright as the subject.
Here is how I go about getting this all set:

Two background lights and a main subject light.
The Post Processing
Obviously you can post process your final images however you like but just in case you are looking for a few pointers here is a brief overview of my workflow and more importantly how I overcame my exposure malfunction.

Starting Point – Notice the horrible 'yellow' area of underexposed floor.

Step 1: White Balance & Crop – Basic adjustments to get the colour right and to straighten up the slight slant on the composition.

Step 2 – Minor exposure adjustment (slight exposure and fill light) to get the subject lighting right.

Step 3 – Contrast corrections using via a minor curves adjustment (slight 'S') and added detail via Clarity.

Step 4 – Now its time to fix the badly exposed floor. This was done using a gradient filter from the bottom up to increase the exposure on the area on the floor. Minor imperfections were cloned out using a spot healing brush.

Step 5 – All done, final image completed. Much better than the start as I am sure you will agree. All in all this took less than 2 minutes and would have been much less if I had got the exposure correct from the start.
Summary
The white infinity backdrop is a fantastically versatile and satisfying lighting setup and one which I would definitely recommend to anyone wanting to try something different to a single light arrangement. Hopefully the tips here will help you to have a go at this classic lighting look, unfortunately though finding the super model is down to you!
Post originally from: Digital Photography Tips.
Check out our more Photography Tips at Photography Tips for Beginners, Portrait Photography Tips and Wedding Photography Tips.
How I Shot & Edited – The White Infinity Setup
First shot with my new Nikon D300s. Amazing Camera. Shot with AF-S 18-55mm. Music by Joe Satriani – Down Down Down www.cedricpoitras.com Watch in HD !
Putting canoes in time lapse. Nikon D300 10.5mm f2.8. December 18, 2010.
Video Rating: 0 / 5
 As we approach the end of the year I thought it might be time to do a weekly challenge on the topic of ‘best shot in 2012′.
So dig through your shots from 2012 and share your best shot with us.
What ‘best’ means is up to you. It could be a shot that is technically best, makes you feel great or captures a best moment. Whatever you like.
Once you’ve selected your best shot of 2012 upload it to your favourite photo sharing site and either share a link to it or – embed it in the comments using the our new tool to do so.
If you tag your photos on Flickr, Instagram, Twitter or other sites with Tagging tag them as #DPSBEST2012 to help others find them. Linking back to this page might also help others know what you’re doing so that they can share in the fun.
Also – don’t forget to check out some of the great shots posted in last weeks Environmental Portraits challenge where there were some beautiful shots submitted.
Post originally from: Digital Photography Tips.
Check out our more Photography Tips at Photography Tips for Beginners, Portrait Photography Tips and Wedding Photography Tips.
Best Shot of 2012: Weekly Photography Challenge
Jessops ‘The Shot’ Directed by Henry Davies. Raised by her nefarious Uncle Morris, young Julie grows up to be the greatest assassin of her generation, until the inevitable happens. A light-hearted action short starring the awesome, 13 time and reigning MuayThai Kickboxing World Champion, Julie Kitchen, in her first on-screen role. Crew: Writer/Director: Henry Davies Producer/Editor: Mitch Adams Sound: Ian Jenkin 2nd Unit: Jake Potter, Nick Maxstead, Underwater Unit: Adrian Brown CGI: Mike Richter (engine-house.co.uk) Fight Choreographer and Co-ordinator: Nathan Kitchen Armourer: Adrian “Kenny” Gazzard Military advisors: Tommo and Pete (OP4) Make-up: Ella Butler Greenscreen Stills: John Wood Photography Chaperones: Ginny Lean Casting Agent: Theresa Outing Music: Ben Hartley Cameras: Canon 5D Mk2 / 550 Nikon D300
Video Rating: 4 / 5
Read more: ow.ly Backstage video footage of photographer Rankin shooting popstress Sky Ferreira for Dazed & Confused April 2010 www.youtube.com
This is the first of a new series of interviews and tips from the master photographers of our time. Come with me to meet some of the most successful and interesting folks in photography. Presented by http/www.samys.com This is part one of three of my conversation with World Renowned Photographer Mark Edward Harris. This is good times for sure. Enjoy
In this video I provide some basics that will help to when it comes to taking photos through glass or any aquarium situations. These shots can be difficult for even the most experienced photographer I’m sure we will have more videos to help you tackle these types of shots.
 I’m excited today because one of our sponsors – and good friends – JOBY are offering to give 5 of our readers 2 of their UltraFit Sling Straps in a competition today.
To win all you need to do is to leave a comment below telling us about:
The Best Shot You Never Got Due to a Malfunction with your Gear.
That’s right – if you’re mourning a shot you never got due to a dead battery, a lens cap not taken off, a broken camera or a camera strap that got in the shot now is the time to get some pay back!
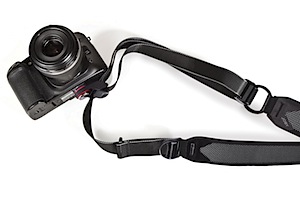
Our friends at JOBY have launched their revolutionary UltraFit Sling Strap that adapts from cinched to shooting so you never miss a shot and now they are offering it for you.
To win the prize of 2 straps (1 for you and 1 for a friend) simply tell us about your photography malfunction in 50 words or less in comments below and JOBY will provide YOU with the straps for the holidays.
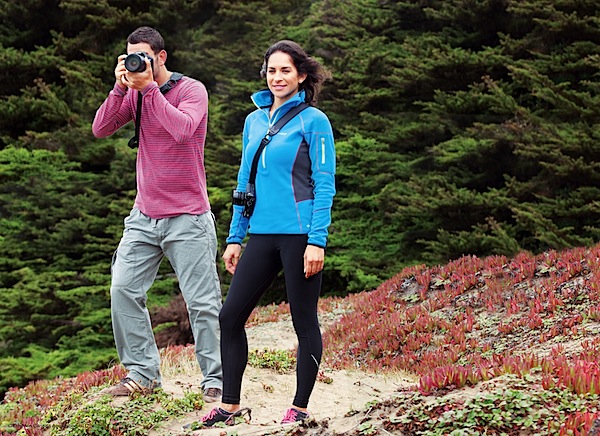
Never miss a shot with the new UltraFit Sling Strap from JOBY that makes your photography comfortable, quick and more fun. The SpeedCinch system allows for easy extension and quick ability to cinch to your body for stability; you can also lock the strap in cinched position for added security. The comfort is all in the design; male and female straps with the UltraFit Layered Pad Technology and S-curve designed specifically for the female body. The strap easily and securely attaches to your DSLR or CSC camera with the LockSafe ¼”-20 Attachment™. See it in action.
Check out a demo of the straps by JOBY in this video:
UltraFit Sling Strap for Women by JOBY from JOBY Inc on Vimeo.
5 dPS readers will be chosen from the comments left below. Each winner will receive 2 UltraFit Sling straps. One for them and one to give to a photography loving friend! To enter leave a comment below telling us about the shot you missed due to a gear malfunction before midnight US Eastern time on Friday 21st December. JOBY will choose the winners and we’ll publish their names here on the dPS blog in the following week.
Conditions: There is one entry per person and entries are open to our global audience (we’ll get your prize shipped to you anywhere in the world).
So get to it – in comments below tell us about the best shot you never got due to a Malfunction with your gear! Good luck!
Post originally from: Digital Photography Tips.
Check out our more Photography Tips at Photography Tips for Beginners, Portrait Photography Tips and Wedding Photography Tips.
Tell us About the Best Shot You Never Got Due to Malfunction & WIN a JOBY UltraFit Sling Straps
A montage of a 14 year old photographers best shots over the course of almost all home games in a season of football. Cameras used: Canon Xsi and T1i. Lenses used: Canon 18-55 f/3.5-5.6 IS and Canon 70-200 f/2.8 IS II USM Everything seen in the video was captured and edited by Brandon Agonoy, no professional editor/professional photographer had anything to do with ANYTHING done in the video. Just the work of a 14 year old freshman with a big passion for photography.
You must be logged in to post a comment.