RSS
 

Posts Tagged ‘shot’

Make Your Last Shot Your Best Shot

30 Nov

Lately I’ve noticed a common occurrence when I review my images from a photo shoot. More often than not the very best frame is the last one.

I think it’s because I’ve been pushing myself further than I used to by consciously carving out my vision of the subject.

For example, when I was in Charleston, South Carolina, I scouted out a beach location that had a lovely pier and faced east. Perfect for sunrise. I got up extremely early, while it was still dark outside, went to my location flashlight in hand and got set up for the morning’s first rays.

When the sun came up it didn’t take me long at all to get the shot I had envisioned. Here it is.

Pier at Folly Beach, Charleston, South Carolina.

There were a couple of other photographers on the beach that morning too. They had come down from the nearby swanky beachfront hotels and made images that were probably very much like the one I made. Then they went back.

I bet they were just in time for breakfast. My mouth watered a bit as I imagined what they were in for. Mmmm, yummy bacon, croissants still warm from the oven, a cheesy omelet. I looked back towards the hotels and paused for just a moment before my conscience told me “NO! FOCUS!” and when I looked back the light had changed just a bit and I smiled knowing I was going to make images that were even better than my initial vision.

When I am at a scene, I always try to focus on whatever attracted my attention in the first place. In this case it was the pier. Sure, the beach was lovely and the sky was lovely, but it was the pier that made this place different from any other beach.

I moved closer and closer to the pier, simplifying the composition, using a different point of view and different lenses to arrange the elements of the scene until I got these two images, neither of which I had envisioned before the shoot.

Pier at Folly Beach, Charleston, South Carolina.Pier at Folly Beach, Charleston, South Carolina.

I carved out my vision of the subject and removed elements from the scene until I was left with only a small portion of what was in my initial image.

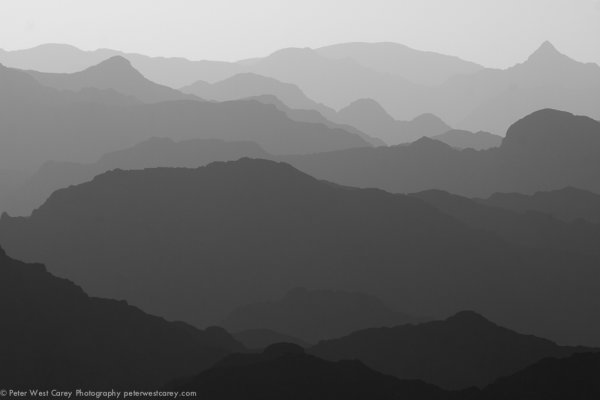
A similar thing happened when I was at Green Point in Gros Morne National Park in Newfoundland, Canada. I went down to an east facing beach for a sunrise shoot and made this image.

Green Point Beach, Gros Morne National Park, Newfoundland, Canada.

There was a very similar scene looking at the beach in the other direction.

Green Point Beach, Gros Morne National Park, Newfoundland, Canada.

But after that, then what? The thing that was different about this beach than any other I had been on were the pinkish granite stones the size of footballs. And I couldn’t help but give them my attention since they were extremely difficult to walk on. They were wet, each one moved as I stepped on it, and when the powerful atlantic waves came in I had to grab my tripod and rush up the beach for fear of being swept away. It was the stones that were the attracting feature.

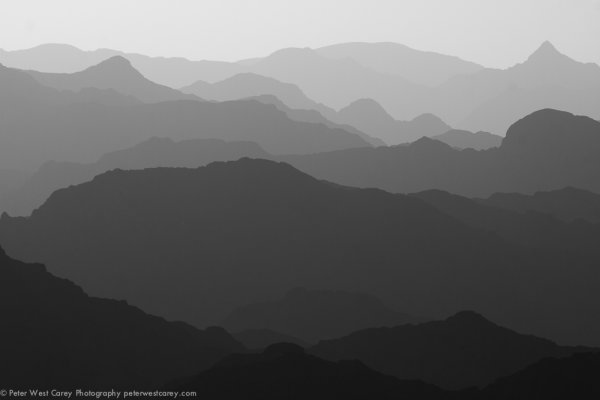
So I changed my point of view by getting down low, used my wide angle lens to get in close, and removed all other elements from the scene to make this image.

Green Point Beach, Gros Morne National Park, Newfoundland, Canada.

The next time you go on a photo shoot think about carving out your vision of the subject and being conscious of what you want to express in your image by answering these questions:

  • What is your photograph about?
  • How can you arrange the elements of the scene to bring out your subject’s best quality?
  • What elements are best left out?
  • What is the true subject?
  • What kind of effect do you want the subject to have on the viewer?

Get closer and closer to your true subject, changing your point of view, and removing elements from the scene until you get that shot that expresses your vision.

You will find that your compositions improve as you go and you might find too that your best shot is your last shot.

Post originally from: Digital Photography Tips.

Check out our more Photography Tips at Photography Tips for Beginners, Portrait Photography Tips and Wedding Photography Tips.

Make Your Last Shot Your Best Shot


Digital Photography School

 
Comments Off on Make Your Last Shot Your Best Shot

Posted in Photography


Food photography – 5 simple ways to get stronger shot

26 Nov

Images by BananaGranola and SuperDewa.

1. Colour Values

Hinamatsuri sushi
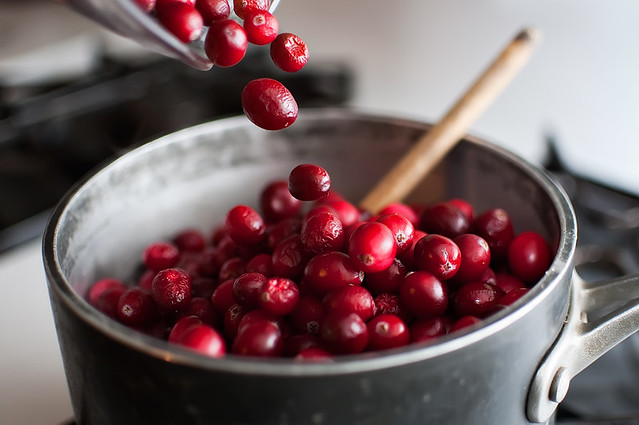
Part of the attraction of food is the way it looks, so making sure your images exude the correct colours associated with the product. Before you begin shooting always take a white balance reading from a grey card if you have one or if you’re using a compact set the White Balance to a preset that matches the lighting environment you are shooting in.

2. Look for the Best Light

The best light for shooting food is soft and even, which is why a lot of it is shot in studios with large softboxes. But if don’t have expensive studio equipment to hand, position food in front of a clean window for the same effect, or if it’s a particularly bright day and you are getting shadows on your captures, veil the window with a white sheet or net to diffuse the rays or simply move the food further from the light source to diffuse its brightness. Alternatively if the weather is fair, consider pitching up outside and shooting alfresco to add another element of interest to the frame.

3. Background

If you’re using a plate or work surface as the backdrop for your shoot, make sure it’s clean, tidy and no smudges of food plague the periphery. After shooting your first shot, zoom in during playback to be sure you haven’t missed anything that will result in hours of Photoshop cloning post-shoot. The backdrop and setting you use can ultimately enhance the message you want to achieve, so use this to compliment the food rather than detract from it; for example a wooden chopping board suggests rustic, an outdoor table says al fresco, square plates suggest minimalism, etc. Typically white backdrops carry connotations of image stock sites, so don’t be afraid to inject colour into the background using coloured sheets or card if item is small enough, for an added element of interest. When choosing the backdrop use a colour that compliments that of the food or reflects the vibe you want to portray, as darker colours can often influence thoughts of comfort and warmth, whereas lighter, brighter colours dictate ideas of freshness and frivolity.

Soba fusilli

4. Composition

Consider what makes the food look appealing and find a way to sell that feature. A wide aperture works well on products that are presented in rows or clusters and are easily identifiable such as; cupcakes, biscuits, and sweets etc.  If the product is small and plentiful, such as coffee beans or nuts for instance, consider cropping in close to fill the entire frame. Also consider your angle to add interest and sense of depth, scale and perspective. Make the most of interesting patterns and shapes by highlighting this as the focus. Including props to present the product can work well to convey a sense of scale or action, such as ladles, bowls, scales, pestle and mortar, or for drinks consider decorating the glass or backdrop with the fruit or flavours used in the ingredients.

Lunch

5. Action

As well as photographing the finished article there is a lot to be said for in-progress recipe shots that show food actually being prepared. Consider shots that feature motion such as chopping, blending, frying, rising in the oven etc and using a longer exposure to convey the sense of motion and speed. But don’t forget the tripod!

336/365: preparations

Post originally from: Digital Photography Tips.

Check out our more Photography Tips at Photography Tips for Beginners, Portrait Photography Tips and Wedding Photography Tips.

Food photography – 5 simple ways to get stronger shot


Digital Photography School

 
Comments Off on Food photography – 5 simple ways to get stronger shot

Posted in Photography


Zoom Shot – Toasted Donut Episode #2

13 Nov

Subscribe to Diggnation! bit.ly And check out Revision3! – www.youtube.com Glenn is a multifaceted photographer. That means Glenn’s talents with a camera are versatile. In this episode of Toasted Donut, Glenn demonstrates a cool zoom shot technique, edited together from multiple still and video shots, where the camera’s location advances to enable a continuous moving “zoom” (or rather, a camera floating through space and time and air effect). Glenn’s Twitter: www.twitter.com Never Miss An Episode! Subscribe Here: www.youtube.com Check Out The YouTube Channel: www.youtube.com More Toasted Donut Episodes: www.revision3.com ABOUT GLENN: Glenn, the occasional host that has a cat that likes toast crumbs. Seems like there should be a term for ‘toast crumbs’ – so hopefully there will be one in the future.
Video Rating: 4 / 5

International superstar and iconic tough guy Charles Bronson stars in this gritty, action-packed TV series. Bronson portrays Mike Kovac, a New York City freelance photographer who specializes in getting difficult shots other lensmen cannot. Assisting law enforcement and insurance agencies, he invariable winds up acting as a private eye and gets himself into plenty of trouble!

 
Comments Off on Zoom Shot – Toasted Donut Episode #2

Posted in Photography Videos


Model Shot Ep 103: Photo on the Go with Joe McNally: Adorama Photography TV

04 Nov

www.adorama.com Adorama Photography TV Presents Photo on the Go with Joe McNally. In this episode, Joe demonstrates how to achieve a line of sight TTL transmission at a distance while using colored gels to alter the color of the environment. Watch as he augments the color in a location by using artificial flash light while maintaining shutter speed in order to keep the ambient light. Joe will show you how to use a light box with a fabric grid, a red gelled flash, and a pop-up camera flash to create a compelling model shot. AdoramaTV features talented hosts including Mark Wallace, Gavin Hoey, Joe McNally, Joe DiMaggio, Tamara Lackey, Bryan Peterson, Rich Harrington Related Products Featured items from this episode bit.ly AdoramaTV related episodes bit.ly Learn More from the Adorama Learning Center bit.ly Phottix TTL Flash Remote Cord for Canon OC-E3 www.adorama.com Phottix TTL Flash Remote Cord for Nikon SC-28 www.adorama.com RPS Off-Camera TTL Coiled Flash Cord www.adorama.com Holga 12MFC Electronic Hot Shoe Flash with Built-In Color Filters www.adorama.com Holga Dedicated Holgon MF (Multiple Flash) Shoe Mount Electronic Flash www.adorama.com Harbor Digital 6-Piece Colored Gel Pack www.adorama.com Nikon D800 Digital SLR Camera Body www.adorama.com Flashpoint Soft Box, 32″” With Bracket www.adorama.com Lastolite Hot Shoe Ezy-box Softbox www.adorama.com Chimera 60 Degree Fabric Grid www.adorama.com If you have questions, share them with us at: adotv@adorama.com

 
Comments Off on Model Shot Ep 103: Photo on the Go with Joe McNally: Adorama Photography TV

Posted in Nikon Videos


Being Creative and Getting the Shot

04 Nov

In this fun and informative seminar fashion photographer Frank Doorhof shows you some simple tips and tricks that can make your images speak. Frank’s Website www.frankdoorhof.com
Video Rating: 4 / 5

 
Comments Off on Being Creative and Getting the Shot

Posted in Photography Videos


Bollywood World – Amitabh Bachchan shot by Daboo Ratnani

02 Nov

Ace film and fashion photographer Daboo Ratnani does a photo shoot of Amitabh Bachchan for the brand Zen Mobiles. Amitabh Bachchan has been announced as the brand ambassador of Zen Mobiles.
Video Rating: 4 / 5

 
Comments Off on Bollywood World – Amitabh Bachchan shot by Daboo Ratnani

Posted in Photography Videos


3D Red/Cyan Shot on Two Canon 7D Cameras – HD

01 Nov

For our holiday greeting this year, we sent out red/cyan glasses with our card, and created this 3D video using as many cheap 3D gags as we could find. Dircks Associates – www.dircksny.com Video, Audio, Design, and Direct Response expertise

 
Comments Off on 3D Red/Cyan Shot on Two Canon 7D Cameras – HD

Posted in 3D Videos


The Big Shot

23 Oct

A day in the life of a photographer trying to make it big in New York City’s world of fashion. Produced by Chris Gidez & Chung Lee Chris Gidez & Chung Lee
Video Rating: 0 / 5

 
Comments Off on The Big Shot

Posted in Photography Videos


How I Shot And Edited It – Layers, Oman

22 Oct

The image above was shot in Oman near sunset and I have received a number of requests to explain how it was shot and processed. I hope this post helps you understand the process I used so it may be of service to you.

Starting at the start, I got lucky. This image is not too far off what I captured while standing on the side of the road, sweating in 100F+ heat. My girlfriend and I were driving the mountainous regions of Oman on holiday with very few particular objectives so it was hapenstance that we came upon this scene about an hour before the sun set. This shot is facing East to North with the sun coming in slightly off to the side.

The shot was taken with a Canon 7D and Canon 28-3400mm L lens. The settings were: ISO 100, 235mm, f/9 and 1/800the of a second. No tripod was used.

I downloaded the image into Lightroom 4 and it was pretty decent from the start. (Click on any image for a larger version.)

I was happy with the range in the capture. Here is the histogram for it at the start.

After removing some spots that showed up with the f/9 setting, I adjusted the Tone Curve to bring in the white and black point.

This expanded the histogram a little.

So far, so good. A few more spots showed up and I removed them (I’m not showing that part so as to not completely bore you). I also adjusted the Luminance Smoothing by +12 because, even with ISO, I wanted things even smoother when it came to tone.

It was at this time I decided to use Seim Effects Silver Shadows 2 to change the image to black and white. Having played with this product for a while, I knew the Dynamic Silver effects would render a great result. There are over 100 presets and I’m not patient enough to go through them all, so I stick with a few tried and true favorites. In this case, it was specifically 3:01 Dynamic Silver I.

Then, I gave a slight curve to the Tone Curve to accentuate the contrast. I have had a problem as of late of going overboard with curves, so I kept this one subtle.

The curve looked like this and the result is after it.

It’s hard to tell the difference without flipping between the two images, I realize, but that is good in my book.

I found another spot (tip: clean your sensor before your next trip) and then decided on one last change. I brought the black and white points even more to stretch the tonal range as such:

Not every photo needs to have a ton of edits in post production. And thankfully this image was pretty nice to start with, fitting well within the sensors capabilities.

The problem with an edit like this is it’s impossible to please everyone. After I posted this image on my Facebook page, I received requests for the original color version with edits. To that end, I submit it here for your opinion.

Which do you like better, the B&W version or the color?


Post originally from: Digital Photography Tips.

Check out our more Photography Tips at Photography Tips for Beginners, Portrait Photography Tips and Wedding Photography Tips.

How I Shot And Edited It – Layers, Oman


Digital Photography School

 
Comments Off on How I Shot And Edited It – Layers, Oman

Posted in Photography


SNYP’s MW2 Trick Shot Guide! Part 2 – Preparation, Techniques and Tactics

17 Oct

PART 2 IS FINALLY HERE! Thankyou all so much for the overwhelming response on Trickshot Guide part 1. We hope this fully interactive beast of a guide was worth the long wait! Please leave a like and favourite if you enjoyed it, we spent absolutely ages on this guide! 🙂 Lots of love, ~ SNYP

 
Comments Off on SNYP’s MW2 Trick Shot Guide! Part 2 – Preparation, Techniques and Tactics

Posted in 3D Videos