RSS
 

Posts Tagged ‘Shooting’

Samsung NX1 First Impressions Review updated with shooting experience

03 Feb

Samsung’s NX1 looks and feels like a DSLR in many ways, but don’t be fooled – it’s an ambitious 28.2MP APS-C mirrorless camera, the first to use a backside-illuminated CMOS chip of that size. It also provides hybrid AF with 205 phase-detect points, 15 fps burst shooting with continuous AF and 4K video recording. We’ve updated our first impressions of the camera with a shooting experience. Read more

Articles: Digital Photography Review (dpreview.com)

 
Comments Off on Samsung NX1 First Impressions Review updated with shooting experience

Posted in Uncategorized


Olympus Stylus 1 firmware update adds wide angle converter compatibility and interval shooting

16 Jan

Olympus has released v2.0 firmware for its OM-D styled premium compact camera, the Stylus 1, which will enable users to fit a wide angle converter to the lens. The update also introduces useful features like focus peaking, 35mm equiv. step zoom, interval shooting and time lapse modes. Read more

Articles: Digital Photography Review (dpreview.com)

 
Comments Off on Olympus Stylus 1 firmware update adds wide angle converter compatibility and interval shooting

Posted in Uncategorized


Shooting Winter Wonderland: How to Take Great Snow Images

14 Jan

Shoot what you love. The Amazing Images Will Follow. That’s my motto. Above, you can see a shot of my daughters, Zoe and Tenley, on their first day of snow ever. Zoe wanted to hold the snow in her hands and blow it, Tenley agreed, and just as Zoe was blowing, Tenley reached up and whitewashed her face with the Continue Reading

The post Shooting Winter Wonderland: How to Take Great Snow Images appeared first on Photodoto.


Photodoto

 
Comments Off on Shooting Winter Wonderland: How to Take Great Snow Images

Posted in Photography


Shooting for the moon: Photo tips from a NASA astronaut

24 Dec

Many of us have dabbled in astrophotography, but it’s a fair bet that none of us have captured star trails quite like Don Pettit has. A NASA astronaut and photographer, part of his job aboard the International Space Station has included photographing Earth from space, capturing aurora and vast glowing cities. Want to learn how to shoot like an astronaut? Read his eight tips for shooting in space. Learn more

Articles: Digital Photography Review (dpreview.com)

 
Comments Off on Shooting for the moon: Photo tips from a NASA astronaut

Posted in Uncategorized


Real-world Test: Shooting Fashion with the Fujifilm X-T1

18 Dec

The X-T1 is Fujifilm’s first weather-resistant interchangeable X-series camera. It is built around a 16.3 MP APS-C X-Trans CMOS II sensor housed in a die-cast magnesium body. Offering a traditional design with five physical top plate dials, two command dials, and six programmable function buttons the X-T1 also has a high resolution OLED viewfinder. In the latest in our series of real-world video tests, we took the X-T1 to a local studio, to see how it would perform in the hands of a professional fashion and portrait photographer. Click through to watch the video

Articles: Digital Photography Review (dpreview.com)

 
Comments Off on Real-world Test: Shooting Fashion with the Fujifilm X-T1

Posted in Uncategorized


Shooting Motorsports with a Micro Four Thirds Camera

17 Dec

Can you use micro four thirds or other mirrorless cameras to photograph motorsports? Well, the answer is a resounding YES, but with some caveats.

You can certainly make good and interesting images using any camera at a motorsport event. All of the images in this article were made with either a Fujifilm X100S or an Olympus OMD EM-5 and two lenses – the m.Zuiko 12-50mm f/3.5-6.3 and the m.Zuiko 75-300mm f/4.8-6.7 II.

Mft motor sport KLP 1

Planning

Perhaps one of the most important things to consider when you intend to photograph motorsports with a micro four thirds camera is the pre-planning you need to do before you actually get to the race track. Think about how you’re going to shoot the event. Remember that professional motorsport photographers use high-end dSLR cameras that are both fast and expensive; their choice of lenses is equally fast and expensive! A typical pro photographer covering motorsport may have two or three camera bodies and a selection of lenses ranging from fisheye to wide angle and telephoto. They could easily have $ 35-$ 40,000 worth of camera gear with them at the track – plus their laptop!

Mft motor sport KLP 2

You probably won’t have that amount of gear with you, and if you intend shooting with micro four thirds you definitely won’t. Micro four thirds cameras use different focusing systems to dSLR’s and their lenses are often slower, that is they have smaller maximum apertures, than the typical lenses used by professionals. They’re also slower to lock focus due to the type of focusing system they use.

You’ll need to consider the limitations of the camera system you’re using, as well as many other factors.

Weather

Weather will play a big part in how you shoot motorsports. If it’s bright and sunny, you’ll be able to use lower ISOs and higher shutter speeds. Of course, if the sky is overcast and grey, or even stormy, then you might need to raise the ISO or lower the shutter speed. Bright sun creates harsh shadows which also need to be considered when composing your shot, simply because cameras don’t have the same dynamic range that our eyes have. You’ll also have to consider the position of the sun when framing. Even if the sun is coming from behind you, there can often be bright reflections bouncing back towards you and your camera. A few specular highlights on the front fairing of an approaching motorcycle is not usually a problem, but a large super-bright reflection from a sponsor’s sign is certainly going to be distracting and will probably ruin your shot.

Mft motor sport KLP 3

ISO

Modern cameras are able to shoot at relatively high ISO without too much in the way of distracting noise. Micro four thirds cameras are no exception. The noise produced by most cameras manufactured in the last few years is more like film grain, rather than ugly colour noise, and simply isn’t an issue. It’s much better to correctly expose your image with a high ISO than it is to use a lower ISO and end up under-exposing the image. When you increase the exposure of an under-exposed image in post-processing you introduce a lot of digital noise and the image begins to break up and lose detail. There is much more data stored in the highlights compared to the shadows of a digital image. Exposing to the right, or for the highlights, is generally better than underexposing the image and boosting the exposure in software.

Mft motor sport KLP 4

Shutter Speed

You can say a lot in an image by controlling your shutter speed. Using a slow shutter speed while panning a fast moving vehicle will blur the background while keeping your subject sharp. The slower the shutter speed, the more blur in the background and the more you convey a sense of speed. Conversely, if you use a high (fast) shutter speed you’ll probably have a nice sharp image, but the vehicle will look like it’s stationary, or parked on the track. With a high shutter speed the background will be sharp, unless you’ve used a large aperture to send everything behind the vehicle into soft focus, and the wheels will also be frozen in time.

Mft motor sport KLP 5

Moving Towards / Away / Across

When a vehicle is moving towards you, you can get away with using a much faster shutter speed than if it’s moving across your path from one side to the other. Most race vehicles use slick tires on the track, which means there is no tread pattern. If the wheel/tire is frozen in time by a fast shutter speed it doesn’t really matter. There will be no visual clues that the tire is frozen because the tire is smooth anyway. Unless you’re zoomed right in on the tire you can’t tell whether it’s rotating or not. However, If you’re photographing something like a motocross bike or an open wheel race car in the rain, which do use treaded tires, then you should keep the shutter speed slow enough that the tires are blurred but the rest of the bike or car are still sharp. Blurring the tires helps to show motion rather than having the vehicle appear to be stationary on the track.

Mft motor sport KLP 6

When you’re panning with a vehicle as it moves across the frame it’s much better to use a slower shutter speed because then the rotation of the wheel is still visible. You get a nice blur of the spokes or writing on the tire’s sidewall. The rotation of the wheel, combined with the blurred background as you move the camera while following the vehicle, really adds a sense of speed and motion. The slower the shutter speed, the more dramatic the effect.

Mft motor sport KLP 7

Aperture

When photographing sports such as football, a large wide open aperture is beneficial to isolate your subject from the background. However, when shooting motorsport, that’s generally not necessary. Remember, as you pan with the moving vehicle, the background remains stationary. By using a small aperture, which means you’ll have a much larger depth of field, you’ll also lower your shutter speed. Having a large depth of field means you don’t have to be as critical on your focus point. It won’t matter whether you focus on the rider (driver) or the vehicle, there will be sufficient depth of field to ensure the entire vehicle is in focus. Even if the background is in sharp focus with a stationary shot, it will become blurred due to the movement of the camera and the slow shutter speed.

Mft motor sport KLP 8

Manual Focus

Expensive dSLR cameras, and their similarly priced prime telephoto lenses, focus very quickly. That’s why you pay a lot of money for them. But micro four thirds cameras and lenses aren’t as fast. They use a different focussing system which is very good, but not as good at tracking focus of fast moving subjects, particularly when they’re moving towards or away from you. So, how do you get around that? You focus manually!

You can focus completely manually or use autofocus and then switch to manual focus. Either method is easy to do. If you’re going to use the autofocus first method, simply choose something that is the same distance from your camera as the subject you will be photographing, and use the camera’s focus system to lock onto that; then switch off the autofocus and wait for your subject to appear.

Pre-Focus

Mft motor sport KLP 9

Pre-focussing is another form of manual focus. An example of pre-focus in motorsports would be to focus on the apex of a corner using either of the manual focus methods above, then waiting for your subject to appear. In this case, you would wait for the motorcycle or car to approach the apex, then make your photograph. Most cameras have a burst or continuous shooting mode, so as your subject approaches the apex you can begin capturing images. Keep the camera still and capture numerous frames as the vehicle travels through the corner. In this case you can use a high shutter speed because your subject will be travelling towards you. You should get at least one sharp image as the vehicle passes through the corner. By using a small aperture you will have a reasonably large depth of field allowing the motorcycle or car to be within the zone of focus.

Mft motor sport KLP 10

Stationary – Motion

There are numerous ways to show motion on the racetrack. Using a small aperture and slow shutter speed as you pan with your subject is one method. Another method involves keeping the camera still and using a slow shutter speed, combined with a small aperture for a large depth of field. Keep the camera stationary as you make your image and let the motorcycle or car pass through the frame. The slower the shutter speed, the more blurred the racer will be. Try to capture the racer as they enter the frame on the left and allow plenty of space on the right of the frame for them to travel through.

Mft motor sport KLP 11

Of course, you can break the rules and have the vehicle on the right side of the frame, but it will generally look better and feel more natural if you capture it on the left, or perhaps both left and right.

Mft motor sport KLP 12

Autofocus

While most of your action shots will probably be made using manual focus, if you choose the right locations you can still capture sharp images using the camera’s autofocus system. Choosing a very tight corner on the track will mean the racers will be travelling at their slowest as they travel through the bend. That may mean they’re going slow enough to capture without switching to manual focus. You’ll need to experiment because even the slowest part of some tracks will be too fast for your camera. Of course, some cameras are better at focusing than others too. The Olympus OMD EM-1 tracks focus better than its sibling the OMD EM-5, for example.

Conclusion

You certainly need to think about how you’re going to shoot a motorsport event when using micro four thirds and other mirrorless cameras, but it’s possible to achieve very good results. Plan your shots and position yourself so you can pre-focus; use manual focus, and pan with your subject.

Mft motor sport KLP 13

Don’t forget to also make images with some background or foreground elements that help to tell the story. Images of track marshals, medical staff, and signage help your audience to appreciate the whole event, not just the action happening on the track.

Mft motor sport KLP 14

You should also try to make images of things that are happening off-track. Photograph the fans enjoying themselves and the crowd after the main event. Think about your shots and make them happen, but above all, have fun at the event!

Mft motor sport KLP 15

Mft motor sport KLP 16

Mft motor sport KLP 17

Mft motor sport KLP 18

Mft motor sport KLP 19

Mft motor sport KLP 20

googletag.cmd.push(function() {
tablet_slots.push( googletag.defineSlot( “/1005424/_dPSv4_tab-all-article-bottom_(300×250)”, [300, 250], “pb-ad-78623” ).addService( googletag.pubads() ) ); } );

googletag.cmd.push(function() {
mobile_slots.push( googletag.defineSlot( “/1005424/_dPSv4_mob-all-article-bottom_(300×250)”, [300, 250], “pb-ad-78158” ).addService( googletag.pubads() ) ); } );

The post Shooting Motorsports with a Micro Four Thirds Camera by Ken Lyons appeared first on Digital Photography School.


Digital Photography School

 
Comments Off on Shooting Motorsports with a Micro Four Thirds Camera

Posted in Photography


Go Au Naturel: Shooting Portrait in Natural Light

08 Dec

When I first bought my little Canon AE1 back in 1993 and started shooting, I couldn’t afford a flash. I shot everything in natural light, and I think I made every mistake known to mankind, so for those who would like to learn from my mistakes, this one’s for you!! Backlight When I was a little girl, my mother would Continue Reading

The post Go Au Naturel: Shooting Portrait in Natural Light appeared first on Photodoto.


Photodoto

 
Comments Off on Go Au Naturel: Shooting Portrait in Natural Light

Posted in Photography


20 Dos and Don’ts for Shooting the Moon

01 Dec
Here the April moon called the "Pink Moon" rose over Marietta, Ohio. The setting sun lit the city in a warm glow.

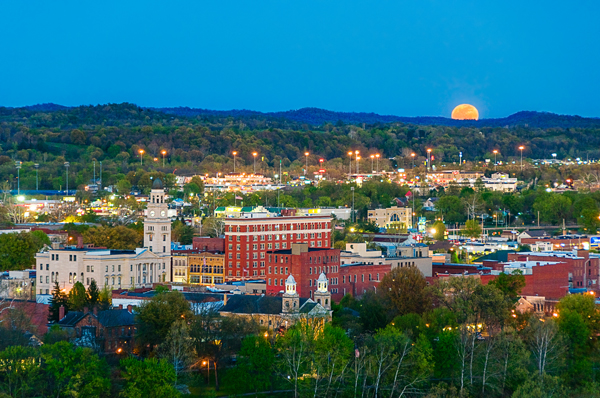
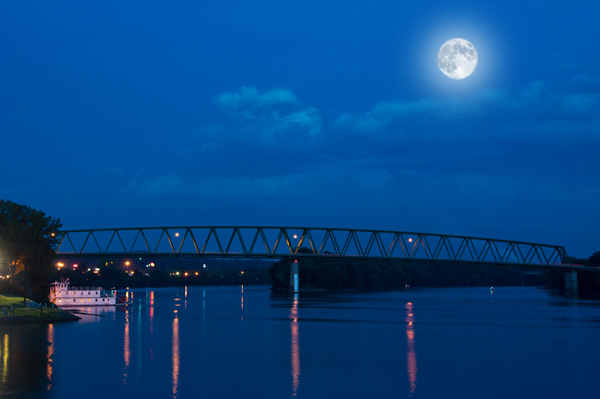
The April moon called the “Pink Moon” rose over Marietta, Ohio. The setting sun lit the city in a warm glow.

The moon is a very popular subject for photographers of all skill levels to shoot. But if you’ve ever tried to photograph the moon, you’ve probably discovered that it’s not that easy to accomplish. In this article let’s look at some dos and don’ts to take your moon shots from snapshot to artwork.

To begin, the first and most important DON’T is: Don’t assume that photographing the moon is going to be easy.

#1 Do use a tripod

One of the most important pieces of equipment for any low light photography is a good tripod. Since the moon is so far away, it is very important to have a sturdy base as even the smallest movement of the camera will cause your image to blur. You might be tempted to think that if you use a fast enough shutter speed you can hand-hold the camera, but you need to realize that your subject is 238,900 miles away and even the slightest movement will be exaggerated.

#2 Don’t use a slow shutter speed

The moon is actually moving very quickly around the earth at a speed of 2,288 miles per hour (3,683 kilometers per hour). The moon is so distant, it doesn’t appear to be traveling very quickly to the naked eye. Because of the moon’s speed and the long focal length necessary to capture an image of the moon, you need to use the fastest shutter speed possible. A good rule of thumb for tack sharp moon photos is nothing slower than 1/125th of a second.

#3 Do use a telephoto lens

To successfully shoot any kind of detail of the moon in your image, you need at least a 300mm telephoto. For a full frame image, you will need around an 800mm lens.

Capture the moon

#4 Don’t use any filters on your lens

Remove ALL filters from your lens! To prevent any chance of distortion, don’t use any filters. Yes, even remove the UV filter. This may sound scary if you never remove the UV filter from your lens, but it’s best to remove to do so in this case. Some may suggest using a neutral density (ND) filter for moon photography to cut back the bright light of the moon. But, all this will do is require you to use a slower shutter speed, and you want to use the fastest shutter speed possible to get that crisp, tack sharp, image.

#5 Do try the Looney 11 rule

The Looney 11 rule is similar to the Sunny 16 rule. Set your f-stop to f/11, then match the shutter speed to your ISO. For example, if your ISO is set at 100, set your shutter speed to 1/125 of a second. (This is not an exact science but will give you a good starting point.)

#6 Don’t touch the camera to start your exposure

Do not manually press the shutter release or even touch your tripod when initiating your moon shot. Remember that even the slightest touch could add enough vibration motion to blur the image. Using a cable release or remote trigger is the best way to start your exposure. If you don’t have either of these gadgets, use the self-timer feature on your camera to begin your shot.

#7 Do use Mirror Lock-up

If your camera gives you the option to lock up your mirror this can greatly increase your chances of getting a tack sharp image. Even the slightest shake of your camera’s mirror can be enough to blur your image. If your camera has this option, use it! Lock the mirror up and wait a few seconds to allow any vibration to settle before beginning your exposure.

#8 Don’t use Image Stabilization

Canon’s IS (Image Stabilization) or Nikon’s VR (Vibration Reduction) must be turned off anytime your camera is on a tripod. Turning on any vibration reduction feature with your camera mounted on a tripod will actually create blur in your image.

#9 Do know the cycles of the moon

Use Photographers Ephemeris to predict the location of the moonrise

Use The Photographer’s Ephemeris app to predict the location of the moonrise.

There are 29.5 days between full moons. There are many online and smart phone applications that can help you track the phases of the moon. One must- have app is The Photographer’s Ephemeris which will not only give you the phases of the moon, but also show you when and where the moon will appear in the sky. This is especially useful when planning your moon shoots in advance. By far the most photographed stage is the full moon, which is also the brightest and the most difficult to expose correctly. The side lighting of the Gibbous stage produces some interesting shadows which may allow you to capture craters and mountains. The crescent moon is, of course, the darkest stage, but one which may create some interesting effects when added to a nighttime landscape.

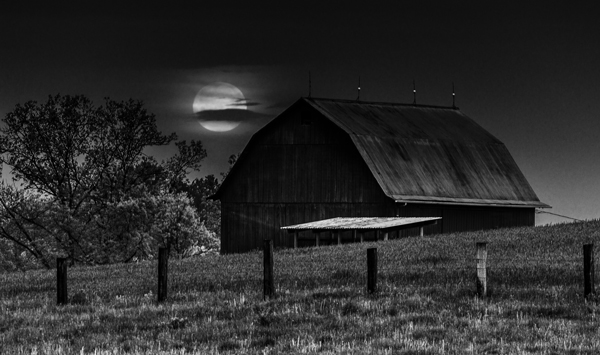
#10 Don’t always place the moon in the center

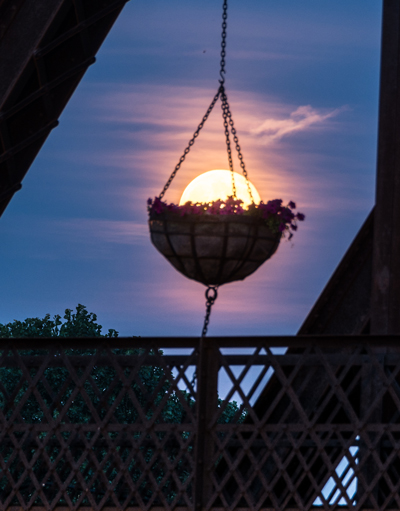
While you can use all the usual rules of composition for your lunar photography, don’t be afraid to break the rules if the shot calls for it. Don’t just put the moon in the center of your image with nothing else –  it’s been done a million times before and there is nothing exciting about this. Try to include other objects in the frame with the moon.

Don't just place the moon in an empty sky, including a foreground object will create a more dramatic image.

Don’t just place the moon in an empty sky. Including a foreground object will create a more dramatic image.

#11 Do switch to manual focus

There are a couple of different methods you can use to focus on the moon: First, try using your camera’s autofocus, and once you have a desirable focus, turn off the autofocus and switch to manual focus. Alternatively, you can set your camera on manual focus, and with your live view feature turned on, zoom in on the moon and turn the focus ring until the moon becomes sharp. Then do not touch the ring again.

#12 Don’t just shoot the moon at night

The best time for photographing the moon is just after it rises or just before it sets, when it is very low in the sky. When the moon is near the horizon, it is closest to Earth and will appear larger in your images. Also, as the full moon rises the sun will be setting, and as the full moon sets the sun will be rising. This may give you great lighting to include or accentuate foreground or landscape objects. Shooting the moon in the day time will give you opportunity to include foreground objects, and you also may be able to capture some craters on the moon’s surface.

The June full moon called the "Honey Moon" captured here setting at sunrise

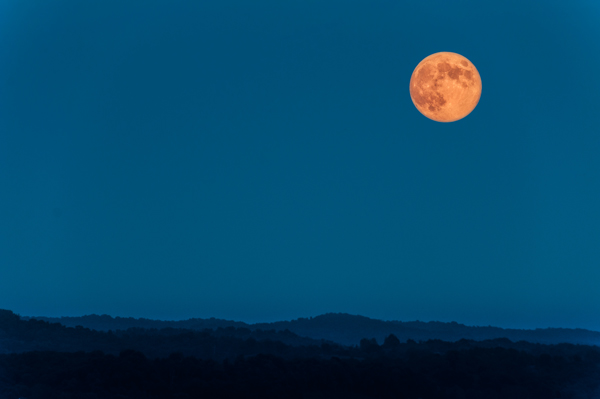
The June full moon, called the “Honey Moon”, captured as it sets at sunrise.

#13 Do use exposure bracketing

Once you have found the exposure that you feel happy with, it is best to bracket around that setting. The view of your images in the dark, on the back of your camera, can often be deceiving. In the dark, images always appear brighter on the LCD of camera than they actually are when opened on your computer. After you are satisfied with the exposure you have dialed in, bracket two stops under and two stops over, just to ensure that you get an exposure you will be happy with later.

#14 Don’t use Auto White Balance

Using auto white balance will give you very inconsistent results. What is the source for the light of the moon? That’s right, the sun! So try daylight white balance, but if you are looking for a different effect, try tungsten or cloudy. Don’t be afraid to experiment, but also remember that if you are shooting in RAW you can change the white balance in post-production.

#15 Don’t depend on your meter

Most likely your camera’s light meter will be fooled by the amount of light reflecting off the moon. Also it is important to note that as the moon rises, the exposure will continual change. It gets brighter as it rises, so you need to keep adjusting your shutter speed.

#16 Do shoot in RAW mode

Shooting in RAW will allow you to capture more details of the moon’s surface, and also give you more latitude for adjustments in retouching. So, unless you are not at all comfortable with using camera RAW software, always shoot the moon in RAW.

#17 Don’t be afraid to crop your image

Unless you are shooting with a very large telephoto lens, you will want to crop your image to display the moon at a decent size. But remember, the more you crop, the smaller the final image can be printed at high resolution.

#18 Do tweak and sharpen

Most moon photography is going to require some post exposure retouching in Photoshop or other photo editing software. Adding clarity and contrast will help bring out details which will enhance the craters and mountains of the moon. As mentioned above, white balance and exposure may also be tweaked to finish your optimal image, as both are somewhat difficult to perfect in camera.

Be creative: two images are combined together here to create this final image

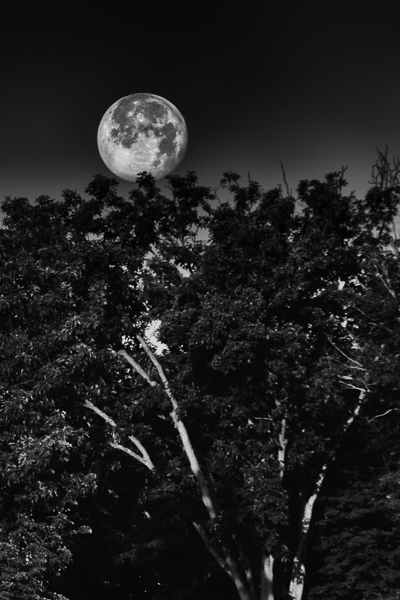
Be creative: two images are combined to create this final image.

#19 Don’t be afraid to be creative

Don’t be afraid to get creative with your images of the moon. Most great moon images have been manipulated in post-production because of the difficulty of capturing a great moon shot in one image. HDR or exposure blending are great methods to enhance the captures of otherwise impossible moon images. A popular method used by many photographers is to combine two exposures: one set to bring out the best of the foreground landscape and a second exposed for the moon only. When combining these two images, try enlarging the moon slightly to achieve a more dramatic effect, but don’t overdo it to the point that it looks fake. It needs to look believable unless you are going for a science fiction affect (which isn’t a bad idea, creatively speaking!).

Two exposures were combined to make this final image. One image was exposed for the landscape and the other for the moon. The moon was enlarged slightly for dramatic effect.

Two exposures were combined to make this final image. One image was exposed for the landscape and the other for the moon. The moon was enlarged slightly for dramatic effect.

 #20 Do Practice, Practice, Practice

Now get out there and shoot the moon! Remember it is not as easy as it looks, so keep trying if your first results are not as dramatic as you expected.

If you have any moon images or other dos and don’ts that work for you, please share them in the comments below.

The post 20 Dos and Don’ts for Shooting the Moon by Bruce Wunderlich appeared first on Digital Photography School.


Digital Photography School

 
Comments Off on 20 Dos and Don’ts for Shooting the Moon

Posted in Photography


Shooting Sunspots or How to Get a Beautiful Lens Flare

26 Nov

Sunspots, they’re such an enigma. They’re huge right now. Everyone wants to see them in their photos, but they don’t want to have them on their wall…unless you do it right. When I first started in photography, 20 years ago, there were Big Taboos, the Uncrossable Chasms that one never even considered crossing; Never use a flash on camera, keep Continue Reading

The post Shooting Sunspots or How to Get a Beautiful Lens Flare appeared first on Photodoto.


Photodoto

 
Comments Off on Shooting Sunspots or How to Get a Beautiful Lens Flare

Posted in Photography


Nikon D750 shooting experience published

26 Nov

The Nikon D750 is a full-frame DSLR that mates features from the D810 with a 24MP sensor, providing a faster frame-rate than any non-pro full-frame Nikon DSLR since the D700. Its comprehensive still and video photography specifications are aimed directly at enthusiasts and full-frame upgraders. We’ve made a significant update to our D750 first impressions review including a shooting experience and studio scene analysis. Read more

Articles: Digital Photography Review (dpreview.com)

 
Comments Off on Nikon D750 shooting experience published

Posted in Uncategorized