RSS
 

Posts Tagged ‘Shooting’

Firmware update enhances Nikon D4s features, including unlimited continuous shooting

22 Apr

Nikon has issued updated firmware for its D4s professional DSLR, altering the way numerous features operate on the camera. Changes include removing the limitation on the number of images that can be captured in a single continuous burst in the manual and shutter priority exposure modes. Firmware version 1.20 replaces versions 1.00 and 1.10, and appears to fix quite a range of glitches as well as adding functionality to the camera’s operation. Read more

Articles: Digital Photography Review (dpreview.com)

 
Comments Off on Firmware update enhances Nikon D4s features, including unlimited continuous shooting

Posted in Uncategorized


Panasonic DMC-GH4 firmware v2.2 brings 4:3 shooting for anamorphic shooters

14 Apr

Panasonic has announced firmware v2.2 for the GH4 to make it easier to use anamorphic lenses with the camera. The new anamorphic mode allows the camera to capture video from a 4:3 aspect ratio chunk from the middle of the sensor to match the projection of specialist lenses, allowing genuine anamorphic capture, rather than digital simulation of the look.

Articles: Digital Photography Review (dpreview.com)

 
Comments Off on Panasonic DMC-GH4 firmware v2.2 brings 4:3 shooting for anamorphic shooters

Posted in Uncategorized


Shooting Better Waterfalls: Five Tips for Improving Your Waterfall Photography

14 Apr

Cave Selfie

Perhaps there isn’t a more sought after and photographed subject than water. More specifically, waterfalls. When you really think about it, waterfalls are one of the most basic and simple things that we can find in nature. They are just streams or rivers that happened, by one geological occurrence or another, to find themselves flowing over some height of cliff or stone or other drop-off. Still, we remain captivated by the simple beauty and serenity that can come from being near, and photographing a waterfall.

That’s where we, as photographers, often slam face first into a huge creative and artistic wall. How can you make an interesting photograph of something that has already been so extensively covered by countless other photographers? While there is unfortunately no secret formula for all waterfall photo sessions, there are some very simple and useful tips that can help you create better, and more unique images, of these phenomenal natural occurrences. Let’s dive in (get it?) and get started on the path to better waterfall photography.

Have a plan

I always stress the importance of research and preparedness before any photographic excursion regardless of what the subject or goal might happen to be. This is especially true when you, the outdoor photographer, are readying yourself to photograph waterfalls. There is simply no denying that the more you know about a location, the better your odds will be of coming home with images that you are happy to claim as your own.

Conduct some quick research and find out what the main waterfall or waterfalls are in the area you plan to visit. Google (or another search engine) will be your absolute best friend in this regard. Try to find as many images as you can before you set out so that you can be inspired and have a head start on coming up with your own unique compositions that haven’t been tried with that particular spot.

Map

Also, if at all possible, print out a map of the area and highlight the waterfalls that you feel are the most promising for you on that particular day and focus on those first. Don’t waste time trekking into a place that probably won’t yield a good result. Know before you go, and you will make better use of your time and become a much more efficient shooter.

Use a tripod

The topic of using a tripod can sometimes scare you off just from the sheer repetition of the statement. For whatever reason it seems like this essential bit of knowledge is where most beginner photographers find themselves in a state of complete denial. Believe me, I know how uncomfortable, to downright physically painful and tiring it can be to carry a tripod on your person for an extended amount of time. Still, though not always convenient, a tripod will always help you in the long run to produce better photographs. There is simply no other way to limit camera shake without having a solid shooting platform – there just isn’t. You will need such a platform for the longer exposure times often used when encountering waterfalls. End of story.

Another fact that beginners, and even some seasoned photographers, fail to grasp is that the quality of the tripod plays an essential role in its overall use to you. You will need a tripod that locks securely and reliably, and can handle the weight of whatever camera rig you happen to be shooting, as well as the shooting conditions. I can’t tell you how many long exposure images I ruined due to drifting of the tripod head because all I had available was a suboptimal tripod.

The biggest gripe I hear concerning tripods is that the good ones are too expensive. It’s true that a quality tripod will not be cheap. However, it is just as true that you can still obtain one without being outrageously expensive. Shop around and find a tripod that has good reviews, fits your current needs, and will also grow with you as a photographer. Do you really need carbon fiber? Do you need the most advanced ball head? Ask yourself questions like that and your purchase will make less of a dent on your pocketbook. A good tripod will last you years and yield incredible benefits. It will literally pay for itself and be one of the best investments you will make.

Make the waterfall the secondary subject

Foreground Focus

This image puts the colors of the moss and the detail of the foreground as the first point of interest and less on the waterfall itself.

This tip may seem a little counter intuitive but stay with me. It’s fairly straightforward to walk up to the front of a waterfall and snap a quick photo to take home. That’s great if that’s all you want. But let’s face it, you wouldn’t be pouring through all the great content here on dPS if all you wanted was to make average photos. You want to shoot with a purpose, and make photographs instead of taking snapshots. One of the best ways to do this is to think about the subject differently than the average photographer, and waterfalls offer a great opportunity to do this.

When you arrive at a particular falls you should really study the scene. Give yourself a few minutes before you even start thinking about making an exposure. Watch how the water flows and interacts with the other pieces of the scene. It may be rocks, boulders, sand, trees or any number of artifacts found in such places. Don’t let the waterfall itself distract you from the other photographs that could be there.

After all, the waterfall is not the only thing you notice so why should it be the only thing you show your audience? Look for ways to include different parts of the scene and even have the falls take a back seat if that makes a stronger image. Pay attention to what is often overlooked by other photographers. If you do this you will almost always be able to present the waterfall in a way that has never been seen before.

Pay attention to color

Color is a great way to grab the attention of your viewers and pull them into a photograph. Never underestimate the creative power of color when photographing waterfalls. Water is an incredible thing because it not only reflects the different colors around the surface such as the sky and leaves, but also the colors that come from underneath as well.

Use Color

The first step to getting the most interesting colors from a scene is to always shoot in RAW if at all possible. Shooting RAW will allow the most information to be recorded by your camera sensor, which will in turn give you much greater latitude for getting creative later with your post processing. Experiment with creative white balance and see what happens. Enhance the vibrancy and saturations in some areas and decrease them in another. You will be surprised how much more lively and interesting a waterfall can become with simply letting your imagination run free, and by using color creatively.

On the flip-side of the color coin, is that some waterfalls work much better when photographed in black and white. I have often said that I prefer images that tell a story through black and white, unless the color of the scene can speak louder. If you find yourself shooting a waterfall that lacks a lot of native color then why not put your pre-visualization skills to work (you’re still practicing that, right?) and try to imagine how the image could appear in black and white? Look for contrasts between light and dark areas on rocks, and contrasts within the water itself. Are there any interesting textures or reflections?

Here’s an unprocessed RAW version of a waterfall. Notice there’s not much color to boast about.

Virgin Falls RAW

Here we see the same image after a little cropping and black and white conversion.

Virgin Falls Processed

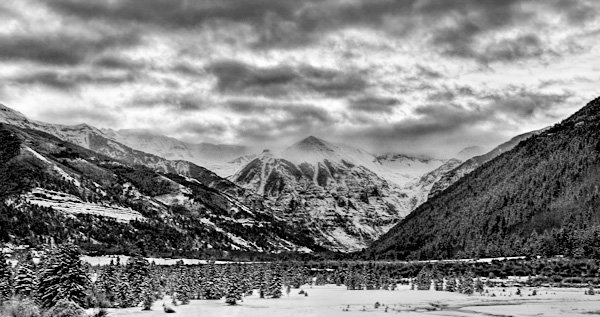
Lastly, with this photo, the textures and light really made the image so I converted it to black and white as well.

Rocks and Falls

Never discount the power of a monochrome image. Black and white waterfall work can be extremely profitable especially when you’re shooting in the drab and often colorless winter months.

Don’t forget to protect your gear

This isn’t really a tip, but rather a lesson that should be learned and become second nature to the serious waterfaller. When shooting a waterfall of any large size and flow there will always be moisture in the air, whether it is visible to you or not. The shear force of the water impacting the terminus of the fall, with render small droplets into the air that will absolutely ruin your shot and potentially destroy your camera and lenses.

Without Water Drops

The air surround a thirty-five foot waterfall without flash.

Water Drops

Then with a flash firing to show the moisture in the air.

Always use some protective barrier to protect your camera and lens while you set up for your exposure, and for transport around the waterfall. This barrier doesn’t have to be fancy. Personally I use pre sized slip-on plastic container covers that you can pick up at virtually any grocery store. They are perfectly waterproof and fit snugly around my camera and are unnervingly cheap.

Protect Gear

The same goes for your lenses. Even if they are in your camera bag, always protect them from the moisture. Again, low tech is often your best option here. I simply wrap my lenses in a cloth and place them individually into resealable sandwich bags. The cloths will help to absorb any condensation that builds up from temperature changes and were a hard learned lesson for me. Lastly, minimize the amount of time you leave the cap off your lens, and always carry a good lens cloth for wiping the front between takes.

Shooting even small waterfalls can be very rewarding, and are a great way to just get out and enjoy nature. Learning to shoot them creatively, however, can be a little more challenging. That doesn’t mean that it has to be difficult or intimidating. Just remember these five simple tips and you’ll be ahead of the game when it comes to waterfall photography:

  1. Research and plan beforehand.
  2. Don’t desert your tripod.
  3. Think of the waterfall as part of a whole and not the only part of a scene.
  4. Learn to use color creatively or when to get rid of it altogether.
  5. Always protect your gear from the elements.

Now go out and do what you love to do!

googletag.cmd.push(function() {
tablet_slots.push( googletag.defineSlot( “/1005424/_dPSv4_tab-all-article-bottom_(300×250)”, [300, 250], “pb-ad-78623” ).addService( googletag.pubads() ) ); } );

googletag.cmd.push(function() {
mobile_slots.push( googletag.defineSlot( “/1005424/_dPSv4_mob-all-article-bottom_(300×250)”, [300, 250], “pb-ad-78158” ).addService( googletag.pubads() ) ); } );

The post Shooting Better Waterfalls: Five Tips for Improving Your Waterfall Photography by Adam Welch appeared first on Digital Photography School.


Digital Photography School

 
Comments Off on Shooting Better Waterfalls: Five Tips for Improving Your Waterfall Photography

Posted in Photography


Island life: Samsung NX500 Shooting Experience

27 Mar

The Samsung NX500 takes some of the best bits of the NX1, including the same 28MP APS-C format sensor and still imaging pipeline, and wraps them up in a smaller, less expensive body. We recently had the opportunity to shoot with an NX500 on the beautiful island of Hawaii. We’ve already published a couple of samples galleries, but click through to read about how we got on with Samsung’s newest mirrorless interchangeable lens camera

Articles: Digital Photography Review (dpreview.com)

 
Comments Off on Island life: Samsung NX500 Shooting Experience

Posted in Uncategorized


Field test: Shooting Roller Derby with the Olympus OM-D E-M5 II

24 Mar

James McDaniel is a self-taught photographer with a special interest in roller derby. He’s also a Micro Four Thirds shooter, so when we were looking for someone to test out the E-M5 II in the real world with us, we immediately thought of James. Watch our latest video field test to see how how the camera performed on game day, and don’t miss an opportunity to see Barney on roller skates. See video

Articles: Digital Photography Review (dpreview.com)

 
Comments Off on Field test: Shooting Roller Derby with the Olympus OM-D E-M5 II

Posted in Uncategorized


Aloha! We go shooting with Samsung’s new NX500

17 Mar

The Samsung NX500 is essentially a scaled down version of Samsung’s flagship NX1. It uses the same 28MP BSI-CMOS sensor, advanced hybrid AF system, and DRIMe V processor as the NX1, with the main differences being the design (rangefinder vs SLR), burst mode (9 vs 15 fps), and viewfinder (none vs electronic). We’ve been using a production NX500 for a couple of days, and we’ve put together a gallery of real-world samples. We’ll update this gallery with some converted Raw files as soon as possible. Click through for the gallery

Articles: Digital Photography Review (dpreview.com)

 
Comments Off on Aloha! We go shooting with Samsung’s new NX500

Posted in Uncategorized


4 Reasons Shooting at Sunrise and Sunset Will Help You Take Better Photos

10 Mar


Tree-2

Perhaps the most important change you can make to improve your photography is to change the time of day you are shooting. It is as simple as that. Photos taken in the middle of the day all have problems that can be avoided if you photograph near sunrise or sunset. Photographers agree on very little, but they all seem to agree that the times around sunrise and sunset are the best for photography. In fact, many photographers go so far as to put their cameras away during the hours between 9 a.m. and 5 p.m.

Getting up at dawn, or hanging around after sunset, is generally not convenient. It is no fun to get up well before sunrise, especially in the summer when sunrise comes early. But if you want to elevate your photography, that is how to do it.

You may have heard all this before, but in this article I will explain why, and show you some of the reasons why sunrise and sunset can help you take better photos.

Schoodic

Reason #1: Avoid harsh contrast

The bright light of the midday sun creates harsh shadows in your photography. Nearly every object within your view will create harsh shadows. Obviously large objects like trees and buildings create such shadows, but it goes at lot further. When photographing a person, for example, you will likely encounter harsh shadows on their faces. Even something as small as grass or leaves will leave unsightly black shadows in your pictures.

Photographing near sunrise or sunset fixes this problem. At those times, the sun’s rays are coming from a more horizontal angle, which means that the rays have to pass through a lot more of the earth’s atmosphere before reaching you.  That makes the light more diffused.

In addition, the times just before sunrise and after sunset don’t involve any direct rays at all. At those times you are dealing only with indirect rays of the sun. You will not have a problem with harsh shadows.


Telluride-2

Reason #2: Maintain tones within your camera’s dynamic range

In all outdoor photography you have to cope with the problem that the sky is invariably brighter than the foreground. Sometimes it is much, much, brighter. If you meter light based on the brightest part of your camera’s view, which is inevitably the sky, the shadows in your picture will end up as pure black. Conversely, if you meter light based on the foreground or shadows in your camera’s view, the brighter portions of your picture will be overexposed or even blown out (pure white).

For pictures taken during the middle of the day, this problem can be exacerbated. That is when the sky is at its brightest. If your foreground is not as bright, you are will have a problem where the scene is beyond the dynamic range of your camera.

When photographing around sunrise or sunset the sky is not quite as bright as it is when the sun is high in the sky. This cuts down the dynamic range your camera has to capture, so it is possible to capture the entire scene in full detail.


WesternLake-2

Reason #3: Avoid the commonplace

You simply cannot take a unique picture by photographing the same places, at the same time, from the same angles as everyone else. If you want your pictures to stand out from the crowd, you need to do something different. Photographing at sunrise and sunset goes part of the way in giving you that something different.

Most people are used to seeing the world as it exists in the middle of the day, they are not used to seeing it at sunrise and sunset. A typical day will have 10 hours of midday lighting, but the sunrise and sunset last only a little while. Further, people often miss them entirely. People are usually sleeping at dawn, or if not, are getting ready for work and not focused on the sky.

By photographing at sunrise and sunset, you are showing your viewers something they don’t see all the time. It avoids the commonplace. It will make your pictures more interesting to your viewers.

Achill

Reason #4: Capture the sky at its most vibrant

People often go to scenic locations to watch the sunrise or the sunset. There is a reason for that: because those are the times when the sky is at its most dramatic. As a photographer, that is the sky that you want to capture.

Skies at sunrise and sunset are full of color. The orange of the sun combines with the blue of the sky and creates interesting colors. When there are clouds in the picture as well, there can be a variety of different colors. Conversely, in the middle of the day, the sky is blue (if you are lucky, otherwise it is grey). By photographing at sunrise and sunset, you can capture those colors in your pictures. To make sure you are capturing the colors at their most vibrant, set your camera to meter off the sky and then underexpose a little bit.

Marina-2


Conclusion

I hope this article explains the advantages of photographing around sunrise and sunset. It is one thing – and perhaps the only thing – that I can guarantee will improve your photography. But one final note to help you maximize the benefit, is that you should not arrive at your location at sunrise and/or leave at sunset. Rather, arrive about 45 minutes before sunrise and hang around at least that long after sunset. These periods when the sky is bright, but the sun is beyond the horizon, sometimes result in more dramatic images than the sunrise/sunset itself. I have often seen people pack up when the sun dips over the horizon, only to miss the most dramatic colors of the day.

I would also encourage you to check out the importance of photographing at these times for yourself. The next time you are on your favorite photo sharing website, look at your most-liked photos. Make a quick note of how many of them were taken at sunrise or sunset. My bet is that it will be a lot of them.

So if you want to take more dramatic and interesting photos, take them at sunrise or sunset. The good news is that it doesn’t cost you anything. You don’t have to buy any special gear. Yet this one change will make more difference than any new camera or lens.

googletag.cmd.push(function() {
tablet_slots.push( googletag.defineSlot( “/1005424/_dPSv4_tab-all-article-bottom_(300×250)”, [300, 250], “pb-ad-78623” ).addService( googletag.pubads() ) ); } );

googletag.cmd.push(function() {
mobile_slots.push( googletag.defineSlot( “/1005424/_dPSv4_mob-all-article-bottom_(300×250)”, [300, 250], “pb-ad-78158” ).addService( googletag.pubads() ) ); } );

The post 4 Reasons Shooting at Sunrise and Sunset Will Help You Take Better Photos by Jim Hamel appeared first on Digital Photography School.


Digital Photography School

 
Comments Off on 4 Reasons Shooting at Sunrise and Sunset Will Help You Take Better Photos

Posted in Photography


Olympus OM-D E-M5 II First Impressions Review updated with shooting experience

20 Feb

Our first impressions review of the Olympus OM-D E-M5 II covered the cameras updates, physical features and (of course) our first impressions on using it. Now that we’ve had some more time with the camera, we’ve put together some more thoughts on shooting with the E-M5 II – from grey Seattle to the bright sunshine of Bermuda. Read more

Articles: Digital Photography Review (dpreview.com)

 
Comments Off on Olympus OM-D E-M5 II First Impressions Review updated with shooting experience

Posted in Uncategorized


Marumi introduces fixed and variable neutral density filters, including ND100,000 for solar shooting

19 Feb

Japanese filter brand Marumi has introduced a collection of neutral density filters for its DHG (Digital High Grade) range including fixed density strengths of ND 8, 16, 32 and 64 as well as a variable ND filter with a range of ND 2.5-500. The company has also announced a ND filter for shooting solar eclipses. Read more

Articles: Digital Photography Review (dpreview.com)

 
Comments Off on Marumi introduces fixed and variable neutral density filters, including ND100,000 for solar shooting

Posted in Uncategorized


Fujifilm adds film simulation to Raw File Converter EX 2.0 and tethered shooting for X-T1

06 Feb

Fujifilm is to release a new version of its Raw File Converter EX at the end of the month, bringing the film simulation modes used in its X-series cameras to the Silkypix-based desktop software package. Initially the new feature will be available for files shot with X-T1, X-A2, X100T, X30 and XQ2 cameras, but the company has said that other models will be included in a further update at a later time. Read more

Articles: Digital Photography Review (dpreview.com)

 
Comments Off on Fujifilm adds film simulation to Raw File Converter EX 2.0 and tethered shooting for X-T1

Posted in Uncategorized