RSS
 

Posts Tagged ‘Shooting’

Taking it easy: Canon EOS 80D shooting experience

25 Mar
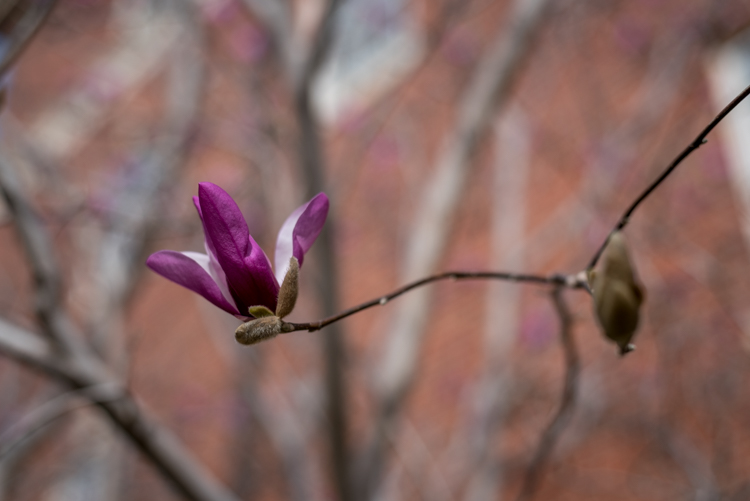
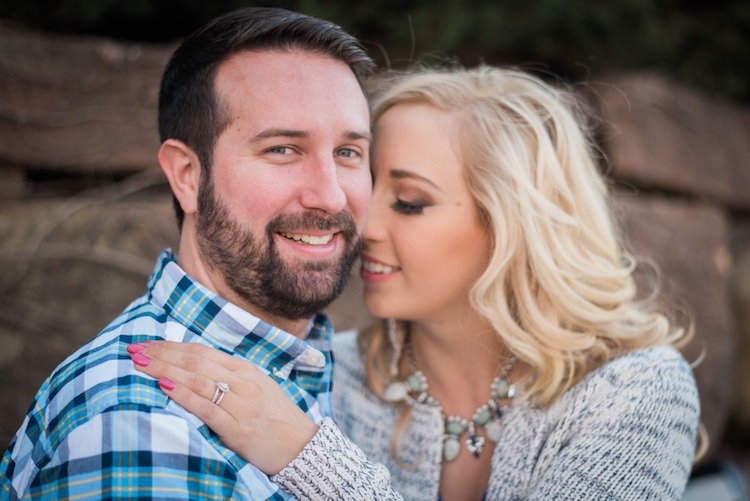
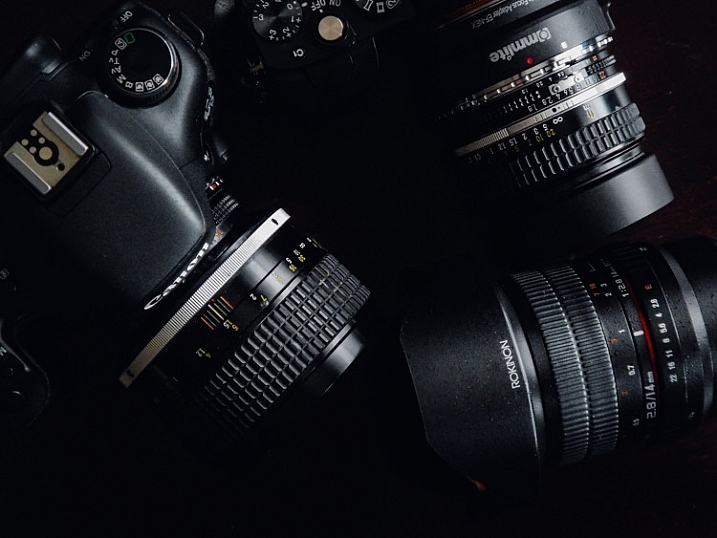
All of the images and videos on this page were shot using the new EF-S 18-135mm F3.5-5.6 IS USM kit lens. ISO 100, 1/1250 sec, F5.6. Shot at 18mm.

The Canon EOS 80D is an enthusiast-level DSLR geared toward photographers looking for a capable stills and video camera. The 80D sports a brand new 24MP APS-C sensor, a 3″ articulating touchscreen, a new 45-point AF system (with dual pixel AF) and 1080/60p video capture capabilities. Like its predecessor, the camera has a weather-sealed construction and a nearly-identical body design.

I had the opportunity to test the 80D having just finished field testing the Sony a6300, a mirrorless camera which also sports a 24MP APS-C sensor and a similar launch price. On paper, the a6300 out-specs the 80D in many categories, like 4K video capture, 11 fps shooting and most notably, its 425-point AF system. But don’t fall into the trap of thinking specs alone make the a6300 a better camera. In hand, it feels as if your holding a small magnesium rectangle jam-packed with cutting-edge technology, but to some degree, the operation and menus feel like a work in progress. In contrast, holding the 80D feels like you’re holding the product of 20+ years of R&D. Which is to say: the 80D feels more refined in operation and more intuitive to use than the a6300.

Of course there are also quite a lot of other APS-C sensor cameras on the market that fall into a similar price range and class to the 80D. Its closest DSLR competitor is most likely the Nikon D7200 (though the Pentax K-3 II also comes to mind). Both the Nikon and the Canon offer very similar still and video specifications, though the D7200 does not have a touchscreen, nor does it offer an equivalent to Canon’s dual pixel AF. There’s also the EOS 7D Mark II, Canon’s top tier APS-C camera. It offers features generally associated with more pro-level cameras like Intelligent Tracking and Recognition (which the 80D does not). And while the 7D Mark II is priced higher than the 80D, it is interesting to note that the 80D uses a newer sensor that we’ve found offers much better dynamic range than previous Canon cameras, including the 7D II.

General camera ergonomics

The 80D is very easy to operate with a single hand. The grip is extremely comfortable, and at 1.8 lbs, the 80D shouldn’t break your back. I do have few small frustrations though: the AF-on button is located next to two other identically-sized buttons and is the most difficult, at least for me, to hit of the three. I also find the switch to lock the back control wheel, which by default is set to Exposure Compensation, can be bumped into the lock position far too easily. In fact, every single time I went to adjust my Exposure Comp., it was locked.

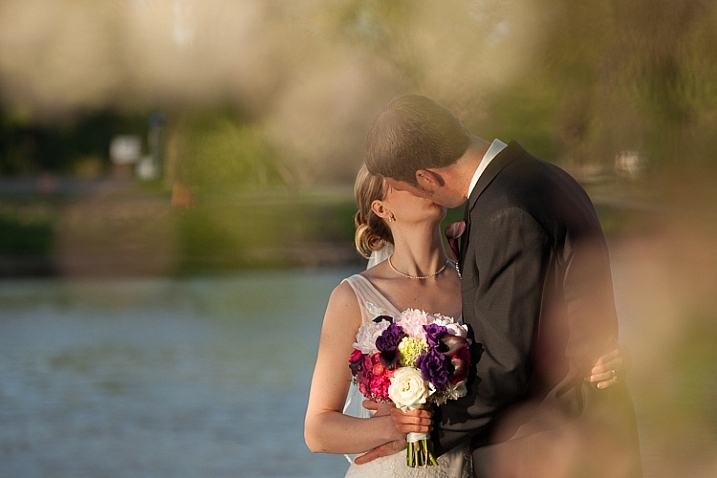
The 80D has an articulating touchscreen, which I used to frame this shot. ISO 100, 1/200 sec, F10. Shot at 24mm.

Finally, I’ve found that the video record start/stop button isn’t quite as sensitive as it should be. I actually missed a few clips because I hit the start button, thinking capture had begun, when in fact it had not.

Of course, it is much easier and quicker to point out frustrations in a camera’s ergonomics, than list everything the company did right. Overall the 80D is a well-designed camera with terrific ergonomics, sensibly-organized menus, and mostly-logical button placement. And unlike most mirrorless cameras, the battery life on the 80D is frankly, a breath of fresh air. A whole day of shooting stills and video (about 700 stills, and 35 videos, most about 30 secs in length) resulted in only a 1/4 drain on the battery.

Dynamic range

Canon’s large-sensor cameras are not exactly known for their dynamic range. Pushing the exposure on a Canon Raw file even a couple stops (or just turning on vignetting correction) can result in the shadow detail starting to fall apart. But the 80D uses a spanking new sensor that supposedly offers better dynamic range than past Canon release. But does it?

Yes it does! We ran the 80D through our exposure latitude and raw dynamic test and found that the new sensor is substantially better than previous Canon sensor in terms of dynamic range. It’s not quite on the same level as the Nikon D7200 or other cameras using recent Sony APS-C Sony sensors, but the improvement is definitely something to cheer about if you’re a Canon shooter.

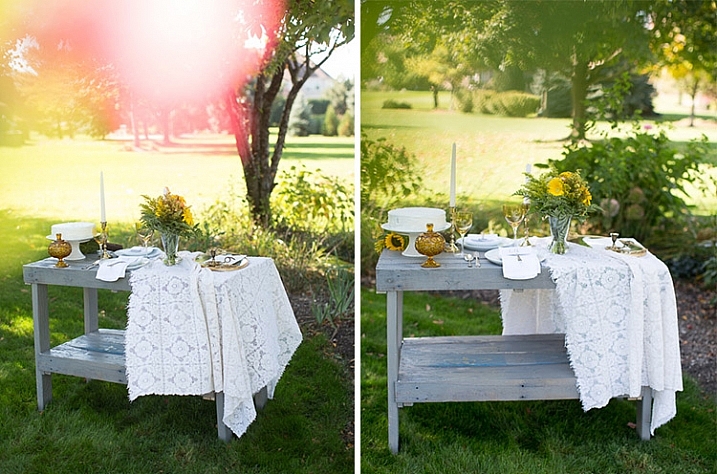
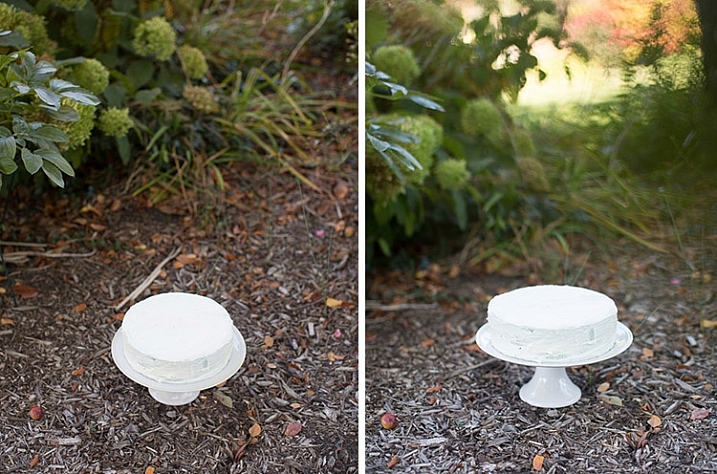
Original exposure, gently edited in ACR. ISO 100 1/500 sec at F16. Exposure pushed +2.5 stops, Shadows pulled up +50 in Adobe Camera Raw.

The silhouetted image above on the left was processed through Adobe Camera Raw without adjusting the exposure, while the image on the right was pushed a full 2.5 stops. Have a look specifically at the areas in the image on the right that were previously in the shadows. While this isn’t a perfect example, it should give you an idea of what kind of dynamic range the 80D offers.

Video

In the demo above, I used AF-C and selected an AF point in the center of the frame. Hunting is minimal as I move from subject to subject and acquisition is reasonably fast.

It is very easy to shoot nice-looking video with the 80D. The touchscreen is an absolute pleasure for selecting focus points, and Dual Pixel AF allows for continuous focus during video capture. In use, it is excellent, with minimal to no hunting and fast acquisition. When using the widest AF area option, called ‘Auto selection: 45 pt AF,’ the camera will automatically look for faces in the scene and focus on them. If it finds no face, it will instead focus on the nearest object.

Video quality looks decent. It can’t touch the quality of footage coming from the likes of the a6300, but for most enthusiast shooters, the quality will be good enough. And the inclusion of both a mic and headphone jack should add to the camera’s video appeal.

Video shot hand-held in 1080/60p.

Unfortunately, several video making tools that seem to be par for the course when it comes to other manufacturers, are absent in the 80D, specifically: Focus peaking, zebra stripes and a clean-HDMI out option. There is also no C-Log gamma option (a very flat tone curve useful for color grading).

Auto ISO

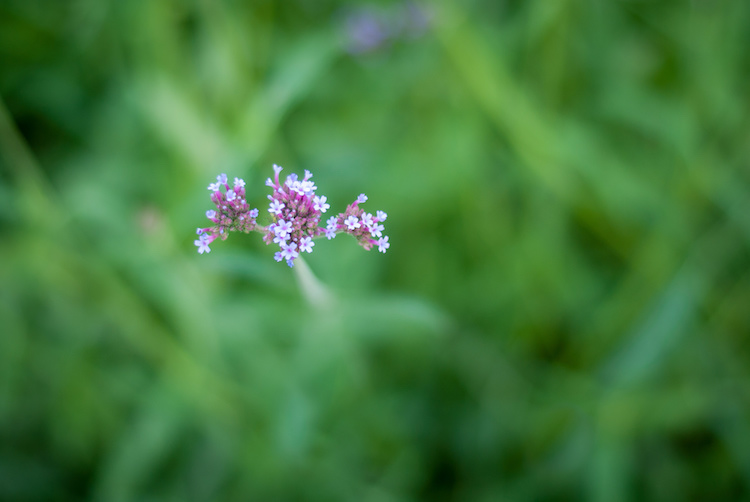
This was shot after I pushed the 80D’s Auto ISO minimum shutter speed default to its fastest setting. Out of the box, when using Auto ISO, the 80D offers a shutter speed about equivalent to 1 over the focal length. However, in the menus, there is a slider to bias the minimum shutter speed by 1, 2 or 3 stops above default (as well as 1,2 and 3 stops below the default). You can also assign a physical shutter speed number to be the camera’s default. ISO 100, 1/400 sec, F7.1. Shot at 135mm.

The default Auto ISO shutter speed often was not fast enough for the scenarios I was shooting. At one point while field testing the camera, a humming bird flew right up to me and hovered mid air for long enough for me to bring the camera to my eye and fire a shot. Unfortunately, the 80D decided that 1/200 sec was the most appropriate shutter speed. Needless to say, the resulting shot was blurred.

Canon has recently been updating its Auto ISO implementations to make them fully programmable (a la Nikon and now Sony), and it’s great to see this update in the 80D. You have two ways to control your minimum shutter speed when using Auto ISO. You can either pick a physical shutter speed, ranging in full stops, or use a slider to bias the default shutter speed to faster or slower than the default. If you use Auto ISO, I strongly recommend the first thing you do when picking up the 80D is push the shutter default to a faster setting.

AF features

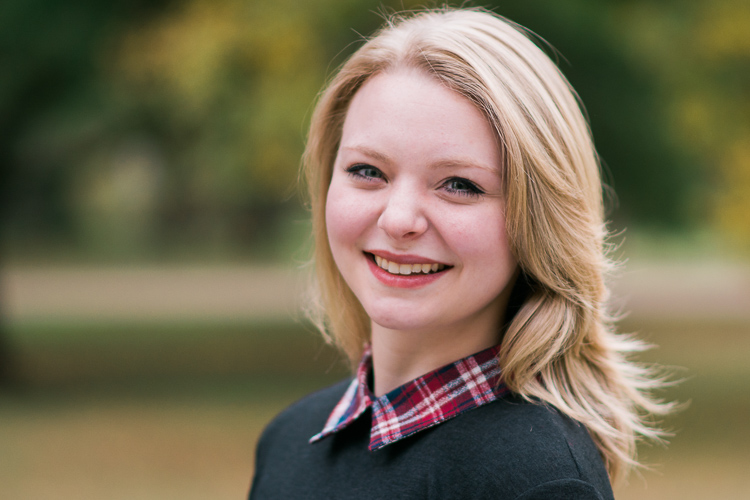
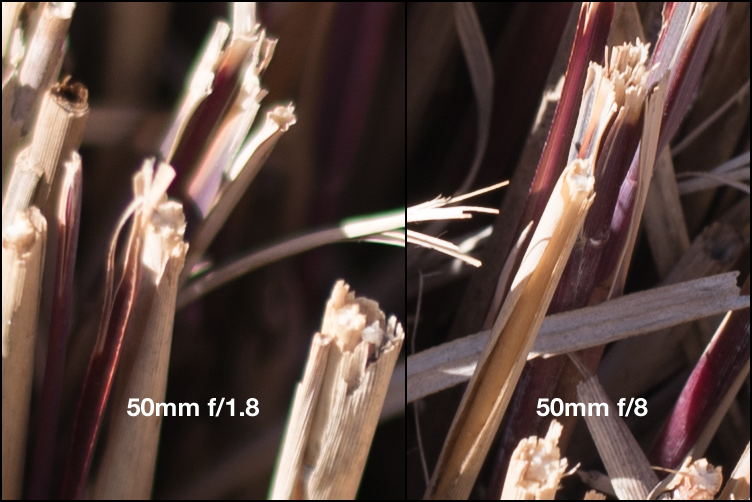
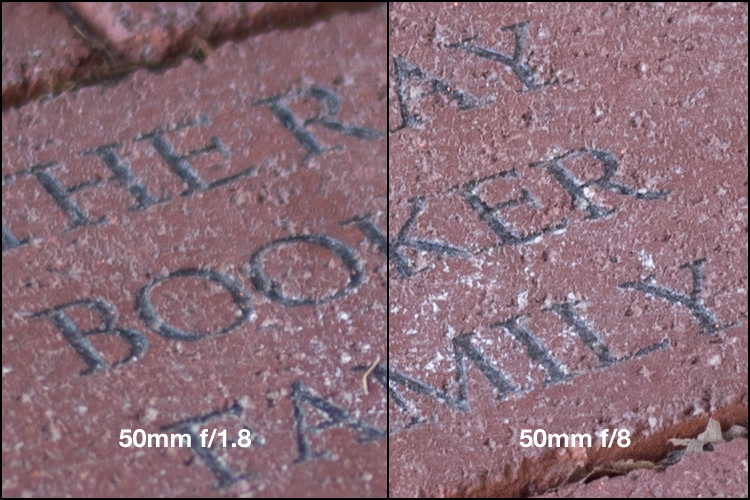
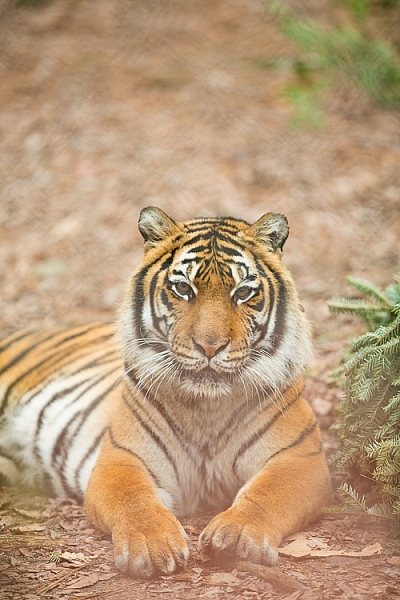
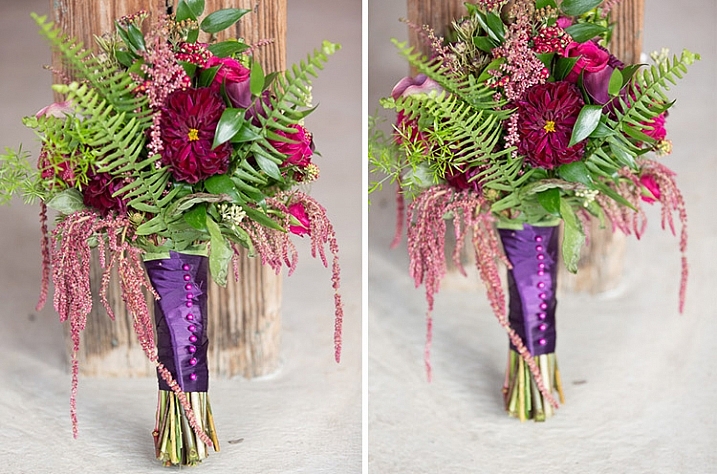
Shot using touch-to-focus. ISO 100, 1/200 sec, F5.6. Shot at 50mm. Cropped in slightly using ACR.

The Canon 80D features a brand new AF system and an increase in AF points over its predecessor, from 19 to 45. Coverage area has also been improved, and all of the points are cross-type. One of the most note-worthy features of the 80D’s AF system comes in Live View, which now offers continuous AF (called AI Servo). It is only the second Canon camera to do this (the Rebel T6s was the first), but the 80D’s Dual Pixel AF is far more capable than the Hybrid AF system found on the T6s. This feature can be used during still or video shooting and should prove especially useful on the video end. That said, we’re also hopeful that it can be used to reliably subject track in stills mode as well (initial impressions are positive, but more on that below).

The 80D’s touchscreen has both touch-to-shoot and touch-to-focus capabilities. In use, the touchscreen is just OK – its operation can be a bit laggy, especially if you are trying to quickly move your AF point. The camera does have a sensitivity slider, but even adjusting it to its most sensitive setting doesn’t seem to help the lagginess much. 

I was disappointed to find out that the touchscreen can not be used as an AF track pad when one’s eye is to the finder. Many camera companies have been including this feature (like Olympus in the PEN F and Panasonic in the GX8, and Nikon in the D5500) and it is extremely useful. A missed opportunity on Canon’s part for sure. To be fair, the 4-way controller on the back of the camera can be assigned to direct AF point selection (but it’s mushy and not well-positioned for quick thumb access with your eye to the finder). You can also use the AF Point Selection button, though I found it frustrating to use when shooting with a single AF point.

I also discovered that there is no way to use touch-to-shoot in continuous drive. Even if you have the camera set to continuous drive, it will simply ignore your selection and default to single frame advance mode (the use cases for this may be limited, but I did find myself in a scenario where touch-to-shoot + burst would have been helpful). In general, I found that using the FlexiZone-Single option, while tapping to specify the area, gave me the best results when using both touch-to-shoot and touch-to-focus.

AF real world impressions

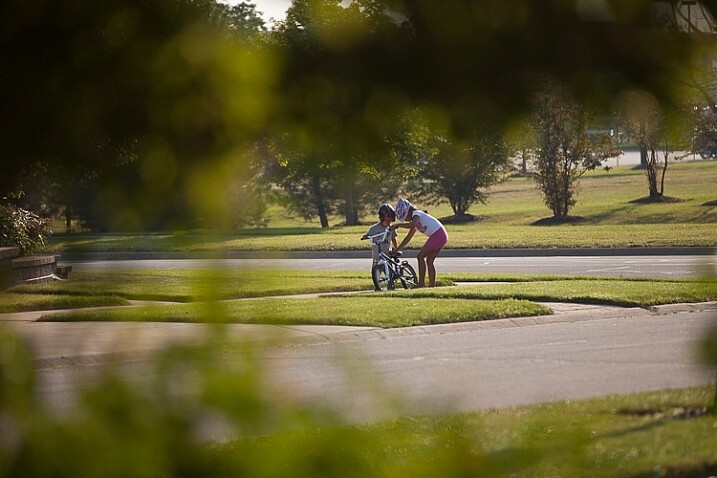
Continuous AF (AI Servo) using a single point gave me the best hit rate, as long as kept my point over the subject. ISO 100 1/500 sec, at F8 (I probably should have used a faster shutter speed).

My initial impressions of the 80D’s AF capabilities are largely positive. I shot quite a bit using the camera in AI Servo mode using either a single point or the Zone AF area mode, with mostly excellent results. Zone AF can sometimes get confused as to which point(s) to use to stay on your subject, so single point is still most reliable. Subject tracking is particularly limited compared to the EOS 7D Mark II, the company’s priciest APS-C offering, because the 80D lacks Canon’s Intelligent Tracking and Recognition. Still, I wanted to get some real impressions of advanced subject tracking ability, so I set AF area to the entire frame (Multi-Area AF) with a manually selected initial point – where the camera automatically moves the initial AF point throughout the entire grid to stick to an initially targeted subject, no matter where it moves to within the frame.

When shooting with one’s eye to the finder, the 80D isn’t great at staying on a subject once it has been identified. This is partly due to the fact that being a DSLR, the 80D cannot not use its image sensor to track (except in Live View mode of course) and likely does not use its metering sensor, which is essentially a low resolution image sensor, either. Although I got lousy results in my initial tests, subject tracking in viewfinder mode is somewhat case specific and has the potential to work well for subjects on non-complex backgrounds, and particularly subjects well isolated in depth (distance) at longer focal lengths.

On the other hand, my experience trying subject tracking in Live View mode was much more positive. When using the touch LCD to subject track, one can simply tap the screen to identify a subject. I had the chance to use this method while shooting candids of friends. The 80D did a great job staying on a subject once identified, which isn’t very surprising: using the image sensor to identify, understand, and track your subject is more reliable than using only distance information to subject track. Furthermore, if you do not tap the screen to identify a subject right off the bat, the camera will settle for the nearest face it finds (as long as you’re in Face + Tracking mode).

Of course, using Live View (the touchscreen) to shoot a burst means you only get the stop-action-style playback of images when firing, which can make it difficult to follow your subject.

Also shot using AI Servo, this one using the Zone AF area, placed in the center of the frame. Overall I found using a single point gave me better results when using continuous focus. For the record, the little guy was cruising real fast! I saw him coming down the sidewalk out of the corner of my eye, and only had time to snap two frames; the first was a little blurry, the second (shown here) was sharp. ISO 100, 1/500 sec, F7.1. Shot at 135mm.

Of course, continuous AF and subject tracking aren’t the only things that matters in an autofocus system, sensitivity is also important. Canon states the 80D’s center AF point is sensitive down to -3EV, which should translate to responsive AF performance using the center point, even in very low light. I ran a quick test in our studio to see if this was the case. Using the EF-S 18-135mm F3.5-5.6 kit lens, and with all lights off except for a dimmed incandescent bulb, I pointed the 80D at out studio test chart. But not before first switching the lens to MF and throwing focus way off (I then switched it back to AF before shooting). With my eye to the finder, I acquired focus and fired a frame. I did this several times at both the wide end and the tele end of the lens’ zoom range. In both cases, the 80D was able to acquire accurate focus nearly instantaneously, which is impressive, especially considering the F5.6 max aperture at the tele end.

And to give you a sense of how dim the above scenario was, when I was testing the low light AF performance at the kit lens’ widest end, I was shooting at ISO 16,000, at 1/30 sec F3.5, which gave me a proper exposure. This is good news for low light shooters, like myself. I’m especially fond of music photography and its encouraging to know that the AF system will perform, even in some of the lowest light scenarios the camera is probably capable of shooting an image in. For instance, with a 24mm F1.4 lens attached, I should be able to shoot at ISO 12,800 1/100 sec F1.4 while still enjoying accurate and responsive AF performance (well, as long as I’ve microadjusted).

The takeaway

It can be hard to get excited about enthusiast level DSLR updates. But in the case of the 80D, enough has been improved upon over its predecessor that while looking nearly identical, the 80D truly is a whole new camera (not just a granular update).

It offers reasonable specs, an easy-to-use interface (the touchscreen adds quite a bit to the camera’s ease of use) and a familiar design. Toss in the fact that it offers maybe the best dynamic range of any Canon DSLR to date, and the 80D has even more appeal. For Canon system users, specifically enthusiasts considering an upgrade from either a Rebel or an older camera, there is an awful lot to like about the 80D.

ISO 12,800 is a pretty high ISO, especially for an APS-C camera. This images was processed through ACR, but I’m fairly impressed with how good the high ISO image quality appears to be. But more testing is needed! ISO 12,800, 1/60 sec, F4. Shot at 27mm.

Canon EOS 80D Sample Gallery

Please do not reproduce any of these images on a website or any newsletter / magazine without prior permission (see our copyright page). We make the originals available for private users to download to their own machines for personal examination or printing (in conjunction with this review), we do so in good faith, please don’t abuse it.

$ (document).ready(function() { SampleGalleryGridV2({“galleryId”:”7982275943″,”isMobile”:false}) })

Canon EOS 80D real world samples

42 images • Posted on Mar 24, 2016 • View album
Sample photoSample photoSample photoSample photoSample photoSample photoSample photoSample photoSample photoSample photoSample photoSample photoSample photoSample photoSample photoSample photoSample photoSample photoSample photoSample photoSample photoSample photoSample photoSample photoSample photoSample photoSample photoSample photoSample photoSample photoSample photoSample photoSample photoSample photoSample photoSample photoSample photoSample photoSample photoSample photoSample photoSample photo

Articles: Digital Photography Review (dpreview.com)

 
Comments Off on Taking it easy: Canon EOS 80D shooting experience

Posted in Uncategorized


Are You Obsessed with Shooting Wide Apertures – Here’s Why You Might Want to Hold Back

24 Mar

There’s a scene in the original Jurassic Park movie, that almost perfectly describes one lesson I have learned when documenting the world around me with my camera. In this scene Dr. Ian Malcolm, a brilliant mathematician who is visiting the prehistoric park, expresses severe reservations about the idea of resurrecting long-extinct species during a conversation with John Hammond, the director of the park. Hammond is gleefully explaining the incredible genetic breakthroughs that his scientists have achieved. “Our scientists have done things which nobody’s ever done before.” Incredulous, Malcolm responds with equal fervor and says, “Your scientists were so preoccupied with whether or not they could, they didn’t stop to think if they should.” The same holds true for camera lenses. Just because you can shoot wide open at f/1.4 or f/1.8, doesn’t mean you should.

ultra-wide-apertures-purple-flower

When I first got into serious photography work, I was amazed at the power and light-gathering ability of my 50mm f/1.8 lens. It opened up a whole new world of photographic possibilities, that I continue to explore today, and was capable of producing incredible images, even on my humble little Nikon D200. Unfortunately, like the scientists in Jurassic Park, I did not spend years in the trenches learning my trade and honing my skills in order to learn how to truly utilize the power of such wide apertures, and went through a phase where I shot everything wide open because of things like low light photos, depth of field, and of course bokeh. Always with the bokeh. Now it’s important to note that I don’t regret any of those early lessons but I do want to offer youa few simple things I’ve learned over the years, and a couple reasons why you might want to reign things in a bit and not shoot wide open with that fancy prime or ultrafast zoom lens just yet.

1. Depth of field can be way too shallow

I shoot most of my photos with three prime lenses: a 35mm f/1.8, a 50mm f/1.8, and my favorite, an 85mm f/1.8, that I call my supermodel lens. (Seriously, you could just about point that lens at a moldy old scarecrow, and get a portrait worthy of Vogue magazine.) Each of these lenses has its own set of unique advantages and limitations, but as you can probably already tell, the one thing they all have in common is a super wide maximum aperture. Certainly there are plenty of lenses available with even bigger apertures, like the Nikon 58mm f/1.4 or Canon 85mm f/1.2, but when push comes to shove an f/1.8, or even f/2.8 lens, is no slouch either. Wielding one of these ultra-wide beasts can be a bit like riding a tyrannosaurus rex, in that the sheer amount of power at your disposal is kind of insane. But, one advantage of fast primes like this, an ultra-shallow depth of field, can also be somewhat of a curse if not used properly.

I’m not going to lie, it’s a ton of fun to shoot things with your lens wide open but it took me a while to learn, that just like the scientists of Jurassic Park, maybe I should have held back a bit. This portrait of a college student is yet another time in which I had no good reason to shoot wide open, but did anyway, and the result was a photo that simply could not be used. Due to the wide f/1.8 aperture, and my proximity to the subject, it left me with a depth of field consisting of just a few centimeters. Her left eye (on the right side of the photo) is perfectly in focus while the other side of her face is blurry, and the result is a strange-looking picture that I had to discard. Thankfully, I quickly realized my mistake and got some other perfectly usable images by shooting at f/2.8 and f/4. But, this was one of those situations in which I thought it would be super cool to get the way awesome background blur of an f/1.8 aperture, but did not realize how I nearly destroyed the portrait in the process.

85mm, f/1.8, 1/750 second, ISO 400

85mm, f/1.8, 1/750 second, ISO 400

Here’s another example from when I first got my 50mm lens, and thought it was so cool to go around shooting all my pictures at f/1.8 – because my warped sense of logic told me that no depth of field could ever be too thin. As a result this picture of some crocuses contains an ugly streak across the center where one flower and a lot of dead grass is in focus while the rest of the image is a blurry mess. Shooting at a smaller aperture would have given me a smooth transition between in-focus and out-of-focus areas and a much more pleasing image overall.

50mm, f/1.8, 1/500 second, ISO 400

50mm, f/1.8, 1/500 second, ISO 400

2. Bokeh and background blur can get out of hand

This is a bit subjective, and open to interpretation on the part of both the photographer and the viewer, but over the years I have found that shooting at the widest possible aperture in order to get the most possible bokeh, or background blur, things can go from artistic and interesting, to messy and incomprehensible very quickly. Bokeh is nice and can certainly be used to add an artistic flair to an image, but when overused, it can overpower the subject and ruin the picture. The following photo of a purple flower sticking up from a bed of grass shows this phenomenon in action.

ultra-wide-apertures-purple-flowers

The flowers are so removed from the background it’s almost like they are hovering in midair, and the effect is somewhat disconcerting, and borders on upsetting. Blowing out the background so much has removed any sense of place and context for the subject, and what’s left is a green and purple mess, that is neither artistically interesting, nor aesthetically pleasing.

3. Vignetting, chromatic aberration, and other optical oddities

Before I say too much on this subject perhaps I need to add a bit of a preface. Less expensive lenses can behave strangely when you shoot with them wide open, but more expensive glass is usually much better at this sort of thing. With that disclaimer out of the way, it’s important to understand some of the optical abnormalities such as vignetting, chromatic aberration, and softness, that often show up when your lens is opened up as far as it will go.

Vignetting is when the edges of your image look a bit darker than the rest of the picture, due to how light is manipulated inside your lens before it hits the image sensor inside your camera. It’s not too big of a problem on cameras with smaller sensors like APS-C or micro four thirds models, but it is certainly there, and even more so on full frame cameras.

Vignetting can be a major issue when shooting wide open. Notice how the centers of both images are equally exposed but the corners are much darker at f/1.8.

Vignetting can be a major issue when shooting wide open. Notice how the centers of both images are equally exposed but the corners are much darker at f/1.8.

If you shoot in RAW, you can use Lightroom, Photoshop, or other such applications to mitigate most of the effects of vignetting if you want. Of course another solution is to use a smaller aperture, which tends to eliminate most vignetting altogether. Vignetting is not always a dealbreaker, and many photographers, myself included, actually prefer the subtle effects of a well-used vignette. You may find that you fall into this camp, in which case go right ahead and shoot at f/1.8 or f/1.4 to your heart’s content.

The other optical abnormality that often rears its ugly head at wide apertures is chromatic aberration, which might be a much bigger problem if you are not ready for it. This usually manifests itself as purple or green outlines or fringes, around places in your pictures with harsh contrast between dark and light. For example the image below was shot at f/1.8, and upon first glance, looks perfectly usable.

50mm, f/1.8, 1/3000 second, ISO 100

50mm, f/1.8, 1/3000 second, ISO 100. It looks Okay on first inspection, but all is not well up close.

Take a closer look and you will notice a big problem around the edges of most of the dry stalks of grass. Ugly green halos show up all over the place, and this is a direct result of shooting wide open, due to how the incoming light is transformed by the lens on its way to the camera. Here’s a 100% crop of the image next to the exact same picture shot at f/8.

Green outlines abound on the left side while stopping down to f/8 eliminates them entirely.

Green outlines abound on the left side while stopping down to f/8 eliminates them entirely.

This optical imperfection can often be mitigated somewhat in Lightroom, by using its: Remove Chromatic Aberration option in the Develop panel. But even then the results are not ideal, and you will often be left with images that still show some green or purple artifacts, or lose a bit of color from other parts of your picture. Rather than mess around with fixing these issues in post-production, I like to just avoid it from the start and shoot at a slightly smaller aperture. It usually fixes the problem, and still leaves me with the same overall composition I would have had with a wider aperture.

The last weird characteristic of most lenses at their widest apertures might not be that big of a problem unless you are painstaking examining your pictures on a per-pixel basis, but it’s something you should know about nonetheless. Almost all lenses are a bit softer when used at their widest apertures, which can result in pictures that are not quite what you want. The picture below was shot at f/1.8 and looks decent upon first glance, but a closer inspection reveals a very different story.

50mm, f/1.8, 1/125 second, ISO 100

50mm, f/1.8, 1/125 second, ISO 100. Seems decent but once again a closer look reveals a much different story.

Zooming in on the exact center of the image, the point at which I locked focus, shows two very different pictures when this is put next to the very same picture shot at f/8.

Focus was locked precisely on the letter "K" and yet the image on the left, shot at the widest aperture on my lens, is much less sharp.

Focus was locked precisely on the letter “K” and yet the image on the left, shot at the widest aperture on my lens, is much less sharp.

Once again this sharpness problem can be corrected to some degree in post-production, but my ideal solution is to avoid shooting at f/1.8 unless I specifically need the light-gathering ability, background blur, or other effects that such a wide aperture offers. Photography is all about tradeoffs, and while closing down the aperture on my lens resulted in a picture that was sharper, it also gave me an image that had much wider depth of field, which made the overall composition less pleasing.

4. Use wide apertures sparingly to maximize their impact

The Roman philosopher Marcus Tullius Cicero once said, “Never go to excess, but let moderation be your guide.” This nugget of wisdom is applicable not only to life in general, but also speaks volumes about how to approach photography. I like to treat the widest aperture on my lenses like flooring the gas pedal on my car. It’s fun, but if I went around driving full speed everywhere I went, it would quickly lose its appeal. (Though in my 1998 Toyota sedan I would probably lose a race to a skateboarder, but you get the point.)

Your lenses have wide apertures for a reason and they are meant to be used to get good images, particularly if you are aware of some of the quirks and idiosyncrasies of using them like this. If you like shooting wide open, and don’t mind some of the potential tradeoffs like a bit of vignetting and chromatic aberration, then go for it! However, my own personal rule of thumb is to only use f/1.8 when I really need it, otherwise the creamy backgrounds and bokeh balls start to lose a bit of their luster. When I’m doing a portrait session I keep f/1.8 in my back pocket for when I really need it, otherwise I shoot most pics at f/2.8, f/4, or smaller.

I took most photos of this couple at smaller apertures, which made this one at f/1.8 really stand out.

I took most photos of this couple at smaller apertures, which made this one at f/1.8 stand out among the rest.

After hearing this list of reasons to hold back a bit when shooting wide open, I almost feel like I should write a similar article about the benefits of taking photos at the largest aperture possible. I don’t want to give the impression that you should never use your equipment to the fullest of its capabilities, just that there are a few things to know before you go around taking all your pictures at the widest possible aperture your lenses can use. You might end up with a few problems, just like the ill-fated scientists of Jurassic Park, but hopefully yours won’t be quite as lethal, and along the way you could very well manage to take some incredible photos too.

I’d like to know what your thoughts are on all of this, and if you have any favorite shots taken at not-quite-wide apertures, please post them in the comments below!

googletag.cmd.push(function() {
tablet_slots.push( googletag.defineSlot( “/1005424/_dPSv4_tab-all-article-bottom_(300×250)”, [300, 250], “pb-ad-78623” ).addService( googletag.pubads() ) ); } );

googletag.cmd.push(function() {
mobile_slots.push( googletag.defineSlot( “/1005424/_dPSv4_mob-all-article-bottom_(300×250)”, [300, 250], “pb-ad-78158” ).addService( googletag.pubads() ) ); } );

The post Are You Obsessed with Shooting Wide Apertures – Here’s Why You Might Want to Hold Back by Simon Ringsmuth appeared first on Digital Photography School.


Digital Photography School

 
Comments Off on Are You Obsessed with Shooting Wide Apertures – Here’s Why You Might Want to Hold Back

Posted in Photography


Tips for Shooting Through Objects to Create a Special Effect

19 Mar

Photography is as much a study of the creative, as it is a study of the technical. Often, knowing all the technical ins and outs of your camera, still does not guarantee a stellar image – an image that evokes emotion, one that makes you stop in your tracks and take a second look. Such images are created by thinking outside the box, by experimenting with new techniques and ideas that may seem crazy, ridiculous, or even somewhat unbelievable! Lucky for us, we photographers are known to be a little bit crazy, so trying new and innovative techniques should not surprise us too much.

One such really cool and innovative technique, to add a little bit of creativity and flare in our imagery, is shooting through objects. This technique is, quite literally, to have a small object between the front of the lens and your subject. This is often used to frame the subject, in order to draw attention to it/them, soften the edges of the image, or add a cool color special effect, to an otherwise ordinary image.

Memorable Jaunts DPS Article Shooting through objects for special effects 01

The whole idea of shooting through objects, is to have an out of focus foreground and be able to shoot through it, but at the same time keep the subject sharp. This effect is best achieved by placing the object close to the lens, either by hand holding it, or by resting it against the lens. Placing the foreground object further away from the actual subject and closer to the front of your lens, makes it easier to blur.

Although any lens will work, the shorter your lens focal length the closer the foreground object will need to be to the front of the lens, making it much easier to hand hold. If the object you are shooting through is large, it is easy to miss the focus on the actual subject. In these situations, it is best to focus on the subject, lock focus by switching to manual focus (MF/AF toggle buttons are located on the lens body in most cases or using back button focus) and then bringing the foreground object close to the lens for the blur effect. Sometimes it is possible to use the out of focus foreground to hide distracting things in the background.

Memorable Jaunts DPS Article Shooting through objects for special effects 06

In the above image, this tiger in North Carolina’s Tiger Rescue facility, was holding a perfect pose and staring dead straight at me. Thankfully, I had a fence between me and the tiger (I am sure he was viewing me as a tasty snack!) and I loved the blur shapes seen in the top of the frame. I also handheld a piece of candy wrapper towards the bottom of the lens to give a little pink tint to the bottom of the image. The only post-processing done here, was to bring up the blacks and add a little contrast to the image.

The shoot-through technique works especially well with leaves, flowers, and even small pieces of glass. The possibilities are quite endless when it comes to finding things to shoot through. If you are feeling uninspired, sometimes bringing something as simple as a small strip of fabric, or a piece of clear plastic, can completely change the outcome of your final photograph. Look around your photography location and you are bound to find something to shoot through. Even if you often shoot in the same location, you may find something new each time. Flowers bloom at different times of year, leaves change color, and sometimes even dry twigs add an element of interest.

Memorable Jaunts DPS Article Shooting through objects for special effects-SidebySide01

Always use these effects to taste. In the side-by-side above, I initially used a pink flower to see if I could get a cool, light leak effect in the frame. But somehow that did not appeal to me. So in the next frame, I took a leaf and held it up to the top of the lens. I loved this effect, as if I was shooting through the bushes but still retaining the details in the bottom half of the image.

Memorable Jaunts DPS Article Shooting through objects for special effects-SidebySide02

In the images of cakes above, the first is a standard, run-of-the-mill, top shot of the cake. But when I changed my angle and used a leaf to shoot through, I loved the blur effect it produced at the top of the frame.

Shooting through objects adds an element of interest to photographs. When you use colored pieces of glass or flowers, you get an effect similar to a light leak (from film days). Some photographs also appear to have been processed with unique filters, except all these effects are straight out of the camera (SOOC), not added during post-processing. When you use clear glass, plastic bags, or even sheer fabric, photographs appear to have additional texture and depth.

Memorable Jaunts DPS Article Shooting through objects for special effects-SidebySide03

The bridal bouquet on the left is a straight shot. The one on the right has a clear piece of plastic (it was used to cover the cake topper) – I held it to the bottom on the lens to add a little texture and interest.

Memorable Jaunts DPS Article Shooting through objects for special effects 05

I love this image of my kids – my daughter is teaching my son to ride his bike. By shooting through the bushes, I caught them unawares, as well as used the bushes to frame the subject (in this case my kids!).

Memorable Jaunts DPS Article Shooting through objects for special effects 03

The sun was setting in my backyard, and to exaggerate its warmth, I added an orange piece of plastic (my flash gel cover). No post-processing needed!

While this is not a technique that should be used on every photograph, there are so many options for framing, introducing texture, and adding interest when you add an unexpected element into your photographs. Use this tool when you want to break free from the mundane and the ordinary, you might be pleasantly surprised with the results!

This week on dPS we are featuring articles on special effects. Check out the others that have already been published here:

  • How to Photograph the Full Band of the Milky Way
  • Fire Spinning with Steel Wool – A Special Effects Tutorial
  • Special Effect – How to Create Multiple Flash Exposures in a Single Frame
  • Stacking Light Trails for Night Photography Special Effects
  • 26 Unique Special Effects Photos to Spark Your Creativity
  • Weekly Photography Challenge – Special Effects

googletag.cmd.push(function() {
tablet_slots.push( googletag.defineSlot( “/1005424/_dPSv4_tab-all-article-bottom_(300×250)”, [300, 250], “pb-ad-78623” ).addService( googletag.pubads() ) ); } );

googletag.cmd.push(function() {
mobile_slots.push( googletag.defineSlot( “/1005424/_dPSv4_mob-all-article-bottom_(300×250)”, [300, 250], “pb-ad-78158” ).addService( googletag.pubads() ) ); } );

The post Tips for Shooting Through Objects to Create a Special Effect by Karthika Gupta appeared first on Digital Photography School.


Digital Photography School

 
Comments Off on Tips for Shooting Through Objects to Create a Special Effect

Posted in Photography


Action packed: Shooting the Sony a6300 in Miami

09 Mar

Sony a6300 shooting experience

by Dan Bracaglia

Shot during an 8 fps burst. Check out the video below for a view through the electronic viewfinder of this burst being captured. Note: image has been cropped in to taste. ISO 250, 1/1250 sec at F5.6. Shot using the Sony FE 70-200mm F4 G OSS at 200mm.

Sony invited us to come out to Miami and field test the company’s new a6300 mirrorless camera. With 4K video capabilities, an overhauled AF system and a new 24MP APS-C sensor, I was more than eager to put the a6300 to the test.

The release of the Sony a6300 further chips away at the advantages DSLRs hold over mirrorless cameras. New sensor and AF system aside, one of the camera’s most noteworthy features is the ability to shoot an 8 fps burst with a live feed of what you are shooting (as opposed to the stop-motion playback of images typically associated with fast burst rates on mirrorless cameras). This live feed during continuous shooting, and the relatively short associated blackouts, are mirrorless firsts and should make it easier to follow the action while you shoot.

As I packed for Miami, I couldn’t help but wonder just how easy it would be to shoot a burst with the a6300 compared to say, a Canon EOS 7D (which also uses an APS-C sensor and can fire 8 fps bursts). If the image above is any indication, my experience shooting bursts with the a6300 were largely quite positive!

First night in Miami, First Impressions

The Sony a6000 was a massive hit. Not only is it the best selling mirrorless camera of all time, but also the best selling digital interchangeable lens camera of all time. These two bits of information were presented to a group of about 30 journalists (including myself) at the start of our first evening in Miami. And regardless of what parameters were considered when the above conclusions were drawn, one thing is clear: Sony anticipates the a6300 to be another top seller.

In terms of design, the body of the a6300 looks nearly identical to its predecessor. But there are several small, yet important changes to the construction. What was previously an assignable AE-Lock button on the back of the a6000 is now a button/toggle combination, allowing for twice the amount of customization. By default, the two positions are AF/MF and EA-Lock. The first thing I did when handed the camera was reassign these two positions to be ‘AF On’ and ‘Eye AF’ (more on that later). 

The other notable change is in the material which the a6300 is constructed. Sony moved away from the shiny plastic of the a6000 to magnesium alloy on the a6300, with a finish reminiscent of the a7R II’s construction. The new material certainly adds a more robust-feeling quality to the camera. That said, I suspect it still wouldn’t handle a fall from several feet with much grace.

The a6300 features a new JPEG engine compared to the a6000. ISO 100, 1/320 sec at F5.6. Shot using the Sony FE 70-200mm F4 G OSS at 101mm.

One easily overlooked improvement on the a6300 is the ease of selecting one’s AF point. I like to shoot using the flexible spot. Previously, on the a6000, to move my spot around I needed to first hit the center button on the back click wheel, before hitting any of the direction keys. On the a6300, the center button functions as a toggle. By default a press of one of the direction keys brings up its assigned function. But hit the center button once and the direction keys function as your AF point selector. Whichever function you have the direction keys set to, your choice is sticky (unlike on the a6000), so even if you turn off the camera or pop into the menu, it will default to the last function set (unless you change the mode).

Shooting bursts

The a6300 can shoot bursts as fast as 11 fps with AF or 8 fps with both AF and a live feed. As I mentioned, going into this shooting excursion, what I was most curious about was how easy it would be to follow very fast moving action with the a6300 while firing a burst at 8 fps. I’ve shot sports, both extreme and team, on DSLRs over the years. And while I thoroughly embrace mirrorless cameras and the benefits they offer over DSLRs, I’ve found them difficult to use for sports photography.

Fortunately, the very first shooting event in Miami was at a wakeboard park, the perfect place to put burst shooting and the a6300’s 425-point on-sensor phase-detection AF system to the test.

In the video below, I rigged a Sony RX100 IV up to shoot 120 fps video through the EVF of the Sony a6300 while I fired several series of bursts (incidentally, the a6300 can refresh the EVF at 120 fps as well, bringing it closer to an OVF experience). This should give you an idea of just how easy it was to follow the action, especially considering the fact that I was framing the subject using the RX100 IV’s LCD as I rolled video.

The above video demonstrates the a6300’s live feed during 8 fps shooting, shot through the EVF.

Of course, once I ditched the RX100 IV rig and used the a6300 with the EVF to my eye, I found following the action to be even easier. Nearly as easy as following action with a DSLR, except for the fact that in bright daylight, as a glasses-wearer, even the nicest EVF’s can be difficult for me to keep an eye to for an extended period of time (as is often necessary when shooting sports or action).

Still, the a6300’s live feed during burst shooting is a massive improvement over every other mirrrorless camera I’ve ever used.

Autofocus

Though it took some time to figure out the best AF settings for wakeboarding, I was largely impressed with the a6300’s hit rate of in-focus images at 8 fps. Sony’s subject tracking system (‘Zone’ in the video above) also meant I didn’t need to keep a tight AF point precisely over my subject: the camera automatically chose appropriate points to maintain focus on my subject.

I found keeping my focus area set to either the ‘Flexible Spot’ (Medium or Large) or ‘Zone’ gave me the best results. With the camera set to Continuous AF, I simply panned and kept my AF point or cluster of points over the subject. The larger AF areas gave me some room for error in placement, and the camera took care of the rest by automatically picking appropriate AF points within my selected region to stay on the subject.

Assuming I locked focus at the beginning of the burst, which the a6300 often did, my hit rate was good. I also briefly tried using lock-on AF, where the camera uses a more sophisticated pattern matching system to identify and track a subject around the frame. In my few attempts, the a6300 did a decent job maintaining focus while also tracking wakeboarders through a relatively simple scene (though I wonder whether the a6300’s pattern matching system is specific enough for more complicated scenarios, a problem we’ve encountered before).

Eye AF is very useful for portraiture. This image was shot the second day of the press excursion, when I was concentrated on field testing the G Master 85mm F1.4 and 24-70mm F2.8 lens. ISO 400, 1/50 sec at F2.8. Shot using the Sony FE 24-70mm F2.8 G Master lens at 24mm.

As I mentioned earlier, one of the very first things I did when handed the camera was re-assign the AF/MF button to ‘Eye AF’ and the ‘AEL’ button to ‘AF On’. A small toggle on the back of the camera lets you choose which of the two functions the button executes. So when I had a human subject, like in the portrait above, I simply flipped the toggle to ‘Eye AF’ and held the button down until the a6300 locked focus on the model’s eyes (Eye AF – and the camera in general – is far more useful in AF-C, by the way). For non-human subjects, I flipped the switch back to ‘AF On’ and went back to shooting with my selected AF point or area.

When using E-mount lenses, Eye AF performed extremely well, on par with the excellent performance we observed from the Sony a7R II. And like the a7R II, in scenes with multiple faces, you can simply hold down the Eye AF button while placing your selected AF point over your desired subject to prioritize that person (you can even recompose freely if you’re in AF-C). However it is worth noting that Eye AF performance (ability to find an eye) and accuracy on the a6300 seemed to drop slightly when I tested it using the 85mm F1.4 G Master lens.

Low light frustrations (saved by the G Master)

 G Master flex: ISO 1000, 1/400 sec at F1.8. Shot using the Sony FE 85mm F1.4 G Master lens.

Our second stop on the shooting excursion was an indoor parkour park. Parkour, for those who do not know, is in a sense, urban acrobatics — it requires an incredible amount of gymnastic ability and physical strength and has a dare-devil, DIY-like culture surrounding it.

The park consisted of all sorts of colorful obstacles, foam pits, ramps and gymnastic bars. Unfortunately, being indoors, I had to crank my ISO very high to have a fast enough shutter to capture the action. And because the only E-Mount (non-FE) lens Sony issued each journalist was a 16-70mm F4, shooting wide open still was not all that fast.

Most of what I shot using the 16-70mm was up at ISO 6400 or beyond and frankly, looked pretty noisy and unappealing. Also a problem: Despite cranking the ISO, I still was not quite getting shutter speeds fast enough to freeze the action. So about half way through the shoot, I switched out the 16-70mm for the much faster 85mm F1.4 G Master (which is an FE mount lens). This not only gave me the ability to bring my ISO back down (by opening the lens up), but allowed me to change my perspective on what was happening in front of me. Instead of shooting wide shots of peak action, I instead looked for details.

In retrospect, I wish I had pushed my ISO just a bit further when shooting with the 85mm G Master and stopped down the lens just a little more (especially in the image above). But had it not been for the fast aperture of the G Master 85mm F1.4, I’m not sure I would have gotten any usable action shots at the parkour park.

As an everyday shooter

Tilt and shoot: I much prefer tilting LCD’s to fully articulating ones. It’s a matter of personal taste and one that video shooter may disagree with. But as a primarily stills-shooter, tilting LCD’s are far more unobtrusive as they don’t flip out to the side, doubling the camera width and potentially drawing attention. ISO 6400, 1/160 sec at F2. Shot using the Sony Carl Zeiss Sonnar T* E 24mm F1.8 ZA lens.

As day turned to night, I swapped out the the 16-70mm F4 for a 24mm F1.8 (which I forgot to bring to the parkour park). Our final destination for the evening: Miami’s Little Haiti.

Here I wandered around using the a6300 as I would a personal camera, and by that I mean: not trying to test features, but simply looking for interesting compositions and using the camera to the best of my abilities). With the 24mm affixed, the a6300 is a rather nice size, and weighs a mere 626 grams, which is about the same as an a7R II, body only. 

While the Sony a6300 is not nearly as lovely to look at or hold as an Olympus PEN-F or Fujifilm X-E2S, it easily out specs both those cameras in every capacity. And honestly, I’ve been hard on Sony design in the past, but the a6300 is no slouch. Between the new customizable toggle on back, the function menu and ample additional customizable buttons, it’s pretty easy to set up the a6300 exactly to your liking. And frankly, having a camera that people aren’t going to “oooh and ahhh” at might mean an easier time getting the shot.

Of course, a front-facing control dial would make a world of difference (the a6300, like the a6000, has a rear control dial as well as a control wheel on the back of the body, but no control dial on front). Furthermore, especially considering the camera’s video-centric features, a touchscreen would be hugely useful. As would the ability to customize buttons for stills vs. video shooting (certain stills functions, like Eye AF or E-Shutter or Drive, are unavailable when shooting movies, so if you’ve assigned buttons to such functions, they all become literally useless in video).

Still, it didn’t take me long to completely forget about what camera I was shooting, and just take pictures. I think this fact is more telling than anything else I experienced in regard to the a6300. Too often cameras can overwhelm a user with options and settings. But a day of shooting with the a6300 got me comfortable enough with the camera, that by evening, we were humming along in unison, each doing our part to make the best image possible, without stepping on each others’ toes. 

As a video shooter

Video quality from the Sony a6300 looks quite good. I’m especially eager to further try out the camera’s continuous AF during video capture (be sure to select ‘4K’ quality in YouTube for best viewing).

I didn’t shoot a ton of video over the course of my time in Miami, but I did shoot a few low light clips in Little Haiti. After all, the a6300 can shoot 4K video with full pixel readout and no binning. What does that mean exactly? Good quality, very good quality.

Furthermore, the a6300 offers ample tools to assist in video-making. Like recent a7 cameras, the a6300 offers three AF Drive speed options (slow to fast), and a toggle to adjust AF tracking sensitivity during video shooting. While I did not mess around with subject tracking during video, which still requires you use the antiquated ‘Center Lock-on AF’ function (seriously, c’mon Sony), I did try using face detect during video capture, as well as continuous AF. In both cases, I had the AF Drive speed set to normal, and found the a6300 able to lock focus in a smooth manner, without hunting.

Final thoughts

It’s pretty clear that Sony set out to create a future-proof camera in the a6300, one who’s specs will likely look impressive, even two years down the road. The camera has a lot of fire power, both in the AF and video departments, and initial impressions indicate that everything works as it should. Which is to say, the a6300 is a really impressive little camera.

It’s certainly not going to turn any heads with it looks, but it should give you everything you need to instead turn heads with your images. Which for most, is a much more worthwhile goal.

Making a splash:  ISO 320, 1/12500 sec, F5.6. Shot using the Sony FE 70-200mm F4 G OSS at 200mm.

Articles: Digital Photography Review (dpreview.com)

 
Comments Off on Action packed: Shooting the Sony a6300 in Miami

Posted in Uncategorized


CP+ 2016: shooting the Pentax K-1 in Yokohama

03 Mar

Introduction

Yes, we have already posted a fair amount about the full-frame Pentax K-1, and no, this does not mean that we are in Ricoh’s pocket. But what Ricoh did offer us was a pre-production K-1 at CP+ 2016 in Yokohama, and the freedom to do whatever we wanted to with it (except post full-resolution images, for now). How could we not take advantage of that? 

The full-frame Pentax K-1 has been years in the making, and they’ve made it pretty darn good.

I am not a Pentaxian, just to get that out of the way. In fact, I’m not really a ‘fanboi’ of any particular brand, though I do continue to own, use and abuse Nikons of the not-so-distant past. That said, I’ve spent a lot of time with the K-3 II and 20-40mm F2.8-4 Limited lens, and the feature set combined with value for money make that camera pretty cream-of-the-crop. I loved the fast continuous shooting speed, large (for APS-C) optical finder, comfy grip, in-body image stabilization, and the confidence of shooting with a truly weather-sealed camera and lens in your typical Seattle downpours.

But it just didn’t click with me. Maybe it was the shutter sound. Maybe it was the inconsistencies I experienced with the autofocus. Regardless of any quirks, and regardless of how technically great a camera might be, I admit that I find little photographic inspiration through using a device I don’t truly love and enjoy. I’m always searching for cameras that I connect with on some intangible level that makes me want to go out shooting, and unfortunately, the K-3 II didn’t fit that bill. Back onto the gear shelf it went.

And then, on the last day of CP+, Barney handed me a Pentax K-1 and told me I had until the end of the day to shoot with it. So I did. I didn’t come away with my greatest work ever, which I’ll blame more on the jet lag than the camera. No, more importantly, I liked the K-1, I had fun with it, and it made me want to keep wandering and keep shooting, even as I approached my end-of-day deadline and crossed the 10-mile mark on my phone’s sketchy pedometer. 

Pentax digital, all grown up

That firmware version is why we aren’t allowed to publish any full-res samples from the camera.

It’s true at this point that a great many mirrorless cameras are highly capable, represent fantastic value, and are home to some pretty impressive tech. Despite this, for a lot of my more serious work, I keep coming back to the good old-fashioned DSLR. That’s something that Pentax excels at, and it shines through with the K-1.

I will try to keep from repeating too much information that’s already been well-covered in our Pentax K-1 First Impressions review, but a little repetition is necessary, if only for context. The body feels extremely well-built and sealed. The grip is excellent and makes holding this heavy camera a breeze. The control system is customizable, but even without much customization, everything is sensibly laid out. It reminds me of a mix of some of the best bits of both Canon and Nikon thrown onto a single camera body. If that sounds a bit confusing, it can be. But after some time with the camera, it comes together nicely.

The colors from the Pentax K-1, particularly reds, are very nice indeed. Watch for white balance that strays to the cool side, though, which has been corrected here. Photo by Carey Rose. Taken on an old Pentax SMC 24mm F2.8 lens, processed to taste from Raw. F4 | 1/200 | ISO 100

The actual shutter might be bigger than previous Pentax DSLR’s, but it isn’t appreciably louder – in fact, it’s soft but not silent, though still with some of that Pentax-ness from APS-C models thrown in. It’s nice in that you get an affirmative, audible signal that you’ve taken a photograph, but you don’t have to deal with a loud ‘clack’ that you get from many other high-end full-frame bodies (though admittedly, many of those have a ‘quiet’ mode that sometimes helps).

What’s new, what stands out and what actually matters

So, we’re only allowed to show you VGA samples, but let’s see what we can do with that.

Dynamic range

First of all, as to be expected, dynamic range from this sensor is excellent. For the image below, I used a base ISO of 100 and exposed for the sky, pulled the overall exposure up over two-and-a-half stops, lowered the highlights back down, and raised the shadows even more. Though there is some grain in the shadow areas, it isn’t obtrusive, and there is no banding of any kind. (Ignore that pretty heavy vignetting from the non-spec hood on the old manual Pentax 24mm F2.8 I was using).

I could have gone even more overboard with the HDR look by not pulling those blacks so far down, but this way of processing is a personal preference. I find that adding some contrast back in can partially negate the flatness that can occur with heavy shadow pushing.

Original, out-of-camera JPEG. F8 | 1/640 | ISO 100 Processed through Adobe Camera Raw, with the following adjustments: exposure +2.65, highlights -100, shadows +85, whites +15, blacks -67.

That weird screen

The tilting screen may seem gimmicky, and it kind of is. But it still works really well.

After watching Barney dangle the K-1 from its screen on the trade show floor (Ricoh said I could do it! – Ed.), I had a little more confidence in the design of Pentax’s new screen articulation mechanism. After pulling it around, slamming it back in, and treating it more or less like the tilting and articulating screens on any other DSLR, I’ve got to say that it’s really no more or less fiddly than a screen that fully articulates out to the side. In certain situations, such as having the camera on a low tripod and at an odd angle for astrophotography, I could see how it could be an advantage over more traditional mechanisms. Still, for a camera as sealed as the Pentax K-1 is purported to be, I’d be a little wary of getting too much moisture, dirt or mud behind there, if for no other reason than what some well-placed grit might do to the tiny ball joints. But overall durability over time still remains to be seen.

The articulating screen allowed me to get a lower angle in portrait mode without forcing me to crane my neck like an OVF or traditional tilting screen would. Photo by Carey Rose. Cropped and resized out-of-camera JPEG, taken on the Pentax 28-105 F3.5-5.6. F5.6 | 1/500 | ISO 200

Focusing

There’s not really much point in showing you samples at VGA resolution of autofocus tracking from a slow-aperture kit zoom. So I won’t. But I will say that for me, it worked better than or on par with previous Pentaxeses, with a high degree of accuracy. This isn’t a sports camera and it won’t keep up with fast action or erratic subjects, but tracking, say, individuals walking down the street works just fine.

In what will go down as the worst product photo of all time, you can see the lenses I was able to use with the K-1 around Yokohama. I’m not a particularly big fan of kit zooms, but this one was sharp and felt better-built than I’m used to. It goes without saying that the all-metal primes felt great, even if I had to stop them down a bit for optimal performance.

One thing to note – the autofocus points are somewhat few for today’s market (33), and the spread is a little strange. With the camera in landscape orientation, there’s more than enough flexibility across the horizontal axis, but the vertical spread seemed limiting to me. Your mileage may vary.

Single-AF works quickly and accurately as well. For this, I pre-focused on the railing and fired off a quick burst. 4.4fps is a bit faster than you might think, but if you’re used to the blazing speed of the K-3 II, you might be a bit disappointed. Taken on the Pentax 28-105 F3.5-5.6 lens. Photo by Carey Rose, processed to taste from Raw. F5.6 | 1/640 | ISO 100

So, then, let’s talk about what it’s like to use some old manual-focus primes on this 36MP digital beast. In two words, it’s pretty good.

Manual-focusing using only the viewfinder and confirmation light works fairly well, if not as well as using an actual split prism, or maybe live-view focus with peaking. Of course, the K-1 has live view with peaking, but since I had such limited time with the camera, I opted to use a method Pentax users are quite proud of. It’s called ‘catch-in-focus.’

This method, enabled through a custom menu function, allows you to hold down the shutter release as you rack the lens through the range where the image would be in focus. Make sure you’re in continuous shooting mode, and the camera will fire a burst when it detects you’ve reached the ‘in-focus’ range, and assuming a high enough shutter speed and moderate enough focus-racking speed, this method works very well, even for candids.

As far as metering with primes pre-dating even the SMC-A lenses, you place the camera in manual, dial in your desired aperture, and hit the green button on the rear of the camera. It will stop down and meter a shutter speed for you. Of course, you’ll still need to remember your apertures – it doesn’t record them in the Raw file. But, as I said, these are really old primes. Later SMC-A lenses may (and probably will) offer more functionality. One other downside of older primes, as we’ve mentioned before, is that they might not seem as amazing on 36MP as they did on film. But you can always downsize your files, stop the lens down, or do what I did: ignore it and get on with shooting.

For the ‘catch-in-focus’ feature, I held down the shutter button, and racked focus on the old manual-focus 24mm F2.8 lens until the camera detected focus and fired off this candid portrait. Because I was mistakenly only in single-shot mode, the resulting shot was very slightly front-focused. But for 36MP paired with a lens older than I am, I found it more than acceptable. Photo by Carey Rose and processed to taste from Raw. F2.8 | 1/125 | ISO 200

The moving sensor

The Pentax K-1 isn’t the first full-frame camera to have a moveable sensor for stabilization, but it is the first to offer a mode that Ricoh calls Pixel Shift Resolution. As we’ve explained before, this mode works by taking four offset shots that increase color resolution by shooting the scene with a different colored capture pixel for each shot. The end result should be that you end up with better resolution, and potentially less noise at medium/high ISO sensitivities.

The video below gives you an idea of how long the whole process takes – and thus why it may work with things like rustling leaves, but not larger movements such as cars driving through your scene. It also shows a noticeable increase in fine detail.

As for stabilization, it works, as expected, rather well. And it’s not just for stabilizing telephoto shots: stopping down (a lot), I was able to pull off a 1/30 exposure in daytime for some blur on the carnival ride, while maintaining details elsewhere in the frame. Of course, shooting at F29 will rob you of some overall sharpness. I should have remembered some ND filters.

Slight motion blur on the ride while maintaining detail elsewhere courtesy of a stabilized sensor and slower-than-normal shutter speed. Photo by Carey Rose, processed to taste from Raw. 1/30 | F29 | ISO 200

The wrap

As so often happens with these shooting experience pieces, it comes down to two fairly simple questions. Who is this camera for, and will they buy it? It seems there’s a bit of variety here.

Old-school lenses and old-school motorcycles have a lot in common. Yes, they’re often imperfect and idiosyncratic. But they’re also charming, with character that can be hard to find in the modern age. Photo by Carey Rose, processed to taste from Raw. Taken on the SMC Pentax 50mm F1.7. F-something (forgot this one) | 1/400 | ISO 100

Pentax has said that the K-1 is primarily targeted at existing Pentax owners. But then they priced it at an MSRP of $ 1,799. At that price, it seems to me they might be targeting just about anyone.

Whether you need a full-frame camera is a matter of personal choice, and needs. Many people don’t, and that is totally fine. In fact, for a good number of photographers, the increase in depth-of-field control is as much a disadvantage as it is an advantage. 

But for Pentaxians especially, who may have a good number of lenses that are inherently limited by the crop factor of the company’s APS-C DSLR cameras, the K-1 is a godsend. It represents a return to glory for all those Pentax primes. And for those of us on the sidelines who perhaps shoot different systems, the Pentax K-1 represents a great many things. 

It represents an increase in competition, which always bodes well for the consumer. It offers some features, such as sensor-shift capability for increased color resolution, Astrotracer, and its uniquely articulating rear screen, that no other manufacturer can meet in any form. 

If you’re a Pentaxian, time to pop that cork – the K-1 is the camera you’ve been waiting for, and then some. Photo by Carey Rose. Taken on the SMC Pentax 24mm F2.8, processed to taste from Raw. F4 | 1/125 | ISO 200

And Pentax has a few decent modern prime lenses and a growing number of professional-grade zoom lenses to help make the K-1 even more relevant. Hell, given a Pentax K-1 and a 43mm F1.9 Limited, your average prime-lens shooter (this photographer included) would have a killer combination for just about anything. 

From what I’ve seen from its files, the Pentax K-1 has earned its position as a flagship camera for the Pentax brand (excluding the 645Z of course). Not so long ago, if you were an advanced amateur photographer and looking to break into the ‘full frame’ DSLR market, I would have told you to go put your hands on a Canon 6D or Nikon D610 and pick what feels best. Now, for a very similar price, I’m comfortable adding the Pentax K-1 to that list as well.

Until next time, Yokohama. Thanks for hosting us. Photo by Carey Rose, processed to taste from Raw. F5.6 | 1/500 | ISO 200

Articles: Digital Photography Review (dpreview.com)

 
Comments Off on CP+ 2016: shooting the Pentax K-1 in Yokohama

Posted in Uncategorized


Fujifilm X70 Shooting Experience: Taking it to the streets

13 Feb

Fujifilm X70 Shooting Experience

The first thing you’ll notice about the Fujifilm X70 is that it looks an awful lot like an X100T. The second thing you’ll notice is how similar some core specifications are to an established cult classic among street photographers, the Ricoh GR II. And despite featuring retro-inspired dials-on-dials design coupled with a 16MP APS-C sensor and 28mm equiv. F2.8 lens, the X70 turns out to be very distinct from both of those cameras in real-world use.

Basics and Handling

The X70’s X-Trans APS-C CMOS sensor is lifted from the X100T and offers the same 16.3MP resolution and hybrid AF system. The lens is new though – it’s a fixed 18.5mm (28mm equiv.) F2.8 prime with two aspherical elements tucked behind a 9-bladed aperture diaphragm. Exposure is taken care of courtesy of a leaf shutter, allowing for near-silent operation, and if for some reason you need to be even quieter, the electronic shutter goes all the way to 1/32,000. That’s a good thing for general daytime shooting as well, since the X70 doesn’t get a built-in ND filter like the X100-series.

Fly by night. SOOC JPEG, Classic Chrome mode. Photo by Carey Rose. F4 | 1/60 | ISO 200

The buttons and dials on the X70 leave a little to be desired. For the most part they function just fine, but the dials feel a little less-than-premium: kind of a halfway point between the X-A / X-M and X100-series of cameras. The buttons have positive feedback, but are a little too flush with the body. In fact, though you can reassign the movie button to something else, it’s so flush that it’s incredibly difficult to press. I’ve found that it’s easiest to ignore it. Also, because the screen protrudes a bit when folded against the body, it gets in the way of you pressing the left-most button on the four-way controller. The playback buttons might seem oddly placed on the top of the touchscreen, but they actually work well there.

All-in-all, though, the act of controlling core settings on the X70 is very similar to the experience of using the X100T, which is to say it works both very quickly and very well.

One-man dance party. SOOC JPEG using Monochrome mode. Photo by Carey Rose. F5.6 | 1/60 | ISO 1000

The X70’s rubberized front and rear grips are grippy and well-sculpted, and the camera feels comfortable and secure even in one hand. That said, the aperture control ring around the lens and the articulating touchscreen encourage two-handed operation.

Performance

But using two hands won’t slow you down with the X70. In fact, not much will. The 0.5-second startup time (high performance mode) of the X70 means that the camera is ready to shoot very quickly. This is about three times faster to start up than the GR II and means that subjectively, the X70 just feels more responsive when shooting out and about.

Play time. Processed to taste from Raw using the Pro Neg Standard color profile in ACR. Photo by Carey Rose. F2.8 | 1/125 | ISO 200

Focus times in Single-AF for the X70 are also on the sprightly side (at least for Fujifilm). The hybrid AF system does usually undergo a slight hunt before locking focus, but the live view never freezes up. Of course, street shooters will miss a thorough implementation of snap focus, but Single-AF was usually fast enough that we didn’t miss it anyway.

So while overall Single-AF speed is good, accuracy tended to vary more than we’d like. The focus would sometimes shift slightly in frames taken in immediate succession, even in daylight. To be fair, I found this mostly when shooting with the contrast-detect-only AF points near the edge of the frame. Your mileage may vary. This focus shifting didn’t affect my images much for web viewing, but I definitely noticed it on even a moderate-sized monitor.

The combination of close focus and a mild wide angle mean you can get pretty close to your subject, have some background isolation, and still have some context in the scene overall. SOOC JPEG using Classic Chrome mode. Photo by Carey Rose. F5.6 | 1/125 | ISO 1250

Continuous AF isn’t really a strong point for cameras of this general type and price point. With the X70 in single-point AF-C mode, you’ll get some lag if your subject is too quick, along with a whole lot of hunting. AF-C + Zone, which uses the PDAF area in the center of the frame works better, but the PDAF area is too small for really meaningful subject tracking. AF-C + Wide / Tracking does a reasonably good job of identifying the subject to track, but you’ll often get excessive and incessant hunting behind and in front of the desired subject. This was noticeable even if the subject wasn’t moving.

I ended up using the X70 in the same way as I use other Fujifilm cameras – in AF-S mode. 

The First Fujifilm Touchscreen

What really sets the X70 apart from both the X100T and the GR II is its tilting touchscreen, a first on any Fujifilm X-series camera. Sure, it’s made it really easy for me to take unflattering couch selfies, but it mostly makes for a very discreet shooting experience. Using the X70 with the screen as a waist-level finder, you can touch to acquire focus anywhere in the frame and capture your scene without ever lifting your head. Uninterested passers-by will assume you’re texting or maybe fiddling with dials on your hipster film camera, and if someone does actually pay you some attention, it just looks like you’re going a little heavy on the chimping.

Just chimping, bro. Processed to taste in Raw using the Monochrome preset in ACR. Photo by Carey Rose. F5.6 | 1/60 | ISO 400

The tilting screen also helps when it comes to getting the most out of the 28mm field of view that the X70 offers. Unlike a 35mm or a 50mm, a 28mm focal length requires some careful attention to foreground and background elements to keep your images from feeling too flat. Being able to easily frame subjects from ground-level or above my head helped me get a little more accustomed to 28mm, a focal length I normally tend not to gravitate towards.

Image Quality

The sensor inside the X70 is quite literally nothing new. Though this 16.3MP X-Trans sensor is getting a little long in the tooth, overall dynamic range and noise performance are still very good, and as we’d expect, very comparable to the closely-related 16MP sensor in the GR II. We prefer the rendering from Fujifilm’s X-Trans sensor in JPEG mode, but Raw files from the more conventional filter array in the GR are easier to handle. 

Camouflage. Processed to taste from Raw using the Pro Neg Standard preset in ACR. Photo by Carey Rose. F2.8 | 1/60 | ISO 1000

The lens on the X70 though is an all-new design, but in both the studio and the real world, we found the lens on our particular X70 to be noticeably less sharp than that on the GR II. Of course, this could be an outlier (we are using a very early production model camera) but we’ll keep an eye on it and do a control test with another sample as soon as we can. 

It’s worth noting that the lens on the X70 doesn’t offer a dedicated macro mode. It doesn’t really need to. The close focus distance of 10 cm (~4 in) allows you to get a little more creative with your compositions as well as get some reasonable subject separation despite the vaguely unimpressive maximum aperture.

Overall Impressions

It’s time for a talk. SOOC JPEG, shot in monochrome mode. Photo by Carey Rose. 1/60 | F2.8 | ISO 2500

Time to be brutally honest. The spec sheet on the Fujifilm X70 isn’t all that exciting. We’ve seen the sensor, processor and autofocus system before. The lens, a new design, only opens to F2.8. It’s appreciably smaller than an X100T, but is more ‘coat pocket’ than ‘jeans pocket.’

In spite of all of this, the Fujifilm X70 is a thoroughly enjoyable and engaging camera to use. Full disclosure: I feel the same way about the GR II, but using it is a completely different experience. If you have a GR II and like it, there’s really not enough of a reason to dump it for the X70. If you like your X100-series but were looking into a more portable option like the GR II, the X70 is definitely worth a look. Strictly speaking, these two cameras are capable of achieving very similar results. But as the files between them have their own unique signature, so does the handling, and handling is a very personal matter indeed.

So in the end, is there room for two similarly-specced street-focused APS-C shooters in the marketplace? Time will tell, but with the X70, Fujifilm has created a compact, responsive camera that in terms of both specification and design, is greater than the sum of its parts.

Additional Content

Fujifilm X70 Updated Samples Gallery

$ (document).ready(function() { SampleGalleryV2({“containerId”:”embeddedSampleGallery_6897602972″,”galleryId”:”6897602972″,”isEmbeddedWidget”:true,”standalone”:false,”selectedImageIndex”:0,”startInCommentsView”:false,”isMobile”:false}) });


Studio Test Scene Comparison

Articles: Digital Photography Review (dpreview.com)

 
Comments Off on Fujifilm X70 Shooting Experience: Taking it to the streets

Posted in Uncategorized


Pride and joy: shooting the Olympus PEN-F in Austin

28 Jan

Austin, art modes, acceptance

When you are inside the Texas Capitol, you cannot forget that you are inside the Texas Capitol. Taken using Olympus’ ‘Classic Film Monochrome’ mode. F4 | 1/30 | ISO 3200

The new Olympus PEN-F has been, on the whole, receiving Texas-sized portions of praise around the DPReview offices. But there’s one design detail that hasn’t been met with much southern hospitality: Olympus’ decision to place a dial smack on the front of the camera that is solely used for selecting various photo effects for your JPEGs, and what’s more, to make it impossible to assign to another feature.

But after just a couple of days of shooting with he PEN-F, I found that I was using that little dial all the time. ‘Keep Austin Weird’ is the saying. Maybe this city is rubbing off on me a bit.

Olympus’ ‘Classic Film Vivid Saturation’ can occasionally push skin tones a little over the top, but is perfect for adding some punch to urban landscapes. F2 | 1/8000 | ISO 200

And there does seem to be a bit of parity going on here. Wander the streets of Austin, an unabashedly hip (and hipster-filled) town and there are times that you’d be hard-pressed to tell that you’re actually thousands of miles away from the west coast. Apart from the drop-dead-delicious down-home cooking, there’s a lot of Austin that just doesn’t seem to jive with the typical Texan stereotypes. To me, that’s totally okay and just adds to this city’s charm.

That’s kind of the same feeling I get about the Creative mode dial on the front of the PEN-F. This camera is solid, expensive, attractive and looks serious – until you read that dial and see that one of the settings is ‘Art.’ It honestly doesn’t really fit in to the classically-styled PEN-F, but somehow, adds some unexpected charm.

The ‘Classic Film Monochrome’ lives up to its name, right down to the heavy-handed grain. I like it. I expect many people won’t. F2 | 1/30 | ISO 400

Most of that added charm is thanks to the fact that this little Creative mode dial hides two completely new profile modes for the Olympus ecosystem. Taking a page out of Fujifilm’s book, Olympus claim that they are meant to be film emulations. I assigned ‘Color’ to either Chrome Film Rich Color or Chrome Film Vivid Saturation, and the ‘Mono’ setting is always on Classic Film Monochrome, which is full-on contrasty, grainy goodness. I rarely used the ‘Art’ or ‘Color Creator’ modes because, you know, there has to be a line somewhere.

I like using this dial so much because I would never get these images if I were shooting in a more ‘natural’ JPEG setting or Raw. I just don’t tend to tone my photos this way. I might come up with similar compositions, but they wouldn’t have the same mood. Not to harp on Fujifilm, but it’s reminiscent of why I shoot my X100 in JPEG mode almost all the time – I like it, and I can’t say I’d get the same feel if I did everything myself.

When they decided to expand Texas’ state capitol facility, they basically tunneled it underground. Because why not? Here, I used the ‘Chrome Film Rich Color’ mode that cranks both the saturation and contrast a bit which, combined with some intentional exposure adjustments, can lead to nice, crunchy shadows. Tasty. F5.6 | 1/1250 | ISO 400

And I’ll come right out and say that you may still think this is all rather silly. I wouldn’t blame you, and these emulations certainly won’t be everyone’s cup of tea. But that’s fine. I don’t think Austin is everyone’s cup of tea either, but it sure is fun.

Now. To the camera.

So, if you came here to read more about an actual camera and less about frivolous-yet-fun art filters, let’s dig in a little deeper. Our illustrious staff has already some some some excellent hands-on and preview content, and I agree with them on most of their points. Here’s a few personal takes from me.

The body does feel extremely solid, and the lack of exposed screws is a nice touch, but it doesn’t get me as excited as I think Olympus’ engineers were. (Also, I can’t imagine what it’s like if you ever have to get this camera serviced.) What’s missing is weather sealing, which is an odd omission for a camera of this caliber, this price and one that Olympus claim is aimed at street shooters.

And let’s be real. If you’re going to go to the trouble to eliminate visible screws, let’s also add some invisible weather sealing.

The new PEN-F’s autofocus modes are on par with Olympus’ other mid-to-high end offerings, such as the E-M5 II. Here, single-point autofocus nailed the can of spray paint perfectly despite some intense backlighting. F2 | 1/6400 | ISO 200

This is an exceedingly comfortable camera to hold, and the typical magic feel of Olympus’ dials is in full force. I find myself just twiddling them as I walk down the street, even if I’m not actively shooting. The viewfinder is big, bright and beautiful, but the fully articulating screen can be hard to see in daytime. Also, I don’t particularly like fully articulating screens, but I do like that this one has leatherette on the back if you fold it away completely – it’s nice if you want to be extra discrete or grasp more of the camera for just carrying around.

Speaking of being extra discrete, this camera can operate completely silently and with no noticeable noise penalty from using an electronic shutter. For moments when silence isn’t necessarily golden, the feel and sound of the mechanical shutter (which goes to 1/8000!) is very nice indeed.

It isn’t all puppies and rainbows. The high saturation of the Chrome Film modes requires careful attention to your white balance, which can (understandably) struggle under mixed lighting. In other words, the colors in this image SOOC are pretty gross and yes, I should have stuck to black and white. F2 | 1/80 | ISO 320

The new sensor represents the highest pixel count of any Olympus camera yet, and it doesn’t disappoint. It provides excellent detail and good high ISO performance. If you add some of your own grain a la Classic Film Monochrome, you can comfortably shoot at ISO 6400. A more reasonable limit for Raw purists will be around 3200, but as always, this will vary on the quality of your remaining light and your choice of exposure.

The new high-res mode on this camera produces 50MP JPEGs and 80MP Raws. To get the most of those extra pixels I found you need to exercise more caution than I did, even if you’re using a tripod. I would also recommended that you engage an extra timer delay to minimize any vibration you might otherwise cause by physically pressing the shutter button.

This is the “Pinhole Camera III” art filter. And this is why I don’t use the art filters much. F2 | 1/1000 | ISO 200

Single-point autofocus is fast and accurate, and continuous focus with tracking is comparable with the E-M5 II (though not the E-M1 with its hybrid system).

Lastly, kudos to Olympus for including a clip on flash that articulates for easy bounce work. What’s more, some non-scientific testing yielded an almost Fujifilm-quality of fill flash: perfectly balanced with the ambient surroundings, and maintaining decent color.

With its sleek yet low-profile looks, fold-away screen and excellent viewfinder, the PEN-F is almost perfectly set up to be a street photographers’ walk-around camera. Except for that whole weather-sealing thing. F1.8 | 1/8000 | ISO 200

At the end of the day, the PEN-F is an excellent camera for its intended audience of fashion-conscious folks who are serious about their travel or candid photography. Though the price is on the high side, the feature set, build quality and image quality from its all-new sensor at least merits a look for anyone looking to move into the Micro Four Thirds system in style.

The heavy-handed (but adjustable) film grain effect adds impact to this portrait, in my opinion. F1.8 | 1/50 | ISO 6400

For more samples from the Olympus PEN-F, please take a look at our samples gallery below.

Articles: Digital Photography Review (dpreview.com)

 
Comments Off on Pride and joy: shooting the Olympus PEN-F in Austin

Posted in Uncategorized


Shooting with a point of view: Anna Mia Davidson in Cuba

24 Jan

In 1999, Anna Mia Davidson packed up 100 rolls of Tri-X film, an old Leica M4-P, two lenses and headed to Cuba to photograph the grittier reality of Cuban life that lurked beneath its colorful surface. Davidson expresses the importance of having a unique point of view to guide her as she made multiple trips over several years, documenting the island nation through some of its most turbulent times.

In this PIX 2015 talk, Davidson’s photos guide you through a Cuba you’ve not likely seen. She purposely eschewed the temptation of color film to ‘focus on finding the essence of the culture in quiet moments; the emotions unimpaired by the appeal of color.’ Davidson’s work spans the entirety of the culture, from the homes, families and streets of Havana to the fields, valleys and farmers of the countryside. Woven in amongst her photographs are hints to the looming presence of the Castro regime and the stark contrasts of Cuban and American culture.

Watch the talk and visit Davidson’s website to see more of her work in Cuba and beyond.

Articles: Digital Photography Review (dpreview.com)

 
Comments Off on Shooting with a point of view: Anna Mia Davidson in Cuba

Posted in Uncategorized


Hell on Earth: Shooting in the Danakil Depression

23 Jan

Hell on earth. It sounds like hyperboly, but the Danakil Depression is exactly that. In late 2013 I spent 1.5 months traveling extensively in Ethiopia, and I visited the Danakil to scout locations for my ‘Earth, Wind and Fire’ workshop. It is, by my own experience, one of the most inhospitable environments you can actually visit. Scorching heat, no roads, no running water, not to mention hotels or any other modern convenience. But it is exactly these qualities which make the Danakil Depression one of the most fascinating places to visit on the planet.

Located in the north of the Afar Triangle, a geological depression formed by tectonic plates that are slowly ripping the earth apart, the Danakil Depression is very low in altitude (about 100 meters below sea level), dry (rain is extremely rare) and hot – so hot that it’s famous for being the hottest place on earth in terms of year round average temperatures. Moreover, reaching it requires a day long drive through the desert, which is both expensive and exhaustingly uncomfortable. But it’s worth the effort, because this area holds invaluable treasures for the avid photographer.

Our journey to the Danakil. Temperatures soared up to 48 degrees Centigrade, and the dust made it quite hard to shoot.

Upon reaching the Danakil after a long drive, one is immediately struck by the vastness of this wasteland. apart of the odd tree and tribal village, there isn’t much else around. This makes sense, since little could survive here, but the few humans that do are quite special.

Arid, seemingly Martian red hills, dry, cracked rock formations, wide salt lakes, fluorescent green pools of sulfuric acid, and of course, the mighty Erta Ale volcano are the main photographic attractions in the Danakil Depression. In this article, I will try to survey them from a photographic point of view, and perhaps make you think differently about Ethiopia and its natural treasures.

A young Afar tribesman. Life is incredibly hard in the Danakil Depression, and the Afar are a hardy folk, farming, mining salt and herding goats for a living. Their appealing appearance and feisty temper, together with the environment they live in, make them unique photographic subjects. 
Canon 5D Mark III, Tamron 24-70mm F2.8 VC

The primary means of interaction between the Afar region and the rest of Ethiopia (and the world) is the endless salt caravans, consisting mainly of camels and donkeys, loaded with heavy bricks of salt – the main natural resource in this area. The caravans are very photogenic, both for their sheer size (the most common response I get to my shots is “surely you’ve duplicated the camels in Photoshop!”) and the landscape they march across.

This was just a part of a longer salt caravan on its way back to the Afar region.
Canon 5D Mark III, Canon 70-300mm F4-5.6L IS

After a night’s sleep under the stars, we started the journey to Erta Ale volcano. I was extremely excited to visit Erta Ale after seeing a few shots from there. The 3-hour hike up the volcano was a bit strenuous, but since it was done at night, it wasn’t too demanding for any of the hikers. Nearing the top, I started sensing faint odors and noises. When I reached the campsite, the bright smoke was clearly visible. I couldn’t resist taking an image of the distant smoking pit and the clear, starry sky.

Erta Ale volcano crater as seen from the campsite.
Canon 5D Mark III, Tamron 24-70mm F2.8 VC

Rising 613 meters, Erta Ale hosts one of only a handful of permanent lava lakes in the world. The name “Erta Ale” means “smoking mountain” in the local Afar language, and it fits this name quite well. It is also notable for being the longest-existing lava lake, present since the early years of the twentieth century.

I knew visiting and shooting this unique place would be very special, but I couldn’t quite foresee the level of excitement I would reach upon getting close to it. In my travels I’ve seen some wonderful natural wonders, but seeing a huge crater, full of red hot, bubbling, exploding lava was one of the most powerful experiences I’ve had so far.

It wasn’t easy shooting the pit itself. The lava is searingly hot and its brightness changes constantly, and the foreground is much darker, requiring HDR technique to reveal its details. Moreover, the pit is very large, and even with a 14mm lens I found it hard to include all of it. If I had tried to step back a bit, I’d have to lose detail in the lava area, since I’d be looking at it from further away.

Erta Ale Volcano up close. Canon 5D Mark III, Samyang 14mm F2.8, manual HDR from 2 images

After several trials, I reached a position I was comfortable with, and shot the lava pool together with the serrated volcanic rock surrounding it. The red glow defined the contour of the pit’s edges, contributing even further to the hellish look. It can’t be conveyed here, but believe me – the smell matched the appearance of the pit perfectly.

After spending the night in the campsite near the volcano, we began our descent to the jeeps. Within an hour’s drive, we reached another spectacular location: the sulfur lake. Colors unlike I’d ever seen before, mineral nozzles spewing hot water, crisp red earth and a feeling of another planet are all offered by the second of the two top locations in the Danakil Depression. What’s left to do is put on a polarizing filter and, well, start the photo-party. The formations and colors are endless.

I especially enjoyed shooting the pools of sulfuric acid, with their surreal bright green color against the red earth.

There is much more to see in the Danakil Depression. From tranquil, shallow salt lakes to red, Martian-like hills and rock fields, this region is home to some of the most unique topography on our planet. Hard to reach and inhospitable as it is, I wouldn’t visit Ethiopia without stopping there to appreciate and photograph a true hell on earth, but a most beautiful and majestic one.


Erez Marom is a professional nature photographer, photography guide and traveler based in Israel. You can follow Erez’s work on Instagram, Facebook and 500px, and subscribe to his mailing list for updates.

If you’d like to experience and shoot some of the most fascinating landscapes on earth with Erez as your guide, you’re welcome to take a look at his unique photography workshops around the world:

Land of Ice – Southern Iceland
Winter Paradise – Northern Iceland
Northern Spirits – The Lofoten Islands
Giants of the Andes and Fitz Roy Annex – Patagonia
Tales of Arctic Nights, Part I and Part II – Greenland
Earth, Wind and Fire – Ethiopia

Selected articles by Erez Marom:

  • Behind the Shot: Dark Matter
  • Mountain Magic: Shooting in the Lofoten Islands
  • Behind the Shot: Nautilus
  • Behind the Shot: Lost in Space
  • Behind the Shot: Spot the Shark
  • Quick Look: The Art of the Unforeground
  • Behind the Shot: Watery Grave
  • Whatever it Doesn’t Take
  • Winds of Change: Shooting changing landscapes
  • Behind the Shot: Prince of the Night

Articles: Digital Photography Review (dpreview.com)

 
Comments Off on Hell on Earth: Shooting in the Danakil Depression

Posted in Uncategorized


Tips for Using Legacy Lenses and Shooting in Full Manual

19 Jan

Shooting Manually

Full manual. Two words. Ten letters. Yet those words can be some of the most discouraging for new photographers to ingest. There has long been a perceived over complication concerning shooting in Manual Mode. Personally, I always leave my camera set to manual. Granted, I dont shoot many fast-paced sporting events that require speedy autofocus, or many situations where there is constantly fluctuating light. Still, the idea of controlling the aperture, shutter speed, ISO, and focus, all independently of your camera’s computer, unsettles even experienced photographers at times. Happily though, not only is there a swelling community of photographerss who are embracing the somewhat challenging, but highly organic and rewarding, benefits of shooting manually…but also upping the ante by adapting completely analog legacy lenses for use with their cameras.

image

In this article, you will learn how to enjoy what might be considered a devolved methodology of making photographs using legacy lenses, and shooting in full manual mode. Full manual lenses, are generally built to exacting quality standards, but are relatively low-priced, which makes them great for beginners, and those shooting on a budget. Furthermore, adapters are available for virtually all mirrorless and digital SLR camera systems, so that you can start making great photographs using these low-tech lenses. Let’s jump right in.

What are Legacy Lenses?

Lenses that were geared for use with older film camera (35mm or medium/large format) systems are called legacy lenses. Glass of this type are non-motor driven, and operate autonomously of your camera. This means that the focus and aperture selection are all accomplished inside of the lens, which is controlled by you. There is no electronic communication between the lens and the camera. You must use the lens’s aperture, and focusing ring, to produce the desired depth of field and focus. Legacy lenses are generally made of metal, making them relatively heavy, but heartily constructed.

Which lenses are fully manual?

Full manual lenses does certainly not include all legacy lenses. Many manufacturers still make completely manual lenses, engineered specifically for the digital camera market. A lens is designated as being fully manual when there is no control being provided by the camera. However, there are quite a few fully manual lenses which have incorporated focus indicator chips into their design. While remaining fully manual, these types of lenses will communicate with your camera when focus has been achieved.

image

Adapting lenses to your camera

In a previous article on dPS we discussed how easy it really is to use legacy lenses (and other non-native glass) with your digital camera. The same holds true. All that is needed to enable the use of fully manual legacy lenses to be used with your modern digital camera body is a simple adapter.

image

These adapters vary in capability from simple adapter rings, to advanced electronic contraptions, with focus indicator chips of their own. Keep in mind though, there are a few things to consider before adapting any non-native lens to your camera. More on that shortly.

Using your camera in full manual mode with manual lenses

image

You’ve found an elegant legacy lens and located the appropriate adapter for your particular camera system. You’re excited and ready begin shooting completely manually, so now what? Well, take a breath and exhale a well deserved sigh of relief, because all of that was the hard part. Now all that’s left are a few quick steps. The first of those steps is to switch your camera into Manual Mode. This is almost always done by moving your selector wheel to M for manual mode. This will give you, the courageous photographer, complete control over all aspects of the shot. If you are using a completely manual lens, or a legacy lens, everything except the shutter speed will now be manipulated using the lens. The aperture will be controlled using the aperture selector ring, and so too will be the focusing.

This is a breakdown of the essential features found on an adapted, full manual legacy lens (in this case a Nikkor 50mm f/1.8).

image

Here are a few tips for using your camera in full manual mode, in conjunction with a fully manual or legacy lens:

Focus Peaking Function

Some cameras now incorporate a technology called focus peaking which visually outlines the edges of the most in-focus area of a scene,, before the shutter is ever released. The technology detects the area of the most contrast between pixels, thus determining what region is most in focus. Though not perfect, this a great option to aid with manual focusing.

Focus Magnifier

Not all camera bodies come equipped with the focus peaking feature, but most modern digital cameras are capable of focus magnification. This lets you digitally magnify the scene, and inspect areas for proper focus. I use focus magnification in all of my landscape work. It is a great way to achieve pin point focus on the areas where precision is a necessity. (Note: this is usually available in LiveView mode).

Shoot RAW

Yes, the old shoot RAW lecture again. Even though focus correction can’t be achieved, even in RAW format files, it will however give you much more room to work on contrast and clarity. This will sometimes help to salvage an image that may otherwise be culled.

Things to consider before using legacy lenses

Along with all the benefits of shooting manually with legacy and full manual lenses, there are also some things to remember before, and during shooting times.

Complete Autonomy of the Camera

There is of course no electronic communication between the lens and the camera, unless you have chosen an adapter or lens equipped with focus indicator technology. So there will be no way to use your shutter priority or aperture priority modes.

Physical Considerations

Some lenses will obstruct the mirror function of digital SLRs. This is one of those things that carries a little bit of buyer beware baggage. Make absolutely sure that the lens you are adapting to your camera does not physically occlude the operation of the mirror, this will damage your camera, possibly beyond repair. This becomes less of an issue with mirrorless camera systems.

Crop Factor

The crop factor of any lens is dependant on the size of the image sensor (or film) being used. Always be mindful of the interactions between your lens, and whatever size sensor you are using, be it full frame of APS-C (cropped). Most legacy lenses were intended for use with 35mm film. This will play a major role in your practical focal length, when shopping for lenses of the prime variety.

image

Fully manual and legacy lenses have a firm grasp on today’s digital world. Though viewed as antiquated by some, the essential elements of this type of photography can produce exceptional images. Shooting in Manual Mode gives you ultimate generalship over your work, and allows you to take every aspect of photo making into your own hands. Not only is the use of legacy and manual lenses a cost efficient way to make photographs, but it is also a reflection of a time when the buck stopped with the photographer, not the camera.

Newer isn’t always better. And even though manual shooting might not be the most effective course in some situations, there is no reason why it should be discounted in today’s modern era. Full manual shooting allows you to use lenses of extremely high quality to fully realize your creative vision, in ways you may not have otherwise been able to accommodate. Take your photography back to the future, and go beyond the realm of the automatic.

Do you have a favorite manual setup that you use regularly? Share it in the comments below!

googletag.cmd.push(function() {
tablet_slots.push( googletag.defineSlot( “/1005424/_dPSv4_tab-all-article-bottom_(300×250)”, [300, 250], “pb-ad-78623” ).addService( googletag.pubads() ) ); } );

googletag.cmd.push(function() {
mobile_slots.push( googletag.defineSlot( “/1005424/_dPSv4_mob-all-article-bottom_(300×250)”, [300, 250], “pb-ad-78158” ).addService( googletag.pubads() ) ); } );

The post Tips for Using Legacy Lenses and Shooting in Full Manual by Adam Welch appeared first on Digital Photography School.


Digital Photography School

 
Comments Off on Tips for Using Legacy Lenses and Shooting in Full Manual

Posted in Photography