RSS
 

Posts Tagged ‘Shooting’

How to Improve Your Photography by Shooting Behind the Scenes of a Short Film Shoot

15 Nov

For any creative photographer, shooting behind the scenes of a short film sounds like a boring idea. That’s what I thought until my friend called me to shoot for one of his school projects (he is in a film school and had to shoot three sequences). I wasn’t going to refuse so I showed up that day and little did I know, I ended up learning so many things and got to meet a lot of people. The best part is that I took some of the best images since I first picked up my camera.

Article bts short film

Here are some reasons why you should consider shooting behind the scenes images and how it can benefit your photography:

#1 – It’s an opportunity for a photoshoot

During a shoot for a short film, most of the actors are used to modeling and aren’t afraid of a camera. There is a director of photography who works on the lighting, and there is a make-up artist (of course there are more people on set who take care of the sound, costumes, assistant, etc.). A short film is basically a photo shoot but instead of taking images, people act and they are being filmed.

Actors have their costumes, they have had their hair and make-up done, and the director of photography just did the entire lighting for you. You have to see it as an advantage because they spend weeks planning and you’re just here to take beautiful photos with perfect conditions. I took my most beautiful images during short films and I would not have had been able to reproduce the scenes, costumes, and ambience on my own.

Article bts short film1

Article bts short film9

Even if you don’t really like the theme or would rather plan a photoshoot on your own, trying other people’s ideas can also put you out of your comfort zone and help you progress.

#2 – You’re surrounded with creatives

Working with other creatives has helped me so much. The best thing is the shared interest and not wanting to disappoint. Working with people who want to create gives you an extra boost and it pushes you to do your best. Most people on a film crew need these images. Looking at all the work they put into creating their projects, whether it’s for auditions to find the perfect actors, negotiating to borrow super expensive filming equipment, let’s not forget the make-up artists who stay on set all day, and all the detailed planning of the sequences. You can’t really disappoint with average images, so you automatically try to get stunner shots.

Article bts short film12

article-bts-short-film6

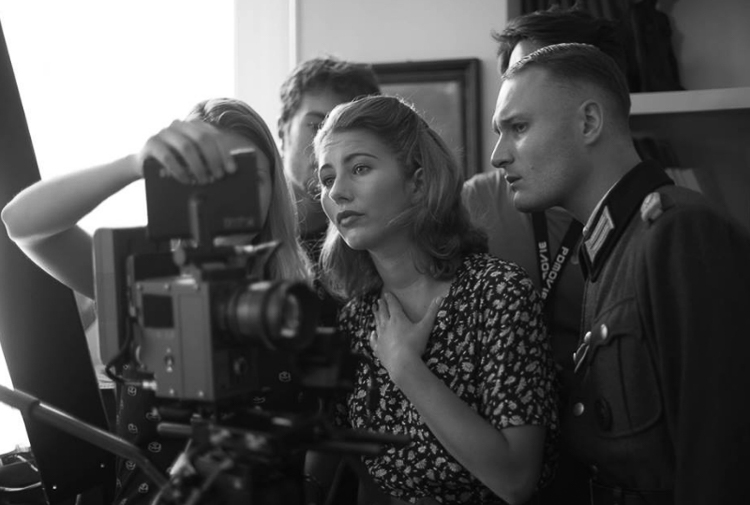
It’s quite difficult because you can only take images after the scenes when the actors are briefed by the film director. So they’re not actually posing for you, you just have to walk around without attracting any attention to get some nice images. Do not take any images when the video camera is rolling. The sound of your shutter can throw a whole scene away, and trust me you do not want to be in that situation. Just patiently wait for the director to say cut and then you can start taking your images.

Article bts short film13

When an actor is not included in a scene, you can kindly ask them to pose for you. Most of them need portraits for their website or their portfolios so they will most likely say yes. If they say no, just tell them that if they change their minds, you’re always fine with taking portraits.

Article bts short film3

Article bts short film5

#3 – You may get to work with these people on future projects

A whole day of filming can take up to eight hours or more. You’re going to meet a lot of people (depending on the size of the crew) and you will have a lot of time to get to know everyone. I would highly recommend socializing during the breaks over a cup of coffee and getting to know everyone. Most of them have the same passion as you, whether it’s the assistant or the sound team, you can speak about previous or future projects, have tech discussions about camera gear, you name it.

The actors are the most talkative, especially when they have a few hours without any scenes. Tell them about your photography. If you like their profile ask them if they would like to have a photoshoot with you in the coming weeks. The make-up artists are also great contacts to have, take their business card and contact them for your next photo shoot if you need someone for make-up and hair.

Article bts short film8

One make-up artist I met had a little girl who wanted to start modeling. We met a couple weeks later and I photographed her daughter. I ended up having a solid image that went directly into my portfolio.

Get your images ready to show them quickly

One tip I can give is to work on the images as soon as possible. Once these people see your images they will start spreading the word to other people in their school or entourage, share your images on social media, etc. (that is of course if you had good results). You will probably end up being Facebook friends with most of the crew and you can keep in contact that way.

Article bts short film2

Article bts short film11

Most of them will post on Facebook or directly contact you if they need a photographer. Once you do a good job, they will most likely call you back. Their friends will start calling you then you will meet other actors and make-up artists, and increase your contacts even more.

#4 – You will learn a lot of technical things

Most film crews use a lot of advanced equipment. By watching them set up everything, you will learn a lot about cameras, the choice of lenses, framing, lighting, sound, communication with actors, team work, tracking shots, and organization. Even if you’re passive in this process, open your eyes and try to absorb as much information as you can.

Article bts short film7

Article bts short film4

Most directors of photography will use different lighting techniques with some hair light, key light, harsh light, soft light, back-light with different modifiers. Pay attention to their work and try to replicate what you see later at home, you can also take images of the light set up to know exactly how each light is placed on set.

Conclusion

Those are just a few ways you can benefit from shooting behind the scenes on a film set. If you’ve had the experience of doing this, please share your thoughts and images in the comments below.

googletag.cmd.push(function() {
tablet_slots.push( googletag.defineSlot( “/1005424/_dPSv4_tab-all-article-bottom_(300×250)”, [300, 250], “pb-ad-78623” ).addService( googletag.pubads() ) ); } );

googletag.cmd.push(function() {
mobile_slots.push( googletag.defineSlot( “/1005424/_dPSv4_mob-all-article-bottom_(300×250)”, [300, 250], “pb-ad-78158” ).addService( googletag.pubads() ) ); } );

The post How to Improve Your Photography by Shooting Behind the Scenes of a Short Film Shoot by Yacine Bessekhouad appeared first on Digital Photography School.


Digital Photography School

 
Comments Off on How to Improve Your Photography by Shooting Behind the Scenes of a Short Film Shoot

Posted in Photography


Fujifilm launches ‘Pro’ tethered shooting plug-in for Lightroom with live view and remote control

03 Nov

Fujifilm X-T2 owners will soon be able to shoot tethered to Adobe’s Lightroom image manipulation software application using a new plug-in that will be sold through the Adobe Add-ons website. Tether Shooting Plug-in Pro is an upgrade from the existing version of the company’s Tether Shooting plug-in that is now compatible with the X-T2 as well as the X-T1. The new version brings a Control Panel display that allows users to check their imported images more quickly and to preview the image in live view mode while at the same time being able to control the camera’s settings.

The plug-in features two shooting modes that allow the user to control settings at the camera or via the computer screen, with both modes allowing the captured images to be transferred directly to the computer by USB connection.

The X-T1 and X-T2 cameras both need the relevant firmware to be able to operate with the plug-in, and Fujifilm has announced that v1.10 for the X-T2 will be available on 8th November. This firmware also makes the camera compatible with the standard version of Tether Shooting Plug-in and Tethered Shooting Software HS-V5.

The camera firmware will be free to download, but the Tether Shooting Plug-in Pro will cost $ 79.

For more information visit the Fujifilm website.

Press release:

Tether Shooting Plug-in PRO for Adobe® Photoshop® Lightroom®

PC tethered shooting support for FUJIFILM X-T1/X-T2

FUJIFILM Corporation (President: Kenji Sukeno) is pleased to announce the launch of “Tether Shooting Plug-in PRO for Adobe® Photoshop® Lightroom®” to enable tethered shooting of FUJIFILM X-T1(hereafter X-T1) and FUJIFILM X-T2(hereafter X-T2)* to a compatible computer.

“Tether Shooting Plug-in PRO for Adobe® Photoshop® Lightroom®” is a tethering software plug-in that allows Lightroom users to connect X-T1 / X-T2 to a computer via USB cable for direct saving of captured images onto computer, and controlling the camera from the computer**.

“Tether Shooting Plug-in PRO for Adobe® Photoshop® Lightroom®” will be available from Adobe Add-ons website*** for US$ 79. The launch of the Mac OS X / macOS Sierra version*4 is scheduled for release around the beginning of November 2016, and the Windows version*5 is scheduled for release around the beginning of December 2016. The detail launch schedule will be informed on this page.

(1) Featuring the “Camera Mode” and “PC Mode” to control shooting on camera or from computer
In Camera Mode, the camera is held in hand or set up on a stand. The images taken will be transferred directly and saved onto computer for use in Lightroom. Adjustment of exposure and other shooting settings as well as the shutter release is carried out on the camera. In PC Mode, users can check the viewfinder image of a remotely-setup camera in the LIVE VIEW window, operate the camera and adjust its settings on the computer screen. The user can also take images and have them transferred directly and saved onto a computer for use in Lightroom. Adjustment of exposure and other shooting settings and the shutter releases are carried out from the connected computer.

(2) Featuring the “Control Panel” to check captured image and to control camera
In addition to the features of “Tether Shooting Plug-in for Adobe® Photoshop® Lightroom®” (standard version)*6, “Tether Shooting Plug-in PRO for Adobe® Photoshop® Lightroom®” has Control Panel which can check captured images and to control the camera. The Control Panel PREVIEW window allows users to check transferred images in quicker than before.

The Control Panel also allows users to check shooting angles with LIVE VIEW, to set shooting conditions from computer, to operate interval/bracketing shootings and to backup/restore all the camera settings*7.

* * X-T1 and X-T2 must be upgraded to the tethering-compatible firmware (X-T1: Ver. 3.10 or later, X-T2: Ver.1.10 or later). Internet connection is required for downloading compatible firmware.
* ** Adobe® Photoshop® Lightroom® 6 or CC is required.
* *** https://creative.adobe.com/addons/
* *4 The compatible OS is same as that of Lightroom. To use on macOS Sierra, Lightroom should be upgraded to 6.7 or later / CC 2015.7 or later.
* *5 The compatible OS is same as that of Lightroom.
* *6 The current version (Ver.1.2) of “Tether Shooting Plug-in for Adobe® Photoshop® Lightroom®” (standard version) is compatible only with X-T1. X-T2 will be supported with upgraded version (Ver.1.3) or later.
* *7 Backup/restore is only compatible with X-T2.

Articles: Digital Photography Review (dpreview.com)

 
Comments Off on Fujifilm launches ‘Pro’ tethered shooting plug-in for Lightroom with live view and remote control

Posted in Uncategorized


66 Degrees North: Olympus E-M1 Mark II Shooting Experience

02 Nov

If there’s one thing I learned about the Olympus OM-D E-M1 Mark II, it’s that it can handle mother nature with the best of them. At an Olympus-sponsored press event in Iceland, the camera got pelted with rain, sleet, snow and hail, all of which occurred over a 20 minute period on more than one occasion. Despite both the camera and the photographer getting soaked, the Mark II kept on going.

Black Beach near Vik. ISO 200, 1/160 sec, F5.6, Olympus 12-100mm F4 lens @ 100mm equiv. Photo by Jeff Keller.

In most respects the E-M1 II feels very ‘Olympus.’ The controls aren’t radically different than other recent OM-D models, and the Super Control Panel (which is on by default) and a slightly restyled menu system are both there. The E-M1 II feels great in the hand and is well balanced. The build quality is superb, which I learned firsthand when the camera knocked the front plate off of the electronic lock on my hotel room door (oops).

Icelandic horses. ISO 200, 1/160 sec, F4.5, Olympus 12-100mm F4 lens @ 132mm equiv. Photo by Jeff Keller.

The E-M1 Mark II has an impressive 440 shots-per-charge CIPA battery life rating, though the battery drained a lot quicker than that in the roughly 4°C/40°F temperatures. Quite a few of my colleagues used the optional grip full-time, while I saved it for aurora shooting, where I really didn’t want the camera to run out of juice, since (ironically) I found it easier to hold the camera without it.

Given its spot as Olympus’ flagship mirrorless camera, it should be no surprise that the E-M1 Mark II has two memory card slots, located on its right side. The top one supports UHS-II media, while the bottom one is UHS-I only. The UHS-II slot is noticeably ‘thicker’ than the UHS-I one, which is another way to tell them apart. For this trip, I set up the camera to put all videos onto the UHS-II card – a necessity when shooting at very high bit rates – and all stills to the UHS-I card.

A break in the hail at Black Beach. ISO 200, 1/400 sec, F10, Olympus 12-100mm F4 lens @ 50mm equiv. Photo by Jeff Keller.

Something that affected my shooting quite a bit was the Mark II’s overly sensitive shutter release button. This resulted in many unwanted photos and, in one case, my memory card became filled with 2000+ shots while using in the Pro Capture mode, because I was unknowingly shooting the entire time I was waiting for a geyser to erupt. Other members of the press echoed my concerns about the touchy shutter release.

Skógafoss. ISO 200, 1/400 sec, F7.1, Olympus 7-14mm F2.8 lens @ 16mm equiv. Photo by Jeff Keller.

While the E-M1 II’s big claim to fame is its advanced autofocus system, the Olympus event in Iceland was essentially all landscape photography. Our journey included a lot of waterfalls and geysers, plus some shooting around Reykjavik, but fast-moving subjects were scarce, so I can’t comment on how well that part of the AF system works. What I can say is that in single AF mode the Mark II was both responsive and accurate, though it did miss focus (in both front and back directions) on a few occasions with the 12-100 and 300mm lenses.

Two features I got to test out were the Pro Capture and Live Time modes. The former works by buffering shots as you half-press the shutter release, saving up to 14 of them when you fully press it. My plan was to capture the moment a geyser erupted, but as mentioned earlier, I was actually recording images the entire time due to that oversensitive shutter release button. The fact that I chose the wrong geyser didn’t help matters, either. Another member of our group had better luck and got some great shots using Pro Capture, so maybe it was just me.

Northern Lights over Reyjavik. In-camera Raw conversion (I’ll update when ACR is available). ISO 800, 21 sec, F2.8, Olympus 8mm F1.8 fisheye. Photo by Jeff Keller.

I used the Live Time feature when shooting the Northern Lights, which unfortunately weren’t as strong as expected. Live Time is a long exposure mode that displays the current image at an interval of your choosing, so you can close the shutter when you’re happy with the result. For aurora shooting I turned on Live Time, set the 12-100mm lens wide-open at F4 and used an ISO value between 800 and 1600, depending on the current auroral activity. Just to be safe, I turned on anti-shock to prevent any shake caused by pressing the shutter release button. While the ‘show’ wasn’t great, Live Time was a valuable feature that made it easy to decide when to press ‘stop’ when the exposure looked right.

I came back pretty satisfied with the photos I took on the trip, though I had to dump a lot of photos due to water on the lens (did I mention it rained a lot? Every time I wiped it off, more would appear.) I have no complaints about color, though at default settings JPEG noise reduction is higher than I’d like. Normally I’d pop the images into Photoshop and use ACR to tweak that to my liking (and bump up the shadows in a few of my photos,) but the only option at time of publication was converting the Raws in-camera. If you’ve used Olympus’ in-camera Raw conversion, you’ll know that it’s quite confusing, though I appreciate the addition of shadow/midtone/highlight correction.

While I didn’t take a ton of video, I was impressed with the results. I shot exclusively at Cinema 4K (24p), which maxes out at 237Mbps. The bit rate never got that high, since it varies depending on your subject, but the quality was never in question. Despite Olympus’ claims of 5.5 stops of shake reduction, a few videos seemed a bit shakier than I was expecting. In continuous AF mode there was a bit of ‘hunting,’ but not enough to concern me.

Gullfoss in Dramatic Tone. ISO 200, 1/100 sec, F5, Olympus 12-100mm lens @ 36mm equiv. Photo by Jeff Keller.

The one thing that about the E-M1 II that remained a mystery until the very end of the trip was its price. Some of the group were guessing around $ 1500, while I was thinking $ 1800. As it turned out, the E-M1 II is a penny under $ 2000 — a full $ 600 over the MSRP of the original E-M1 and on par with the Nikon D500. That’s a lot of dough for a Micro Four Thirds camera and while my initial impressions of the camera were positive, I want to see how it performs in our tests – especially in terms of autofocus – to see if its worth the price.

Sample gallery

$ (document).ready(function() { SampleGalleryV2({“containerId”:”embeddedSampleGallery_2955274204″,”galleryId”:”2955274204″,”isEmbeddedWidget”:true,”standalone”:false,”selectedImageIndex”:0,”startInCommentsView”:false,”isMobile”:false}) });
Articles: Digital Photography Review (dpreview.com)

 
Comments Off on 66 Degrees North: Olympus E-M1 Mark II Shooting Experience

Posted in Uncategorized


Shooting Festivals and Events – Tips for Travel Photographers

26 Oct

Festivals, fairs, and carnivals are a great visual opportunity for any travel photographer because they provide us with a glimpse into the local culture. I remember working in the Gion Matsuri festival in Japan. While one can say that Japan is super modern and hi-tech, the festival allowed me to see a different, more traditional side of the place – from the local food to the clothing.

festivals and events travel photographer

Here are some tips that will allow you to make the best out of your next festive event

Before you go

Build your next vacation around a festival. Why not schedule your next trip or family vacation around a festival? Not only can festivals and local events give lots of great visual opportunities, but a festival can be a good experience for your non-photographing partners as well. Thus, you can combine a family vacation with your love of photography at the same time and place.

How to find your next festive vacation

Choose your destination according to your schedule. If you know that you can take some time off in the summer, Google “best festivals in July and August” and Mr. Google will offer some great ideas – from a music festival in England to a tribal festival in Papua New Guinea. Now, all you have to do is to choose.

Or, choose your schedule according to your destination if you already decided on your next destination. If possible, try to choose the time and season according to a local festival or event.

festivals and events travel photographer

Booking and planning your trip

Book your trip as early as possible. Well-known festivals and fairs tend to attract huge groups of visitors from all around the world. Everything from booking a flight ticket to getting a good hotel can be extremely expensive or even impossible. So, do your best to book everything well in advance.

Choose smart lodging. While traveling, time is everything and as a cultures photographer, you want to maximize your time by selecting a smart lodging. Don’t waste your time and money on a hotel which is far from the main attractions. Be on the streets with first light, before the crowds.

Get the event schedule. Knowing when and where to be is important for every photographer, but this is a must if you are working around a moving festival (like a parade). If possible, look for the event schedule online, and be sure to double check it with a local (like a receptionist at your hotel or a local taxi driver) upon your arrival.

festivals and events travel photographer

On location

Get there before the crowds. To get yourself a spot in the first row, you will need to be there as early as possible. It might feel a bit boring or like a waste of time, but this is essential if you want to photograph the action and not just the backs of people’s heads.

Get a good vantage point

Find an off-public vantage point. Get creative and find yourself a (legal) way to avoid the hustle of the street (and standard imagery) by getting to a high vantage point. Scout a location – balconies or windows that can give you a better perspective on the event, and seek the owner’s approval in advance.

Build your own vantage point. I saw this technique while working on that story on the Japanese festival in Kyoto. To get a higher vantage point, the local photographers brought small ladders and stools that allowed them to shoot the action without thousands of heads in their frame. This is a smart and extremely practical idea.

festivals and events travel photographers

Be safe

Watch yourself and your gear. Besides being a paradise for pickpockets, some festivals and events can get pretty wild and even violent (I never got so many elbows and punches as I had in India). Avoid getting into a situation that might get too crowded or dangerous!

This recommendation is relevant for any significant event, but from my experience, mostly in festivals which are religious in nature.

Back home

Create a diverse set of images. While sorting and editing your work, try to make your set of images as diverse as possible. Showcase the event from different points of view; high vantage points, portraits, day and night, food, local arts and crafts, etc.

festivals

Approach organizers and pitch your work. Sending your work to the event organizers can be a great way to get published, and it may get you a ticket for the non-public areas at next year’s festival. In a case of a traditional festival, you can always send your images to the local embassy and offer them to use your work.

Here is my list of some of the best festivals for photographers. You may want to add some of these to your list.

Well known festivals

Kumbh Mela festival India

The Indian Kumbh Mela festival is the largest religious gathering in the world, with millions of people coming to bath in the holy Ganges River.

  • When: Every 12 years, with the next one on 2022.
  • Where: Haridwar, Allahabad , Nashik-Trimbak and Ujjain in India.

Kombh Mela festival India

Dia de Muertos Mexico

The Dia de Muertos, or the Day of the Dead, is a unique and photogenic festival which takes place in Mexico. On that day, locals believe that their dead will return to earth and are preparing for the event. After preparing food and offering, the locals will visit the cemetery, decorating the graves with candles and flowers, making it both spooky and very photo worthy.

  • When: The beginning of November.
  • Where: Throughout Mexico.

Songkran festival Thailand

In this festival, which is the Thai New year, you will need to find a solution to cover your camera, because you are going to get wet. Very wet! In the Thai culture (and in many other cultures as well) water are considered as a purifying source and this festival is the largest water fight in the world. Along with great food, music, and dancing in the streets, it is the Thai culture as its best.

  • When: 13-15th of April
  • Where: Throughout Thailand.

8.jpg

Hanami – Japan

If you thought that Japanese people could be a little crazy sometimes, wait until you meet them at cherry blossom time. Local picnics, karaoke singing, and amazing natural sight of the white cherry flowers, making it a local event to experience.

  • When: Depending on temperature and location on the island, but aiming for late March will be the best.
  • Where: Throughout Japan

Kombh Mela festival India

Less well-known festivals

Damadihana – Madagascar

Turning of the bones. A Malagasy tradition in which local families, take out the remains of their ancestors from the family graves and wrap them in new cloth. Dancing with the remains to the sound of local music is part of this morbid festival.

  • When: Throughout the second half of the year.
  • Where: Highlands of Madagascar.

Argungu Fishing Festival – Nigeria

This festival take place every year in the Northern part of Nigeria. The main event is a competition where thousands of men and women jump into the river with limited time to catch the largest fish, using only traditional tools or their hands.

  • When: February or March.
  • Where: Northern Nigeria.

Kombh Mela festival India

German Christmas market

Maybe not as exotic as the other events on this list, but the Christmas markets in Germany are an experience not to be missed. Local art stalls, outstanding food, music, and everything from the unique design of the stalls to the lights illuminating the streets, is so visually interesting!

  • When: November and December.
  • Where: Throughout Germany.

Conclusion

Do you have any other festival or event photography tips to share? Or maybe you know of some other great festivals to add to this list. Please share in the comments below.

googletag.cmd.push(function() {
tablet_slots.push( googletag.defineSlot( “/1005424/_dPSv4_tab-all-article-bottom_(300×250)”, [300, 250], “pb-ad-78623” ).addService( googletag.pubads() ) ); } );

googletag.cmd.push(function() {
mobile_slots.push( googletag.defineSlot( “/1005424/_dPSv4_mob-all-article-bottom_(300×250)”, [300, 250], “pb-ad-78158” ).addService( googletag.pubads() ) ); } );

The post Shooting Festivals and Events – Tips for Travel Photographers by Oded Wagenstein appeared first on Digital Photography School.


Digital Photography School

 
Comments Off on Shooting Festivals and Events – Tips for Travel Photographers

Posted in Photography


Why Shooting with the Joyful Abandon Approach Can Improve Your Photography

12 Sep

A few months ago I was at a keynote speech given by a famous photographer and workshop leader (you’d know him). He had a lot of great advice to give, but one thing that he said still bugs me. He told us a story about one of his students who, at the end of a wildlife workshop, exclaimed that he’d captured over 8,000 images. In his keynote speech, this famous photographer laughed at his student for shooting so much, since he himself had only shot 800 images.

W5A4762Joyful Abandon B

Shooting with a goal

I never like it when a workshop leader pokes fun at his students but, as he explained further, his reason for telling us the story was a pretty good one. As a workshop leader he would always set a daily goal. He would decide ahead of time what he wanted to capture and then he’d focus on making those images. He coached his students to work that way too.

I love the idea of setting a goal and having a vision. Setting goals is part of how we improve our photography. Every fall the squirrels descend upon my backyard tree and gorge themselves on nuts. During this time of year, I stealthily make images of the little rascals. I don’t shoot aimlessly when I work on this project. My on-going goal is to capture soft golden light, creamy blurred backgrounds, sharply focused eyes and engaging expressions. Squirrels move fast and I’m neither as speedy nor as stealthy as I’d like to be. I shoot a lot of frames when I work on this project.

W5A2808Joyful Abandon A

1F8B8628Joyful Abandon B1

But…

You knew there was a but, right? The singular vision of this workshop photographer might not work for all of his students. As great a teacher as he is, the first morning you head out together, you probably won’t have enough information to have an instant vision of the work you want to make during the workshop. You might even struggle as you climb the steep learning curve of wildlife photography – and you may shoot a lot as you learn.

Plus, shooting with a goal doesn’t equate to less shutter clicks, it equates to more focus. You might need even more shutter clicks than you usually do, depending on the goal you’ve set yourself.

MG 9090Joyful Abandon C

This big cat, photographed at Lincoln Park Zoo in Chicago, is one of the few images I’ve made there that I’ve been pleased with. Most of my images from the zoo don’t fulfill my vision. This one does because the she-lion is engaging with another lion (out of the frame). Her eyes are sharply focused and the background is not only blurred, but it frames her beautifully, and emphasizes her coloring.

I easily shot several hundred images of this lion one afternoon, to get this single image. Shooting my backyard squirrel project helped me define a vision of how I wanted this image to look, but it still took me a lot of frames to reach my goal.

Developing authentic vision

The way the keynote speaker made fun of his student for “over-shooting” bothers me because shooting wildlife images from inside a jeep or blind, elbow to elbow with four other workshop photographers, while steadying a super zoom lens, isn’t exactly easy stuff. Once you start to learn the technical aspects of this type of shooting, your authentic vision might kick in as early as Day 2 or 3 of your workshop. If it takes you all week to get comfortable with wildlife shooting techniques, your vision might not kick in until well after you get home.

Personally, that delayed vision is why I encourage photographers to shoot with what I call the joyful abandon approach. I especially recommend the joyful abandon approach when you’re visiting somewhere you’ve never been, or learning to shoot in a new way. Imagine that you do finally fully develop your vision well after you’ve finished your wildlife workshop. Won’t you want a huge pool of images to ensure that you have the raw materials to realize your vision?

IMG 065320131104Joyful Abandon D

I’ve traveled to Florida dozens of times but up until a few years ago, I’d never visited the Everglades, or ridden in an airboat. Even with an amazing guide explaining the ecosystem and gliding the boat slowly up to known alligator dens, it was a technically difficult shoot. With the movement of the boat and the reeds, my camera struggled to grab focus where I aimed.

The result? I shot. And shot. And shot some more. I’m grateful for all that shooting, since this is the one image I walked away with (above). It has that blurred golden background I love and – key for me when I shoot wildlife – that engaged expression, and tack-sharp focus on the eye.

Build your portfolio

You may never again have a chance to return to that wildlife workshop location, but your workshop leader does. He has the luxury of going annually with his students. He can take years to develop vision, shoot with measured patience, and build a portfolio of the 25 best wildlife images anyone has ever seen.

You, on the other hand, should shamelessly fill memory cards so that when you arrive home, you have access to a massive database of images that might yield 200 shareable gems. It will take work to cull those images and get to those gems, but it’s worth it, isn’t it?

Since your workshop leader has been on this type of shoot over and over, all that familiarity gives him increased comfort, and that increased comfort opens the portal for him to be more focused, and more creative, while shooting fewer frames. Plus, he already owns all of those classic wildlife images that you’ll still want to bring home. He has the luxury of pressing that shutter button once every 15 or 30 minutes. You don’t. You have work to do and a portfolio to build.

W5A4327Joyful Abandon E

W5A4341Joyful Abandon E1

A wild horse rolling in dust is a classic, portfolio-building wildlife image. Over the years, I’ve easily shot a thousand frames of rolling horses, but for me, this is “the one.” The experience I’ve gained from shooting with joyful abandon taught me just where to stand and how to compose my image. To maximize the dust and light beams, while capturing all four legs in the air, a well-defined face, and a highlighted mane.

I continued to shoot as this horse lumbered back up to his feet and was rewarded with a glorious, dusty shake too.

Keep shooting with joyful abandon

While I’m using a wildlife workshop as an example, since that was this keynote speaker’s specific remark, this idea of shooting with joyful abandon really applies to any opportunity to shoot, anywhere, even if you’re not on a workshop.

Whenever I travel to a new-to-me wild horse range, I carry massive amounts of memory cards and storage, and I shoot with absolute gleeful, joyful abandon. When I have a chance to return to that same wild horse range, I still have stacks of memory cards and storage, plus a more informed, authentic vision of the images I’d like to capture. I continue to shoot with joyful abandon and I promise you, over the course of a week, I’ll shoot far more than 800 frames.

W5A4799Joyful Abandon F

1F8B2291Joyful Abandon F1

Making images isn’t just about how many frames we shoot, or how many keepers we get, it’s also about the process. Every single frame you shoot is part of your process, and that process helps you develop your unique vision. Whether that vision is focusing on the big picture or honing in on small details, or documenting grand moments or capturing subtle tender ones like these foals with their mothers, shooting with joyful abandon will help you achieve it.

The shooting with joyful abandon approach is how I’ve developed my vision – and how I continue to develop it and stay passionate about shooting. How do you develop your vision and fuel your passion for photography?

W5A4782Joyful Abandon G

googletag.cmd.push(function() {
tablet_slots.push( googletag.defineSlot( “/1005424/_dPSv4_tab-all-article-bottom_(300×250)”, [300, 250], “pb-ad-78623” ).addService( googletag.pubads() ) ); } );

googletag.cmd.push(function() {
mobile_slots.push( googletag.defineSlot( “/1005424/_dPSv4_mob-all-article-bottom_(300×250)”, [300, 250], “pb-ad-78158” ).addService( googletag.pubads() ) ); } );

The post Why Shooting with the Joyful Abandon Approach Can Improve Your Photography by Lara Joy Brynildssen appeared first on Digital Photography School.


Digital Photography School

 
Comments Off on Why Shooting with the Joyful Abandon Approach Can Improve Your Photography

Posted in Photography


Field Test: Shooting action with the Nikon D5

06 Sep

Nikon’s D5 is a full-frame professional DSLR designed for shooting fast action in tough environments. To test the D5’s market-leading autofocus system, we took the camera out to Santa Fe, and put one in the hands of professional photographer Michael Clark.

In this field test, DPReview’s technical editor Rishi Sanyal joined Michael to shoot a range of activities, including dirt bikes and white-water kayaking. Watch the video to see how the D5 performed. 


This is sponsored content, created with the support of Nikon. What does this mean?

Articles: Digital Photography Review (dpreview.com)

 
Comments Off on Field Test: Shooting action with the Nikon D5

Posted in Uncategorized


6 tips for shooting fall color

04 Sep

6 tips for shooting fall color

The leaves are already starting to turn and the pumpkin beer is already flowing up here in the Pacific Northwest. Fall is just around the corner and photographing fall color is one of our favorite things to do when that autumn chill starts to take hold. Here are some fun and helpful tips to make shooting fall color that much more enjoyable!

Check the fall color reports

One of the first things that I always do prior to planning a trip to photograph fall color is to check the trip reports and the fall color or fall foliage reports.

  • The Weather Channel is a great place to get a broad feel for how the fall color season is shaping up. They have a variety of useful maps and tools to give users a good sense of when their region will have peak color.
  • The Smoky Mountain parks guide also has a unique predictive map that offers a bit of insight into how the current years foliage is developing and what it looks like two months out.
  • I also consult local hiking forums and other photographers through social media to get a good sense of how things are coming along. 

Visit your local Japanese Garden

One trip that I seem to make on an annual basis is to one of our local Japanese Gardens up here in Seattle. Here are a few tips for catching and shooting the gardens in their prime.

  • Call ahead to get a fall color report and to see if tripods are allowed. A number of the gardens in Seattle (and other cities) don’t allow tripods inside of their gates. 
  • Look for the Japanese Maples! Shooting up ‘inside’ of these gorgeous trees can give them a whole new perspective and can offer up some amazing possibilities in terms of composition.
  • Include the architecture- don’t be afraid to photograph the bridges, pagodas and other structures in the garden- let the fall color become a gorgeous backdrop to the architecture.
  • Go early or late- these gardens tend to get very crowded, so go around sunset or sunrise (depending upon the garden’s hours) to avoid the people and other photographers.
  • Look for abstract and macro possibilities in the garden- colors, patterns and structures can offer a seemingly endless amount of compositional choices.
  • Bring a wide selection of lenses and your circular polarizer- a CPL can really increase the vibrancy of the foliage and having a good selection of focal lengths can help you to expand your creativity.

Use fall color to add layers

Fall color can also add layers to a already interesting composition. Finding a way to incorporate fall color into a forest scene or a mountainous landscape can really add depth, character and interesting colors to your image.

  • Use a telephoto lens to minimize the scene and add depth through layers.
  • Look for patterns and textures – a mixture of fall foliage and evergreen trees can offer a nice variety of colors and textures to the scene.
  • Shoot panoramic images – scenes with fall foliage and layers tend to lend themselves very well to a panoramic treatment.
  • Utilize light at different times during the day to emphasize the fall color – the colors in the scene will change drastically throughout the day depending upon the direction and amount of light present in scene, so experiment and take lots of images throughout the day.

Shoot falling leaves

Fall foliage doesn’t last forever, but even the falling leaves can add interest and color to your images.

  • One of my favorite things to shoot just after the fall color has peaked are the leaf-covered driveways, streams and trails that seem to be everywhere after the leaves have begun to fall.
  • The fallen leaves can not only add texture and color to your images, but they can also convey motion and help to form leading lines in your composition.
  • If the colors have already peaked in your area, fear not! There are still a number of great shooting opportunities at your fingertips.    

Go abstract

Fall foliage offers a unique opportunity to try techniques such as motion blur while your out in the field:

  • Mount your camera on a tripod and adjust your settings to enable your camera to shoot for around 0.5″ to 2″ seconds with proper exposure.
  • You may need to use an ND filter to achieve the longer exposure depending upon the lighting conditions.
  • Press the shutter and while the camera is taking the longer exposure pan the camera vertically to achieve a vertical motion blur in your photo.
  • Experiment with different shutter speeds and varying amounts of movement to achieve your desired result.
  • Blend your motion blur shot with a tack sharp shot in your favorite photo editing program to give your abstract a nice sense of depth and a varying amount of texture.
  • If you’re shooting in windy conditions try taking a longer exposure to blur the leaves while leaving the tree trunks tack sharp.

Shoot in all types of weather

One of my biggest pet peeves in photography is the idea that you absolutely have to shoot in specific lighting and weather conditions and at specific times of day. Sure, sunrise and sunset are ideal but I honestly love shooting in anything from blue bird to adverse and frankly bad weather conditions at any time of day. 

  • Don’t get discouraged by the forecasts- fall color offers up some unique opportunities to photograph brilliant colors in snow, rain, sleet and wind. I often find those types of images even more appealing because they tell a story and are very unique.
  • Before you head out to shoot always check your local weather forecasts- fall is a time of year that tends to catch many people off guard, especially while venturing into the mountains, so it’s best to look ahead and plan accordingly.
  • Be prepared for anything – fall is one of the those seasons that can throw rain, sun and snow at you all on the same day.

Articles: Digital Photography Review (dpreview.com)

 
Comments Off on 6 tips for shooting fall color

Posted in Uncategorized


Tips for Shooting the Milky Way

23 Aug

Seeing the Milky Way with your own eyes is what you may call a jaw dropping experience, but one that can be truly achieved only in complete darkness. While stars are visible even in light polluted areas, the Milky Way’s beauty, which is actually caused by concentrations of stars, gas and dust, fades away in the light polluted areas and cannot be seen.

2 frames portrait

Before going in to practice, you need to understand few things about the appearance of the Milky Way:

  • The part that you want to shoot is the center of the galaxy, and it is not visible all year long. In the northern hemisphere the Milky Way is best observed between April and September. During April and May it is almost parallel to the horizon (the best time for Milky Way panoramas) while in June to September it gets more vertical.
  • Unlike star trail photography, when shooting the Milky Way your goal is to achieve a sharp image, where the stars are seen as points and do not smudge.
  • At the beginning of the Milky Way season, it rises above the horizon late at night – and as the months pass, it rises earlier and earlier.
  • Getting a good photograph requires quite a lot of editing, in order to emphasis the Mily Way’s colors and shapes.

Planning ahead

Before going out to shoot the Milky Way, there is some planning that needs to be done.

  • Choose your location carefully (there is no place for spontaneity). There are several things to consider, but most importantly you need a dark location, as far as possible from light polluted areas. Consider that city halos are visible at night for a very long distance, so get as far as possible from light sources. The darker the area you’re in, the clearer the Milky Way will be seen.
  • Consider an interesting item to be used as your anchor in the photo. It is not enough to shoot the Milky Way, you want to have a nice foreground to make your photo interesting and unique. Find yourself a big tree, an interesting rock formation, a pier on a lake, or any other item to be used as your anchor. Try to make your foreground correspond the the Milky Way’s view.
  • Learn about the weather and lunar (moon) phases – to get a good, clean shot you need a good, clear and dark sky. Choose that period of the month when the moon is not visible in the night sky, and make sure the forecast does not predict too many clouds. High humidity is also not good, as it may accumulate on your lens and result in blurry frames.

2 frame landscape

Prepare your gear

Before you head out make sure you are prepared with:

  • A DSLR camera with a fully charged battery. Unfortunately – not any DSLR (or mirrorless) camera will work for you. You need to be able to go to a minimum of ISO 2,000 and preferably even higher.
  • Plenty of room on your memory card. Shooting in RAW is crucial for post-processing.
  • A wide angle lens. Anything between 10-20 mm will give you good results. You can shoot also with narrower lens but results will be less impressive. A wide aperture is also essential to allow lower ISO.
  • A strong, steady, tripod. When placing it, make sure nothing will cause it to shiver from a passing wind.
  • A remote control can help but it is not mandatory – you can program your camera to shoot in delay mode or self-timer.

3 frames

Getting started

Single frame option:

Although you may want to show as much of the Milky Way as possible, it cannot stand alone. Your photo must rely on a strong anchor, or foreground, if you want your viewers to be really impressed. You also need to consider that it is impossible to have all of the Milky Way in your frame, and shooting a panorama may be a good solution.

In most cases, it will be quite difficult, to the verge of impossible, to build your composition at night, in total darkness. So, it is better to arrive before night falls and it gets too dark to see. The last minutes of the day are your best time to plan and build your composition. But, remember to consider the expected location of the Milky Way in the sky. Use one of the many sky apps available to help you plan.

1 frame

Single frame shot.

Take the first shot which will be used as the foreground of the frame. If you want your foreground to be a silhouette then all is good but, if you want details to be shown, you will need to have at least one frame lit. This can be achieved in a few ways:

  • Shooting one frame during twilight (to be blended in during post-processing later).
  • Using a high ISO and longer exposure.
  • Using an outside light source such as flash (with a flash it is better to use a CTO gel for the right temperature).
    Your goal here is to get one frame that has good appearance of your chosen foreground. It is better to take a few options; using different ISO level, exposure time, lightning options, to be able to choose the best rest afterward. When satisfied, you can move on.

Set your camera to the widest aperture you have on your lens, the highest ISO bearable, manual focus to infinity, and longest possible shutter speed, considering the rotation of earth (see below).

Choosing the correct shutter speed:

  • If your exposure is too long, the rotation of earth will start to have impact, and the stars will start to arch in your frame.
  • Calculate the longest possible shutter speed while keeping the stars clear and sharp using the 500 Rule. This rule considers your focal length to determine when star movement will start to be seen in your image. The calculation is 500 divided to the focal length equals time in seconds. This calculation is for full frame cameras and in crop sensors you need to add the crop factor to the calculation (1.6 for Canon / 1.5 for Nikon). Here are couple of samples:
    • Using a 10mm focal length on a full frame sensor: 500 / 10 = 50. You can use up to 50 seconds as your shutter speed with this lens/camera combination.
    • Using a 10mm focal length on a Canon crop sensor: 500 / (1.6*10) = 31.25. You can use up to 31 seconds as your shutter speed with this combination.
    • Using a 10mm focal length on a Nikon crop sensor – 500 / (1.5*10) = 33.33. You can use up to 33 seconds as your shutter speed with this gear.

Panoramic option:

9 frames

9 frame panoramic shot.

There is no change in the settings for your camera when shooting a panorama.

You may want to consider the appearance of the Milky Way though. If it is relatively horizontal it is a good idea to aim for a wide panorama, showing it from side to side. If it is vertical, you may want to build your panorama upwards.

In a panorama it is recommended that you have a 30% overlap, but when shooting at night it is more difficult to see – so it is even better to have a larger overlap between the frames. Better to be on the safe side, than discover later that you have gaps in your final result.

When shooting a Milky Way panorama you may want to position your camera in portrait orientation (vertical). Although you will need more frames from one side to the other, you will have more sky, and a chance of catching the entire Milky Way. If shooting in landscape position, you may need to shoot two “floors”, in order to catch the entire Milky Way together with the ground.

10 frames

10 frame pano shot.

18 frames

18 frame pano shot.

Post-processing your Mikly Way photos

Milky Way frames require a lot of post-processing work, which deserves its own article. There are also many ways to approach post-processing of the Milky Way, and it depends on the software you are using and your personal taste.

I’m working with Lightroom and Photoshop. Starting with Lightroom, I use the Dehaze and clarity sliders, tone adjustments, saturation and noise reduction. After reaching the best possible outcome, I move to Photoshop for some additional adjustments by playing with curve layers.

1 frame original

Before post-processing.

1 frame edited

Final processed image.

Your turn

Have you tried to capture the Milky Way before? Please share your experiences, questions, and your images in the comments below.

googletag.cmd.push(function() {
tablet_slots.push( googletag.defineSlot( “/1005424/_dPSv4_tab-all-article-bottom_(300×250)”, [300, 250], “pb-ad-78623” ).addService( googletag.pubads() ) ); } );

googletag.cmd.push(function() {
mobile_slots.push( googletag.defineSlot( “/1005424/_dPSv4_mob-all-article-bottom_(300×250)”, [300, 250], “pb-ad-78158” ).addService( googletag.pubads() ) ); } );

The post Tips for Shooting the Milky Way by Amir Ehrlich appeared first on Digital Photography School.


Digital Photography School

 
Comments Off on Tips for Shooting the Milky Way

Posted in Photography


8 creative tips for shooting waterfalls

30 Jul

8 Tips For Shooting Waterfalls

Photographing waterfalls can be a tricky endeavor – especially when shooting in conditions where the light can change drastically depending upon the weather conditions. If you’ve ever struggled to get the waterfall shot you envisioned, you’ve come to the right place. This article will cover everything from basic tips to more advanced techniques to make shooting waterfalls a breeze.

Choose the Right Gear for the Job

The most important piece of gear that you will need beyond a camera and lens is a sturdy tripod. This is an absolute must when shooting longer exposures. Here’s a list of a few more important pieces of gear that will come in handy in the field:

  • Tripod: Any time you’re shooting long exposures a tripod is a must
  • Selection of lenses: I generally try to cover a focal range of 16mm to 300mm to give myself a number of options in the field
  • ND filter: I typically don’t use ND filters as I generally shoot fairly short exposures, but they can come in handy depending upon the lighting conditions and the type of water texture you hope to achieve
  • CPL: I always use a circular polarizer when shooting waterfalls as it can really help give the vegetation more ‘pop’ – the above image is an example of where a CPL can make big difference in terms of how the foliage appears in your photo and it can also help enhance the appearance of wet rocks and reflections in the water
  • Remote Shutter Release: This isn’t a necessity but it certainly can make shooting waterfalls a bit easier
  • Rocket Air Blaster and Lens Cleaning Cloths: Let’s face it; you’re going to get wet. Using these two products, plus a waterproof housing (or zip lock baggies) can help to keep your lens and camera dry while shooting
  • Bag of Rice: You never know when disaster may strike, so I always bring a large bag or canister of rice with me in the event that my camera decides to take a dip  

Shoot in Diffused Light

If you’ve ever tried to shoot a waterfall in direct sunlight then you’ll know how difficult it can be. Shooting with an ND filter can help to resolve some of these issues but shooting in diffused light is the best solution to the problem. When planning a waterfall shooting trip I always take a look at the weather forecast and check sunrise/sunset times before heading out to a location.

In general, I’ve found that shooting during the hours just after sunrise offers the best results as morning light can provide some impressive shooting conditions. The image you see here was shot about 3 hours after sunrise at Metlako Falls in the Columbia River Gorge, OR.

Choose the Shutter Speed

It seems like it was only a few years ago that using extremely slow shutter speeds while shooting waterfalls was all the rage, but lately I find myself using shorter shutter speeds to really capture the texture in the water. The rate at which the water is falling dictates how quick or slow of a shutter speed you will need to use when shooting in lower light conditions. To give you an idea, the above image (Panther Creek Falls, WA) was shot at a shutter speed of 1/4 second to freeze the water and capture some of the texture as it cascaded down the rock face.

Choosing a longer shutter speed will soften up the water a great deal and in some cases that’s just what the scene calls for. It really all comes down to personal taste. Experiment with the shutter speed while you’re out in the field – the more options you have the better!

Save the Foliage

If you’ve ever shot a waterfall on a breezy day you know that it’s nearly impossible to utilize slower shutter speeds while simultaneously ‘freezing’ the foliage in the frame. You almost always see motion blur in the vegetation surrounding the waterfall.

To solve this problem I always take at least two exposures: one for the waterfall at your favorite shutter speed to obtain the right amount of water texture, and an additional exposure taken at a much faster shutter speed to freeze the foliage in place. In the above example I blended two exposures together to get sharp foliage along with the amount of water movement I was trying to achieve with the longer exposure.

Choose Your Composition Carefully

Choosing a strong composition can be challenging when shooting waterfalls. Here are a few of the key guidelines that I follow when shooting images like the one you see above:

  • Find a leading line or an ‘S’ to work with in your composition
  • Let the water flow guide you to the focal point
  • Shoot downstream of the waterfall to add depth
  • Utilize rocks and other elements in the scene to guide your eye to the focal point
  • Don’t be afraid to try out several variations – I always shoot at least 3 or 4 compositions at any given location

Think Outside of the Box

One of my favorite things to do while shooting waterfalls is to think outside of the box in regards to composition. Taking an abstract approach to shooting a waterfall can lead to some really fun results. Use different focal lengths and experiment with tighter compositions that may only show a small portion of the waterfall.

I always try to shoot at least a handful of abstract shots while I’m in the field because let’s face it: it’s just plain fun to get the creative juices flowing!

Adjust Your Exposure

Getting the exposure right can be a tricky business when shooting waterfalls. When using longer shutter speeds it’s very important to constantly meter your exposure to make sure that you aren’t losing detail in the water by clipping your highlights. Check the histogram to make sure that you are staying to the left or dead center in your exposure. As the light changes you will have to do this quite often so definitely keep an eye on it!

Provide a Sense of Scale

Waterfalls come in all shapes and sizes, but it’s often difficult to provide a sense of scale while shooting them. Adding a human element to your photo can really bring a whole new sense of wonder and scale to your image. Special thanks to Max Foster for snapping this photo of me at Spirit Falls, WA.  

Save

Articles: Digital Photography Review (dpreview.com)

 
Comments Off on 8 creative tips for shooting waterfalls

Posted in Uncategorized


Video explains Kubrick’s use of innovative camera tech when shooting Barry Lyndon

30 Jul

Legendary director Stanley Kubrick was known to be obsessed with cameras and pushing the limits of cinematic technology, with much of his technical awareness stemming from his days as a stills photographer. A new video essay by the British Film Institute now explains his use of different lenses to create the movie Barry Lyndon, which won an Oscar for its cinematography.

We’ve written before about the famous Carl Zeiss Planar 50mm F0.7 lens (originally developed for NASA) that he used, but the BFI essay also discusses how he used it. It also looks at his use of zoom shots and the meanings he hoped to convey with them.

Many scenes in the movie were shot in natural light and very dim candlelight to authentically portray the look and feel of the 18th century. In the very low light conditions Kubrick had to shoot with the superfast F0.7 lens’ aperture fully open, resulting in an extremely shallow depth-of-field. This required re-thinking the way such scenes were staged and demanded reduced actor movement, to avoid mis-focus, but the director felt this helped convey the stilted 18th century atmosphere.

The video essay can be viewed on the British Film Institute’s Facebook page.

Articles: Digital Photography Review (dpreview.com)

 
Comments Off on Video explains Kubrick’s use of innovative camera tech when shooting Barry Lyndon

Posted in Uncategorized