RSS
 

Posts Tagged ‘Shoot’

Feature Shoot announces Emerging Photography Award winners

04 May

$ (document).ready(function() { SampleGalleryV2({“containerId”:”embeddedSampleGallery_1073019103″,”galleryId”:”1073019103″,”isEmbeddedWidget”:true,”standalone”:false,”selectedImageIndex”:0,”startInCommentsView”:false,”isMobile”:false}) });

Feature Shoot has announced five winners in its 2016 Emerging Photographer Awards. Now in its second year, the awards hope to help jumpstart the careers of budding photographers, and entries are accepted from around the world. The five winners’ photos will be exhibited at United Photo Industries in Brooklyn next month. Each winning photographer also receives $ 500 cash, a Lomo’Instant Montenegro Camera and a Cecilia camera strap.

Take a look at some of the winning images above, and learn more about the competition at emergingphotographyawards.com.


Press release:

Developed: Five Emerging Photographers
Opening: June 2, 2016? 6:00-9:00 PM
United Photo Industries
16 Main St, #B, DUMBO, Brooklyn, New York

Spanning the globe and various genres within the medium, Developed: Five Emerging Photographers highlights some of the most surprising and excellent work produced by rising stars within the photographic world.

New York – April 28, 2016 Feature Shoot is proud to present the Second Annual Feature Shoot Emerging Photography Awards exhibition, showcasing the work of five diverse and exceptional fine art, documentary, and portrait photographers from around the world.

The Feature Shoot Emerging Photography Awards are given annually to a set of photographers whose voices are unique. The prize and subsequent exhibition, featuring five artworks from each winning artist, are geared not only towards jumpstarting the careers of promising new photographers but also towards contributing to fresh and forwardthinking discourse within the international photographic community.

This year, our jury of leading industry experts – Jessie Wender, Senior Photo Editor at National Geographic Magazine? Sarah Sudhoff, photographer and Director/Owner at Capsule Gallery? Kevin Wy Lee, photographer and Founder of Invisible Photographer Asia (IPA)? Liz Lapp, curator and Content Manager at Yahoo – selected five photographers from an estimated 1,000 submissions. The exhibiting photographers will be Marlena Waldthausen, Camille Michel, Mariya Kozhanova, Lissa Rivera, and Kimberly Witham.

Marlena Waldthausen was chosen for her intimate series Brothers, chronicling the lives and close relationship between two deaf twins, one of whom is also entirely blind, living in Germany. 

Camille Michel‘s series The Last Men tells the ancient tale of the Inuit fishermen of Uummannaq, Greenland, who are gradually losing their ties to the land in an increasingly globalized community. 

Mariya Kozhanova focuses her lens on Russian youth, who in a precarious political climate, have clung to and become a part of the Japanese subculture of anime cosplay.

Lissa Rivera was selected for Beautiful Boy, a series confronting gender roles and aesthetics, made in collaboration with her romantic partner after he told her about his habit of donning women’s clothes in college.

Kimberly Witham’s winning project On Ripeness and Rot takes inspiration from Dutch Golden Age paintings, incorporating fresh fruit and roadkill to create beautiful and disarming still lifes that speak to mortality, loss, and rebirth.

Articles: Digital Photography Review (dpreview.com)

 
Comments Off on Feature Shoot announces Emerging Photography Award winners

Posted in Uncategorized


How to Shoot a Pine Cone Time-lapse: A Mini Tutorial

03 Mar

This week over at our sister site, SnapnDeals, we have a great deal running where you can get 20% off Time-Lapse Photography: A technical and practical time-lapse tutorial guidebook for all skill levels designed to get you out the door and shooting now!

How to Shoot a Pine Cone Time-lapse
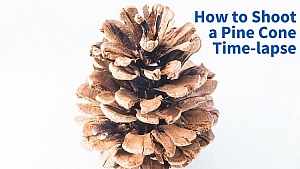
In this lighthearted mini-tutorial we’ll take an 80/20 approach to creating a simple time-lapse of a common pinecone (in this case a Black Pine).

For a more general introduction to time-lapse photography view: Time-lapse Photography Tutorial: An Overview of Shooting, Processing and Rendering Time-lapse Movies.

You already know that pine cones are nature’s mysterious seed pyramids, but did you know they have a gender? Yes, there are both female and male pine cones. Did you also know that pine cones are an interesting time-lapse subject? Go get a female pine cone, and give it a shot. Let this whole male/female Nature Notes youtube revelation be your last straw, or should I say pine needle that breaks your procrastination. Here was my result:

Here’s how to make your own pine cone time-lapse:

Step 1. Find pine cones

Collect some good looking pine cones (preferably female: watch the Nature Notes video above). Look for good cones in fresh condition, without rot or discoloration, uniform shape, and bottoms that provide support for upright standing. I’d grab two or three for variety, and a dog chew backup. Here’s an example of an open found pine cone.

Pinecone bts1

Step 2. Make them close

Pine cone motion is all about moisture, it’s a hydromorphic response. In high moisture environments pine cones close. In low moisture, over time, they open. This video showing both opened, and closed cones, with visible moisture is a perfect learning example.

To close a cone, simply put it in a cup of water and leave it for an hour or two. That’s it.

Step 3. Prepare for the opening shot

Key thoughts: Steady (consistent) lighting, simple background, camera position, power. Let’s take these one by one.

Steady light: Light fluctuations in a sequence of time-lapse images are bad, as they create unappealing bright and dark frames in the rendered movie, better known as time-lapse flicker (learn much more about that here). Chose a room that you can cordon off for a day or so to prevent disturbances, and block all light from any windows. Move any light sources near the photo white box, to provide a constant uniform brightness, then adjust their positions to eliminate shadows.

Background: Completely up to you creatively. I chose a minimal white background, using a simple inexpensive white box. By slightly overexposing each shot, you can effectively eliminate almost all appearances of a background.

Camera position: Choose one or more angles from which to shoot. I chose first, a front downward angle, and a second fully vertical angle from above.

Power: A pine cone bloom from closed to opened may last anywhere from 8-24 hours, so you’ll need an AC adapter for your camera to make sure it keeps going.

Step 4: Craft the time-lapse and begin

We talked a little bit about avoiding stray light sources in the room where you are shooting, as these changes introduce time-lapse flicker into the image sequence. Having your camera in any automatic mode may also introduce flicker. To get the best possible consistent exposure over many frames, shoot in manual mode, set a manual white balance, manual ISO, and manual focus. In the example video above I used a Sony A7s and FE 90mm f/2.8-22 Macro G OSS lens.

Pine cone bts2

Exposure: Six seconds at ISO 200, f/22, produced a great image, and just started to wash out the brighter white background. You can push the whites a little further in post-production, and really create a clean image background.

Time-lapse interval: To be honest I didn’t know how long I would be shooting, or when the action would begin. Times will vary, as no two cones and no two climates, or indoor humidity levels are exactly alike. The side angle pine cone shot took from about 9:00 a.m., to 3:00 a.m. the following morning, approximately 18 hours. I chose a 30 second interval, and set the shot count to infinity, so it would continually shoot until it was manually turned off. When unsure of how quickly to shoot, or how many frames to capture, it’s always good to capture more, rather than less. You can always speed up a time-lapse with too many frames, but if you don’t get enough shots and miss important movement, you are usually stuck.

Capture

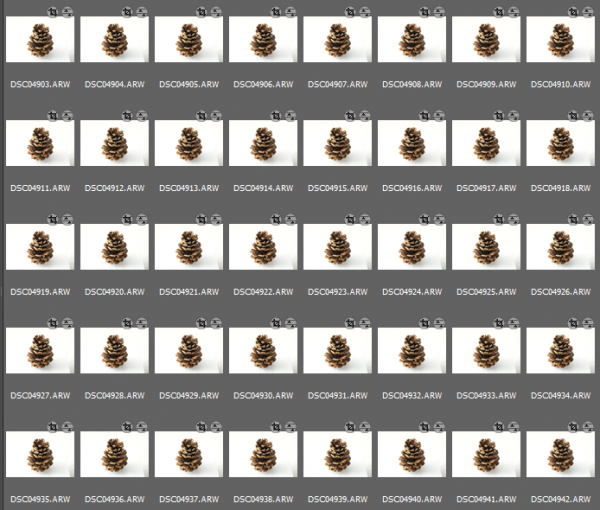
These 30 second exposures, over 18 hours, resulted in about 3,246 images. That’s a lot of frames. Pine cones are slow. Much slower than I anticipated, and my interval was pretty fast capturing more frames than necessary for smooth movement. For your experiment I’d recommend increasing your interval time to about 50 seconds, or one minute. Having a longer interval time will result in less photos, and with the slow moving nature of the bloom it will not result in a jumpy or less smooth cone opening video.

Step 5: Adjust the exposures and render the time-lapse

The beauty of Lightroom, or Adobe Bridge and other applications, is that you can adjust the exposure on a single reference photo, then apply those changes across all your photos. Simple – and so is rendering the basic time-lapse. There are several different applications to choose from, to turn your collection of images into a video – varying from free and inexpensive, to not so inexpensive. Fear not, you can learn much more about time-lapse rendering in previously mentioned article, but the diagram below provides an overview of time-lapse software and applications.

Timelapse Photography by Ryan Chylinski Book Preview6

Patience is your most valuable commodity for this project. From pine cones to The Milky Way, I hope this mini peak into the world of creative time-lapse photography has ignited your curiosity to learn more. Time-lapse has a way of slowing the world for the photographer, while at the same time accelerating it for everyone else. I shoot time-lapse because it alters the way I think, it challenges my view of the world, and teaches me things I can bring back and share with everybody else. It’s a real honor and privilege to partner with you on this training journey. I hope is helpful and I would love to hear from you in the comments below.

This week over at our sister site, SnapnDeals, we have a great deal running where you can get 20% off Time-Lapse Photography: A technical and practical time-lapse tutorial guidebook for all skill levels designed to get you out the door and shooting now!

googletag.cmd.push(function() {
tablet_slots.push( googletag.defineSlot( “/1005424/_dPSv4_tab-all-article-bottom_(300×250)”, [300, 250], “pb-ad-78623” ).addService( googletag.pubads() ) ); } );

googletag.cmd.push(function() {
mobile_slots.push( googletag.defineSlot( “/1005424/_dPSv4_mob-all-article-bottom_(300×250)”, [300, 250], “pb-ad-78158” ).addService( googletag.pubads() ) ); } );

The post How to Shoot a Pine Cone Time-lapse: A Mini Tutorial by Ryan Chylinski appeared first on Digital Photography School.


Digital Photography School

 
Comments Off on How to Shoot a Pine Cone Time-lapse: A Mini Tutorial

Posted in Photography


Find Love Through Your Lens: 3 Ideas for a Valentine Photo Shoot

09 Feb

Editor’s note: Valentine’s Day is a good opportunity for aspiring portrait photographers to practice love story and romantic / family photo shoots. Below you can find three practical tips and ideas for a Valentine photo shoot from our regular writer, a portrait photographer, Barbara Stitzer. *** Ahhh, Love. It can be giddy, maddening, complacent, jealous, warm and gooey, and downright Continue Reading

The post Find Love Through Your Lens: 3 Ideas for a Valentine Photo Shoot appeared first on Photodoto.


Photodoto

 
Comments Off on Find Love Through Your Lens: 3 Ideas for a Valentine Photo Shoot

Posted in Photography


Improve Your Photography by Having Go-To Places to Shoot

22 Dec

There is a spot about 25 minutes west of the city. It is a spot right along the highway with a big sign that says, “Scenic Viewpoint”. Naturally it draws a lot of photographers. A quick look on Google will show a lot of sunsets shots, most with the guard rail along the bottom.

tree-on-cliff-2

Having 45 minutes before sunset, with a 20 minute drive, plus 10 minute walk, leaves no time to find and compose a shot. Being able to walk into the spot, set up and shoot makes some shots possible.

I know, I am one of them, making the scramble to get set up. Of course, it’s natural not to know the cool little spots when you are just passing through the area. However, after living in a place for some time, you start to learn of some go-to spots. You know, those places you can confidently walk into as the light is building, set up, and be there when the shot happens? If you don’t have a list of go-to spots you may want to consider making one, it can help you improve your photography.

Over the past couple of years that I’ve been shooting, I have developed a lengthy list of very specific spots (down to where the tripod stands) that all have their ideal season, weather, and time of day combination.

Peterson

After an hour of walking this area, I found the spot that aligns the features of this shot. This way if it looks like a certain shot might have good light, I can save myself a ton of hassle and just get to where I need to be quickly.

This is particularly important when shooting at night, the Milky Way, northern lights, etc. Night photography requires a lot of planning. To make an interesting shot, having good foreground and mid-ground objects is key, and just cannot be done blindly in the dark. Thus a lot of mediocre shots are required while scouting a new area. Learning the angles to line up items in your shot with features in the sky.

River aurora

This photo was taken on the third trip in to this spot. I knew everything would work, so when the auroras started up I was ready.

The whole process takes some time, but as you revisit locations you will become so confident about it being right, that you can walk up to that certain rock and set up. There’s no second guessing, and wasting time repositioning for a better composition.

Building your list of go-to spots

Most places I shoot, I return to many times. The first trip in is often just to gather info, and shoot some images to use for planning purposes. Here are a few tools that I use:

1. Facebook:

Yes Facebook can be useful, I am part of several Facebook photography groups and specifically one for my local area. Going out to photograph with other people, is a great way to learn an area. Just be careful not to poach another photographers exact go-to spot. I also find groups for other places that I plan to visit.

Ryanfisher2

Being invited along to an area with another photographers is a privilege. Be sure not to steal their go-to spot.

2. Google Maps and Images:

I use Google all the time to find new areas, specifically Maps, for looking into an area to see the lay of the land. The terrain is critical as to how the natural light will play into the shot. If a waterfall only shoots facing north, but you want the sunset behind it, then that will quickly rule out this spot for that shoot. However, it might make a fantastic spot to photograph the auroras.

3. The Photographer’s Ephemeris:

I use the Photographer’s Ephemeris to place celestial events. I won’t go into the ins and outs of the Ephemeris, but it will allow planning of moonrise, sunset, sunrise, etc., type of shots. It shows the azimuth, and time when certain events occur for any day of the year. Very handy if you plan to photograph the moonrise in a notch along a ridge, or something.

Ephemeris

If you are interested in getting a shot of the sun rising at the end of the lake you will have to wait.

4. Boots on the ground:

Research can only take you so far before you have to get your feet dirty. Making day hikes into a new area is by far the best way to explore a specific spot. Just make sure to get off the beaten path, if possible, to see what others might miss. This is also the time to get some shots which I call taking notes. The images can even be iPhone shots, because their purpose is to gather info. I always look at my images and quickly see better positions to shoot from, or a feature that went unnoticed.

Timing is everything when lining up celestial objects. Knowing your go to spot can help you get the most out of your shots. I wasn't by chance that the Milky Way lines up with that point of rock.

Timing is everything when lining up celestial objects. Knowing your go to spot can help you get the most out of your shots. I wasn’t by chance that the Milky Way lines up with that point of rock.

You get the idea. I guess there is a fifth note, and that is to just keep going into places and taking shots. I always see better positions to shoot from while going through my images. Having a lot of go-to spots is the result of simply going to a lot of places. Remembering how each spot shoots, and knowing when the conditions will work best.

Although I am a landscape and nature photographer, who focuses on night sky photography, I also know the value of go-to spots for portrait and wedding photographers as well. Knowing when and where to shoot can make or break your shots. Being able to reduce harsh shadows and wrong angles to make more of your shots usable.

Do you have any go-to spots near where you live? Share your images and comments with us below.

googletag.cmd.push(function() {
tablet_slots.push( googletag.defineSlot( “/1005424/_dPSv4_tab-all-article-bottom_(300×250)”, [300, 250], “pb-ad-78623” ).addService( googletag.pubads() ) ); } );

googletag.cmd.push(function() {
mobile_slots.push( googletag.defineSlot( “/1005424/_dPSv4_mob-all-article-bottom_(300×250)”, [300, 250], “pb-ad-78158” ).addService( googletag.pubads() ) ); } );

The post Improve Your Photography by Having Go-To Places to Shoot by Dave Markel appeared first on Digital Photography School.


Digital Photography School

 
Comments Off on Improve Your Photography by Having Go-To Places to Shoot

Posted in Photography


Make-up bracketing and selfie boutiques help shoot Casio to record levels of profit

16 Dec

Casio’s TR series of Exilim compacts has propelled the Japanese company to record profitability this year after the cameras caught a firm grasp of the massive Chinese selfie market. According to a report from Nikkei Asian Review, Casio is on-track to make a $ 403 million profit this year, and a good part of that has come from the sale of its unusually shaped EX-TR compact cameras that the company has designed to appeal to female selfie shooters.

Just after the launch of the first TR – the Exilim TRYX EX-TR100 – in 2011, Casio’s photography business was in such trouble that it pulled distribution in the majority of territories it operated in. At the time Casio concentrated on the ‘cool’ looks of the camera and its ART modes that created HDR and painting-effect images, but since 2013 the TR cameras have proved such a hit with the Chinese that its imaging division expects to make a ¥4.2bn (about $ 34.5 million) operating profit. That comes after four years of losses, up to 2012. 

The secret of the camera’s success has been a combination of a growing fashion-conscious design and the product’s suitability for shooting selfies. With a hinged frame the TR models can support themselves standing upright so are ideal for placing on a table facing the subject. They also have a number of ways to trip the shutter including squeezing the frame, using a ‘selfie pad’ on the side of the body, using a count-down-display self-timer, by the camera detecting the subject putting his/her hand in a certain part of the frame and by touching the 3″ LCD. The 921,600-dot LCD also acts as a digital mirror so the subject can check hair and make-up before the picture is taken – as the camera lens and the LCD face in the same direction. 

It has become common to feature digital retouch shooting modes in compact cameras, but Casio’s Exilim TR models go a step further with make-up modes that offer up to 12 levels of skin smoothness as well as skin tone adjustments to suit the way you want to look. A step beyond that even is make-up mode bracketing that provides three images with smoothness levels either side of the setting you chose yourself. In the latest model, the EX-TR70, make-up mode is now available when shooting movies too. 

For those not sure of their best side, pose bracketing gives you five chances to look good as the camera’s voice guidance counts down three-two-one between pictures so you have the opportunity to ruffle your hair, bend a knee or pout a little bit more. 

All of the EX-TR models use a lens with an angle of view equivalent to a 21mm on a 35mm system. Such a focal length would seem excessively wide for general purpose photography, but when holding a camera at a short-arm’s length it has proved perfect for getting you and your friend in the frame. Instead of a flash the cameras are equipped with an LED light that’s positioned very close to the lens axis to create soft and shadowless lighting – and the LED is round to form an attractive circular catch-light in the eyes. Genius. 

The cameras have proved so popular in China that Casio has opened three stores that sell only TR series models. The stores are designed like make-up boutiques, to set the products apart from other cameras in the market. At up to ¥100,000 (about $ 800) a pop these are not low-cost novelties priced for the mass market, so clearly Casio has been doing something very right indeed. 

For more information on the Casio Exilim TR series see the Casio digital camera website.

Articles: Digital Photography Review (dpreview.com)

 
Comments Off on Make-up bracketing and selfie boutiques help shoot Casio to record levels of profit

Posted in Uncategorized


5 Holiday Photography Ideas to Shoot More and Get Less Stress

19 Nov

Ahhh, the Holidays, that time of year when everyone is happy and feeling great. Tensions are low, everyone is totally relaxed, and since there’s so much copious free time, everyone wants to get their family pictures taken. Well, that statement might be a little bit off, but I have to say, I love shooting holiday pictures. Just in case the Continue Reading

The post 5 Holiday Photography Ideas to Shoot More and Get Less Stress appeared first on Photodoto.


Photodoto

 
Comments Off on 5 Holiday Photography Ideas to Shoot More and Get Less Stress

Posted in Photography


Fall In Love With Fall!How To Shoot Autumn Colors

15 Oct

Red and yellow and orange, oh my!

It’s officially fall and you know what the means: gorgeous colors everywhere begging to be photographed.

But fall colors can be a tad tricky to capture accurately, so we’re giving you some tips to get it juuust right.

Put on your cutest autumn accessories and let’s go!

(…)
Read the rest of Fall In Love With Fall!
How To Shoot Autumn Colors (549 words)


© Taylor for Photojojo, 2015. |
Permalink |
No comment |
Add to
How To Shoot Autumn Colors”>del.icio.us

Post tags:


Photojojo

 
Comments Off on Fall In Love With Fall!How To Shoot Autumn Colors

Posted in Equipment


5 Reasons To Should Shoot Your Landscape Images in RAW

20 Sep
Detail recovered from a RAW file, before and after

Detail recovered from a RAW file, before and after.

There is often a debate among photographers about shooting in RAW. Try it out – next time you are with a group of photographers, ask them who shoots in RAW. Better still, ask them why they don’t shoot in RAW. The conversation will become pretty interesting. When I first started photography, I was told that shooting in RAW was a waste of time and that I won’t need all that “information”. I was told it was better to shoot on JPEG as it saves space. Yes, RAW files are bigger, especially on a high-resolution camera, but is it true that we don’t need all that “information”? Over the past few years, I have done a fair amount of research into the RAW vs JPEG debate and I now shoot completely in RAW. Yes, my image files are MUCH bigger; yes, I need more space to store my images; yes, it does impact my image editing workflow. Is it worth it? A categorical yes. Here are five reasons why you should shoot your landscape images in RAW.

1. Details

RAW files are big because they don’t discard any image information that is captured in the scene. When you shoot on JPEG, the algorithm for JPEG determines which information is discarded and which is kept without changing the way the image looks. That is great for saving space on your memory card, but not so good if you intend to edit your images in Photoshop.

The reality is that your camera can capture a significant amount of data if you shoot in RAW, which in turn gives you much more flexibility in Photoshop later. On average, a normal JPEG file will be between four and six megs per image. The same image shot on the same camera in 14-bit lossless RAW format will be 25 – 30mb, five times bigger. The reason is that there is much more information in a RAW file. That information is critical in post-production. You can get so much detail out of a RAW image, such as pulling back blown-out highlights and bringing back detail in the shadows that would be impossible to recover in JPEG format. This doesn’t mean you should be sloppy and not pay attention to your exposure. What it does mean is that in tricky lighting conditions, you will be able to get a shot that’s usable.

Recovered details in a street scene, overall much more detail can be seen.

Recovered details in a street scene, overall much more detail can be seen.

2. Color

We all shoot on color nowadays. If you don’t, you should, even if you are going to convert to black and white – but that’s for another post. Shooting in RAW means that you are saving as much color information as possible from the scene. This is really important in landscape photography, portrait photography, food photography and even street photography. The color in your scene can make the difference between a good image and a great image. By shooting in RAW, you will have all the color information possible. The important part of that is the subtle color. For example, the gradation in the sky will look better than it would on JPEG, even if you think that JPEG will be fine from a color perspective.  If you are shooting a landscape scene, you want to get as much color information as you can. RAW would be the format to do this. In Photoshop, the vibrance function will saturate the colors in your scene which are undersaturated and this can give your RAW file that subtle boost to make the image pop.

Much more colour can be rendered from a RAW file

Much more color can be rendered from a RAW file.

3. Exposure

The exposure in your scene should always be as good as you can get it in camera. In the past, most photographers would underexpose a little to make sure they didn’t blow out the highlights. In recent years, most photographers shooting in RAW have been exposing to the right (ETTR). The new generation of cameras have a really good dynamic range and are able to render details in the shadows and the highlights in one shot. This was not possible a few years ago. ETTR means that when you look at your photograph’s histogram, try and push it over to the right a little – in other words, overexpose it a little. The reason is because RAW can handle highlights in a scene really well and if your shadows are a little brighter there won’t be as much noise in the shadows. This is really a good technique to use in landscape photography and architectural photography. Your images will be cleaner and have very little noise in them. Once you adjust the image in Photoshop, you will have a well-exposed image across the dynamic range.

Blown out highlights in this scene were brought down, but the overall exposure was brightened.

Blown out highlights in this scene were brought down, but the overall exposure was brightened.

4. Flexibility

The best part about RAW files are that they give you flexibility. If you shoot landscape images or street photography, you have a lot of information to work with and you can use that information to create the best possible image. Also, Photoshop is always improving their tools and functions. I have gone back and reworked older images: the RAW file had all the information and the new functions brought out the best of that scene. This has happened quite a few times, so don’t delete “throwaway” images so quickly. For this reason, I am also not a fan of chimping too much. Wait until you download the images to see what is worth keeping. Use RAW to give you as much flexibility as you can, even on older images.

Original RAW file, the image was really dark from the use of an ND filter

Original RAW file, the image was really dark from the use of an ND filter.


The result of the above image after being edited in Adobe RAW converter

The result of the above image after being edited in Adobe RAW converter.

5. Quality

Editing your RAW image is a two-step process. The first step is converting it in a RAW converter. (Lightroom converts RAW images, as does Photoshop and many other image editing products.) Once you have made the corrections and subtle adjustments in the RAW converter, then you can open the converted image in Lightroom or Photoshop. You will then be editing on the best quality image possible. Image quality is almost the “holy grail” of photography. If you ask any photographer what the most important thing is for any image, it will most likely boil down to image quality. To be clear, when I say image quality I include sharpness, noise, dynamic range, color, tone, chromatic aberration and so on. Anything that adds to the overall look and feel of the image. Your image quality will be fantastic if you work carefully in your RAW converter and edit well in Photoshop. You can get good image quality in JPEG too, but you will be able to squeeze that much more out of the image if you shot in RAW.


Look at the quality and detail of the scene after being edited in Adobe Camera Raw converter

Look at the quality and detail of the scene after being edited in Adobe Camera Raw converter.

RAW is a great format to use if you plan on editing your images. If you shoot landscapes, fashion, food, architecture and even weddings you should be considering shooting in RAW. One caveat on using RAW for weddings – you don’t have to shoot the whole wedding in RAW, but shoot the important images or images where the light is tricky in RAW. That way you can be confident you have the shot and information you will need for editing later.

RAW requires a different workflow for your image processing. If you don’t want to spend too much time editing, then maybe RAW will not work for you. The reality is RAW files are bigger, but that’s because they capture so much more information. If you are skeptical, give it a try. Shoot some scenes in RAW and try the Adobe RAW converter. Lightroom also works with RAW files. You might find that you have more details and information in your image than you thought.

googletag.cmd.push(function() {
tablet_slots.push( googletag.defineSlot( “/1005424/_dPSv4_tab-all-article-bottom_(300×250)”, [300, 250], “pb-ad-78623” ).addService( googletag.pubads() ) ); } );

googletag.cmd.push(function() {
mobile_slots.push( googletag.defineSlot( “/1005424/_dPSv4_mob-all-article-bottom_(300×250)”, [300, 250], “pb-ad-78158” ).addService( googletag.pubads() ) ); } );

The post 5 Reasons To Should Shoot Your Landscape Images in RAW by Barry J Brady appeared first on Digital Photography School.


Digital Photography School

 
Comments Off on 5 Reasons To Should Shoot Your Landscape Images in RAW

Posted in Photography


13 Useful Tips You Need To Shoot Stress-Free Fashion Events

14 Sep

13 Useful Tips You Need To Shoot Stress-Free Fashion Events

Hi there FashionPhotographyBlog.com readers, today we have a Peter Werner on our site. He has been a long time follower of FPBlog for many years and took time out of his day to write us a response to an article we posted before titled on how to shoot fashion shows. We at FPBlog thought that his reply had great insights and brought another viewpoint to our previous post, that we want to share it with you, because we know it will be useful to photographers currently shooting at fashion events, or thinking about doing it soon. 


We have invited Peter Werner to share with our community, his tips for shooting at fashion events so photographers can get a sneak peak into what to expect as well as how to prepare themselves so they don’t miss great photo moments in the middle of all the commotion at fashion events.


Just a word of warning before we dive into Peter’s tips – fashion shows and fashion events may not be suited for everyone. There are lots of people running around at these fashion events; triggers are going off everywhere, peak noise levels and you are constantly on your feet lugging around your photography gear. Then again, you could be an adventure seeker and live for the adrenaline rush. We just want you to be wary so you can be on point, focused on the shooting great photos and not getting distracted by all the commotion all around you. The stage is now all yours, Peter!


Fashion Events: How To Shoot Without The Stress


Thanks for the post (great stuff as usual)! I haven’t shot a fashion show yet, but I have shot several other types of fashion events so far. I absolutely hate it, too, but I think it is very good training for problem-solving when you have to move fast on a regular photo shoot. Here are a few things I have learned the hard way:


1. Don’t use the biggest memory card you have. If it dies or gets stolen, all your photos will be lost, and that’s a great way to destroy all the reputation you have built. Instead, use smaller ones.


2. If one memory card is full, continue shooting with your other camera body until you have time to change cards, don’t trade important moments for a card change.


3. Keep the full memory cards and the empty ones in separate pockets so you don’t lose time by re-inserting a full one by accident.


4. Use the two-pocket system for your flash batteries.


5. Don’t waste time deleting failures. You are very likely to miss your second chance to get it right.


6. Only check your images occasionally to make sure nothing is wrong (like a leftover exposure compensation or something like that). But don’t look at every single image you take right away.


7. Do take multiple shots of the same subject. The auto focus system sometimes focuses on the background, people have their eyes closed etc. So you want to have a backup in such a situation, plus you get to choose the best one of the set when you’re doing your editing. I usually take two or three shots per subject, depending on how much time there is, but you definitely need more for groups.


8. Always shoot RAW (even if you usually don’t), especially if you are using bounce flash a lot. Lighting often changes very quickly and people sometimes move in unexpected ways, so it is hard to get the exposure perfect every time. By shooting RAW, you can compensate for problems to a certain degree. Plus, you get between 12 and 16 bits of color depth instead of 8 with JPEG. Don’t rely on RAW’s ability to save you, though, you still need to expose as well as you can.


9. Get ear plugs. Not only can music be annoying, it can also be very loud. This is probably more relevant to concerts, but ear plugs also allow you to position yourself right in front of the speakers, where usually nobody is standing (or not for long), not even photographers, even if it gives you a perfect view on what’s happening.


10. Use a fast lens. Both Nikon and Canon make very sharp very fast zoom lenses. That way you can use more of the available light and thus get better recycle times on your flashFast lenses also enable you to use a shallow depth of field if you have to deal with a very busy background and but don’t have a chance to move.


The fast zooms are usually the more professional ones and, therefore, tend to give you sharper images, and they maintain their minimum aperture throughout the whole zoom range. And you can take non-shaky pictures at greater focal lengths if flash is not permitted or your flash does not reach far enough.


Even if you don’t use the aperture wide open, fast lenses are stopped down more at identical apertures, thus you are more likely to photograph on the lens’ sweet spot if you use an f2.8 lens at f4.5 than an f4.5 lens at f4.5. The Nikon VR system is great for low light, too.


11. If you know an important shot is coming up, make sure you don’t press the shutter release a few seconds before because your flash may not be ready again in time.


12, If you don’t own a good lens, you can always rent one, it’s worth it.


13. Also, be sure to get all the info you can in advance. If you know how the lighting is going to change, what the durations of individual segments are etc., you can plan in advance and for instance use a fresh card if you know you won’t have time to swap in the next 20 minutes. If you know that very shiny dresses are coming up, you can switch to spot metering and so on. Knowledge is power.


All those things can not only help in getting the pictures you want, they also help differentiate your images from those of the seven other guys right next to you with the exact same equipment as you have. I hope this is helpful for those of my fellow readers who are doing fashion events. Thanks again for this awesome blog, it is really an invaluable resource for the “secret” stuff that can’t be found anywhere else on the internet. Keep up the great work!


Peter Werner 


Did you find Peter’s tips for fashion events helpful? Please share this post on social media if you did. If you have tips of your own that were not covered in Peter’s list, please write them down for us in the comments box. below We would love to hear your tips!


Lastly, if you would like to be featured as a guest writer like Peter Werner, do send us a message and get in touch with us. We’d love to hear from you! For more details on how to contribute to FashionPhotographyBlog.com click here –> CONTRIBUTE TO FPBLOG HERE


Fashion Photography Blog

 
Comments Off on 13 Useful Tips You Need To Shoot Stress-Free Fashion Events

Posted in Uncategorized


Nikon D7200 Field Test: Desert dance photo shoot

10 Sep

Nikon’s flagship APS-C DSLR is a real workhorse. Offering a 24.2MP CMOS sensor, the D7200 provides a 51-point AF system sensitive to -3EV, an increased buffer depth with 6 fps continuous shooting and 1080 HD video at 60p. We tagged along with pro photographer Gabe Bienczycki on a desert photo shoot to push the D7200 to its limits. Read more

Articles: Digital Photography Review (dpreview.com)

 
Comments Off on Nikon D7200 Field Test: Desert dance photo shoot

Posted in Uncategorized