RSS
 

Posts Tagged ‘Scenes’

Stark Suburbs of Paris: Scenes from a Former Utopia

12 Nov

[ By Steph in Architecture & Houses & Residential. ]

dystopian paris 2

Dull gray concrete volumes stacked in irregular shapes stretch across the landscape just beyond Paris like a set from a dystopian film, dwarfing the mostly elderly residents who wander their halls. The ‘Babel-like’ housing estate known as Noisy-le-Grand began, in fact, as a utopian dream: a postmodern wonderland built between the ‘50s and ‘80s to welcome a migrant population of refugees from rural areas of France and other nations.

dystopian paris 1

dystopian paris 12

dystopian paris 7

Standing in stark visual opposition to the gleaming glass and steel of Paris’ more modern architecture and all of its centuries-old Gothic grandeur, Noisy-le-Grand was envisioned as a counterpoint to the boxy white creations of Le Corbusier, which the architects deemed unimaginative. Ricardo Bofill and Manuel Nunez-Yanowsky designed the Espaces Abraxas and Arénes de Picasso with a postmodern sensibility.

dystopian paris 8

dystopian paris 10

dystopian paris 9

But while the structures certainly aren’t lacking in imagination, ambition or scale, they are often – not unreasonably – compared to fortresses, prisons and industrial architecture. Unsurprisingly, the estate has been used as a set for everything from Terry Gilliam’s classic 1984 film ‘Brazil’ to ‘The Hunger Games: Mockingjay.’

dystopian paris 3

dystopian paris 4

The fact that the residents of this strange suburb are almost all elderly reinforces the somewhat dystopian feel, especially when they’re photographed under vast concrete archways in this compelling photographic series by Laurent Kronental. Their humanity and the warmth and personality of their interior spaces contrast against the coldness of the architecture.

dystopian paris 5

dystopian paris 6

Entitled ‘Souvenir d’un Futur,’ the series is the result of four years of visits. According to his artist statement, Kronental “felt a need to examine their living conditions and shed light over a sometimes-neglected generation. Exposing these unsung and underestimated suburban areas is a means to reveal the poetry of aging environments slowly vanishing, and with them, the memory of modernist utopia.”

Share on Facebook


[ By Steph in Architecture & Houses & Residential. ]

[ WebUrbanist | Archives | Galleries | Privacy | TOS ]


WebUrbanist

 
Comments Off on Stark Suburbs of Paris: Scenes from a Former Utopia

Posted in Creativity


Behind the Scenes: Recording a music video with Samsung NX cameras

09 Oct

Seattle-based band Ever So Android are an indie rock trio who have played all over the western USA. Their energetic live shows pack venues throughout the year in their hometown, but recently, they performed their single ‘Moment’ for a different crowd: a small crew of filmmakers armed with Samsung NX1 and NX500 cameras, led by director Brad Strain. Read more

Articles: Digital Photography Review (dpreview.com)

 
Comments Off on Behind the Scenes: Recording a music video with Samsung NX cameras

Posted in Uncategorized


Miniature Museum: Scaled Scenes with Jaw-Dropping Details

26 Sep

[ By Steph in Destinations & Sights & Travel. ]

miniature museum 1

Before special effects went digital with CGI, part of the magic of movie making included artists laboring over tiny scaled-down sets, creating little worlds that look totally real until a normal-sized human hand appears in the scene. One museum in France lets visitors explore over 100 such sets, each standing out for its incredible realism. At Musée Miniature & Cinéma in Lyon, you can gaze upon these miniatures as well as a collection of over 300 full-scale movie props.

miniature museum 11

miniature museum 8

miniature museum 2


miniature museum 13

Painstaking attention is paid to textures and weathering in the miniature scenes, like a kitchen with cooking implements smaller than sewing needles, peeling floor tiles and grimy windows. A thick layer of dust covers the floor of a brick-lined underground storage space.

miniature museum 5

miniature museum 3


miniature museum 6

miniature museum 4

A dimly-lit hair barber shop boasts photos of Elvis on the walls, with stained towels crumpled on the counters. The lighting is half of the magic, often coming in through windows or illuminating only one small section of a scene so the rest remains shadowy and mysterious.

miniature museum 14

miniature museum 12

miniature museum 10

miniature museum 9

Pick up a magnifying glass and examine the museum’s 1,000-piece collection of arts and crafts in miniature, including stringed instruments, origami, micro paper art and other tiny delicate creations. Then, move on to the Cinema Collection, which “unveils all the tricks that are used by cinema magicians” like masks, prop guns and robotic dinosaurs. Walk onto scaled sets that are somewhere between miniatures and full-size, which made train crashes and spaceship scenes a lot easier to film.

miniature museum 15

miniature museum 16

The Musée Miniature & Cinéma is owned and curated by Dan Ohlmann, himself a famed miniaturist responsible for many of the scenes that can be found within the museum. You can even go ‘backstage’ to watch him and other miniature artists work on commissioned pieces and restore artifacts from famous films, like the giant Alien Queen body from the movie Alien vs. Predator.

Share on Facebook


[ By Steph in Destinations & Sights & Travel. ]

[ WebUrbanist | Archives | Galleries | Privacy | TOS ]


WebUrbanist

 
Comments Off on Miniature Museum: Scaled Scenes with Jaw-Dropping Details

Posted in Creativity


Urban Melodies: Multiple-Exposure Street Scenes Remix Cities

03 Jun

[ By WebUrbanist in Art & Photography & Video. ]

urban paris metro

Capturing the cacophony of urban life, this series of superimposed photographs renders local phenomena, regional monuments and international architecture in a strangely compelling style.

urban berlin street

urban times square

urban central park

Alessio Trerotoli‘s work has taken him to Rome, Paris, Berlin, Buenos Aires, New York and other world cities, sometimes shooting in subways or side streets and other times photographing iconic settings.

urban abstract berlin

urban subway system

urban side street

Each image is comprised of multiple exposures in the same location, creating a layered effect that reflects a sense of movement despite the images themselves remaining technically static.

Next Page – Click Below to Read More:
Urban Melodies Multiple Exposure Street Scenes Remix Cities

Share on Facebook


[ By WebUrbanist in Art & Photography & Video. ]

[ WebUrbanist | Archives | Galleries | Privacy | TOS ]


WebUrbanist

 
Comments Off on Urban Melodies: Multiple-Exposure Street Scenes Remix Cities

Posted in Creativity


7 Ways to Handle High Contrast Scenes

02 Dec

Perhaps the greatest challenge you will face in outdoor photography is the high contrast created by the sun and the bright sky versus a darker foreground. That is one of the reason photographers try very hard to shoot at dawn or sunset. Otherwise, the sky is virtually always so much brighter than anything on the ground that it is hard for your camera to deal with the contrast. Either your camera exposes the sky correctly, which makes everything on the ground look black, or the camera exposes the foreground correctly resulting in a blown out (or pure white) sky. If you try to expose in the middle, you will have problems with both highlights and shadows.

The challenge is constant and great, but there are some things you can do to create great pictures no matter what the light. This article will walk you through some ideas for doing that.

1. Fix it in Post-Production

GiantsCauseway

The first thing you can do is try to fix the problem in post-processing. Both Lightroom and Adobe Camera Raw (used in Photoshop and Photoshop Elements) have sliders that can help bring your sky back or add detail to a dark foreground. They won’t bring back a truly blown out sky or pitch black foreground, but you might be surprised at what they can do.

For an overly bright sky, try pulling the Highlights slider down (in other words, pull it to the left). That will usually add detail. If you have blue portions of your sky, another trick is to target the blue portion and make that darker, while keeping the clouds white.  To do that, go to the HSL/Color/B&W panel in Lightroom, or the HSL/Greyscale tab in ACR, and find the Blue slider.  Click on the Luminance tab, and pull the Blue slider down (to the left). That will preserve good highlight tones in the clouds but darken the blue tones to make the sky look much better.

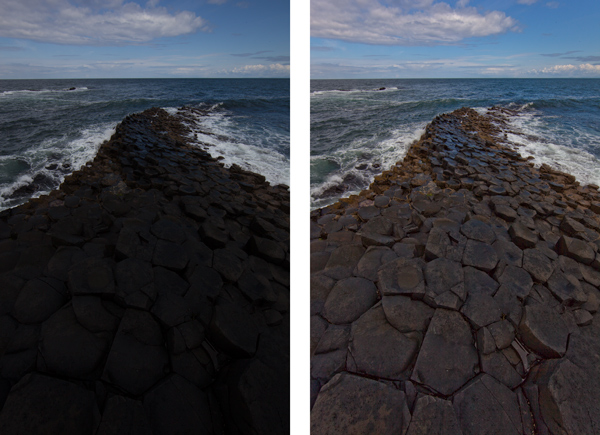
If your foreground is too dark, you can brighten it up using the Shadows slider in the Basic tab of Lightroom or ACR. Pull that slider up (to the right). That will brighten up the darker tones.  You may find, however, that lightening the shadows in this fashion makes the foreground look too flat or washed out. There is a simple cure for that though. Find the Blacks slider, which is just below the Shadows slider, and pull the Blacks slider down (to the left) a little bit. It may seem counter-intuitive to darken the Blacks since you just lightened the Shadows, but this adds contrast back to your foreground. So the foregound will be lighter due to the increase you made to the Shadows, but will still have contrast because of the decrease you made to the Blacks.

2. Consider Converting to Black and White

Horse

The problem you’ll encounter most of the time when you convert your pictures to black and white is a lack of contrast. Very often, photographers convert their pictures to black-and-white only to find that they look dull and flat. You want tones ranging from pure white all the way to pure black. The high contrast you are combating can actually be an asset in black and white photography.

One problem with shooting with a bright sky or at midday, of course, is usually the high contrast. In addition, people are just plain used to seeing the middle of the day, so when they see a picture taken at midday viewers can find it uninteresting. Converting to black and white can solve both of these problems. As mentioned above, the high contrast can be an asset in black and white. Further, black and white is not how people are used to seeing the world, so the photo may look more interesting to them. Of course, this is not a cure-all, and a blown out sky is still a blown out sky, but converting to black and white can occasionally save a really high contrast picture. So, try converting toblack and white if your picture is overly contrasty.

3. Use Fill Flash

People often think about using a flash only in low-light situations. But perhaps a better use for flash is in very bright situations like those we are talking about here. It doesn’t seem to make sense at first, but what you are doing is letting the flash fill in some of the harsh shadows and thereby deal with your high contrast problem.

If you use fill flash, set your camera’s exposure settings so that the sky is properly exposed. You might take a shot or two without the flash to make sure you have it set properly. Then add the flash to brighten up the foreground and keep it from being black. Dial back on the power of the flash unit or the flash exposure compensation to make it look more natural. That should result in a properly lit subject with a sky or background that looks good as well.

4. Use a Graduated Neutral Density Filter

MarinCo

The scenes we are talking about in this article stem from an overly bright background and a dark foreground. The previous tip addressed a way for you to brighten the foreground. Now let’s reverse that and talk about a way to darken the sky so that it is roughly the same exposure as your foreground.

To do that to, you will want to buy a graduated neutral density filter. These are square filters that fit in holders attached to the front of your lens. The top portion of the filter is dark, and it fades to clear glass at the bottom. That way it darkens the sky while having no effect on the foreground. Use one to darken the sky and keep the brightness values within the dynamic range of your camera.

5. Blend Your Exposures

GrandCanyonAll

Another way to deal with contrast that goes beyond the dynamic range of your camera is to bracket your pictures and blend them later. Most cameras have a function in the menu that allows you to set the amount you would like to overexpose or underexpose your pictures. That way when you press the shutter button it will take three pictures: One at normal exposure, one underexposed, and one overexposed. Some cameras will actually allow you to take five or even seven photos.

You can blend these three pictures later in Photoshop by using parts of each exposure for your final photo. For example, you may want to use the sky from the darker, underexposed photo. You may want to use the foreground from the brighter, overexposed photo. There may be elements of each that you want to take from the normally exposed picture. By blending them all together in Photoshop, you will have a picture that is properly exposed across the board.

To accomplish the blending, here’s a quick primer on the process:

  1. Open all your files as layers in the same picture. You can accomplish this in Lightroom by selecting your photos, and then going to Open as Layers in Photoshop (either Photo > Edit In > Open as Layers in Photoshop or right-click and select Open as Layers in Photoshop).  If you don’t have Lightroom, there is a similar function using Adobe Bridge. In addition, in Photoshop you can select photos and open them as layers by choosing File > Scripts > Load Files into Stack, and then using the resulting dialogue box to select the photos you want.
  2. From there, add a layer mask to your top layer (Layer > Layer Mask > Reveal All). The white layer mask you just created does not change anything, and all of this top layer will still show up in your picture. But you have created a mechanism to change that.
  3. To have Photoshop apply portions of the layer below, select your brush tool and set the color to black. Then just brush in where you want the layer below to appear. Remember, anywhere the mask shows white the top layer will show; anywhere the mask shows black it will reveal the layer underneath.
  4. If you want to combine a little of each layer, reduce the opacity of your brush to a lower percentage. Often this process works best by  setting the opacity very low (under 10%) and brushing in the layer below where you want it gradually with a large brush.
  5. When you are done with that process and the photo looks the way you want, merge these layers (Layer > Merge Down). Then repeat the process for the layer below, revealing whatever portions of that layer you want in your final picture.

6. Blend into an HDR File

Thus far, I’ve avoided the option of using High Dynamic Range (HDR) software to deal with the dynamic range problem you face. Of course, you can bracket your photos (as set forth above) and process them using Photomatic Pro, HDR Efex Pro, Photoshop, or other HDR software. That is a topic in and of itself.

For purposes of this article, consider using an HDR file as part of the blending process discussed above. In other words, first bracket your exposures. When you are in front of your computer, create an HDR file using your preferred method. Now, bring your original three exposures and the HDR image into Photoshop using the method outlined above. When you bring them all in, you should have four layers showing.

Then just do the blending process described above. Put the file you think looks the best on top. Next, follow the process set forth above for blending in each of the other layers. If it turns out you don’t want to use one of the layers you can just delete or hide it. Using this method, you should have complete control over the exposure levels in your picture. In addition, this process will provide you the benefit of HDR software without that HDR-look that many photographers try to avoid.

7. Work with it

Tree

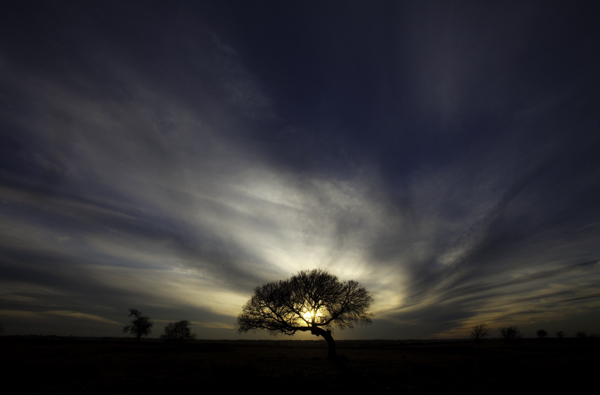
This might sound like giving up, but you might consider using the high contrast for effect. For example, you can use the brightness by adding sun’s rays into the picture. You can use the darkness by creating a sillouette. Think about effects like these at the time you are shooting. Sometimes you can turn a problem into an interesting feature of your photograph.

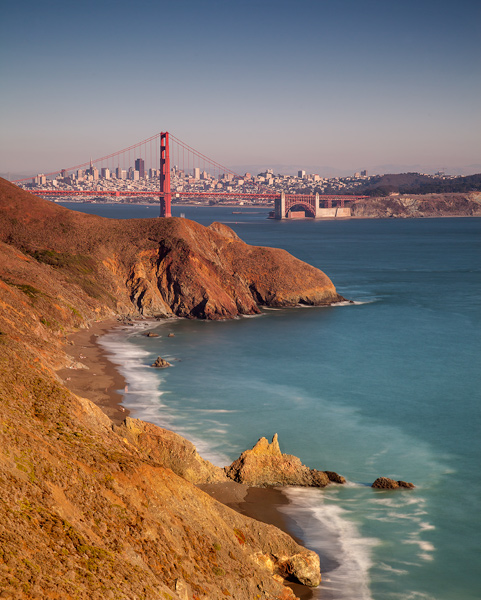
Or, if there is no way to use the high contrast as an effect, you can sometimes minimize it by shooting away from the sun. Not having the sun in your picture will keep the sky from being too bright.  If you are lucky, the sun will lighten up the foreground enough to keep it within the dynamic range of your camera without creating any harsh shadows.

Your Greatest Challenge

Dealing with this problem of dynamic range is perhaps the greatest challenge of the digital photographer. Unless you have thousands of dollars to buy a medium format camera and get the increased dynamic range that the larger sensor size offers, you will need to take steps such as those above when you are shooting outside. Use these tips to overcome this obstacle and make your photos stand out.

The post 7 Ways to Handle High Contrast Scenes by Jim Hamel appeared first on Digital Photography School.


Digital Photography School

 
Comments Off on 7 Ways to Handle High Contrast Scenes

Posted in Photography


Behind the Scenes with USAF Thunderbirds Official Photographer

10 Jul

Sergeant Larry Reid Jr. is an official photographer for the US Air Force’s Thunderbirds display team, covering everything from mechanics working on the team’s F16 fighter jets to air-to-air shots at high G-loads. A new video produced by Jaron Schneider takes a detailed look at Reid’s job, which has everyone here at DPReview insanely jealous (albeit a little queasy). Click through for a look – and hold on to your hat!

Articles: Digital Photography Review (dpreview.com)

 
Comments Off on Behind the Scenes with USAF Thunderbirds Official Photographer

Posted in Uncategorized


Crossroad of Realities: Photography Subverts Gaming Scenes

03 Jun

[ By WebUrbanist in Gaming & Computing & Technology. ]

game photograph distant shot

As improved game graphics generate increasingly photo-realistic spaces, projects like this blur the boundaries between virtual and real in perception-warping ways. Test and see for yourself: how long do you have to stare at each picture to ascertain what elements comes from within the game and which ones are derived from everyday reality?

game photo virtual device

game photo rain image

Referencing Jean Baudrillard (of Simulacra and Simulation), gamer and photographer Benoit Paillé of Montreal, Quebec explains his aim to “overlay a material reality with a virtual one, erasing the border between the two worlds … to show that we can use a virtual space in conceptual photography and approach these areas with the same sensitivity as the physical space.”

game photo gta v

game photo device zoom

The process of making Crossroads of Realities involved carefully capturing in-game scenes from Grand Theft Auto V, then simulating the same conditions (time of day, angle of light, conditions of weather) in a real photograph of a human hand holding an image-capturing device. These images were then hybridized into finished shots representing uncanny combinations of virtual and physical reality.

game photo capture example

game photo upside down

game photo night shot

As to his inspiration: “It is a response to the proliferation of visual projects that take place in virtual spaces. It is a questioning about the notion of border and territory. A mix of two distinct realities into a single image. I ask questions about the legitimacy and the authorship of artwork created this way.”

Next Page – Click Below to Read More:
Crossroad Of Realities Photography Subverts Gaming Scenes

Share on Facebook


[ By WebUrbanist in Gaming & Computing & Technology. ]

[ WebUrbanist | Archives | Galleries | Privacy | TOS ]


WebUrbanist

 
Comments Off on Crossroad of Realities: Photography Subverts Gaming Scenes

Posted in Creativity


Composite Crime Scenes: NYC Past Patched onto Present

29 Apr

[ By Steph in Art & Photography & Video. ]

NYC Crime Scene Collage 1

Murdered gangsters, car crashes and four-alarm fires are nearly forgotten in the peaceful present day, but this photo series reminds us that the past is not so far away. Photographer Marc A. Hermann, a historian with the New York Press Photographers Association, lays old New York City crime scene photos on top of their present-day locations for dramatic juxtapositions of time period and mood.

NYC Crime Scene Collage 2

Warning: these are real crime scene photos, and aren’t for the faint of heart. The very recently deceased are seen cradled in the arms of their loved ones, or sprawled out on the floor. The top photo depicts a distraught woman who climbed onto the ledge of her building; the second shows the Church of the Sacred Hearts of Jesus and Mary aflame.

NYC Crime Scenes 6

NYC Crime Scene Collage 4

The demise of gangsters Salvatore ‘Sammy’ Santoro and Frankie Yale can be seen after a shooting and a car crash, respectively. A woman hides her face in mourning of her sister in front of the ruins of a car. Firefighters battle a blaze at the Elkins Paper & Twine Co. that claimed the lives of six people.

NYC Crime Scene Collage 5

NYC Crime Scene Collage 3

In each photograph, the black-and-white historical image contrasts sharply with the modernized full-color setting. Tourists stroll past the scenes of some of the city’s most tragic disasters, completely unaware. The message seems to be that life goes on, but the ghostly imprints of those incidents remain. See the full series at New York Daily News.

Share on Facebook


[ By Steph in Art & Photography & Video. ]

[ WebUrbanist | Archives | Galleries | Privacy | TOS ]


WebUrbanist

 
Comments Off on Composite Crime Scenes: NYC Past Patched onto Present

Posted in Creativity


Behind the scenes: Small lighting, big results with Joe McNally

17 Apr

Screen_Shot_2014-04-16_at_12.26.16_PM.png

Nikon’s latest in a series of behind the scenes videos features photographer Joe McNally. An off-camera lighting wizard, McNally shares some useful tips from three different flash scenarios. No diffusion panel? No worries, McNally explains you can get the same results by placing a bed sheet between the flash and the subject. And as natural light began flowing through his studio, like any good photographer, McNally moved his model to make some pictures — without flash, this time. See video

News: Digital Photography Review (dpreview.com)

 
Comments Off on Behind the scenes: Small lighting, big results with Joe McNally

Posted in Uncategorized


Gear breakdown: Behind the scenes with Chase Jarvis

20 Mar

Screen_Shot_2014-03-19_at_11.40.03_AM.png

Chase Jarvis has posted another show-and-tell video about the core gear he carries with him on shoots. In this video, you can see bag upon bag of photo and video gear sitting on industrial shelving in the background. Rather than going through every piece of equipment he owns, Jarvis presents his essential camera gear, the stuff he takes with him on every shoot. See video

News: Digital Photography Review (dpreview.com)

 
Comments Off on Gear breakdown: Behind the scenes with Chase Jarvis

Posted in Uncategorized