RSS
 

Posts Tagged ‘Right’

Secret Graffiti: Railings Reveal Art Only at the Right Angle

11 Oct

[ By WebUrbanist in Art & Street Art & Graffiti. ]

angled rail street art

Railings, shutters, sun shades and other surfaces with separate-but-repeating elements are all potential canvasses for this unique semi-secretive approach to street art.

angled rail various perspectives

angled graffiti approach

angled graffiti right perspective

Zebrating is the German artist group behind these pieces, carefully calculated, printed and glued onto surfaces with a balance of color and simplicity that lets them stand out but seem also like part of their environment.

angle graffiti evil eye

angled graffiti whole building

angled graffiti horizontal slats

Though sometimes seen in process and stopped by the cops, this crew continues to paint their lenticular-style pictures both on public urban surfaces and in more sanctioned venues like museum galleries or approved architecture.

Next Page:
Secret Graffiti Railings Reveal Art Only At The Right Angle

Share on Facebook


[ By WebUrbanist in Art & Street Art & Graffiti. ]

[ WebUrbanist | Archives | Galleries | Privacy | TOS ]


WebUrbanist

 
Comments Off on Secret Graffiti: Railings Reveal Art Only at the Right Angle

Posted in Creativity


Secret Graffiti: Railings Reveal Art Only at the Right Angle

10 Oct

[ By WebUrbanist in Art & Street Art & Graffiti. ]

angled rail street art

Railings, shutters, sun shades and other surfaces with separate-but-repeating elements are all potential canvasses for this unique semi-secretive approach to street art.

angled rail various perspectives

angled graffiti approach

angled graffiti right perspective

Zebrating is the German artist group behind these pieces, carefully calculated, printed and glued onto surfaces with a balance of color and simplicity that lets them stand out but seem also like part of their environment.

angle graffiti evil eye

angled graffiti whole building

angled graffiti horizontal slats

Though sometimes seen in process and stopped by the cops, this crew continues to paint their lenticular-style pictures both on public urban surfaces and in more sanctioned venues like museum galleries or approved architecture.

Next Page:
Secret Graffiti Railings Reveal Art Only At The Right Angle

Share on Facebook


[ By WebUrbanist in Art & Street Art & Graffiti. ]

[ WebUrbanist | Archives | Galleries | Privacy | TOS ]


WebUrbanist

 
Comments Off on Secret Graffiti: Railings Reveal Art Only at the Right Angle

Posted in Creativity


9 September, 2013 – Understanding The Left and Right Brain

09 Sep

Most photographers pay little attention to the psychological aspects of image perception. Yet how we perceive things and the way the brain’s different hemispheres interpret what we’re seeing plays a huge role. Find out more in Sharon Tenenbaum‘s new article – Understanding The Left and Right Brain.

"Having been to Antarctica with Michael and Kevin, I would say after having traveled the world and shot nearly my entire life as an exhibiting photographer,  it was one of my highlights in my life and I talk about it, all the time.  The images and experience of seeing something visionary and nearly extinct from the world, to see and experience the wildlife and scenery that does not fear humans is amazing.  The images I shot there won me two Smithsonian awards and nearly 18 other international awards". – Tim Wolcott

 Find Out More Now
These Expeditions Will Sell Out Quickly. They Always Do


The Luminous Landscape – What’s New

 
Comments Off on 9 September, 2013 – Understanding The Left and Right Brain

Posted in News


The Best iPhone Photo Apps That You Should Download Right Now

01 Jul

Your handheld device is nothing without apps, that lovely and beautiful software that lets you do much more on your smartphone than just call someone. If you’re a serious photographer, you just can’t pass up the chance to install serious photography apps on your mobile device. They will empower you to engage in your picture-taking passion when you’re on the Continue Reading

The post The Best iPhone Photo Apps That You Should Download Right Now appeared first on Photodoto.


Photodoto

 
Comments Off on The Best iPhone Photo Apps That You Should Download Right Now

Posted in Photography


Exposing to the Right on Your EOS Camera

08 Jun

01.jpg

By Andrew S. Gibson – the author of Understanding Exposure: Perfect Exposure on Your EOS Camera (currently 36% off at SnapnDeals).

Over the years that I’ve worked as a photography writer I’ve noticed that people keep asking the same questions about exposure on their EOS cameras.

One of the most common is why doesn’t the camera doesn’t get the exposure right every time?

This is a reasonable question. Modern digital SLRs are advanced machines with built-in microprocessors that can handle complex calculations. So just why do they get exposure wrong?

Part of the reason is that the light meter inside a camera measures reflected light. If a scene is darker or lighter than average, the camera may return an incorrect reading.

02.jpg

Optimum exposure

But think about this for a moment. Who gets to say whether a given exposure is correct or not? I don’t like using the word correct in relation to exposure because it implies that there is only one right answer.

I prefer the term ‘optimum exposure’. This is the exposure setting that is best suited to the scene that you are photographing and the medium you are using.

Imagine that you are photographing the same subject with four different cameras. One is loaded with black and white film, another with colour transparency film, the third with colour negative film and the last is a digital camera. Each has the same lens and frames the subject the same way. The quantity of light falling on the subject is also the same.

Potentially, the scene could require four different exposure settings. That’s because each camera is using a different medium which reacts to light in a slightly different way. Film users will know that black and white film, slide film and colour negative film all need to be treated differently. The same goes for digital cameras.

Put simply, the optimum exposure depends as much on the medium you are using as the quantity of light falling on the subject.

That’s another reason why cameras get exposure wrong. The metering system has yet to be invented that takes into account the medium being used as well as the amount of light entering the lens.

JPEG vs. RAW

Even with digital cameras, the optimum exposure may be different depending on whether you are using the JPEG or Raw format. In JPEG, the aim is to get the exposure as precise as possible. That’s because there isn’t much leeway in post-processing to make the image darker or lighter, and you certainly can’t bring back shadow or highlight detail lost due to poor exposure.

In Raw the aim is different. The idea is to create a file containing as much information as possible in preparation for converting to the JPEG or TIFF formats in Raw processing software. That may require different exposure settings.

Exposing to the Right

Exposing to the right (often referred to as ETTR online) is a technique used by photographers to create a Raw file containing the maximum amount of possible information.

The technique is simple – you use the exposure settings that allow the maximum amount of light possible to reach the sensor without clipping the highlights. The result is a histogram with a graph that is as close to the right hand side of the graph as possible without crossing it.

The main benefit of exposing to the right is that it reduces noise levels in your photos. It also ensures that you capture as much shadow detail as possible, without losing any highlight detail.

Lets take a look at how this works in practice:

03.jpg

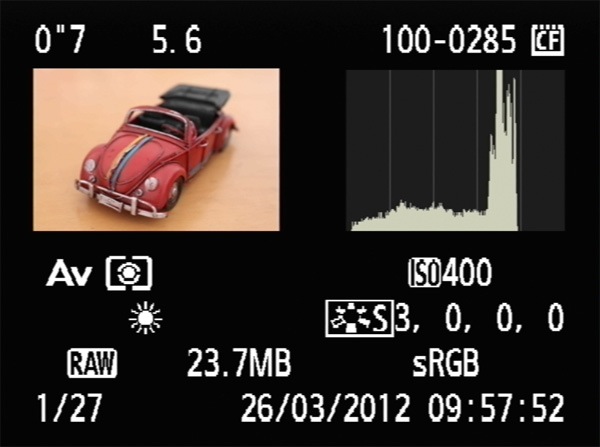
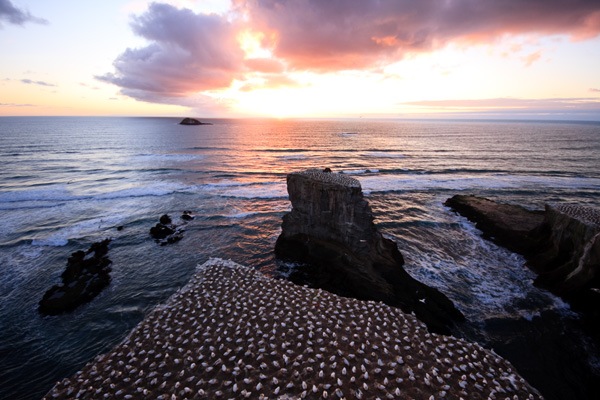
Here’s a photo take at my camera’s recommended exposure settings. It doesn’t cover the full range of the graph. The right hand fifth is empty. This tell us we can increase exposure without clipping any highlights.

04.jpg

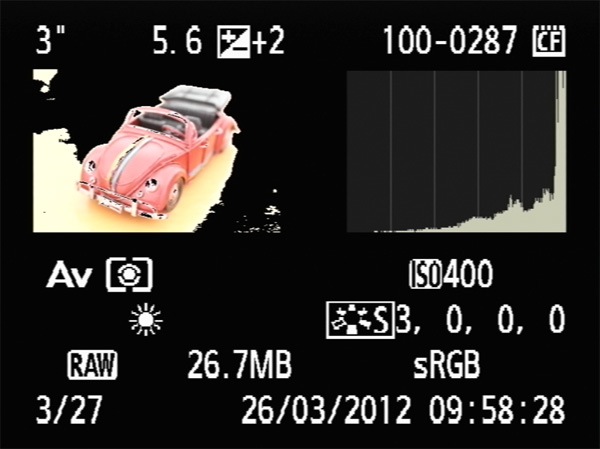
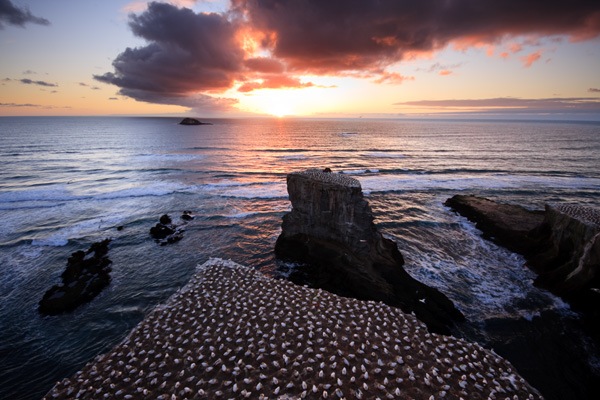
Here, I increased the exposure by a stop using exposure compensation. The histogram is further to the right, but no highlights have been clipped. These are the optimum exposure settings.

05.jpg

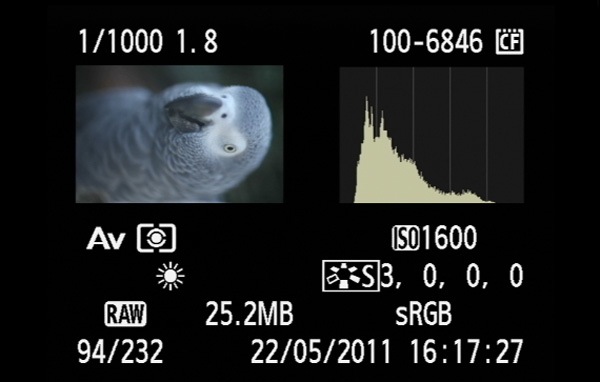
This is what happens if you increase exposure by too much. Here, I increased exposure by two stops. The histogram is cut off on the right hand side and the highlight alert (black region of photo) shows the clipped areas.

Exposure Technique

So, what’s the best way to put the exposing to the right technique into action?

A lot depends on what you are photographing. If your subject is static (such as a still life or a landscape) you have time to take a photo, look at the histogram, then change the exposure settings and take another one if necessary.

If you are shooting something like portraits or street photography you probably don’t have the luxury of time. But you should still check your histogram every now and then to see how your exposure is doing. If you notice that your camera is consistently under- or over-exposing the image, you can make an adjustment using exposure compensation. You may even find it easier to switch to manual mode. It’s your call – the most appropriate response depends on the situation.

High Contrast Scenes

The effectiveness of exposing to the right really depends on the contrast range of the scene that you’re photographing.

If you’re shooting a high contrast scene then you may find that you can’t successfully capture all the tones that you would like to, let alone use a technique like exposing to the right. The most common scenario where this might occur is in landscape photography, as the sky may be much brighter than the land.

If this happens to you, ask yourself whether the high contrast is a signal that you are shooting in the wrong light. It may be that you need to come back when the sun is lower in the sky. The quality of the light will be better and the contrast will be lower.

If the light is good, then there are two good options for dealing with the excessive contrast.

One is to use a graduated neutral density filter to reduce the brightness of the sky.

The other is to set the camera on a tripod and take two separate exposures, one for the sky and the other for the land, then merge the correctly exposed parts in Photoshop afterwards.

06.jpg

Here’s a landscape with a bright sky.

07.jpg

I created this version by taking separate images for the sky and the land and blending the two in Photoshop.

Flat lighting

If the light is flat then your camera will have no trouble capturing all the tones of your subject. The histogram occupies just part of the graph, and you can push it to the right by increasing exposure.

08.jpg

In this photo you can see that the histogram occupies just part of the graph. It is possible to increase exposure and push the histogram to the right to create a better quality Raw file.

Where Histograms come From

Finally, it helps to understand where the histogram comes from. When you take a photo on your EOS camera, even if you have selected the Raw format, the camera embeds a JPEG version of the photo you have just taken in the Raw file. The JPEG file is processed by the camera using the Picture Style and White Balance settings you have selected. The camera displays the JPEG file on your camera’s LCD screen when you play back your images.

The important thing to understand is that the histogram is generated from the JPEG file, not the original Raw file. This is significant for two reasons.

The first is that Raw files contain more highlight detail than JPEG files. If the histogram indicates that there are clipped highlights, that just means that the clipped highlights exist in the JPEG file. The highlight detail might be intact in the Raw file.

Some photographers may use this fact to encourage you to increase exposure to the point where the histogram shows clipped highlights, on the basis that you can pull back the lost detail when you process the Raw file. You can try that if you wish, but you’re taking bit of a risk, as you never really know at what point your highlights will clip.

The other thing to be aware of is that if you go into your Picture Style settings and increase the contrast, that only affects the JPEG thumbnail and not the Raw file. The more you increase contrast, the less accurate the histogram becomes in relation to the Raw file.

Understanding Exposure

09.jpg

My ebook Understanding Exposure: Perfect Exposure on Your EOS Camera covers everything you need to know in relation to exposure on your EOS camera. It’s on special now for a limited time at Snapndeals.

Post originally from: Digital Photography Tips.

Check out our more Photography Tips at Photography Tips for Beginners, Portrait Photography Tips and Wedding Photography Tips.

Exposing to the Right on Your EOS Camera


Digital Photography School

 
Comments Off on Exposing to the Right on Your EOS Camera

Posted in Photography


Tips For Choosing The Right Photographer For The Occasion

27 Feb

Choosing the right photographer for your special day can be a real concern for some, you want to have beautiful photos of the day that you can treasure forever. So it makes sense to do your homework before deciding on a photographer.

Here are some things you should be aware of before hiring your photographer to ensure your day goes as smoothly as possible.

Digital Or Film?

While the vast majority of photographers these days have made the switch to digital, there are some photographers who prefer to keep it traditional and use film. It is down to personal choice and budget as to which method you choose, bear in mind using film will be more expensive due to the process of developing the prints afterwards. The drawback of film is that it is not quite so easy to make changes to your prints, even switching a colour print to black and white. With digital, there is no danger of over-exposure and the photographer can literally take thousands of shots at no extra cost to you.

Today’s digital photography offers sharp, clear, bright photographs with great clarity. What’s more, digital film allows the photographer to quickly and easily edit the photographs, put them onto DVD and email the shots to the client. This means you can share your photographs with family and friends without waiting weeks after the event.

Choosing A Photographer

No photographer is alike; they have their own individual style which reflects in their work. Depending on the occasion in which you want the photographer for, you need to check out their portfolio. For example, a wedding photographer should have an extensive range of photographs in different conditions, outside, indoor, candid, formal and more classic shots. Businesses and corporations may wish to use a commercial photographer. Make sure the photographer you select has adequate experience in photographing most events such as weddings, christenings and graduations etc. Check out their colour and black and white work as there can be variations on both styles.

Personality

A sign of a good photographer is one that is prepared to listen to what you want and work closely with you to get the best results, a good photographer will never dismiss your ideas and tell you that he/she knows best, they will want you to be happy with their work and though they may offer their opinion the final decision should always rest with the customer. Also evaluate how they work with other people. A family photographer, particularly working with children should be patient and accommodating.

Experience

How long have they been in the business for? Do they have experience in working at many different events? Make sure they have at least a few years’ experience under their belt before hiring them for an important event. This will ensure that there are no tears when looking at the images of the day. Check out testimonials and ask around for references of your chosen photographer.

Pricing

Before signing on the dotted line, make sure the photographer is upfront about all of the costs involved. And don’t be afraid to ask. Be wary of photographers that offer a very low fee initially as you can get caught out when purchasing the prints as they most likely charge extremely high prices to buy the prints.

Get a full written and signed contract of what you are paying for, the hours, the location/s, the date/s of the event etc. Does the photographer have a cancellation policy? What about copyright?

By following these guidelines will assure that you will have a permanent record of your special day for many years to come.

This post was written by the team at Beck Photographic – the premier Northampton wedding photographers.

dslrBlog

 
Comments Off on Tips For Choosing The Right Photographer For The Occasion

Posted in Photography


5 Tips on How to Choose the Right Lens

19 Feb

Lens lust is a terrible thing. It didn’t quite make the list of the 7 Deadly Sins, but can still be an agonizing process that will have your significant other wondering if Zeiss Prime is the codename for an escort service. Choosing the right lenses is also a lonely decision. I get questions almost daily from people wondering which lens Continue Reading

The post 5 Tips on How to Choose the Right Lens appeared first on Photodoto.


Photodoto

 
Comments Off on 5 Tips on How to Choose the Right Lens

Posted in Photography


How To: Easily Fine Tune Your Flash Right From the Camera

18 Feb

Strobist reader (and relative lighting newb) Ron Ibarra of New York City asks, via Twitter:

"I can't control the flash through the PC cord. Am I doing something wrong?"

Nope, Ron, you are not. A PC cord is what we call a "dumb sync," meaning it only triggers the flash but does not otherwise control it. And if you are a smart photographer, all you really need is a dumb sync.

That's because you can control everything right from the camera itself. And today's follow-the-bouncing-ball post will show you the super-easy way to do just that.

Read more »
Strobist

 
Comments Off on How To: Easily Fine Tune Your Flash Right From the Camera

Posted in Photography


MIC HANDZ (freestyle) “RIGHT WHERE YOU STAND”

18 Jan

Shout Out and the highest level of respect to GURU RIP.. This Jadakiss assisted Premo track was so infectious and Hip-Hip that is was impossible for me to not attempt to make Guru and Premo proud!!! Recorded for the Mic Handz 2012 Release SAYOUAINTKNOW! Project Mic Handz delivers an array for flow pattern changes and a BlockBoy bravado worthy of this industries attention… Mic Handz has breached the perimeter and god help who ever is not paying attention… Your spots are in jeopardy …”These Half Ass Freshman Class, Bastids is Killin Me!!, ” Quoted “RIGHT WHERE YOU STAND” freestyle ,Mic Handz 2012
Video Rating: 4 / 5