RSS
 

Posts Tagged ‘REVIEW’

Review Comparison of the Canon EOS 70D vs Canon 700D / Rebel T5i

21 Mar

EOS 700D and 70D review comparison

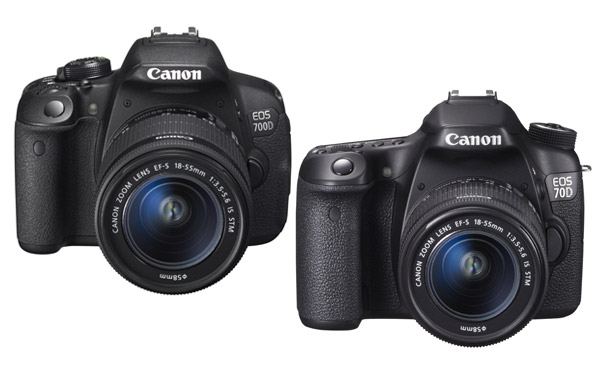
Earlier in the year I compared the EOS 5D Mark III and 6D, Canon’s least expensive full-frame cameras. Today I’m going to look at two other models that cause confusion: the Canon EOS 70D vs Canon 700D (Rebel T5i).

Note: North America readers will know the EOS 700D as the Digital Rebel T5i. EOS 700D is the European name for the same camera. It is called the Kiss X7i in Japan.

The confusion arises because many photographers, when buying a new camera, start by searching online for information. While there are lots of websites that list the differences between the two cameras, it isn’t always easy to understand which of these matter to you.

The major differences

I’m going to start by looking at the major points of differentiation between the two models. It’s impossible to list them all, but these are the ones most likely to influence a buying decision:

Price

Budget is an important part of the buying decision, and there is a sizeable difference in price between the two models. At the moment you can buy the EOS 700D (Rebel T5i) body only for around $ 700 and the EOS 70D for about $ 1100 (body only prices, excluding tax). The difference isn’t really surprising considering the difference in specifications between the two models.

Bottom line:  If you’re on a tight budget then the EOS 700D (Rebel T5i)  is the model for you, but not before considering the benefits of the 70D.

Megapixels

Not really a big deal in today’s world of high megapixel digital cameras, but it may matter to some. The EOS 70D has a 20.2 megapixel sensor compared to the EOS 700D’s (Rebel T5i) 18.0 megapixels.

EOS 700D and 70D review comparison

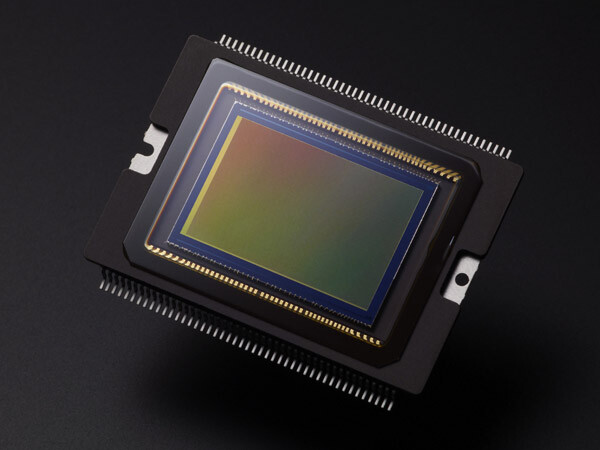
The sensor of the EOS 70D. Both cameras have an APS-C size sensor with a similar megapixel count.

Bottom line:  The difference between the two models is negligible, and shouldn’t greatly influence your decision.

Autofocus performance

This is a big difference. Minor differences aside (and excluding AF in Live View or movie mode), the autofocus of the 70D is the same as that found in the more advanced Canon EOS 7D camera. It has 19 cross-type AF points (the more reactive ones) plus a transmissive LCD screen in the viewfinder that lets you configure different display options.

By contrast the EOS 700D (Rebel T5i) has 9 cross-type AF points and a fixed viewfinder display. This diagram shows the difference between the two:

EOS 700D and 70D review comparison

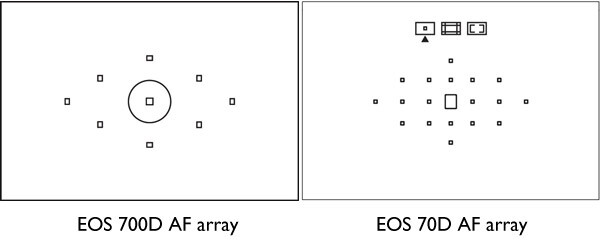
The autofocus arrays of the EOS 700D (Rebel T5i) and 70D compared

The higher AF point count of the EOS 70D makes it better for shooting moving subjects, as there are more AF points to measure the focusing distance to the subject. It is also more likely that you can find a well placed AF point to use when photographing still subjects, without having to focus and recompose. This is useful when using prime lenses at wide apertures, where the margin of error for focusing is small.

The autofocus of the EOS 70D also excels when using the camera in Live View or movie mode. It uses new technology called Dual Pixel CMOS Autofocus, the only EOS digital SLR to do so. This is mainly of interest to people who want to use the camera to shoot movies.

You can read about the autofocus performance of the EOS 70D in more detail in my article Understanding EOS Autofocus: The EOS 70D.

Bottom line:  The autofocus performance of the EOS 70D is much better than that of the EOS 700D (Rebel T5i). If you want to buy an EOS digital SLR to shoot movies, the 70D currently has the best AF performance in movie mode.

Lens micro-adjustment

The EOS 70D allows you to calibrate your lenses so they focus as accurately as possible. This is a feature found only on higher end Canon cameras and will appeal in particular to photographers who use prime lenses at wide aperture settings, where AF performance is critical. The EOS 700D (Rebel T5i) doesn’t have this feature.

Bottom line:  Autofocus micro-adjustment complements the more advanced autofocus of the EOS 70D. It is Canon’s least expensive camera with this feature.

The Quick Control dial

The Quick Control dial is one of the features that differentiates mid-range EOS cameras such as the EOS 70D from enthusiast level models like the 700D (Rebel T5i). It is located on the back of the camera where it is easily moved by your thumb when holding the camera. The benefit of the Quick Control dial is that it lets you adjust exposure compensation and focus point selection easily while looking through the viewfinder. This speeds up the photo taking process and may make the difference between getting a shot and missing it. The cross keys on the EOS 700D (Rebel T5i) can be used while looking through the viewfinder, but are much harder to do so.

This diagram shows the difference between the two:

EOS 700D and 70D review comparison

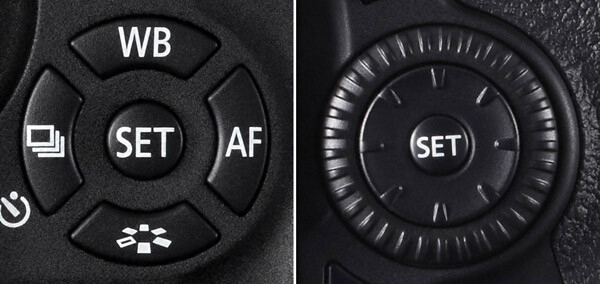
These photos show you how the Quick Control Dial (700D/T5i – left image) and (70D – right image above) cross keys influence the design of the back of the camera:

EOS 700D and 70D review comparison

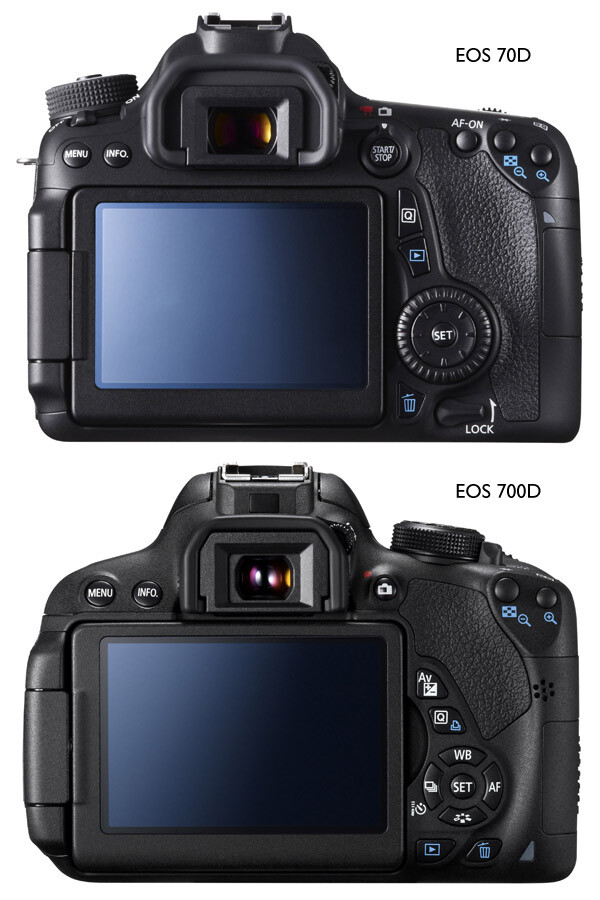
Another advantage of the Quick Control dial is that it lets you scroll very quickly through your images when playing them back on the camera’s LCD screen.

For me, the Quick Control dial is so useful that I never want to use another camera without it.

Bottom line:  The Quick Control dial on the EOS 70D makes it easier and quicker to use in many situations. This is something you can only appreciate by trying the camera out, so make sure you do so before making a buying decision.

Size and weight

The EOS 70D isn’t a great deal bigger than the 700D/T5i, but it is heavier (755 grams/1.6 lbs. compared to 580 grams/1.3 lbs.). If you are intending to carry the camera around all day, then the lighter 700D/T5i may have more appeal. But it really is subjective, and this is where the hands-on comparison comes in again. I cannot stress the importance of trying out both models to see which one you prefer to handle.

Bottom line:  Try before you buy, as preferences when it comes to size and weight are personal.

Built-in Wi-fi

The EOS 70D has built-in Wi-fi, the EOS 700D/T5i doesn’t. The Wi-fi feature lets you:

  • Transfer images to other Canon cameras with Wi-fi
  • View saved images or operate the camera from a smartphone (the free app EOS remote is required)
  • Print images using a Wi-fi printer
  • Operate the camera remotely using EOS Utility (free software that comes with the camera) which lets you transfer photos wirelessly to your computer, something that photographers working in a studio may find useful
  • Upload images to Canon iMage Gateway, a free photo online service for Canon camera owners(but not to photo sharing sites like Flickr or FTP)
  • View photos on a television screen if you use a media player supporting (DLNA) Digital Living Network Alliance

You can’t do any of those things with an EOS 700D/T5i, nor can you buy a Wi-fi unit for the camera.

Bottom line:  If Wi-fi is important to you, then buy the EOS 70D. If you shoot tethered in a studio, remember you can transfer images to a computer using an extra long USB cable if your camera doesn’t have Wi-fi.

Electronic Level

The EOS 70D has an electronic level display that you can view on the LCD screen. It is useful for taking photos with a level horizon when you have the camera mounted on a tripod. There is also an electronic level display in the viewfinder to help you keep the camera level when shooting hand-held. The EOS 700D/T5i doesn’t have this feature.

Bottom line: The electronic level is a useful feature, especially for landscape photographers. However, if your budget doesn’t stretch to the EOS 70D, remember you can buy an inexpensive spirit level that fits in the EOS 700D/T5i’s hotshoe for landscape photography.

Shooting speed

The EOS 70D can shoot at 7 frames per second (fps), the 700D/T5i is a little slower at 5 fps. How important this is depends on the subjects you shoot – it is more likely to be of interest to those of you into sports and wildlife photography.

Bottom line: The more advanced autofocus and higher shooting speed of the EOS 70D makes it the better model for sports and wildlife photography.

Minor differences

There are lots of minor differences between the two cameras, so I’ve provided some links to in-depth reviews so that you can get more information before making a purchasing decision. You’ll also see some photos taken with both models. In the meantime, if you own or have used either of these cameras, why not tell us what you think in the comments. Why did you choose one or the other, and do you think you made the best choice?

EOS 70D reviews

  • Digital Photography School
  • DP Review
  • Camera Labs
  • Petapixel

EOS 700D/T5i reviews

  • Digital Photography School
  • DP Review
  • Pocket Lint

Finally, if you want to ask owners of these cameras what they think, a good place to do so is the EOS magazine forum. It’s a high quality forum with lots of helpful members. You should also take a look at EOS magazine – the most in-depth magazine for Canon EOS users you can buy.

For more reviews and discussion on cameras and equipment see our Cameras section!


Understanding EOS – a new ebook

Understanding EOS ebookMy ebook Understanding EOS is written for photographers who want to learn to get the best from their EOS cameras. It teaches you everything you need to know to take control of your camera and start creating beautiful photos. Click the link to learn more.

The post Review Comparison of the Canon EOS 70D vs Canon 700D / Rebel T5i by Andrew S. Gibson appeared first on Digital Photography School.


Digital Photography School

 
Comments Off on Review Comparison of the Canon EOS 70D vs Canon 700D / Rebel T5i

Posted in Photography


Best of both worlds: Sony Cyber-shot DSC-RX10 review

20 Mar

rx10.jpg

The Sony Cyber-shot DSC-RX10 looks at first glance a bit like a high-end superzoom with its 24-200mm equivalent F2.8 lens. That’s a fairly modest range by modern standards, but then the camera’s 1″ sensor is very large compared to conventional superzooms. Sony has put a lot of effort into the camera’s video capabilities and tools, making it more than just a stills shooter, but are the sum of these parts enough to make the whole worth $ 1300? Find out in our review

News: Digital Photography Review (dpreview.com)

 
Comments Off on Best of both worlds: Sony Cyber-shot DSC-RX10 review

Posted in Uncategorized


Stellar Phoenix Mac Photo Recovery Software Review

19 Mar

The “click of death!”

I’m sure it’s happened to you at some point or other, a drive dies *click bzzt click bzzt click*  or a memory card stops working for some unknown, and entirely frustrating reason. I’ve used pretty much every memory card and hard disk on the market at some point or another, and have lost images to the “corruption demons” with a couple of them… Here’s how to get those files back!

Photo recovery software to the rescue!

simon pollock photography gtvone

It’s not always the fault of the card or the drive – a premature ejection like pulling the drive out of your computer / usb / firewire or indeed grabbing a card out of your camera while it’s writing a file – most of the time the file system (like a set of drawers on the card or drive) manages to put the data away before stopping, but sometimes, like my office floor, things are left everywhere and that’s when you encounter data corruption (very basically).

Stellar Phoenix Mac Photo Recovery 6 Mac

stellar phoenix photo recovery software review

What they say

Stellar Phoenix Mac photo recovery is a utility that recovers deleted, formatted, lost photos, pictures, songs, movies, and other multimedia files from Mac systems.

  • Recovers from Mac – Systems, External Drives, USB Drives, iPod and Digital Cameras
  • Supports a wide range of image, audio, and video file formats
  • Supports hard drives with capacities over 2 TB
  • Efficient Scan Engine scans the storage media faster
  • Also recovers Thumbnails of the corresponding image files
  • Compatible with Mac OS X 10.5 up to the Latest OS X Mavericks

What we say

After recovering from all kinds of old drives, CF cards (a 16mb one from a LONG time ago) including a 2TB disk, I am very happy with Stellar Phoenix Mac Photo recovery! It’s dead easy to use – you start it up, choose your drive and click recover… Sure, you can head into the advanced tab and recover only single file types if you wish, for example if you were after a set of CR2 files (Canon RAW) from a CF card, you could narrow your search down to just those files. Once scanned you can save the scan / found files information if you wish to restore the files at a later date.

5

I started this review a long time ago and, with the first version of the software, I had some minor issues – it called a CR2 a DNG and so on, which in the big scheme of things wasn’t a total fail, but could be very confusing… I was able to give this feedback to the creators, and with the new version there are no issues, and none of the previous bugs.

There are two versions of the software, one that simply recovers any of your media files and another slightly more expensive ($ 39 vs $ 49.99) version that also repairs corrupt jpeg files. I am using the regular version and I did encounter a couple of corrupt images, I hope to run through the same tests with the platinum version soon.

Recovery time was about average based on my previous experience (Yes, the photo at the top is me and yes, we’d just lost a 9TB storage array… long story) with a CF card of 16GB taking a bit over an hour and a 2TB drive via USB taking about a day and a half. In both cases I was able to successfully recover the data I needed.

Data recovery isn’t always guaranteed, I’m not going to lie – sometimes the pretty photographs just don’t want to come back. ever. I was able to recover everything I set out to recover using Stellar Phoenix Mac Photo software in this case.

Conclusion… Based on my time in I.T. and my previous experience with recovery software, I’m happy to recommend this software if you find yourself in a spot of digital bother.

For more on image recovery and back up see:

  • Recover Images from a Damaged SD card
  • Recovering lost or deleted files – Backing Up & Saving Your Images: Part 4
  • Memory Cards – How to Extend Their Life and Keep Them Healthy

The post Stellar Phoenix Mac Photo Recovery Software Review by Sime appeared first on Digital Photography School.


Digital Photography School

 
Comments Off on Stellar Phoenix Mac Photo Recovery Software Review

Posted in Photography


Little wonder: Samsung NX mini First Impressions Review

19 Mar

NX-MINI-9-27MM-Lens_006_R-Perspective_Black.png

Samsung has announced the NX mini, the world’s slimmest interchangeable lens camera. It boasts a 1-inch, 20MP sensor and provides all of the wireless connectivity we’ve come to expect from Samsung’s cameras. We spent a little bit of time with a pre-production unit getting to know it, photographing it, and pondering its existence. Take a look at some hands-on photos and read our first impressions of Samsung’s latest (and littlest) connected, mirrorless camera. 

News: Digital Photography Review (dpreview.com)

 
Comments Off on Little wonder: Samsung NX mini First Impressions Review

Posted in Uncategorized


OM sweet OM: Olympus OM-D E-M10 review

18 Mar

omd_em10_beauty.jpg

The Olympus OM-D E-M10 is the third incarnation of Olympus’ popular range of high-end mirrorless interchangeable lens cameras. The E-M10 boasts some impressive DNA, using the same excellent 16MP Four Thirds sensor as its E-M5 sibling. We’ve been shooting with it extensively over the past few weeks, hoping to find out whether this ‘digital’ OM is as capable as the two that preceded it. Those are two solid acts to follow – how does the OM-D E-M10 perform? Find out in our review

News: Digital Photography Review (dpreview.com)

 
Comments Off on OM sweet OM: Olympus OM-D E-M10 review

Posted in Uncategorized


Nikon D4s studio samples added to first-impressions review

18 Mar

specs.jpg

We just added studio test scene images to our First Impressions Review of the Nikon D4s. The D4s is a refined version of Nikon’s flagship DSLR, incorporating several changes – large and small – resulting from feedback from professional users. As well as minor ergonomic refinements and a slightly improved video mode the D4s also offers a highest ISO sensitivity of 409,600 (equivalent) – the highest we’ve ever seen. Click through to see for yourself what that looks like. 

News: Digital Photography Review (dpreview.com)

 
Comments Off on Nikon D4s studio samples added to first-impressions review

Posted in Uncategorized


Dusted off and updated: Nikon D610 review

13 Mar

P3111165.JPG

The D610 is the exact same as the D600 but with a new shutter mechanism that boosts continuous shooting and adds a ‘Quiet Continuous’ mode. The only other upgrade is an improved auto white balance system. Although the D610 lacks some of the frills, like built-in Wi-Fi, GPS or an articulated LCD, it’s a lot of camera for the money. Do the slight updates still make the D610 a compelling option in a growing full-frame market? Find out in our review

News: Digital Photography Review (dpreview.com)

 
Comments Off on Dusted off and updated: Nikon D610 review

Posted in Uncategorized


Wireless K-3 control: Pentax FluCard review

07 Mar

Pentax_FluCard.jpg

The Pentax O-FC1 FluCard offers quite a bit more than just Wi-Fi image sharing and transfers, but not quite as much as some wired tethering applications. This makes it a mixed bag as a general camera tool, but one that has been entirely out of reach for Pentax for quite some time.. In light of this, is it worth the $ 99 price tag? Find out in our review

News: Digital Photography Review (dpreview.com)

 
Comments Off on Wireless K-3 control: Pentax FluCard review

Posted in Uncategorized


SensorKlear Loupe Kit Review

07 Mar
sensor-klear-kit-review-dps-002

The SensorKlear Loupe Kit from LensPen.

A couple of years ago, I decided it was time to face my fears head-on. Since the day I had unboxed my first DSLR I’d fallen victim to all of the various doomsday warnings about the horrors that could befall me if something went wrong while cleaning my sensor. Don’t get me wrong– those warnings are all valid. Messing this up could scratch the sensor, push it out of alignment, or even break it, just to name a few. I’d always figured that if something was going to go wrong, I wanted it to be someone else’s fault– someone who would have to pay to replace the camera or repair the damage. Luckily, I have a great local camera shop that offers sensor cleaning twice a month and does a great job, but I finally got to that “how-hard-can-it-be?” point and decided it was time to learn.

DOOMSDAY WARNING: I would be totally remiss if I didn’t offer my own caution flag. If any part of cleaning your own sensor makes you the slightest bit uncomfortable, you should absolutely not do it. The consequences I mentioned above are only a few of the things that can happen if this delicate task is done incorrectly. There are a lot of products out there to help you clean your sensor, some better than others. You should thoroughly research any product before sticking it into your camera. Also make sure that it comes with clear, easy-to-follow instructions.

The SensorKlear Loupe Kit comes from the same company that manufactures the LensPen–one of my favourite lens-cleaning tools. The sensor-cleaning kit contains three components. The SensorKlear Loupe, the LensPen Hurricane Blower, and the SensorKlear II Pen.

The Loupe

For me, the biggest drawback to most sensor-cleaning products is that you really can’t see what you’re doing. The SensorKlear Loupe changes that, providing an illuminated, magnified view of the sensor. Being able to quickly and easily detect sensor dust not only makes the task of cleaning it easier, but also tells you whether your sensor even needs cleaning at all. There’s no sense sticking anything in your camera unnecessarily. The loupe is also designed with an opening on the side, allowing access for the cleaning tools while maintaining your view of the sensor. The loupe uses two AAA batteries (included) and fits perfectly over the camera opening. Be sure to check your camera’s owner’s manual for instructions on locking the mirror in the “up” position for sensor cleaning.

The loupe provides an illuminated, magnified view of the sensor, making dust removal easier.

The Blower

Chances are you probably already have a similar blower in your gear bag, so I’m not going to take up a lot of your time describing this one. It’s a blower–plain and simple. By now I’m sure you know to not let canned air anywhere near your sensor. The velocity of the air can blow the sensor out of alignment and the chemical propellant can permanently damage its surface. The hand blower is the most basic solution–and perfectly suited to the task–for removing dry dust particles from your sensor.

The SensorKlear Pen

Sometimes, though, you’re battling more than just dry dust. Every once in a while, sticky particles decide to make your sensor their new home. For those situations, the SensorKlear Pen has worked flawlessly each time I’ve used it. The tip is a smaller version of the LensPen tip and is impregnated with a patented carbon cleaning compound that removes and absorbs the more stubborn dust and other particulates that find their way into cameras and onto sensors. The adjustable angle of the pen works perfectly in conjunction with the loupe, allowing you to use it an angle that doesn’t block your view of  the sensor.

sensor-klear-kit-review-dps-005

Wrap-Up and Recommendation

As with anything, there is no one perfect solution to the challenge of maintaining a dust-free sensor. For me, though, the quality of the tools, their ease of use, as well as their results, make this kit a great choice if you are ready to start cleaning your own sensor. If you’re already one of the brave ones, share your recommendations in the comments.

The SensorKlear Loupe Kit is available on Amazon.

More on sensor dust and how to remove it:

  • Got Sensor Dust? Here’s How to Check.
  • Do you Clean your Own Sensor?
  • How to Remove Sensor Dust With Lightroom

The post SensorKlear Loupe Kit Review by Jeff Guyer appeared first on Digital Photography School.


Digital Photography School

 
Comments Off on SensorKlear Loupe Kit Review

Posted in Photography


Distinctly evolved: Fujifilm X-E2 review

06 Mar

xe2_beauty.jpg

Fujifilm’s idea of a mid-range camera is a remarkably photographer-friendly affair, and the X-E2 is the latest example of that. It’s superficially similar to its predecessor, the X-E1, but adds the X-Trans CMOS II sensor that includes on-chip phase detection elements to allow continuous autofocus. It also has a nicer rear screen and built-in Wi-Fi, along with a host of small operational and feature tweaks. Is the X-E2 a photographic tool that lives up to the promise of its classic looks and control layout? Find out in our full review

News: Digital Photography Review (dpreview.com)

 
Comments Off on Distinctly evolved: Fujifilm X-E2 review

Posted in Uncategorized