RSS
 

Posts Tagged ‘REVIEW’

ThinkTank StreetWalker HardDrive backpack review

26 Apr

ThinkTank-Streetwalker-1.jpg

A good photography backpack is capable of stowing essential elements like a full-size camera body, small family of lenses, laptop, tripod, and all necessary accessories. A truly great backpack can carry all of that while being carry-on friendly and providing a high level of comfort and adjustability. The minds at ThinkTank strove to bring that full package with the StreetWalker HardDrive photo backpack. But does it provide enough bang to justify its $ 229.75 price tag? Find out in our review

News: Digital Photography Review (dpreview.com)

 
Comments Off on ThinkTank StreetWalker HardDrive backpack review

Posted in Uncategorized


All teed up: Leica T First Impressions Review

25 Apr

leica-front.jpg

Leica’s new T (Typ 701) is the company’s first mirrorless interchangeable lens camera with autofocus. While its ‘guts’ aren’t much different than other cameras in its class, the hand-built body is all Leica. We’ve been able to spend some quality time with the German manufacturer’s latest baby, and have put together our first impressions of it. Find out what we think of it thus far.

News: Digital Photography Review (dpreview.com)

 
Comments Off on All teed up: Leica T First Impressions Review

Posted in Uncategorized


23 April, 2014 – Olympus OM-D EM1 and Fuji XT-1 Video Review

23 Apr


Mirrorless cameras are getting a lot of attention these days.  The new Fuji XT-1 and Olympus OM-D EM1 have redefined this format.  Both Kevin Raber and Michael Reichmann have adapted this format for much of their shooting.  We plan to do some more articles going over this format and using it on an everyday basis.  There will be some future articles on this soon.  In the mean time Luminous-Landscape made a video review on using both the Olympus and Fuji.

In a two-part video review, Kevin Raber (Luminous Landscape’s Publisher) takes a close look at the Olympus OM-D EM1 and the Fuji XT-1. These two mirrorless 16 megapixel cameras each offer very high image quality but differ radically in their design approach, features and intended user.

In Part One, Kevin details the features and functions of each camera.

In Part Two, the video follows Kevin on a field shoot in Zion National Park, Utah. He talks through his use of the cameras while shooting and demonstrates the cameras’ controls. He also offers some observations & advice while shooting.

These videos are available in the Video Store now for $ 10.00 USD. Or if you are a subscriber as part of your subscription. 


There aren’t too many places to slow your photography down and to work the landscape as Isle Of Skye. Come join Kevin Raber, Steve Gosling and Joe Cornish on an amazing photographic adventure to this amazing landscape.  It gets even better as this is being held with the cooperation of Phase One as a PODAS workshop and each participant will receive a Phase One camera system to use for the duration of the workshop.  There isn’t a better camera system to do the Islel Of Skye Landscape with than the Phase One camera and digital back.  Spaces will go fast for this workshop.  Your workshop fee provides you with an all expenses paid worry free trip. All you need to do is get to the Inverness airport.  Learn more about this amazing week of photography HERE.

If you can’t make this workshop check out our other workshops.  We have an amazing small ship cruise in July to The Land Of The Polar Bear.  We have only select berths left for this trip so please inquire.   And our August Palouse Harvest workshop is filling fast. There are still a few berths left for our second Antarctica Workshop next January. 

Mark your calendars for December of this year in New Zealand, details coming soon and a most amazing adventure next April aboard the True North sailing the Kimberley region of Western Australia.


The Luminous Landscape – What’s New

 
Comments Off on 23 April, 2014 – Olympus OM-D EM1 and Fuji XT-1 Video Review

Posted in News


For starters: Nikon D3300 review

22 Apr

beautyshot_1_.jpg

Nikon’s introduction of the D3300 at this year’s CES didn’t shake up the industry, but it was still a noteworthy launch. The entry-level 3000 series have been popular with consumers looking to making a first step into more advanced photography, and the 24 megapixel D3300 is the latest generation in that popular line. With 1080/60p HD video capture, 5 fps burst shooting and 700-shot battery life it provides a beginner with some useful tools to experiment with. Is it a clear winner in the entry-level class? Read our full review

News: Digital Photography Review (dpreview.com)

 
Comments Off on For starters: Nikon D3300 review

Posted in Uncategorized


21 April, 2014 – Panasonic GH4 Review

21 Apr

The Panasonic GH4 is a new micro four thirds system camera that is fully competitive in terms of features, functionality and image quality with anything currently on the market. It leaves little undelivered for stills work. If a 16MP image size is adequate for your shooting (and it is for mine), then you’ll likely find the GH4 a very practical and enjoyable stills camera.

When it comes to video, the GH4 is in a class of its own. There is nothing currently on the market, or even announced from any manufacturer, that can trump the GH4 when it comes to video in a DSLR / CSC form factor. This is the only camera of its type that can shoot 4K to an internal card, and which also features variable frame rates in HD mode. 

You can win an all-expenses paid photographic expedition to Antarctica, along with air fare from anywhere in the world. The value of this prize is $ 15,000.

The Luminous Landscape wants you to try any of our more than 60 training or travel videos and our new free video player. Each purchase is an entry, and an annual subscription that includes all previous as well as new videos counts as six entries. The winner of a free lifetime subscription is also chosen from each month’s entries.


 FIND OUT MORE


The Luminous Landscape – What’s New

 
Comments Off on 21 April, 2014 – Panasonic GH4 Review

Posted in News


Light Blaster [ For Special Effects Lighting ] a Review

20 Apr

Sometimes a new piece of camera equipment will let you do something better, faster, or cheaper. But sometimes it lets you do something wholly new, that nothing else can do, and it opens up a whole new world of creative opportunities. The Light Blaster is that kind of gear.

Light blaster 33 1024 resize

By combining a flash, a lens, and one of many different slides which you can buy or provide yourself, the Light Blaster lets you project an image into your scene or onto the subject. Like any new piece of equipment there’s a bit of a learning curve, but you can create effects that add to your photo in ways only possible with tricky DIY hacks until now.

How it works

The Light Blaster is a strong plastic shell that acts as a mount to hold the three key elements – lens, flash and slide – securely in place and in the correct relative positions. You provide a lens and a flash. The lens attaches to the front via an EOS bayonet mount (a Nikon adapter is available). There’s no lock, but it is held firmly. At the back you slide in your flash, which is held in place with a strong leather friction-secured strap, which is adjustable and held in place with velcro. Flashes of many sizes are accepted, and I tested with a Canon 580EX and a Lumopro 160.

In the centre of the Light Blaster there is a slot which accepts the provided caddy. The caddy holds the slide which is to be projected. You can use standard mounted 35mm slides or small plastic sheets about the size of a coloured gel you might put on the front of your flash. Just on that topic: you can gel the flash you’re using to give a colour tint to the projected image as well. The caddy is super easy to swap, although putting the slide in can be a wee bit fiddly. Topping off the well designed and sturdy construction is a metal tripod thread on the bottom in the thickest part of the plastic body so that you can securely mount the whole arrangement on a light stand.

Looking at the whole thing assembled, one might think it’s a bit precarious and that the lens or flash could be bumped and fall out, but that was not my experience at all. Everything felt sturdy and secure, and I didn’t mind picking up the light stand with everything attached and moving it around the set.

The Light Blaster also comes with a convenient case which safely holds everything, including a whole bunch of slides and an extra caddy in a small package with a fabric handle.

The Results

While I was testing out the Light Blaster I used it primarily in three different ways:

  1. Projecting onto the background
  2. Projecting onto a model
  3. Projecting into the air itself with the aid of a smoke machine

Here are some examples:

Creek 131110 078 X3 resize

Model: Mei Hikari

For this shot I projected a pair of wings onto a large wall behind the subject. It was dusk and low light, so the flash projection was easily visible, even though it’s a dark wall. The contrast was enhanced in post processing. The image projected ended up being about three meters wide. It took a few shots to get myself and the model lined up exactly right, since you can only see the projection on the camera screen. Have a look at the rest of the photos from this shoot here.

Creek 140319 236 X3 resize

Model: Graciously

I used the Light Blaster to project a simple circle of light onto the backdrop behind my model in this burlesque style shoot for a “stage” feel. While a snoot can restrict the light to a spot, only a focussed light can create the sharp clean edge I wanted, like a stage spotlight, or the Light Blaster. See more photos from this shoot.

Creek 140319 383 X3 resize

Model: Graciously

Later in the same shoot I fired up my smoke machine, and using a random geometric pattern on one of the effects slides, I created cool light beams through the smoke. The shafts of light you see wouldn’t be possible with a single light. It needs to be broken up in order to cast shadows into the smoke.

I NXG3q3z X3 resize

Here a photo of autumn leaves was projected directly onto the model and background, creating interesting layers of texture and shadow. I filled in the shadow of the model’s face with a tightly gridded flash to make his whole face visible. Projecting onto the model can be tricky to get right, but the results can be impressive. I want to experiment more with this technique. I think it is particularly well suited to art nude photography.

Any Problems?

There’s a couple of potential ‘gotchas’ when using the Light Blaster, which you’ll need to overcome and learn how to work with, but that’s true of any piece of gear in your kit.

Firstly, you’ll most likely want the projected image to be in focus, which is achieved by turning the focus ring on the attached lens, (make sure it’s in manual focus mode). Since the image is only visible when the flash fires, you’ll need to use a flashlight in place of the flash before you add the flash to the back. You’ll need the set to be quite dark or use a bright flashlight to see well enough to focus, and if you move the Light Blaster relative to the surface it’s being projected onto, you’ll need to take the flash out and re-focus.

As mentioned in the first example shot above, it can be tricky to get the best placement of the image, your model and yourself. You might need to take several shots and make small adjustments each time.

Because there’s a powerful flash shining through the slide, the blacks are never going to be truly black. Some of the light will still pass through the black ink or emulsion, so the contrast might not be as good as you’d like it to be. To address this issue, a brand new set of laser-cut metal “slides” has just been announced for the Light Blaster. This will give you absolutely solid blacks.

Conclusion

I had a great deal of fun testing this product, and I’m looking forward to using it in future shoots. With a good variety of effects slides available from the Light Blaster site, the ability to take any 35mm slide, and even home-printed acetate slides, there is literally unlimited creative potential. You can put any backdrop you like behind your subjects, and transport them to another world. Or you can use it in ways similar to what I have here. Have a look at the Light Blaster site for more example photos. For under $ 100, this is a super versatile creative tool to add to your kit.

Want more on special lighting techniques? Try these articles:

  • How to Create this “Fight Club” Inspired Portrait using One Light
  • Accent Lighting for Portraits
  • Studio Lighting: Building a Light Set-up
  • How the Shot was Done: SNK Police Cosplay

The post Light Blaster [ For Special Effects Lighting ] a Review by Neil Creek appeared first on Digital Photography School.


Digital Photography School

 
Comments Off on Light Blaster [ For Special Effects Lighting ] a Review

Posted in Photography


HDR Darkroom 3 Software Review

19 Apr

Digital cameras may be making incremental improvements with dynamic range capabilities, but are still lacking in terms of what they can capture. Bracketing multiple exposures of the same scene and merging them together with tone mapping software is one way of creating an HDR photograph allowing you to capture the full range of the scene in front of your camera.

HDR-darkroom3

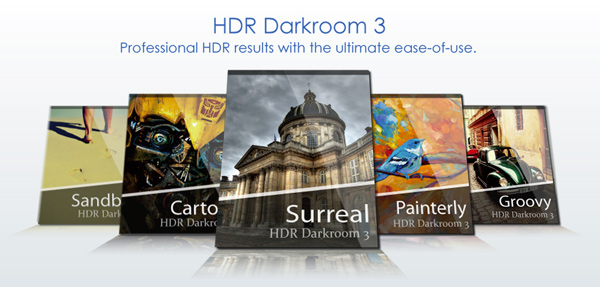
The people at Everimaging have recently upgraded their HDR tone mapping software offering to its third edition, and as a result today we’re going to talk about HDRDarkroom 3. It’s available for both Mac and Windows users, and a free trial version can be downloaded from their site.

What’s Cool About HDR Darkroom 3?

The number one thing that stands out to me is the user interface. The simplicity of the way that HDR Darkroom 3 uses presets to get you started with tone mapping is unique, and takes a lot of the work out of finding the right starting point. The program is also stripped down in a way that gives even the most novice HDR photographer an easy learning curve to get started.

HDRDarkroom3-review-2

When you launch the program you can choose from three different import methods: New HDR, Single Photo and Batch. These work as you might expect where New HDR allows you to choose the set of bracketed images that you’d like to work on, single photo allows you to tone map a single photograph and batch processing allows for processing a batch of HDRs using the same settings.

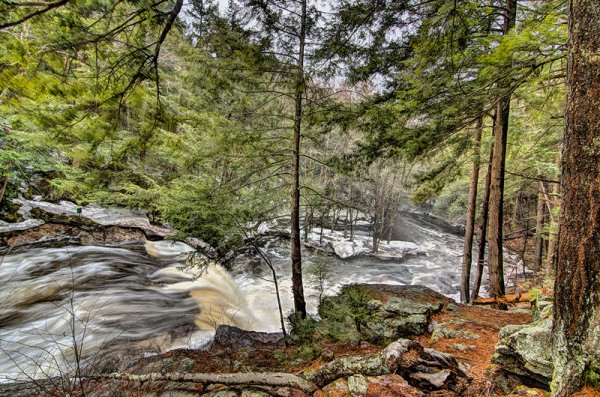
For this review I’ll be using a three bracket set I took while photographing waterfalls recently. When importing photographs you can have HDR Darkroom 3 align the images by either a fast method or advanced method. When switching between the two options there is no difference to the user interface (both options are completely software driven) so I’m assuming this is just going to depend on the amount of time it takes for the merge to be completed.

On top of the alignment you can also have HDR Darkroom 3 take care of ghosting effects by checking the appropriate box. Again, this is a very simplistic approach, where the user is left at the mercy of the algorithm inside the program with no ability to customize which areas of the photograph to focus on, or the intensity of the ghosting effect removal.

HDRDarkroom3-Review-3

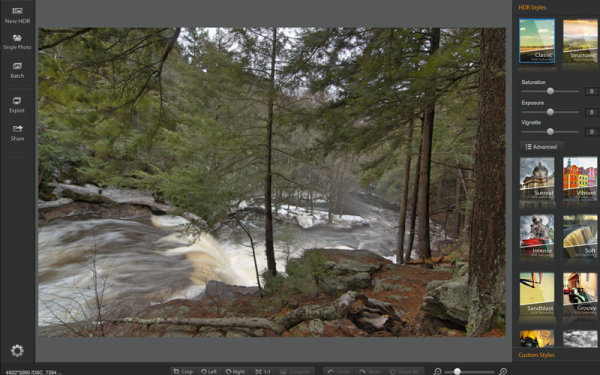
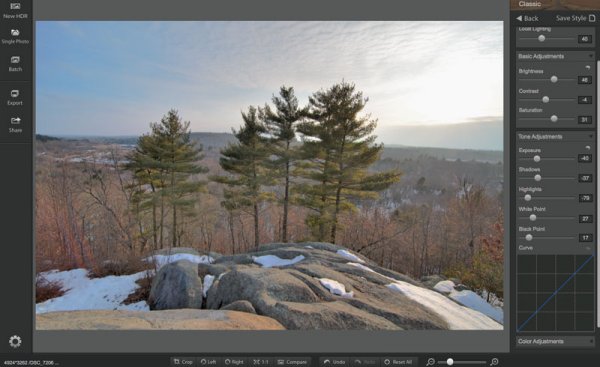
After importing your image you are defaulted to the ‘Classic’ preset which is a very standard almost uninteresting HDR image. On top of this preset the program comes packed with 15 more for you to choose from and the option to save any modifications that you’ve made as custom presets.

HDR Darkroom 3, unlike the other programs in the industry, actually forces you to start with a preset. You choose which one you like best for the image that you’re working on and each one will change the image to achieve a particular look.

HDRDarkroom3-Review-6

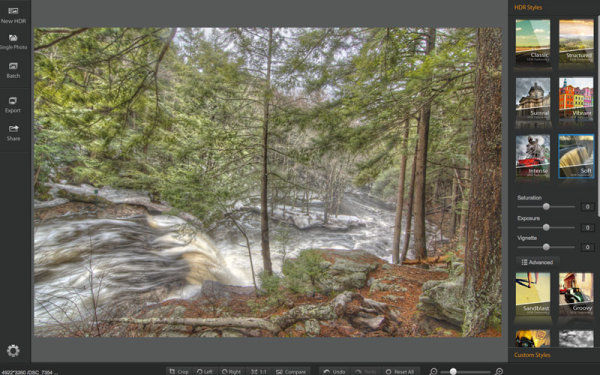
When you have found a preset that you like for the image, you can then customize it to your liking with three different sliders for Saturating, Exposure and Vignette as well as an advanced button for more freedom in the editing process.

HDRDarkroom3-Review-5

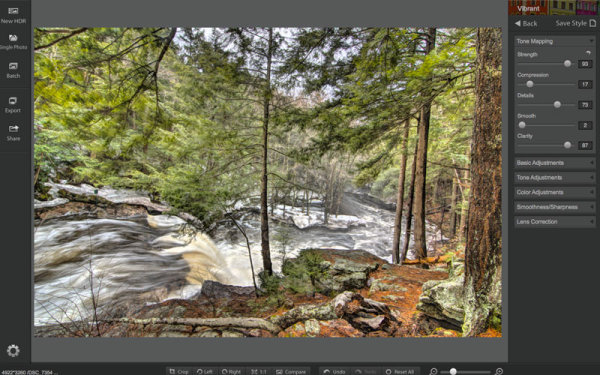
Once in the advanced section you have access to many of the tools you might expect like: tone mapping, basic exposure and contrast control, highlight and shadow adjustments, white and black point adjustments, and other tools for color, smoothness and even lens correction.

HDRDarkroom3-Review-4

Overall, HDR Darkroom 3 does do a good job at processing a bracketed set of photographs with a slick, easy to use interface to boot. However, for those who do want a little more control, it might be just a bit too limiting. One of the biggest things that I felt was missing was a local adjustment brush for finer control over where effects were being applied.

HDR-Darkroom3-Review-7

How’s HDR Darkroom 3 handle worst case high dynamic range?

The waterfall photo above that I used for the walkthrough is a fairly easy shot for an HDR process as its low on dynamic range and won’t really push the software to its maximum potential. But, I didn’t want to be too unfair in the introduction.

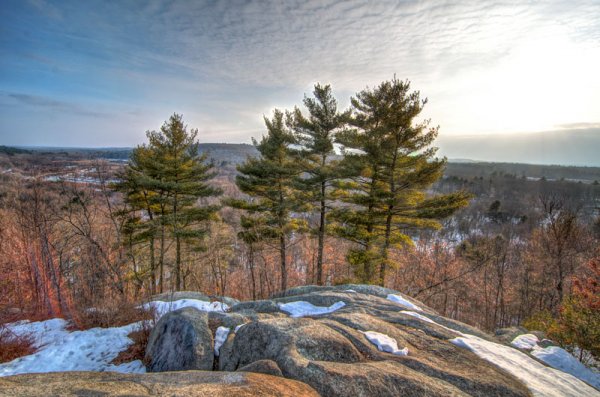
So let’s take it a bit further, let’s try and and do something close to a worst case scenario HDR. The image below is made up of three bracketed images shot at +2, 0, -2 directly into the sun. Plus there’s snow and shadows in the foreground to deal with as well, making for a truly difficult shot.

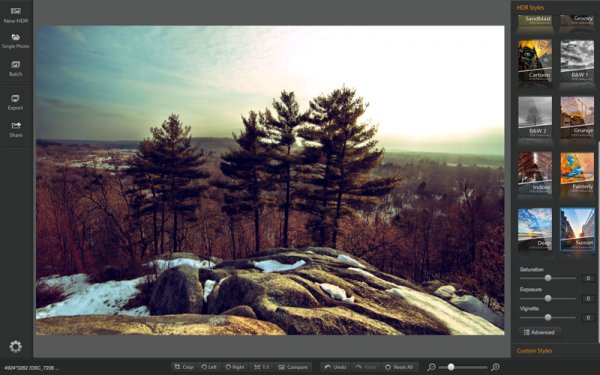
Admittedly HDR Darkroom 3 did struggle here, I tried to recover those highlights in the sky, but no matter what I did they were always blown out. Below are screenshots of three different presets plus advanced adjustments that I applied in order to try to control the image.

Sunset-HDR-Darkroom3.2 Sunset-HDRDarkroom-3.3 Sunset-HDR-Darkroom3

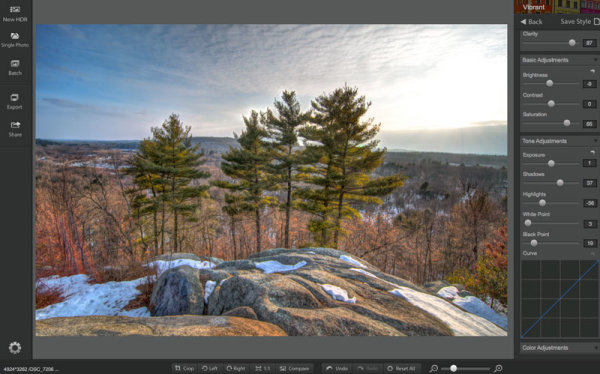
While the presets make for some easy switching between different effects of HDR, the overall fine-tuning control of the process is lacking in some situations. On most occasions when I went to reduce the highlights I was left with something that was lacking detail and muted in color. Not to mention the sliders are very heavy handed and effect a much larger portion of the tone curve than the respectively named ones in Lightroom.

The best I was able to come up with, shown below, has a few issues with haloing around the trees (the blown out highlights around the sun. It’s something that you may be able to fix in Photoshop later by masking in the sky from one of the brackets, but that’s beyond the scope of this review.

HDR Darkroom 3

HDR Darkroom 3 Final

Compared to the Merge to 32-Bit Lightroom Plugin by HDR Soft

Being that this was a challenging photograph it’s worth checking out two other HDR options to see how they would handle the same scene. Both of the options I’m testing below are offered by HDRSoft. One of these is very budget friendly at a price of $ 29, while the other one is more comparably priced to HDR Darkroom 3 listing for only $ 10 more at $ 99.

Our budget friendly option is a plugin called Merge to 32-bit HDR for Lightroom. It’s a very simple process that really strips out the tone mapping process of creating an HDR image, but still allows you to merge the data from a bracketed set of photos directly inside of Lightroom 4 and greater. For more about how it works you can read Five Minutes to Realistic HDR using Lightroom and a 32-Bit Plugin.

Now it’s not surprising that the 32-bit plugin struggled with this photograph, as after all, it is very limited. However, because it imports the 32-bit TIFF file back into Lightroom for you to work on, I think it may have handled the highlights in the sky slightly better than HDR Darkroom 3, it’s a judgement call, but for the price difference I’d say it’s a win.

LRPlugin

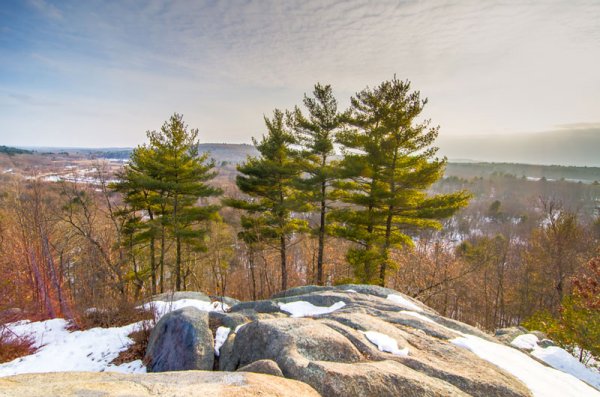
Merge to 32-Bit HDR Plugin for Lightroom

HDR Darkroom 3 Versus Photomatix 5.0

Next up would be the flagship offering from HDRSoft, and one of the leaders in the HDR tone mapping word, Photomatix 5.0. It’s no surprise to me that Photomatix did a fairly decent job with the foreground detail and even most of the sky, it still had some problems with the sun, but that’s not surprising given the circumstances of the image set.

Photomatix-+-LR-3

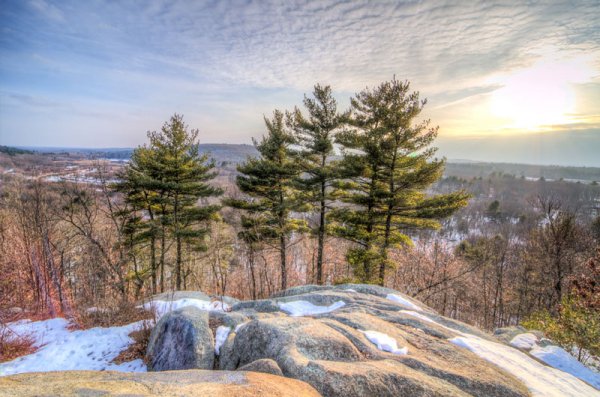
Photomatix 5.0 + Quick Lightroom Cleanup

Overall I’d argue that this particular image set is one of the more challenging that you will run through an HDR tone mapping software, and all three options above gave it a fair attempt.

My thoughts on the three software in terms of how they did overall:

  • Photomatix 5.0 – Probably did the best overall job at merging the three images. However, it’s a more involved process, requires more training, and ultimately isn’t a standalone editor you’re going to need to clean up the tone mapped image in LR or some other program after the fact.
  • Merge to 32-Bit plugin – It’s quick and dirty. You are able to collect more data from the scene and basically create an HDR image without ever leaving Lightroom all for less than 30 dollars. Yes it’s limited, but it’s also affordable.
  • HDR Darkroom 3 – Like I said at the start of this article – I think HDR Darkroom 3′s best features are its user interface and intuitive preset oriented process of tone mapping images. I’d argue that it struggles the most when it comes to complicated scenes mainly due to the fact that the localized tone controls of highlights and shadows are a bit heavy handed and could stand to be more refined.

Would I Recommend HDR Darkroom 3?

HDR Darkroom 3 is a bit more affordable than some of the other premium tone-mapping solutions out there and does make a fair attempt at providing a good amount of the basic functionality into a nice looking and affordable package.

I think it boils down to this…

If you’re the type of person who likes to keep it simple and you don’t mind giving up a bit of control for the sake of simplicity then HDR Darkroom 3 might be the best option for you. But I’d urge you to check out the Merge to 32-Bit plugin first, as it may be all you need considering the price points.

However, I just can’t recommend it to those who are looking for a full featured product with total control over the HDR tone mapping process – there are better tools for the job such as Photomatix Pro and the small amount of savings here just doesn’t justify what you’ll give up.

Have you used HDR Darkroom 3? Tell us your own thoughts on it in the comments below – after all I’m just one opinion.

The post HDR Darkroom 3 Software Review by John Davenport appeared first on Digital Photography School.


Digital Photography School

 
Comments Off on HDR Darkroom 3 Software Review

Posted in Photography


Canon G1 X Mark II First Impressions Review

17 Apr

CanonG1XII.jpg

Canon’s PowerShot G1 X Mark II is an intriguing update. It keeps the 1.5″-type sensor from its predecessor, but adds a faster processor, longer and brighter lens, tilting LCD, dual control rings and has Wi-Fi with NFC. The big change for 2014 is no more optical viewfinder. Our first impressions review covers the usual aspects of the camera (Controls, Body and Design, etc.), but also has our Shooting Experience report where we talk about it handles in the real-world. Learn more

News: Digital Photography Review (dpreview.com)

 
Comments Off on Canon G1 X Mark II First Impressions Review

Posted in Uncategorized


Object of desire? Our Fujifilm X-T1 in-depth review

14 Apr

decrapped.jpeg

The Fujifilm X-T1 is surely one of the most desirable cameras of the year so far, with its SLR-like styling, huge electronic viewfinder, and wealth of external controls on its compact, weathersealed body. It also promises class-leading autofocus performance, including the ability to track focus on moving subjects –  something that’s traditionally eluded this type of camera. But is this enthusiast-oriented mirrorless model really a match for a traditional SLR? Read our in-depth review to find out.

News: Digital Photography Review (dpreview.com)

 
Comments Off on Object of desire? Our Fujifilm X-T1 in-depth review

Posted in Uncategorized


Fully loaded: Pentax K-3 review

10 Apr

k-3-beauty-shot.jpg

Pentax cameras have always been innovative, and Ricoh has upped the ante with the K-3. Its image stabilization system not only reduces shake, but it can also simulate an anti-aliasing filter. The K-3 marks the latest evolution of one of the best-handling DSLRs in its class. It features a new autofocus system, 24 megapixel CMOS sensor, 8.3 fps continuous shooting, and USB 3.0 support. Has Ricoh put together a top-notch DSLR in the K-3? Read our review to find out

News: Digital Photography Review (dpreview.com)

 
Comments Off on Fully loaded: Pentax K-3 review

Posted in Uncategorized