RSS
 

Posts Tagged ‘REVIEW’

One step ahead: Nikon 1 V3 Review

16 Jul

We’ve just completed our full review of the Nikon 1 V3, that manufacturer’s enthusiast mirrorless camera. The V3 offers an 18.4 megapixel 1″-type CMOS sensor, a significant gain in resolution over its 14.2 megapixel V2 predecessor. Since its introduction the 1 system has offered impressive auto focus and burst shooting capabilities – see just how well it performed in our testing. Read review

Articles: Digital Photography Review (dpreview.com)

 
Comments Off on One step ahead: Nikon 1 V3 Review

Posted in Uncategorized


Quick Review: That Steady Thing

10 Jul

The simple idea that tripods are inconvenient to carry for extended periods has given birth to a host of attempts to find an easier way to steady a camera during a long exposure. A new device that joins this list is That Steady Thing – a metal boss that sits between a monopod’s leg and its head, into which a pair of steadying legs screw. See if it lives up to its name. Read more

Articles: Digital Photography Review (dpreview.com)

 
Comments Off on Quick Review: That Steady Thing

Posted in Uncategorized


Camera Review: Samsung Galaxy S5

10 Jul

We’ve come to expect loads of camera features from Samsung’s high end smartphones and the Galaxy S5 does not come up short. The S5 offers a 16MP BSI CMOS sensor, F2.2 lens and 4K video recording. With claims of improved AF speeds and the addition of features like real-time HDR processing and Selective Focus, Samsung’s flagship device has a lot of potential as a photographic tool. Does its performance live up to its specs? Read review

Articles: Digital Photography Review (dpreview.com)

 
Comments Off on Camera Review: Samsung Galaxy S5

Posted in Uncategorized


Ebook Review – From Basics to Fine Art Black and White Photography

07 Jul

Ebook Review: From Basics to Fine Art

If you’re interested in black and white photography, the names Joel Tjintjelaar and Julia Anna Gospodarou will probably need no introduction. The work of both photographers has helped define, and push the boundaries of long exposure photography, a relatively new genre in the fine art world.

Julia and Joel have joined forces to write a new ebook called From Basics to Fine Art: Black and White Photography – Architecture and Beyond. It is principally aimed at photographers interested in using long exposure techniques to photograph buildings, with some chapters being more general and having a wider appeal.

Ebook Review: From Basics to Fine Art

The contents

The ebook starts with personal statements from the authors exploring their interpretations of the word vision as it relates to architectural black and white photography. For me, the most interesting concept here is expressed by Joel. He talks about long exposure black and white photography as being several steps removed from reality. It is an interpretation, not a reproduction. The intent is not to capture the scene as it looked to the eye, but to present it in a way that represents the artist’s vision.

This theme is continued in the later chapters where Joel explains his post-processing techniques. Take a good look at his photos (follow the link to see some) and think about whether you could achieve similar results. The likely answer is no, because Joel has developed his processing techniques beyond the level that most photographers achieve. Be warned – Joel takes a long time to process his photos and this section of the ebook reflects that. If you’re looking for quick fixes or shortcuts you will need to look elsewhere.

Ebook Review: From Basics to Fine Art

But if you’re looking for a detailed explanation of black and white post-processing techniques that you won’t find anywhere else, then you’re in the right place. Joel explains his workflow, demonstrating how he uses Lightroom and Photoshop, along with plug-ins such as Silver Efex Pro. Most importantly, he shows you how to use what he calls Iterative Selective Gradient Masks, a technique he developed himself, to create the unique look of his black and white images.

He also explores fairly complex techniques modelled on what the calls: the 10 monochromatic commandments for good black and white photography. The idea is that you can create presence and depth in photographs by altering contrast, tonal relationships and defining edges in a way that adds volume, depth and luminosity to the subject.

Don’t be surprised if you don’t understand what this means as it’s an intricate topic that represents a fairly new way of looking at black and white photography. Joel is ahead of everybody else in this respect so you won’t find this information anywhere else. However, the examples in the ebook, and the clear presentation, makes it simple. By the way, the 10 monochromatic commandments I just mentioned are essential reading for anybody interested in black and white photography, regardless of genre.

For me, the aspects covered in the previous paragraphs are the most interesting part of the ebook. There’s more, including some interesting thoughts from Julia (a trained architect) on using light to render the form and volume of buildings. She draws on techniques used in drawing and applies them to photography to get you thinking in a new way about rendering three-dimensional objects in photography.

Ebook Review: From Basics to Fine Art

There’s also an extensive chapter from Joel about long exposure photography, and the equipment (including a detailed look at neutral density filters) and techniques required to get results.

Included is more of the usual stuff that you would expect from a book about architectural photography, including composition, the practical aspects of photographing architecture and a chapter on using tilt-shift lenses. There’s also a useful chapter on pricing your work that will be of interest to professionals (or aspiring professionals).

A niggle: the discussions about composition contain a heavy emphasis on rules that continues throughout the ebook. I’m always suspicious of anybody that claims a certain way of things is a rule, and I’m certainly not convinced of the veracity of using (just to give an example) Fibonacci spirals and then stating that there’s a rule attached to it. I’m a strong believer in principles, rather than rules, and I don’t think Fibonacci spirals are going to help readers improve their composition. This minor complaint aside, there is plenty of good and practical information in this ebook.

Ebook Review: From Basics to Fine Art

Conclusion

I came away from reading this ebook with mixed feelings. On one hand, you have two photographers whose work I admire immensely explaining how they create their images, from their general philosophy to the specifics of long exposures and post-processing.

If you’re ever looked at their photos and wondered how they achieved the results they do then this ebook has the answers. It’s a tremendous act of generosity and sharing. No one else seems to be doing this stuff yet, or at least doing it and teaching it, so that makes some of the content unique. If you’re a fan of either of these authors, and want to learn the secrets behind their work, then it’s a must buy.

Ebook Review: From Basics to Fine Art

My main misgiving comes from the price. It’s an expensive ebook and it would be a shame if this information reaches a limited audience because of that. I realize that expense is a relative concept; the ebook is much cheaper than taking a workshop and you will learn things here that you wouldn’t from any other source. It’s a unique resource, and ultimately the buying audience will decide whether it has a fair value.

I have to admit that what I’d really like to see is a print version of this ebook, properly designed to give precedence to the photos of both authors. Their images would be better enjoyed on the printed page, and a book has the potential to become a lasting testament to their body of work and teachings.

From Basics to Fine Art: Black and White Photography – Architecture and Beyond

You can learn more about or buy From Basics to Fine Art: Black and White Photography – Architecture and Beyond by clicking the link. The price is €49 for those of you in the Eurozone, £39 for anybody in the UK and $ US59 for the rest of the world.

The post Ebook Review – From Basics to Fine Art Black and White Photography by Andrew S. Gibson appeared first on Digital Photography School.


Digital Photography School

 
Comments Off on Ebook Review – From Basics to Fine Art Black and White Photography

Posted in Photography


Review Domke Chronicle Camera Bag

03 Jul
The new Chronicle is part of Domke's Next Generation line of camera bags.

The new Chronicle is part of Domke’s Next Generation line of camera bags.

There’s a new line of camera bags on the market, but they come from an old, familiar name. Originally founded in 1976 by photojournalist Jim Domke with the introduction of the F-2, the Domke brand has been synonymous ever since with low-profile, high-quality bags geared towards photojournalists, travel photographers, and anyone else looking for a bag that does a great job protecting their gear without drawing unwarranted attention to the thousands of dollars worth of kit hanging from their shoulder.

Domke’s “Next Generation” consists of eight new bags, each available in different choices of materials and equipped with Domke’s new GearProtex™ and PocketFlex™ systems of customizable dividers, inserts and storage pockets. I recently had the chance to spend some time putting The Domke Chronicle (J-Chron) through its paces. One of three bags in the Journalist Series (alongside the Ledger and the Herald), the Chronicle– described as the grandchild of that original F-2– is obviously designed with the working photojournalist in mind, but would also be a great bag for any photographer, professional or otherwise, looking for a low profile or a classic retro look.

domke-chronicle-review-digitalphotographyschool-009

First Impressions

Fresh out of the box this bag brought a smile to my face. My dad was a truly amazing photographer. Wanting to make his hobby my own, when I was a kid, we spent countless hours together in the darkroom. This is a bag my father would have loved. Not getting too lost in its retro appeal, though, it’s abundantly clear that a lot of thought and attention to detail went into the design and production of this bag. Available in four different color options, I opted for the Ruggedwear Military/Black. All materials, both inside and out, appear to be of extremely high quality, yet they don’t add any unnecessary bulk or weight. This keeps the bag comfortable on your shoulder, even when fully packed.

domke-chronicle-review-digitalphotographyschool-008

domke-chronicle-review-digitalphotographyschool-006

Dimensions and Specs

  • Exterior:  15.75″ (L) x 7″ (W) x 10″ (H)  (40 cm x 17.8 cm x 25.4 cm)
  • Interior:  12.25″ (L) x 6.5″ (W) x 9.25″ (H)  (31.1 cm x 16.5 cm x 23.5 cm)
  • Weight: 4.2 lbs.  (1.9 kg)
  • YKK brand zippers
  • Top access double zipper
  • Expandable zippered side pockets
  • Expandable front pockets
  • Rear zippered pocket
  • Padded zippered tablet pocket (fits up to 11″ x 8″)
  • Antique steel hardware exterior flap fasteners
  • Detachable shoulder strap
  • Detachable hand strap
  • Velcro silencers
  • Numbered identity plate

domke-chronicle-review-digitalphotographyschool-003

What I Packed

  • Nikon D300s with 35mm prime lens attached
  • Nikon 70-200 mm f/2.8 lens
  • Two SB800 speedlights
  • Flashpoint Blast Power Pack
  • Think Tank PPR with extra CF cards
  • Think Tank DSLR battery holder
  • Light Meter
  • Gaffers tape
  • Notebook/pens/business cards
  • Client contract, model releases, and paperwork
  • iPad

It’s well worth pointing out here that the Chronicle could have easily handled several additional items, but I’ve been trying to travel a little lighter these days.

domke-chronicle-review-digitalphotographyschool-007

Dividers and Inserts

Domke’s new GearProtex system of dividers allows you to fully customize the inside of the bag with dividers that can attach to any interior surface, not just corresponding Velcro attachment points. The PocketFlex system is a collection of pockets and pouches that can also attach to any interior surface of the bag. If I had to pick one area where this bag fell slightly short it would be here, with the dividers. While many companies seem to give you way more dividers than you could ever possibly need, I found the number of included dividers to be a bit lacking for my taste. With only three included dividers and one included pocket patch, if I want this bag to be 100% in line with my needs, I’m going to have to order a few more dividers. Considering the cost of this bag ($ 349 USD), it might have been nice of them to include a few more dividers. On the up side, however, the flexibility of the dividers, combined with almost limitless attachment points, does help create sections of sizes and shapes I’ve never been able to get with standard dividers.

domke-chronicle-review-digitalphotographyschool-002

Domke PocketFlex SS

Fabric Choices

Here is an option you don’t often see when choosing a camera bag. The Chronicle, as well as every bag in the Next Generation line, is available in a choice of materials and colors. As noted, the bag in this review is the RuggedWear Military/Black option. Also available are Cordura Black/Black, Canvas Khaki/Black, and RuggedWear Black/Sand. While it’s obvious from a quick inspection that the exterior materials are of a high quality and built to withstand the regular challenges our bags face on a daily basis, let’s face it, it’s material and eventually it’s going to get dirty or show some wear. In what was a first for me, I was pleasantly surprised to find a tin of Domke Ruggedwear Refinishing Wax in the bag for those inevitable occasions when parts of the bag exterior might need a little attention.

domke-chronicle-review-digitalphotographyschool-010

Wrap-up and Recommendations

I really love this bag, particularly its classic retro look. I’ll most likely end up using it more for personal photography than commercial work, but it’s a bag that is well-suited for both. Even though it is the smallest bag in the Journalist series, I never felt limited in terms of what I could or couldn’t pack. This bag should appeal to a wide variety of photographers, from photojournalists and nature photographers, to hobbyists and travel photographers, as well as every photographer in between. The price may be a bit steep for a bag this size, but I think you absolutely get what you pay for in terms of quality, longevity, and adaptability. I’ve given it a 4.5 out of 5 due to not enough dividers.

The post Review Domke Chronicle Camera Bag by Jeff Guyer appeared first on Digital Photography School.


Digital Photography School

 
Comments Off on Review Domke Chronicle Camera Bag

Posted in Photography


Cecilia Gallery Camera Straps Review

03 Jul

Fashion Photography Blog Reviews Cecilia Gallery Camera Straps (FashionPhotographyBlog.com)When FashionPhotographyBlog.com was approached by Cecilia Gallery to review their camera straps I was excited. I had seen their products on their website and on first impressions I thought they looked really trendy and exuded quality… a perfectly stylish camera accessory. I have always been intrigued about ancient civilizations, particularly the Incas, so when I saw their hand-woven Peruvian designs I was in a happy place.

Fashion Photography Blog Reviews Cecilia Gallery Camera Straps (FashionPhotographyBlog.com)

If you haven’t heard of Cecilia Gallery before, the story of the online store began in Cusco, Peru in 2011. During the filming of a documentary, Michael Fleisch purchased a woolen belt made of alpaca wool from a peddler on the street. With a belt and scrap leather in hand he presented these items to a cobbler and requested that they be fashioned into something that resembled his strap for his Canon camera. The result was the basis of a unique product that he and his friend, MacLean Fisher could create a potential business together, that lead them to León, Mexico where they worked with the skilled leather artisans there.  Two years later in 2013, Celia Gallery was formed.

Fashion Photography Blog Reviews Cecilia Gallery Camera Straps (FashionPhotographyBlog.com)

Cecilia Gallery stocks a range of designs of their camera straps, all made with real Argentinian cowhide leather tanned in different shades, to suit any camera color, whether for DSLRs or vintage camera models. The straps are strong yet soft under the fingers, while the textile design has been interwoven using genuine baby alpaca wool and come in a range of patterns and solid colors as seen on their website.

Fashion Photography Blog Reviews Cecilia Gallery Camera Straps (FashionPhotographyBlog.com)

As some of you are aware, I have been known to be an avid traveler, and generally, a busy person always on the move. When I am hopping across country to country and sprinting across town for my next appointment I ideally want all my equipment to be lightweight, but can also handle some rugged wear. It has to be comfortable to wear around my neck or over my shoulder for long periods of time (many hours). It also has to feel good, look good and actually be functional with my avid schedule, which is why I was keen to give Cecilia Gallery’s camera straps a try.

Fashion Photography Blog Reviews Cecilia Gallery Camera Straps (FashionPhotographyBlog.com)

When I opened the package, to inspect the contents, I was not disappointed. The camera straps look even better than the pictures. On close inspection I can see the intricacies of the detailed pattern of the Challaypu (representing mountains) and Q’enqo (representing rivers) designs and stitching between the leather backing and nylon reinforcements, as well as the incredible softness of the leather front.

Fashion Photography Blog Reviews Cecilia Gallery Camera Straps (FashionPhotographyBlog.com)

The price range for these products range between the $ 90-100 mark, which is the price of quality and reliability, when you are looking for a camera strap that will provide a return on investment and be able to last in the long run, due to its attention to its workmanship (as explained on the information card that comes with the product). The straps can handle the weight of my camera, and has adjustable lengths.

Fashion Photography Blog Reviews Cecilia Gallery Camera Straps (FashionPhotographyBlog.com)

So what kind of photographer would these camera straps suit? The connoisseur of fine accessories, the eclectic and the trendsetter are what comes to mind, someone who is looking to spice up their camera with a unique camera strap that is not only aesthetic to the eye, but also durable and practicality.

Stay tuned to FashionPhotographyBlog.com because we will be announcing how one of our lucky readers can win one of these gorgeous camera straps from Cecilia Gallery really soon!

PHOTO SOURCE:

Images courtesy of Cecilia Gallery


Fashion Photography Blog

 
Comments Off on Cecilia Gallery Camera Straps Review

Posted in Uncategorized


eMotimo TB3 Review – Robotic Tripod Head and Time-lapse Movie

02 Jul

I’d forgotten all about my childhood dreams of achieving world domination using my very own robot army until I switched on the TB3 from eMotimo. As soon as I synched up the wireless remote and started panning and tilting this robotic tripod head, I was transformed into a grinning 8 year old boy who believed he could do anything.

I expect that the eMotimo exhibit at trade shows is usually ringed by a troupe of grinning time-lapse photography nerds like myself, who just realized they stumbled upon a truly legendary tool for photographic creativity.

My example footage

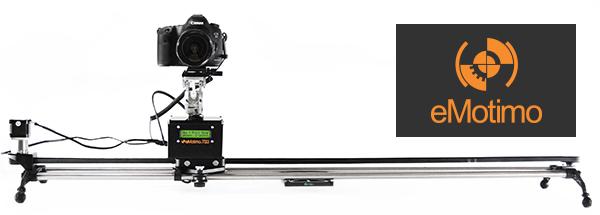
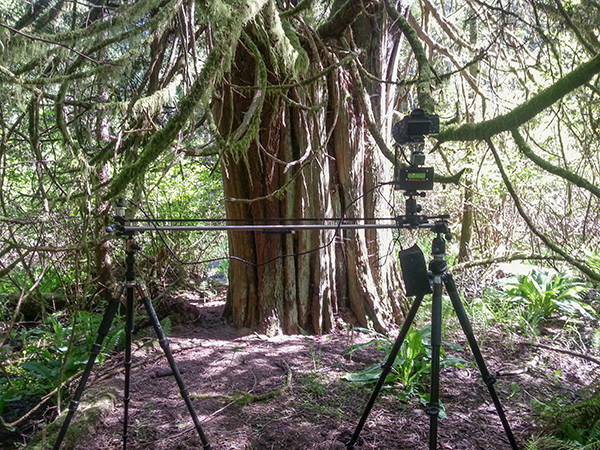
The short time-lapse movie above was made entirely using the TB3 with my Sony A7R Camera mounted on the Rhino Slider Pro 4ft. What started out as a couple of quick test shots turned into a fully fledged trailer when I realized what I could achieve with the TB3. Once I stuck it on a slider, things got awesome real quick.

What does the TB3 do?

Emotimo TB3 Review

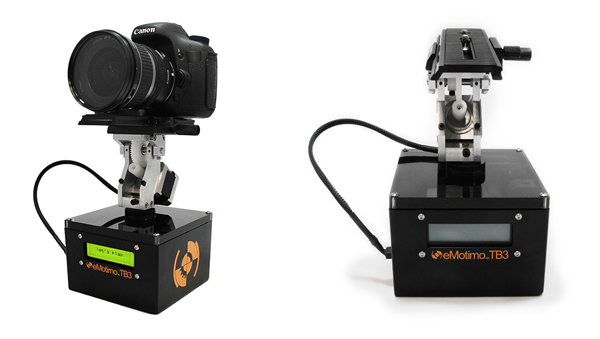
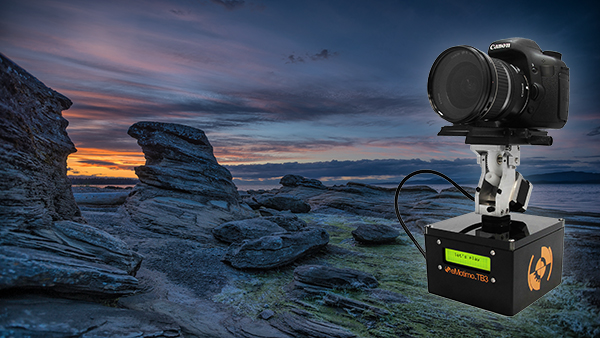
Pictured on the left with a Canon DSLR

For those of you who have no idea what’s so great about a device like this, let me throw the term ‘Motion Control’ at you. If you want to shoot videos or time-lapse movies that offer the viewer a more captivating perspective than just a plain old dolly/slider shot, you’ll be wanting one of these TB3′s.

The TB3 from eMotimo allows you to add high production values to your footage by moving your camera along two axes while shooting. It can pan AND tilt all at the same time. Combine this device with a slider and you’ve got yourself a powerful three axis rig for making fascinating cinematography and time-lapse photography. Your footage will appear to have been shot with a camera that magically floats through the air.

Motion Control Timelapse- TB3 Review

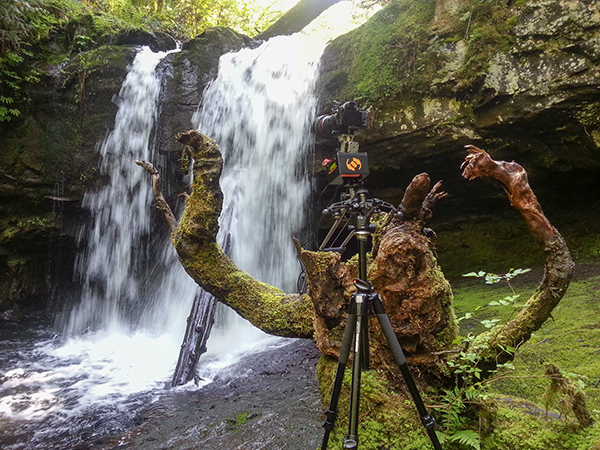
The TB3 shown here with a Canon DSLR and a Rhino Slider Pro 4FT.

Create multi-gigapixel panoramic photos

It’s not just about time-lapse and video. The TB3 also allows you to take multi-gigapixel images such as panoramas. For landscape shooters who want wall-filling image resolution, this feature is a major bonus. When you add in the awesome time-lapse and video shooting capabilities, you’re getting a lot of functionality for just under a $ 1000 USD.

Programming interface

Programming the movement of the TB3 requires a small learning curve. The interface is a very basic LCD screen with abbreviated titles and you navigate through this by using the included remote control joystick. It takes a while to get used to but if you’ve ever used a video game joystick you’re already half way there.

Emotimo TB3

Two-point or three-point movement and reverse moves

You can decide how many points of location your film sequence will have. If you want a simple A to B movement you select a two-point move. You tell the TB3 where you’d like to start and where you’d like to end, and the TB3 fills in the blanks.

With a three-point move you can get more creative by adding a less obvious direction to your movement. You could even program the TB3 to go into reverse after you’ve reached point two, or point the camera in the opposite direction, whatever you like. This is great for taking your audience on an unpredictable ride through your scene.

‘Reverse’ moves come in really useful when you’re using a slider and need to save valuable battery life by cutting out the ‘return to start’ move that the TB3 has to do once you’ve programmed in your move. You basically work backwards and tell the TB3 to start shooting from your last position. This is essential when doing vertical ‘jib’ shots on a slider which sucks a LOT of battery power.

The TB3 by eMotimo

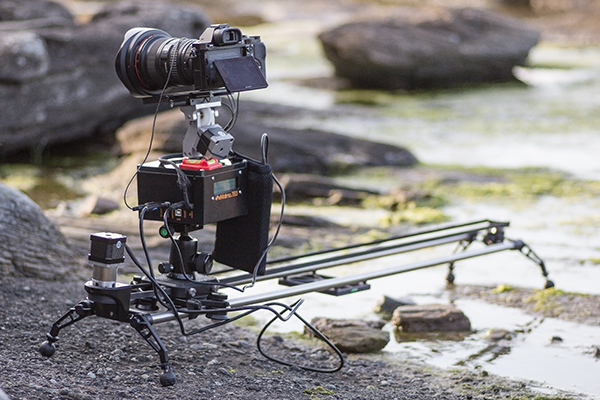
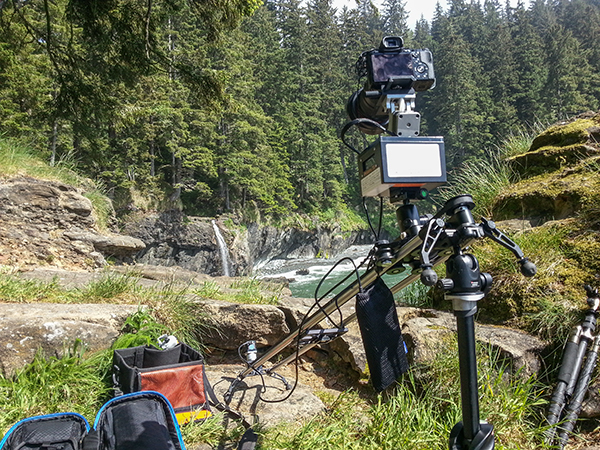
At the beach shooting a Timelapse sunset with the TB3 from eMotimo on a Rhino Slider.

Ramp

When I first saw the word ‘Ramp’ in the interface I thought it referred to Bulb ramping or ‘Bramping’ for time-lapse, but it actually refers to the degree of acceleration used when the TB3 moves to its start and end points. This is a really cool feature as it gives your camera motion a very smooth, but dynamic movement, as the TB3 gradually speeds up and then slows down to its end point. Most of the scenes in my video feature a ramp setting of 70.

Lead in-out

Another great feature of the TB3 is that you can specify a static ‘no movement’ period to either end of your shooting sequence. This is great if your sequence ends and you then fade up some titles in your video but want to keep the movie playing in the background.

Emotimo TB3 shooting a timelapse

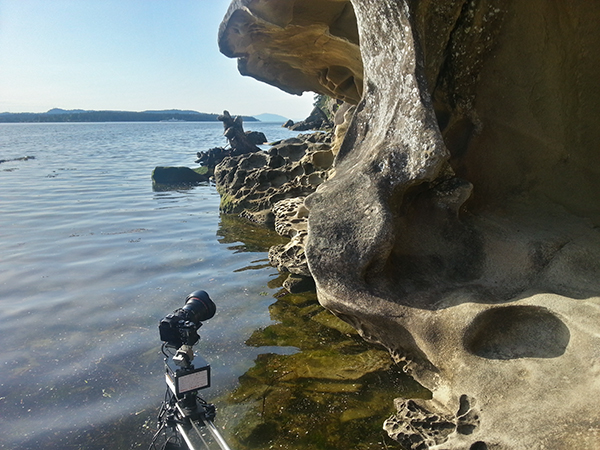
Smartphone shot. The TB3 almost going for a swim while shooting a time-lapse at Jack Point, Nanaimo (Canada).

Build quality

This is a sturdy unit. It kind of looks like something you’d expect to find under the skin of a young Arnold Schwarzzeneger during his debut as the world’s favourite cybernetic assassin. It’s built for functionality, not looks, and I expect it will appeal to the gadget geek in all of us due to its no nonsense appearance.

As well built as the TB3 is, I wouldn’t want to drop it. There are lots of exposed moving parts so it’s best to handle it with the care and attention it deserves. Encasing it in rubber would perhaps give it more protection but would add more weight. The interface cable that connects the moving parts to the brain of the unit could be more rugged as it’s already started to fray after light use.

Rugged Build Quality on the TB3

Smartphone shot. Semi-vertical jib style shots like this require more battery power so the TB3′s reverse 2-point move helped save me a little battery life.

Weight and size

Lets face it, if you’re doing serious time-lapse movies or cinematography, you long ago accepted that you’d be lugging heavy gear around. The TB3 isn’t that heavy in itself but it’s yet another bag to carry along with your camera bag, tripod(s) and slider. For what this gadget does, I think they’ve packed a lot of tech into a relatively small device but I can’t wait to see a ‘Sonyfied’ future version that won’t add to my chiropractor bills. Till then, just deal with it.

Battery pack required

Yet another essential accessory for the time-lapse and video shooters – the external battery pack. eMotimo were kind enough to lend me the ‘Anker Astro Pro’ battery pack which powers the TB3 and many other devices such as your phone and camera. Although this adds yet more weight to carry, it’s great to know that when my Sony A7R battery inevitably lets me down (which it does daily), the battery pack will allow me to recharge in the field.

Shooting a timelapse with the Emotimo TB3

Smartphone shot. You can see I’ve written down all my interval settings for the 7 second sequences featured in my film.

Compatibility

The TB3 is compatible with most major camera systems but as you’d expect, the best compatibility is reserved for the two major giants Canon and Nikon. I’m a Sony shooter so this posed somewhat of a problem for my plans to shoot the time-lapse movie shown above. eMotimo managed to get around this problem by providing a simple IR (infrared) transmitter cable that I taped to the IR receiver port on my Sony A7R. Not as slick as the Canon/Nikon cabled version but it did the job. I’d like to see a wired solution from eMotimo pretty soon though as it looks like Sony is starting to gain traction with their new range of cameras.

For time-lapse shooters that use advanced bulb ramping devices like the ‘Promote Control’, you’ll be glad to know that this can be integrated with the TB3. eMotimo also provides motor accessories for various popular sliders so you have some different options for the 3-axis motion control shown in my example video.

Waterfall timelapse with the TB3

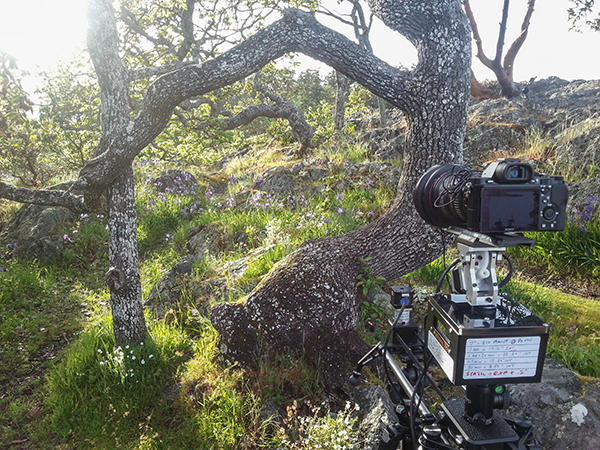
Smartphone shot. My favourite angry tree stump gets the time-lapse treatment with the TB3 carefully balanced on the stump.

Things I love about the TB3

  • Super smooth motion – this really is the most important part of any motion control device. It may not look like it in my video, but before the dreadful internet compression butchered my film, I can assure that the footage is buttery smooth. Not all motion control devices are made equal and eMotimo have totally nailed this most essential aspect.
  • Rugged, no-nonsense construction. I filmed time-lapse sequences in all kinds of weather, even heavy rain. The TB3 handled it all with indifference.
  • The cool little sound effects that it makes while you pan/tilt the head using the joystick.
  • Tech support – eMotimo is a small company in San Francisco with a very hands-on approach. All of my foolish newbie questions were answered with patience and resolved quickly.
Forest timelapse movie

Smartphone shot. I found that hanging the battery pack off the slider caddy gave the best results.

Things I don’t love about the TB3

  • The carry case seemed like an afterthought. It doesn’t fit very well and I was forever worried about accessories falling out. I’d rather buy a larger all-purpose camera bag and put the TB3 in that.
  • The programming procedure could be more accommodating. The TB3 has a cool ‘repeat/reverse’ function that you can set off immediately after your time-lapse sequence is finished. Sadly, I couldn’t figure out a way to edit the settings, which is essential after the sun has gone down and the light has changed. Maybe a firmware update could fix this?
  • The ‘Fotomate’ mounting plate onto which you attach your camera was a little fiddly.

Emotimo TB3 Review

Would I buy the TB3?

Absolutely. The TB3 has enjoyed something of a cult following among the rockstar time-lapse and DLSR video shooters. It’s not just because eMotimo were there during the early years of the time lapse video phenomenon, it’s because they make a very versatile and rock solid product. When you factor in the sub $ 1,000 price point and the awesome tech support, I really don’t see any other contenders.

My star rating

Our rating system doesn’t allow for a 4.9 so I’m forced to give the TB3 5 stars. I could have given it 4.5 stars but that just wouldn’t be enough. If eMotimo can fix my two main gripes of having a better carry case and some form of improvement on the Fotomate mounting plate, the TB3 would be perfect and fully deserving of 5 glorious shining gold stars.

Want some time-lapse tips? Try these:

  • Timelapse Photography Tutorial: An Overview of Shooting, Processing and Rendering Timelapse Movies
  • Capturing the Northern Lights in Timelapse Video
  • Discover the Wonder of Time-Lapse Photography

The post eMotimo TB3 Review – Robotic Tripod Head and Time-lapse Movie by Gavin Hardcastle appeared first on Digital Photography School.


Digital Photography School

 
Comments Off on eMotimo TB3 Review – Robotic Tripod Head and Time-lapse Movie

Posted in Photography


2 July, 2014 – Panasonic FZ1000 Review

02 Jul

The latest so-called Bridge camera from Panasonic is the FZ1000. It features a 20MP  1" sensor, 4K video and a 25-400mm f/2.8-f/4 lens. By choosing to make the Panasonic FZ1000 about the same size as a chunky entry-level DSLR, Panasonic has found a combination that will likely meet the needs of a great many photographers, including some who might not have considered a camera in this category before.


The June winner in our 2015 Antarctica Expedition Contest is David Rosenthal, of Palo Alto, CA. Congratulations David.

David is now a finalist in the contest and also wins a free lifetime subscription to all LuLa videos.

You can also enter the contest. Every purchase at our online store is an entry, and each annual subscription is equal to six entries.

The grand prize is an all-expenses paid Antarctic Expedition worth $ 15,000. This is the last month to make an entry that makes you eligable for this prize. Find out more.


The Luminous Landscape – What’s New

 
Comments Off on 2 July, 2014 – Panasonic FZ1000 Review

Posted in News


One of a kind? Nikon 1 V3 First Impressions Review

30 Jun

The Nikon 1 V3 offers an 18.4 megapixel 1″-type CMOS sensor, a significant gain in resolution over its 14.2 megapixel V2 predecessor. Since its introduction the 1 system has offered impressive auto focus and burst shooting capabilities so it’s no surprise that the V3 excels in these areas – it offers 20 fps burst shooting with continuous AF and a Hybrid AF system using 171 contrast-detect and 105 phase-detect points. It’s the most promising mirrorless camera Nikon has offered enthusiasts yet, and our full review is underway. In the meantime, take a look at our first impressions and shooting experience. 

related news: Digital Photography Review (dpreview.com)

 
Comments Off on One of a kind? Nikon 1 V3 First Impressions Review

Posted in Uncategorized


Third time’s a charm: Sony Cyber-shot DSC-RX100 III Review

30 Jun

We’ve just posted our full review of the Sony Cyber-shot DSC-RX100 III. In this third generation compact, Sony offers a 20.1 megapixel BSI CMOS sensor and a couple of important new features – a faster 24-70mm equiv F1.8-2.8 lens and a pop-up EVF with 1.44M dots. With these additions to what was already an impressive camera, does the RX100 III earn our highest recommendation? See for yourself. Read review

related news: Digital Photography Review (dpreview.com)

 
Comments Off on Third time’s a charm: Sony Cyber-shot DSC-RX100 III Review

Posted in Uncategorized