RSS
 

Posts Tagged ‘REVIEW’

Sony A6000 Mirrorless Camera Review and Example Images

02 Dec

The Sony A6000 Review by Gavin Hardcastle

If the Sony A7R is a champion heavyweight in its prime, the Sony A6000 is the scrappy younger brother with a leaner frame, faster feet and a few tricks up its sleeve that big brother hasn’t bothered to learn.

Having spent almost a year with the A7R as my main camera, I’ve become very familiar with the current Sony Alpha system, so I hit the ground running with the A6000. Here is my Sony A6000 review along with a load of example images from my most recent road trip.

Sony A6000 Mirrorles Camera Rewview

For this shot I used my Canon 24-105mm with the hated Metabones Adapter.

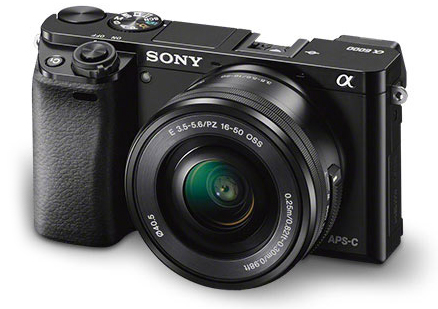
Sporting a 24.3 Megapixels APS-C sensor, this mirrorless camera crams a lot of horsepower into a tiny little box and the E-Mount (like the A7R) means you have some nice Sony/Zeiss glass to choose from. You can also use an adapter for the E-Mount which will allow you to use a wide variety of lenses. If you already own some nice Leica, Nikon, or Canon glass for APS-C cameras, you can throw those on the A6000 with the right adapter.

The Price is Right

For just under $ 800 you can walk away with the Sony A6000 and the 16-50mm kit lens, or get the body only for around $ 600. For image quality like this in a tiny package that boasts a lot of versatility, that’s a keen price. When you compare it to the likes of the full frame A7R and the A7S, it’s a total bargain.

Image Quality

Lets face it, Sony are the world leaders when it comes to image sensors and they know how to get the most out of them. While you won’t get ultra low noise, or A7R-like sharpness out of the A6000, you’ll certainly get great image quality and enough sharpness to suite most requirements. This sensor has the same ability to pull up shadow detail like the A7R (although with more noise than its counterpart), while keeping the file sizes at a much more manageable, yet very print-worthy level.

The Sony a6000 reviewed by Gavin Hardcastle

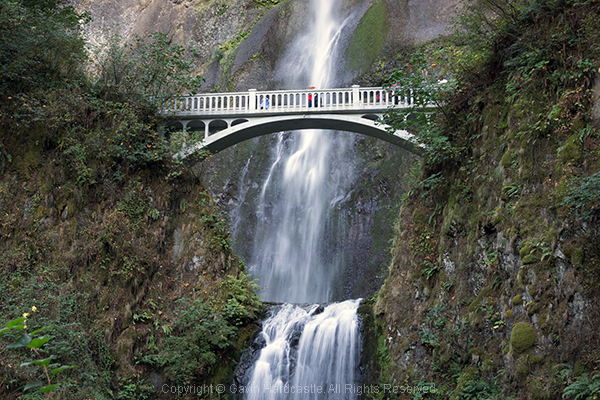
This shot was made with the E PZ 16-50mm F3.5-5.6 OSS kit lens

Faster Focus

One of the main selling features of the A6000 is its super fast hybrid autofocus and focus tracking. While these are features I would rarely use, I can see the attraction for sport, wildlife shooters and parents hoping to capture images of their kids at play. With a burst rate of 11 fps, you’ll have a good chance of catching those golden moments.

Small Form Factor

I actually prefer the feel of the A6000 to the A7R. This camera is clearly all about being small, lightweight, and discreet. The A7R was designed to take advantage of big wide angle and telephoto lenses so it never felt big enough. The A6000 however, feels exactly right for its purpose and for me, that is to get the best image quality out of the smallest package possible.

With the 16-50mm kit lens this camera looks and feels wonderfully miniature. As more premium E-mount lenses become available from Sony/Ziess you’ll be able to get much better image quality but still retain that perfect small form factor. I doubt the prices of that premium glass will be small though.

Sony A6000 Reviewed by Gavin Hardcastle

The 16-50mm Kit Lens

E PZ 16-50mm F3.5-5.6 OSS

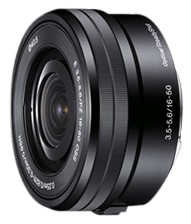
I often find that kit lenses get a bad rap. They are deliberately made to feel shabby next to their more deluxe siblings, but if you know how to squeeze the best out of your glass you’ll be able to get some decent image quality from the 16-50mm.

The sharpest aperture was f/8 with a very noticeable drop in image quality when you select wider or narrower apertures. Sadly there is a very noticeable edge vignette even at f/8, which I thought very shabby of Sony. It’s not a great lens at this price but if you’re prepared to do a bit of tweaking in post, you’ll achieve some decent shots. The main challenge with this budget lens is getting tight focus with the pathetic focus ring of misery.

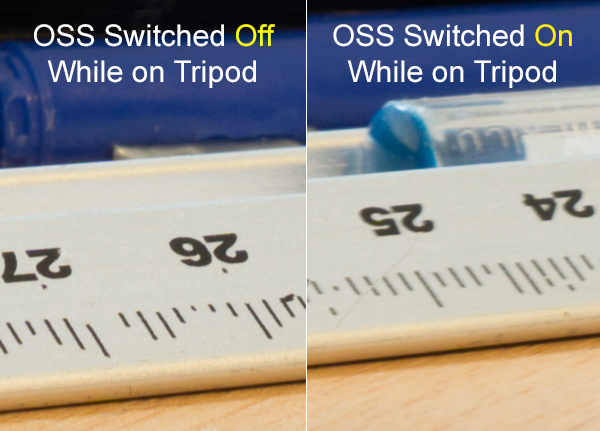
OSS – Optical Steady Shot

Apparently, image stabilization is performed inside the Sony lenses that have this feature but enabling/disabling the OSS has to be done in the menu. I much prefer a switch on the lens to turn this feature on and off.

If you plan on shooting on a tripod you’ll want OSS switched OFF. It’s really only any use for hand held shots. Here’s an example of the OSS on and off while used on a tripod. You can see that the numbers on the ruler look much sharper with OSS switched OFF. You’ll find the same results of most cameras that have some form of image stabilization.

Sony A6000 Review by Gavin Hardcastle - OSS testing

Video Quality

While the A6000 records superior video to the A7R, it’s actually not as good as the video quality you can get with the even cheaper A5100 mirrorless camera which boasts the XVID codec. You’ve got to wonder what Sony is playing at with these silly configurations. I’m sure it would have been a small thing to include XVID video recording on the A6000 but Sony in their wisdom decided to forego it to make the A5100 more attractive.

Sony A6000 Reviewed with Example Images

The Sony A5100 as an Alternative

The one thing that stopped me from choosing the A5100 over the A6000 was the lack of dedicated buttons and dials for controlling your settings. Although it has the exact same 24.3 MP sensor, the A5100 is even smaller than the A6000 and that means you’re forced to dig into the menu system in order to play with your settings. This would have resulted in me having a full blown frustration tantrum on a mountaintop and launching the A51000 off a cliff, so I chose the A6000 due to its two dials and three customizable buttons, way more user friendly but man I miss that XVID codec.

The Viewfinder of Mediocrity

If you’re switching from DSLR to a Sony Mirrorless, be prepared to be completely underwhelmed by the horrifically pixelated joke of an electronic viewfinder. DSLR users will look through that thing and feel that there is no chance their image will turn out well. Don’t be dismayed. Just use the viewfinder to set your focus and view your settings but don’t for one second think that your lovely RAW file will remotely resemble the grainy atrocity on display through that poxy peephole.

Apparently the viewfinder on the RX1 is infinitely better, but at almost $ 2800 it should be. If you can live with the lame EVF of the A6000 which is the same as on the much more expensive A7R, you’ll be fine. It took me a bit of getting used to when I switched from DSLR but once you’ve seen those gorgeous RAW files, you’ll come around.

Sony A6000 Example Images and Review

Hot Shoe Accessories for the Sony A6000

Flash fanatics will be delighted to learn that the A6000 has a multi-interface hot shoe slot on the top of the camera. This is also great for videographers who want to add the external mic. Sadly there are no software audio level controls when recording video on the A6000 and that is a MAJOR let down. Again, Sony could have included that software which is available on the A7R but in their wisdom, decided not to.

Apps for the Sony A6000

Like all of the current alpha range, the A6000 allows you to install Sony apps for extended functionality (and cost). The Time Lapse app had an update a few months ago that has made it much more usable. Other apps include remote control, star trails and a bunch of other awful ideas I’ll never bother to download or use.

Review of the Sony A6000 Mirrorless Camera

Built-in Flash

The A6000 does have a built in flash that pops up dramatically. You can even angle the flash to point up at the ceiling to bounce the light.

Tilt Screen

Sony A6000 Tilt Screen

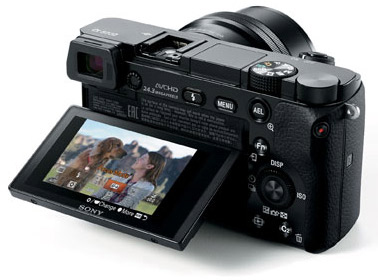
Like the A7, A7R and A7s, the A6000 has a tilt screen which you can angle for low or high shots and still be able to view the screen comfortably. I love this feature and although the A6000 has a smaller screen than the A7R, it works well while fitting into the smaller frame of the chassis. When cameras at this price point all seem to be able to include this technology it baffles me why the likes of Canon and Nikon exclude this feature on their high end cameras.

While I’m delighted that the A6000 does have a tilt screen, it has to be said that the screens image quality is pretty shabby compared to the screens you’ll see on the likes of the Olympus OM-D EM1. I heard a rumour that Sony makes those screens for Olympus so why not include that technology in the A6000? Perhaps that would have jacked up the price to a place where Sony didn’t feel comfortable.

Test images using the Sony A6000 in the Gavin Hardcastle Review

Battery Life Woes

Although nowhere near the longevity of a Canon DSLR battery, the FW50 batteries last longer in the A6000 than they do in the A7R. Just like the A7R, you won’t get a battery charger with the A6000 either so your options are to connect the charger cable directly to the camera or buy a third party charger. I’d recommend the latter as you’ll soon wear out the multi/charge socket on the camera.

Shutter Noise

This is a non-issue with the A6000. Unlike its noisy big brother the A7R, which has a super loud shutter noise (that I love), the A6000 has a very quiet shutter so you won’t startle the koala bears.

What I love about the Sony A6000 Mirrorless Camera

  • Small form factor feels great in the hand – it’s discreet
  • Great image quality if you don’t need full frame
  • Uses the same batteries as the current Alpha family of mirrorless cameras
  • Tilt screen is really useful for low to the ground shots
  • Competitive price
  • Has a built-in flash
  • Shoots 59 fps video in AHVCD
  • Features the E-Mount lenses
  • MU hot shoe
  • I can assign any setting to the three custom function buttons

What I hate about the Sony A6000 Mirrorless Camera

  • No digital level like on the A7R
  • No audio level control like on the A7R
  • No XVID codec like on the a5100 which is cheaper
  • Poor quality display on both the EVF and tilt screen
  • I can’t seem to reverse the EV dial operation
  • I hate the position of the mode dial, I keep hitting it by mistake when I change my aperture setting because that’s where my thumb falls naturally
  • There’s no C1, C2 setting on the mode dial. I have to dig into the menu to call these up.

Should You Buy the A6000?

Sony A6000 Camera Review

Yours truly. Dynamic range is surprisingly good with great highlight recovery and shadow detail.

That depends on your needs. If like me, you use the A7R as your main camera, the A6000 is the logical choice for your backup camera. It shares the same menu, batteries, lens mount and can be configured to be almost identical in operation to the A7R.

If you’re a DSLR user that’s used to the APS-C sensor size, the main thing you’ll struggle with is the EVF. Once you’ve gotten used to that, you’ll enjoy the superior image quality, customizable controls and most of all, the adorably small size of this wrist saving camera. Shoot with one of these for a week and then try going back to your clunky DSLR. Your old camera will feel like a breeze block.

Canon videographers will find little reason to switch due to the average codec and lack of audio level controls on the A6000.

First time camera buyers will love this camera because of its image quality, portability and price.

With that well considered summary, I’m awarding the Sony A6000 four out of five stars. They could have achieved five stars with a better quality LCD that included touch screen functionality.

The post Sony A6000 Mirrorless Camera Review and Example Images by Gavin Hardcastle appeared first on Digital Photography School.


Digital Photography School

 
Comments Off on Sony A6000 Mirrorless Camera Review and Example Images

Posted in Photography


Review Of The Rugged Pelican 1510 Carry-On Case

01 Dec

If you own a lot of photography gear, you’ll likely want to protect it from any environmental dangers as well as possible. Pelican claims that the 1510 is a hardcase that is water-, dust- and crushproof while still meeting carry-on restrictions of international airlines. The Pelican 1510 can be carried with a handle or rolled with the integrated wheels. Here’s Continue Reading

The post Review Of The Rugged Pelican 1510 Carry-On Case appeared first on Photodoto.


Photodoto

 
Comments Off on Review Of The Rugged Pelican 1510 Carry-On Case

Posted in Photography


Review: The Filter Hive from Mindshift Gear

30 Nov
Filter Nest by Mindshift Gear review

The Filter Hive, made by Mindshift Gear. The fabric exterior is coated with a water resistant coating to help protect your filters in bad weather.

If you are a landscape photographer it’s quite possible you own several filters that you use regularly. These may include a polarizing filter, three or four stop neutral density filters, graduated neutral density filters (you might have two or three of these) and, if you practice long exposure photography, a 10 stop neutral density filter such as the LEE Filters Big Stopper.

Filters can be difficult to deal with. I’ve tried several solutions, like using a messenger style bag (so I can just reach down by my side and take out the filters I need) and a small waist pack to store them. The problem is that filters come in cases that need to be taken out of the bag, then opened, all without dropping the filter. It becomes even trickier when trying to change one filter for another.

The bottom line – filters are essential for landscape photography, but handling them is a pain in the backside.

Filter Hive

That’s why I was so glad to come across the Filter Hive from Mindshift Gear. Essentially it’s a padded, charcoal coloured case with a removable insert that you use for storing your filters.

The Filter Hive is an extremely well thought out product. There are six slots for storing large rectangular filters (such as those made by LEE filters) and another six for storing smaller circular filters. The large slots are colour coded, making it easy for you to find the filter you are looking for. All the slots have a soft lining that is designed not to scratch glass or plastic, so your filters are safe.

Filter Nest by Mindshift Gear review

A peek inside the Filter Hive shows the larger colour coded slots at the back (ideal for large rectangular filters) and smaller slots at the front. You can also see the soft lining that helps protect your filters from scratches.

The insert is removable and comes with a dust flap to help protect your filters from dirt. The case has a zippered pocket on the front, as does the insert. On the back of the case is a loop so you can attach the case to your belt or to the side belt of Mindshift Gear’s Rotation 180 Panorama Rotating Backpack. There’s also a grab handle with a release buckle that you can use to hang the Filter Hive on the side of your tripod while taking photos.

Filter Nest by Mindshift Gear review

The insert containing the lined and padded slots for filters is removeable.

Filter Nest by Mindshift Gear review

The rear of the Filter Hive shows the belt loop (secured by velcro) and the buckle strap for attaching it to a tripod.

So, how does the Filter Hive perform in practise? The answer is brilliantly. I can store all my filters, removed from their cases, plus stepping rings in the Filter Hive. It’s easy to find and remove the filter that I need, and when I’m changing filters I can remove one from the lens and place it directly into the Filter Hive. It’s like the third hand that I’ve always felt I needed when changing filters up to now, and greatly reduces the chance that I will accidentally drop one.

The Filter Hive hanging from my tripod.

The Filter Hive hanging from my tripod.

Another benefit of the Filter Hive is that there is plenty of space to include a sachet of silica gel, helping to ensure that the filters inside stay free of fungi during the colder, damper, months. There’s also room for lens cleaning accessories like micro-fibre cloths and lens tissues.

Learn more

You can learn more about the Filter Hive, and it’s smaller brother the Filter Nest, from Mindshift Gear’s website by clicking on the links. They are also available from retailers such as BH Photo & Video, Adorama and Amazon.

This YouTube video will also give you a good idea of how the Filter Hive works.

Editor’s disclaimer: this product was donated to the author by MindShiftGear. dPS has not received any compensation and the author’s review is unbiased.

The post Review: The Filter Hive from Mindshift Gear by Andrew S. Gibson appeared first on Digital Photography School.


Digital Photography School

 
Comments Off on Review: The Filter Hive from Mindshift Gear

Posted in Photography


A Practical Review of the Nikon 24-70mm f/2.8 lens

27 Nov
The Nikon 24-70mm F2.8 Lens

The Nikon 24-70mm F2.8 Lens

You will hear this from many photographers – “invest in your lenses”. Camera bodies will come and go, but a good lens can last a very long time. This was the advice that I first received when I started taking my photography seriously. Initially, I thought it was a bit hyped. I bought a cheap 70-300mm lens and used it at the first wedding I shot. I thought the images were fantastic until I bought a better lens a year later. I then realized how much difference a good lens can make.

This review is not going to be a technical review of the lens. You want to know how this lens performs, what the strong points are and what the weak points are – I will cover that. You will see images taken with the lens, many will be edited in Photoshop, some will be straight out of the camera, I will point out to you which are which.

About this lens

This lens is regularly praised as the best midrange zoom lens that Nikon has ever made. That sounds like a crazy statement, but when you look at the image results from this lens you can understand why. The lens is a high spec lens with a maximum aperture of f/2.8 and a minimum of f/22. Here is a quick look at the technical specs:

Focal Length: 24-70mm
Format: Full Frame – 35mm, can be used on a DX body, but will be cropped
Maximum aperture: f/2.8
Minimum aperture: f/22
Dimensions: 83mm (diameter) x 133mm (length)
Weight: 900g
Zoom ratio: 2.9X
Minimum focusing distance: 38cm

This lens is a perfect “all rounder” lens. You may find that you keep the lens on your camera most of the time. It has a really good focal range for everyday photography. It is a good travel lens too. Many photographers have said that this lens was the only lens they went on vacation with and it worked really well.

Photographic Genres that it can be used for:

1. Landscape Photography

This is not considered a super wide angle lens, but at 24mm on a full frame sensor, you will get a viewing angle of of 84 degrees which gives a pretty wide angle of view. This lens can be used for landscape photography for a few reasons. Firstly, it has really good glass elements that handle light beautifully. There is some distortion at 24mm, but this is easily corrected in Photoshop. Secondly the lens is really sharp, it makes an image seem almost too sharp. You may find that you won’t need to sharpen your image as much if you use a tripod and are properly focused. The colour rendition on this lens is really good too, colours are true and vibrant. This lens is good for landscapes, not necessarily as a dedicated landscape photography lens (you may want to look at some wide angle lenses) but it can certainly perform well for this type of photography.

This seascape image was shot at 24mm. The clarity and colour was amazing, this has been edited in Photoshop

This seascape image was shot at 24mm. The clarity and colour was amazing, this has been edited in Photoshop

2. People Photography

This lens can work well for people photography as well which can encompass portraiture, weddings, and even street photography. This lens will do a really good job in any of these genres. In people photography, you will want to have a lens with minimal distortion. If you are using the 24-70mm for people photography, you will want to be shooting at 50mm and upwards. With a wide open aperture at f/2.8 you will be able to isolate your subject easily and have a soft out of focus background. The bokeh on this lens is good, but more on this later.

A scene in a coffee shop, taken at 24mm. Converted to B&W and edited in Photoshop

A scene in a coffee shop, taken at 24mm. Converted to B&W and edited in Photoshop

3. Close-up and Macro Photography

While the 24-70mm is not a macro lens, it has a 37 cm (14.5″) minimum focusing distance. That sounds like a long way, but at 70mm you can get pretty close to your subject. If you are shooting on a high resolution sensor (16 megapixels and above) you will be able to crop in quite a bit and so you will be able to get some good close up images. Bear in mind, this is not a macro lens, but if you want to get in close to a subject, really nice and close, this lens can do that. The sharpness and clarity is amazing, and it is good to have this ability on this lens.

This badge on the hood of a car was taken at 70mm and handheld. The clarity and sharpness is good and the close up shot isolates the badge

This badge on the hood of a car was taken at 70mm and handheld. The clarity and sharpness is good and the close-up shot isolates the badge

4. Street Photography

Most street photographers will traditionally use a prime lens for their work. You will often find a 50mm f/1.8 or and 85mm f/2.8 on their cameras. Sometimes though, it is good to have a little more flexibility and the 24-70mm is perfect for this. You can shoot at 35mm, 50mm, or 70mm and you will get great results. Based on your creative desire, you can shoot at f/2.8 or up to f/8 depending on your scene. The beauty of the lens is that it can focus really quickly and easily. It has a SWM (Silent Wave Motor) which means the autofocus is quick and quiet, really useful in street photography. There is some vignetting when the lens is wide open at f/2.8, but this adds some depth and contrast to street photography images.

This lens gives you flexibility when shooting street photography.

This lens gives you flexibility when shooting street photography.

5. Travel Photography

When you are planning to travel, there is always the consideration of what lenses to pack. Weight is always a challenge and of course, space. Many photographers have found that the 24-70mm is a prefect travel lens. At the low end, you can capture some great images of wide open spaces and the interiors of  churches and cathedrals easily. Zoom in and you can get pretty close to your subject, step in closer and you can do some wonderful cameo and detail shots. The 24-70mm is almost designed for travel photography. Yes, it lacks a little in the zoom category, 70mm is not a huge zoom, but you will come home with bright, sharp, colour-filled images.

The magnificent Peyto Lake in the Canadian Rockies, made with the 24-70mm lens

The magnificent Peyto Lake in the Canadian Rockies, made with the 24-70mm lens

Performance

The Nikon 24-70mm has amazing optics. It is sharp throughout the zoom range and has a fixed aperture of f/2.8 which means you can get a very shallow depth of field throughout the entire range.

1. Autofocus

This lens focuses quickly and accurately. I use it on a Nikon D800 and it works really well on that camera. You can of course manually focus, but I would only suggest doing that when you are shooting landscapes or close-up photography. If you have a subject that is moving, autofocus is necessary.

2. Colour rendition

The lens produces good colour, which is vibrant and rich.

3. Distortion

If the lens is zoomed out to 24mm you will see some barrel distortion. Once you zoom in though, the distortion goes away, so be aware of the distortion when shooting at 24mm. It is easily fixed in Photoshop or Lightrooom, so don’t be too overly concerned about that.

4. Handling

The lens is quite large and heavy, mostly because the lens has all glass elements and the body of the lens is metal. It is a hardy lens and can take some rough handling, but be careful with it as it is an expensive lens and you wouldn’t want to repair it unnecessarily. When mounted on a Nikon D800 without a battery back, the combined weight of the lens and camera body will be at least 2 kilograms (4.4 pounds). Thats a fair amount of weight to carry around at the end of your hand, so be aware if you plan to buy this lens.

5. Bokeh

Many lenses are judged not only on how sharp they are, but how smooth and creamy are the out of focus areas (bokeh) of the image. In this area, the 24-70mm does okay. The bokeh on this lens is not a wow, but it is smooth and soft. On a lens that offers so much, the bokeh is not perfect, but it is acceptable.

Overall Conclusion

This lens has been praised as one of the best lenses Nikon has ever made. It is a great addition to any photography bag. You will find that you may keep it on your camera most of the time. It really is a sharp lens and is a perfect “all-round” everyday lens. Its specifications make it a “pro-spec” lens which means it’s not cheap (just under $ 2000). Remember though, it is recommended to invest in your lenses. Generally they will outlast your camera bodies and you will have them for many years if you look after them. This is one of those types of lenses, it will last well and produce great images for many years.

The post A Practical Review of the Nikon 24-70mm f/2.8 lens by Barry J Brady appeared first on Digital Photography School.


Digital Photography School

 
Comments Off on A Practical Review of the Nikon 24-70mm f/2.8 lens

Posted in Photography


Small change: Samsung NX mini review

27 Nov

The Samsung NX mini is truly tiny, offering a 20MP 1″ sensor inside a highly compact body which features a 180-degree tilting LCD and extensive connectivity features. The mini’s touch-sensitive display is the camera’s primary interface for changing shooting settings, and an interchangeable lens mount should make this the ideal combination of versatility and point-and-shoot simplicity. Read our review to find out how it compares

Articles: Digital Photography Review (dpreview.com)

 
Comments Off on Small change: Samsung NX mini review

Posted in Uncategorized


F-Stop Tilopa BC Backpack Review

24 Nov

I have to shamelessly admit that I, as are many other photographers, am a camera bag junkie. Maybe the reason behind it is that I was never able to find the perfect fit for my needs. Granted, different situations or travel circumstances may require different type of bags. It’s not the same to go out for a walk in your neighborhood as it is to go on an overseas trip. As I mentioned in one of my prior posts, I am a big believer in going light. During the years I have purchased, used, tested, abused and torn apart all kinds of bags. But only up until now, as I believe I have found my perfect travel companion, the bag that will perfectly suit almost any kind of adventure: the Tilopa BC by F-Stop.

Tilopa_BC_Front_Profile

I have used F-Stop products before, specifically the Kenti Backpack, and their quality was excellent. As I was about to travel for three weeks in Southeast Asia, including heavy trekking portions in northern Vietnam, I needed something bigger than the Kenti, a bag capable of transporting my gear, including computer, chargers, and essential clothing for two to threee days at a time. I needed something versatile.

I went back to F-Stop because I was satisfied with my other bag. They have a different approach when it comes to building their products, which are rigorously tested by their team of pro photographers. It’s a concept that allows the company to permanently have field feedback straight from working hardcore users. One of the key elements for me is the flexibility available to build a system. The backpacks consist of two components: the backpack itself, and the Internal Camera Unit, called the ICU. In a nutshell, once you pick the backpack that suits you best, then you can configure the interior in several different ways depending on your needs. This is a big plus, as one bag can be used for different situations.

The Tilopa BC

I chose this bag because at 48 liters, it was big enough to carry all my gear and yet be very carry-on friendly. The dimensions are generous and can be configured in several ways. I have also picked up the Small Pro and Medium Slope ICU with the idea that if I needed a full bag of gear I could throw both in, and if I only needed a regular or small kit I could use just one of the ICUs.

techspecs-tilopa_03

The backpack is constructed with durable, water-resistant materials and features, double Ripstop Nylon with Polyurethane coating, YKK® heavy-gauge zippers, Duraflex® buckles, and Eva-padded shoulder straps and hip belts. There is also an internal aluminum frame support that helps to better distribute heavy loads.

Besides the internal ICU, there are several pockets and options to organize either accessories or essentials for a day out. The top lid features a separate pocket where you can store smart phones, extra batteries, headsets, travel documents, etc. There is also a mesh compartment in the interior side of the lid. A big front panel pocket can be used for extra layers or even a light jacket. The internal padded computer sleeve can fit a laptop up to 18”; there are also two smaller pockets (not padded) on the side that I’ve used to throw in hard drives.

If you carry a tripod, it can be mounted either on the front or the side of the bag using the multiple quick-release straps. These straps are very handy as the ones at the sides also allow for side compression, making it possible to adjust depth when the backpack is not full. Last, the pack also features the ability to attach multiple accessories as it is compatible with the MOLLE, an international standard used by other third-party add-ons companies and, of course, F-Stop itself. It also packs several bungee cords and two D-rings as additional mounting points for small accessories.

F-Stop Tilopa BC bag with tripod attached at the front and accessory attached to the side via the MOLLE system

F-Stop Tilopa BC bag with tripod attached at the front and accessory attached to the side via the MOLLE system

Tilopa BC Detail

In Practical Use

I put the backpack through its paces during the three-week trip and it didn’t disappoint me. Despite being loaded, it was very easy to carry and the weight was well distributed. Over 10-mile treks in the mountains? No problem. Carry on in international or regional jets? Not a problem.

One of things that I particularly like about the bag is that the camera gear is accessed via the back panel, so the equipment is secure, but you can also access the main compartment via the top opening as well, making it very practical.

20141012_untitled_0004-Edit

As I was taking my Fuji X kit, I outfitted the pack with just the Medium Slope ICU, and as you can see there was plenty of room left in the main compartment to carry other personal stuff. I put my cleaning stuff, extra caps, regular batteries and cables on the interior mesh pocket of the lid. My laptop (not shown here) and paper model releases were in the computer sleeve.

20141012_untitled_0005-Edit

20141012_untitled_0003-Edit

The gear goes into the ICU; depending on your liking, you can either carry the internal ICU with the lid closed or open. My choice was to have it closed as it felt more secure having an extra layer of protection. The zippers are easy to access anyway, and it takes no time to open it and close it once you are in the field.

20141012_untitled_0006-Edit

The Medium Slope ICU is roomy and can fit my kit very well. I have two camera bodies, six lenses, a flash, wireless triggers, grids, batteries, SD cards and a GPS tracker.

20141012_untitled_0008-Edit

This is a bag I’ll continue to use on my travels as it is versatile, can be configured in several ways, and it really looks great.
I have picked mine in Foliage Green, but you also have two more color options: Black and Malibu Blue. The price starts at $ 339 for the bag itself, a bit pricey, but when you consider the quality of the materials, construction, versatility, and the manufacturer’s 20-year warranty, the Tilopa BC becomes an excellent option for the hardcore photographer.

The post F-Stop Tilopa BC Backpack Review by Daniel Korzeniewski appeared first on Digital Photography School.


Digital Photography School

 
Comments Off on F-Stop Tilopa BC Backpack Review

Posted in Photography


Canon EOS 7D Mark II shooting experience added to first impressions review

21 Nov

Canon’s successor to the EOS 7D was a long time coming, but the 7D Mark II appears to have all the makings of a DSLR worth the wait. Offering a 20.2MP APS-C CMOS sensor, Dual Pixel AF with 65 phase-detect points and more robust weather-resistance, the 7D II is a formidable follow-up indeed. Our full review is well underway and we’ve just updated our first impressions with a detailed shooting experience. Read more

Articles: Digital Photography Review (dpreview.com)

 
Comments Off on Canon EOS 7D Mark II shooting experience added to first impressions review

Posted in Uncategorized


The photographer’s perfect pick? Panasonic Lumix DMC-LX100 review

19 Nov

Panasonic’s Lumix DMC-LX100 turned a lot of heads when it was introduced at Photokina 2014. That might be because its spec sheet reads like an enthusiast’s wish list of compact camera features – a 16MP Four Thirds sensor (albeit a multi-aspect design using 12.7MP), fast 24-75mm equiv. F1.7-2.8 lens, built-in EVF, 4K video recording and Wi-Fi with NFC. The large sensor zoom compact has become an intensely competitive field in recent year, read the review to see how the LX100 compares.

Articles: Digital Photography Review (dpreview.com)

 
Comments Off on The photographer’s perfect pick? Panasonic Lumix DMC-LX100 review

Posted in Uncategorized


It’s all in the details: Canon PowerShot G7 X Review posted

12 Nov

One of the year’s most interesting compacts comes in the form of the Canon PowerShot G7 X, which bears a 20MP 1-inch BSI CMOS sensor. It’s not just the bigger, likely Sony-branded sensor that’s the G7 X’s attraction, it’s also the 24-100mm equivalent F1.8-2.8 lens. On paper it’s a serious rival to Sony’s RX100 series, widely considered class leaders in terms of compact camera image quality. Does the G7 X live up to its impressive spec sheet? Read review

Articles: Digital Photography Review (dpreview.com)

 
Comments Off on It’s all in the details: Canon PowerShot G7 X Review posted

Posted in Uncategorized


DxOMark Mobile Report added to our Amazon Fire Phone review

05 Nov

We just updated our full review of the Amazon Fire Phone’s camera capabilities with data from DxOMark’s mobile analysis. With an overall score of 69, the Fire Phone lands at 18th on DxO’s mobile rankings, tied with the HTC One M8 and coming in well behind flagship phones from Apple, Samsung and Sony. Read more

Articles: Digital Photography Review (dpreview.com)

 
Comments Off on DxOMark Mobile Report added to our Amazon Fire Phone review

Posted in Uncategorized