RSS
 

Posts Tagged ‘REVIEW’

Google Nexus 6 camera review

28 Jan

The latest in Google’s line of showcase devices – the Nexus 6 – was designed and built in cooperation with US company Motorola. The Nexus 6 comes with the same dual-LED ring flash as the Motorola Moto X and a 13MP imaging sensor. However, at F2.0 its aperture is a touch faster and it comes with an optical image stabilization system which should make for improved low light performance. Click through to read our detailed review of its camera’s performance

Articles: Digital Photography Review (dpreview.com)

 
Comments Off on Google Nexus 6 camera review

Posted in Uncategorized


Review: Zenelli Carbon Fiber Gimbal Tripod Head

27 Jan

One of the more impressive pieces of gear that I’ve been using as of late is the Zenelli CARBONZX Carbon Fiber Gimbal Head. I can’t say I’d have ever thought of myself being excited over a tripod head, but Zenelli has made one of the sexiest pieces of equipment I’ve seen and used. As you’d imagine any product that is Carbon Fiber is going to come with a hefty price tag and this gimbal head is no exception, but for those in need of cutting the weight of their gear for remote trips this could be worth the spend. It’s important to note that the fact this gimbal head is carbon fiber is not the only reason to consider it. The engineers at Zenelli have come up with very innovative features to protect high value super telephoto lenses with the Save Lens Lever®, Pin Save Tablet® and SaveLook® lever.  The Save Lens Lever ensures the lens remains balanced and does not fall when changing gear or leaving your gear unattended. The Pin Save Tablet is a mechanism that ensures the arm of the gimbal head cannot uncouple accidentally.  The Save Look lever ensures that the gimbals quick release can’t be accidentally released allowing your camera and/or lens to fall plus it allows for preset tightening of your Arca-type lens plates. I was also impressed the manufacturer thought to support panoramic photography by engineering the head so the lens plate mount is perfectly centered atop the rotational axis of the tripod head base. I demonstrate all of these features in my review video and with out a doubt the Zenelli CARBONZX Carbon Fiber Gimbal Head  gets my highest rating.

Order your Zenelli CARBONZX Carbon Fiber Gimbal Head at B&H

Key Specifications

Height: 9.25″ (23.5 cm)

Width: 3.58″ (9.1cm)

Depth: 9.33″ (23.7 cm)

Weight: 2.6 lb

Distance from Center of Lens to Vertical Arm: 3″ (7.6 cm)

Arca-Type Compatible

360° Pan & Tilt Ranges

Quick-Release Lever

Save Lenses Lever (Home Bar)

Bubble Level

(optional) Camouflage Cover

Copyright Jim M. Goldstein, All Rights Reserved

Review: Zenelli Carbon Fiber Gimbal Tripod Head

The post Review: Zenelli Carbon Fiber Gimbal Tripod Head appeared first on JMG-Galleries – Landscape, Nature & Travel Photography.


Related Stories

  • Review: Zenelli Carbon Fiber Gimbal Tripod Head – Enclosure
  • Review: Landscapes in Lightroom 5 eBook
  • Review: Landscapes in Lightroom 5 eBook – Enclosure
Feed Ads by FeedBlitz
powered by ad choices


JMG-Galleries

 
Comments Off on Review: Zenelli Carbon Fiber Gimbal Tripod Head

Posted in Equipment


Kupo Grip Master C-Stand Review

25 Jan

I’ve been using studio lights for a couple of years now, I’ve used a few different brands with all sorts of different modifiers, from the basic softboxes that your less expensive lighting kits might come with, to my current favourite, the 2 meter Octa from Studio-Flash.com.

The one consistency with bundled lighting kits is that they mostly all come with a set of lightweight stands that, for the most part, are great and will certainly do what you need them to do when you’re starting out and they’ll get you a long way with clever use of sandbags and counterweights. But when you start using bigger, heavier modifiers on these stands, you may find it’s time to get yourself a dedicated “big” stand.

Enter stage left, Kupo Grip. (Thanks to the crew at ProTog for sourcing what I was after – also available on Amazon)

I wanted a stand that was going to take anything I’d ever use, I wanted it to be modular and easy to put up and tear down, I’m a one man show and setting up and packing down needs to be easy! (I’m not lazy, honest) so after visiting the crew out at ProTog in Melbourne, I settled on the 40″ C-Stand (C for Century, folks) with the Kupo Turtle base. The base and the upright pole come apart for easy packing and transporting.

Kupo-grip-light-stand-review-simon-pollock

They come in 20″ or 40″ and in black or silver (I went for the black option, for no real reason…)

silver_kupo_c-stand_20_inch

It isn’t always the strength (or weight) of the stand riser that gives you problems, it might be when you first get a 70cm beauty dish and put it on the front of your studio light and then find that the locking mechanism that holds the stand’s legs in place just doesn’t have the wherewithal to hold it all up. Maybe you simply need something more sturdy to hold a light and Kupo Convi Clamp (like the little beast below) or something similar like a Magic arm that you sit a Tether Tools Aero on… Anyway, you get the point – one solid workhorse of a stand has made all of these things much easier for me.

Kupo_Grip_C-Stand_Master_Review_Clamp

The other main reason I love my C-Stands is that with the legs the way they are, sticking out low to the ground and horizontally to the riser pole, you can load them up with some big heavy sandbags and use them in most any weather. If you’ve ever had even a single flash on a lightstand blow over and smash on the ground, you’re most likely nodding along right now! I have a special umbrella at home that’s kind of flat on one side – as a reminder. Use a solid stand OR bag your lightweight stands.

lightstand-smashed-brolly-on-ground

No sand bags, a lightweight stand in a light breeze… An accident waiting to happen.

As I mentioned earlier, with the ‘Turtle base’ they’re easy to pack down but obviously not as easy as a small telescopic light stand or a tripod with a long neck and you might not want to fly a whole lot with them, but when you need a heavyweight and you want innovative, maybe take a look at the Kupo Grip Master C-Stand.

Kupo Grip gear (well, my stands at least, I’ve not checked ALL of their products) comes with a two year warranty which, if you register, gets you an extra three years giving you five years warranty.

My summary, if you will… They’re priced nicely, they have a really solid build and a great finish, I can’t fault the things – that’s five big smiley stars from me.

googletag.cmd.push(function() {
tablet_slots.push( googletag.defineSlot( “/1005424/_dPSv4_tab-all-article-bottom_(300×250)”, [300, 250], “pb-ad-78623” ).addService( googletag.pubads() ) ); } );

googletag.cmd.push(function() {
mobile_slots.push( googletag.defineSlot( “/1005424/_dPSv4_mob-all-article-bottom_(300×250)”, [300, 250], “pb-ad-78158” ).addService( googletag.pubads() ) ); } );

The post Kupo Grip Master C-Stand Review by Sime appeared first on Digital Photography School.


Digital Photography School

 
Comments Off on Kupo Grip Master C-Stand Review

Posted in Photography


Dicapac WP-S10 Underwater Housing Review

21 Jan

Peter-West-Carey-Case2014-1229-7411
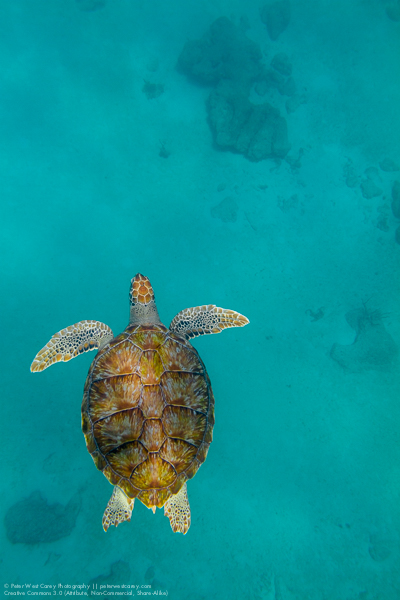
In an industry known for getting what you pay for, I am always skeptical of cheap, new solutions where only expensive ones existed previously. But curiosity got the better of me before a trip last year to Barbados when I wanted to take photos of turtles underwater, but lacked funds for a $ 3000 underwater housing for my DSLR. That’s when I dropped $ 60 on a housing and prayed it would not kill my Canon 7D.

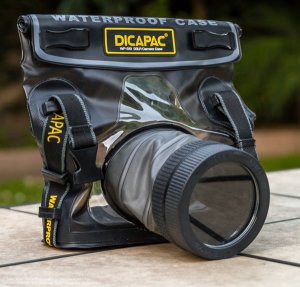
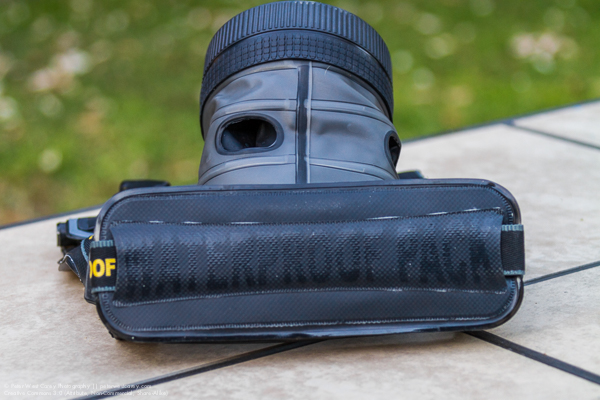
The housing I chose is from a company you probably have never heard of – Dicapac USA. They have a few models for different sized cameras and mine is the WP-S10 model, suitable for normal size DSLRs (they have smaller size bags for point and shoot as well as mirrorless cameras).

The lay of the bag

For lack of a better term, the Dicapac is a heavy duty Ziploc bag with a special port for your lens. But unlike your average sandwich bag, the plastic on the Dicapac is heavy duty PVC/TPU and the seams are all welded tight on the inside.

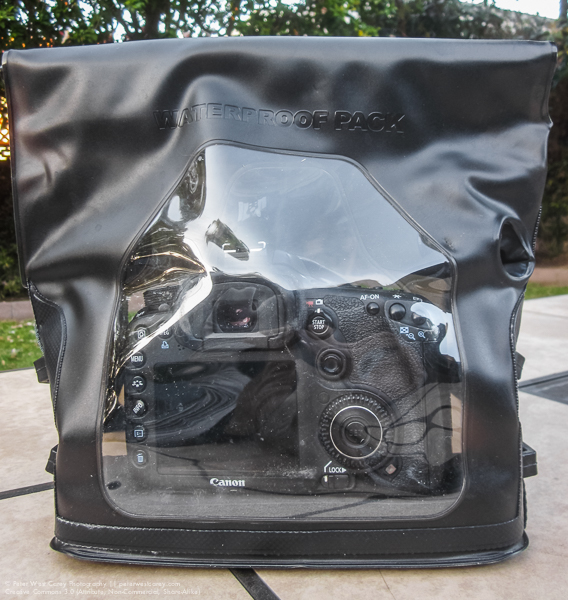
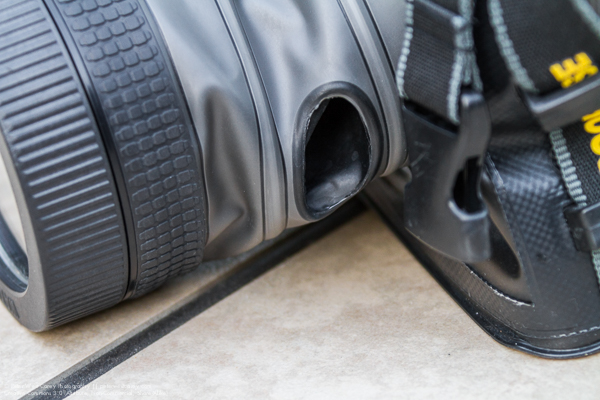
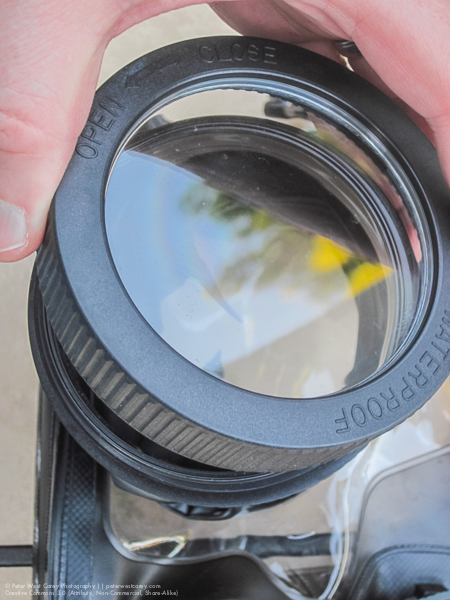
With a clear plastic back, LCDs are easy to view and there is a softer rubberized plastic opening for a shutter release finger. Extending out the front of the bag is the lens tube with a special screw on port for the end. The tube also has two of the finger holes to allow for adjustment of zoom (typically on zooms that use a dial, rather than push/pull type) and focus. It is also conceivable to activate side-of-lens controls, such as VR/IS or manual focus modes.

Peter-West-Carey-Case2014-1229-1298

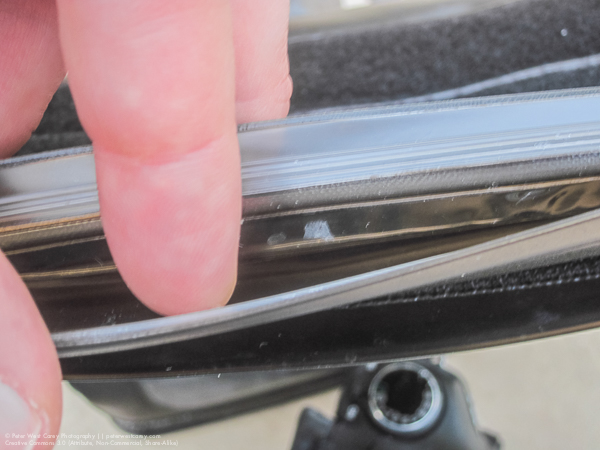
The top of the bag is where the sealing happens. There is a double industrial plastic clamping zip along the top and then strips of Velcro to hold things in place.

Peter-West-Carey-Case2014-1229-1287

Inside, the bag is fairly sparse but it does come with a one inch thick foam pad to place beneath your camera.

How it works

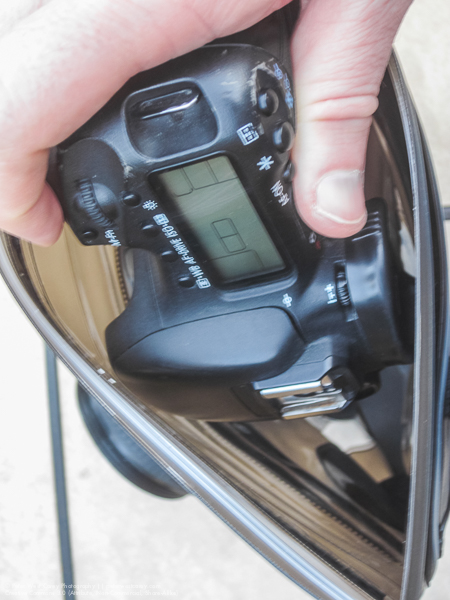
Following trial and error and then searching the Internet, I found it easiest to insert my camera with the lens off. I was using a Canon 7D without the standard battery grip. This made it easy to slide in the top with the zip open. I was then able to take off the front port and insert my Canon EF 10-22mm lens, attaching it to the body inside the bag. A smaller camera, like the Digital Rebel lineup of cameras, would probably fit easily without removing the lens. For me, it wasn’t required, but it was easier.

Peter-West-Carey-Case2014-1229-1288 Peter-West-Carey-Case2014-1229-1289

I then checked the front optics of my lens for smudges or dirt before screwing on the lens port. It was a little tricky finding the beginning thread but easier after a couple of practices. Now, like any Ziploc, I had to squeeze out the excess air and then clamp shut the top zip. This isn’t a sandwich in a bag so this too took a few practice tries to get most of the air out. So far, nothing earth shattering.

Next, you need to roll down the zip a few times and then attache the first velcro strip to hold it in place. Lastly, you attach one last, larger velcro strip, to hold everything closed. There is also an additional neck strap that can be clipped into the buckles, but I usually didn’t use it.

In use

As an operational note, I practiced zipping up the bag with only paper towels inside a few times. I then dunked the unit in my bathtub to make sure no water got inside. I suggest new owners do the same to ensure their unit is not faulty.

Peter-West-Carey-Barbados2014-0808-1330

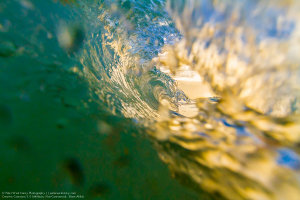
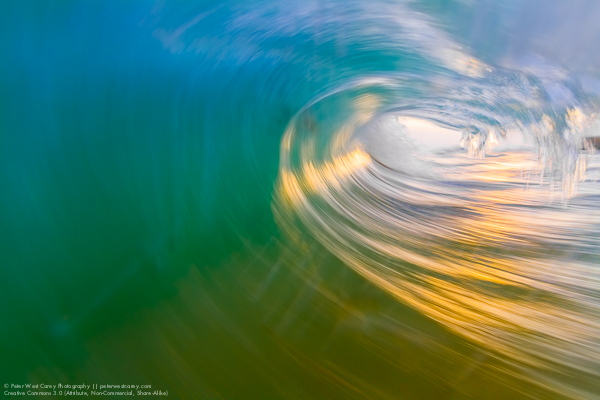
After a few very boring photos of the drain in my bathtub, and a flight to the Caribbean Island of Barbados, it was time for a real world test of the case. With no pretty coral out front our hotel, I took some inspiration from Clark Little and decided to shoot through wave tubes toward the setting sun.

The camera was already in the bag when I realized my best bet was to use manual focus and simply set it to a given depth, rather than miss shot after shot in the fast breaking surf. With the holes in the side of the lens tube I was able to switch over to manual focus without much problem. Setting my focus took a little more effort as the holes don’t allow a wide range of movement. Meaning I had to spin my focus ring about half an inch at a time. No biggie, it just takes longer and won’t work well for lots of fast action.

Because my lens didn’t fully fill the lens tube, I had to pull back on the tube with my fingers in both tube holes to keep the port flush against the front of my lens. In time this causes fatigue and after about 30 minutes of shooting I was starting to feel cramps in my hands. Not bad, but I wouldn’t want to shoot a weddings with this setup.

This is what happens if you don’t pull back on the tube with a wide angle lens installed:

Peter-West-Carey-Barbados2014-0808-1202

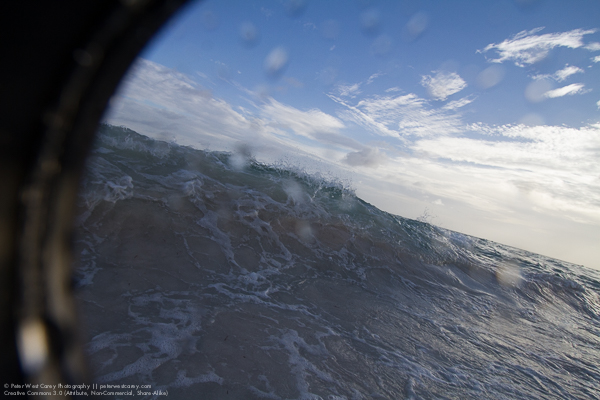
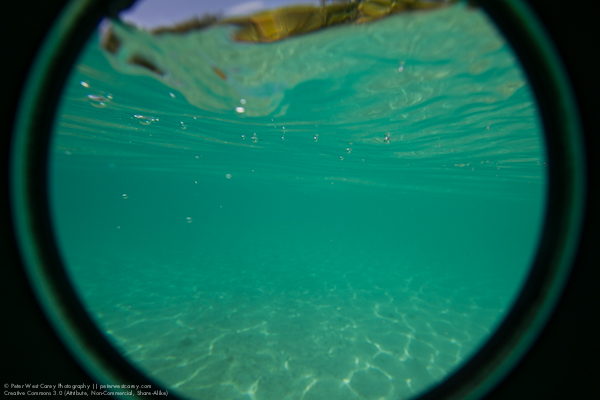
But it can be used to create a nice “porthole” effect:

Peter-West-Carey-Barbados2014-0809-2878

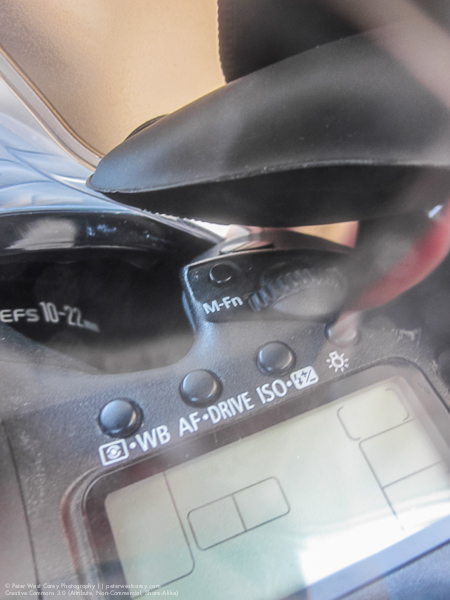
Shutter activation was easy but most controls, especially the rear wheel, on my camera were not accessible. This meant I had to think ahead and set the frame rate to continuous and choose my metering mode as well as shooting mode. I could spin the front/top dial which controlled my aperture but the back dial was useless as I couldn’t reach it.

Here is the range of motion you can expect from the activation access hole. That black thing at top is my finger:

Peter-West-Carey-Case2014-1229-1291

I was able to adjust my zoom with the same effort needed for focusing. So, again, not swift but doable.

Peter-West-Carey-Case2014-1229-7420

How did it do?

My first run with the bag in the surf showed me that it could take a pounding but after a while I needed to check to make sure the top Velcro was still tight. It needed to be adjusted a couple times because of this specific use and I noticed a few droplets of water on the inside of the case. nothing much. I was able to dry the bag off with a towel on the beach, remove it (this time leaving the lens on so as to not let water get in the threads of the front port) and review images. After making some adjustments, I placed the camera back in and waded back to the surf for more.

Peter-West-Carey-Barbados2014-0808-1330

Closing down my aperture made motion blur possible:

Peter-West-Carey-Barbados2014-0808-1903

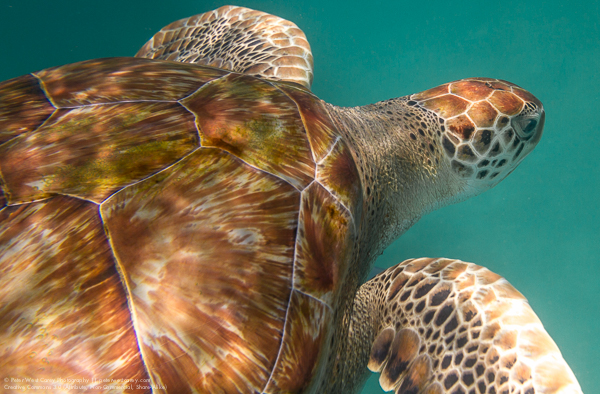
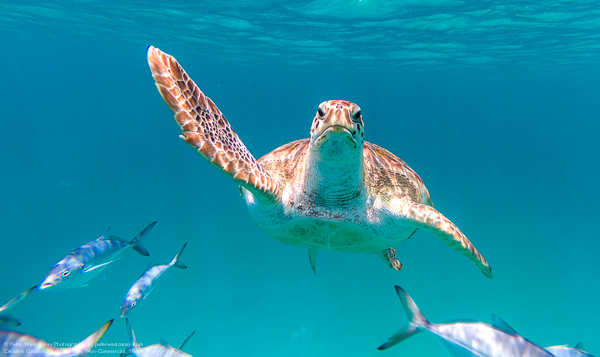
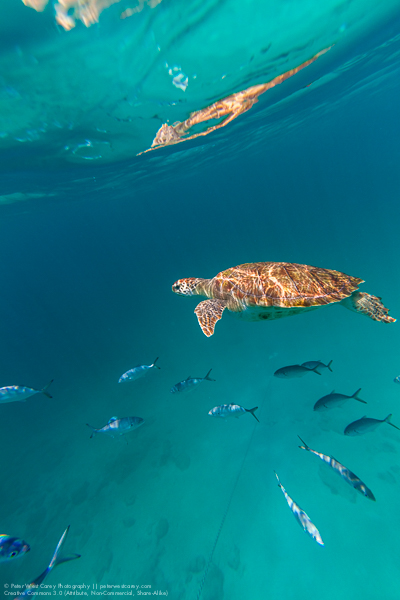
While use of the viewfinder is possible, it is difficult in waves with goggles on. Later, when I was snorkeling and shooting turtles, I was able to better line up shots. But truth be known, it was just easier to shoot blindly and let experience help me line up the shots. Use of the rear LCD in LiveView mode is also possible with slower moving action, like the turtles.

For my three times taking the the bag into the saltwater, including duck-dives in the waves and 15 foot dives to meet turtles, the bag never leaked significantly. It does get a little hard to hold after a while as your hand is in a non-normal grip.

Peter-West-Carey-Barbados2014-0809-2553

A hawksbill sea turtle (Eretmochelys imbricata) swims directly a

Gliding Along Peter-West-Carey-Barbados2014-0809-2376

Conclusion

For the money and intended use, this bag is worth the expense. As proof, I have already sold a stock photo of one of the turtles, which covered the cost of the bag.

This bag is good for recreational use but not SCUBA. It is rated to 16’/5m (JIS IPX8 standard). Some people have voiced concerns about cameras overheating but I left my camera on inside the bag for over two hours with no problem (the 7D has a warning when it gets too hot).

Peter-West-Carey-Barbados2014-0809-2912

It also works well as a general dry bag and I think it would be great for times you want to keep spray or sand out of your gear. It would be idea for whitewater rafting or piece of mind while ocean kayaking. I heard talk of an adapter which helps the front port attach to your lens as a filter would, which would greatly aid in shooting and cramps. I have not yet found it.

I will be heading to Mexico, Belize, Alaska, Jamaica, Australia and New Zealand this year and plan to take the bag with me for each trip. I will also get a small bottle of Rain-X to help with beading when taking wave shots.

PROS

  • Cheap – $ 70 on Amazon.
  • Can be used with multiple cameras.
  • Packs small for traveling as compared to hardshell housings.
  • No need for different ports for different lenses. Would work well with a 100mm macro, for instance.
  • Viewfinder use is possible, but not often used.
  • Port window comes off for easier camera and lens insertion.
  • Neck strap and loops you can clip to keep it with you, hands-free, while swimming.
  • Functions as a drybag out of the water.

Peter-West-Carey-Case2014-1229-7421

CONS

  • Limited button and dial control. You have to think ahead about some settings.
  • It takes practice to seal properly.
  • It’s hard to zoom and focus quickly, but it can be done.
  • Holding the lens to the port is tiring.
  • While not holding the camera, it flops around inside the bag.
  • Lens port has a coating which makes polarizing filter use impractical (shows rainbows). Otherwise, it is fairly neutral.
  • No flash use, internally nor with external flash, although it may be possible with a wireless transmitter.

If you have specific question, I am happy to answer them in the comment section below.

googletag.cmd.push(function() {
tablet_slots.push( googletag.defineSlot( “/1005424/_dPSv4_tab-all-article-bottom_(300×250)”, [300, 250], “pb-ad-78623” ).addService( googletag.pubads() ) ); } );

googletag.cmd.push(function() {
mobile_slots.push( googletag.defineSlot( “/1005424/_dPSv4_mob-all-article-bottom_(300×250)”, [300, 250], “pb-ad-78158” ).addService( googletag.pubads() ) ); } );

The post Dicapac WP-S10 Underwater Housing Review by Peter West Carey appeared first on Digital Photography School.


Digital Photography School

 
Comments Off on Dicapac WP-S10 Underwater Housing Review

Posted in Photography


Vanguard Vojo 25 Camera Bag Review

14 Jan

Vanguard Vojo 25 camera bag review

Earlier this year I bought a couple of mirrorless cameras. The camera bodies and lenses are smaller than those of my digital SLR system, so I also needed a new, smaller, camera bag to put them in. The one I chose is the Vanguard Vojo 25. I’m really happy with the purchase so I thought I’d share my experience for those of you in the market for a similar bag.

Why I like this camera bag

It’s light

Shoulder bags soon weigh down on your shoulder no matter how well they are designed. If the bag is heavier than it should be, then that adds to the weight of your gear, and reduces the time you can comfortably use the bag. I learned this the hard way when I bought a Retrospective 10 shoulder bag for my dSLR. The bag is too heavy and, to be honest, I hate it. The Vojo 25 is much better.

The Vojo 25 weights 920 grams (a little over two pounds).

Vanguard Vojo 25 camera bag review

The padded shoulder strap eases the weight of the bag on your shoulder.

The design is well thought out

This bag is really cleverly made. The shoulder strap is padded, so it doesn’t cut into your shoulder (something that should be standard on all shoulder bags). The flap that covers the bag is secured by both velcro and clips. There’s a zip in the top of the bag that you can leave undone for quick access to your gear, or keep closed for protection and security.

Vanguard Vojo 25 camera bag review

A zip in the top of the bag provides quick access to your gear.

The padded insert is removable

The insert that holds your gear is attached to the inside of the bag using velcro. It’s designed to be easy to remove so that you can use the bag for something other than holding your cameras. If you pull the straps on the side (the ones with the clips holding the flap in place) the bag is squeezed closed so it looks more like a satchel than a camera bag. The green version of the bag doesn’t look much like a camera bag, and does excellent double duty as a casual bag when required.

Vanguard Vojo 25 camera bag review

The removeable padded insert. You can zip it shut, making it ideal for storing your gear elsewhere while you are using the bag for something else, or even putting into another bag.

Vanguard Vojo 25 camera bag review

The side buckle that holds the bag’s flap shut.

Vanguard Vojo 25 camera bag review

If you take out the removeable insert and pull the side buckles tight the bag compresses into a satchel type bag, ideal for casual use.

It has a waterproof cover

Very important for those times when you’re caught out in a surprise rain shower. The cover protects both your bag and your equipment from the elements.

There’s space for a tablet or a kindle

The camera bag has a padded slot at the side that’s large enough for an iPad, or any tablet or kindle device the same size, or smaller.

There are several Vojo bags to choose from

If the Vojo 25 is too big or too small for you, there are several others in the range to choose from. The Vojo 28 is larger, and the Vojo 22 is smaller. The Vojo 13, Vojo 10 and Vojo 8 are much smaller, but even these mini versions come with a raincover and may be of interest if you just have one small camera to carry around.

Vanguard Vojo 25 camera bag review

The Vanguard Vojo 25 camera bag with a digital SLR, spare lens and iPad.

Capacity

The Vojo 25 can comfortably carry two mirrorless camera bodies with small to medium size lenses attached in the removable insert, a single mirrorless body and lens plus an extra lens or two, or a digital SLR with a small lens attached plus a second lens.

The removable insert isn’t quite as big as the bag, leaving a gap at the side. That space is for the raincover plus any additional accessories you want to keep there.

Vanguard Vojo 25 camera bag review

The Vanguard Vojo 25 camera bag with two mirrorless cameras and iPad. The raincover is visible in the gap on the left-hand side.

There’s also another padded slot at the front (ideal for a mobile phone), a small zipped compartment at the front (very tight, intended for small items such as lens cleaning cloths or lens caps) plus another small zipped compartment in the flap (again, suitable for small items like lens cloths and lens caps).

Conclusion

After two months of use I have to say I’m very happy with this camera bag and happily recommend it. I use it most of the day with a lightweight setup (one or two mirrorless bodies, a lens or two, plus a small water bottle). It’s ideal for photographers using mirrorless bodies or a single dSLR with small lenses (look at the Vojo 28 if you need more space). It’s a well-made bag that does exactly what it’s supposed to – protect my gear while simultaneously providing easy access.

googletag.cmd.push(function() {
tablet_slots.push( googletag.defineSlot( “/1005424/_dPSv4_tab-all-article-bottom_(300×250)”, [300, 250], “pb-ad-78623” ).addService( googletag.pubads() ) ); } );

googletag.cmd.push(function() {
mobile_slots.push( googletag.defineSlot( “/1005424/_dPSv4_mob-all-article-bottom_(300×250)”, [300, 250], “pb-ad-78158” ).addService( googletag.pubads() ) ); } );

The post Vanguard Vojo 25 Camera Bag Review by Andrew S. Gibson appeared first on Digital Photography School.


Digital Photography School

 
Comments Off on Vanguard Vojo 25 Camera Bag Review

Posted in Photography


Gold Standard: Nikon D750 review posted

20 Dec

The D750 is Nikon’s newest FX-format camera, offering a number of features from the D810 in combination with a 24MP sensor. It also boasts a faster frame rate than any non-professional full-frame Nikon DSLR since the D700. Aimed squarely at enthusiasts and full-frame upgraders the D750 boasts a comprehensive video and still photography specification – see how it performed in the field and in our extensive studio tests. Read review

Articles: Digital Photography Review (dpreview.com)

 
Comments Off on Gold Standard: Nikon D750 review posted

Posted in Uncategorized


Motorola Moto X (2014) camera review

19 Dec

Despite using the same name as its predecessor, the new Moto X is a very different device. Its 5.2-inch 1080p OLED screen, thin bezels and aluminum body give it a premium feel. In the camera department it offers a 13MP sensor and F2.25 aperture, 4K-video and a dual-LED ring flash. We put it through our comprehensive testing – see if the 2014 edition is a better choice for mobile photographers than the original Moto X. Read review

Articles: Digital Photography Review (dpreview.com)

 
Comments Off on Motorola Moto X (2014) camera review

Posted in Uncategorized


Take two: Canon EOS 7D Mark II Review

12 Dec

Canon’s EOS 7D Mark II was a long time coming. It arrived in time for Photokina 2014, combining a pro-grade AF module with a 20MP APS-C CMOS sensor using Dual-Pixel AF. The 7D II also provides 10 fps continuous shooting, a 150,000 RGB +IR pixel metering sensor and 1080/60p video recording. Our full review takes an in-depth look at its performance. Read review

Articles: Digital Photography Review (dpreview.com)

 
Comments Off on Take two: Canon EOS 7D Mark II Review

Posted in Uncategorized


All-in-one: Ona Capri bag review

07 Dec

Ona is known for high-end camera bags and accessories that go big on style – and price. The Capri leather tote is no exception – it’s an attractive bag with padded storage for photo gear that could easily double as a high-end purse. Can it replace a camera bag and a purse, and is it worth the price? Read our review

Articles: Digital Photography Review (dpreview.com)

 
Comments Off on All-in-one: Ona Capri bag review

Posted in Uncategorized


Review Of The Rugged Pelican 1510 Carry-On Case

04 Dec

If you own a lot of photography gear, you’ll likely want to protect it from any environmental dangers as well as possible. Pelican claims that the 1510 is a hardcase that is water-, dust- and crushproof while still meeting carry-on restrictions of international airlines. The Pelican 1510 can be carried with a handle or rolled with the integrated wheels. Here’s Continue Reading

The post Review Of The Rugged Pelican 1510 Carry-On Case appeared first on Photodoto.


Photodoto

 
Comments Off on Review Of The Rugged Pelican 1510 Carry-On Case

Posted in Photography