RSS
 

Posts Tagged ‘REVIEW’

Think Tank Shape Shifter Backpack Review

12 Aug

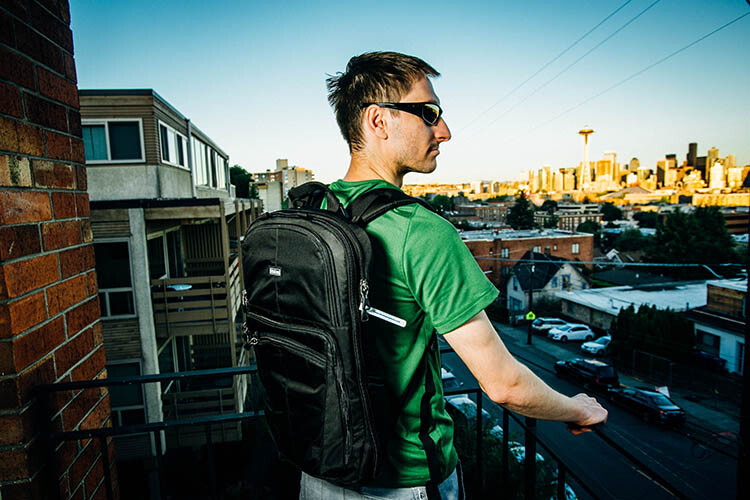
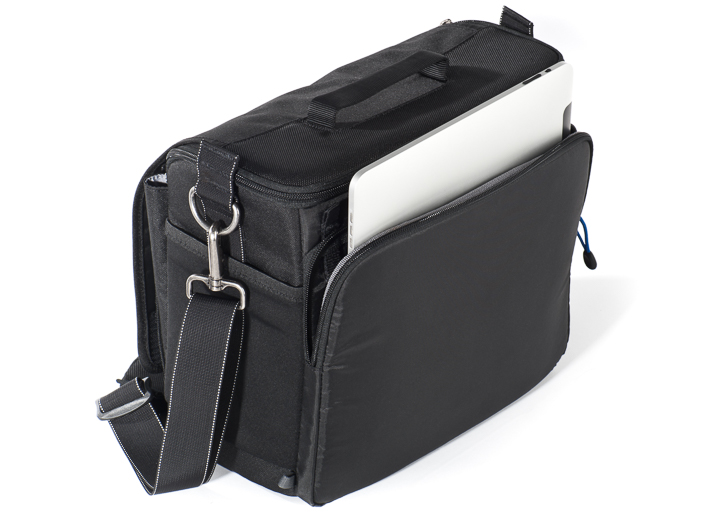
Finding the perfect camera bag is a challenge in today’s world where every bag style is possible. From messenger bags to belt packs to purses, there are many different camera bags out there to tickle your fancy. While the trend recently may be minimalist and compact, I’d like you to consider for a moment the exact opposite – a large, yet highly versatile, camera backpack known as the Think Tank Shape Shifter.

In general, many bags suffer from giving off the feeling and appearance of too much bulk, while at the same time not having nearly enough space for all of one’s camera gear. The Think Tank Shape Shifter is ingenious in that it is designed specifically to go from thin and skinny, to large and expansive, whenever you need it to. Top that flexibility off with fantastic padding and back support, as well as lots of pockets to hold all sorts of gear, and you have what I deem to be the perfect camera bag.

Think Tank Shapeshifter Backpack 2

Flexible sizing

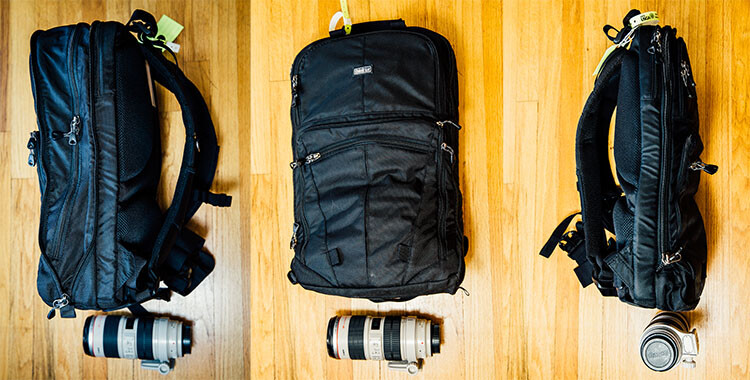
The Shape Shifter’s key feature is its flexibility in sizing, thanks to its rather simple zipper system. Similar to how luggage works, you simply unzip a section of the bag when you need it to expand, or zip it up to minimize the size. At its most compressed, the Shape Shifter measures 3 inches in diameter, and 7 inches at its maximum expansion.

Think Tank Shapeshifter Backpack

Sturdy build

As you can expect from all Think Tank bags, the Shape Shifter is built tough, despite having a minimalist profile. Featuring a black water-resistant exterior fabric, it also comes with a seam-sealed removable rain cover, just in case of a sudden downpour. The straps and back padding are made of 3D air mesh with a breathable air flow system, making the bag extremely comfortable to wear for long periods of time. There are also strong waist and chest straps to help equally distribute the bag’s weight across your upper body. The ergonomic value here is especially high, since backpacks already do a better job of equalizing the weight of heavy gear, as opposed to a one-sided messenger bag.
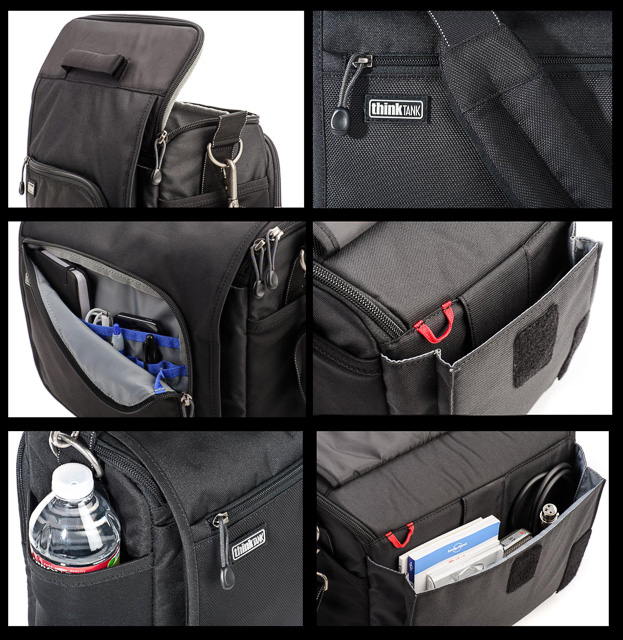
Think Tank Shapeshifter Backpack 4

Pockets galore

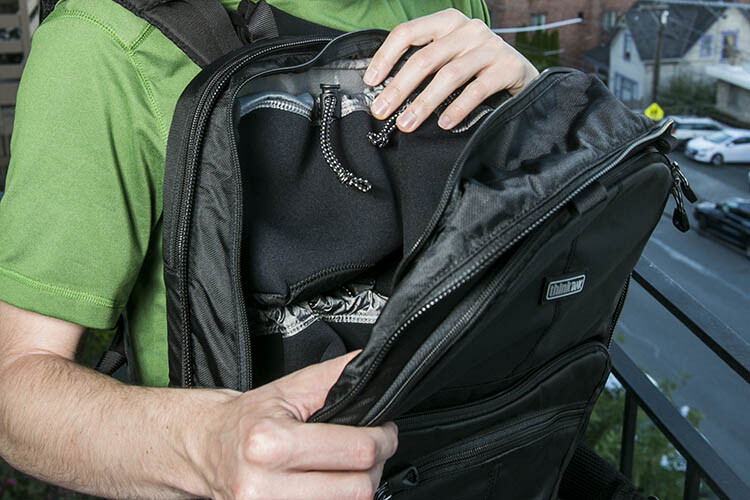
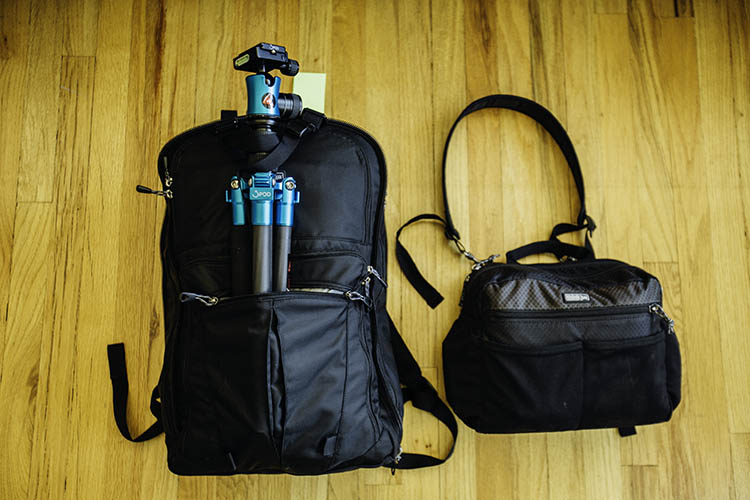
There are several main pockets in the Shape Shifter including a compartment for a laptop, up to 17″, and a huge compartment full of stretchable neoprene pouches for holding lenses and camera bodies. Alternatively, you could also stuff about four size small t-shirts in the pouches if you wanted to use the bag as a makeshift suitcase. There are also smaller zippered pockets on the bag’s exterior, where smaller items such as batteries and memory cards can be stored. Larger items such as tripods and lighting stands can also be strapped to the backpack if needed, using two sturdy straps that come with the bag.

Think Tank Shapeshifter Backpack 6

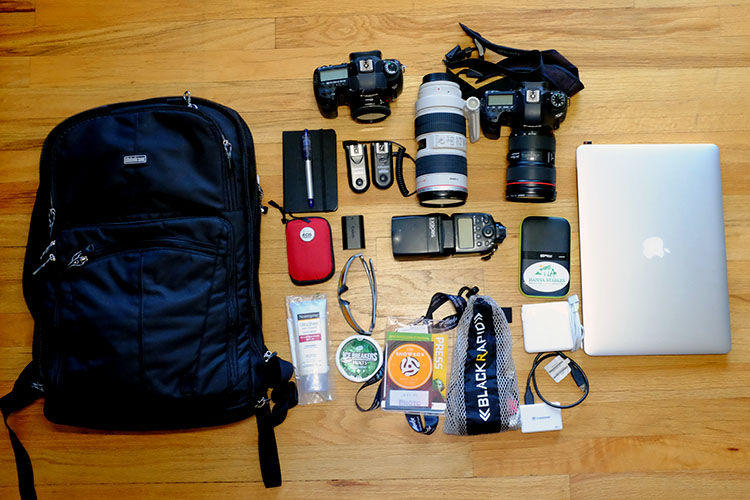
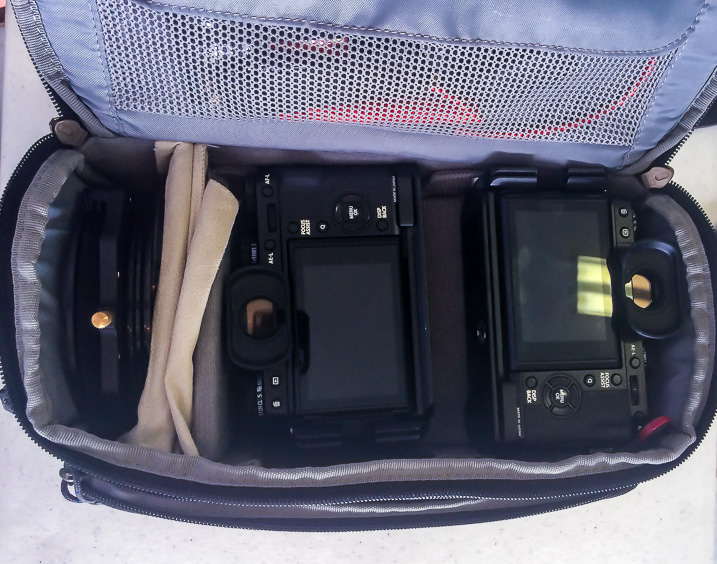
I took the Shape Shifter on a trial run while photographing the USGA U.S. Open at Chambers Bay recently. Needing to take along a majority of my photography equipment, I managed to fit all of the following into the backpack:

  • (2) Camera bodies (Canon 6D and 5D Mark III)
  • (3) Lenses (Canon 40mm f/2.8, 70-200mm f/2.8, 24-70mm f/2.8)
  • (1) Flash (Canon 580 EXII)
  • (2) Flash Triggers (Yongnuo)
  • (1) Laptop (Apple 15″ MacBook Pro Retina Display)
  • Camera accessories (memory card wallet, spare batteries)
  • Laptop accessories (card reader, external hard drive, charger)
  • Other goodies (sunscreen, sunglasses, mints, credentials holder, notebook)

The resulting bag was admittedly pretty heavy, but the comfortable back padding and straps made the bag much easier to carry despite the added weight.

Think Tank Shapeshifter Backpack 5

Versatile, despite shortcomings

One of the biggest challenges that the Shape Shifter has is in its ability to carry your whole photo studio. You can indeed do just that, but the bag gets extremely heavy, and some gear is difficult to reach without stopping to unzip and lay out the entire bag. Additionally, the structure of the bag makes it hard to carry preassembled cameras (lens attached) in it, meaning it is meant to have the lens and bodies in separate pouches rather than attached as one unit. The best way around this is to simply wear your cameras while shooting, and keep items you don’t need regular access to in the Shape Shifter.

Alternatively, you could also convert the Shape Shifter into a more functional daypack or suitcase, since its pockets and design don’t restrict it from being used as solely a camera bag. Say you’re travelling by air and trying to meet the two bag carry-on limit. You could put the majority of your camera gear that you need to be readily accessible in a smaller bag such as the Think Tank ChangeUp, and use the Shape Shifter to carry your overnight travel items and excess gear. Again, the big benefit of the Shape Shifter is its ability to shrink or enlarge depending on your needs.

Have you tried out the Think Tank Shape Shifter? Did it meet your expectations? Let me know in the comments below!

googletag.cmd.push(function() {
tablet_slots.push( googletag.defineSlot( “/1005424/_dPSv4_tab-all-article-bottom_(300×250)”, [300, 250], “pb-ad-78623” ).addService( googletag.pubads() ) ); } );

googletag.cmd.push(function() {
mobile_slots.push( googletag.defineSlot( “/1005424/_dPSv4_mob-all-article-bottom_(300×250)”, [300, 250], “pb-ad-78158” ).addService( googletag.pubads() ) ); } );

The post Think Tank Shape Shifter Backpack Review by Suzi Pratt appeared first on Digital Photography School.


Digital Photography School

 
Comments Off on Think Tank Shape Shifter Backpack Review

Posted in Photography


Rough and ready: Olympus Tough TG-4 review

10 Aug

While most of the rugged cameras we covered in last year’s roundup have received minor upgrades, the Olympus Tough TG-4 brings something big to the table: Raw support. Does adding Raw put the TG-4 at the top of its class? Read more

Articles: Digital Photography Review (dpreview.com)

 
Comments Off on Rough and ready: Olympus Tough TG-4 review

Posted in Uncategorized


Hands-on Review – Nissin Di700A Speedlight and Wireless Trigger Kit

09 Aug

Following the big bang that introduced capable and affordable digital cameras, the digital photography universe has been expanding at an astounding rate. So much amazing imagery is being produced, and equipment manufacturers are working tirelessly to develop, and improve upon, the products you use to create those images.

Despite the tendency of some photographers to not even consider third party brands, that market exists and is flourishing. It seems that there are more players in it than ever before, and the competition is stiff.

Photography accessories

The market for third party photography equipment and accessories is bustling.

If you are considering adding a speedlight to your arsenal of gadgets, it’s definitely worth having a look at third party brands. Don’t make the mistake of assuming that a product is inferior because it’s not the same brand as your camera.

Although the industry dominators (Nikon and Canon) have a large array of speedlights to choose from, you just might find that you have to pay for features which you will never use, or their products may not have the features you need.

One company that has gained some ground, making a name for themselves in the third party sector, is Japan-based Nissin. They are a dedicated photographic lighting company who just released a new flash system for Nikon and Canon (Sony version coming in September) and one just showed up on my doorstep.

The Nissin Di700A speedlight shown with the Air 1 wireless commander.

The Nissin Di700A speedlight shown with the Air 1 wireless commander.

I shoot Nikon so they sent me the dedicated Nikon system but don’t worry, the Canon and Sony versions are similar, so this review is still worth reading even if you’re not a Nikon shooter.

First of all, this is exciting for us Nikon shooters. Unlike Canon, Nikon doesn’t have any flashes with radio triggers built-in, only optical. Why? Good question. Get it together Nikon.

First Impressions

Excavating the Nissin Di700A out of its packaging – yes, that’s the alphabet soup name they gave this unit – it was instantly apparent that it is meant to rival the SB-900/910, at least in size and weight.

Side by side comparison of the Nissin Di700A and the Nikon SB-900

The Nissin is in many ways comparable to the Nikon SB-900.

A quick inspection of the unit shows it to be sleek, simple, and solid. The plastic seems heavy-duty and I suspect it would survive some abuse. The locking head swivels and swings into the same positions as its Nikon counterpart – 7-degrees down, 90-degrees up and 180-degrees left and right (as every flash should).

On the back, below the matte-finish LED screen, is a dial with a Select button in the middle, a flash test button, and the power button. They went for the minimalist approach which I applaud. It has a small rubber cover on each side; one with a socket for a battery pack hiding behind it, and the other with a PC cable and auxiliary sync inputs.

The metal hot shoe mount is a welcome sight but the circular threaded disc for tightening the flash onto the hot shoe seems a bit archaic. A slide-out diffuser and reflector panel are also familiar features.

You may have noticed that earlier I called this a camera system. The kit they sent me comes with a radio trigger called the Air 1 Commander. The hot-shoe-mount Air 1 matches the flash in most respects, but has an extra Mode button. It automatically locks into place when slid onto the hot shoe, and has a button which is held in to release it. Personally, I would have preferred the same button on the speedlight instead of the threaded disc.

Firing it up

I popped in four AA batteries, hit the power button, and a kaleidoscope of colorful lights sprung to life on the rear panel. However, the flash was effectively frozen and would not work at all. Come to find out, the Eneloop XX rechargeable batteries that I prefer to use for all of my speedlights do not work in this unit. I swapped them out for the regular Eneloops which work fine. The only difference that I’m aware of is the XX are 2,500 mAh compared to the regular’s 2,000 mAh (any electrical engineers out there please chime in).

Following the thread of simplicity that Nissin has going, I just tightened that baby down onto my hot shoe and it did what it is supposed to do, fired away in TTL metering mode.

I instantly fell in love with the rear display. Various bright, vivid colors, clearly visible in any lighting conditions, indicate the six different menu settings:

  1. A (automatic)
  2. TTL (through the lens metering)
  3. M (manual)
  4. SD (slave digital)
  5. SF (slave film)
  6. And the wireless setting identified by a little radio tower symbol

A few things I liked immediately were: a quick press of the power switch locks all functions of the flash so you don’t inadvertently change settings, the tactile feel of the buttons and wheel are soft but feel very sturdy, and changing modes and adjusting exposure compensation is quick and easy.

Another issue I encountered was that the zooming flash head feature didn’t work. It zooms all the way out when deploying the small diffusion panel but did not respond when changing the zoom on any of my lenses as the manual says it should, nor does it respond to the manual zoom control feature of the Air 1. We’ll assume I got sent a defective unit. To play devil’s advocate, this can happen to any brand so I’m not going to throw them under the bus just yet.

The controls on the Di700a are intuitive and very easy to adjust to get the exposure just how you want it.

The controls on the Di700A are intuitive and make it quick and easy to adjust and get the exposure just how you want it.

A detail that could prove handy is the standalone battery magazine. Spares can be purchased which can be pre-loaded for easy swapping. This can save you time and prevents fumbling around for batteries in the heat of the moment.

Perusing the instruction manual divulged that the flash has an overheating circuit which supposedly shuts it down for 15 minutes, to recover after firing 20 to 30 times (presumably at full power). This is a significant detail as 15 minutes might as well be an eternity for professional shooters. I immediately had flashbacks of the SB-900 which would overheat and shutdown often, and at the most inopportune times.

The system supports all of the nifty features found on the camera body: high-speed sync (FP for Nikon and HSS for Canon) to 1/8,000th of a second, red-eye reduction, slow and rear -curtain shutter, and on-camera exposure compensation which is added onto the unit’s own exposure compensation, covering two stops in both directions.

The Nissin Di700A not only has a built-in wireless receiver, but can also be optically triggered by the camera’s built-in flash. This is cool because you can mix and match flashes that have optical receivers. The Di700A and the Air 1 can be purchased separately. The Air 1 wireless commander claims a 100 foot effective range. Although this may seem generous, and plenty for most applications, the Cactus transmitters I use boast three times the range but do not support TTL metering, so it’s a trade off.

Using the Air 1 with the Di700A proved undependable. My first attempt at about 50 feet, with the flash behind a motorcycle for backlighting, was met with intermittent results. The signal seemed weak, and I had to move around to get the flash to finally fire.

Testing the Nissin Di700a and Air 1 commander.

I had mixed results using the Air 1 to trigger the Di700A. The system struggled having the motorcycle between the flash and transmitter at about 50 feet.

The Air 1 can also support three groups of flashes, on eight separate channels, with exposure compensation for each group in half stop increments.

I would certainly recommend the kit to beginning through intermediate shooters, but despite Nissin’s efforts to offer some pro-level features, it falls a little short to meet the demanding needs of working photographers.

All in all, for a sub $ 300 kit, that is sleek and easy to use, versatile, and capable of wireless TTL shooting, the Nissin kit is definitely a strong contender.

googletag.cmd.push(function() {
tablet_slots.push( googletag.defineSlot( “/1005424/_dPSv4_tab-all-article-bottom_(300×250)”, [300, 250], “pb-ad-78623” ).addService( googletag.pubads() ) ); } );

googletag.cmd.push(function() {
mobile_slots.push( googletag.defineSlot( “/1005424/_dPSv4_mob-all-article-bottom_(300×250)”, [300, 250], “pb-ad-78158” ).addService( googletag.pubads() ) ); } );

The post Hands-on Review – Nissin Di700A Speedlight and Wireless Trigger Kit by Jeremie Schatz appeared first on Digital Photography School.


Digital Photography School

 
Comments Off on Hands-on Review – Nissin Di700A Speedlight and Wireless Trigger Kit

Posted in Photography


Video: Summing up our Fujifilm X-T10 Review

06 Aug

Our full Fujifilm X-T10 Review takes a comprehensive look at many aspects of the camera’s performance, with in-depth analysis of our studio tests and shooting experiences. But if you’re looking for something more bite-sized, we’ve got that too. Take a look at the quick version of our review, shot in Seattle’s lovely Golden Gardens where many of the images featured in our full review were taken. See video

Articles: Digital Photography Review (dpreview.com)

 
Comments Off on Video: Summing up our Fujifilm X-T10 Review

Posted in Uncategorized


Less is more? Fujifilm X-T10 review

05 Aug

The Fujifilm X-T10 puts many of the X-T1’s capabilities into a smaller, less expensive body. It uses the same 16MP X-Trans CMOS sensor and EXR Processor II and, despite a more compact body, offers an additional custom function button and even squeezes in a pop-up flash. Is the X-T10 capable of holding its own against APS-C competitors? Read our full analysis. Read more

Articles: Digital Photography Review (dpreview.com)

 
Comments Off on Less is more? Fujifilm X-T10 review

Posted in Uncategorized


Canon EF-S 24mm f/2.8 Pancake Lens Review

03 Aug

In November of 2014, Canon introduced us to its newest member of their low-cost prime lens family, the EF-S 24mm f/2.8 STM pancake lens. Canon gave us the 40mm version in 2012, and hoped to up the stakes by adding a wide-angle version this past year.

Sitting at the extreme end of what can be considered wide-angle, the EF-S 24mm (full-frame equivalent of 38mm on an APS-C sensor) does so in the form of a small, light, and inexpensive prime lens that is easily accessible to all Canon enthusiasts.

24mmPancake

The first features that will strike you about the 24mm are its inconspicuous qualities; the lens is incredibly thin at only 2.75 inches, and weighing under five ounces. Street shooters wanting a wider angle of view will be pleased at how reserved the profile of this glass is, as it makes even a large camera body appear smaller, and less noticeable.

In addition to being visually unobtrusive, the STM (stepping motor) feature of this lens allows for faster, and much quieter autofocusing, compared to the USM (ultrasonic) motor system used on many other lenses. Manual focus is available in full, and Canon maintains this lens is capable of a minimum focusing distance of six inches.

Aperture: f/4.0  Speed: 1/800  ISO: 200

Aperture f/4.0, Shutter speed 1/800, ISO 200

For filter users, the lens uses a standard 52mm fitting, and will accept all filters of that size. Also keep in mind that as this lens is part of Canon’s EF-S line, it cannot be used on full-frame systems, such as the Canon 6D, and will only fit APS-C (crop sensor) cameras.

Aperture: f/4.5  Speed: 1/400  ISO: 250

Aperture f/4.5, Shutter speed 1/400, ISO 250

As far as my personal experiences with the lens, they were generally very positive, despite my preconceived worries about image quality that were bolstered by rather mixed pre-release reviews. I was pleasantly surprised to find that the 24mm pancake performed admirably well in this area, giving me very sharp and accurate photos throughout the full range of aperture stops.

Aperture: f/8  Speed: 1/640  ISO: 250

Aperture f/8, Shutter speed 1/640, ISO 250

The shot above showcases the clarity of the 24mm pancake. The beachgoers far to the back of the frame are sharp, details are well-defined, and I was still able to create a soft blur on the sand directly in front of the camera.

Aperture: f/3.2  Speed: 1/2000  ISO: 200

Aperture f/3.2, Shutter speed 1/2000, ISO 200

The image above highlights how well the 24mm pancake handles blurring and bokeh at wider apertures, especially for a wide-angle lens. I usually take this shot with my 50mm f/1.8, but I wanted to see what the 24mm could do. The foreground blurring, sun glare, and porch details were all handled in a pleasant manner.

Aperture: f/8  Speed: 1/200  ISO: 100

Aperture f/8, Shutter speed 1/200, ISO 100

Textures are captured very accurately with this lens, as you can see with the water in the picture above. Ripples and the smoothness of the surface translate well also, and great tonal range helps define the lake from front to back.

Aperture: f/8  Speed: 1/50  ISO: 1250

Aperture f/8, Shutter speed 1/50, ISO 1250

Colors are deep and accurate, as shown in the photo above. Other than sharpness, noise reduction, and a bit of contrast adjustment, this image is as it appears right from the camera. I didn’t have to go crazy with the noise reduction, and had a great looking image even with sensitivity set at ISO 1250.

Obviously, being a wide-angle affair, this lens doesn’t produce bokeh or blurring as easily or smoothly as my 50mm f/1.8. This isn’t an issue as I’m usually doing landscape shots using a smaller aperture.

This little jewel is available (at the time of this writing) for $ 149.00. I’d highly recommend giving this lens a try, especially if you’re in the need of a backup at this focal length, or even an affordable wide-angle starter lens.

Have you shot with the 24mm f/2.8 STM? What did you think? Share your experiences with us below!

googletag.cmd.push(function() {
tablet_slots.push( googletag.defineSlot( “/1005424/_dPSv4_tab-all-article-bottom_(300×250)”, [300, 250], “pb-ad-78623” ).addService( googletag.pubads() ) ); } );

googletag.cmd.push(function() {
mobile_slots.push( googletag.defineSlot( “/1005424/_dPSv4_mob-all-article-bottom_(300×250)”, [300, 250], “pb-ad-78158” ).addService( googletag.pubads() ) ); } );

The post Canon EF-S 24mm f/2.8 Pancake Lens Review by Tim Gilbreath appeared first on Digital Photography School.


Digital Photography School

 
Comments Off on Canon EF-S 24mm f/2.8 Pancake Lens Review

Posted in Photography


Think Tank Photo Sub Urban Disguise 30 Shoulder Camera Bag Review

02 Aug

Packing and carrying equipment for travel adventures is always a challenge. With increasing airline restrictions and not being willing to check your gear, you need to find the best possible alternative for your needs. Like most of my peers, I covet several bags. Usually when going abroad I take a bag with all the equipment and a smaller, second bag for everyday outings once on location. As I tend to travel lighter and lighter every day, I was on the lookout for a bag that could serve dual purposes for my recent Italy trip. I wanted a bag that could carry my two Fuji X bodies, some lenses, a filter kit, and my iPad. The other important consideration was that the bag needed to be easy to access and work from.

Think Tank Photo Sub Urban Disguise 30 - Image Courtesy of Think Tank Photo

Think Tank Photo Sub Urban Disguise 30 – Image Courtesy of Think Tank Photo

After much looking around, I settled on the Think Tank Sub Urban Disguise 30. As you may know, Think Tank products are legendary and they carry their well-known “non-rhetoric warranty.” This bag is one from their compact series, designed for small kits. There are four different models and the 30 is the biggest of them all, the one that features a separated iPad compartment.

The bag is constructed of high-quality ballistic polyester, treated for water resistance. It features YKK® zippers, stretch pockets on the sides, two-ply bonded nylon thread, and a removable shoulder strap. The interior comes with removable dividers and a rain cover that fits in the main outside pocket.

Besides the main compartment, the Sub Urban Disguise 30 has multiple pockets. There is a front organizer pocket on the front flap that can accommodate personal items. Under the main flap, there is a large pocket that is roomy enough to store bigger accessories, like battery chargers, cables, or perhaps a travel book. There is also a mesh pocket inside the main flap for smaller accessories. The exterior stretch side pockets can fit a bottle of water or a flash.

Think Tank Photo Sub Urban Disguise 30 Details - Images Courtesy of Think Tank Photo

Think Tank Photo Sub Urban Disguise 30 Details – Images Courtesy of Think Tank Photo

The bag dimensions are:

  • Exterior: 12” x 10” x 7.3” ((W x H x D)
  • Interior: 11” x 9.5” x 5” (W x H x D)
  • iPad pocket: 10.7” x 8.5” x .8” (W x H x D)

According to Think Tank, this bag can fit a standard-size DSRL, two to four zoom lenses, a regular iPad, and a 70-200 f/2.8 lens unattached. As I am shooting mirrorless, my use was a little different, and I was able to fit two Fujifilm X-T1 bodies with lenses attached, three separate lenses, a full-size filter kit, the iPad, and accessories, and I had room to spare.

Lower Section Think Tank Photo Sub Urban Disguise 30

My kit bottom layer  contains Fujinon XF 55-200 mm f/3.5-4.8, Fujinon XF 23mm f/1.4 and Rokinon 8mm f/2.8 fisheye for Fuji X mount.

Lower Section Think Tank Photo Sub Urban Disguise 30

My kit upper layer contains Fujifilm X-T1 body with Fujinon XF 10-24mm f4.0 lens attached, Fujifilm X-T1 body with Fujinon XF 16-55 f/2.8 attached and on there is a complete Lee Filter kit with 3 ND grads and 2 NDs. (Photo taken with iPhone)

As you can see, I loaded mine by layering the interior in two tiers. I placed lenses on the bottom of the bag, which I separated from the top with the provided dividers, and then placed both camera bodies on top for easy access. On the side I had the filter kit. As explained above, one of the things that I was looking for was to have easy access to the gear, and this way I had both bodies with the most used lenses within very easy access. The bag is very comfortable to wear as the shoulder strap is solid but very well padded.

One of the best things about this bag is the way it opens. There is a flip-top lid that folds away from your body, and that really helps you to reach the camera fast. This top lid is zippered and totally separated from the main Velcro exterior flap that accesses the bigger pocket. In the end, the bag was everything that I expected, so I will continue to use it on future trips, especially the ones around cities with lots of walking, and where I need quick access to the cameras, to take a shot and put it away again.

Obviously, how much you can fit in the bag will depend on the type of configuration you use and how you divide the bag internally, but if you want something relatively light for urban walks or travel, this is really a very good option. If you don’t need to carry a tablet, you can also consider this bag’s smaller siblings with three more models to choose from. There is probably one that will suit you well. The price for this bag starts at $ 49.75 and this particular model is $ 84.75, a price that I believe is more than reasonable for all these features and quality.


googletag.cmd.push(function() {
tablet_slots.push( googletag.defineSlot( “/1005424/_dPSv4_tab-all-article-bottom_(300×250)”, [300, 250], “pb-ad-78623” ).addService( googletag.pubads() ) ); } );

googletag.cmd.push(function() {
mobile_slots.push( googletag.defineSlot( “/1005424/_dPSv4_mob-all-article-bottom_(300×250)”, [300, 250], “pb-ad-78158” ).addService( googletag.pubads() ) ); } );

The post Think Tank Photo Sub Urban Disguise 30 Shoulder Camera Bag Review by Daniel Korzeniewski appeared first on Digital Photography School.


Digital Photography School

 
Comments Off on Think Tank Photo Sub Urban Disguise 30 Shoulder Camera Bag Review

Posted in Photography


Quick Review: PhotoKeeper

31 Jul

PhotoKeeper aims to provide photographers with safe cloud storage and easy access to their images from anywhere. While there’s no shortage of websites providing free storage for photos, PhotoKeeper goes beyond the standard offerings and tailors its product to photographers. Are its features worth the price? Read review

Articles: Digital Photography Review (dpreview.com)

 
Comments Off on Quick Review: PhotoKeeper

Posted in Uncategorized


Pocket full of tricks: Sony Cyber-shot DSC-RX100 IV review posted

29 Jul

Sony defined a category when it rolled out the enthusiast-focused Cyber-shot DSC-RX100. This shirt pocketable compact’s fourth iteration brings a new 20MP 1″-type stacked CMOS sensor to the table, maintaining an F1.8-2.8, 24-70mm equivalent zoom lens from the preceding model. Our full review analyzes its performance in the field and in our studio. Read more 

Articles: Digital Photography Review (dpreview.com)

 
Comments Off on Pocket full of tricks: Sony Cyber-shot DSC-RX100 IV review posted

Posted in Uncategorized


The Ice Light by Westcott – Product Review

22 Jul

Having easy access to the right light at every photo shoot is essential to any photographer, and in this case made possible by the Ice Light. A portable and brightness adjustable, continuous LED light source, the Ice Light is a lightweight and simple on-demand lighting solution. If anything, its similar build to that of a light sabre, will almost always be a conversation starter between you and your photo subject. This review will discuss the pros and cons of the Ice Light, as well as some photo shoot scenarios where it shines the most.

History of the Ice Light

A relatively new product, the Ice Light was developed in 2012 by world-reowned photographer Jerry Ghionis and manufactured by Wescott. The Ice Light’s main attributes are its ability to transmit daylight-balanced LED lighting via a long, handheld device, and the fact that is is powered by a rechargeable battery. Despite its relatively simple function, the Ice Light was groundbreaking as the very first daylight-balanced, handheld LED light on the market. It has quickly become a favorite light source for on-the-go photographers and videographers.

Ice-Light-Kit-b


The Ice Light Specs

The Ice Light’s long light bulb emits a perfect 5,200K color temperature through a frosted diffusion panel, helping your camera find the best white balance in the scene. With an outer encasing of aluminum, the Ice Light is durable, yet transportable. It stands about 24 inches long, weighs a mere 1.3 pounds, and it fits inside most regulation carry-on luggage. In fact, a slim carrying case is included with the light, making it easy to swing over one’s shoulder, or clip to a belt while on a photo shoot. The Ice Light has a very comfortable hand grip on one end, but also has mounting threads on both ends so it can be easily mounted to a tripod or light stand.

Powered by a single rechargeable Lithium Ion battery, the Ice Light can run for up to 60 minutes at full power, and be fully charged up in about 2.5 hours. Battery packs are also available to boost battery life by an extra 5 hours. There are also some light modifier accessories available including tungsten gels and barn doors to further modify the light.

Ice-Light-example-2b


Best uses

Given the Ice Light’s long shape, it can be likened to a rectangular strip light that operates according to the logic of the larger the light source is in relation to the photo subject, the softer the light will be.  As a result, the Ice Light really shines in these specific photography situations:

Achieving dramatic lighting

Due to the Ice Light’s long, narrow body, achieving a photo that is equally balanced with light requires at least two Ice Lights, or a single Ice Light and a reflector. However, if you’re aiming for a dramatically lit photo with lots of shadows, the Ice Light can give you just that!

Ice-Light-Buttons-2


When you don’t have a knowledgable photo assistant

If you consistently perform run-and-gun type of photography, or change locations frequently, you will likely be in need of an assistant to hold or set up your lights as you shoot. If you have a spur-of-the-moment need for lighting, the Ice Light’s easy-to-use interface makes it simple for anyone to operate. There are three simple buttons: an on/off switch, a button to increase light, and another to dim it. As a result, there’s less time required to futz around with light testing as you might have to with strobes, and you can use any Average Joe as a lighting assistant.

When you need continuous lighting

Another big advantage of the Ice Light is its ability to emit continuous lighting rather than strobes. This can be hugely beneficial for videographers or any other media specialists who need a constant, on-demand stream of daylight-balanced LED illumination.

Ice-Light-example-1b


Sold? Well, about that price…

All in all, the Ice Light makes a compelling case to be a photographer’s new best friend. There is only one potential downside: the cost. A brand new Ice Light runs roughly $ 400, while its newer, upgraded version the Ice Light 2 is priced at $ 549. Both Ice Lights include a battery charger, power cords, plug converters, gel clips, and a carrying case. Still, the price may seem steep to some.

Maybe try your own DIY solution – How to make creative images with a $ 12 LED light

What are your thoughts on the Ice Light?

Have you tried out an Ice Light? If so, would your recommend it to others?

googletag.cmd.push(function() {
tablet_slots.push( googletag.defineSlot( “/1005424/_dPSv4_tab-all-article-bottom_(300×250)”, [300, 250], “pb-ad-78623” ).addService( googletag.pubads() ) ); } );

googletag.cmd.push(function() {
mobile_slots.push( googletag.defineSlot( “/1005424/_dPSv4_mob-all-article-bottom_(300×250)”, [300, 250], “pb-ad-78158” ).addService( googletag.pubads() ) ); } );

The post The Ice Light by Westcott – Product Review by Suzi Pratt appeared first on Digital Photography School.


Digital Photography School

 
Comments Off on The Ice Light by Westcott – Product Review

Posted in Photography