RSS
 

Posts Tagged ‘REVIEW’

Good genes: Samsung NX500 review posted

09 Nov

The Samsung NX500 is the baby brother to the company’s superb NX1 mirrorless camera. It brings over many of the features of the NX1, including its 28MP BSI CMOS sensor and AF system, and puts them into a compact body at a price competitive with other midrange mirrorless models. Read more

Articles: Digital Photography Review (dpreview.com)

 
Comments Off on Good genes: Samsung NX500 review posted

Posted in Uncategorized


Lights, camera, action: Manfrotto Digital Director quick review

29 Oct

Manfrotto’s Digital Director, introduced in April, is a departure from its usual array of tripods and tripod heads. It’s a device designed to hold an iPad Air tethered to a DSLR, providing a large live view screen, access to camera controls and wireless sharing options. Shooting with a large screen can be a revelation compared to using a 3″ LCD, but the Digital Director is pretty pricey. Is it worth the cost? Read more

Articles: Digital Photography Review (dpreview.com)

 
Comments Off on Lights, camera, action: Manfrotto Digital Director quick review

Posted in Uncategorized


Tripod Review: Gorillapod Focus Field Test

25 Oct

I personally have one of these guys and find it extremely handy for travel and using in places where you either aren’t allowed to have a tripod, or don’t want to haul a big heavy one around. Check out what you can do with the Gorillapod Focus with X ball head kit in this video from Big Iris Productions.

They put it in some pretty challenging situations and gave it a mixed review. I would add that I find it to work great just to put your DSLR onto and walk around with. I did that while travelling in Spain – put the camera on Gorillapod, and the strap around my neck as usual  – but then just rested the legs of the tripod on my hip. It takes all the weight off your neck and I found it really comfortable to walk around that way, ready to shoot.

googletag.cmd.push(function() {
tablet_slots.push( googletag.defineSlot( “/1005424/_dPSv4_tab-all-article-bottom_(300×250)”, [300, 250], “pb-ad-78623” ).addService( googletag.pubads() ) ); } );

googletag.cmd.push(function() {
mobile_slots.push( googletag.defineSlot( “/1005424/_dPSv4_mob-all-article-bottom_(300×250)”, [300, 250], “pb-ad-78158” ).addService( googletag.pubads() ) ); } );

The post Tripod Review: Gorillapod Focus Field Test by Darlene Hildebrandt appeared first on Digital Photography School.


Digital Photography School

 
Comments Off on Tripod Review: Gorillapod Focus Field Test

Posted in Photography


Quick review: Xiaomi Redmi Note 2

24 Oct

Usually at DPReview Connect we focus on high-end devices from established smartphone manufacturers. However, sometimes we come across devices from lesser-known manufacturers that, because of their specification and price point, have the potential to make excellent alternatives for budget-minded mobile photographers. The Xiaomi Redmi Note 2 is such a device. Read more

Articles: Digital Photography Review (dpreview.com)

 
Comments Off on Quick review: Xiaomi Redmi Note 2

Posted in Uncategorized


Planning Your Photoshoot – Review of the App: LightTrac

18 Oct

Getting to know when is the best time of the day, or the best lighting conditions in specific locations, is key for the outdoor photographer. Whether you are shooting landscapes or portraits outside, it is always good to know in advance what to expect in terms of lighting at your desired location. Of course, as the old saying goes, there’s an app for that.

LightTrap-App-Review-3

While there is no shortage of similar applications, I find LightTrac easy to use and understand. It basically helps to plan outdoor photo sessions in advance, by finding the right lighting conditions and time, depending on the specific location you want to photograph.

The application calculates the angle of the sun, the moon, and plots the results on top of a map for any location in the world. While using LightTrac you can pick any date and time, at any place, then visualize the position and elevation of the sun and moon. It’s quite handy to be able to know not only what time sunset or sunrise will be, but more importantly, the relative position of the sun.

Here is the list of features for the iPad and iPhone version:

  • Find angle and elevation of sun for any location and time
  • Find angle and elevation of moon for any location and time
  • Find sunrise, sunset and twilight times for any day
  • Find moonrise, moonset and moon phase for any day
  • View when full moon, new moon, first and last quarters occur
  • View elevation chart and azimuth chart for sun and moon
  • Integrated compass view on the iPad
  • Search locations by address, city or zip code
  • Save multiple locations and switch between them easily
  • Use address book to pick locations from your contacts’ addresses
  • Share your saved locations easily with fellow photographers via email
  • Easily export your locations to KML file to view on other apps
  • Does automatic timezone detection
  • Available in English, German and French languages

There is also an Android version with a more limited list of features.

The application is very easy to read and understand. The screen is mainly divided into three sections: top, middle and bottom.

LightTrap-App-Review-2

The upper section of the application’s screen shows the date and all information pertaining to moonrise and sunrise with times, including twilight for dawn and dusk. It also display the lunar phases for the month, and GPS coordinates. If you are looking to search information for a specific place, you can tap in “Location” and either enter your own GPS coordinates, or make a search by city name. The same can be done with “Date”; just tap to enter a date in the future.

LightTrap-App-Review-1

But the upper section provides much more information. Just by sweeping to the left, there are two more screens. The first one will show you an elevation chart and an azimuth chart; these sets of tools basically help you to determine the position of the sun in the sky related to your location at a certain time of the day.

LightTrap-App-Review-5
That’s practical information for sure, but it seems a bit geeky to me. I’d rather use the second screen. If you sweep one more time, the following illustration will show you the shadows projections from an object; it’s more practical and easier to understand than the previous screen.

LightTrap-App-Review-4

As you can see in the screen captures above, the middle section shows a map with super-imposed information of the sun’s angle. The sun’s angle at sunrise is marked in yellow, at sunset in blue, and the red line will show the sun’s angle at any time you select. The selection can be easily done by moving the slider of the bottom section, and as you do, the time changes and the red line that represents the sun angle moves accordingly, emulating the position and movement.

There is also a very useful tool in the bottom section. If you tap in the clock besides the time, a window will pop up offering you to set a reminder, an alarm, or even add to your calendar that specific event.

In conclusion, LightTrac is a simple but practical tool that is very useful for the outdoor photographer, because one the best ways to create beautiful photos is to properly plan the best time of the day to shoot. This application allows you to do that very precisely and in advance.

googletag.cmd.push(function() {
tablet_slots.push( googletag.defineSlot( “/1005424/_dPSv4_tab-all-article-bottom_(300×250)”, [300, 250], “pb-ad-78623” ).addService( googletag.pubads() ) ); } );

googletag.cmd.push(function() {
mobile_slots.push( googletag.defineSlot( “/1005424/_dPSv4_mob-all-article-bottom_(300×250)”, [300, 250], “pb-ad-78158” ).addService( googletag.pubads() ) ); } );

The post Planning Your Photoshoot – Review of the App: LightTrac by Daniel Korzeniewski appeared first on Digital Photography School.


Digital Photography School

 
Comments Off on Planning Your Photoshoot – Review of the App: LightTrac

Posted in Photography


Rex aeternae? Sony Cyber-shot DSC-RX10 II review

13 Oct

The Sony RX10 II is the follow-up to a camera we already thought quite highly of. While the 24-200mm F2.8 equivalent lens and external body design remain unchanged, the RX10 II sports a new stacked sensor and can record 4k video internally, with full sensor readout. It also features improved AF performance and a higher-res EVF, but is it worth the sticker price? Read more

Articles: Digital Photography Review (dpreview.com)

 
Comments Off on Rex aeternae? Sony Cyber-shot DSC-RX10 II review

Posted in Uncategorized


Motorola Moto X Style / Pure Edition camera review

02 Oct

Replacing the 2014 Moto X, Motorola’s flagship Moto X Style has received a complete overhaul in the camera department. It comes with a Sony IMX 230 1/2.4-inch 21MP BSI CMOS sensor and a dual-LED flash, while an F2.0 aperture and 4K video recording remain unchanged from the predecessor. We put its camera through our range of studio and field tests for this full review. Read more

Articles: Digital Photography Review (dpreview.com)

 
Comments Off on Motorola Moto X Style / Pure Edition camera review

Posted in Uncategorized


Review: Westcott Rapid Box 10×24? Strip Light

26 Sep

One of the best, and easiest ways, to modify your studio lighting is to use a soft box. There’s nothing like a soft box when it comes to providing soft, diffused light, for any style of photography. But among the chief concerns of soft boxes is their size, especially when shooting on location. Enter, Westcott!

The legendary lighting brand, probably best known for their solid Apollo Orb soft boxes, has a slimmed down lighting solution known as the Westcott Rapid Box series. Available as an octabox, strip light, or the mega 32″ octabox duo, the members of the Rapid Box series are solidly built, very compact, and compatible with most speedlight flash units. This particular review is of the Westcott Rapid Box 10×24″ strip light.

Westcott Rapid Box Strip Light product review

What’s in the Box

The Westcott Rapid Box 10×24″ Strip Light arrives in a beautifully packaged box and comes with:

  • A 10 x 24″ narrow rectangular Rapid Box modifier
  • A Height and depth adjustable aluminum hotshoe-mount tilt/swivel bracket
  • A diffusion panel
  • Compact carrying case with shoulder strap

All pieces of the product are constructed of durable, high-quality material, that is also very lightweight. The modifier opens and closes like an umbrella, and has a reflective silver interior. Even the one stop diffusion panel is made of the same high-quality material as all of Westcott’s other current soft boxes. You don’t need any extra rods or adapter rings to set up the Rapid Box. The only extra parts you’ll need are a light stand and hot-shoe mounted flash, and you’re good to go!

Westcott Rapid Box Strip Light product review

Gear Used

Since the speedlight mount is held in place by the adjustable bracket outside of the soft box, the Rapid Box is compatible with just about any hot-shoe flash and any speedlight radio triggers or sync cords. For this product review test, I used the Rapid Box 10×24″ Strip light, Manfrotto Nano light stand, Canon 430 EXII flash, and a Yongnuo RF-603 II wireless flash trigger. Everything was compatible, and was easy to assemble and sync.

Why a Strip Light?

Given the fact that Westcott offers both a 26″ and 20″ octabox, choosing the narrower strip light may seem like an odd choice. But with the Rapid Box Strip’s narrower 10 x 24″ frame, this modifier’s shape makes it a perfect for lighting subjects in tight spaces, such as food photography in a small restaurant. Speaking of food photos, the strip light’s long shape can also help create a long, elegant strip on objects with reflective surfaces such as wine bottles. When paired with other lights, the strip light also lends itself to use as a back light, hair light, or rim light to help separate the subject from the background.

Westcott Rapid Box Strip Light product review

Con: Semi-Complicated Setup

Unless you are already familiar with Rapid Boxes, the initial setup work might be slightly more complicated than expected. Despite the lack of moving parts, there may be some difficulty figuring out how to set up the aluminum bracket, which feels so solid and tight that it’s not intuitive how to adjust it to fit the hot-shoe mounted flash. The initial set up time took me about 45 minutes toying with all the pieces before understanding how they fit together. However, with practice, I found that setup could be completed in under five minutes.

Westcott Rapid Box Strip Light product review

Pro: Beautiful, Flexible Lighting

Once you get over the initial hurdle of figuring out how the Rapid Box functions, it starts to live up to its name and is a speedy, flexible, lighting modifier. Lightweight and especially compact as it is a strip box, this little 20-inch light performed particularly well for on-the-go portraits and on-location restaurant shoots, when shooting in notoriously tight dining room spaces. The image quality was superb, likely thanks to the Rapid Box’s solid silver interior which adds a bit more of a kick when the flash is fired.

Westcott Rapid Box Strip Light product review

IMG_9798-750px


Westcott Rapid Box strip light review

Conclusion

As an on-the-go photographer, I have yet to find a more compact lighting modifier than this handy Rapid Box strip box. Even though initial set up can be a pain, I wouldn’t hesitate to stick this strip box into any of my travel photography kits, and rely on it for shooting on the road or in tight spaces.

googletag.cmd.push(function() {
tablet_slots.push( googletag.defineSlot( “/1005424/_dPSv4_tab-all-article-bottom_(300×250)”, [300, 250], “pb-ad-78623” ).addService( googletag.pubads() ) ); } );

googletag.cmd.push(function() {
mobile_slots.push( googletag.defineSlot( “/1005424/_dPSv4_mob-all-article-bottom_(300×250)”, [300, 250], “pb-ad-78158” ).addService( googletag.pubads() ) ); } );

The post Review: Westcott Rapid Box 10×24″ Strip Light by Suzi Pratt appeared first on Digital Photography School.


Digital Photography School

 
Comments Off on Review: Westcott Rapid Box 10×24? Strip Light

Posted in Photography


Adding it up: Sony a7R II First Impressions Review

24 Sep

The Sony Alpha 7R II has been the topic of much discussion and in our office, much testing. We’ve published a number of articles with results of our tests, picking apart Raw files from its 42MP full-frame BSI CMOS sensor and pushing its 399 on-sensor phase detect AF points to their limits. This first impressions review is the culmination of that work to date, including an in-depth analysis of the camera’s image quality and the effects of shutter shock. Read more

Articles: Digital Photography Review (dpreview.com)

 
Comments Off on Adding it up: Sony a7R II First Impressions Review

Posted in Uncategorized


Portrait Pro v12 Studio Max Editing Software Review

16 Sep

V12-boxshot-750pxWorking mostly in fine art portraits I’ve never felt the need to try a retouching program.  I like to keep a natural look, using Photoshop only for any minor retouching needed. I had looked into a retouching program briefly, but after clicking on a few sites I never got further than looking at the before and after samples. I always preferred the natural before image to the over processed, plastic looking after images. I want my subjects to look like themselves, in their best light of course, but not like some barbie doll cyborg with lifeless eyes.

When our Digital Photography School editor offered a free download of Portrait-Pro 12 Studio Max to test out and possibly review I figured this was a perfect opportunity to see if this kind of thing is something that a cynic like me, I might actually find useful.

Getting started

The download and install were super easy, off to a good start. There are instructional videos, tutorials, a forum, a support page, and a manual to download on the website. All good things, but I’m not one for instructions and just opened the program with a test image.

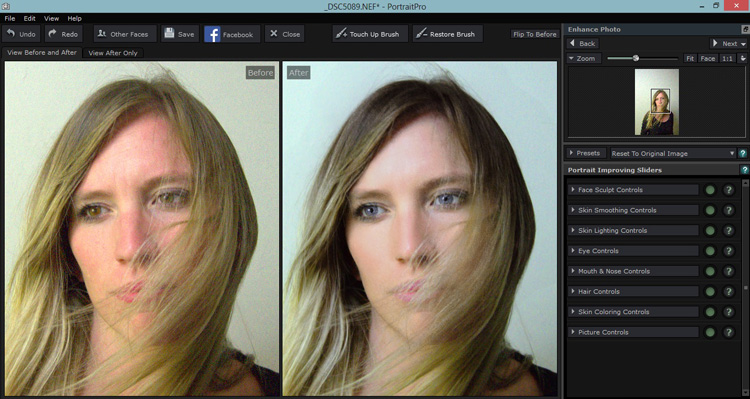
Portrait Pro did its thing and opened the before and its auto processed after image. It came up with an interesting eye situation and I thought, oh dear, this is not good.

My first attempt , not so great.

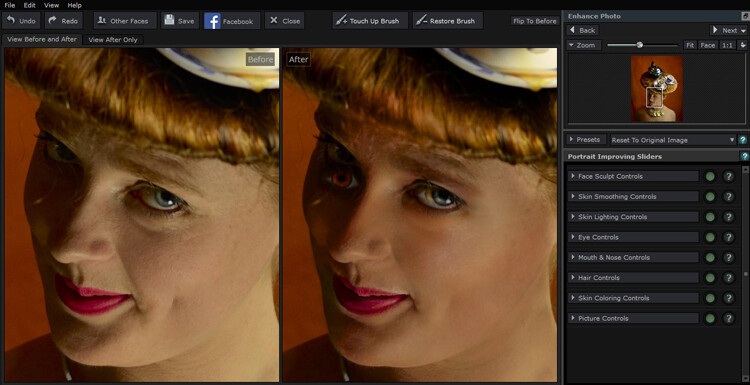
My first test image didn’t go so well, if I was going for a Picasso look, this would be great, but it wasn’t exactly what I was after.

Second attempt

Rather than succumb to instructions I tried another image. This one had the correct number of eyes, so I started playing around. The simple interface, and pop up instructions made it easy to just jump right in. I tested out the sliders and their effects, then went to town. It was pretty fun, with a bit of practice I eventually turned my blonde, brown-eyed, no make-up friend into a saucy red lipped, blue eyed, red head vixen with an uncanny resemblance to pop star Kylie Minogue.

I won’t show you the results, because the before shot was a not exactly flattering lighting test, when I say not flattering, a beautiful woman looked more like a potato than herself, and I would like to keep the friendship. I did show my friend both images and she really liked the after shot.

That had me thinking this program certainly has potential. I had only been mucking about and I turned an unusable portrait shot into something the subject of the portrait really liked.

Testing on a tough shot

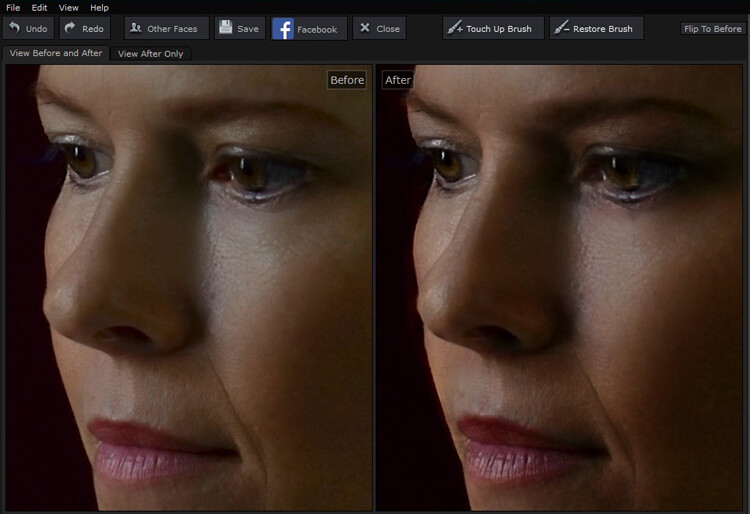
So I decided to put the program through its paces with a poorly lit, overly grainy, weirdly white balanced shot of a dear friend who looks lovely no matter how terribly I might light her. Portrait Pro popped up with the auto version, it gave her quite the tan and sparkly, but kinda spooky eyes.

The auto edit can make for spooky eyes

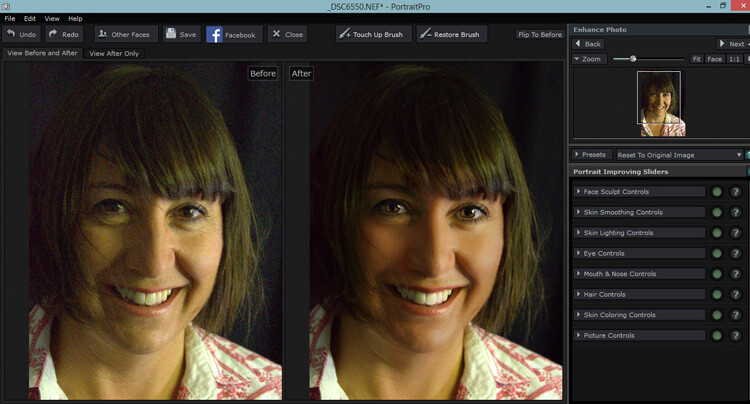
Portrait Pro helps out by offering up an auto edited version to work from.

But this where the easy to use sliders come in. You can adjust how much the skin is smoothed, colored, alter lighting, or how much cyborg look you want in the eyes. I was pleased to see you could just use this program subtlety. I could do a fair bit of gentle retouching, even on this poorly photographed shot that I either would have been unable to, wouldn’t have been bothered to, or taken for ever to do in Photoshop.

Much less spooky looking with less slider action.

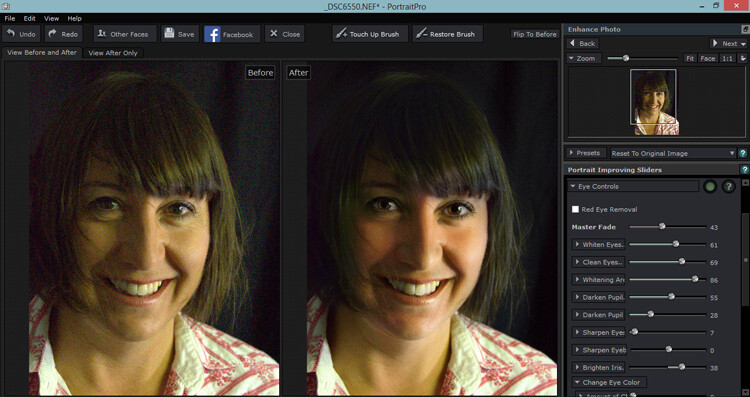
Pulling back the sliders to get a more natural look.

Of course after that I couldn’t help myself with pushing it a bit further.

The sliders can also smooth, lighten,add shine to hair.

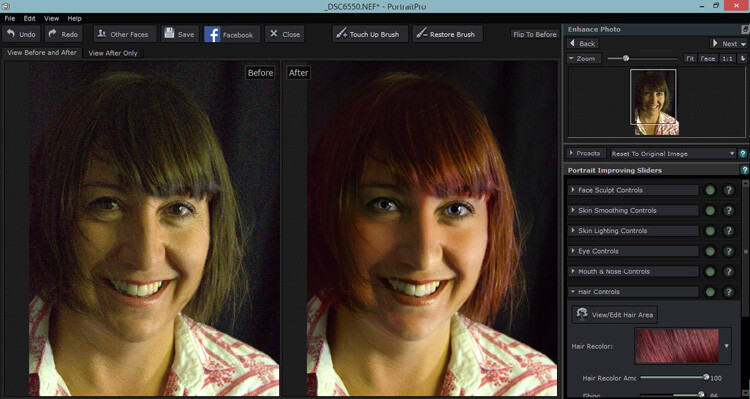
It was super fun playing around with the hair/eye color adjusters. I can see this being handy for some of my more surreal fine art images. After showing this version to my friend, she is now considering this new hair color!

Testing on a saleable shot

I was pretty impressed that I could pull something out of a rejected shot with this program, but what about a shot I would use? Would it be subtle enough to be useful for my regular work? Turns out yes, the sliders make it possible to add very slight retouching, and still maintain the natural look of the portrait.

Subtle is best in my books. I like to see wrinkles and pores!

While Portrait Pro can smooth out wrinkles and pores, it can also be used very subtly without loosing the natural look of your subject.

After playing with some faces, I thought all well and good but now the neck looks weird and the face and body don’t match, but turns out you can adjust those too. You can also batch process with the Studio Max version and work directly with Raw files.

I was pretty much sold on the program by this point, but I had a free version, would I actually pay for it? I was pretty surprised to see that it sells for around A$ 100, depending on which version you choose. For that price, I absolutely would buy it, even as a photographer who likes to keep programs to a minimum, and doesn’t like to fork out for new ones.

Any issues?

My only issues were finding the face alignment tool a bit tricky on some images, but then again, I still haven’t actually read the instructions. That was the only issue I had with the program itself, I took a slight offence with the promotional line “Slimmer subjects result in happier clients and more revenue“ in reference to the program’s ability to change face and body shape.

I’m sure that is true, but do we as photographers, really want to make money out of peoples insecurities? To edit distracting parts of a photograph and improve lighting flaws, sure, but to pander to the illusion of perfection created by modern media, not so much. I’d prefer my subjects to see themselves in their portrait as they are and still like what they see with the only retouching being to fix faults in my camera work, not in them. Portrait Pro can do both.

I have no doubt I will continue to use this program, both in my fine art and regular portraits. It will clearly save some editing time and in some cases does a better job that I would in Photoshop. I particularly liked the ability to adjust the lighting and skin tones. I’m even inclined to read the instructions and check out a few tutorials to really get to know the program. In fact I wish I had found it sooner.

Having fun with eye color!

My favorite part of this program was how much fun I had playing with it and how easy it was to use straight away, with impressive results even on not so great original images.

I can’t compare Portrait Pro to any other retouching programs, but as someone who has been against them in general and preferred to stick to Photoshop, I’m converted. It’s simple and fun to use, you have a lot of control of the subtlety with the sliders and it produces great time saving results. It’s a thumbs up from me.

How do you feel about retouching? Would you use a program like this? Have you ever tried a program like this? Tell us about your experiences and results.

googletag.cmd.push(function() {
tablet_slots.push( googletag.defineSlot( “/1005424/_dPSv4_tab-all-article-bottom_(300×250)”, [300, 250], “pb-ad-78623” ).addService( googletag.pubads() ) ); } );

googletag.cmd.push(function() {
mobile_slots.push( googletag.defineSlot( “/1005424/_dPSv4_mob-all-article-bottom_(300×250)”, [300, 250], “pb-ad-78158” ).addService( googletag.pubads() ) ); } );

The post Portrait Pro v12 Studio Max Editing Software Review by Lea Hawkins appeared first on Digital Photography School.


Digital Photography School

 
Comments Off on Portrait Pro v12 Studio Max Editing Software Review

Posted in Photography