Do you ever get the feeling you’re being played by the camera manufacturers? Sony appears to have no shame in regularly drip feeding its technology to consumers, eager for the next best thing in image quality.
If you don’t mind your hot new camera becoming a dinosaur six months after you buy it, Sony is the camera brand for you. You see, Sony has been very crafty by releasing a wide range of new mirrorless cameras, in such a way that you’ll probably need more than one of them, if you want to avail yourself of their best features.
The Sony A7RII Mirrorless Full Frame Body continues this money grabbing trend. The A7R was like the ultimate prototype, with a lot of usability problems, but it did produce gorgeous images. The next big hitter was the A7S with its amazing lowlight performance, and limited 4K video recording functionality (I say limited, because it cannot do internal 4K recording) .
Enter the Sony A7RII – the next resolution monster from Sony.

As you may know, I switched from Canon to the Sony A7R system as soon as it was launched, and overall I’m delighted with the results, even if the actual functionality of the camera can be painfully annoying at times.
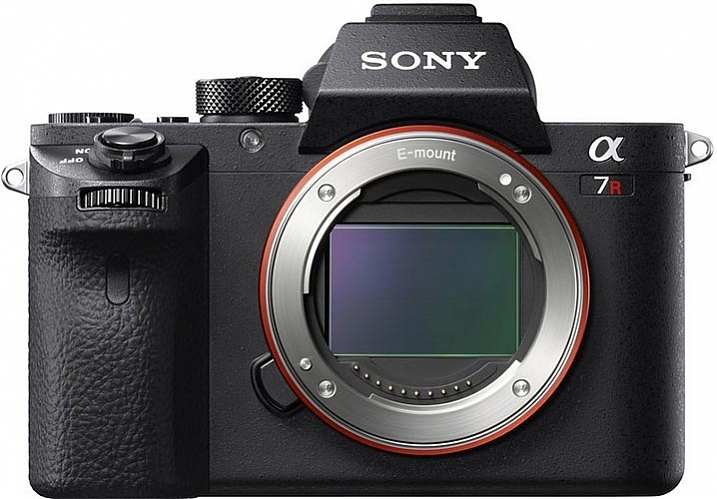
Image courtesy of Sony
For $ 4000 CDN ($ 3198 USD) the 42 Megapixel Sony A7RII packs a lot of firepower into a very small package, when you look at the specs. If your credit card is quivering in anticipation of buying this camera, there are a few things you might want to consider before throwing down your dollars.
I’m going to approach the question of whether or not you should buy this camera based on the assumption that there are likely three types of buyer for this camera:
- Existing Sony A7R users considering the upgrade.
- DSLR users considering switching to the Dark Side.
- New camera buyers with no current investment in any system.
#1 – Existing Sony A7R users considering the upgrade
If you already own the Sony A7R, here are four major reasons to shell out the big bucks for the upgrade:
- If you shoot a lot of handheld work and want the 5-axis image stabilization.
- You want to shoot 4K video (see below for my thoughts on that).
- You value the silent shutter for less vibration, and therefore sharper images.
- You value the new Eye Detect autofocus.
If none of the features listed above have any great importance to your photography, you’re probably better off keeping your A7R, and spending your upgrade dollars on some of the stunning new Zeiss glass for E-Mount that’s available now, or coming out soon. The Batis and Loxia range of lenses are a force to be reckoned with. Also, realize, that based on Sony’s track record, there will probably be a Sony A7RIII on the shelves before you’ve filled your first memory card.
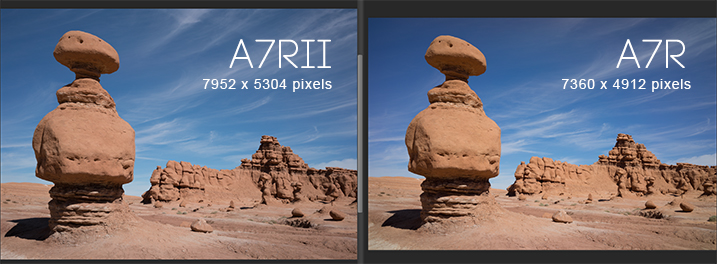
But what about the extra megapixels?
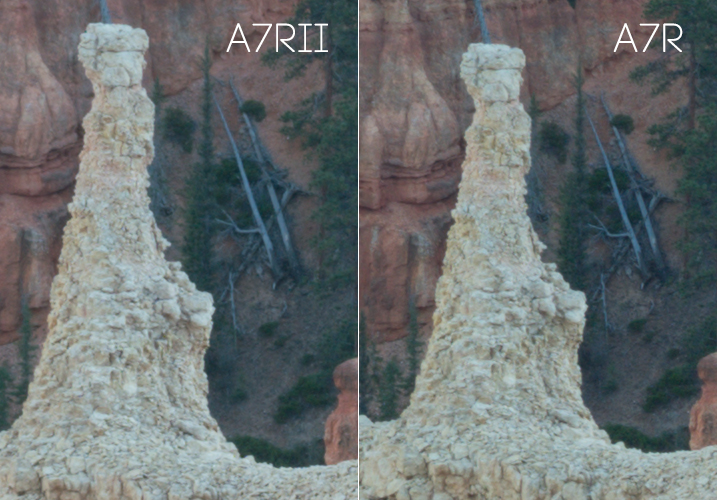
The difference between 36mp and 42mp is not that big a deal. In realistic terms, all it means is that you’ll be able to makes prints ever so slightly larger with the A7RII, and you’ll have a little bit more resolution to play with when cropping. To give you an idea of how big the difference is take a look at this comparison.
What about the Silent Shutter?
I was very keen to discover how much of a sharpness improvement I could expect from the new silent shutter (and therefore vibration free) on the A7RII.
Using the Zeiss Loxia f/2.8 35mm lens, I took the above shots on the A7RII and the A7R, with identical settings and focus point. The only difference was that the A7RII was set to silent shooting mode, and therefore didn’t suffer from the notorious shutter shock vibration of the A7R, which is something of a problem for fast exposures and when using telephoto lenses.
The results were impressive. Zooming in to 100%, I can see a significantly sharper image produced by the A7RII, when shooting in bright daylight with fast shutter speeds.
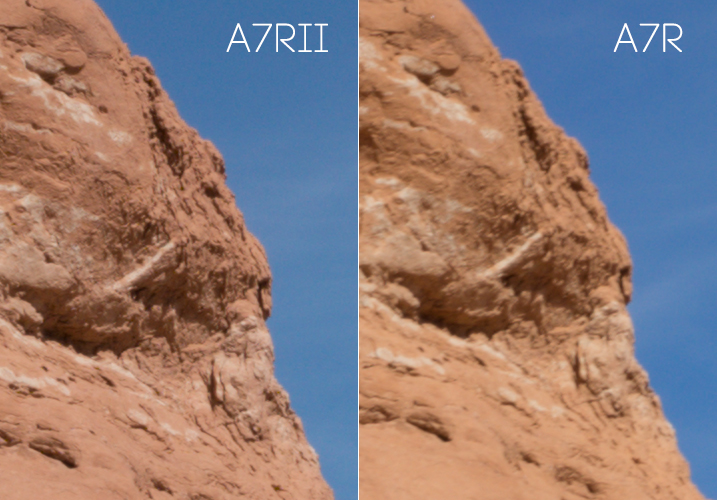
Both shots used the Zeiss Loxia 35mm at f/11 with focus manually set at the same point. No sharpening was added in post- production.
After the above comparison, I thought I’d do the same thing in low-light, with a long exposure, to see if the increase in sharpness was consistent.
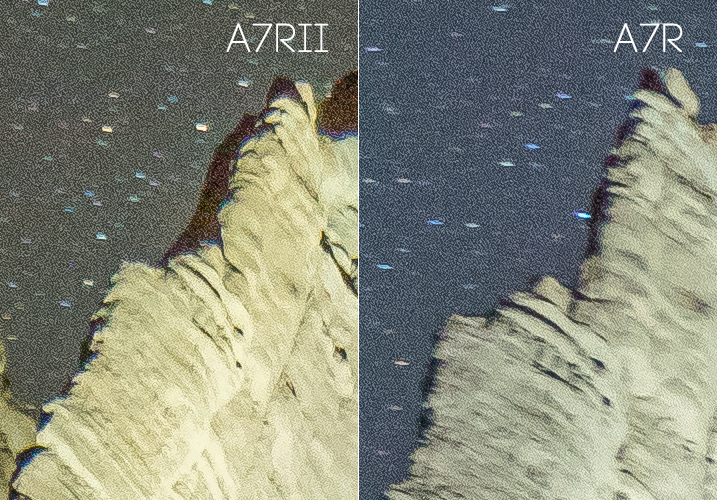
With this post sunset shot of Bryce Canyon, the sharpness increase on the A7RII is much less significant. Zoomed in to 100% I can barely see a slightly sharper image produced by the A7RII, but the difference is not as significant in low-light situations with long exposures. Once you add a little sharpening in Adobe Camera RAW there is no visible sharpness difference between the A7R and A7RII image when shooting long exposures in low-light.
100% magnification. Both shot with Sony FE 55mm lens at f/11. No sharpening was added in post-production.
It has better noise performance right?
When I heard that the A7RII had much better noise performance than the A7R, I was pretty excited to see how it would fare with astrophotography.
In my tests I could see hardly any improvement over the A7R when pushing the ISO up to 3200 during long exposures for astrophotography. Don’t get me wrong, the A7R was already pretty impressive at astrophotography when paired with good f/2.8 lenses. But, if you’re considering upgrading mainly for the supposed better noise performance, you may be setting yourself up for disappointment.
What about the USB power option?
If I wanted to carry around a brick all day I’d still be shooting with a DSLR.
Granted this is a major improvement on the A7R which wouldn’t allow you to use the camera when connected to a USB power source, but I only ever use this feature when shooting a time-lapse sequence longer than the measly one hour provided by the feeble Sony batteries, which I pop like Tic Tacs.
A better solution would be to provide longer lasting batteries. The A7RII has a bigger body than its previous version, so how about a bigger battery?
What about dynamic range?
In my tests I couldn’t see any improvement in dynamic range between the A7RII and the A7R in real use cases. By real use cases, I mean the limits by which you can recover shadow detail and highlight detail in your photos. It’s typical to deliberately underexpose your shots, so that you can recover the shadow detail when processing, and you won’t usually have to worry about blown out highlights.
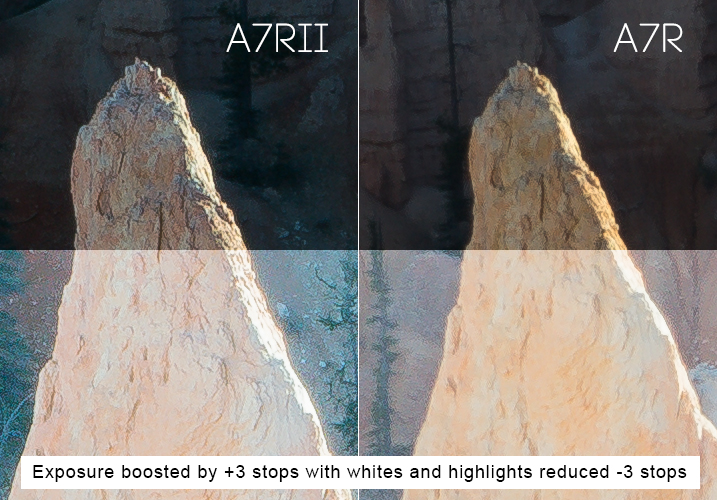
I deliberately underexposed these shots to avoid blown out highlights. I knew I could recover the shadow detail in post-production. Shown in the bottom half of the images, I increased the exposure by a ridiculous three stops in ACR, then reduced the Whites and Highlights sliders by three stops. I can see no noticeable difference in dynamic range between either camera, but the A7RII image is considerably sharper in this fast exposure as previously mentioned because of the silent shutter.
I tried this many times with both the A7RII and the A7R, and my conclusion is that they both performed equally well. I’m sure there will be some scientific test that proves the A7RII has better dynamic range, but when it comes to what you’ll observe with your own eyes, I doubt you’ll see any noticeable difference between both cameras in most situations.
If other users are observing better dynamic range in fast exposures, I wonder if what they’re seeing is actually the increase in sharpness on the A7RII, which simply records more detail than the A7R when shooting in silent shutter mode.

The 5-Axis Image Stabilization
This is a very good feature. If you’re using adapted prime lenses with no vibration reduction, you’ll really see the benefit of this feature when shooting handheld in low-light, where otherwise trashed shots can end up being very usable.
You’ll also be able to capture smoother handheld video with the image stabilization switched on, and with the additional Custom Function button on the camera body you can easily assign IS to that button, to save digging around in the menus to turn it on and off. This is a major improvement over the A7R.
The menu system of Purgatory
The one consistent gripe among all reviewers of the A7 series over the last couple of years has been the atrocious Sony menu system. They should have dealt with this issue long ago, but decided it wasn’t worth bothering on this upgrade.
Sony doesn’t seem to use any sensible kind of logic as to where they place menu items. For example, you’d expect anything to do with Autofocus to be grouped in one menu – but no, it’s scattered all over the place as if deliberately trying to test your patience. Things like this are a real turn-off for professionals who don’t have the time to waste on menu digging.
Get a grip Sony and sort this out! I’ll happily provide a much better layout for FREE if it means I no longer have to suffer the menu of misery.
Much better autofocus
Let’s be honest, the autofocus on the A7R is pretty lame, when compared to high-end DSLR cameras. If you’re seriously considering using the A7RII for portraiture the new Eye Detect autofocus function is a major attraction, and it works very well. If you primarily shoot landscapes this feature alone might not be worth the upgrade.

It does 4K video right?
Well – kind of. If you want full frame 4K video you’ll probably want to buy the A7SII instead, because the 4K full frame footage that I shot with the A7RII looks more like scaled up 1440p, and comes out looking pretty soft.
You’ll get proper 4k image quality when shooting in the Super 35 mode, but you’re basically shooting in crop sensor mode, so you loose a major part of the frame to get that crisp 4K video quality. The other downside, is that the better looking Super 35 mode suffers from bad rolling shutter.
Once again, this is another example of how Sony eeks out their technology across different camera models, ensuring that you have to buy more than one camera if you want all the coolest features. That being said, Sony is still offering better value than their competitors when it comes to how much bang you’re getting for your buck.
Better color rendering?
It’s been said that the A7RII produces better colors than the A7R, but I’ve yet to see any improvement from the test shots that I made. I’ve always been quite happy with colors produced by my A7R, but try as I might, I can’t see any difference (good or bad) in the colors produced by either camera. My examples above may show a slightly different color tone, but I’m putting that down to the time difference between shots while I got everything set up.

Isn’t the EVF mind blowing?
There’s been a lot of hype over the improved image quality on the EVF (Electronic View Finder) of the Sony A7RII, and while it’s definitely better than the A7R, it all amounts to nothing once you’ve punched in and magnified the image so that you can accurately set your focus manually.
Sadly, the magnified image quality of the new EVF still looks like a bag of smashed crabs, and I didn’t find it to be any more usable than the A7R for that specific purpose. I tried viewing in both Normal, and High Quality modes, and my conclusion is that the new EVF doesn’t live up to all the hype. Sorry Sony Fanboys.
Where you really notice the improved resolution of the EVF is during playback, and that can be very useful when you need to check the focus after shooting. This is something I do very often when working with poorly made Samyang lenses that have terrible build quality, but produce amazingly sharp images when focused correctly (especially for astrophotography). So, in that respect it’s great, but don’t for a second think that it’ll be any easier to set perfect focus using the EVF magnification.
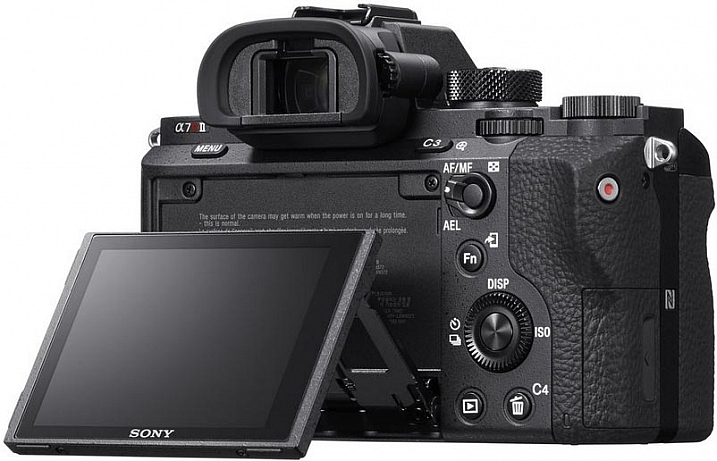
Image courtesy of Sony
It’s bigger and heavier than the A7R
The first thing I noticed as soon as I held the A7RII, was how much bigger and heavier it felt. While I liked the slightly larger size of the A7RII, I was none too happy about the added weight.
One of the major attractions of mirrorless camera systems is their small size, and even with the added weight of carrying lots of spare batteries, it’s still a relief not to be lugging around a breeze-block (cinderblock) of a DSLR.
If Sony could keep the same light weight to these cameras, but make them slightly larger and more ergonomically pleasing to the average hand size, I think they’ll win a lot of new business.
#2 – DSLR users considering switching to the Dark Side
If you’re considering jumping ship from another camera system, there are some things you need to consider before buying into the Sony brand. For most hobbyists these issues aren’t that big of a deal but for professionals these might be deal breakers.
- No second memory card slots
- Tedious and slow menu system induces violent tantrums
- Slow response times when changing settings, writing to card, previewing and using apps
- Battery life gives you a maximum of one hour of shooting
- Small size is not comfortable for long periods shooting handheld unless you have tiny hands
- Weather sealing is pathetic on the A7 series, don’t even test it
Adapt your DSLR Glass
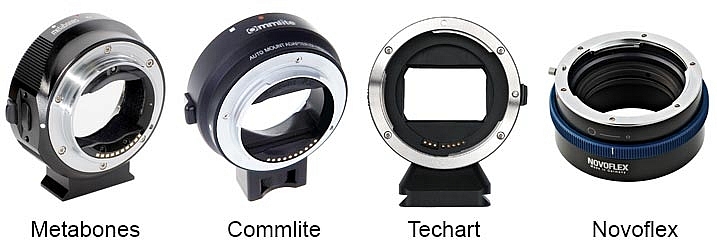
On the plus side, there are now many choices of lens adapter available from different manufacturers, some of which can now handle aut focus. If you own a lot of expensive DSLR glass you’ll most likely be able to adapt it to the Sony E-Mount system. I’ve personally gone down this route but I’ve begun to gradually invest in native Zeiss glass for the Sony because the bulky size of the adapted DSLR lenses makes for a very uncomfortable experience and my camera bag needs to get smaller, not bigger.
Is there really any competition?
It’s pretty slim pickings in the DSLR camp if you need big megapixels. The Canon 5DSR offers more pixels but I’ve yet to see it produce better image quality than the A7RII, especially when it comes to low light shooting and ISO performance. The Nikon D810 is still the king of dynamic range in the DSLR world, but it falls behind the A7RII when it comes to accurate manual focusing using Live View, they don’t even have flip screens!
None of the high end DSLR cameras currently records 4K video.
If you’re outgrowing your current DSLR, or thinking of adding a second camera, that can produce superb images, the Sony A7RII is a logical choice if you can afford the asking price.
3 – New camera buyers with no current investment in any system
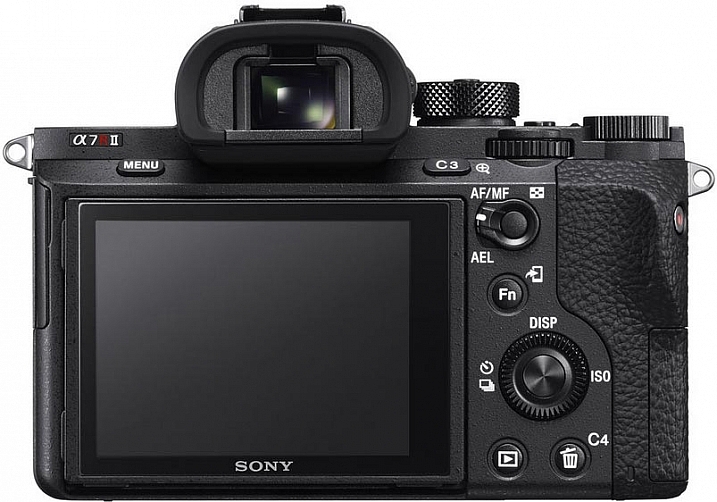
Image courtesy of Sony
If you’re not already invested in any camera system and are thinking of splashing out in this camera, I can summarize the entire ethos of the Sony A7 series for you in one sentence.
Image Quality Over Functionality. That’s what it’s all about. The Sony A7 series of cameras cannot compete with high end DSLR cameras in terms of functionality and reliability in high pressure shooting situations. But when it comes to sheer image quality, sharpness and low light performance, Sony crushes the competition with ruthless dominance.
If you’re a landscape photographer there really is no competition in this price bracket. The Sony A7RII will produce spectacularly sharp and detailed images when paired with good quality lenses.
What do you need from your camera?
Your decision as to whether or not you should buy this camera depends entirely on your shooting style and requirements. Want to shoot weddings and sporting events where reliability is paramount? Buy a high end DSLR. Want to shoot stunning landscapes with the utmost clarity? It doesn’t get much better than the A7RII for the current asking price.
But hold on – What about the A7R?
If the $ 3200 USD price tag of the A7RII (body only) puts too much strain on your bank account, I would recommend that you seriously consider saving some money for Zeiss glass and look for a good used A7R. There should be quite a few Sony fanboys out there, selling off their now obsolete Sony A7Rs for peanuts. Snag one of those for a bargain price and you might still have money left over for a Zeiss Loxia 21mm f/2.8, and maybe even the Sony FE 55mm f/1.8 which are both excellent lenses.
The attraction of top glass

Image courtesy of Zeiss
When the Sony A7 range first came out there were hardly any native lenses to choose from. Now there are more and more high quality lenses from Sony and Zeiss that are so good, I can see some photographers buying into the A7 system simply to take advantage of lenses like the Zeiss Batis 85mm and Sony SEL35F14Z Distagon T FE 35mm f/1.4, which are quickly becoming legendary lenses.
The Sony A7RII gets 4.5 stars

Why not 5 stars? In some ways Sony has listened to its users and fixed, or worked around, many of the issues voiced by A7R users. However the menu system is still atrocious, and the full frame 4K video is something of a let down.
I would have placed more value on improved dynamic range over the extra few megapixels, and there has been zero improvement in battery life even though the A7RII is a larger camera than its predecessor.
Maybe Sony will fix all of these issues in the A7RIII, and based on recent history, that camera should be in the shops before the next Star Wars sequel comes out.
Special Note: All of the test shots created for the review were done before the latest firmware update which now allows the A7RII to shoot 14-bit uncompressed RAW files.
googletag.cmd.push(function() {
tablet_slots.push( googletag.defineSlot( “/1005424/_dPSv4_tab-all-article-bottom_(300×250)”, [300, 250], “pb-ad-78623” ).addService( googletag.pubads() ) ); } );
googletag.cmd.push(function() {
mobile_slots.push( googletag.defineSlot( “/1005424/_dPSv4_mob-all-article-bottom_(300×250)”, [300, 250], “pb-ad-78158” ).addService( googletag.pubads() ) ); } );
The post Sony A7RII Mirrorless Full Frame Camera Review by Gavin Hardcastle appeared first on Digital Photography School.

Digital Photography School


You must be logged in to post a comment.