RSS
 

Posts Tagged ‘REVIEW’

Retro through-and-through: Fujifilm X-Pro2 Review

15 Mar

The X-Pro2 is a high-end, rangefinder-esque mirrorless camera that directly succeeds the first X-mount camera: the X-Pro1. The Pro2 is based around a 24MP APS-C sensor and a host of feature improvements in a body that very closely resembles that of its predecessor.

Fujifilm X-Pro2 features

  • 24MP X-Trans CMOS III sensor (APS-C)
  • 273 Autofocus points (169 of which PDAF)
  • 2.36M-dot OLED/Optical hybrid viewfinder with pop-up picture-in-picture tab
  • ISO 200-12800, expandable to 100-51200 with Raw shooting at all settings
  • 1/8000 sec maximum shutter speed and 1/250 sec flash sync
  • Acros black and white film simulation
  • Grain Effect option for JPEGs
  • 1080/60p movies

The X-Pro2’s higher resolution sensor also gains wider-spread on-sensor phase-detect AF coverage, which is another significant improvement. In addition it has a small, thumb-operated joystick that allows you to more easily select an AF point and, in turn, the camera lets you select from a any of the camera’s AF points.

Other changes include allowing Auto ISO to extend up to 12800 and the ability to shoot Raw files at all the camera’s ISO settings (extended settings have always been JPEG-only on previous X-series cameras), as well as the ability to apply lossless compression to Raw files. The X-Pro2’s shutter has been improved, too, and can now shoot as fast as 1/8000 sec, with flash sync extended to 1/250 sec of a second.

But much of what else made the original X-Pro1 stand out remains. The genuinely rangefinder-styled body, rather than just being a rectangle with a band of faux leather around it, mimics most of the control points and design accents of a 1960s camera. It still has the all-metal construction but more attention has been made to provide environmental sealing, as you’d expect in a camera at this price.

And, although the body looks broadly the same, it’s been significantly reworked to offer improved ergonomics as well as additional features. The hybrid viewfinder has been improved through the inclusion of an X100T-style pop-up tab in the corner, onto which an LCD image can be projected.

Here’s a spec comparison between the X-Pro2 and its predecessor, as well as the X-T1:

 
Fujifilm X-Pro2
Fujifilm X-T1
Fujifilm X-Pro1
Pixel count 24MP 16MP 16MP
AF points 273 points (169 of which PDAF) hybrid system.
All directly selectable.
77 point (15 of which PDAF) hybrid system
49 directly selectable (9 of which PDAF)
49 point CDAF system
All directly selectable.
Viewfinder 2.36M-dot OLED/Optical Hybrid 2.36M-dot OLED 1.44M-dot LCD/Optical Hybrid
ISO Range 200-12800
(100-51200 Extended)
200-6400
(100-51200 JPEG-only)
200-6400
(100-25600 JPEG-only)
Auto ISO settings 3 1 1
Maximum frame rate
With AFC/With Live View
8 fps / 3 fps 8 fps / 3 fps 6 fps / 3 fps
Maximum shutter speed 1/8000 (Mechanical)
1/32000 (Electronic)
1/4000 (Mechanical)
1/32000 (Electronic)
1/4000 (Mechanical)
X-Sync Speed 1/250 sec 1/180 sec 1/180 sec
Movie shooting 1080/60p 1080/60p 1080/24p
Wi-FI Yes Yes No
Customizable Q Menu Yes Yes No
Custom ‘My Menu’ Yes No No
Direct controls Shutter Speed
Exposure Comp
AF Drive Mode
ISO
Shutter Speed
Exposure Comp
AF Drive Mode
ISO
Drive Mode
Metering Mode
Shutter Speed
Exposure Comp
AF Drive Mode
Direct AF point control Yes – Joystick Optional – At expense of custom buttons No
Custom buttons 6 6 (2 if direct AF select chosen) 2
Exposure Comp Dial ±3EV (±5EV using front dial) ±3EV ±2EV
Rear screen 3″ Fixed (3:2)
1.62M-dot (900 x 600)
3″ Tilting (3:2)
1.04M-dot (720 x 480)
3″ Fixed (4:3)
1.23M-dot (640 x 480)
Command dials 2 (Push-button type) 2 1 (Push-button type)
Card slots 2 (1 of which UHS-II) 1 (UHS-II) 1 (UHS-I)
Film Simulations* 9 8 7
AF Tracking Yes Yes No
Eye-detection AF Yes Yes No
AF in MF mode AF-C or AF-S AF-C or AF-S AF-S
Panorama mode No Yes Yes
Compressed Raw? Optional (Lossless) No No
Battery life 350 OVF
250 EVF
350 EVF ~300 OVF
Battery percentage? Yes No No
Maintain zoom when changing image in playback Yes Yes No
Lens Modulation Opt Yes Yes No
Grain simulation Yes No No
Split prism focus guide Color/Mono Mono No
Brightline display Yes N/A No

*Not including color filter simulation variations

As you can see, compared to the X-Pro1, the Pro2 is significantly improved. Almost every aspect of the camera has been refreshed and these updates quickly add up to a much nicer-to-use, more capable camera.

However, in the four years that have passed since the launch of the X-Pro1, a lot has changed, with mirrorless cameras maturing dramatically and expectations for features such as continuous autofocus and movie shooting leaping forwards. However, neither of these two factors is likely to be a prime concern for would-be buyers, instead, the main thing likely to make life difficult for the X-Pro2 could be the existence of its own sister model: the X-T1.

The X-T1 was described at launch as a flagship model and offers a fully fleshed-out feature set for enthusiasts, semi-pros and perhaps even some professionals. It has sealed magnesium alloy construction, a huge electronic viewfinder, weather sealing and abundant external controls. So is there really still room for a new X-Pro alongside the DSLR-style model?

Scanning through the table above, there are certainly some areas in which the X-Pro2 is more advanced than the X-T1, but details such as shutter speed and pixel count are just generational improvements that would make just as much sense in a X-T2. So one of the main things we’ll be looking to address in this review is: how does the hybrid viewfinder change the shooting experience and is it enough to allow the X-Pro and X-T lines to continue in parallel?

 Review History
15 Jan 2016 First Impression Review based on Pre-Production camera running Firmware 1.00
25 Jan 2016 Raw Dynamic Range, Studio Test Scene & Full-production Samples Gallery added.
8 Feb 2016 Movie page added.
14 Mar 2016 Autofocus and Conclusion published

If you're new to digital photography you may wish to read the Digital Photography Glossary before diving into this article (it may help you understand some of the terms used).

Conclusion / Recommendation / Ratings are based on the opinion of the reviewer, you should read the ENTIRE review before coming to your own conclusions.

We recommend to make the most of this review you should be able to see the difference (at least) between X, Y, and Z and ideally A, B, and C.

This article is Copyright 1998 – 2016 and may NOT in part or in whole be reproduced in any electronic or printed medium without prior permission from the author.

Articles: Digital Photography Review (dpreview.com)

 
Comments Off on Retro through-and-through: Fujifilm X-Pro2 Review

Posted in Uncategorized


From another planet: Venus LAOWA 15mm F4 Wide Angle Macro quick review

13 Mar

Venus LAOWA 15mm F4 Wide Angle Macro lens
£325 / $ 499 | www.venuslens.net

Chinese company Venus Optics (Anhui ChangGeng Optical Technology Company Ltd.) is a new lens and camera accessory manufacturer started by a group of macro photography enthusiasts who design and create their own macro photography lenses. They began with the Venus 60mm 2:1 macro (which enables twice life-size reproduction), and have followed this up with the LAOWA 15mm 1:1 wide macro of this review. In addition to these lenses, they also offer a twin head macro flash unit, which we think looks quite a bit like an alien on top of a camera.

Features and specifications

The LAOWA 15mm lens is one of the widest full-frame lenses to offer a full 1:1 magnification ratio (meaning that the object in focus is projected at actual-size onto the film or sensor). Admittedly, this magnification only occurs when the object is 0.2 inches (4.7mm) from the rather large front element of this lens, but that’s the trade off between a wide angle of view and the desire for ‘true’ macro abilities.

In addition to the headline feature, this entirely manual lens (manual focus; manual aperture; no communication to the camera body) also includes a shift mechanism to physically move the optics up or down along the lens mount. This shift provides perspective correction for converging lines, as well as a way to create seamless panoramas (though the shift direction is fixed to the frame’s vertical axis).

Focal length  15mm
Max. aperture  F4
Min. aperture  F32
Angle of view 110° (135 frame) / 85° (APS-C)
Shift distances + / – 6mm
Aperture blades 14
Min. focus (1:1) 4.7mm
Filter thread 77mm
Dimensions 83.8 x 64.7mm / 3.3 x 2.5in
Weight 410g / 14.5oz
Available mounts

Nikon F / Canon EF / Pentax K /
Sony A, E, FE / Fuji X / m43

The lens is designed around 12 elements in 9 groups, with three High Refractive elements, and one Extra-low Dispersion lens.

Multi-layer coatings minimize flare and ghosting, while the overall optical design strikes a balance between close focus abilities and wide angles.

Of note is the 77mm filter thread around the non-protruding front element. This allows for easy filter use without requiring the more expensive square filter systems (although for ND grads, those are recommended). Given the wide angle of view, slim filters are still required.

The body surrounding the glass elements is made from aluminum and brass, with engraved aperture and distance scales that are necessary for the all-manual operation.

The aperture ring is ‘clickless’ and located toward the front of the lens, while the focus ring near the back has a relatively short throw for a macro lens (90° of rotation).

The lens comes with a shifting lens mount, allowing for perspective correction by adjusting the center of the image circle on the film or sensor. The range of adjustment is 6mm from the center, either up or down.

The small lever to engage the shift mechanism is just behind the focus ring, at the rear of the lens. There are no scales or gears to finely control the amount of shift.

Shooting experience

1:1 macro at F11. The flare comes from the combination of back-lighting and inability to use the hood at such close working distances.

The LAOWA 15mm is an entirely manual lens, but still easy enough to adjust and work with. This was aided somewhat by testing a K-mount lens on a Pentax APS-C camera body and a Sony a7 II (w/ Novoflex adapter), both of which provide image stabilization (from a manually entered focal length), stop-down metering, and focus confirmation/peaking, despite the low-tech, ‘slab of brass’ lens mount.

When ordering this lens in Micro Four Thirds, Sony E, or Fuji X mount, the folks at Venus bundle an appropriate adapter with either a Nikon F or Canon EF mount lens. (For single-system Sony shooters, there is the option of a native FE mount, without adapter.) However, as our friends at Lensrentals point out, testing a wide-angle lens with an adapter (regardless of manufacturer) can introduce issues, so much of the more technical analysis in this article is based on experience of using this lens on a native Pentax (APS-C) body. 

Ergonomics

The absence of autofocus is not much of a detriment when using this lens for wide-angle macro photography, since adjusting the subject distance while looking at the LCD or viewfinder is typically a much faster way to focus at these minute working distances. Stop-down metering and looking through a dim viewfinder or noisy LCD at smaller apertures (due to the lack of automatic aperture control), on the other hand, is a bit harder to adapt to.

The focus throw is somewhat short for a macro lens, requiring only a bit more than 90 degrees of rotation to go from the closest focal distance (and 1:1 macro) to infinity. Further, the helical is biased toward the macro and close-focus end, so there is only a tiny amount of travel between 2 meters and infinity. This took some getting used to, and initially resulted in enough mis-focused shots to warrant bracketing.

The biggest ergonomic difficulty was getting used to using an aperture ring positioned in front of the focus ring. Adding to the confusion is the fact that both rings are ‘clickless’ and identically sized. Of course, the lack of hard stops on the aperture ring, along with the wide angle and availability in many different lens mounts, combine to make this an interesting option for video work, but that’s beyond the scope of this article.

Macro

The image quality of this unique lens is excellent at closer focus distances, and shows the commitment of the macro photographers at Venus Optics for getting very close and very wide. There is a high degree of sharpness in the center of the frame, even at wider apertures, and the inevitable distortion and falloff along the edges doesn’t interfere at closer focus distances. Being very well corrected for aberrations is another plus as a macro lens.

However, this lens is differentiated by its 1:1 macro focusing, which, unfortunately, comes with some inconveniences. To keep the price of the lens reasonable, the LAOWA relies on manual focus and a manual aperture without linkage (resulting in the dim viewfinder when stopped down, as mentioned above), while the wide angle optical design means a minuscule 4.7mm working distance (for true 1:1) coupled with a rather large front filter ring and hood.

The petal-shaped hood prevents many subjects from reaching the tiny minimum focus distance for 1:1 macros, and furthermore blocks out light that becomes necessary for macros with acceptable depth-of-focus (narrow aperture). After a few experiments with macro flash rigs, resulting in images that looked like ‘flash party photos’ due to the lack of beam spread across the very wide angle of view, natural light (and a tripod for static subjects) was the order of the day. Thomas Shahan, of course, could probably overcome this with aplomb.

Shift ability

Unshifted Shifted +6mm

The addition of a shifting lens mount is a great bonus for a wide angle lens like the LAOWA 15mm, however the optical characteristics of the lens tend to make this function most useful on APS-C or smaller format sensors. In images shot with a full frame body (the Sony a7 II w/ Novoflex adapter), the vignetting and distortion at the edge of the image circle eclipsed the value of shifting the lens (although it is unknown how much of this is due to it being an adapted lens).

One troublesome aspect of the lens shift is that it lacks the gearing and markings for fine control of the shift found on most other perspective control lenses. Press the shift release button and almost immediately the lens slides up (or down) to the maximum shift amount. There is a detent in the middle to reset the lens to an unshifted position, but getting a small or precise amount of shift requires patience and a steady hand.

15mm wide angle

Toronto skyline, as seen from the islands offshore. On the full-frame Sony, the 15mm shows significant degradation at the edges, as evident in the lights on the right side.

When using this lens as a ‘normal’ ultra-wide angle, the results are something of a mixed bag. At close focus distances, the center is quite sharp (where most macro subjects tend to be) at all apertures, while at infinity the corner details appear smeared until the lens is stopped down significantly. Some night shots on the full-frame Sony, and attempts at astrophotography with the Pentax O-GPS Astrotracer, both show significant degradation of the lights at the edges. These examples are perhaps not quite as comprehensive as LensRentals’ OLAF system, but still illustrative. Check out the full resolution images in the gallery below.

Many macro lenses are designed to have a ‘flat field’ for the in-focus region. The LAOWA 15mm is not one of those lenses. Similar to other wide angle lenses, the field of focus curves radically, yet does not flatten out as focus is shifted toward infinity. Add in some edge distortion, and the resultant lack of corner sharpness at infinity is perhaps the biggest issue with the image quality from this lens on full-frame cameras. It requires some acceptance of the ‘dual nature’ of the lens (macro and ultra-wide) to work within this limit. Oddly enough, shifting the lens provides some relief for at least two of the corners, due to the curved field being off-center.

Distortion

Very few ultra wide angle lenses are free from distortion, and this 15mm is no exception. In most shots with the APS-C Pentax, curved lines were minimal (see the shift photos above) and could be corrected in processing if desired.

However, on the full-frame Sony, the barrel distortion along the edges reached a point where it was almost un-correctable. The image to the left shows doors that have very straight edges, but look organically curved in the (uncorrected) photo.

Chromatic aberrations

One area where the LAOWA 15mm is quite competitive is in the control of chromatic aberrations. While there definitely is some lateral CA, particularly visible at high contrast edges in the corners, it is fairly well controlled when stopped down, and quite consistent. A few clicks in most modern Raw processing software removes these distractions very easily. In addition, longitudinal CA (color fringing in the out of focus areas) is almost non-existent, which is excellent for a macro lens, even though many other wide angle lenses tend to be similarly devoid of this aberration.

(Note: none of the images in this article, or the samples, have had software lens corrections applied; whether for distortion, vignetting, chromatic aberrations, or fringing.)

Bokeh

Close focus at F4 Close focus at F16

It’s a bit unusual to discuss the bokeh of an ultra-wide lens: considering the typical design for this kind of lens provides such wide depth-of-field, there is frequently little out of focus anyhow. However, the close focus and macro abilities of the LAOWA 15mm give quite a lot of room for shifting the focal plane, so bokeh is not only visible, it can be an integral part of the image.

With a 16-bladed aperture, the blur discs produced by this lens appear round at all stops, with a slight ‘onion-ring’ artifact when examined closely. More importantly, the falloff in the blur is smooth and gradual, as one would expect from a macro lens. This combines to make the exaggerated field curvature less bothersome at closer focal distances and wider apertures, and becomes another one of the strengths of this lens.

Summing up

The Venus LAOWA 15mm F4 Macro is an unusual lens, both in its pedigree (or lack thereof) and its unique features. With a relatively reasonable price and availability in many different lens mounts, there is now an ultra-wide option for anyone who likes to get really close to their subjects. The lack of autofocus and auto-aperture prevents this from being a ‘snapshot’ lens, and may make it frustrating to use on camera systems that do not support low-tech lenses very well.

There are some compromises in the optical design of this multipurpose lens, including wide field distortion, and some edge softness at infinity. However, wide-angle macro enthusiasts will definitely enjoy this lens, while anyone with patience and a desire to explore the options it provides will similarly find the Venus LAOWA 15mm to be a fun and rewarding addition to their system.

Things we like:

  • Very close focus (1:1 macro)
  • Sharp in the center, even wide open
  • Well built and smooth focusing
  • Shift option is useful for APS-C
  • Nice bokeh for a wide angle

Things we don’t like:

  • Extremely short macro working distance
  • No mechanical aperture linkage (K and F mounts)
  • Significant distortion on full-frame
  • Edges smeared at infinity with wider apertures

Real-world samples

$ (document).ready(function() { SampleGalleryGridV2({“galleryId”:”8066630650″}) })

Venus LAOWA 15mm F4 Wide Angle Macro samples

47 images • Posted on Oct 27, 2015 • View album
Sample photoSample photoSample photoSample photoSample photoSample photoSample photoSample photoSample photoSample photoSample photoSample photoSample photoSample photoSample photoSample photoSample photoSample photoSample photoSample photoSample photoSample photoSample photoSample photoSample photoSample photoSample photoSample photoSample photoSample photoSample photoSample photoSample photoSample photoSample photoSample photoSample photoSample photoSample photoSample photoSample photoSample photoSample photoSample photoSample photoSample photoSample photo

Articles: Digital Photography Review (dpreview.com)

 
Comments Off on From another planet: Venus LAOWA 15mm F4 Wide Angle Macro quick review

Posted in Uncategorized


Accessory Review: Tenba Cooper Messenger bag

11 Mar

Tenba Cooper 13 Slim and Cooper 15
$ 229/299 | www.tenba.com | Buy Now

Over the past few years, Tenba has built a reputation for its solid line of messenger style shoulder bags. I have regularly used one of their Mini Messenger bags for my mirrorless or small DSLR kits. It has been a surprisingly solid performer that has traveled thousands of miles with me. For the price, it is near or at the top of my camera bag ‘bargains’ list. But if I’m being honest, it has always been a bit light on features, ungraceful to use/carry and looks very much like a padded camera bag. So when Tenba asked me if I would like to check out their new Cooper line of premium messenger-style bags, I jumped at the opportunity. 

Tenba released the Cooper line in late 2015 as unobtrusive photojournalist styled bags with luxury materials. Premium features include peach-cotton wax canvas, full grain leather accents, brushed tricot interior and hand riveted zipper pulls. There are four bags in the Cooper line, each designed to carry a specific camera kit. 

  • Cooper 8: A mirrorless camera with 2 to 3 lenses, accessories + a small tablet 
  • Cooper 13 Slim: A mirrorless camera with 3-5 lenses or a small DSLR with 2-3 prime lenses, accessories + a 13″ or smaller laptop
  • Cooper 13 DSLR: A DSLR with 2 or 3 lenses or a mirrorless camera with 4 to 5 lenses, accessories + a 13″ or smaller laptop
  • Cooper 15: Up to a pro-size DSLR with grip, 3 to 4 lenses, accessories + a 15″ or smaller laptop.

This review focuses on the Cooper 13 Slim and the Cooper 15. They are, in my opinion, the standouts of this line. The Cooper 8 is nice, but is really suited for the smallest of mirrorless kits. The Cooper 13 DSLR is a great bag, but is just slightly bigger than the Cooper 13 Slim, with two inches of interior depth (5.5 in vs 3.5 in) being the only difference. So virtually all comments about the Cooper 13 Slim will apply to the 13 DSLR. If the 13 Slim sounds just a little tight for you, then the 13 DSLR is probably your bag.

Specifications 

All dimensions (W x H x D) 

Cooper 13 Slim:

  • Exterior: 37 x 27 x 14 cm / 14.5 x 10.5 x 5.5 in 
  • Interior: 34 x 24 x 9 cm / 13.5 x 9.5 x 3.5 in
  • Laptop Compartment: 33 x 23 x 3 cm / 13 x 9 x 1 in 
  • Weight: 1.2 kg / 2.6 lbs

Cooper 15:

  • Exterior: 41 x 29 x 20 cm / 16 x 11.5 x 8 in
  • Interior: 38 x 28 x 17 cm / 15 x 11 x 6.5 in
  • Laptop Compartment: 38 x 27 x 3 cm / 15 x 10.5 x 1 in
  • Weight: 1.6 kg / 3.6 lbs

Design/Construction

I’m not sure how peach-wax cotton canvas differs from standard waxed canvas, but the peach-wax-cotton canvas on the Cooper bags looks sleek and understated, as well as being quite soft to the touch. Some of that softness comes from the fact that the bags have water repellent applied to the backside of the fabric, rather than the front. This allows water to bead up, but keeps the front of the fabric soft and flexible.

I was wary of the leather accents, as they seem like they could be useless affectations on a camera bag that is meant to be used out in the field. Much to my surprise, they not only gave the bag a professional look well above its price tag, but felt good in the hands. My only concern about the fabric and general construction is, what will these bags look like in 5 years? Mundane as it may be, my Mini Messenger looks much the same as it did when I got it. Waxed canvas and leather can age beautifully (think about your grandfather’s Filson coat), so I’m going to be cautiously optimistic.

Overall, Tenba succeeded in making the Cooper line feel like a step up from the average bag. Comparing them to my Mini Messenger bag makes the old bag look pretty boring and shabby indeed. Perhaps more to the point, these bags don’t scream ‘camera inside!’.

In fact, despite the higher end design and materials, one of the best parts about the Cooper bags is how quickly they fade into the background. I’ve had many bags over the years and I have no trouble saying that these bags are at or near the top of my list as far as stylishness. It may be a minor thing when we’re talking about something that is essentially a tool. But given the choice between a well designed bag that looks good and one that doesn’t, most of us will take the looks as long as functionality is equal. 

$ (document).ready(function() { SampleGalleryV2({“containerId”:”embeddedSampleGallery_7574697011″,”galleryId”:”7574697011″,”isEmbeddedWidget”:true,”standalone”:false,”selectedImageIndex”:0,”startInCommentsView”:false,”isMobile”:false}) });

I’ll say this right now, the ‘quiet’ velcro on the Cooper bags is nothing short of amazing. It works just like regular velcro, but if you pull the flap down (as opposed to ‘out’), the hooks release with 98% less noise. Instead of a huge RIIIIIPPPPPPPPPP, you might just hear 2-3 little loops pulling away. Not totally silent, but quiet enough for church, which is impressive. What’s more, by choosing velcro for the flap closure instead of buckles, there is no risk of a metal buckle dinging a piece of gear as the flap is opened. And because the Cooper bags have a handy top-access zipper, I didn’t find myself opening the flap as much as you might think. Particularly with the Cooper 13 Slim, I was able to quickly access bodies and lenses easily through the top-access zipper. 

While the leather bottom and other luxury touches get all the attention (and understandably so) there are any number of small features that are worth mentioning. Using YKK instead of generic zippers may seem like a small thing, but anyone who has been frustrated by a cheap zipper will appreciate the quality.

Speaking of zippers, I love the fact that the zippers to expand the side pockets don’t unzip all the way. There’s no fiddling when you want to zip it back up again. There are also a ton of pockets and slots to organize all the extras you carry in a camera bag. There are even nylon backed leather MOLLE compatible attachment loops. Not all is perfect, but the complaints are pretty darn minor.

One that comes to mind involves the rain cover. As nice as it is to have the raincover included, the fact that it is not built-in and takes up space in the bag is kind of a hassle. Particularly in the smaller bags, I’d opt to carry an extra prime lens than the cover. Another minor complaint? The side pockets on the smaller bags are also pretty, well, small. I’m glad they exist, but even expanded, you aren’t going to be sticking telephoto zooms or big water bottles in there. 

A final item worth mentioning can be considered both a feature and a drawback, depending on your point of view. These bags are not designed as bombproof protective cocoons for your gear, they are designed to be unobtrusive and functional. To that end, the padding inside is not as thick or heavy as in many other shoulder bags. I measure the padding and dividers in the Cooper bags to be around 1/4 inch. By way of comparison, the padding in my old Mini Messenger ranges from 3/8 to 1/2 inch. This cuts down significantly on the bulk and stiffness of the bags. In exchange, your gear is going to be less cushioned from bumps and bonks. This is a trade that I’m personally happy to make, but others may not feel the same.

In Use

Cooper 13 Slim 

While all four Cooper bags are solid, the 13 Slim might be the standout of the line. It is perfectly sized for a mirrorless kit. An Olympus OM-D E-M1 with a mix of 3-5 zoom/primes lenses fits beautifully. The gear comes in and out with ease and there is a place for everything.

If you are looking for a bag to carry a decent sized mirrorless kit, the Cooper 13 Slim deserves your attention. That said, perhaps what was more surprising to me is that my standard full-frame ‘prime’ kit (Canon 6D, 24mm F1.8, 35mm F2, 50mm F1.8 & 85mm F1.8) also fits. And it didn’t just fit; I found that I love using the bag for that kit. There’s not a lot of extra room and the 24 & 85 are a bit less accessible, but even so the 6D hasn’t left the Cooper 13 for weeks. Now, I’m not sure that this would be practical for a DSLR with zoom lenses of any length or girth. If you want a small bag for your DSLR and plan to carry anything bigger than prime lenses, I’d encourage looking at the Cooper 13 DSLR. 

The 13 Slim is big enough to hold a substantial amount of gear, but is also so slim that it hardly sticks out from your body and doesn’t hinder your ability to move through a crowd. This is something that is huge for me. To be honest, I’m rarely concerned that someone knows I have a camera bag, after all, I typically have a camera in my hand. But if I’m banging into people or knocking drinks off tables in a crowded bar concert, well, that’s going to get people’s attention, and not in a good way.

Not only is the Cooper 13 Slim only 5.5 inches deep, but its lack of rigidity allows it to conform slightly to the shape of your body, allowing it to protrude even less. There is one drawback to the Cooper 13 Slim’s ‘slim’ nature, it doesn’t tend to stand upright when set down. It will balance, but I wouldn’t leave the flap open and rely on it staying that way. 

Cooper 15

The Cooper 15 fits a full size DSLR with multiple F2.8 zoom lenses. I used a Canon 6D, 17-35mm F2.8, 24-70mm F2.8 and a 70-200/2.8 and had room for a speedlight and accessories without using any of the outside pockets. I will say that even a large mirrorless kit is absolutely swallowed in this bag. Unless you were using it as more of a briefcase that also happened to carry your mirrorless kit (not a bad idea actually), I might encourage you to look at one of smaller Cooper bags. 

Overall, the Cooper 15 performed the same as the its Slim/DSLR counterparts with a few small caveats. Due to the larger size of my F2.8 zooms, it wasn’t quite as easy to get them out/in through the top-access zipper. This isn’t something exclusive to the Cooper 15, some of it just comes with pro bodies and lenses.

This brings me to another small concern worth mentioning: the Cooper 15 is a pretty darn big bag. It’s sized to carry these big zooms and bodies. I tend to encourage photographers to look at a backpack or sling if they are carrying big gear. The only time I use a shoulder bag for my pro kit is when I’m on a job where I’ll be in and out of the bag a ton – setting it down, picking it up, rushing across the reception hall and grabbing a new lens so I don’t miss the first dance, that kind of thing. Otherwise, that’s a lot of weight on my shoulder just for a street photography session through town. If you are carrying a smaller DSLR kit, you should probably look into the Cooper 13 DSLR, as the Cooper 15 is going to be overkill. 

But I fully admit that some of that is my own personal preference as far as how I carry by gear. If you know that you like a shoulder bag for your big DSLR kit, the Cooper 15 is an outstanding choice as far as I’m concerned. While I was partially joking before, I do think there is a strong case to be made for using the Cooper 15 as a briefcase/schoolbag. It’s sized perfectly for that task, looks cooler than most anything else you’ll see at a powerpoint presentation and could still hold your ‘everyday’ camera kit. 

What’s the bottom line?

The Tenba Cooper bags are well designed, good looking and extremely functional. They are not particularly cheap, but I would consider them on the affordable end of the spectrum as far as high end bags are concerned. If sheer economics are your main concern, there are other cheaper bags out there. But the Cooper bags are an impressive mix of style, functionality and features. For what it’s worth, the Cooper 13 Slim/DSLR has made my list of bags that I love to use and recommend to just about anyone.

Articles: Digital Photography Review (dpreview.com)

 
Comments Off on Accessory Review: Tenba Cooper Messenger bag

Posted in Uncategorized


Great Eight: Panasonic Lumix DMC-GX8 review

10 Mar

Key Features

  • 20MP Four Thirds MOS sensor
  • Dual IS capability
  • Depth from Defocus AF system
  • 2.36M-dot tilting OLED EVF
  • 1.04M-dot, vari-angle OLED touchscreen display
  • 4K video / photo
  • Weatherproof magnesium alloy body
  • Wi-Fi with NFC

The Panasonic Lumix DMC-GX8 is the company’s flagship Micro Four Thirds interchangeable lens camera, and the followup to the popular GX7. While sharing some similarities with its predecessor, such as a tilting electronic viewfinder and rangefinder-styled body, the majority of the specs and features are dramatically improved.

The GX8 was the first Micro Four Thirds camera to leave the world of 16 Megapixel sensors behind, moving to 20MP. This increase in resolution allows the GX8 to appear to be closer in spec to other ILCs, many of which have 24MP sensors. When combined with Panasonic’s latest Venus Engine processor, the GX8 is capable of 4K video capture, 10 fps burst shooting (8 with the mechanical shutter), and a top ISO of 51200. 

The camera has also received a big upgrade in the autofocus department. While we’ll explain how Panasonic’s Depth from Defocus technology works later, it impressed us with its speed and subject tracking abilities when we reviewed the DMC-G7.

Another very useful new feature on the GX8 is ‘Dual IS’. The camera already has built-in sensor-shift IS and, when selected stabilized lenses are attached, can combine the two systems for even better shake reduction. Panasonic claims a 3.5x improvement at wide-angle and 1.5x at telephoto compared to the GX7 (which relied solely on its less advanced in-body IS system). 

The GX8 has also gained 4K (UHD) video capture support that surpasses the DMC-G7 in terms of features, though it’s not as robust as the GH4. 4K support also extends to stills, via the camera’s 4K Photo mode, a tool which helps capture moments that you might otherwise miss.

One last thing to mention in this introduction is the design of the DMC-GX8. The camera is considerably bulkier than its predecessor, closer in size and weight to Fujifilm’s X-Pro2. That’s good, though, as build quality has increased and the camera is now splash and dust resistant. The tilting EVF remains but now it’s larger and uses OLED rather than LCD technology. The tilting rear LCD on the GX7 has made way for a fully articulating OLED screen on the GX8. A few dials have moved around as well, and there’s now direct control for exposure compensation on the camera’s top plate.

The Lumix GX8’s feature set comparable to both mirrorless cameras like the Olympus PEN-F and Fujifilm X-Pro2, but also DSLRs such as the Canon 80D and Nikon D7200. As you’ll see throughout the review, the GX8 offers some features that none of those cameras can compete with.

Spec comparison

   Panasonic GX7  Panasonic GX8  Olympus PEN-F
 Sensor  16.0MP MOS   20.3MP MOS  20.3MP MOS 
 Image stabilization  Sensor-shift (2-axis)  Sensor (4-axis) + lens shift*  Sensor-shift (5-axis)
 AF system  23-pt CDAF  49-pt CDAF  81-pt CDAF
 Max shutter speed  1/8000 (mechanical)  1/8000 (mechanical)
 1/16000 (electronic) 
1/8000 sec
1/16000 sec
 Flash x-sync  1/320 sec  1/250 sec 1/250 sec
 Burst rate
 (mech./elect.)
 5 / 40 fps  8 / 10 fps 10 / 20 fps 
 EVF resolution  2.8M-dot equiv.  2.36M-dot 2.36M-dot
 EVF type/mag  Tilting LCD / 0.7x  Tilting OLED / 0.77x  Fixed OLED / 0.62x
 LCD type/res  3″ tilting touch
 1.04M-dot LCD
 3″ vari-angle touch
 1.04M-dot OLED
3″ vari-angle touch
1.04M-dot LCD
 Built-in flash  Yes (GN 7 @ ISO 200) No No**
 Video  1080/60p @ 28MBps 2160/30p @ 100MBps 1080/60p @ 77Mbps 
 Mic/headphone sockets  No / No Yes / No No / No
 Wi-Fi  Yes, with NFC Yes, with NFC Yes
 Weather-sealing  No Yes No 
 Battery life   320 shots*** 330 shots*** 330 shots
 Dimensions  123 x 71 x 55mm 133 x 78 x 63mm 125 x 72 x 37mm
 Weight (CIPA)  402 g  487 g 427 g 
* When using lenses with built-in image stabilization
** External flash included
*** With 14-42mm kit zoom

As you can see, the GX8 is a pretty big leap forward from its predecessor. It is very close in spec to the Olympus PEN-F, though it’s weather-sealed, supports 4K video, and has a considerably larger EVF. One could argue that the GX8 is targeted more toward the video crowd, while the PEN-F is for those looking for a classic ‘camera-loving’ audience.

Pricing

The DMC-GX8 is sold in a body-only configuration for $ 1199 / £919 / €1099. The camera may be bundled with a lens in certain regions.

If you're new to digital photography you may wish to read the Digital Photography Glossary before diving into this article (it may help you understand some of the terms used).

Conclusion / Recommendation / Ratings are based on the opinion of the reviewer, you should read the ENTIRE review before coming to your own conclusions.

We recommend to make the most of this review you should be able to see the difference (at least) between X, Y, and Z and ideally A, B, and C.

This article is Copyright 1998 – 2016 and may NOT in part or in whole be reproduced in any electronic or printed medium without prior permission from the author.

Articles: Digital Photography Review (dpreview.com)

 
Comments Off on Great Eight: Panasonic Lumix DMC-GX8 review

Posted in Uncategorized


Review: Think Tank Modular Component Set V2.0

09 Mar

If you’re a photographer who frequently carries lots of gear, and needs it easily accessible to you during a shoot, it’s time to start thinking like Batman! That doesn’t mean donning a cape and mask, but rather making use of a utility belt that allows you to attach various accessories to it, for easy access. Luckily, you need not look any further than the Think Tank Modular Component Set, a customizable waist belt that holds you gear close to you, while taking the weight off your neck and shoulders.

In this review, I’ll take a closer look at the Modular Component System V2.0, and why it’s essential for on-location photographers.

Think Tank Modular Components 1

What’s in the Box

One of the best parts of this product, is that it includes the following modular components that can be used separately, or in conjunction with each other:

  • Lens Changer 50 V2.0
  • Lens Changer 75 Pop Down V2.0
  • Strobe Stuff
  • Speed Changer V2.0

Everything arrives neatly packaged in a zippered travel pouch.

Think Tank Modular Components 2

What Fits

As you can probably tell by the product photo above, two of these modular components are pouches with drawstrings, while the other two are zippered mini bags. Let’s look first at the pouches.

Think Tank Modular Components 1
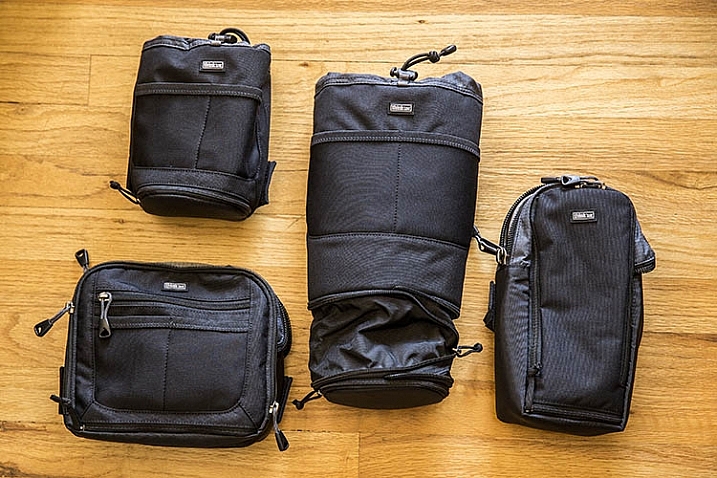
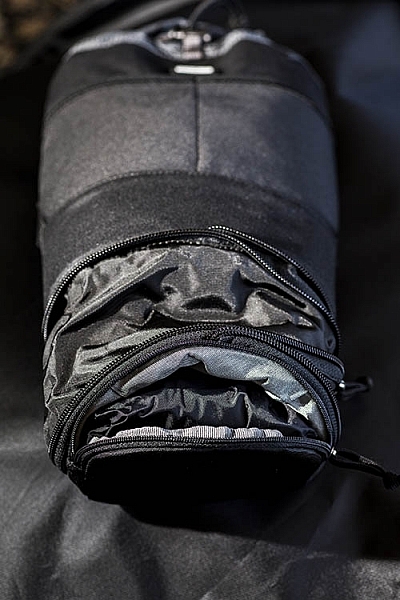
Pretty much any wide-angle or standard zoom lens will fit in the Lens Changer 50 pouch. The larger Lens Changer 75 pouch can unzip to extend its length, to be able to carry a lens as large as a 70–200mm f/2.8, or Canon EF 100-400mm f/4.5-5.6, with the lens hood reversed. Both of these pouches have wide, flexible openings, and drawstring cords that can be easily loosened or tightened with one hand. These two qualities make it very easy to quickly access the contents of the pouches. Each pouch also has a low-profile zippered bottom, that holds a rain cover.

In addition to the drawstring pouches, there are two mini bag components, one that can hold a large speedlight flash, and the other is quite a bit larger for holding extra small to mid-size lenses, or even a professional DSLR camera body without a lens attached.

Together, these modular components can hold quite a bit of gear if you use all of them, or you can slim down your pack by being more selective about the components you add to your belt. Speaking of that belt…

What isn’t included

If you purchase the Think Tank Modular Component System V2.0, you will also need to purchase one piece of gear that holds them all together: the actual utility belt itself. Think Tank offers three different versions of their Speed Belt. The main differences between them is the thickness of the material, with the thinnest being the Think Tank Thin Skin belt, and the thickest the Steroid Speed Belt. The middle option is the one that was used during this review: the Think Tank Pro Speed Belt, which has just the right amount of padding without too much added bulk.

Think Tank Modular Components 1

The Speed Belt can be used in conjunction with the Modular Component System, by attaching the pouches and mini bags to the belt via thick, secure velcro. Alternatively, you can also purchase larger holster bags, that can also be attached to the Speed Belt.

Think Tank Modular Components 1

Pros

This Modular Component System is very valuable for event or wedding photographers, who need quick and easy access to a wide repertoire of gear, while constantly shooting on the go. Wearing your gear as a utility belt, gives you a slimmer profile to weasel through crowds, while capturing photos of an event without accidentally hitting people with a bulky shoulder bag. Also, shooting with the Modular Component System gives you the polished look of a professional photographer, with the bulk of your gear on display. With that said, there are some cons to using this product.

Think Tank Modular Components 1

Cons

As mentioned above, wearing your gear on full display makes it more accessible to you during a shoot, but it also exposes the fact that you have lots of valuable camera gear. If you’re a street or documentary photographer, you probably won’t want to use this product, as you don’t want to attract unwanted attention. Additionally, while it can be tempting to load up the components with a ton of gear, this can quickly become overly bulky and heavy, so it’s important to be selective about how much you actually want to carry.

Over to you

Have you used the Think Tank Modular Component Set, or a similar belt system before? What was your impression of it? Let us know in the comments below!

googletag.cmd.push(function() {
tablet_slots.push( googletag.defineSlot( “/1005424/_dPSv4_tab-all-article-bottom_(300×250)”, [300, 250], “pb-ad-78623” ).addService( googletag.pubads() ) ); } );

googletag.cmd.push(function() {
mobile_slots.push( googletag.defineSlot( “/1005424/_dPSv4_mob-all-article-bottom_(300×250)”, [300, 250], “pb-ad-78158” ).addService( googletag.pubads() ) ); } );

The post Review: Think Tank Modular Component Set V2.0 by Suzi Pratt appeared first on Digital Photography School.


Digital Photography School

 
Comments Off on Review: Think Tank Modular Component Set V2.0

Posted in Photography


The 3Pod P3COR Tripod and SH-PG Ball Head Review

06 Mar

In one of my previous articles, while reviewing the Nitz Strap heavy-duty camera strap, I mentioned that straps fall into the category of accessories most of us photographers hate to spend money on. We know that we need them, and we know that we usually get what we pay for, but our minds don’t connect the piece of hardware that doesn’t technically take the image we’re capturing, and the image itself.

Tripods seem to fall in that category as well. We know that a sturdier tripod can lead to a sharper, clearer image, yet we cringe at the thought of dropping $ 200, or more, on one. My first tripod was a wobbly Velbon50 that I picked up for $ 10 at a local garage sale. It helped me along through my first landscape images, but I didn’t actually think about the fact that my images could suffer from using unsturdy equipment.

3pp3cor_12

Image courtesy Adorama and 3Pod

Of course, the images from less sturdy tripods can be perfectly acceptable, and you can make the argument that there are some excellent tripod setups to be had for $ 100 or less. But, once you’ve used a beast of a piece of hardware, such as the 3Pod Orbit 3 Carbon Fiber setup I’ll be discussing here (see photo above), it’s really hard to go back, and makes you wonder why you didn’t buy something this solid in the first place.

When I received my tripod (Orbit 3 Section Carbon Fiber, P3COR) and head (Pistol Grip Ballhead, SH-PG) from 3Pod, the first thing I noticed was the heft. Pulling the tripod itself out of the box, I got the feeling I was handling a piece of military equipment – tough and rugged.

3pp3cor

Image courtesy Adorama and 3Pod

The tripod weighs in at 4.25 lbs. (1.9kg), while the head was a considerable 1.85 lbs. (0.84kg) so it’s clear from the beginning, this isn’t a nimble photographer’s setup. The P3COR is meant to be an absolute oak, to mount heavy camera and lens combinations on top of, without so much as a wobble. Carbon fiber is the material choice (lighter and sturdy, but more costly) for this tripod, as opposed to the usual aluminum setup.

3pp3cor_2 3pp3cor_4

The tripod features the Orbit Overhead Shot System, which means the vertically-adjustable center column, and its accompanying standard direct-mount plate, can be pivoted at almost any angle (see photos above, images courtesy Adorama and 3Pod), allowing for some interesting composition possibilities.

013016__myshot-600

The three carbon fiber legs are rated to hold 18 lbs. (8.16kg), and the unit can be extended to a maximum usable height of just over 69 inches (1.75m), while collapsing to a very manageable 28.5 inches (0.72m). The legs use a standard flip lock, for raising and lowering, and they work very well. The locks aren’t too simple to disengage, but don’t take a ton of strength either, making them easy to manage while giving you peace of mind.

The screw mount itself is reversible from 3/8″ to a 1/4″  variety, by flipping the mount block upside down. I found the mount easy to remove and lock, and my Canon 60D felt very sturdy when locked into the mount. Coverable foot spikes allow you to ensure stability in any situation, from dirt, rocks and sand, to smooth indoor floors, without worrying about damaging any sensitive surfaces.

3pp3cor_6

Attractive appearance (Image courtesy Adorama and 3Pod)

With appearances having absolutely no impact on the functionality of a tripod, it must be said that this particular 3Pod model is beautiful, with metallic red color accents, against dark carbon fiber pieces. An attention-getter at the local beach, let me tell you!

013016__myshot-3-cropped

013016__myshot-4

This was my first experience with a pistol-grip type tripod head, and let’s just say I’m sold on the concept. The 3Pod SH-PG is a delight to use. No more hassling with various screws on various planes of movement to get the perfect horizontal and vertical positions; simply squeeze the trigger on this unit, adjust to the desired angle, and release. The position is set in stone, and you’re free to concentrate on your primary focus, taking a great picture.

The advantage of this setup, is the ability to compose your image with one hand, freeing up the other to operate the camera itself. The mount is situated directly on the ball, and can be moved to allow for several configurations, including left-handed, right-handed, and traditional joystick orientation (see example photos below). A thumb-operated dial on the grip allows for modifying tension within the handle; lighter camera setups can use less tension, for more precise adjustments.

3pshpg_11

Image courtesy Adorama and 3Pod

3pshpg_04

Image courtesy Adorama and 3Pod

The rotation of the ball head is a full 360 degrees, with -20 to 90 degrees of tilt. The head features the expected quick-release plate, and a bubble level, separate from the tripod body. The head itself weighs in at 1.85 lbs. (0.84kg), and supports up to 11 pounds (4.99kg) of camera body and lenses, although it feels as if it would support more weight.

I tested the head and tripod legs at a couple of different locations, as well as indoors. I was pleased at how well the unit gripped all surfaces. The legs predictably sank and settled perfectly into beach sand, as well as a grassier area just inland. I place the tripod in a rather sandy/muddy situation as well, and again, found the support for my camera to be very sturdy. Finally, covering the adjustable leg spikes allowed me to use the tripod indoors in a carpeted area, with no worry of damage to the fibres.

3pp3cor_10

Carbon fiber legs with flip lock mechanisms (Image courtesy Adorama and 3Pod)

3pp3cor_11

Spikes and covers on the legs (Image courtesy Adorama and 3Pod)

I was met with the usual high winds on the beachfront, and found I was able to capture standard shots, as well as long exposures without any issue. Images were crisp and clear. As solid and hefty as the unit is, I was able to collapse it down to its smallest size, and carry it over my shoulder with my 60D still attached, for the long walk back to the parking lot, fairly easily.

This particular setup will set you back $ 249.95 USD for the tripod and $ 39.95 USD for the pistol-grip head. Many photographers won’t scoff at a $ 300 USD entry price for a very solid piece of hardware, but some beginners/enthusiasts may not feel such a price is doable for their first tripod. As we discussed in the beginning of this article, some accessories have qualities that reflect their price point, and we see that here with 3Pod’s offerings.

3pshpg_1

Image courtesy Adorama and 3Pod

At the end of my review period, I boxed up the 3Pod with a bit of a heavy heart, as I had no desire to send it back. For me as a photographer with a focus on landscape and nature, the Orbit 3 and pistol grip head are the perfect combination, and I can see how owning this particular setup will make my photography immensely easier, and therefore more enjoyable and satisfying. Which means one thing – I’ve got a new spot in my budget for a purchase this year.

Have you used 3Pod tripods and heads before? What has your experience been? Sound off below and let us know how these quality pieces of hardware have helped your photography.

Editor’s note: these products were loaned to our author by Adorama at no cost, but in no way influence Tim’s review and opinion of this tripod and head combination.

googletag.cmd.push(function() {
tablet_slots.push( googletag.defineSlot( “/1005424/_dPSv4_tab-all-article-bottom_(300×250)”, [300, 250], “pb-ad-78623” ).addService( googletag.pubads() ) ); } );

googletag.cmd.push(function() {
mobile_slots.push( googletag.defineSlot( “/1005424/_dPSv4_mob-all-article-bottom_(300×250)”, [300, 250], “pb-ad-78158” ).addService( googletag.pubads() ) ); } );

The post The 3Pod P3COR Tripod and SH-PG Ball Head Review by Tim Gilbreath appeared first on Digital Photography School.


Digital Photography School

 
Comments Off on The 3Pod P3COR Tripod and SH-PG Ball Head Review

Posted in Photography


What a view: Aukey Super Wide Angle lens quick review

05 Mar

Aukey is a mobile device accessory maker that has been in the clip-on lens business for quite some time. We’ve had a chance to try out one of the company’s latest models, the ‘Super Wide Angle’ lens which at 238 degrees offers quite an extreme angle of view. Read more

Articles: Digital Photography Review (dpreview.com)

 
Comments Off on What a view: Aukey Super Wide Angle lens quick review

Posted in Uncategorized


Upgrading a classic: Canon 100-400mm F4.5-5.6L IS USM Mark II review

02 Mar

Canon 100-400 F4.5-5.6L IS USM Mark II Review

The king is dead, long live the Mark II. After 15 long years, Canon finally upgraded one of the biggest-selling telezooms of all time – the 100-400mm F4.5-5.6L IS USM. The Mk II version has the same headline specifications but with enhanced features and improved performance all-round. While the new model is better for sure, when comparing the Mk I and Mk II side by side it quickly becomes clear just why it took Canon so long: the MkI version was, and still is, a decent lens. It’s always been very popular too, and known for holding its value well on the used market, so Canon was in no rush to change a winning formula.

The 100-400mm Mk II retains the same focal length and F4.5-5.6 overall maximum apertures as the original model. Both lenses change up to F5 at around the 125mm mark, and the Mk I then goes to F5.6 at 250mm while the Mk II holds on slightly longer, making the final switch at just over 300mm. Apart from a little extra weight, the physical dimensions are basically unchanged, but everything else is new and upgraded. There’s a totally new state-of-the-art optical design with more elements, a much-improved image stabilization system, a minimum focusing distance that’s been cut in half and faster autofocus drive. Build quality has been taken up a notch, now with a full set of weather seals, and the push-pull zoom control (unloved by some) is swapped for a more conventional twist-ring. It’s finished in Canon’s newer light gray L-color, as opposed to the old creamy-white. 

Headline features

  • Improved optical design with 21 elements in 16 groups (versus 17 in 14 for Mk I)
  • Upgraded image stabilization with 4-stops benefit (vs. 2-stops)
  • Twist-ring zoom control (vs. push-pull)
  • Extensive weather-resistant seals (vs. partly sealed)
  • Faster USM autofocus drive
  • Close focusing down to 98cm, 0.31x magnification at max focal length (vs. 180cm, 0.2x)
  • Same size as Mk I, though slightly heavier at 1570g (vs. 1380g)

Canon now offers the broadest selection of telezooms of any brand, at a variety of price points. In the premium sector, there are four 70-200mm L-grade zooms, with a choice of F2.8 or F4 maximum apertures, with and without image stabilization. The 70-200mm F2.8 L IS USM Mk II is relevant here as it works well with 1.4x or 2x extenders, as an alternative to something longer.

More recently, Canon added a third lens to its options in the versatile 70-300mm category, with the 70-300mm F4-5.6L IS USM being an excellent zoom that is essentially a scaled-down version of the 100-400mm Mk II (and considerably cheaper, too). There is also the Canon 200-400mm F4L IS USM with its unique built-in 1.4x extender, though the stratospheric price puts it in a rather different class, and Canon has a couple of excellent prime telephotos in this focal length range, too. The image-stabilized 300mm F4L IS USM and 400mm F5.6L USM both hail from the same era as the original 100-400mm Mk I, and have also stood the test of time well.

Looking at other brands, the Nikon AF-S 80-400mm F4.5-5.6G ED VR is a close rival to the Canon 100-400 II in terms of specification, design and high performance. Likewise, the Sony 70-400mm F4-5.6 G SSM II for A-mount is another proven performer. Both lenses feature a slightly wider angle of view at the short end, but have notably longer minimum focusing distances than the Canon 100-400 Mk II. Compare Nikon vs Sony performance data here.

Surprisingly, no third-party manufacturer currently offers anything similar, though anyone in the market for an extra-long lens should be sure to check out the trio of 150-600mm F5-6.3 superzooms from Sigma (which has two versions) and Tamron that have caused quite a stir, bringing new standards of performance to this market segment at an affordable cost. But while they might appear to cover much the same ground as the Canon 100-400mm Mk II on paper, they’re very different in the hand – much bigger, much heavier, and arguably, harder to get the most from. The new Nikon AF-S 200-500mm F5.6 E ED VR and as yet unproven Pentax D FA 150-450mm F4.5-5.6 ED DC AW also fall into the larger/heavier category, and with longer minimum focusing distances compared to the Canon Mk II.

Angle of View

100mm F4.5, full-frame (Canon 5DS R)

400mm F5.6, full-frame (Canon 5DS R)

Shire Hall, Cambridge, UK, is one of my favorite subjects for comparisons (also used for the Tamron 16-300mm VC review) though unfortunately it was partly obscured by scaffolding on this occasion.  Sharpness is very high, and unusually consistent – throughout the zoom range, at all apertures, and across the frame. It’s at larger apertures where the Mk II shows most sharpness improvement over the MkI. The images above are both at maximum aperture, F4.5 at 100mm and F5.6 at 400mm, using a Canon 5DS R (full-frame), and are shown without any software corrections applied for chromatic aberration, distortion or vignetting.

The 100-400mm zoom range, with a generous 4:1 ratio, provides a 24.4° to 6.2° angle of view on full-frame, measured across the diagonal from corner to corner. It’s very versatile and well suited to a wide range of popular subjects, including all kinds of field sports, and wildlife from safaris to zoos. At a motor race or air display, the spectator fences are often lined with Canon 100-400mm zooms. Compared to a fixed focal length lens, when photographing sports or anything where the shooting distance varies, you can zoom to pull in subjects from a distance, then zoom back when the action gets closer. Longer focal length settings are also perfect for sniping candid portraits, say at a wedding or other social occasion. At the shorter end, while it may not be the obvious choice for portraiture, at around 100-135mm it’s just about perfect on full-frame.

$ (document).ready(function() { SampleGalleryV2({“containerId”:”embeddedSampleGallery_7167562452″,”galleryId”:”7167562452″,”isEmbeddedWidget”:true,”standalone”:false,”selectedImageIndex”:0,”startInCommentsView”:false,”isMobile”:false}) });

ABOVE: With a broad 4:1 zoom range, unusually close focusing, and excellent image-stabilization, the Canon 100-400mm Mk II can turn its hand to more than just sports and wildlife. It’s sharp at all focal lengths and apertures. Check the fly on the flamingo’s beak – the fine veins on its wings are barely more than 1-pixel wide (Canon 5DS R, monopod, 400mm F5.6, 1/250 sec, ISO 400).

The Canon 100-400mm Mk II goes very well on APS-C cameras like the Canon 7D Mk II, with its excellent AF and fast frame rate. The 1.6x crop factor gives more effective reach and creates a megazoom 160-640mm equivalent angle-of-view. The Canon 100-400mm Mk II is also compatible with the Canon 1.4x extender, though it will only autofocus on higher-end Canon DSLRs that retain AF up to F8 (currently 7D Mk II, 5D Mk III, 5DS/R, 1DX/II). The 2x extender will physically fit, but all AF functions are disabled.

Articles: Digital Photography Review (dpreview.com)

 
Comments Off on Upgrading a classic: Canon 100-400mm F4.5-5.6L IS USM Mark II review

Posted in Uncategorized


History Repeating: Olympus PEN-F Review

25 Feb

The original Olympus PEN-F first hit the streets in 1963. Built around the half-frame film format, it quickly gained a following thanks to its beautiful, yet simple design and small size. Getting 70 images to a roll of film probably didn’t hurt, either. Now, 53 years later the PEN-F is back.

The digital reincarnation of the 35mm film Olympus PEN-F does not replace the current digital PEN flagship E-P5, rather it slides in next to it as the ‘premium’ option in the PEN family. The reason being that unlike digital PENs before it, the F has something much more OM-D-like: a built-in 2.36 million dot OLED electronic viewfinder. The F also boasts the highest output resolution of any Olympus body to date, boasting a 20MP Four Thirds sensor (probably the same one we’ve seen in the Panasonic Lumix DMC-GX8).

Released specifically to appeal to street shooters and the design conscious looking for a capable camera with retro-styling and rangefinder-like controls, the PEN-F has a lot going for it.

Olympus PEN-F features:

  • 20MP Live MOS Four Thirds format sensor
  • 5-axis image stabilization with automatic panning detection
  • 2.36 million dot OLED electronic viewfinder
  • Up to 10 fps continuous shooting (20 fps with electronic shutter)
  • Highly customizable interface, twin controls
  • Fully articulating 1.04 million dot, 3″ LCD touchscreen
  • 50MP High-res Shot mode
  • 1/8000 sec top mechanical shutter speed (1/16,000 with e-shutter)
  • 1080/60p video recording

All of the above come packaged in a machined aluminum and magnesium body, with no visible screws anywhere. A faux-leather wrap encircles the PEN-F and the body itself is both well-weighted and has a very solid feel to it. 

With many of the same guts as the OM-D EM-5 II and sleek rangefinder-style looks (reminiscent of Fujifilm’s X100 series cameras), the most direct Micro Four Thirds competitor to the PEN F is the Panasonic GX8, which also uses a 20MP chip. Other close competitors include the Sony a6000, a6300 and the Fujifilm X-E2S – all of which are APS-C format cameras. Of course, the PEN-F also has to compete against alternatives within the OM-D series as well.

To help us to better understand how the PEN-F fits into the market place as a whole, we chatted with Eric Gensel, a technical specialist with Olympus. He breaks down exactly how the PEN-F fits in Olympus’ lineup, who the target-audience of the camera is and what went into the design process:

Compared to its siblings

Many of the highlight features of the PEN-F aren’t new. In fact a lot of the key spec is shared with other recent Olympus releases. However, some functions have been improved upon. For instance, thanks to its 20MP sensor, the Pen F is capable of higher resolution in multi-shot mode compared to the OM-D E-M5 II, up to 80MP in Raw mode (50MP in JPEG). It also features a dedicated creative control knob on the front, as well as four customizable shooting modes, accessed via the locking exposure mode dial.

It’s hard to see the PEN-F as a large step forward given how many of its core features are inherited from other models, but it offers a handling experience that is unique in Olympus’s lineup. Is the PEN-F more than just a pretty face? Let’s dig in.

 
Olympus PEN-F
Olympus OM-D
E-M5 II
Olympus PEN E-P5
Pixel count 20MP 16MP 16MP
Image stabilization 5-axis 5-axis 5-axis
Stabilization (CIPA) 5 stops 5 stops 4 stops
Max shutter speed

1/8000
(1/16000 electronic)

1/8000
(1/16000 electronic)
1/8000
On-sensor PDAF No No No
Continuous shooting
(without /with AF)
10 fps / 5 fps 10 fps / 5 fps 9 fps / 5 fps
Flash Clip-on
Tilt/bounce/rotate
Clip-on
Tilt/bounce/rotate
Pop-up flash
Viewfinder Built-in 2.36M-dot LCD
1.23x mag
Built-in 2.36M-dot LCD
1.48x mag
Optional VF-4 accessory EVF w/ 2.36M-dot LCD and 1.48x mag
Max video res/rate 1080/60p 1080/60p 1080/30p
Max bitrate 77Mbps 77Mbps 20Mbps
Mic socket No Yes No
Rear screen

Fully articulating 3″ touchscreen
1.04M-dots

Fully-articulated
3.0″ touchscreen
1.04M-dots
Flip up/down
3.0″ touchscreen
1.04M-dots
Wi-Fi Yes Yes Yes
Environmental sealing? No Yes No
Battery life (CIPA) 330 310 330
Weight 427 g 469 g 420 g
Dimensions 125 x 72 x 37mm 124 x 85 x 45mm 122 x 69 x 37mm

Pricing and availability

The Olympus PEN-F will be available at end of February – early March 2016, and will hit the streets at a body-only price of $ 1199. It ships with the FL-LM3 flashgun seen in the image at the top.

If you're new to digital photography you may wish to read the Digital Photography Glossary before diving into this article (it may help you understand some of the terms used).

Conclusion / Recommendation / Ratings are based on the opinion of the reviewer, you should read the ENTIRE review before coming to your own conclusions.

We recommend to make the most of this review you should be able to see the difference (at least) between X, Y, and Z and ideally A, B, and C.

This article is Copyright 1998 – 2016 and may NOT in part or in whole be reproduced in any electronic or printed medium without prior permission from the author.

Articles: Digital Photography Review (dpreview.com)

 
Comments Off on History Repeating: Olympus PEN-F Review

Posted in Uncategorized


Quick review: Nextbit Robin camera

21 Feb

The Nextbit Robin is a different kind of smartphone. It’s an Android device with a fresh modern design, but its most important feature is the one you never see – it’s fully integrated with the cloud, backing up and archiving your phone’s images, apps and files so you never run out of local storage. We got ahold of an early unit to test out its camera and unique interface. Read more

Articles: Digital Photography Review (dpreview.com)

 
Comments Off on Quick review: Nextbit Robin camera

Posted in Uncategorized