RSS
 

Posts Tagged ‘quick’

The Quick Guide To Corporate Photography

27 Mar

Businesses as well as individual business professionals have a wide range of photography needs that may need to be filled over time, and as a professional photographer, you have the opportunity to profit when you make an effort to fill these needs. There are essentially two types of corporate photography that you can focus on, and you may choose to Continue Reading

The post The Quick Guide To Corporate Photography appeared first on Photodoto.


Photodoto

 
Comments Off on The Quick Guide To Corporate Photography

Posted in Photography


10 Quick Lightroom Tips and Shortcuts

21 Mar

Lightroom is a powerful and complex program. It’s great to have shortcuts and fast ways to do things you do often. Here are ten Lightroom tips to help you out:

#1 Check RBG values

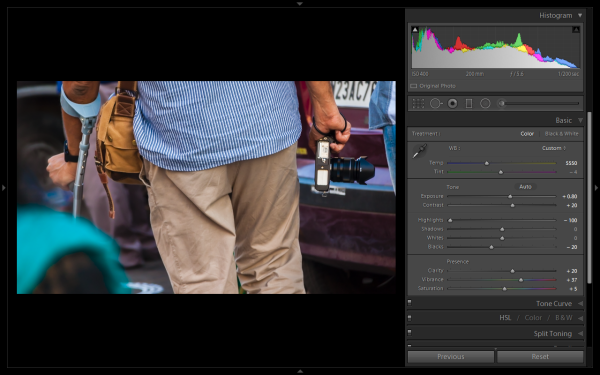
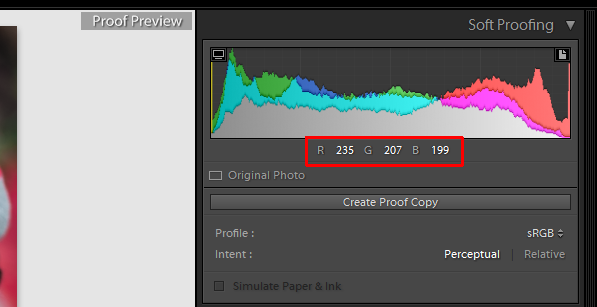
Did you know that you can check the RGB value of the pixels for an selected image in Lightroom? When you are working in the Develop module press S on the keyboard which will show you the soft proofing for the image. Hover the cursor over the image area, and it will display the RGB values (not percentages) of the pixel where your mouse is being located, look just below the histogram. (See the screenshot below)

Smarttips Lightroom 01

#2 Full screen mode

2. Making a clutter free workspace will not only provide you more working area but it will be distraction free as well. To enable full screen (without even the menu bar and the window frame )- press Shift+F (in LR4 and earlier just hit F). Pressing that combination repeatedly will give you another two options. Try it out for yourself. I use this all the time.

Smarttips Lightroom 02

#3 Preview effects by panel

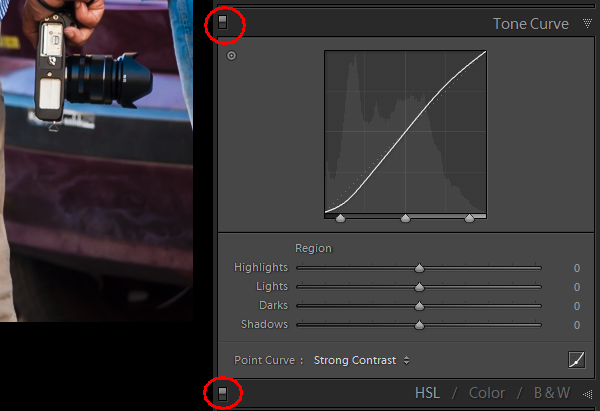
You can turn off one particular sub-panel’s effect on the image. Click that little button to see the effect of that particular panel on the image toggle off and on.

Smarttips Lightroom 03

#4 Work with the histogram

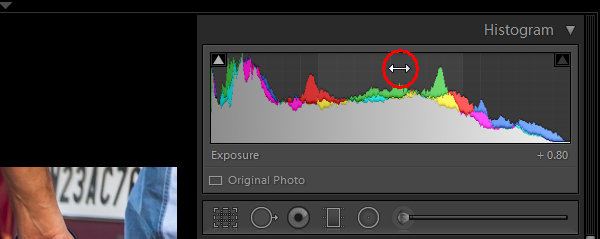
4. If you are person who works based on the histogram, you can work directly on the image’s histogram itself inside Lightroom. Once hover your cursor over on the histogram, it will change into a double-sided arrow on specific areas. Then you only have to click and drag to the right or left, as you wish based on what values you want to change (Black, Shadows, Exposure or mid tones, Highlights, or Whites).

Smarttips Lightroom 04

#5 View file properties

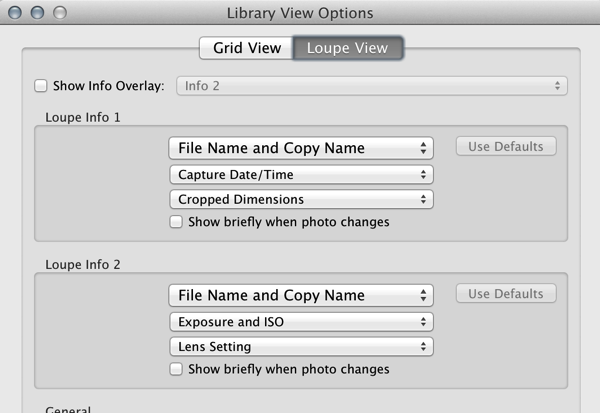
If, while working on your photograph, for whatever reason you want to check the image’s properties including size, format, you can do so by pressing I (it will display the size of the file, file type, date taken, lens model). Pressing I one more time will provide you another set of properties, clicking I again will remove all the details from displaying.

Smarttips Lightroom 05

If you do not see all of those options go to View > View Options (Cmd+J) where you can customize what is displayed in the Louse overlay mode using this pop-up dialog box.

Screen Shot 2015 03 14 at 5 35 25 PM

#6 Clipping warnings

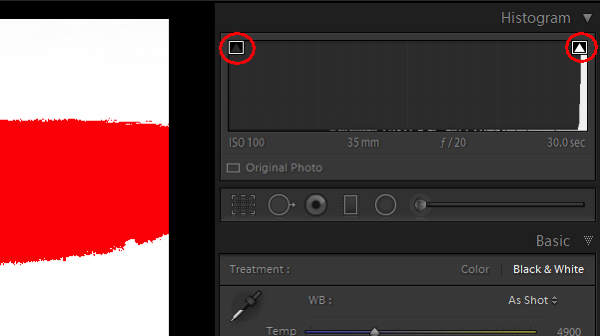
To avoid processing outside of your image’s dynamic range, while working in develop module clicking J (keyboard shortcut) will activate the clipping warnings for highlights and shadows. If you push exposure towards the right far more, a red colour warning will be displayed on the region of the photograph where it is overexposed, Conversely if you bring down the exposure (for whatsoever reason) a blue colour warning will be displayed on the region of the photograph where it is underexposed. (Below screenshot is an example of overexposure)

Smarttips Lightroom 06

#7 Unflagging

In Library module, when you are flagging photographs for sorting purposes, if you mistakenly press pick (p) instead of rejecting (x), stay calm and press (u) for unpick or unflag. It will remove the flag, now you can mark it as you originally wished.

#8 Lesser known Develop keyboard shortcuts

If you are in the habit of using your keyboard, in Develop module the complete basic panel can be controlled by keyboard. Press period (.) or comma (,) for selecting a slider (e.g., Exposure) and then press plus (+) to increase the value and press minus (-) to decrease the value of the same. Now press period (.) to go the next. Repeat, enjoy.

#9 Shift key to lock

While applying a graduated filter, if you want to make it straight – press and hold Shift the key to make the filter locked into perfectly horizontal or vertical position. You can also hold Shift when applying the crop tool on your image (if required), to avoid changing the image proportions.

#10 Saving local adjustment tool presets

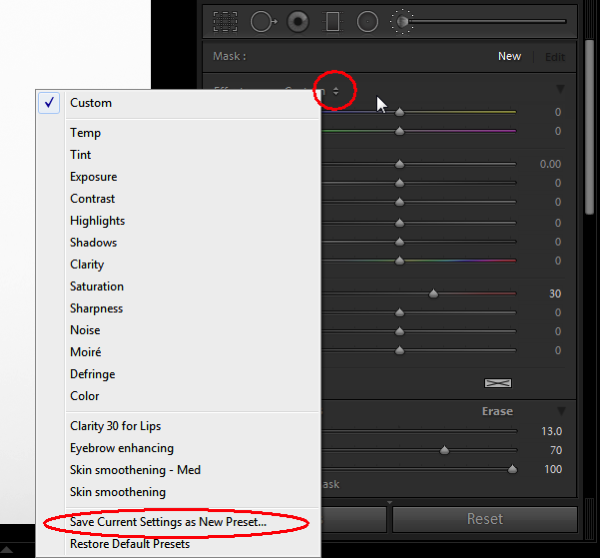
You can save any of the local adjustment tool settings as a preset which can be used for any of the tools. For example, if you are a portrait retoucher, you may want to save your favorite skin-softening settinsg as a preset. You can do that by clicking save as a preset at the bottom of the local correction tool set. Likewise you can save any kind of settings which you may use often.

Smarttips Lightroom 10

Do you have any others you’d like to add to this list of Lightroom quick tips?

googletag.cmd.push(function() {
tablet_slots.push( googletag.defineSlot( “/1005424/_dPSv4_tab-all-article-bottom_(300×250)”, [300, 250], “pb-ad-78623” ).addService( googletag.pubads() ) ); } );

googletag.cmd.push(function() {
mobile_slots.push( googletag.defineSlot( “/1005424/_dPSv4_mob-all-article-bottom_(300×250)”, [300, 250], “pb-ad-78158” ).addService( googletag.pubads() ) ); } );

The post 10 Quick Lightroom Tips and Shortcuts by Navan Viswa appeared first on Digital Photography School.


Digital Photography School

 
Comments Off on 10 Quick Lightroom Tips and Shortcuts

Posted in Photography


How to use Photoshop’s Quick Selection Tool to Change a Background

20 Jan

It’s the question I get asked the most in my workshops and classes – “How do you change the background of an image?” Or “How can I cut my subjects out of an image and place them on a new background?”

A quick capture of my parents at a coffee shop.

A quick capture of my parents at a coffee shop. The BEFORE image.

Perhaps, despite your best efforts at placing your subjects in a pleasing, non-distracting environment, the situation made it impossible. Maybe you used your smartphone to capture a spontaneous moment and now the image needs a little background work? Maybe you want to cut your subjects out of the background to isolate them or use them on a website banner or other marketing material? Whatever the reason, this task has challenged every photographer, beginner or pro, since the invention of the camera! I’m going to show you how to use one of Photoshop’s most underrated tools for easily extracting your subjects from the background.

This photo (above) was a very spontaneous iPhone capture of my mom and dad, the photo itself isn’t great (lots of things wrong with it technically) but it has big sentimental value for me. It’s the last photo I have of my parents together.  But it also has a busy background which typically causes problems for many photographers when trying to use Photoshop’s Selection Tools to remove it. In previous Photoshop versions, selection tools like Magic Wand and Lasso would get confused by the similar colors, and patterns of this type of background, making it a difficult and frustrating project. But with a relatively new selection tool it’s pretty straight forward, so this is a good example photo for learning the technique.

In this demonstration, you can make this a stronger image by removing the cluttered background to make it less like a snapshot and more like a portrait. The secret of any image editing is to use the right tool for the job. In this situation you want to use the Quick Select Tool to remove your subjects from an image and place them on a different background.

How to use the Quick Select Tool

In the past, you may have avoided most of the Selection Tools in Photoshop because they were not easy to use. The Quick Select Tool has changed all that. It has never been easier to make selections that don’t look like they were “cut and pasted.” There are two, or sometimes three steps.

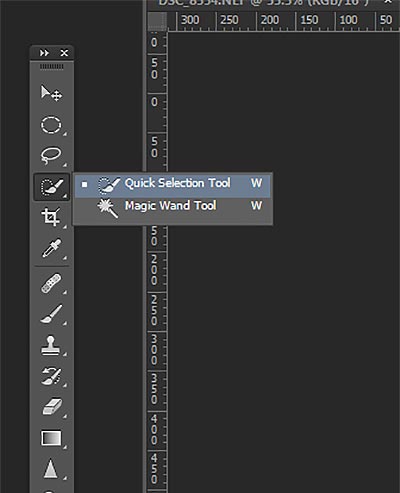
Choose the Quick Selection Tool from the Toolbox palette:

tool

It works like a Brush so you can change the size of the tool by using the [ –  ] keys on your keyboard (  [ to make it smaller, and ] to make it larger).  Give the tool a size that makes it easy to select your subject.

Step 1: Make your selection

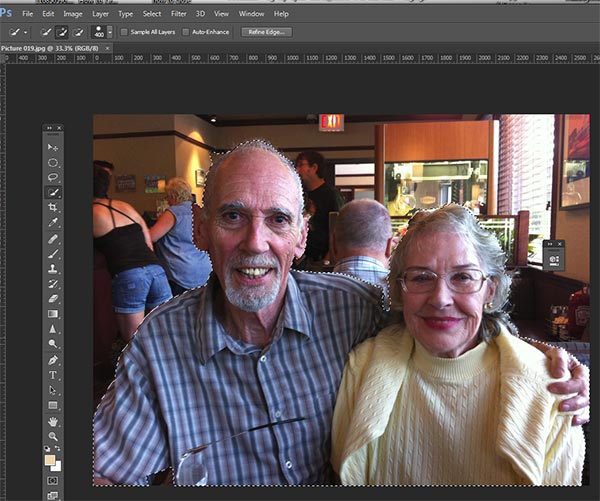
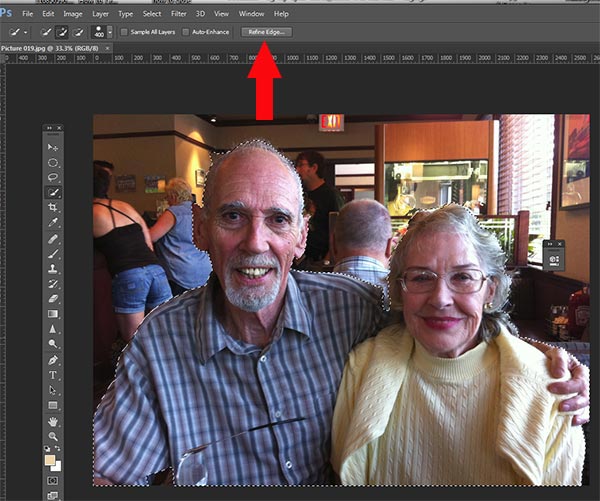
Just drag the tool over your subject and stop when the “marching ants” get to the edge. The tool is smart and can detect the change in pixels so most of the time it will stop on the edge correctly. If it selects something that you don’t want it to, just click on the Alt key to switch to “deselect” mode and drag the selection back to where it should be.

selection

The Quick Select Tool selecting the subject with the “marching ants” outline.

Step 2: Refine the Edge

Once you’ve got everything selected as you want it, click on the Refine Edge button on the top menu. In this area, you’ll adjust the pixels around the edges of the selection. This will make the “cut” more smooth and realistic.

refine-edge


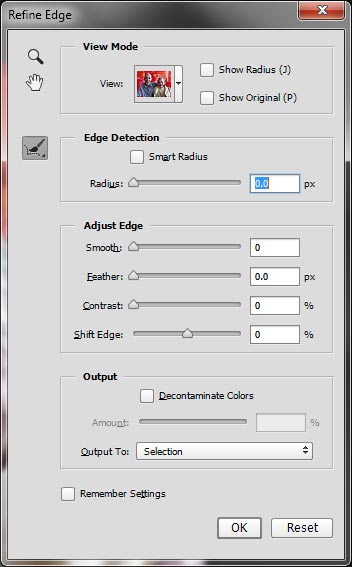
The refine Edge tool opens a pop up that looks like this:

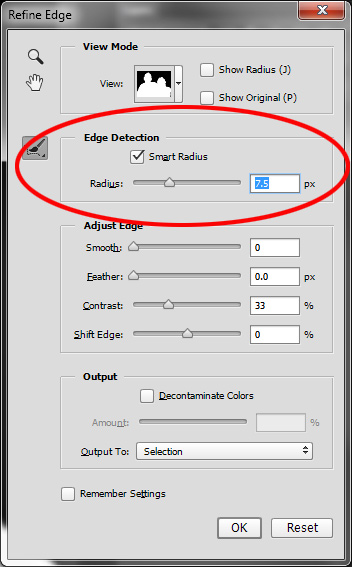
refine-edge-palette

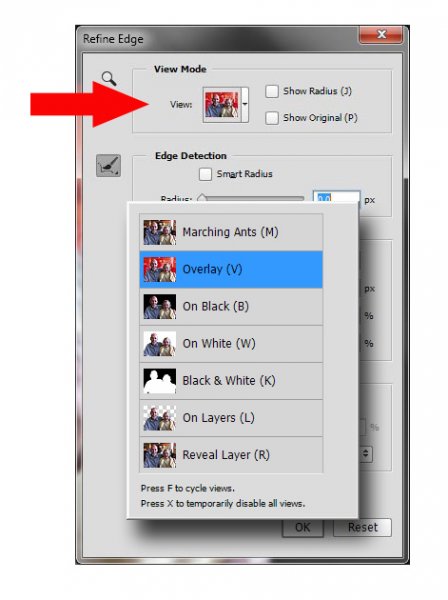
From here you can select how you want to view your selection against a few background options. You can select the Mask overlay which you may be familiar with if you’ve used layer masks before. This view allows you to see the background as well as your selection. But you can also check it against a black background, which I like, so you can clearly see how your edge looks and if you have selected everything accurately. To change views, click the drop-down to get the View Options box. Scroll through these to get a feel for how they display your data. The Adjust Edge sliders give you many options to smooth, feather, and further refine your edge if needed.

For now, select Black & White view mode. Hover over the Black & White Box and click.

popup

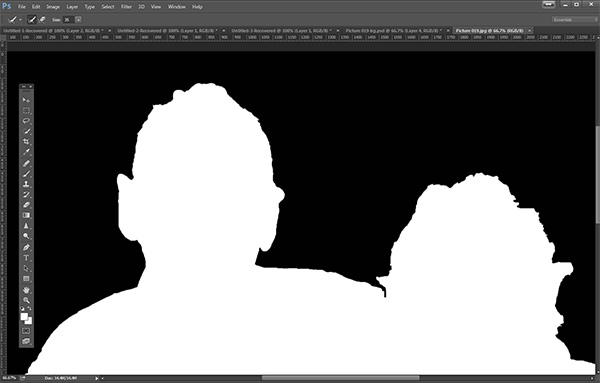
You should see something like this (below). You can see your edges very well against the black. You can see that the edges look okay, they are well defined, and not pixelated or blocky. But what about that hair? My poor dad with his fine and wispy (almost no hair), and my mom who had recently undergone chemo also has fine baby-like hair, making the hair selection task a bit of a challenge. But the Quick Selection Tool has a method for this too!

b+wmask

Click the Edge Detection Smart Radius box and move the slider to the right just a bit. watch how the edge around the hair change to be a bit more transparent. Be sure to watch the rest of your edges to make sure they don’t change too much.

Step 3: If needed, use the Edge Detection Brush

If you still need to get more transparency for hair, make sure the brush icon on the left is selected and carefully brush around where you need more transparency. You can switch between the View modes to see what is being displayed or removed. If you remove too much you can click and hold the Refine Edge brush to reveal the Eraser which lets you undo your brush strokes, much like a regular layer mask.

Untitled-2

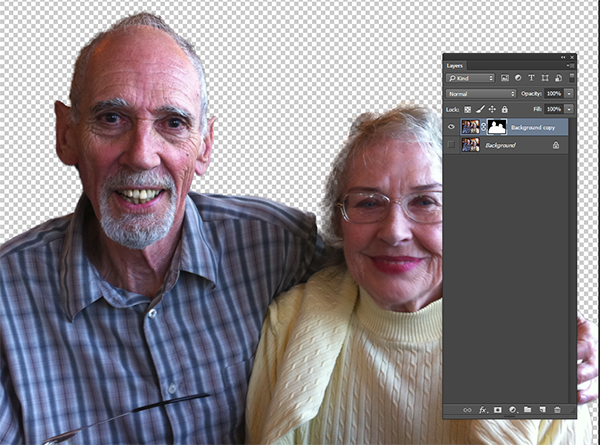
When you’re happy with your results, Look for the Output section at the bottom of the Refine Edge box, and click on Decontaminate Colors and select a small number as the amount, 2 is usually good, depending on your image.  Change Output To: New Layer with Layer Mask.

This is what you should see now:

layermask

Note: to see the transparent background you must turn off the visibility of the bottom layer.

Your cluttered background is gone!  You have a nice transparent background and all on new layer. This will be your main image.

Add your new background layer

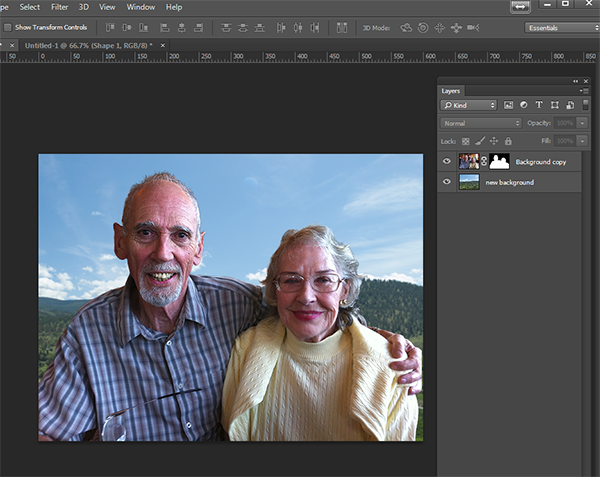
Open the image you want to use as your new background, and using the Move Tool, drag the new background into your main image. Voila! You have a great new background layer and your subjects look very realistic and not like cut and paste paper dolls.

You may have to drag the new background layer under the subject layer – the one with the mask. I’ve deleted the original Background layer and replaced it with the scenery background and called it new background. You could also make any existing background layer invisible if you don’t want to display it.

almost-done

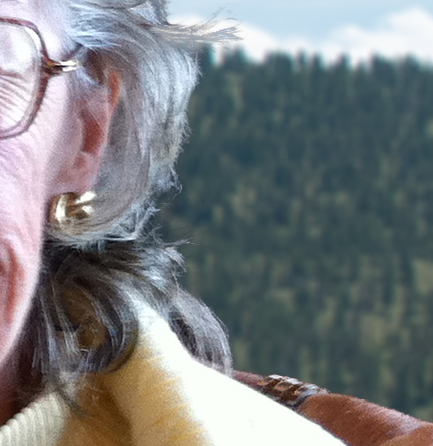
Here’s a 100% close up look at the job the Quick Select tool and Refine Edge brush did on my mom’s hair (yes the image is a bit shaky at 100%, but I think you can see that took works pretty well to give you very realistic extractions, with the right amount of transparency and detail preservation).

100crop-hair

The finishing touches

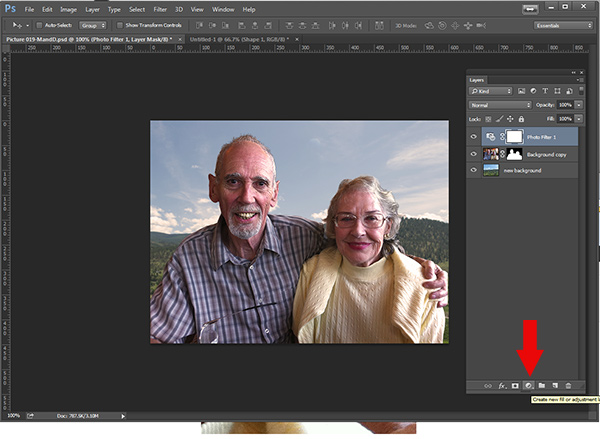
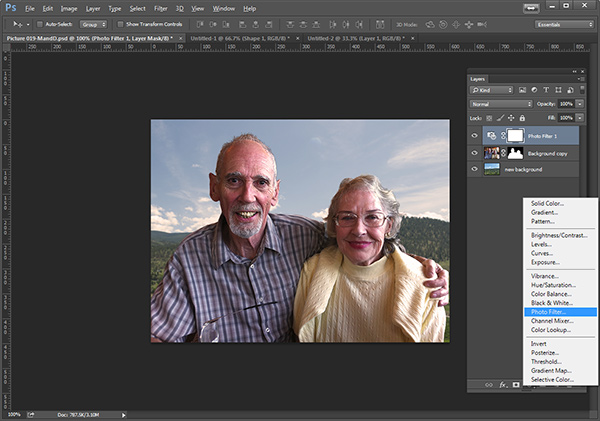
So for the final image, let’s balance the colors a bit and give this photo a nice warm tone, by using a layer mask and a warming Photo Filter.

layermaskto-photofilter

photofilter

And here is the final image:

final-warming-filter

Final image AFTER changing the background. Not a snapshot any more!

What do you think? Is it better than the original? Was it worth the 10 minutes to edit and give it a new background? Just imagine, with a well captured image (not a shaky iPhone capture) think  of all the new possibilities you will have if you master this process.

Why not give this nifty tool a try and post your results here – I’d love to see how you use this. If you have questions or problems, just let me know, I respond to my comments and questions regularly.

googletag.cmd.push(function() {
tablet_slots.push( googletag.defineSlot( “/1005424/_dPSv4_tab-all-article-bottom_(300×250)”, [300, 250], “pb-ad-78623” ).addService( googletag.pubads() ) ); } );

googletag.cmd.push(function() {
mobile_slots.push( googletag.defineSlot( “/1005424/_dPSv4_mob-all-article-bottom_(300×250)”, [300, 250], “pb-ad-78158” ).addService( googletag.pubads() ) ); } );

The post How to use Photoshop’s Quick Selection Tool to Change a Background by Alex Morrison appeared first on Digital Photography School.


Digital Photography School

 
Comments Off on How to use Photoshop’s Quick Selection Tool to Change a Background

Posted in Photography


5 Quick Reasons to Use the Nifty Fifty for Landscape Photography

17 Jan

The 50mm prime lens, or as it’s more commonly known, the Nifty Fifty; we all know the name, even inexperienced photographers have likely heard of it. Most of us know it for its outstanding qualities; an inexpensive, quality, prime lens that is in plenty of photographers’ bags around the world, and one of the most popular lenses of all time.

What we might NOT think of it as, however, is a lens normally used for landscape photography. The zoom is tight, and doesn’t possess a field of view wide enough to usually be considered proper for this sort of work.

But I have. For four years, the 50mm f/1.8 has been my workhorse for portfolio building (which is primarily nature and landscape), and even though I’m branching off with other lenses, I can’t stress the usefulness of the Nifty Fifty. And I’m not alone.

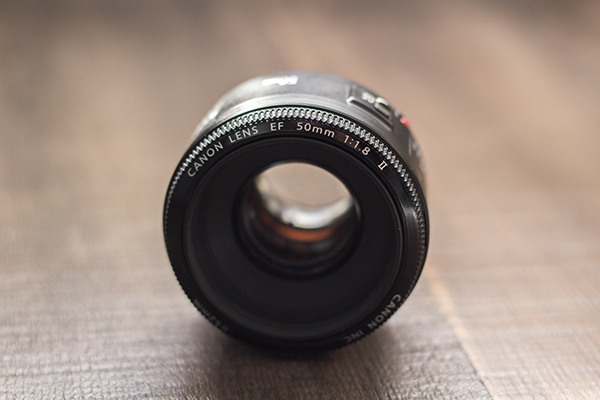
50mmLens

My primary reasoning for using the 50mm instead of going out and buying a proper wide angle lens such as a 35mm or even wider? Cost. I was delving back into photography, and was on an extremely tight budget. After buying my camera, spending $ 500 on a lens simply wasn’t an option. It didn’t take long for me to hear my fellow photographers sing the praises of this wonderful lens; cheap, fast, and sharp. Right up my alley.

There are no tricks or immaculate revelations here, and you won’t likely become famous for taking only landscape shots with 50mm lenses – but there are a few reasons why shooting landscapes with a 50mm lens can produce great results. Giving it a try can only improve your photography and make you a better observer of the world around you.

Focus on What’s Important

We think of landscapes as sprawling, wide shots, that include many elements in one frame, but does it have to be that way? Can we not capture the beauty of the area around us, in a tighter package? The rolling hills and an interesting tree in an outdoor scene are more than enough to create a photo that provokes thought.

The Nifty Fifty makes it easier to focus on whatever is most important in your photo, while still capturing enough around the subject to lend it scope.

The Nifty Fifty makes it easier to focus on whatever is most important in your photo, while still capturing enough around the subject to lend it scope.

Shooting at this focal length forces us to focus on the most important parts of what we’re seeing around us. Trimming the fat, as they would say. In doing this, we’re also training ourselves psychologically to do the same in all of our shots.

Quality

Landscapes usually require very good sharpness, and the 50mm prime lenses excel at that. No extra moving parts normally required for varied focal lengths (zooms) mean a crisper, sharper result. As with most lenses, its sweet spot isn’t wide open, but more in the f/4 to f/5.6 range. Even narrower apertures will still yield excellent results.

The 50mm prime allows you to capture very sharp images

The 50mm prime allows you to capture very sharp images.

Take Your Time

Since the 50mm is a prime lens, you’ll get an added benefit (or detriment, depending on how much you care for walking); the single focal length means you can’t just shoot from anywhere, you’ll need to move around to find the best angle and distance. This automatically forces you to think about your shot a bit more, which is always a good thing.

The 50mm allows you to think differently about the landscape or subject you're framing, and to make more creative choices.

The 50mm allows you to think differently about the landscape or subject you’re framing, and to make more creative choices.

With a zoom, you’d adjust focal length without even thinking, until the scene is framed in a way that looks good. But what if that isn’t the best angle or distance? The Nifty Fifty will give you incentive to take a chance and try something different, whether it be an angle, a distance, or even perspective.

No Wide Angle…or Can There Be?

Of course there can! The 50mm gives you a gentle push into playing around with some panoramic shots. Three, four, five, or more shots can be stitched into a flattering wide angle composite, sometimes with even more dramatic results than a single wide angle shot.

By stitching together shots, we can create a panorama that gives us the wide field of view we're looking for

By stitching together shots, we can create a panorama that gives us the wide field of view we’re looking for.

Lightweight is King

If you’re serious about landscape photography, you’re probably already lugging around a considerable amount of gear; camera bodies, other lenses (you don’t go out with just one lens, do you?), tripods – the list goes on. The last thing you need are more heavy lenses when you’re out and about, right? Do you know what the Canon 50mm f/1.8 weighs? 4.6 ounces (130 g). It’s short, sweet, and light to boot.

At the end of the day, all lenses and focal lengths have advantages and disadvantages, and the case can certainly be made for using glass with wider angles. But as a teaching tool, the 50mm prime lens is a great option for your landscape photography; it will make you think a bit differently about those types of shots and easily provide you with clear, sharp images.

What are your experiences with this lens? What images have you captured? Tell us your opinion below, and show us those Nifty Fifty shots!

googletag.cmd.push(function() {
tablet_slots.push( googletag.defineSlot( “/1005424/_dPSv4_tab-all-article-bottom_(300×250)”, [300, 250], “pb-ad-78623” ).addService( googletag.pubads() ) ); } );

googletag.cmd.push(function() {
mobile_slots.push( googletag.defineSlot( “/1005424/_dPSv4_mob-all-article-bottom_(300×250)”, [300, 250], “pb-ad-78158” ).addService( googletag.pubads() ) ); } );

The post 5 Quick Reasons to Use the Nifty Fifty for Landscape Photography by Tim Gilbreath appeared first on Digital Photography School.


Digital Photography School

 
Comments Off on 5 Quick Reasons to Use the Nifty Fifty for Landscape Photography

Posted in Photography


10 Quick Photography Business Tips to Kickstart 2015

13 Jan

It’s that time of the year – everywhere you turn, people are talking about new year resolutions, goals and targets. Be it health related, relationship related or even business related. If you have a professional photography business or even if you are an serious enthusiast who has thought about becoming a professional photographer, here are some business tips to help kickstart 2015.

Memorable Jaunts Writing Business Goals Article for 2015

A new year is the perfect time to set up new goals for your business.

#1 Legitimize your business

This can mean different things in different parts of the world. But the end result is almost always the same. Take whatever steps needed to ensure you are following the law in setting up your business the right way legally. In most countries, that means registering your business name, getting a tax ID number, and filing the appropriate paperwork with the local government. When you are legitimate, clients will appreciate and respect you even more.

General Photography Business Tips From Memorable Jaunts for DPS

Becoming a legit photography business goes beyond business cards, gear and website.

#2 Create tangible, measurable and achievable goals

I cannot stress enough the importance of creating professional goals. They form the anchor for your business and help you navigate the waters when things are going great, and when the waters turn rough. When you have a clear vision of where you want to go, nothing can stand in your way. When you are having a bad photography day where everything seems to be going wrong, revisit your goals and they will help you correct your course.

Writing Goals for Your Photography Business

Glitter glue and Shinny Stars are a must for any goal writing exercise – puts you in a good mood!

#3 Invest in education

The photography industry, like most industries, is constantly changing and evolving. As professionals we often forget to take the time to update our own skills and knowledge. Luckily there are many different avenues to get an update on what is the latest and greatest in the industry. There is no lack of online classes, articles, or even YouTube videos. Or if you are like me, sign up for a workshop or two – it is a great way to not only polish your skills, but also meet other photographers and make a connection or two.

Memorable Jaunts Photography Education

#4 Showcase your brand

I really believe in the adage that there is only ‘One’ you. What makes your brand unique is you and your personality. There are millions of photographers out there, but there is only one you!  Differentiate yourself by showcasing your unique personality in your brand. You can do that in many different ways in your business – through videos, your interactions with your clients, the content on your website, and your images. My love for nature and the outdoors is very apparent in my images and my website. Travel is my inspiration and has its own page on my website. I love clean and fresh images and my editing style is minimalist – that is who I am, and my clients appreciate that and have come to expect it.

#5 Streamline your workflow

This was a great eye opener for me. Recently I sat down and documented my workflow from start (initial client inquiry) to finish (delivering products and getting paid). There was such an imbalance of time spent across various activities. Documenting the process not only helped me understand where I was wasting precious time, but also where I was spending too little time. I was able to automate some processes and streamline my workflow.

Another personal tip – I turn off the internet and shut off my phone when I am editing a family session or a wedding. This really helps me focus and manage my workflow.

Documenting your photography business workflow process

#6 Differentiate yourself from the crowd

Follow other photographers and gain inspiration from their work. But don’t imitate them – imitation stifles personal growth. Let your individuality shine through your own work. Not only will this help you stand out from the rest of the crowd, but it will also help you find your own voice and give you the confidence to take your art to the next level.

Memorable Jaunts General Photography Business Tips for DPS

My favorite motivational quote sits on my desk reminding me everyday why I do what I do.

#7 Spruce up your blog

We all know that having a blog is like having a voice on the internet. A blog helps clients interact with you. Make a conscious decision to update your blog regularly. Most people believe that updating your blog three times a week is really beneficial for SEO. If that is something that you can commit to, more power to you. Keep content fresh and exciting – don’t just blog about your sessions and post a bunch of images about the session. I categorize my blogposts as ‘Weddings’, ‘Portraits’, ‘Inspiration’ and ‘Personal’. Use your blog to showcase other aspects of your business – products you provide, gear that you love and why, or even who are you as a person – the face behind the camera.

#8 Maintain your gear

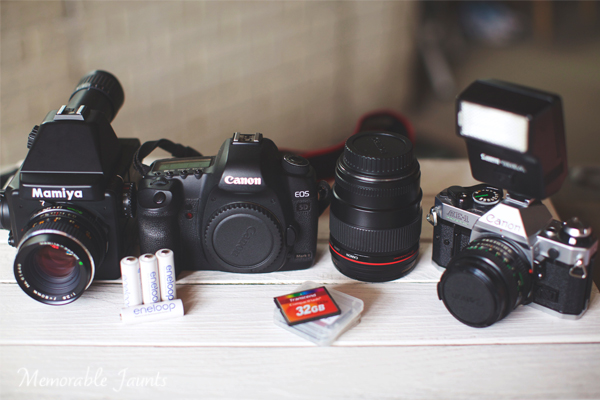
Check your equipment. This includes your primary camera, backup camera, and flash. Get cameras and lenses cleaned and serviced so that they are in top working order when you need them. I use Canon Professional Services Membership, which is a great service that is quick and efficient. Don’t forget the accessories – check reflectors for tears, missing tripod attachment plates, old batteries, and faulty memory cards. Keep everything ready for your photography season.

Memorable Jaunts General Photography Business Tips for DPS

I use a myriad of digital and film cameras – all my gear gets the same care and maintenance.

#9 Update your website with your latest work

I will be the first to admit this is generally one of the things I put on the back burner many times. However this is a key piece of the puzzle to attracting new clients. Showcase your best work on your website, blog, and other social media channels. Let your pictures speak volumes and keep the content fresh. Often times you are so busy photographing and managing your current clients, you forget about the new potential clients out there. Give those clients something new to look at so they keep coming back for more.

#10 Maintain your health and general well being

Perhaps this should be the first tip on the list. This is one of the most important things you can do for yourself and your family. Managing a photography business is hard and exhausting – both mentally and physically. I love photographing weddings but after every wedding, I feel like I have been run over by a truck! Set aside time to exercise, eat healthy, and schedule ‘retreat time’. Time away from the computer and camera to enjoy the other finer things in life! After all what good is a great photographic career, numerous awards, and accolades if you are not able, mentally or physically, to enjoy the glory.

googletag.cmd.push(function() {
tablet_slots.push( googletag.defineSlot( “/1005424/_dPSv4_tab-all-article-bottom_(300×250)”, [300, 250], “pb-ad-78623” ).addService( googletag.pubads() ) ); } );

googletag.cmd.push(function() {
mobile_slots.push( googletag.defineSlot( “/1005424/_dPSv4_mob-all-article-bottom_(300×250)”, [300, 250], “pb-ad-78158” ).addService( googletag.pubads() ) ); } );

The post 10 Quick Photography Business Tips to Kickstart 2015 by Karthika Gupta appeared first on Digital Photography School.


Digital Photography School

 
Comments Off on 10 Quick Photography Business Tips to Kickstart 2015

Posted in Photography


Quick Look: The art of the unforeground

10 Jan

‘It’s all about the foreground’. Generations of landscape photographers learn this principle the moment they first pick up a camera. In this quick behind-the-shot look, professional landscape photographer Erez Marom argues for a compositional technique he calls the ‘unforeground,’ or lack of a defined foreground subject. Read more

Articles: Digital Photography Review (dpreview.com)

 
Comments Off on Quick Look: The art of the unforeground

Posted in Uncategorized


Two Quick and Easy Photoshop Head-Swapping Techniques

03 Nov

photo-1

Sometimes you get that photo that is almost perfect. If all it takes to make it great is a little head swap, well, today is your lucky day! I’m going to show you two techniques, for quick and easy head swapping. I’ve even included a demo video at the end, if you want to watch the tips in action. I am using Photoshop CS6 for this demonstration. If you are using a different editing program, these methods may not work for you. If you are using an older version of Photoshop, the techniques should work the same, but your screen may look slightly different.

potential

Ready to see how to combine two photos to make that perfect photo? Let’s get started! First, open the two photos you want to work on in Photoshop. Select the photo that you want to swap a head FROM. Now we’re ready to really get to work.

Method #1

01

For the first method, we are going to use the Lasso Tool. You can click right on the lasso in the menu, or click “L” as a shortcut. The instructions will indicate shortcuts in parenthesis (L) to help speed things up as you as you try these techniques on your own photos.

02

Use Cmd/Ctrl+C to copy the selection

Use the lasso to draw a loose circle around the part of the photo that you want to move. You’ll want to leave extra room, and make the circle fairly large. This is easy to take off later, but if you have to add more on, you can’t do anything except start over. Copy the selected part of your photo.

03

Go back to your original photo, and paste the selection there. I like to decrease the opacity of that layer so I can line things up a little bit easier. Select the move tool, and move the layer around until things are as lined up as possible. In the photos I worked with, I tried to line the mom’s fingers up exactly. If you can find something near the edge of the new part and the old part that is the same in both photos, this can make things a lot easier.

04

Bring the opacity of the layer back up to 100%, and add a mask to the layer. Layer masks are really awesome! They allow you to show parts of that layer or hide them.

05

Now you can select a soft brush. You want your brush to be black, because your layer mask is white. When you are turning part of the layer off, you need to make sure that the brush is the OPPOSITE color of the mask (white reveals, black conceals). If the white box is in the front, just click “X” to toggle back and forth between black and white.

06

Use that black brush to hide the excess parts of the new layer. I like to start with the hard circle edges, and then work in to the details. You can zoom your photo in as close as you need to for this part.

08

Once you feel that it’s mostly there, you can click the visibility off and on on the layer to see if there are strange things happening, or spots that you missed. If you turned too much of the layer off with your black brush, simply change your brush back to white and brush it back on.

09

Method #2

Not too hard, right? Let’s try another method for swapping heads, this time using the Clone Stamp. This one is not as forgiving, but it is super quick! You’ll want to make sure that your two photos are very similar for this one. The placement needs to be close to the same for both photos. This method works especially well if you just need to replace closed eyes with open eyes from an almost identical photo.

10

Select your Clone Stamp tool, and let’s give this one a try!

11

It’s easiest if you select a part of the photo that is easy to see and line up once you switch to the original photo. In this example, I selected mom’s hand.

12

Cmd/Cntrl+J duplicates the layer as well

You can do this without making a background copy, but if you don’t make a background copy, and you make a mistake, you have to start over. This allows you to fix a mistake later without starting completely over.

13

Line the stamp up with your selected spot, and then, while holding down the mouse button, move the stamp over the old part that you want to replace. As you do this, you’ll see the new face appear.

14

If you covered more area than you wanted to, add a layer mask, and use the soft black brush again to take off some of that layer. (Just like we did before.)

finish

Head swapping doesn’t work for every photo, and it always works best for photos taken one right after the other, with all the people positioned almost the same. It never hurts to give it a try, and the more you practice, the better you will get at making it look natural, and working quickly. You’ll also be able to tell at a glance if a head swap will work for two photos or not.

I’ve made a quick video demo to show these techniques in action. Let me know if you have any questions, and I’ll do my best to answer them. Now, go swap a few heads, just for fun!

The post Two Quick and Easy Photoshop Head-Swapping Techniques by Melinda Smith appeared first on Digital Photography School.


Digital Photography School

 
Comments Off on Two Quick and Easy Photoshop Head-Swapping Techniques

Posted in Photography


23 October, 2014 – Arches National Park – A Quick Guide To Photography

25 Oct


The National Parks in the US offer a wide variety of photographic opportunities for the landscape photographer.  There is so much to see and photograph, and all of these great parks have something unique to see.  This is the second of a continuing series of National Park Quick Guides by QT Luong.  In his previous guide QT described all the good location in Acadia National Park.  Today QT takes us to Arches National Park, which is one of the most famous parks for photographers.


The Luminous Landscape – What’s New

 
Comments Off on 23 October, 2014 – Arches National Park – A Quick Guide To Photography

Posted in News


Quick Review: Using Iconosquare to manage and grow your Instagram following

15 Oct

Instagram’s straightforward user interface is geared for posting and viewing photos, but if you’ve got an eye on growing or managing a large following, you’ll soon run into the app’s limitations. Iconosquare aims to give Instagram users basic metrics about their content and help manage large groups of followers. We tried the service out to see how it works and how useful it is. Read more

Articles: Digital Photography Review (dpreview.com)

 
Comments Off on Quick Review: Using Iconosquare to manage and grow your Instagram following

Posted in Uncategorized


How to do Quick and Easy Curves Adjustments in Photoshop

02 Oct

Photoshop-make-adjustments-using-the-curves-dialog-opener

When you are starting out learning to edit in Photoshop there are a lot of tools from which to choose. The Curves Adjustment is one of the more advanced tools, so it often overwhelms new users. However it is such a powerful tool that it is well worth investing some time learning to use it. In this article I’ll explain what you can understand about your image from the Curves dialog and how to use curves to edit your photos.

Creating a Curves Adjustment

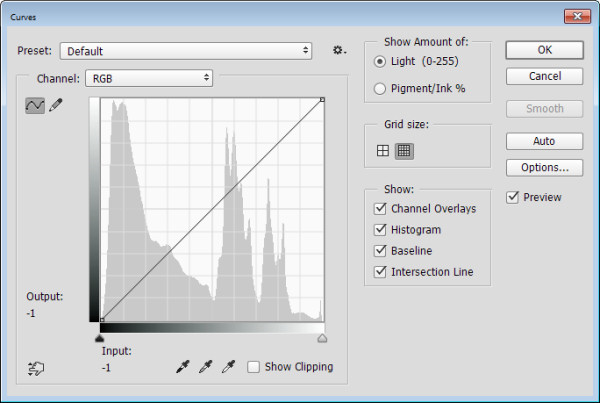
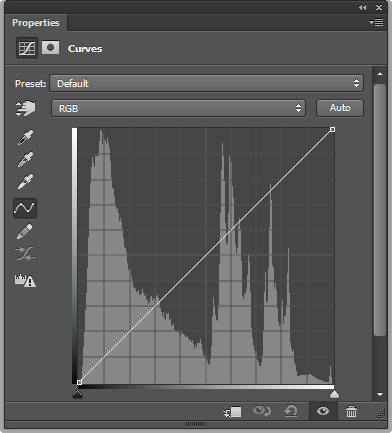
You can get to the Curves dialog in two ways; by choosing Image > Adjustments > Curves or you can add it as a new adjustment layer by selecting Layer > New Adjustment Layer > Curves. In each case the dialog is a little differently laid out but the same features are available.

This is the curves dialog you see when you choose Image > Adjustments > Curves:
Photoshop-make-adjustments-using-the-curves-dialog-1

And this is the Curves dialog you see when you choose Layer > New Adjustment Layer > Curves:
Photoshop-make-adjustments-using-the-curves-dialog-2

In this article I’ll focus on the Curves Adjustment Layer dialog because when you edit a photo using Adjustment Layers you can come back later and remove the adjustment or fine tune it. It would be more difficult to do this if you were to apply the effect directly to the image. In addition an adjustment layer has a mask that you can use to remove its effect from selected areas of the image. In short, using a Curves adjustment layer is a non-destructive editing technique.

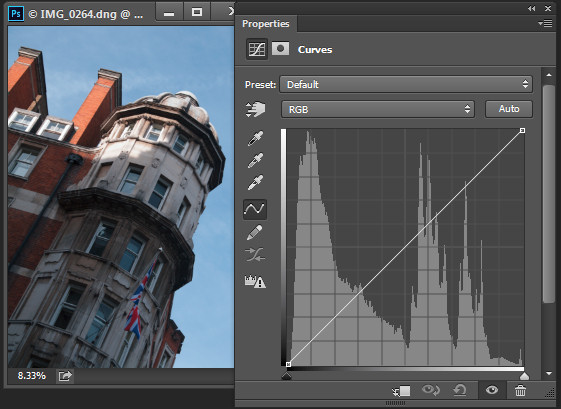
When you open the Curves dialog you’ll see a chart – called a histogram – beneath the curve line (you must be using Photoshop CS3 or later to see this). The histogram is a plot of the brightness of every pixel in the image so it is an indication of the image’s tonal range. The darker pixels are plotted on the left and the lighter pixels on the right.
Photoshop-make-adjustments-using-the-curves-dialog-3

Ideally the histogram should stretch between the left and right side of the grid without bumping up heavily against either edge. If the histogram is hard up against the left edge of the grid as in the following example, the image is underexposed so the image contains plugged up shadows where detail has been lost.
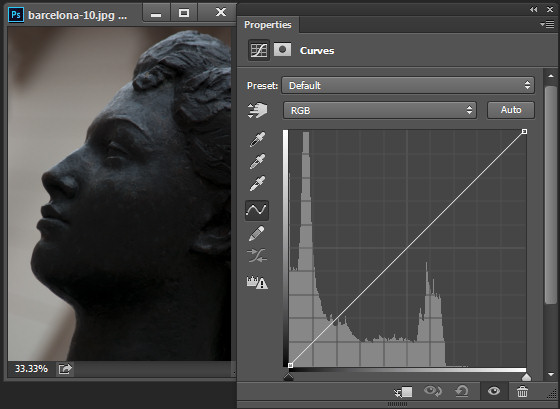
Photoshop-make-adjustments-using-the-curves-dialog-4

On the other hand, if the histogram is jammed up against the right side of the grid, the image contains blown out highlights. It is overexposed and some detail has been lost in the highlight areas.
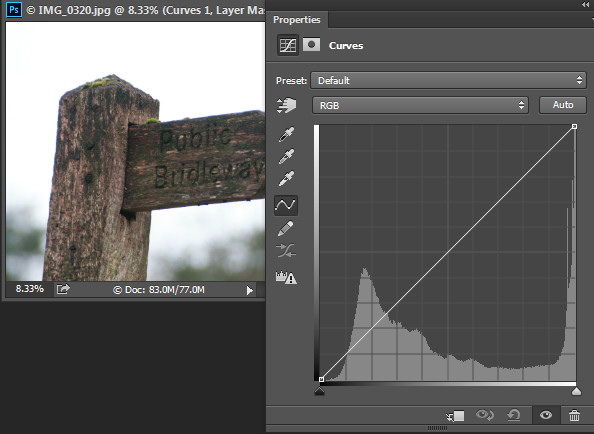
Photoshop-make-adjustments-using-the-curves-dialog-5

Plugged up shadows and blown out highlights may be difficult, if not impossible to recover, particularly if you capture images as jpeg files. If you capture in a raw format you have a better chance of recovering detail in these areas because more data is retained in the raw file.

Setting the White and Black points

If the histogram does not reach either edge of the grid then you will have an image that lacks either blacks, whites, or both. Hold the Alt key (Option key on a Mac) and drag each triangle marker underneath the histogram to move them inwards so they appear just under the point where the first white or black pixels are located in the chart.
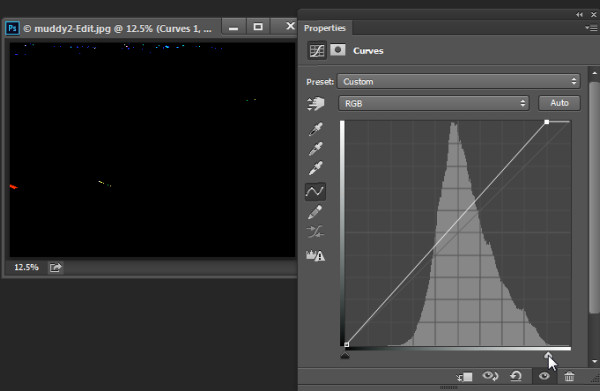
Photoshop-make-adjustments-using-the-curves-dialog-6

Holding the Alt or Option key ensures that you can see the pixels change on the image as you are adjusting them. Adjust the markers under the chart until you only just see a few white and black pixels in the image (as seen above as areas that are light or a color).
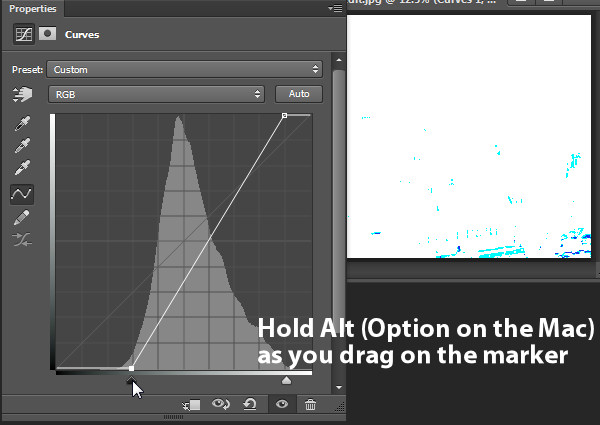
Photoshop-make-adjustments-using-the-curves-dialog-7

Remove a Color Cast

The Curves dialog also has an eyedropper that you can use to remove a color cast from the image. Click the middle of the three eyedroppers to set a grey point by clicking on an area of the image which should be neutral grey. If the color under the eyedropper isn’t neutral (if it’s Red, Green and Blue values are not equal) then Photoshop will adjust the image to make the color neutral – effectively removing the color cast. You can click repeatedly on the image until you find a place that gives you a good result. It is advisable to set the sample size on the tool options bar to 3 by 3 Average before you sample a gray point so that your sample is more than just a single pixel.
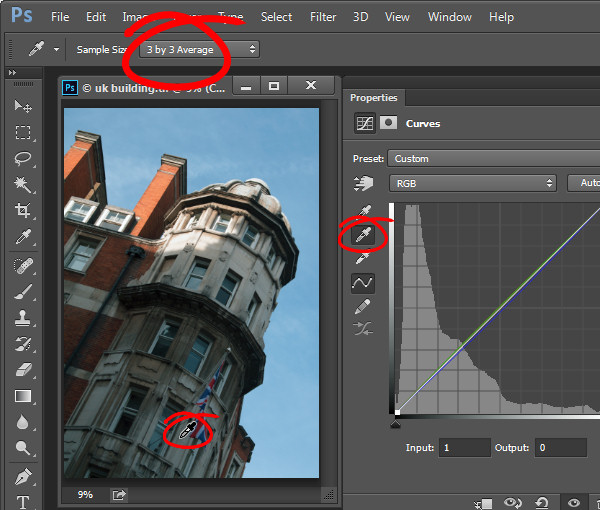
Photoshop-make-adjustments-using-the-curves-dialog-7a

Adjusting the Curve

The standard curve is actually a straight line running diagonally across the grid from the bottom left to the top right of the chart. This straight line is equivalent to no adjustment at all so, by default, the Curves adjustment does nothing to the image.
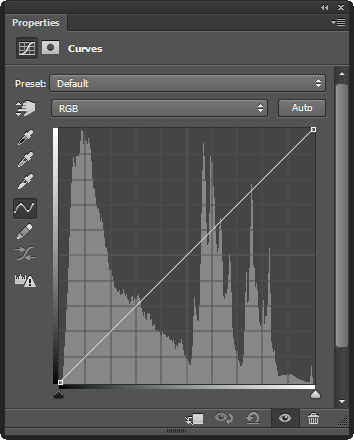
Photoshop-make-adjustments-using-the-curves-dialog-8

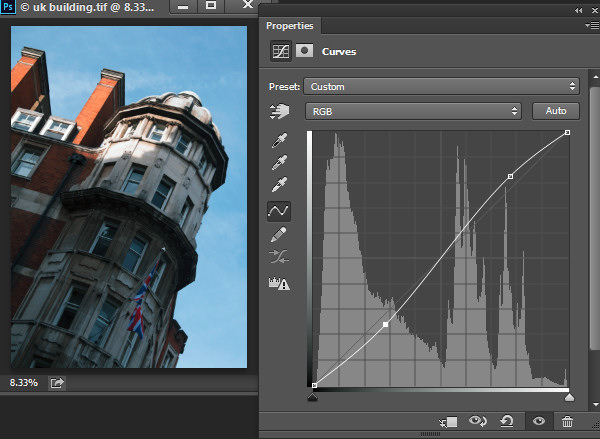
You can adjust the Curve line a couple of ways. One option is to click and drag on the line in an upward or downward direction to adjust the pixels of that tone in the photo. One adjustment that you can perform using this technique is to drag the line into what is often referred to as a shallow S-curve.

To do this, click and drag the line down on the left side of the grid and drag the line slightly up on the top right of the grid. This adds additional contrast to the image mid-tones – because anywhere that the curve line is steepened, you add contrast and anywhere it is flatter you reduce the contrast. By dragging the line into a shallow S-curve you’re steepening the line through the area in which the image mid-tones are located increasing contrast in those tones.
Photoshop-make-adjustments-using-the-curves-dialog-9

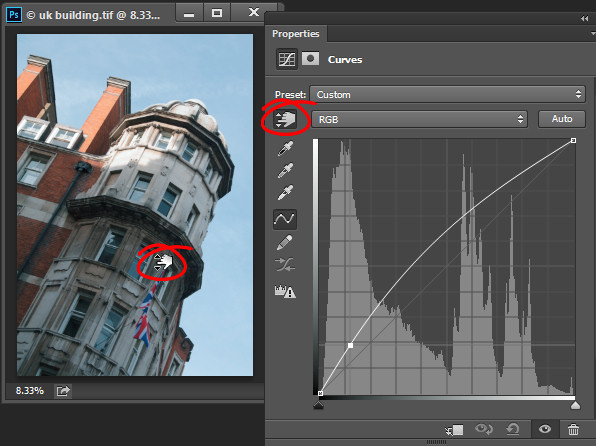
You can also adjust the curves line by clicking the onscreen adjustment tool and then drag on an area of the image that you want to adjust. Drag upward to lighten the tones represented by the pixels under the eyedropper, and drag downward to darken them. Notice that you aren’t just adjusting the area around the point where you are dragging, you are also adjusting all the pixels of that tonal value in the image, wherever they are located.
Photoshop-make-adjustments-using-the-curves-dialog-10

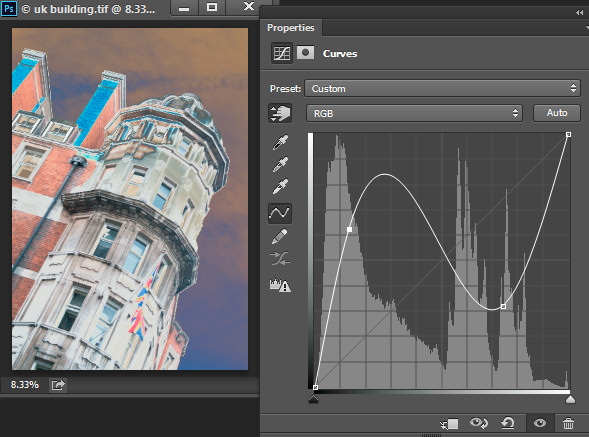
Whenever you’re adjusting the curve line make sure not to flatten it or invert it. If you invert the line as shown below then you’ll invert the colors in the image.
Photoshop-make-adjustments-using-the-curves-dialog-11

If the line is flat (horizonally) then the pixels in the flat area will all become the same shade of gray.
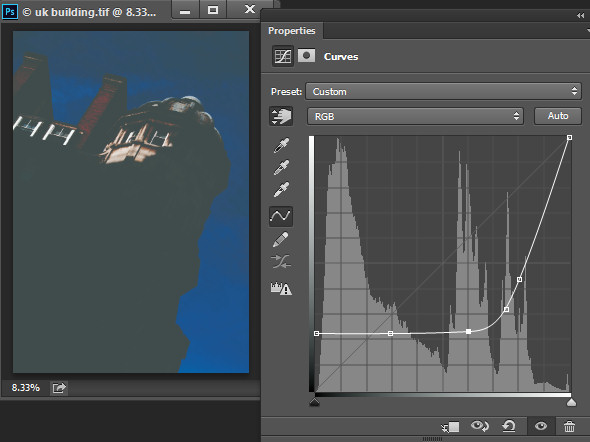
Photoshop-make-adjustments-using-the-curves-dialog-12

Working with Points on the Curve

To add points to the curve line simply click on the line where the point should be added. To remove a point on the curve, click on it and drag it off the edge of the chart and it will be removed.

Sometimes you may want to fix the line so it does not move, thus allowing you to adjust the curve on either side of the fixed point. To fix the line, click on it to add a point at its current position. Sometimes you may need to add a couple of points so that you can then adjust other areas of the line without also affecting tones that you don’t want to change. In the image below I have fixed the highlights so that the curve line wouldn’t move when I dragged up on the left end to lighten the darker areas of the photo. If I hadn’t locked down the highlights the entire curve line would have moved upwards, risking the highlights become too light.
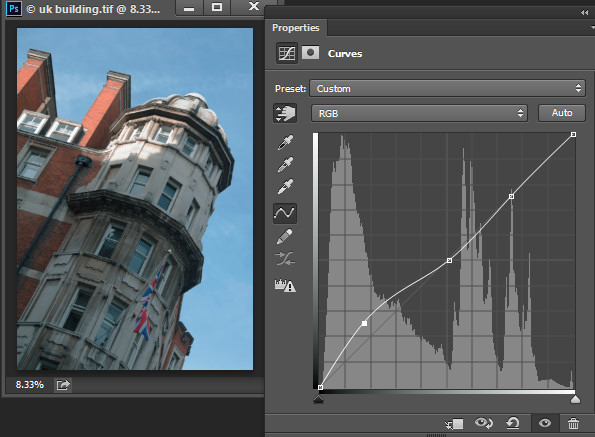
Photoshop-make-adjustments-using-the-curves-dialog-13

Using the onscreen (targeted) adjustment tool you can also determine where on the curve line certain tones in the image are located. Instead of clicking and dragging on the image, simply hold your mouse pointer over an area of interest. When you do this the appropriate point on the curve that relates to the pixels under the mouse pointer will be indicated with a hollow circle.
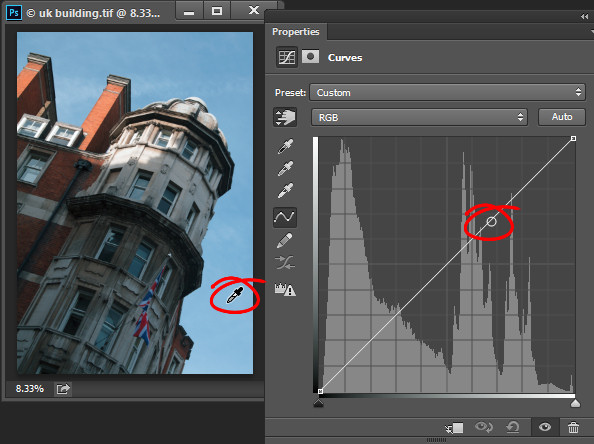
Photoshop-make-adjustments-using-the-curves-dialog-14

If you want to add a point on the curve at this location Ctrl + Click (Command + Click on a Mac) on the image to do so.
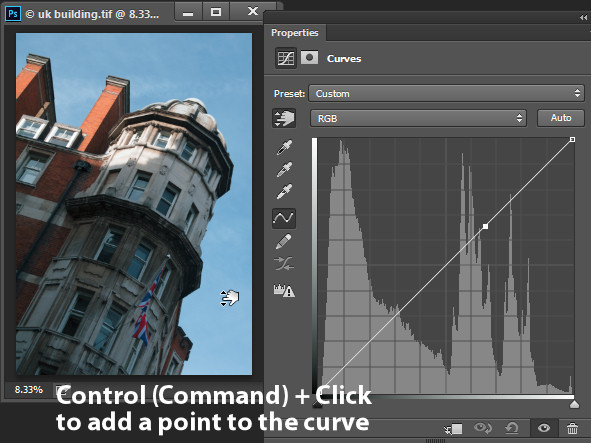
Photoshop-make-adjustments-using-the-curves-dialog-15

Adjusting Individual Colors with Curves

In addition to the RGB channel you can also adjust the curve for individual color  channels. From the dropdown list that displays RGB by default, choose the channel you want to adjust – there are selectors for Red, Green and Blue.
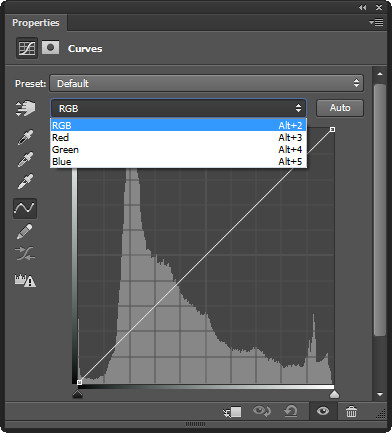
Photoshop-make-adjustments-using-the-curves-dialog-16

The red channel controls both red and cyan in the image; drag upward to add red to the image and downward to add cyan. The green channel controls green and magenta, so drag upward to add green and downward to add magenta. Likewise the blue channel controls blue and yellow; drag upward to add blue and downward to add yellow.

Using the color channels you can, for example, warm up an image. You could do this by adding red (drag up on the curve in the red channel) or yellow (drag down on the curve in the blue channel), or both.
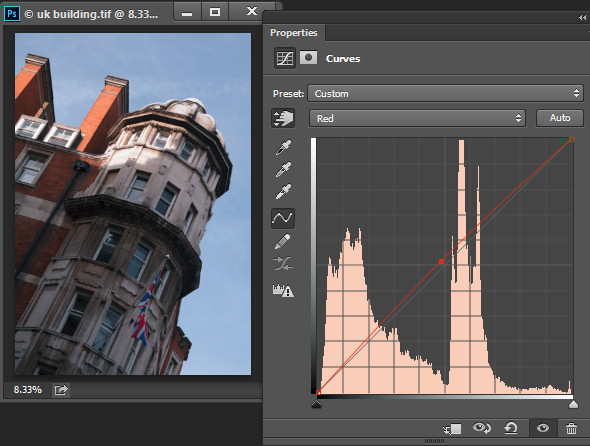
Photoshop-make-adjustments-using-the-curves-dialog-17

Adjusting the Curves Adjustment

Once you have applied a Curves adjustment to your photo you can close the Curves Properties dialog. At any time, if you used a curves adjustment layer you can double click on the curves layer thumbnail to open the curves dialog and further adjust it.
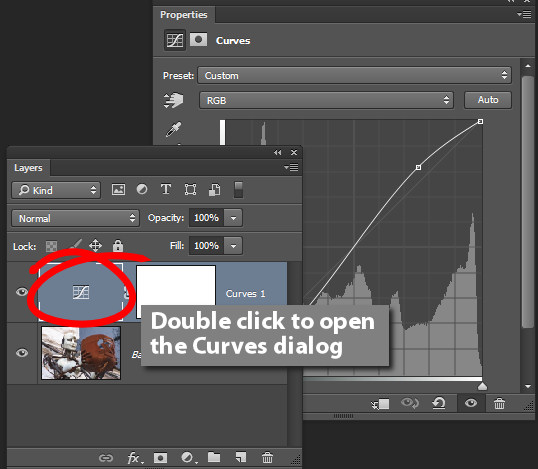
Photoshop-make-adjustments-using-the-curves-dialog-17a

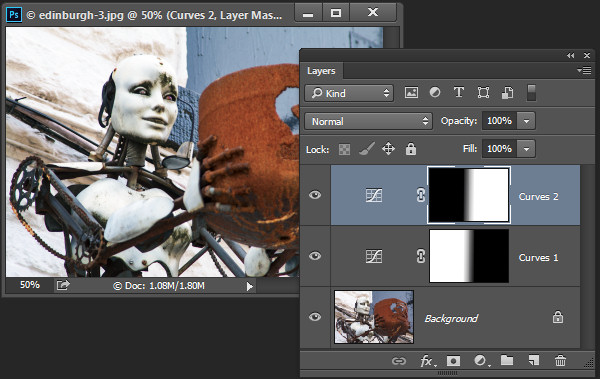
As with other adjustment layers a layer mask is automatically added to the curve adjustment layer. Target the mask in the Layers palette and you can then paint on it with black or gray to remove the effect of the curve from a selected area of the image. Paint on the mask with white to paint reveal the adjustment in that area again. In the image below, the mask shows that the curves adjustment affects only the building (white area) and not the sky (black area).
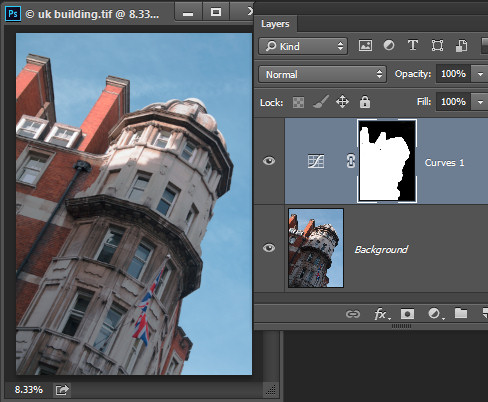
Photoshop-make-adjustments-using-the-curves-dialog-18

You can also add a black to white gradient fill to mask the curves adjustment so it is applied to the top part of the image and not the bottom.

In some situations you may want to add multiple curve adjustments to an image – the first which fixes one part of the photo and another to fix another part of the photo. You can use the layer masks to control how each curves adjustment affects the photo.
Photoshop-make-adjustments-using-the-curves-dialog-19

Using Presets

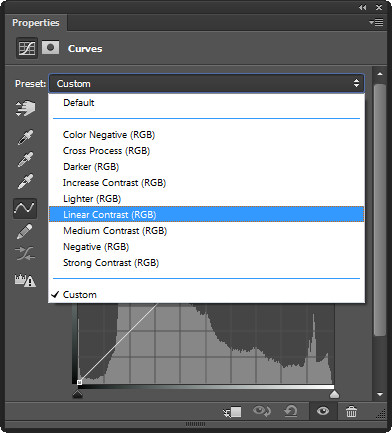
Photoshop ships with some curves presets that you can use by selecting them from the Preset dropdown list.
Photoshop-make-adjustments-using-the-curves-dialog-20

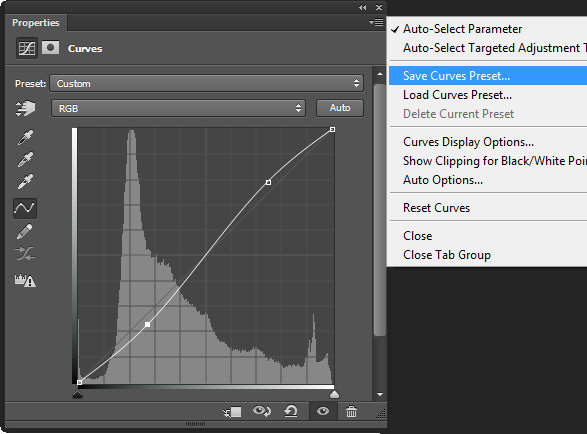
You can also create your own presets. So if there is an adjustment such as a shallow S-curve that you like to apply to many of your photos, you can save this curve as a preset by first adjusting the line to the desired shape then click the fly-out menu and choose Save Curves Preset, type a name, and click Save. In future your preset will be available from the list.
Photoshop-make-adjustments-using-the-curves-dialog-21

Learning to use curves will give you more options when editing your images in Photoshop. You’ll find curves are a feature of most advanced editing software so it is an adjustment you will find in other programs including Gimp, Lightroom and Adobe Camera Raw.

You can view a video of this tutorial on curves below:

Do you have any other tips for using curves in Photoshop? Please share in the comments below.

The post How to do Quick and Easy Curves Adjustments in Photoshop by Helen Bradley appeared first on Digital Photography School.


Digital Photography School
 
Comments Off on How to do Quick and Easy Curves Adjustments in Photoshop

Posted in Photography