RSS
 

Posts Tagged ‘quick’

What a view: Aukey Super Wide Angle lens quick review

05 Mar

Aukey is a mobile device accessory maker that has been in the clip-on lens business for quite some time. We’ve had a chance to try out one of the company’s latest models, the ‘Super Wide Angle’ lens which at 238 degrees offers quite an extreme angle of view. Read more

Articles: Digital Photography Review (dpreview.com)

 
Comments Off on What a view: Aukey Super Wide Angle lens quick review

Posted in Uncategorized


2 Quick Ways to Add a Sunflare in Photoshop

28 Feb

Sunflares can make an otherwise dull image, look pretty dramatic. It’s very tricky to get good images of a sunflare in-camera, especially when using natural light only, as the contrast between the light and dark parts of the image is often too great that no amount of Active-D lighting can fix. Thankfully, we have Photoshop and many special effects like sunflares can be magically created, added, or enhanced, using this software’s mind-blowing functionality.

special-effects-sunflare-photoshop-tutorial

Why add a sunflare?

Special effects, such as a sunflare, ultimately boil down to the photographer’s personal taste. Here are a few reasons why sunflares may be added in post-processing.

  • To exaggerate the sun’s rays.
  • To enhance contrast and inject drama.
  • To hide unwanted clutter.
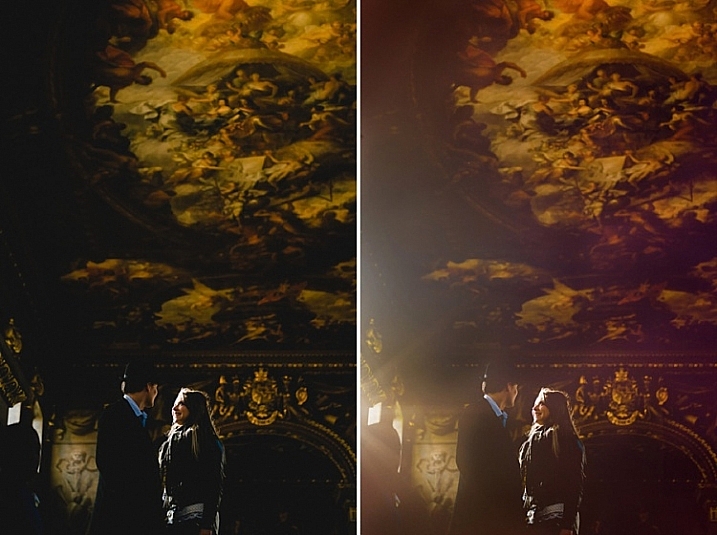
  • To achieve artistic effects, for example if you are aiming for a dreamy and romantic effect, or soft and hazy ambience, such as the image above right.

When not to add a sunflare?

When you discover the magic of Photoshop, you can easily get carried away by the excitement of adding special effects, and there’s the danger that you add it on all your images, even when completely out of context, out of place, or totally unnecessary. I suggest avoiding sunflares when:

  • There is no sun at all or any large light source, in the shot.
  • When it makes the image look completely fake, when you really mean for it to look natural.

How to add flare in Photoshop

As is the usual case in Photoshop, there are always several methods to do something. This tutorial focuses on two ways of adding a sunflare.

special-effects-sunflare-photoshop-tutorial (1)

1. Method one: Using the LensFlare filter

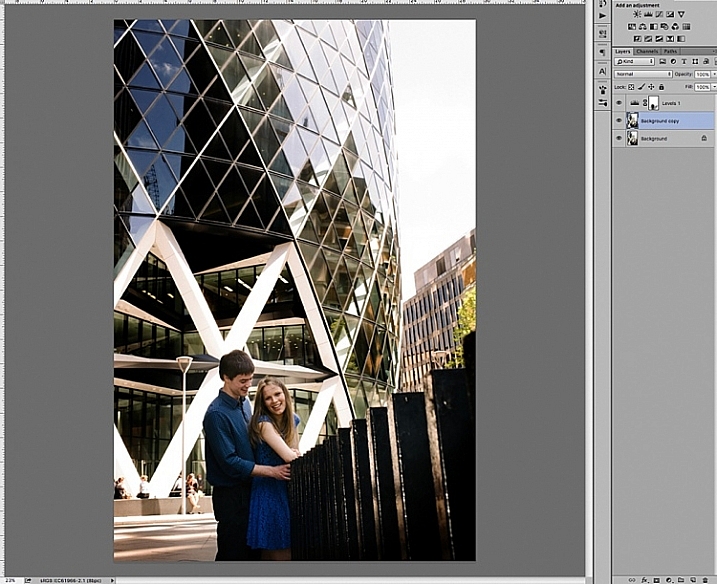
Adding a bright sunflare to the image above won’t make much difference to an already washed out sky and part of the building. First of all you would need to create contrast by darkening the image. Copy the image on a new layer using CMD/CNTRL + J, and darken it using a Levels adjustment layer.

special-effects-sunflare-photoshop-tutorial (12)

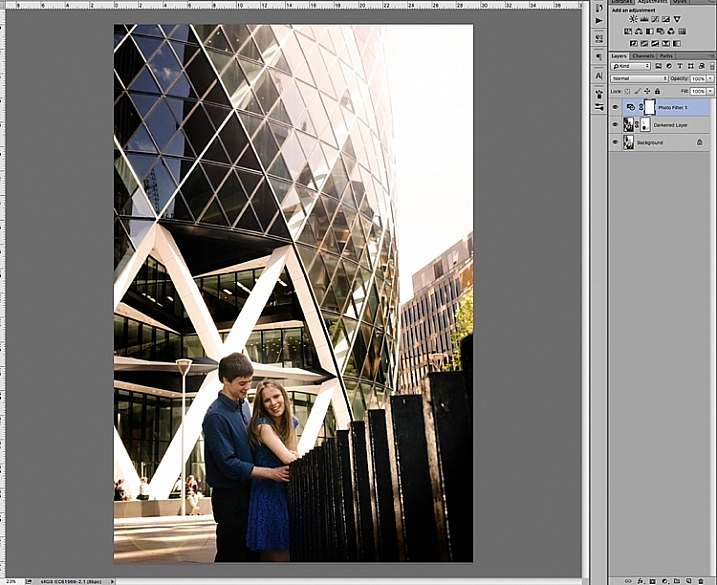
Merge the background copy layer with the levels layer, by selecting both layers and typing CMD/CNTRL + E to merge them. Now you have a new darkened layer. Make another copy of the new darkened layer, then work on this new layer with the sunflare.

When you add sunflare, it is automatically added on the layer as part of the image, and not on a new layer by itself. So to be safe, keep a copy of the darkened layer which you don’t touch. Always work on the new copy with the sunflare, so in case you make mistakes or need to reposition your sunflare, then you won’t need make a darkened layer all over again. You can just delete the layer you are working on, and duplicate your untouched dark layer, to start adding a new sunflare.

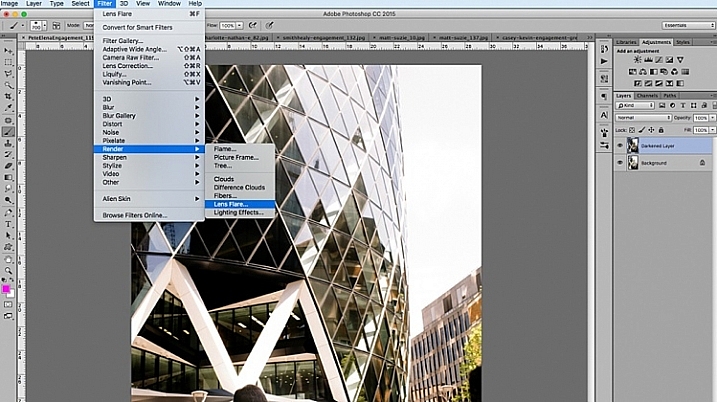
In Photoshop, bring up the Lens Flare from the top menu bar using the Filter>Render>LensFlare drop down menu.

special-effects-sunflare-photoshop-tutorial (1)

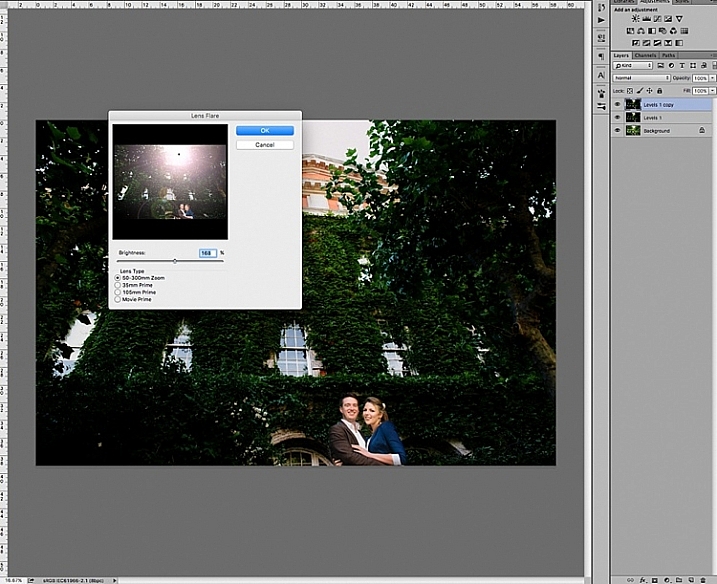
You can experiment which type of lens flare you want to add, by clicking the circles next to the type of sunflare option, and adjusting the brightness intensity by moving the slider. Click OK when you’re happy with your choice, and the sunflare will be superimposed on your image on the same layer.

special-effects-sunflare-photoshop-tutorial (8)

Once the sunflare is applied to the image, add a layer mask, and using a soft black brush, remove some of the sunflare from areas you want to protect such as faces (make sure to paint on the mask, not on the layer).

special-effects-sunflare-photoshop-tutorial (9)

special-effects-sunflare-photoshop-tutorial (14)

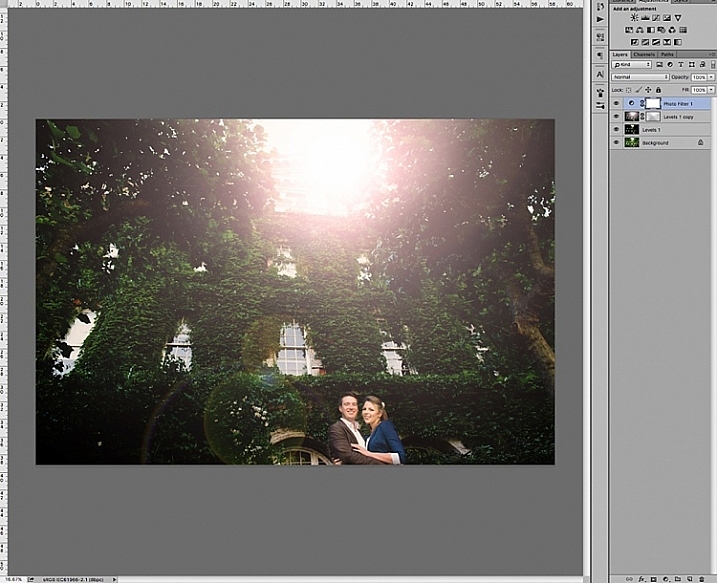
To finish, I added a photo filter on top, to warm up the image. Below is the image before and after the sunflare has been added. It is always a good practice to save the image with sunflare as a new JPG file, and always save your Photoshop file (PSD) with all the layers in tact, in case you need to revisit it again in the future.

special-effects-sunflare-photoshop-tutorial (3)

special-effects-sunflare-photoshop-tutorial (2)
2. Method two: Using overlays

The built-in sunflares in Photoshop have very limited choices, as you have seen above. There are far more interesting sunflares of all shapes and colours available, in the form of overlays.

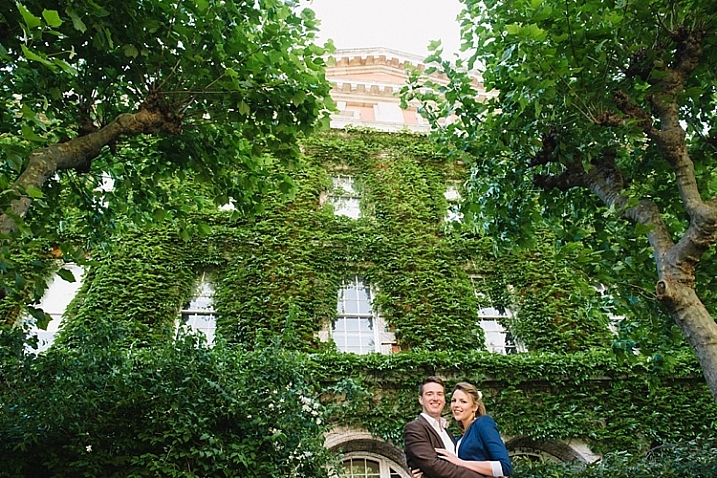
Below is an example of an image with a faint sunflare added in Photoshop, using one of the built-in choices above. I don’t think this is dramatic enough. In this example, I am exaggerating the sunflare by adding a sunflare overlay.

special-effects-sunflare-photoshop-tutorial (5)

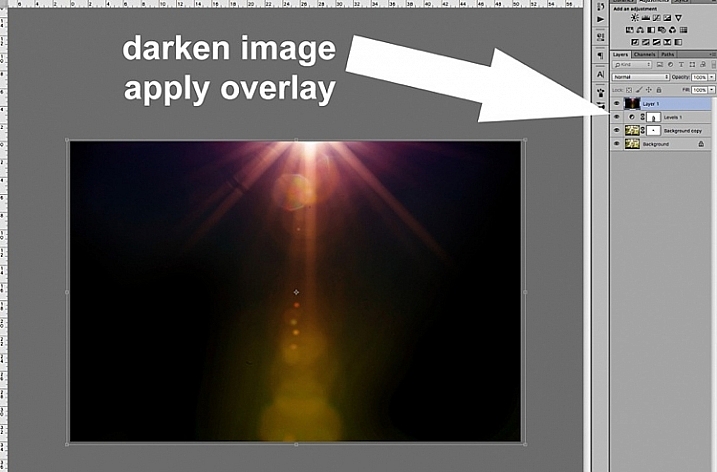
First darken the image with Levels, as in the first method above, using a layer mask to protect areas you don’t want to be darkened. Then apply the overlay on the entire image, as shown below.

special-effects-sunflare-photoshop-tutorial (11)

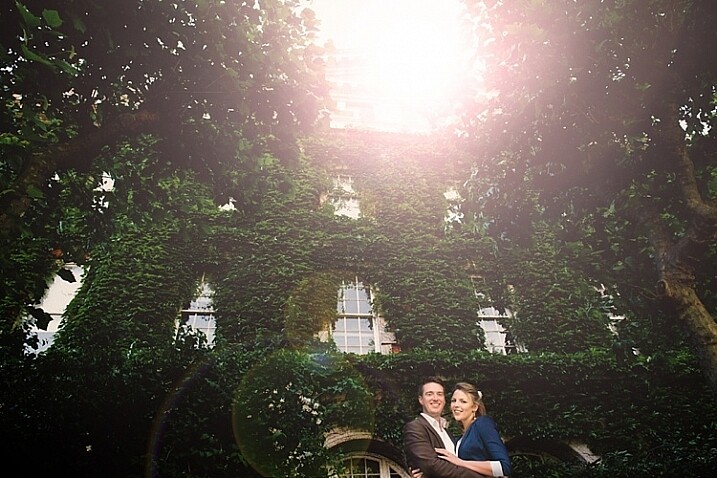
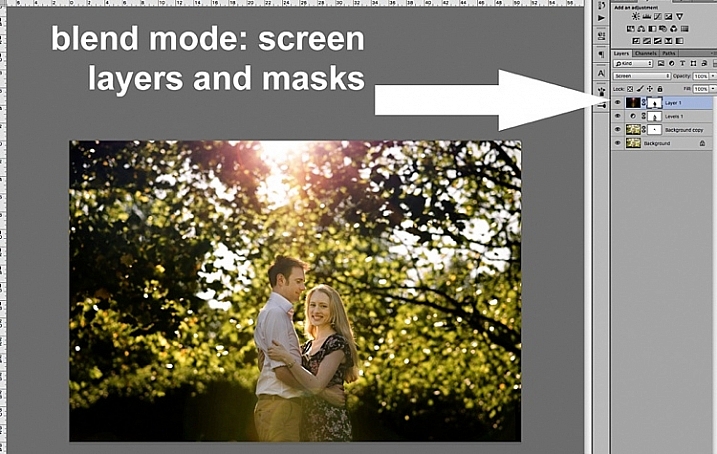
Change the layer blend mode to Screen, which makes all the dark areas of the overlay disappear, and you will only be left with the light areas superimposed on your image.

special-effects-sunflare-photoshop-tutorial (10)

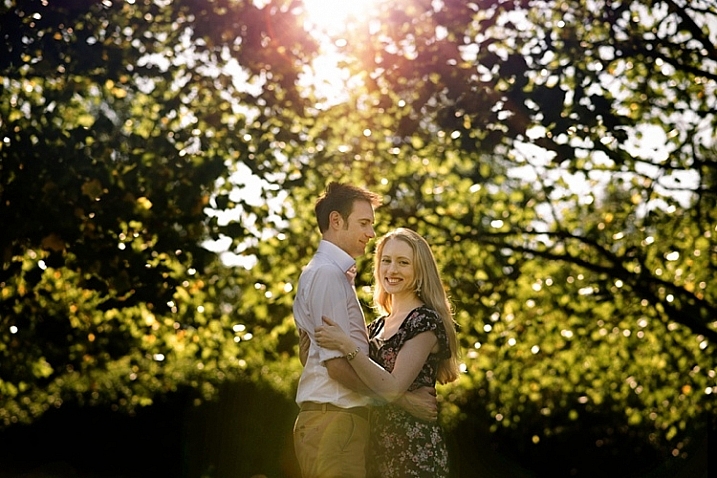
Below is the final JPG image with the new sunflare overlay, with the whole image darkened for more contrast.

special-effects-sunflare-photoshop-tutorial (4)

Below is another image about to be treated with a sunflare overlay, but this time way more exaggerated than the example above.

special-effects-sunflare-photoshop-tutorial (7)

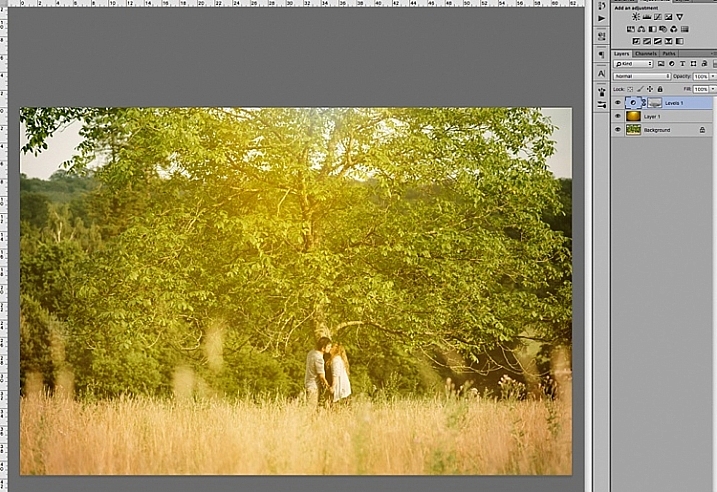
The overlay is so strong, as you can see on Layer 1 below, I have applied a levels layer to brighten it a little, and a layer mask to gradually remove some of the overlay from areas I wanted to protect.

special-effects-sunflare-photoshop-tutorial (7)

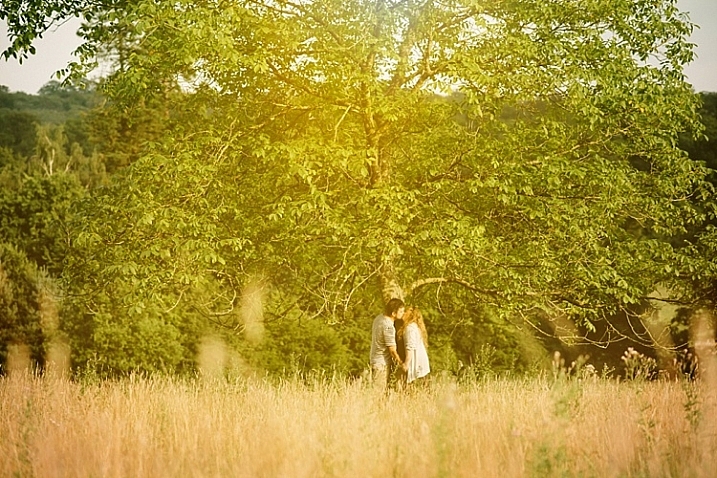
Below is the final image with an exaggerated sunflare overlay, that looks like it has been photographed through a warm filter over the lens.

special-effects-sunflare-photoshop-tutorial (7)

A few things to note when applying special effects

  • Be subtle and experiment with the opacity to achieve the desired effect.
  • Darken surrounding areas to emphasize flare, especially on a very bright image.
  • Mask off special effects from faces, and areas that clearly do not need it. The built-in sunflares in Photoshop have circular flares that appear too perfect and hard-edged. You can always mask some of this away to take the edge off, and soften the flare effect.

I hope you have enjoyed this little tutorial in adding a sunflare special effect in Photoshop. Do you have other tips and ways to add sunflares in post-processing? Please share them in the comments below.

googletag.cmd.push(function() {
tablet_slots.push( googletag.defineSlot( “/1005424/_dPSv4_tab-all-article-bottom_(300×250)”, [300, 250], “pb-ad-78623” ).addService( googletag.pubads() ) ); } );

googletag.cmd.push(function() {
mobile_slots.push( googletag.defineSlot( “/1005424/_dPSv4_mob-all-article-bottom_(300×250)”, [300, 250], “pb-ad-78158” ).addService( googletag.pubads() ) ); } );

The post 2 Quick Ways to Add a Sunflare in Photoshop by Lily Sawyer appeared first on Digital Photography School.


Digital Photography School

 
Comments Off on 2 Quick Ways to Add a Sunflare in Photoshop

Posted in Photography


4 Quick Ways to Add a Vignette to Your Images in Post-Processing

21 Feb

What is a vignette?

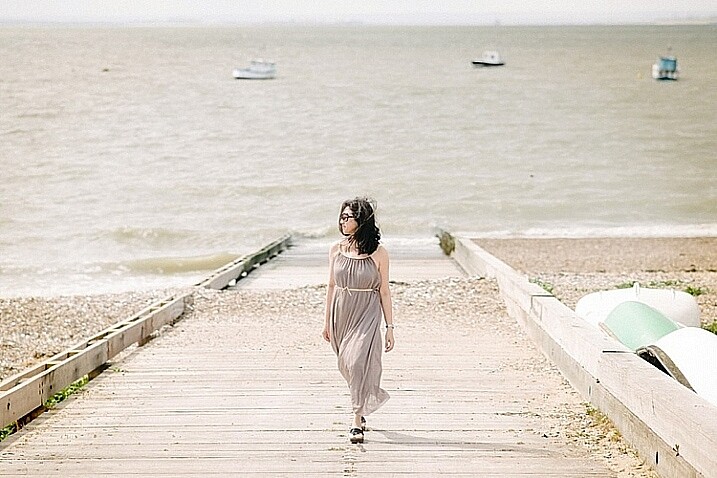
way-to-add-vignette-tutorial
The word vignette comes from the root word vine, which originally was taken to mean a decorative border on a page. In photography, this translates to a border around the edge of the image. This border is caused by a reduction of light from the center of the image, or a light fall-off. Light fall-off can be due to a variety of reasons: the amount of light hitting the sensor, the type of lens used, or an intentional addition in post-production. This article will focus on the latter.

In adding vignettes in post-processing, you have two choices: darker or lighter, and soft-gradual or hard-edge.

Why add a vignette?

way-to-add-vignette-tutorial

The addition of a vignette in post-processing comes down to your personal taste. It would also largely depend on your photography style, and the type of image you are editing. Generally speaking, high-key images do not need a dark vignette. If you want to add a vignette to bright images, most often a lighter one looks better, but I would still be very careful about adding one.

A vignette helps draw the viewer’s eye to the center of the image. This is particularly useful if the image has plenty of clutter, or distracting elements around the edges. Similarly, if the edges are pretty bare which makes the image look flat, a vignette adds an illusion of foreground, or another layer to the image, giving it more depth.

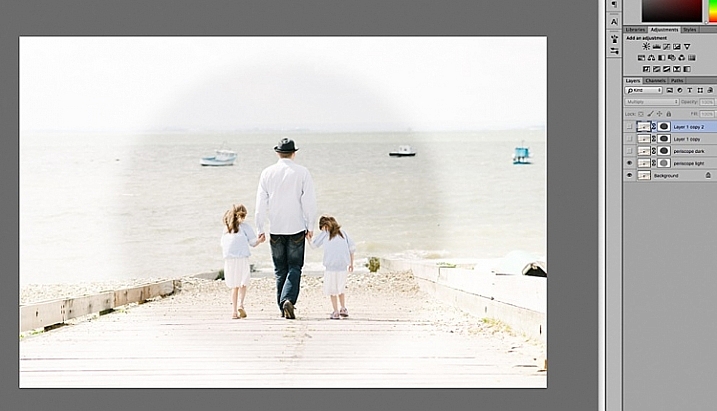
Be gentle and sparing when adding a vignette, it can enhance or ruin an image. What works often, and best, is a gradual and very subtle vignette, especially for portraits. More exaggerated vignetting may be required on some artistic images – the choice is yours. If you want to add a spotlight effect to an image, then adding vignettes can be essential. A hard-edged vignette, if done unintentionally, makes your image look like a view through a periscope and can burn your image, like a moth to a flame.

Here are four quick ways to add a vignette

In Adobe Camera Raw

The quickest and easiest way to add a gradual and gentle vignette in your image is via Adobe Camera Raw (this works in both Photoshop and Lightroom).  My previous article on batch editing with Bridge and Adobe Camera Raw explains how you can open your file in Camera Raw and make your initial edits.

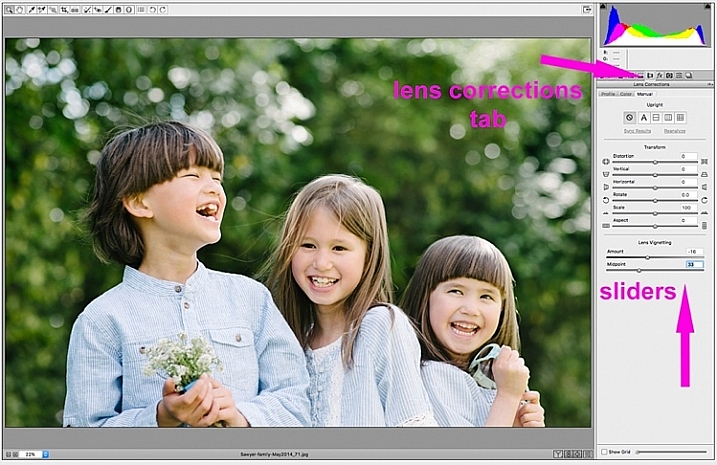
1. Using the lens correction tab

On the image below, you will see the lens vignetting slider under the lens correction tab. Move the sliders along to add, and remove vignettes to your image, according to taste.

way-to-add-vignette-tutorial

2. Using the radial filter tool

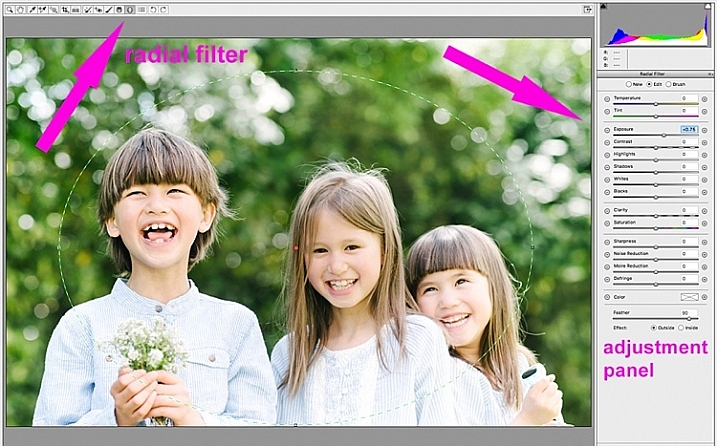
You can also add a dark or light vignette using the radial filter tool. On the adjustments panel, you need to specify where you want the vignette added – whether inside or outside the radius, then adjust the exposure to lighten or darken the vignette (with this method you can even add blur, lower highlight, or change the color of it if you like – anything on the sliders). This is a really handy feature in ACR because it acts like a layer mask, although you can’t easily do fine tuning with this tool like you can in Photoshop.

way-to-add-vignette-tutorial

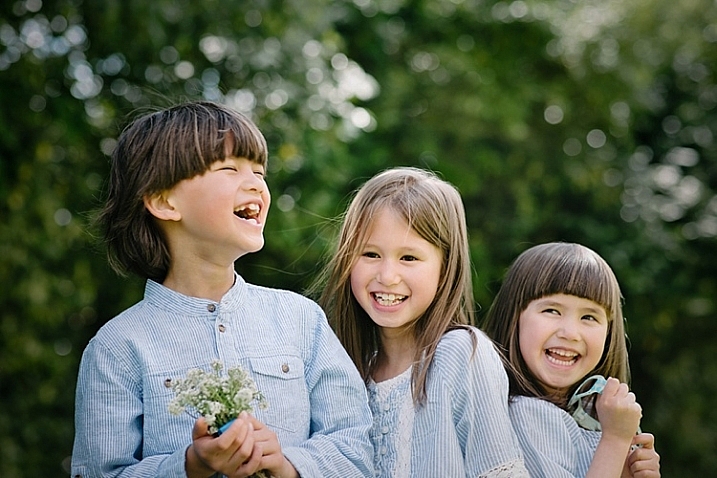
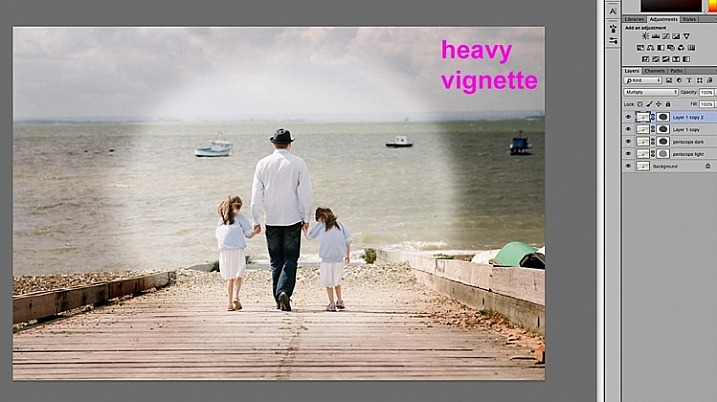
Below is an image with a pretty dark and heavy vignette. In my opinion it’s too much, and takes away from the image, rather than enhancing it.

way-to-add-vignette-tutorial

Below is the same image with a bright vignette; this doesn’t look right to me at all.

way-to-add-vignette-tutorial

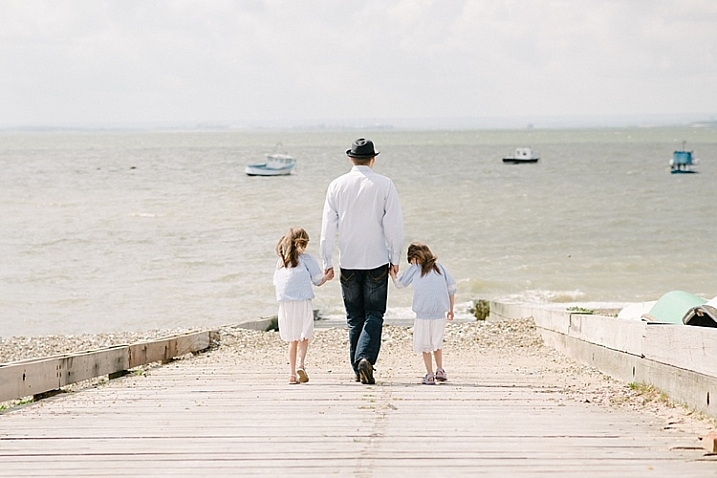
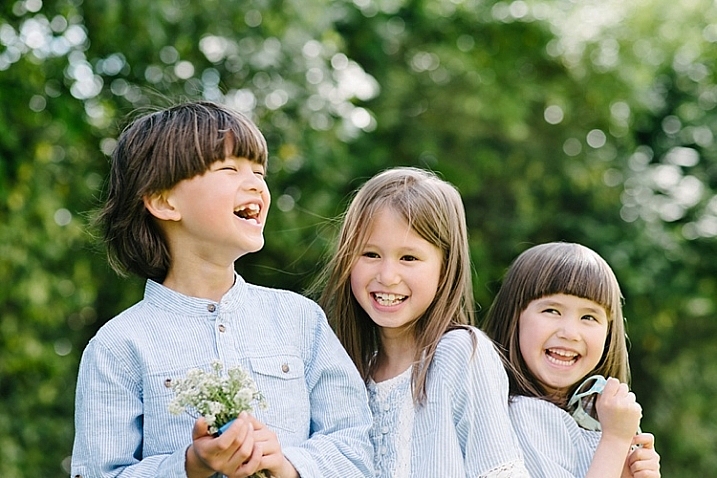
On this version below, I think the vignetting is just right, as it enhances the natural look of the photograph, which was my aim.

way-to-add-vignette-tutorial

In Adobe Photoshop

If you skip Adobe Camera Raw and open your file in Photoshop, there many ways to add a vignette. Below are the two quickest ways I have found. Before attempting to add a vignette in Photoshop, in order to perform non-destructive edits to your images, I recommend you learn to use layers and masks.

1. Using blend modes

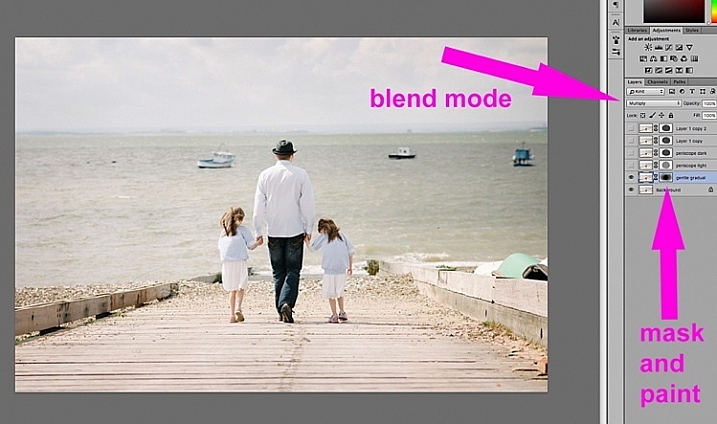
The first quick way  of adding vignettes in Photoshop that I found is by duplicating the background layer using CMD/CNTRL + J. You need to make all your adjustments on the layers above your background layer, in this case the duplicated layer, so that your original file is safe and untouched.

way-to-add-vignette-tutorial

With your duplicate layer selected, change the mode to darken or multiply to add a dark vignette, or to screen or lighten to add a light vignette. Now add a layer mask to the duplicate layer. If you choose to paint the vignette on, make sure the mask is blacked out. Select a big soft brush, using the brush tool set to a very low opacity, and paint with white on the vignette around the edges.

Alternatively, you can choose to remove the vignette instead of painting it on, which in this case would be my preference. With your duplicate layer superimposed on the background layer, add a white layer mask. Choose a big soft brush set to a higher opacity and start painting the layer mask black, starting from the middle and ever so gently radiating outwards until all the vignette is removed from the center, and only a touch on the edges is left. Adjust the opacity of the layer to suit your taste.

Below are two examples of exaggerated vignetting added in Photoshop using this method.

way-to-add-vignette-tutorial

way-to-add-vignette-tutorial

Manually painting, or removing the vignette by hand, gives you flexibility as to where to apply the vignette, how far in, and to what degree, depending on what’s required for each image.

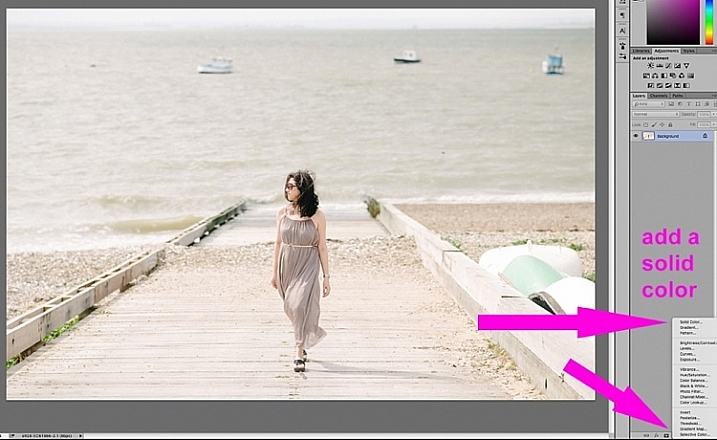
2. Using a solid color layer

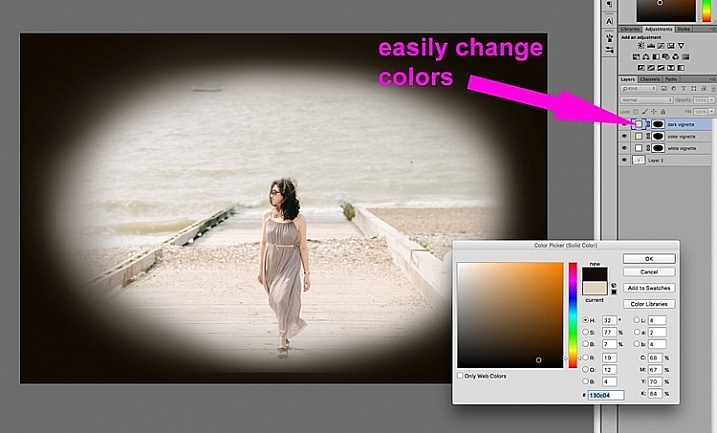
Another quick way is to add a solid color. This method allows you to be more experimental, as it’s very easy to change the colors with a click of the eyedropper tool.

way-to-add-vignette-tutorial

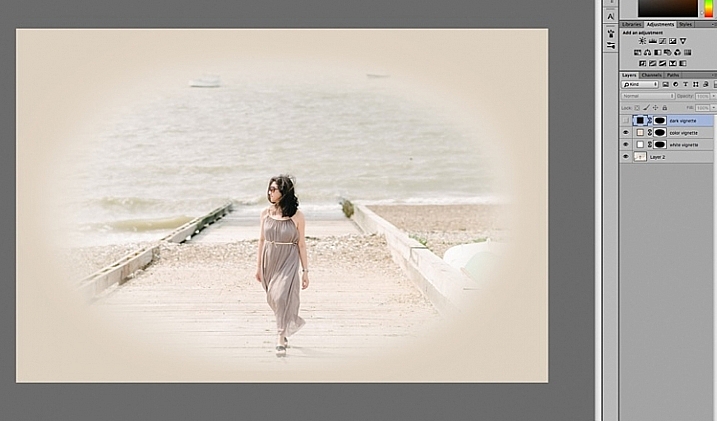
The solid color will sit on top of your image, so all you will see is a flat rectangular block of color. You need to add a layer mask, and start removing some of the color beginning at the center and radiating outwards. Again, use a soft large black brush to remove the color. If you do this kind of vignetting, as in the two images below, it has to be intentional as these do not give you a natural look to the images at all. They may work for a scrapbook, or other specific purposes, but this is not the look I would give to my clients.

way-to-add-vignette-tutorial

On the image below, the vignette was added using the same solid color method as above. You can then play around with the blend modes to see what looks best.

biege - color-burn

This was done using the same solid color as above but Color Burn Blend Mode.

way-to-add-vignette-tutorial

This one is done with a black solid color added, masked, and Overlay Blend Mode with the layer at 80% opacity.

This one is done with a black solid color added, masked, and Overlay Blend Mode with the layer at 80% opacity.

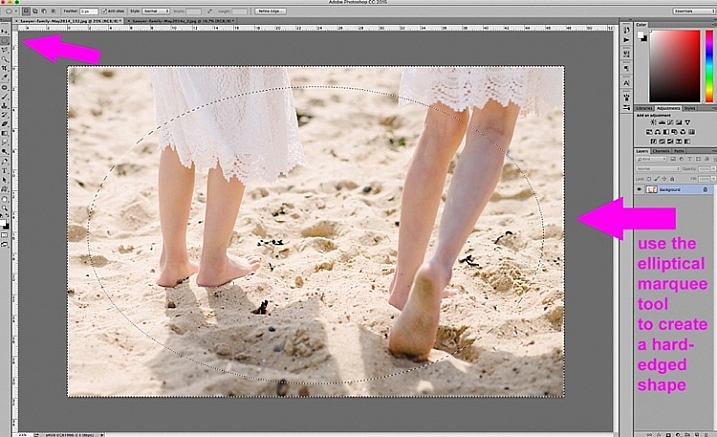
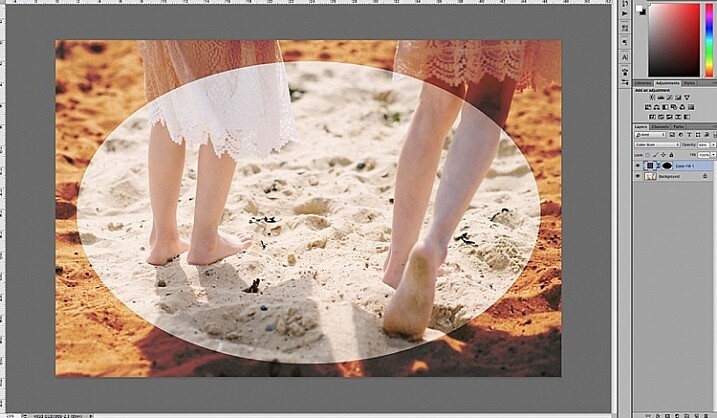
You can also make shapes as vignettes, using the marquee tool.  The elliptical marquee tool was used for the image below, creating a hard-edged vignette. Make your shape by dragging this tool on your image, and you will see marching ants around the shape you have just created. You must immediately invert it using CMD/CNTRL + shift + I so the outside of the shape will be selected and would now be the area surrounded by the marching ants (as below).

elliptical marquee

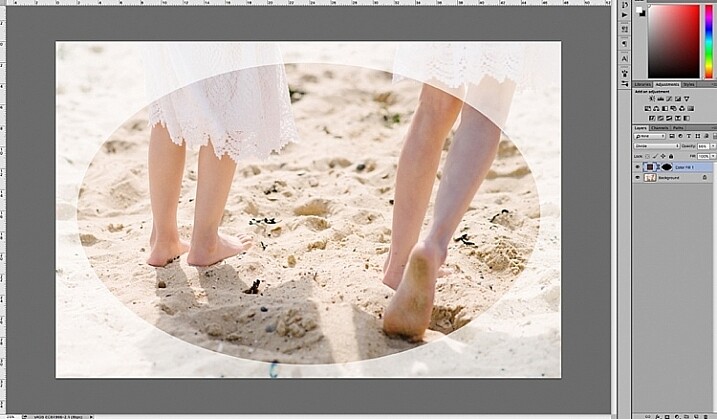
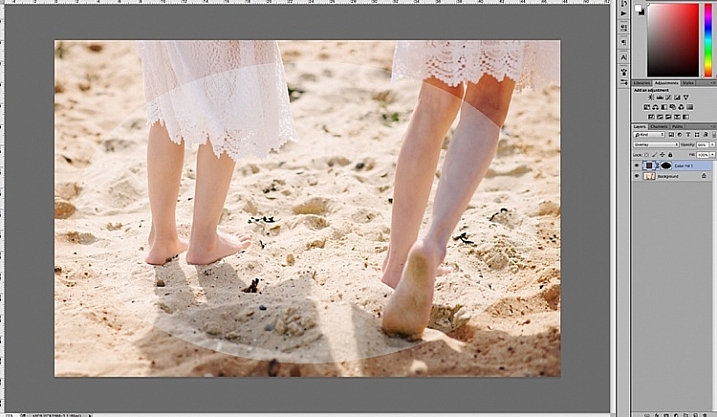
Click on the solid color icon and select a color. A new layer with your shape filled with the solid color will automatically be created. Select this layer and play around the the blend modes and the layer opacity. You will see below what the Divide, Color Burn and Overlay modes look like.

Color Burn Blend Mode

Color Burn Blend Mode

Divide Blend Mode

Divide Blend Mode

Overlay Blend Mode

Overlay Blend Mode

You will want to feather the mask on your color layer, or blend the edges manually using the brush tool so that you do not see the edge of the vignette so well-defined. I’ve left it like this for demonstration purposes so you can see what the vignette layer is doing.

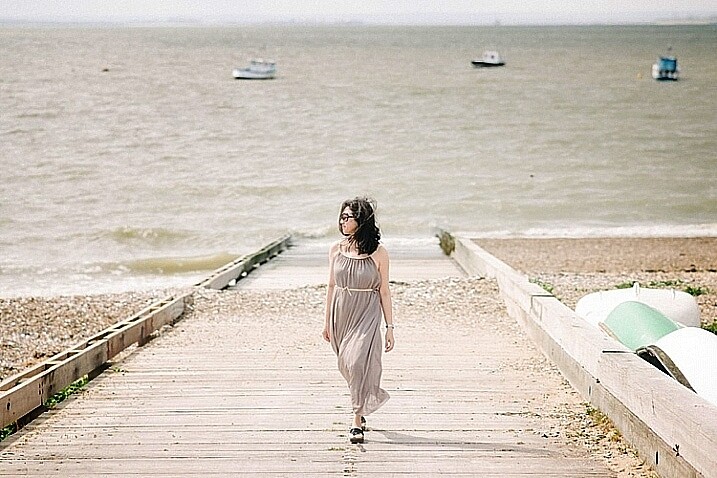
Below is the final image with only a hint of vignette on the edges, just to take the edge off the brightness of the scene.

way-to-add-vignette-tutorial

I hope this tutorial has given you some new ideas on how to enhance your images using vignettes. Do you have other quick ways of adding vignettes to your images? Share them here.

googletag.cmd.push(function() {
tablet_slots.push( googletag.defineSlot( “/1005424/_dPSv4_tab-all-article-bottom_(300×250)”, [300, 250], “pb-ad-78623” ).addService( googletag.pubads() ) ); } );

googletag.cmd.push(function() {
mobile_slots.push( googletag.defineSlot( “/1005424/_dPSv4_mob-all-article-bottom_(300×250)”, [300, 250], “pb-ad-78158” ).addService( googletag.pubads() ) ); } );

The post 4 Quick Ways to Add a Vignette to Your Images in Post-Processing by Lily Sawyer appeared first on Digital Photography School.


Digital Photography School

 
Comments Off on 4 Quick Ways to Add a Vignette to Your Images in Post-Processing

Posted in Photography


Quick review: Nextbit Robin camera

21 Feb

The Nextbit Robin is a different kind of smartphone. It’s an Android device with a fresh modern design, but its most important feature is the one you never see – it’s fully integrated with the cloud, backing up and archiving your phone’s images, apps and files so you never run out of local storage. We got ahold of an early unit to test out its camera and unique interface. Read more

Articles: Digital Photography Review (dpreview.com)

 
Comments Off on Quick review: Nextbit Robin camera

Posted in Uncategorized


Beginner Tip: How to Use the Canon Quick Menu to Change Cacmera Settings

16 Feb

canon-quick-menu-3

When it comes to beginner photographers, one of the first major goals is often to get off Auto. Doing so really is an important step to using your camera to the best of its capabilities. However, the concern that I hear most often from beginners in terms of stepping away from auto mode, is that it takes so long to get their shutter speed, aperture, ISO, white balance, and focal points set, that sometimes they’ve missed the shot that they were hoping for completely. I understand how frustrating that dynamic can be, and I have one Canon tip to share that may make life a little simpler if you’re just starting out.

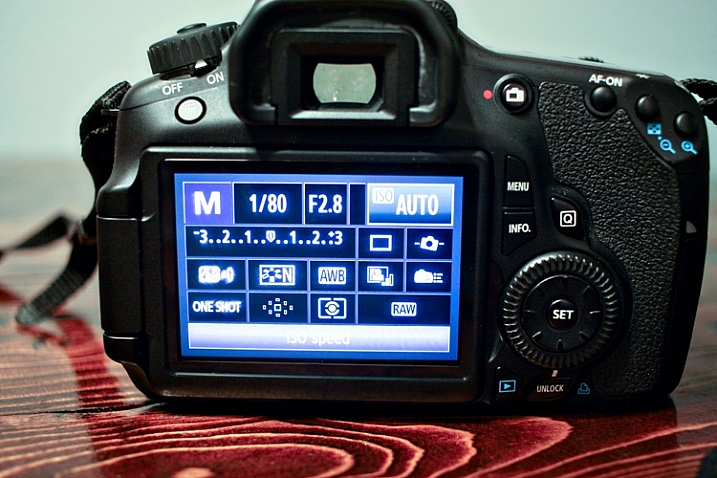
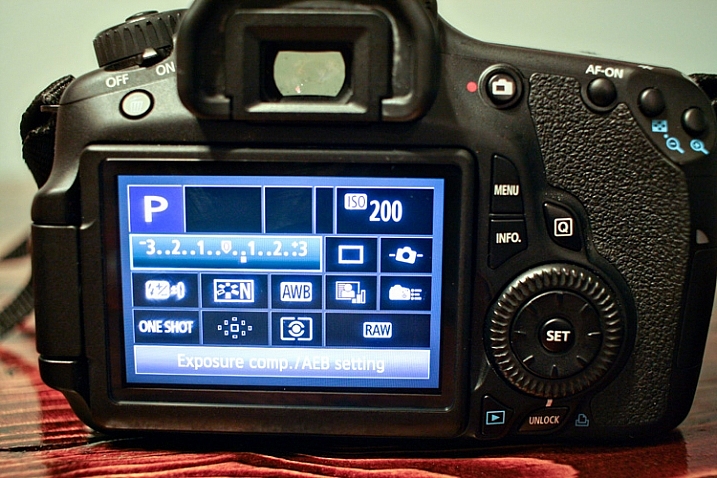
Canon EOS cameras have a feature called the EOS Quick Menu. For the vast majority of EOS cameras, you’ll access the Quick Menu or Control Screen by pressing the button on the back of the camera with the letter Q. For a few older EOS cameras, you’ll have to push the button in the center of the multi-controller (that’s the big wheel on the back of your camera to the right of the screen). Once you hit that button, a very handy screen pops up that looks something like this:

canon-quick-menu-1

Now, you’ve got many of the most commonly changed settings right at your fingertips. You can change shutter speed, aperture, ISO, metering mode, focal point, file type, and several other features, right from the Quick Menu, without having to scroll through several different menus or adjust settings located in several different places on your camera body. You just use the multi-controller to navigate to the setting that you’d like to change, and then press the SET button to access that setting.

It’s worth noting that your available options will change somewhat depending on which camera mode you’re in. In the above image, the camera is set to manual mode and thus there are high number of settings available to be changed.

canon-quick-menu-2

If you switch the camera to Program mode, the option to change shutter speed and aperture vanishes, as those are set automatically by the camera. You still have access to other controls like ISO, file type, metering, and exposure compensation through the Quick Menu in this mode.

canon-quick-menu-4

Of course, all of these features can also be accessible via the buttons/dials on the top and side of your camera, or in the standard menu screens. I do think it’s important to learn how to change your settings in those traditional ways, as the Quick Menu may not always be the most effective, or efficient, way to change a particular setting depending on the circumstances. The more you know about your camera, the better you’ll be able to utilize all of its features! That said, it’s never a bad thing to know how to accomplish the same task in more than one way, and the Canon Quick Menu can be a huge help when you’re trying to make changes to your settings in a short amount of time. In my opinion, both shorthand and longhand have their time and place!

If you’re a Canon EOS user, have you found the Quick Menu to be a helpful tool? Are there some settings you still prefer to access and change in other ways? Do you shoot Nikon or another brand of camera – and does it have something similar? Please share in the comments below.

googletag.cmd.push(function() {
tablet_slots.push( googletag.defineSlot( “/1005424/_dPSv4_tab-all-article-bottom_(300×250)”, [300, 250], “pb-ad-78623” ).addService( googletag.pubads() ) ); } );

googletag.cmd.push(function() {
mobile_slots.push( googletag.defineSlot( “/1005424/_dPSv4_mob-all-article-bottom_(300×250)”, [300, 250], “pb-ad-78158” ).addService( googletag.pubads() ) ); } );

The post Beginner Tip: How to Use the Canon Quick Menu to Change Cacmera Settings by Meredith Clark appeared first on Digital Photography School.


Digital Photography School

 
Comments Off on Beginner Tip: How to Use the Canon Quick Menu to Change Cacmera Settings

Posted in Photography


Quick Overview of How to do Macro Photography

09 Feb

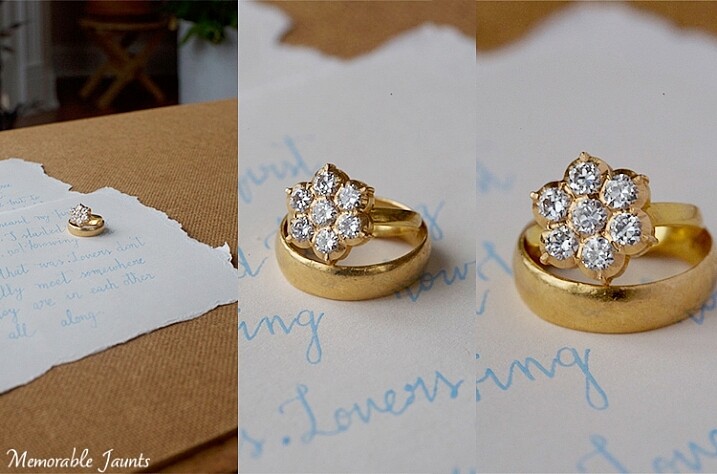
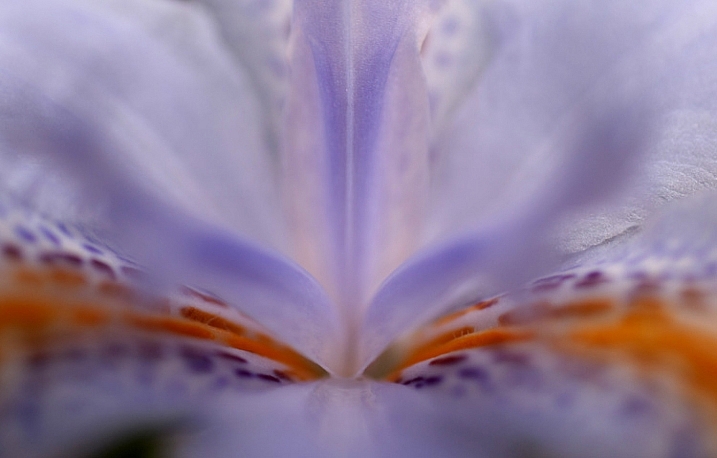
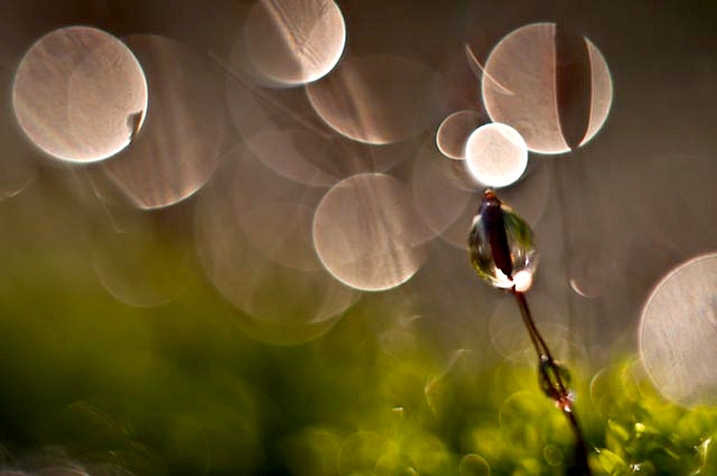
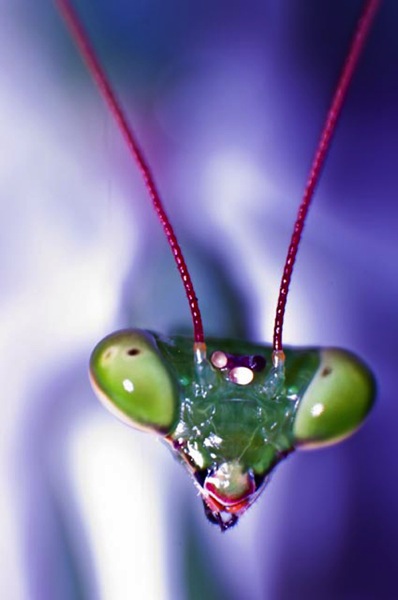
In the photography domain, macro photography is defined as the art of magnification of subjects. It is a very interesting form of photography, which seems to have an application in almost every genre.

Memorable Jaunts Macro Photography Article for DPS 05

For wedding photographers, it’s a great way to highlight wedding details like rings, the invitation suite, certain aspects of the bridal bouquets, and boutonnières. For nature photographers, it is a great way to get up close and personal with many interesting subjects like bugs, insects, and small animals. For food photographers, a macro lens is one of the ultimate tools to highlight their craft because it’s such a great way to emphasize textures, patterns, and details. Even portrait photographers are known to favor the long focal length macro lens, as it gives them the flexibility of getting close details of their subjects, without invading a client’s personal space, especially when dealing with camera-shy children and adults.

Gear choice

There are several options in the marketplace in terms of gear choices for the macro photographer. Extension tubes, macro (or close-up) filters, as well as specific macro lenses are available for every budget. Based on the macro lens used, you can achieve magnification anywhere from around half to four or five times life-size, of the object being photographed.

Memorable Jaunts Macro Photography Article for DPS

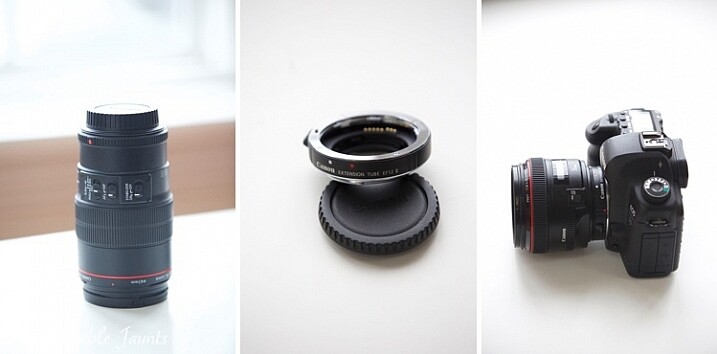
Left image: 100mm f/2.8L IS Macro Lens
Middle: Canon 12mm Extension Tube
Right: Canon 5D MkII with 50mm lens and extension tube attached

  1. Speciality Lens – Macro lenses come in various focal lengths. Short macros are typically lenses in the 30-50mm range. Standard macro lenses are in the 60-105mm focal length range, and tele-macro lenses are in the 150mm-200mm range. These macro lenses tend to perform better than extension tubes and macro filters, since they are build specifically for close-up photography. They work great at short focal lengths as well as longer ones. The main disadvantage with these lenses tends to be the price point. Most of the dedicated macro lenses are upwards of $ 500 (or more) and that can be a limiting factor for someone just getting into macro photography.
  2. Extension tubes are hollow tubes that fit between your lens and your camera mount. They don’t have any glass elements within them, they simply move the actual lens further from the camera, and the front element of the lens closer to the subject, thus offering a certain amount of magnification to the subject. Extension tubes tend to be less expensive than traditional macro lenses and can be mounted on any lens. But they tend to work best with shorter focal lengths. The main disadvantage with extension tubes is that your lens looses the ability to focus on distant objects, since it works only on close-up magnifications. There is also some light loss, which can be compensated by increasing the ISO or by using a slower shutter speed. The camera sensor is also exposed to dust, and the external elements, every time you remove or add the extension tube to the front of your lens.
  3. Macro filters are similar to other types of filters that attach to the front of your lens. They come in different sizes, and different magnification ratios, so if you want to use them on various lenses, then you will need to invest in a variety of filters. They tend to be relatively inexpensive, and can be stacked one on top of one another, in order to get a variety of magnification factors for your subjects. Macro filters also tend to lose light, especially when used as a multiple stack. Hence these cannot be used very effectively with wide apertures. They work best when apertures are stopped down (higher f-stop number).

My initial choice for macro photography was the Canon extension tube EF12 II. As a wedding photographer, I wanted something small and inexpensive for photographing details and ring shots. Since then I have migrated to the Canon 100mm f/2.8 L-series macro lens, and find myself reaching for this beautiful lens more often than not. I have used it for portraits, food photos, as well as still life details.

Technical tips

The key thing to note in macro photography, is that depth of field (DOF) depends primarily on two factors: aperture value and magnification. For any given aperture value, the higher the magnification ratio, the smaller the DOF will be, hence the DOF tends to be very shallow for macro photography (higher f-stop).

Memorable Jaunts Macro Photography Article for DPS 04

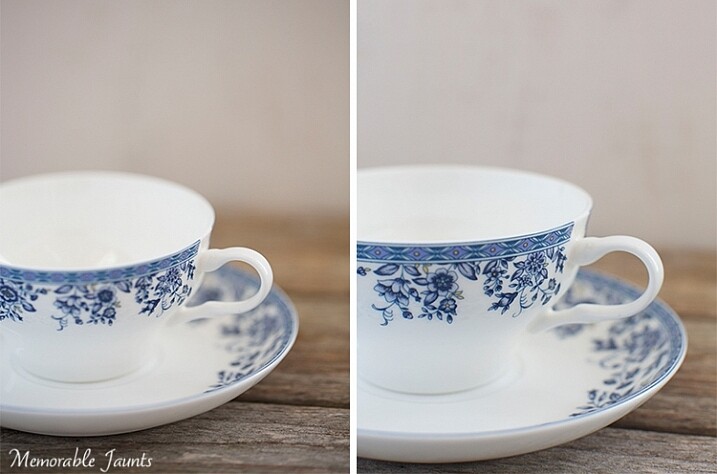
Both images were shot at f6.3 – the one on the left is using the 50mm with extension tube, right image is with 100mm macro lens

Memorable Jaunts Macro Photography Article for DPS 02

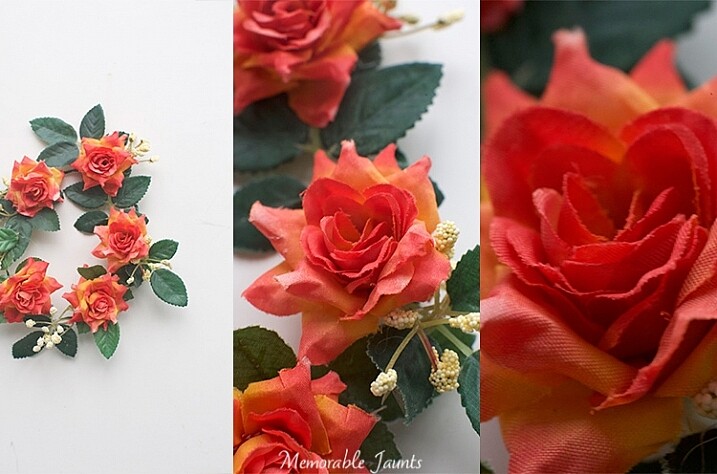
The left image is a pull back using a 50mm lens
Middle is using the 50mm + extension tube
Right is using the 100mm macro lens (all other settings are fairly standard across all three images)

From an application perspective, focus on the main point of the subject that you want to target. If your camera supports live view, use it to zoom-in and ensure that the image is sharp. Set the aperture around f/11 (feel free to experiment to find the optimal setting for your lens, filter, extension tube combination). If you want a greater depth of field (more of the subject is in focus) use a smaller aperture like f/16 or f/22.

Another thing to note is that when photographing objects that tend to move suddenly, like bugs and insects, a higher shutter speed is advantageous to stop motion and freeze the subject. As a rule of thumb try not to drop below 1/400th or 1/500th shutter speed.

Memorable Jaunts Macro Photography Article for DPS 07

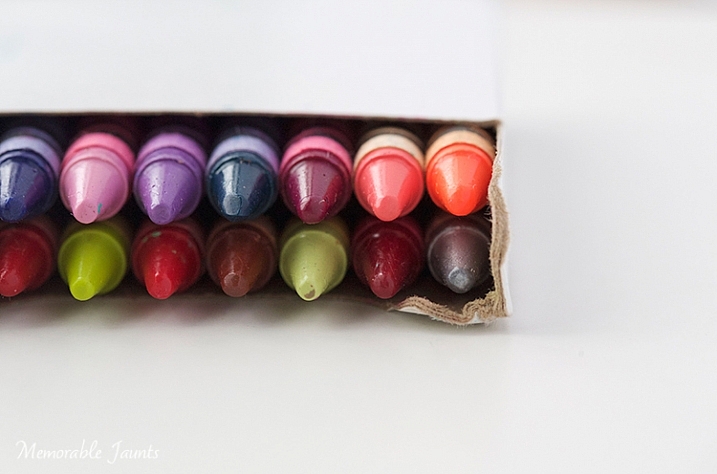
One of the most popular uses of macro lenses is in food photography. Left image using 50mm with extension tube, right image using 100mm macro lens. Both have shallow depth of field because I wanted to blur out the food in the background.

Mirror lock-up

Most DSLR cameras have a mirror inside, which allows you see the image in the viewfinder. The mirror flips out of the way when you press the shutter button, and this action itself can introduce camera shake, and cause your image to be blurry. You can reduce the chances of blurry images by turning “ON” the mirror lockup function (look for it in your camera’s manual). On most cameras that means you will press the shutter button once and it will flip up the mirror, pressing it again takes the exposure. If you have a mirrorless camera then this does not apply to you.

Diffraction

In Photography, diffraction is the bending of light as it passes by the small sharp edged blades, which form the aperture opening. The light gets squeezed together, or blends together. Diffraction is worse with smaller aperture settings like f/16 to f/22. This causes the image to be less sharp, especially at the edges, even more so in macro photography when you are often shooting at smaller apertures. You can avoid diffraction by not dropping below f/16, or by using selective focus over multiple images, and stacking (focus stacking) them together in post-production to get an overall sharp image.

Practical Applications

Contrary to popular belief, macro photography is not restrictive to images of bugs, leaves, flowers and food. They can be an effective tool to highlight any form of detail, texture and pattern. Specific macro lenses also double up as great portrait lenses, extending their use beyond just macro photography.

Memorable Jaunts Macro Photography Article for DPS 06

Memorable Jaunts Macro Photography Article for DPS 03

Left image is pull back of the ring
Middle is with 50mm + extension tube
Right is 100mm macro. F-stop was around f/9 and shutter speed was around 1/50 (I was loosing light very fast and had my ISO up to 2500).

So the next time you want a little boost of creativity, use macro photography to get a fresh, up close perspective on things!

googletag.cmd.push(function() {
tablet_slots.push( googletag.defineSlot( “/1005424/_dPSv4_tab-all-article-bottom_(300×250)”, [300, 250], “pb-ad-78623” ).addService( googletag.pubads() ) ); } );

googletag.cmd.push(function() {
mobile_slots.push( googletag.defineSlot( “/1005424/_dPSv4_mob-all-article-bottom_(300×250)”, [300, 250], “pb-ad-78158” ).addService( googletag.pubads() ) ); } );

The post Quick Overview of How to do Macro Photography by Karthika Gupta appeared first on Digital Photography School.


Digital Photography School

 
Comments Off on Quick Overview of How to do Macro Photography

Posted in Photography


Video: A quick look at the Sony a6300

04 Feb

Earlier today Sony introduced its new a6300 APS-C mirrorless camera, an update to the very popular a6000 model. DPReview’s Richard Butler was at the event in person and had a chance to get some hands-on time with the new body. In this video he gives us a quick look at Sony’s new crop-sensor flagship camera. 

For more information about the Sony a6300, as well as full specifications, have a look at our news story.

Articles: Digital Photography Review (dpreview.com)

 
Comments Off on Video: A quick look at the Sony a6300

Posted in Uncategorized


Do These 5 Quick Exercises to Learn What Your New Camera Can Do

13 Jan

new=-camera-experiments-1Have you learned everything your new camera can do yet? If not, then you’ve found the right article.

I present you with five quick exercises you can try right now, to help you better understand your new camera, and how it captures light. I’ll give you some hints about what is happening, but you will need to come to your own conclusions.

If you get stuck after running the experiment, there are answers at the bottom of the article. Don’t cheat! You have to try to come to the conclusion yourself first, you will learn more if you can do that.

To do these exercises your camera will need to have a shutter (although mirrorless cameras will work here), variable aperture, and adjustable ISO. It will also be helpful if you have a Program Mode, Aperture Priority, Shutter Priority, and Manual Mode. Check your user manual to see if these exist on your new camera.

1. Play with depth of field using the aperture

You might have learned a little about your camera’s aperture in this DPS article: Seeing in Depth of Field: A Simple Understanding of Aperture. If not, take a quick look.

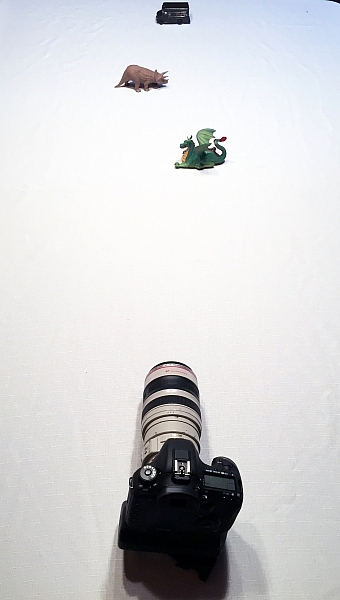
This first exercise is easy. I want you to line up three objects on a table in front of your camera. Make sure the objects are something easy to focus upon (have lots of lines or contrast). If you need to, borrow toys from your kids, I find those work best.

During this exercise your camera will not move, so set it on the table in one spot. Place your first object directly in front of the camera, about two feet (0.6 meters) away. Your second object should be one foot (0.3 meters) beyond the first, and the third object, another foot beyond the second. It should look something like this:
new-camera-experiments-2

The objects should be staggered sideways to ensure they are all visible from the camera angle.

Set your camera to Aperture Priority mode. You may need to reference your camera’s user manual to find the setting. Usually it is the A or Av label on your camera’s main dial. Then set your ISO to Auto, and your focus dot to the camera’s central focus point. Again, you may need to reference the manual as all cameras are a different in how they choose focus points.

Point your camera at the first object (so the active focus point is on it), so that your camera focuses there. Set your aperture to the smallest f-number your lens can achieve; it will around f/1.8 or f/3.5. If you are using a zoom lens, pick a focal length somewhere in the 40-60mm range.
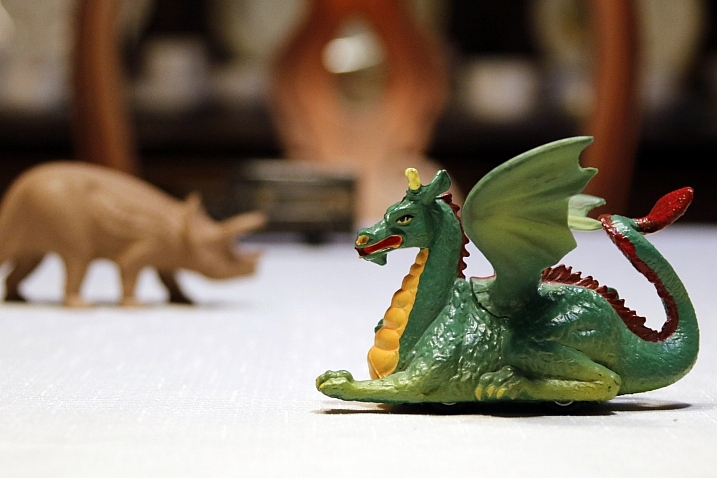
new-camera-experiments-3

Now take a picture. Without moving your camera, change the aperture to f/8. Take another picture. Then change your aperture to the largest number (smallest opening) your lens can achieve; this might be f/22 or even higher. Take a third picture.

Next, point your focus point at the second object, so it is sharp, and repeat the steps above so you have three new images at a low number aperture (f/3.5), a medium number (f/8), and a high number (f/22).

Lastly, focus on the third object and repeat the steps again.

You should now have nine images; three of each of the objects in sharp focus, at three different apertures.

The aperture on your camera controls the depth of field. What do you notice as the aperture number (or f-number) gets larger? Are more or less things in focus? What about when you focus on an object further away and look at the same aperture setting as a close object? Is more or less in focus?

BONUS EXPERIMENT: Run this experiment again and set your focal length to a smaller number (wide angle view) such as 18mm. What differences do you notice now?

2. Exposure compensation when the exposure is wrong
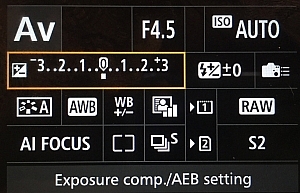
new-camera-experiments-5This may be disappointing to find out, now that you have a fancy new camera; but your camera is often wrong with its automatic settings. I’m sorry, but it just is. It’s not human and it has limits, but you can get around them.

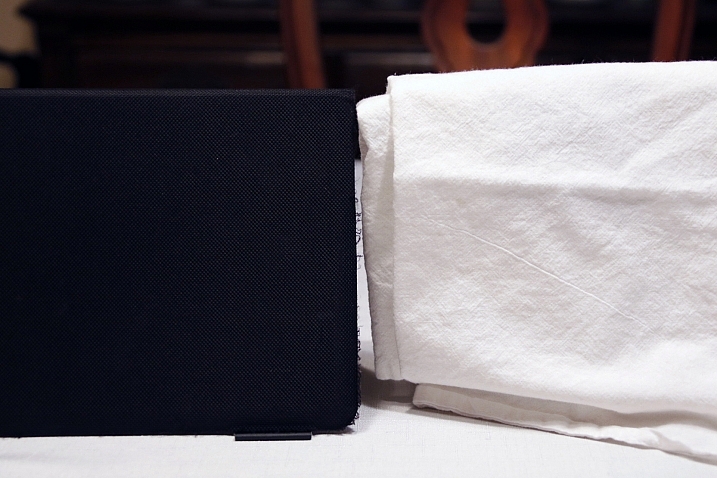
Choose two objects for this experiment. One should be predominantly white, and the other should be predominantly black. Set them side by side. I chose a black iPad cover and a dish towel in this case.

Set your camera to Aperture Priority and choose the lowest f-number you can (e.g. f/1.8 or f/3.5). Set your ISO to 400 and turn autofocus on. Reference your user guide to set your camera’s metering to Spot or Center Weighted. This is typically signified by a small circle in the middle of the viewing area.
new-camera-experiments-4

Set up your camera in one position so it doesn’t move much, and point that center metering spot at the black object, so it fills the entire metering area. If you are using Center Weighted metering, fill as much of the center area with the black object. Take a photo.

exposure-compensationNow find the exposure bias (or exposure compensation) feature on your camera. It will look something like this:

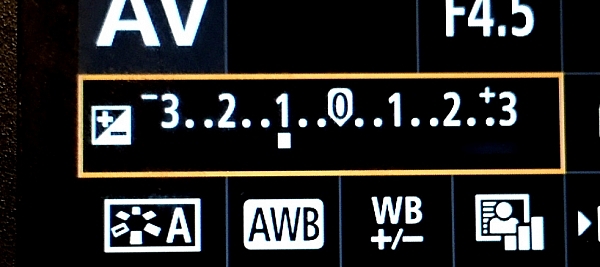
Change the exposure bias/compensation so it is set to underexpose by one stop. This will either look like “-1” or on some cameras there will be a scale with tick marks and one should be labeled “-1”. Move to that point. Take another identical photo of your black object.
new-camera-experiments-6

Reset your exposure bias to zero (0) and point your camera over to the white object, so that it fills the metering area; take a photo. Then change the exposure bias/compensation to “+1”.

You now have four images. Looking at the two shots of the black object, which one makes the object look more like its actual color? What about the white object?

3. Test your ISO

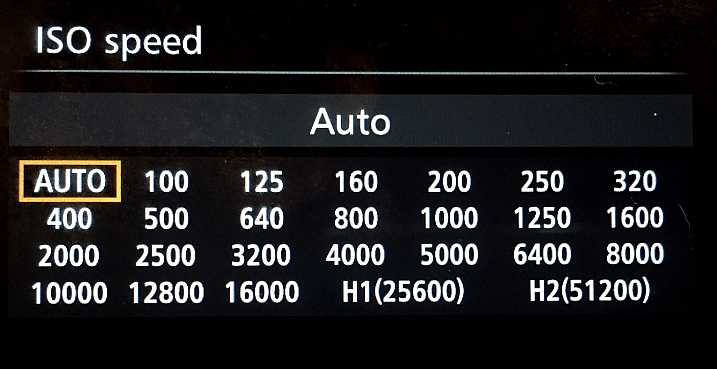
Modern cameras have an awesome range of ISO settings, but they still have their limits. Don’t get fooled into thinking you can just shoot at ISO 6,400 in a dark room and things will be peachy. This experiment is set to help you understand what happens when you change ISO, and what your personal limits might be for your camera.
new-camera-experiments-7

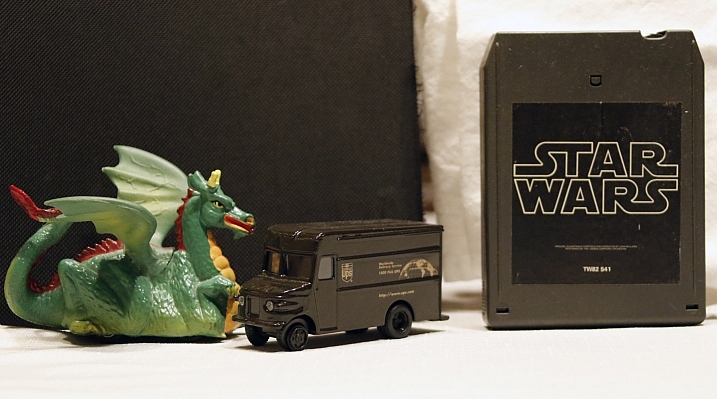
Set up a few objects on a table, at one end, and set your camera at the other end. Zoom in so the viewfinder is mostly filled with the scene in front of you. Include white and black objects, and some other colors. Have a couple of lights on in the room so it is normally lit, make sure the camera’s flash does not fire for this exercise.

Set your camera to Aperture Priority and your aperture to f/5.6. Set your ISO at 100 and take a photo. Without moving your camera much, change to ISO 200 and take another photo. Then ISO 400, take photo, ISO 800, take another shot, and so on (doubling the ISO each time) until you run out of ISO settings.

Examine the images, preferably on a computer screen, or use the zoom feature when reviewing images on your camera. You want to zoom in on the darker areas.
new-camera-experiments-8

What do you see happening from low ISO settings to the higher ones? Do you notice a big difference between white areas as compared to black areas?

If you need a hint about what is happening read: 6 Tips for Using ISO Effectively With Your Camera.

4. Add some blur with a slow shutter speed

This one is easy and quick. You may need a willing assistant, or you can find cars moving on a city street. You will want objects moving past your field of view, from side to side (not front to back) at a fairly consistent speed.

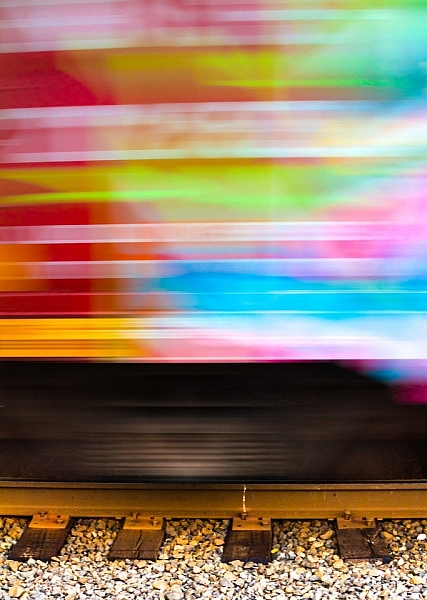
Set your camera on a solid object; this can be a tripod, desk, the hood of a car, etc. Point your camera toward the moving objects. Set your camera to Shutter Priority (S or Tv) Mode, ISO should be 100, and set your shutter speed to 1/500th.

Take a photo of the objects passing in front of your camera. Change your shutter speed to 1/60th and take another photo as the objects move.
new-camera-experiments-9

Lastly, set your shutter speed to 1/10th and take another photo. What do you notice happened in the three photos?

BONUS EXPERIMENT: What happens when you keep the slow shutter speed of 1/10th and move with the subject while you shoot?

5. White Balance is important for good color

White Balance is very important if you shoot in a file format other than RAW, such as JPEG. Your camera will usually do a good job of guessing the correct White Balance settings, but it is important to know how to control your camera if it messes up.

You will need a place with three different light sources to make this one work. It’s okay if they are not in the same spot, you can walk around. You will also need a piece of white paper with writing on it, to help focus.

Set your camera on Program Mode. This allows your camera to handle shutter speed, ISO and Aperture automatically, but you are going to take control of the White Balance. Again, you may need to reference your camera’s manual as each manufacturer handles these changes differently.

new-camera-experiments-12

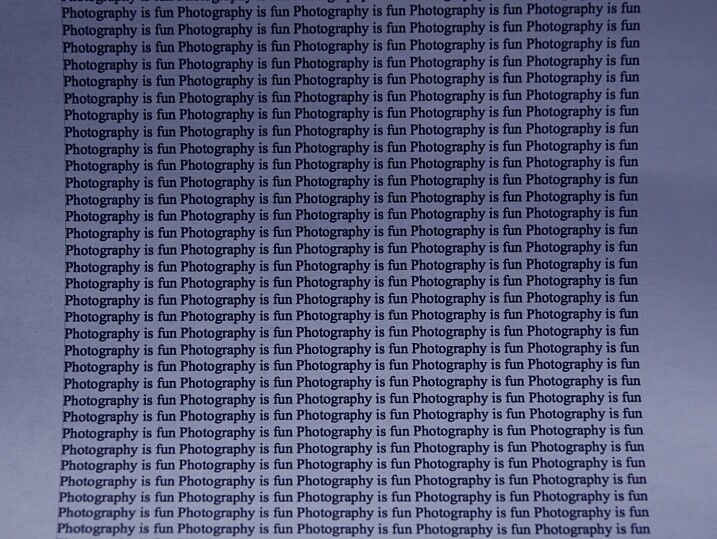
First, find a scene that is lit by daylight. Set your camera’s white balance to the Daylight Preset. It’s setting looks like a little sun in the image above. Take a photo of your white paper with the daylight hitting it. If you can only manage cloudy daylight, that will be okay as well.

Without moving much, set your White Balance to incandescent or tungsten (looks like a little lightbulb). Take the exact same photo you did before. Lastly, set your White Balance to shade (a little house icon with shade next to it). Take the exact same photo.
new-camera-experiments-11

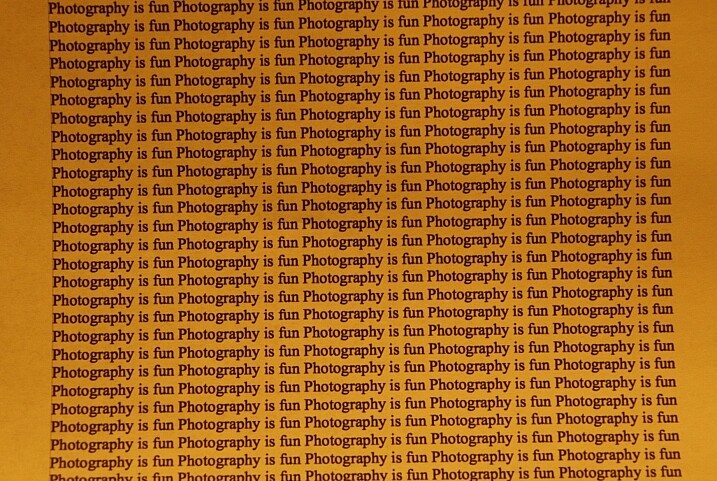
Which White Balance preset under daylight conditions produces this color?

Next, move to an area lit by incandescent or fluorescent light. This would also include compact fluorescent bulbs. You can hold your paper close to the light source for these next photos, just make sure the light is falling on the page and not coming through it.

Run through the same three White Balance settings as before; daylight, incandescent and shade.
new-camera-experiments-10

Which White Balance preset under incandescent lighting produces this color?

What happens to the color of the white paper when each of these changes are made? Its color changes, doesn’t it? When you shot with the shade setting, did things get more blue or more yellow? Think about  how you can use this in your photography once you understand how it works.

Answers and Helpful Hints

Now that you have played around a little, let me help clarify what you should have seen in each exercise.

1. In the first exercise you should see more depth of field (more things in focus, front to back) as the aperture number increases. As you focus further away from the camera, the depth of field also increases at the same aperture. This might be hard to see in this limited of a test, but it is explained better here: How to Control Aperture and Create Images You Love.

2. Your camera is set to expose the world as if it were 18% gray. This means objects that are black are exposed to make them more gray; the same goes for white things. If you are taking pictures of something already gray, like pavement, then there is no adjustment needed. Otherwise, to make white things white, you need to tell your camera to overexpose (that was the “+1”) and to make black things black, you need to under expose (“-1”). More info on exposure compensation is available here: Using Exposure Bias To Improve Picture Detail.

3. As ISO increases, digital noise (not the same as grain in the days of film, but similar) increases. Noise is usually not desired but as time goes on, camera manufacturers get better at reducing it. That’s why camera owners five years ago were told not to go over ISO 800, or there would be too much noise. Now, I regularly shoot at ISO 2000 with results that work for me. It’s important to know the limits of your camera so you are okay with exceeding them in certain circumstances.

4. As your shutter speed gets slower, the chance for blur increases. This can be blur from you moving the camera (we have all done this before) or from your subject moving. Blur is not an inherently bad thing, it can be used with great affect. But it’s important to know when, and how much, works best for you. Play around on this one a little with different subject speeds and shutter speeds.

5. White Balance can be trickiest when there is more than one light source and it’s helpful to know which way to adjust the colors. A lower temperature (incandescent and fluorescent) give more of a yellow/green cast while cloudy and shady gives your more of a blue tone. If you want to eliminate that color cast in your images, move the White Balance toward those settings.

The great thing about photography is it is highly reproducible. When you do this, that happens – and when you do this again, that happens again. That makes it a great art form, in which experimenting can teach volumes, if you keep control of the variables. You might note that only one variable was allowed to change in each of these exercises, that was on purpose.

Go forth and experiment more with your new camera. The more you shoot and the more you experience through the lens of your camera, the more you will learn!

googletag.cmd.push(function() {
tablet_slots.push( googletag.defineSlot( “/1005424/_dPSv4_tab-all-article-bottom_(300×250)”, [300, 250], “pb-ad-78623” ).addService( googletag.pubads() ) ); } );

googletag.cmd.push(function() {
mobile_slots.push( googletag.defineSlot( “/1005424/_dPSv4_mob-all-article-bottom_(300×250)”, [300, 250], “pb-ad-78158” ).addService( googletag.pubads() ) ); } );

The post Do These 5 Quick Exercises to Learn What Your New Camera Can Do by Peter West Carey appeared first on Digital Photography School.


Digital Photography School
 
Comments Off on Do These 5 Quick Exercises to Learn What Your New Camera Can Do

Posted in Photography


7 Quick Tips on How to Use Visual Balance to Make Better Photographs

19 Dec

Balance is one of the characteristics of good composition. It is the way elements of an image are arranged to create a feeling of stability. If you imagine that your image is a set of scales, all elements of your composition should be balanced to make a photograph feel stable.

balance 1 eva polak

There are many ways to create balanced images. The easiest way to achieve it is by using symmetry, as it guarantees left to right, or top to bottom balance. The results look formal, organized, and orderly.

If you would like to create a balanced composition that feels more casual, free, and energetic, then use asymmetry.
To understand this concept, let’s go back to our analogy of a set of scales. If you have several small items on one side, they can be easily balanced by one large object on the other side. Visual balance works in a very similar way, but it can be affected not only by the size of objects, but also by their value, colour, texture, quantity, orientation and isolation.

Different colours, shapes and sizes create different degrees of visual interest. So, to achieve asymmetrical balance you need to arrange elements of all different visual weights, when composing your image, in such a way that each side is still balanced out.

balance 2 eva polak

There are seven basic factors to consider when you compose your images with visual balance in mind. Let’s have a close look at how you can use these different factors affecting visual weight and gain some advantage.

1 – Colour

1 Colou by Eva Polak

Colour has many properties that can affect an object’s visual weight relative to others in the photograph, such as saturation, brightness, darkness, and hue. Warm colours advance into the foreground and tend to weigh more than cool colours, which recede into the background. Red attracts attention better than any other colour, and thus has the highest visual weight as opposed to yellow, which has the least visual weight. Also bright colours attract more attention than subdued colours.

2 – Size

2 Size by Eva Polak

Large elements appear heavier than small ones. Size is an evident visual weight factor because, in the physical world, an object that’s bigger than another will naturally be heavier, and will take up more physical space. Large elements command more attention. We naturally see them first, or spend more time looking at them anyway.

3 – Value


3-Value-by-Eva-Polak.jpg

Value is a powerful tool for balancing images. Dark elements feel heavier than light items. The higher the value-contrast (between object and background), the heavier will be the weight of the object.

4 – Texture

4-Texture-by-Eva-Polak.jpg


Texture adds visual weight to items in photographs. Texture is just more interesting and our eyes are drawn to it. Smooth areas will feel lighter than those with a lot of heavy texture.

5 – Isolation

Objects isolated in a space appear heavier than those surrounded by other elements. Look at the image below with a brown circle on it. Your eyes go directly to the brown circle first because there’s nothing else to see.

5-Isolation-by-Eva-Polak.JPG


6 – Quantity

A few small objects can balance out a single large object. Repetition of objects can be used here as well. In the example below, the three small berries are balancing out the large berry.

6-Quantity-by-Eva-Polak.jpg


7 – Orientation

Vertical objects appear heavier than horizontal objects. A diagonal orientation carries more visual weight than a horizontal or vertical one. Lines can be very powerful in your composition. Pay close attention to them.


7-Orientation-Eva-polak.JPG

Remember, you don’t have to balance colour with colour, or light with dark – you can mix and match your visual weights. For example, a counterweight to a large, bright area might be a small red object. Experiment with different kinds of balance and play around with visual weight. See what works best for your images and the story you want to tell.

As you go out exploring with your camera on your next photo shoot, keep balance in mind and the seven factors of visual weight. Look closely and try to determine which elements are commanding the most visual weight when you compose your photographs, and see how they affect balance in your images.

If you have any comments or questions please post them below. And we’d love to see your visually balanced images.

googletag.cmd.push(function() {
tablet_slots.push( googletag.defineSlot( “/1005424/_dPSv4_tab-all-article-bottom_(300×250)”, [300, 250], “pb-ad-78623” ).addService( googletag.pubads() ) ); } );

googletag.cmd.push(function() {
mobile_slots.push( googletag.defineSlot( “/1005424/_dPSv4_mob-all-article-bottom_(300×250)”, [300, 250], “pb-ad-78158” ).addService( googletag.pubads() ) ); } );

The post 7 Quick Tips on How to Use Visual Balance to Make Better Photographs by Eva Polak appeared first on Digital Photography School.


Digital Photography School
 
Comments Off on 7 Quick Tips on How to Use Visual Balance to Make Better Photographs
Posted in Photography


Lights, camera, action: Manfrotto Digital Director quick review

29 Oct

Manfrotto’s Digital Director, introduced in April, is a departure from its usual array of tripods and tripod heads. It’s a device designed to hold an iPad Air tethered to a DSLR, providing a large live view screen, access to camera controls and wireless sharing options. Shooting with a large screen can be a revelation compared to using a 3″ LCD, but the Digital Director is pretty pricey. Is it worth the cost? Read more

Articles: Digital Photography Review (dpreview.com)

 
Comments Off on Lights, camera, action: Manfrotto Digital Director quick review

Posted in Uncategorized