RSS
 

Posts Tagged ‘quick’

App review: Full Frame is a quick, easy JPEG viewer, EXIF editor

28 Jun

Full Frame is a Mac-based image viewer, photo importer and metadata editor that centers around an incredibly clean and intuitive user interface. Released by California-based Inland Sea and available now in the App Store, its potential to speed up one’s workflow caught our attention.

Of course, there are a lot of different photo viewing, ingesting and sorting programs available on market, many of which are geared toward casual users. Full Frame, on the other hand, is targeting more toward high-end users like photo enthusiasts.

In Use

Having spent some time trying out using Full Frame in my own workflow, it seems its closest competitors are Photo Mechanic, a time-honored program with a cult-like following from photojournalists world-wide, as well as Adobe Bridge.

Unlike Adobe Bridge, which I find frustratingly sluggish and cluttered in design, Full Frame comes across as exceptionally lean in terms of speed (except when working with un-supported Raw files) and design. It has much more in common with Photo Mechanic like quick startup and image load times. Of course the spectrum of its functionality is much more limited than that of Adobe Bridge.

I took Full Frame for a spin while sorting images to post to one of my personal sites. Specifically,  I used it to move and rename selects from one drive, to a folder on another.

Once you have Full Frame fired up, users simply select the source folder and destination (assuming you are copying files) in the upper-left of the screen. The above screenshot represents the entire window when the program is open. There is literally nothing to get in your way of viewing images and deciding which to keep and which to trash.

To select an image to copy, simply click on it and a checkmark appears. Alternatively you can select all by hitting ‘Command A’ and uncheck the ones you don’t want. In the upper-left portion of the window you’ll find a slider to zoom in the grid view as well as options to view metadata and delete files from their source.

With your mouse hovering over an image, a small plus sign will appear in the upper left of the photo. Click on it to expand the view. Once in the single image viewer, users can use the slider at the top to zoom the image in and out, to check for critical focus. Unfortunately, when zooming in and out, there is no display of the percentage you are zoomed to, unlike in Photo Mechanic.

One of the best features of Full Frame is the metadata/EXIF viewer. It offers an incredibly detailed list that goes above and beyond what a lot of other programs show, including Photo Mechanic.

Users can also add EXIF info to any imported files from within the preferences panel. One thing I’ve always really liked about Photo Mechanic is how simple it is to add copyright warnings and contact info to my files. In Full Frame, it is just as painless. From within the preference panel users can also assign rules for renaming files on import, which is very handy. 

In many ways, Full frame comes across as a utilitarian program, built to accomplish several specific tasks related to moving and organizing images. However it also doubles as an outstanding way to show off your work to clients, friends or families. The grid view is frankly gorgeous, and once in the single image view, users can simple use the arrow keys to move from image to image. It also starts up very fast, which is a plus.

Things to consider

While I found a lot to like about Full Frame, there are some things to consider before purchasing it: First and foremost, despite the claims of Raw support, I found numerous files, from varying manufacturers, to be unsupported. For instance, Raw files from the Nikon D750 are unsupported, as are those from the Sony a7 II. However, if you have Raw+JPEG files, load times will slow significantly but you can at least view and import your images.

This is really quite unfortunate. Sure, app updates could bring about Raw support but who has time to wait around? On the other hand you could always covert to DNG first, but if the whole point of this program is to speed your workflow, that also makes little sense. Photo Mechanic on the other hand does not have this problem, it can display a JPEG rendering from any Raw file, and loads quickly regardless.

Another beef I have with Full Frame is that there is only one option for sorting/rating images. In Photo Mechanic and Bridge, there are numerous ways to rate and sort images. For instance, when choosing my selects, I first do an initial sweep and check mark all of the ones I like, I then assign color or star ratings until I’ve got the images sorted down to a manageable amount.  At that point I copy the selects to a separate drive to be imported into Lightroom for processing.

The Takeaway

Full Frame is not a program that can do it all, but the things it can do, it does well. If you need a quick, easy way to view JPEGs or edit/view EXIF info, it might be your cup of tea.

Full Frame is an outstanding option for photographers seeking a powerful EXIF viewer/editor or a quick and easy way to import and rename files. Its spotty Raw support is the main thing holding it back. But at $ 30, Full Frame is a major bargain compared to Photo Mechanic, which will set you back $ 150. It is also a much faster way to quickly view and sort JPEG files than Adobe Bridge.

What we like:

  • Intuitive user interface
  • Very clean, simple design
  • Powerful EXIF viewer and editor
  • JPEGs load very quickly
  • Can be used to import, sort, batch rename files
  • Support for video files

What we don’t:

  • Despite claims of Raw support, many Raw files not supported
  • No percentage shown on zoom slider
  • Not as many options for rating photos as competition

Rating:

Articles: Digital Photography Review (dpreview.com)

 
Comments Off on App review: Full Frame is a quick, easy JPEG viewer, EXIF editor

Posted in Uncategorized


10 Quick Photoshop Tips to Improve Your Workflow

27 Jun

Whether you are a Photoshop newbie or a guru, there is always something new to learn or discover in this extensive image editing software. One of the joys of using it,  is that there are many ways to do the same thing in Photoshop. Here are a few tips that are useful to improve your workflow, either by speeding it up or adding a few tweaks to your process.

1. Copyright Metadata Tip

Many people use the terms watermarking and copyrighting interchangeably, but these are two different things. While arguments continue for and against watermarking images, in this digital age copyrighting your photos is still highly recommended. One of the best ways of doing this, is to embedding the copyright information right into the metadata of your image.

Follow these steps:

  1. Click Ctrl + Alt + Shift + I (Mac: Command + Option + Shift + I), or go to File > File Info to bring up the Metadata panel
  2. Click on the Description tab (left one) and enter your copyright information in the relevant fields

Copyright

2. Color Correcting with Curves Tip

As you may know, there are many way to correct color in Photoshop, and you may have even experimented with using a Curves Adjustment layer to achieve this. Sometimes, while working on this layer to color correct an image, you may inadvertently make the image lighter (or darker).

An easy fix that allows you to apply your color correction, without affecting the tonal values of the image, is to set the Curves Adjustment layer’s Blending Mode to Color.

3. Double Windows Tip

ComparativeForEdit

Zooming into your images can be helpful when editing details, but it can feel like a chore if you constantly have to zoom in and out to see how your changes affect the overall image. A simple solution to your problem is to open the same image in two windows. Now you will be able to put them side by side, at different zoom levels for your comparative purpose.

  1. With your image open, go to Window > Arrange > New Window for [file name of your image].  This this will open up a second window for the original image.
  2. Then, go to Window > Arrange > 2-Up Vertical and this will put your windows adjacent to each other. Now you have one zoomed out for an overall picture, and you can zoom in to edit the other.

The coolest part is that all the adjustments you make to one window, will be reflected in the other.

4. Contrast with Channel Mixer Tip

The Channel Mixer is an easy way to add great contrast to an image.

  1. Create a new Channel Mixer adjustment layer.
  2. Choose Black and White With Red Filter from the preset drop-down (in the Properties Panel).
  3. Change your blending mode for the adjustment layer to Soft Light.
  4. Play around with the opacity of the layer until you get the desired level of contrast.
Before_ChannelMixerContrast

Original Image

After_ChannelMixerContrast

Image Contrast changed using Channel Mixer

5. Content Awareness Tip

Several tools use Content-Aware, which is Photoshop’s method of examining your image, and calculating which pixels are needed to repair the selected area. At times though, even awesome tools such as the Healing tool or the Content Aware fill, do not return the best results when applied

If you are not happy with what the tool has returned, simply apply the adjustment again. Yes you read that correctly, you can apply content aware a few times and get a more desirable result the second or third time around.

6. Better Black & White Image Tip

Making a black and white photo can be as easy (and boring) as desaturating your images (using Image > adjustment > desaturate). If you want to take it up a notch, try using a Black and White adjustment layer (from the Layers panel), where you can use up to six color sliders to control the main colors in your imag,e and adjust the relative brightness of each color.

While you’re there, check out the very useful click and drag (targeted adjustment tool) icon. Click it, then click and drag (hold the button in while you drag) on any area of the image that you wish to make darker or lighter— to the left for darker, right to make it lighter

BWAdjLayer

7. Getting Historical Tip

Have you ever wanted to repeat your timely editing on another image and found your memory unreliable? Photoshop’s History Log is a great feature to turn on if you want to keep a text record of every single step you have done to your image.

  • Click Ctrl + K (Mac: Command + K) to bring up the Preferences panel.
  • In the General tab check the History Log and the Text File box, and choose a location to save the file (name it for easy reference later on).

Now when you work on your image, and Photoshop will record every step you take. If you ever want apply the same steps to another image, just locate the text file and review.

HistoryLog

8. Check Spelling With Photoshop Tip

Spell check is not something that would come to mind when you think of Photoshop, but yes it can do that too. All you have to do is click on Edit > Check Spelling and your visible text layers will benefit from more accuracy.

9. Revealing Hidden Detail Tip

To bring out hidden detail in the shadows and highlights of your image, one of the best tools is the (you guessed it) Shadow/Highlight Adjustment. Sadly though, it is not available for application via an Adjustment Layer, so for non-destructive use, first convert your layer to a Smart Object.

Then go to Image > Adjustments > Shadows/Highlights and apply to recover those details.

HighlightsShadows

10.  Close Everything Tip

Did you know you can close all your open images at once? Simply hold down the Shift key and click the close icon on any of your image windows.

Conclusion

While there are several ways to accomplish a task in Photoshop, hopefully there was something new hidden in these quick tips. Were any of these new to you or did you discover a new way to execute an old favorite? Maybe you can share some other must-know, or time saving tip,s that you use to be more efficient at post-processing in Photoshop.

googletag.cmd.push(function() {
tablet_slots.push( googletag.defineSlot( “/1005424/_dPSv4_tab-all-article-bottom_(300×250)”, [300, 250], “pb-ad-78623” ).addService( googletag.pubads() ) ); } );

googletag.cmd.push(function() {
mobile_slots.push( googletag.defineSlot( “/1005424/_dPSv4_mob-all-article-bottom_(300×250)”, [300, 250], “pb-ad-78158” ).addService( googletag.pubads() ) ); } );

The post 10 Quick Photoshop Tips to Improve Your Workflow by Nisha Ramroop appeared first on Digital Photography School.


Digital Photography School

 
Comments Off on 10 Quick Photoshop Tips to Improve Your Workflow

Posted in Photography


23 Quick Tips for Street Photography or Your Next Photo Walk

26 Jun

The guys over at the Cooperative for Photography (COOPH) have some good quick tips from Thomas Leuthard for you. If you are planning on doing some street photography this summer, joining a photo walk, or even doing travel photography – apply this tips to those genres and have some fun. Let’s see the tips:

My faves are:

  • #2 control your camera remotely: I never even thought of that but will work great with my Fuji X-T1
  • #10 get down low: another thing cameras like the Fuji X-T1 do well with a tilting screen.
  • #13 shoot water as a slow shutter speed: this is starting to sound like an ad for the Fuji X-T1, but I love the fact my camera is weather resistant (WR) and I’ve stood in the rain, and taken a direct hit from an ocean wave and it withstands it and keeps going! Read more on this camera here.
  • #17 shadows make great photos: see How to Use Shadow and Contrast to Create Dramatic Images for more on that

Thomas Leuthard, “Street photography is like fishing, catching the fish is more exciting than eating it.”

Which of those quick tips did you like best?

googletag.cmd.push(function() {
tablet_slots.push( googletag.defineSlot( “/1005424/_dPSv4_tab-all-article-bottom_(300×250)”, [300, 250], “pb-ad-78623” ).addService( googletag.pubads() ) ); } );

googletag.cmd.push(function() {
mobile_slots.push( googletag.defineSlot( “/1005424/_dPSv4_mob-all-article-bottom_(300×250)”, [300, 250], “pb-ad-78158” ).addService( googletag.pubads() ) ); } );

The post 23 Quick Tips for Street Photography or Your Next Photo Walk by Darlene Hildebrandt appeared first on Digital Photography School.


Digital Photography School

 
Comments Off on 23 Quick Tips for Street Photography or Your Next Photo Walk

Posted in Photography


3 Quick Tips for Photographing in the Harsh Midday Sun

15 Jun

One of the most important elements of photography is light. So it’s only natural that as photographers, one of the most important skills to have under your belt is the understanding of different kinds of light, and how to SEE it before taking a single shot. Every photographic frame needs some sort of light but the intensity, direction, and quality is always in question.

3 Quick Tips for Photographing in Harsh Midday Sun(1)

For natural light or outdoor photographs, early morning sunlight (when the sun is low in the horizon and has a soft quality), or beautiful golden light of the setting sun is ideal. However this is not always practical, especially when dealing with clients. Firstly, not all clients are open to early morning or sunset photoshoots. Secondly, particularly in wedding photography, timing is not something the photographer has much control over. Many wedding ceremonies are scheduled outdoors at noon, when the sun is the highest in the sky, and the light is the harshest.

As photographers we know that good quality light does wonders to an image, almost giving it an ethereal, magical look, but we cringe when we have to deal with harsh midday sun. Luckily there are a few tips and tricks to deal with this harsh light source, while still achieving beautiful images. In this article, my aim is to help explain some of these simple tips, using my newly purchased rose bushes that are waiting to be planted, and also prove that they will work for any subject, not just people!

Memorable Jaunts Tips for photographing in the harsh midday sun-2-2

Beautiful roses photographed at noon, under the shade cast by the front of my home.

Please note – most of the images used in this article are SOOC (straight out of camera). I have applied minimal to no processing, because I want to show the direct results of shooting in harsh light, similar to what a photographer would experience, so as to fix as much as possible in camera, not via post-processing later.

#1 Put the subject’s back to the sun – backlighting

If there is no shade is available, and your only choice is to position your subject in full sun, an easy tip to follow is to position your subject with their back to the sun. This will help block most of the direct light from falling on their face, which causes them to squint their eyes. Instead, their face or the main part of the subject will be evenly shaded. This technique is called back lighting.

As you can see, in the first image below, the roses are in full sun. To backlight them, I simply moved the plant so that the roses I wanted to photograph, had their backs to the sun. This is sometimes easier to do with one subject because you can position them perfectly, to make sure no sunspots are making their way onto their face. If you are dealing with two or more subjects, particularly people, then have their faces closer together or even have them turn their bodies slightly inward towards each other. This helps eliminate any harsh light spots on their face.

Make sure to expose for the subjects’ faces or they will be too dark to see any detail. Something to note, is that when metering for the face in a situation like this, your background may be overexposed and may lose all the details, that’s okay.

Memorable Jaunts Tips for photographing in the harsh midday sun-1

Roses in full sun. You can see from the shadows that the sun was high in the sky, almost overhead at the time of these pictures.

Memorable Jaunts Tips for photographing in the harsh midday sun-5

Image on the left – Roses are facing the bright sun and almost appear washed out. Image on the right – Roses are in shadow and are darker when backlit.

If you want to maintain detail in the background or sky in a backlighting situation, you should use a reflector to bounce some light back into the subject’s face. This eliminates the need to overexpose the background especially when metering for the face (or part of the subject in the shade). Depending on the strength of the reflector, and the position of the sun, you can even underexpose the image to retain more highlights in the background while evenly lighting the subject by way of the reflector.

Memorable Jaunts Tips for photographing in the harsh midday sun-7

Left: A reflector with the silver side facing the roses is used to add more directional light on the flowers. Right: A close-up picture of the roses, slightly underexposed to maintain the clear blue in the sky, the light from the reflector is adding the pop of light on the flowers.

#2 Open shade or even lighting

The best way to avoid distracting facial shadows from midday lighting, is to bring your subjects into a shaded area. Shade can be provided by a large tree, an open garage, a building, an awning, or anything that casts a big enough shadow to cover your subject. The benefit of shade is that it creates even lighting where no direct sun is hitting the face or body, allowing the subject to be evenly lit. The key is to place your subject at the very edge of the shade, so that while they are evenly lit there is still enough light to illuminate them. If you place your subject in the darkest part of the shade, the light hitting them may be lost. Also make sure you are not using patchy shade, especially when subject is placed under a tree. This can cast what is called dappled light on your subject, causing uneven spots of light on their face and body.

Memorable Jaunts Tips for photographing in the harsh midday sun-8

Left: Rose bush under the shade of a tree. Right: An example of dappled lighting on the roses. Notice how some roses are in the sun, while other are in the shade. This type of uneven lighting can cause undesired hot spots, especially on skin and hair.

Memorable Jaunts Tips for photographing in the harsh midday sun-10

Left: Rose bush at the edge of the shadow cast by the front of the house. This type of open shade is more even and uniform. Right: Close-up of the roses in the shade.

Memorable Jaunts Tips for photographing in the harsh midday sun-11

A simple white foam core board was used to add a little pop of reflected, directional light, onto the roses in the shade.

#3 Full sun with a diffuser

If all else fails, and you have no other alternative but to place your subject in the full, harsh sunlight, either because of location restrictions, or time of day limitations, then using a diffuser (translucent panel of your reflector) might be the next best option.

A diffuser takes in the harsh sunlight and spreads it evenly over your subjects. This also gives your subject some respite from the harsh sun, and casts a shadow on them so they are not squinting into the sun. In the simplest form a diffuser can be a piece of translucent white fabric (like a bedsheet). Of course, this does assume that you have an extra pair of helping hands to hold up the diffuser, when you’re shooting on location. I have been known to solicit the help of strangers, to help hold the diffuser for a quick minute or so while I take the shot – be resourceful!

Memorable Jaunts Tips for photographing in the harsh midday sun-16

Left: Roses in full sun. Right: A simple diffuser panel that casts even, soft light onto the flowers

Memorable Jaunts Tips for photographing in the harsh midday sun-15

Close-up of the roses with diffused lighting for a more even tone and color under harsh midday sun.

So the next time you have a client wanting to shoot in the middle of the day, don’t hyperventilate and come up with excuses to avoid the situation. Instead take up the challenge and try these techniques. If nothing else, it will make you more confident as a photographer, and also help you understand light a bit better.

For more reading check out: Portrait Photography: How to Photograph People in the Harsh Midday Sun or 5 Ways to Create Dramatic Landscape Photos at Midday.

What other tips do you have for photographing in the harsh midday sun? Please share in the comments below.

googletag.cmd.push(function() {
tablet_slots.push( googletag.defineSlot( “/1005424/_dPSv4_tab-all-article-bottom_(300×250)”, [300, 250], “pb-ad-78623” ).addService( googletag.pubads() ) ); } );

googletag.cmd.push(function() {
mobile_slots.push( googletag.defineSlot( “/1005424/_dPSv4_mob-all-article-bottom_(300×250)”, [300, 250], “pb-ad-78158” ).addService( googletag.pubads() ) ); } );

The post 3 Quick Tips for Photographing in the Harsh Midday Sun by Karthika Gupta appeared first on Digital Photography School.


Digital Photography School

 
Comments Off on 3 Quick Tips for Photographing in the Harsh Midday Sun

Posted in Photography


8 Quick Tips to Improve Your Photos of Architectural Details

19 May

When you’re photographing architecture, it’s easy to get lost in the grandeur of some buildings. That’s not a bad thing. That’s how they were designed, to be a spectacle. Cathedrals, palaces, opera houses, and state buildings are all examples of architecture that’s meant to impress.

That’s the bigger picture. In terms of photography, however, it can be better to pull away from the grand, and look for opportunities in the details. All buildings and structures are sums of smaller parts, and it’s these parts that can often lead to visually interesting photos. Photographing these details comes with its own set of considerations. This article will point out a few things to look out for while you are out and about looking for the smaller picture, and 8 tip on how to improve your photos of architectural details.

#1 – Low contrast lighting

If the weather is poor and the sky is a drab, colorless grey, it may seem like a less than worthwhile opportunity for photography. That may be the case for some subjects, however, overcast days provide incredibly soft light that is quite suited for architectural details. This softness allows you to capture subjects with a lot of fine detail, that would normally be lost in the contrast.

8-tips-architectural-details-2448

Overcast days will help to bring out details that would have been lost in contrast.

Likewise, keep an eye out for photo opportunities in areas of shade. You may need a tripod to take advantage here, but the extra effort is worth it.

8-tips-architectural-details-1927

Photographing subjects in the shade provides soft, even lighting.

#2 – Side lighting

For bold images, look for scenes with strong light coming from the side. This type of lighting will increase contrast, especially in texture, and it will help to emphasize the shape of your subject.

8-tips-architectural-details-9763

Side lighting helps to emphasise texture and shape.

#3 – Patterns in light and shadow

Pay close attention to how light falls on various subjects. When you’re photographing details, shadows and highlights can, themselves, become an important compositional element.

8-tips-architectural-details-9709

Shadows and highlight can become graphic elements in their own right.

#4 – Patterns

8-tips-architectural-details-1864

Repeating patterns can make for bold imagery.

To me, the best part of photographing architectural details is the wealth of compositional possibilities. Man-made structures are full of patterns and shapes that can be exploited for photos. Take advantage of them by filling the frame for an abstract feel.

8-tips-architectural-details-9717

The curve in these stairs made for natural leading lines.

#5 – Reflections

For all of the wonderful architecture in the world, there’s at least as many drab and ugly buildings that appear to have little to offer photographers. They often do have something worth captuing, but it takes work to figure it out. One way to add interest to these subjects is to look for reflections. Reflections can add visual interest and color, to an otherwise lifeless and boring subject.

8-tips-architectural-details-9752

Reflections can add a boost to an otherwise lifeless scene.

#6 – Fixtures

It’s not always about the buildings, and only the buildings. Fixtures can often be overlooked, yet they can prove to be as compelling a subject as the architecture. When you’re considering a location, do look out for interesting fixtures like signs, light fittings, and security cameras.

8-tips-architectural-details-1903

Keep an eye out for interesting fixtures that other may overlook.

#7 – Statuary and monuments

When you think of architecture, statues are probably the last thing on your mind. However, they are a key element to a lot of buildings and monuments. For example, the Charles Bridge in Prague has 30 large, and very detailed, statues that beg to be photographed.

8-tips-architectural-details-2250

Statues are a common architectural features. Don’t neglect them with your camera.

8-tips-architectural-details-2470

#8 – Black and white

This last tip is for when you’re back at home. If your images are full of texture or strong patterns, consider a black and conversion. Stripping the color element out of those images will help to emphasize your compositional elements, and can lead to much stronger photos.

8-tips-architectural-details-2595

Black and white processing can help to emphasise texture in a scene.

Experiment

These tips are hardly exhaustive, and only scratch the surface of the possibilities available to you when photographing architectural details. If there’s something man-made, there’s a photograph to be had somewhere. Just keep going until you find it.

Do you have a tip of your own? Please share it below!

googletag.cmd.push(function() {
tablet_slots.push( googletag.defineSlot( “/1005424/_dPSv4_tab-all-article-bottom_(300×250)”, [300, 250], “pb-ad-78623” ).addService( googletag.pubads() ) ); } );

googletag.cmd.push(function() {
mobile_slots.push( googletag.defineSlot( “/1005424/_dPSv4_mob-all-article-bottom_(300×250)”, [300, 250], “pb-ad-78158” ).addService( googletag.pubads() ) ); } );

The post 8 Quick Tips to Improve Your Photos of Architectural Details by John McIntire appeared first on Digital Photography School.


Digital Photography School

 
Comments Off on 8 Quick Tips to Improve Your Photos of Architectural Details

Posted in Photography


Quick Intro to the New Sony Cyber-Shot RX10 Mark III

24 Apr

At the end of March (2016) Sony released the new version of their Cyber-shot RX10 Mark III. The main difference between it and its predecessor, the Mark II, is the lens, which is a lot longer. Let’s take a quick look at its main features:

  • 24-600mm f/2.4-4 zoom lens with 3 control rings for focus, zoom and aperture
  • 4K video quality
  • Fast autofocus
  • Magnesium alloy body

This video from B&H photo will show you what the new camera looks like, check it out.

This video by Chakru shows some of the key features and specs:

If you are a travel photographer and want to go light, this might be a good option for you. Or maybe even as a a backup camera to a heavy pro SLR. Perhaps an upgrade from a point and shoot camera is in order, give it a go and see if this is the right one for you.

googletag.cmd.push(function() {
tablet_slots.push( googletag.defineSlot( “/1005424/_dPSv4_tab-all-article-bottom_(300×250)”, [300, 250], “pb-ad-78623” ).addService( googletag.pubads() ) ); } );

googletag.cmd.push(function() {
mobile_slots.push( googletag.defineSlot( “/1005424/_dPSv4_mob-all-article-bottom_(300×250)”, [300, 250], “pb-ad-78158” ).addService( googletag.pubads() ) ); } );

The post Quick Intro to the New Sony Cyber-Shot RX10 Mark III by Darlene Hildebrandt appeared first on Digital Photography School.


Digital Photography School

 
Comments Off on Quick Intro to the New Sony Cyber-Shot RX10 Mark III

Posted in Photography


5 Quick Tips for Better Blue Hour Photography

11 Apr

tips for blue hour photography

Blue hour is a special time for photographers. The sky turns a different shade of blue, it’s velvety and delicious. It’s easy to take photos during blue hour because you don’t have to worry about harsh lighting or shadows.

In this article, you’ll learn:

  • When blue hour takes place
  • How to capture blue hour photos   
  • The best subjects to shoot for blue hour photography 

When is blue hour?

Blue hour happens twice a day, just before sunrise and just after sunset. It lasts between 20 to 40 minutes, depending on the weather, and your geographical location. During this time, the sky can turn different shades of blue and reflect orange, yellow, purple and pink.

blue hour photography tips 2 blue hour photography

To catch the blue hour, look up your local sunrise/sunset times and plan on being there early. There is also a great website that tells you exactly when the blue hour is, based on the date and your location.

5 easy tips for blue hour photography

Blue hour photos look amazing! While they might appear complicated to create, they aren’t. Blue hour photography is easy, the hardest part might be getting there before it’s over. These tips will help beginners get started with blue hour photography.

Howard Ignatius

By Howard Ignatius

1. Shoot in Shutter Priority mode

During the blue hour, the sky will be relatively dark because the sun is below the horizon. You’ll need a long/slow shutter speed to let in enough light for properly exposed photos.

Putting your camera in Shutter Priority mode allows you to manually choose your shutter speed. A shutter speed of one to six seconds should get good results. For the photos in this post, I used a six-second shutter speed in Shutter Priority.

Jeff Wallace

By Jeff Wallace

In Shutter Priority mode, your camera will choose the aperture and ISO (if your ISO is set to auto) automatically. This makes things easier when you’re getting started with blue hour photography.

2. Use a remote or self-timed shutter release

Pressing the shutter release button can cause camera shake, which will create blurry photos. To avoid this, use your remote or set the camera’s self-timer to two seconds.

3. Use a tripod

As mentioned above, you’ll be using a slow shutter speed, so a tripod will help you capture a sharp image. If you hand hold your camera during a slow shutter speed, your photos will be blurry because of camera shake.

Image by dPS Managing Editor – Darlene Hildebrandt

Image by dPS Managing Editor - Darlene Hildebrandt

Image by dPS Managing Editor – Darlene Hildebrandt

4. Shoot in RAW

It’s best to capture RAW files when shooting the blue hour. This will give you the highest quality capture, and the best advantages when editing. One nice advantage of shooting in RAW is that you can adjust the exposure compensation in editing. This way, if your photos came out a little too dark or light, you can adjust them up or down accordingly.

But if you have a point and shoot that only captures JPEGs, don’t worry – you can still get great blue hour shots.

Image by dPS Managing Editor – Darlene Hildebrandt

5. Include electric lights

Your blue hour photography will be easier if you choose a location near electric lights. This extra light may also add drama and interest to your photos.

car-trails-750px-03

Image by Darlene Hildebrandt

blue hour photography tips

Image by Dena Haines

While you want electric lights in your photos, don’t shoot too close to them. If you are standing too close to the light source, lens flare could be a problem. You could get unwanted, randomly placed, light spots in your photos.

What to photograph during the blue hour

The easiest subjects to get started with are landscapes that include electric lights.

Mike Boening Photography

By Mike Boening Photography

Miroslav Petrasko

By Miroslav Petrasko

Some blue hour landscapes to consider include:

  • Cityscapes
  • Busy winding roads
  • Beaches
  • Wharfs
  • Bridges
  • A fair or circus
  • Marinas
tips for shooting the blue hour

I love blue hour photos that include water reflections.

Mac H (media601)

By Mac H (media601)

What are your favorite blue hour subjects? Let me know by commenting on this post. And if you have any tips for blue hour photography, please share as well as your images.

googletag.cmd.push(function() {
tablet_slots.push( googletag.defineSlot( “/1005424/_dPSv4_tab-all-article-bottom_(300×250)”, [300, 250], “pb-ad-78623” ).addService( googletag.pubads() ) ); } );

googletag.cmd.push(function() {
mobile_slots.push( googletag.defineSlot( “/1005424/_dPSv4_mob-all-article-bottom_(300×250)”, [300, 250], “pb-ad-78158” ).addService( googletag.pubads() ) ); } );

The post 5 Quick Tips for Better Blue Hour Photography by Dena Haines appeared first on Digital Photography School.


Digital Photography School

 
Comments Off on 5 Quick Tips for Better Blue Hour Photography

Posted in Photography


Lightroom Quick Post-Processing Tips for Landscape Photography

30 Mar

Processing a good landscape image is a lot like getting a good haircut…it should look good, but people shouldn’t really be able to tell you’ve had anything done. Now while that may be a slightly funny (hopefully) analogy, it really is a good way to approach the editing of your landscape photos. Ideally, the image should be developed to its full potential in accordance to your vision, while stopping well short of over-processing. The key to pulling off a strong landscape image can sometimes be understanding when to stop.

Before and After Split

In this article, we will go from a straight out of the camera RAW file to a fully processed photograph using Adobe Lightroom CC. We will look at each step, and I will explain why each edit was made. By the end, you will see just how easy it is for you to take full control of your landscape photography with a few simple edits.

Shoot in RAW

Here we have the RAW file as it looked after importing into Lightroom.

RAW Screenshot

As always, the better the ingredients you have to begin with, the better the finished product will be. This means to always strive to make for best exposure, crop, and composition you can, before any processing is applied. Shooting in RAW format helps you immensely when working with landscapes. The greater dynamic range (exposure latitude) will allow you to bring up shadows, and manage highlights, much better than with smaller JPEG files. I know, I know – you’ve heard all of this before – but it doesn’t hurt to hear it again! RAW truly is the best friend of the landscape photographer.

Crop first

The image above is virtually level, but not perfectly so. The first thing we will do is open the crop panel and tweak the alignment before we begin any development. Having a grid overlay will really help you to get the lines of the image just right (with the crop tool activated, press the O key to cycle through all the grids available until you find the one you want). If you wanted to crop the image further, this would be done here as well.

Crop

Add Graduated Filters to adjust sky and foreground

Now that the image has been straightened, it’s time for the real fun to begin. The first thing to do is take control of the sky so that it isn’t quite so bright. To do this, we will use the Graduated filter tool. It’s located just above the Basic Panel in the develop module, in the same row as the crop tool.

GND Indicator

The filter simulates the effect of a graduated neutral density filter. It is an indispensable tool for adjusting landscape photos. Using the Graduated filter, you can decrease the exposure, add a little contrast, and then increase the clarity just to make the clouds more pronounced, which adds a little drama in the sky. In this example I also took town the highlights, and dehazed ever so slightly. The dehaze feature is a relatively new addition to the Lightroom tool box, is available in Lightroom 6 and Lightroom CC, and really helps when clearing skies.

GND Sky

Next, you want to process the foreground but not disturb the edits you’ve just made to the sky. To do this, click new to make a new Graduated filter.

New GND Indicator

To better understand where your edits will be applied with the ND filter, simply hover the pointer over the indicator dot for a second. Everything in red indicates where the filter is working (you can also just press the o key and it will show the mask overlay – it may also show in another color on your screen, press Shift+o to cycle through all the various colors).

GND Red

Using the Graduated filter, I increased the clarity of the foreground grass, as well as illuminated the shadows. This will help to draw the viewer’s eye into the image. I’m careful not to overdo the exposure here. The main subjects of the image are the horses, and the mountains in the background, so I want to keep those emphasized. Speaking of horses…

Do local edits using a Radial Filter

I wanted to really make the horses standout within the photo so let’s make use of another powerful tool in the Lightroom arsenal – the Radial filter. It works virtually the same way as the Graduated filter, except that it is applied in the form of a circle (fully adjustable). It can be set to apply edits either inside or outside of the circular outline.

Circular GND Indicator

With the Radial filter, I raised the shadows around the horses and increased clarify slightly. I also threw in a little extra sharpening there as well. When using the Radial filter, it’s important to remember that the border between what is, and what is not edited, is very controllable. Make use of the feathering slider in order to control the density of your adjustments as they radiate outward or inwards of the circle. Effective feathering will make make your adjustments with the Radial filter seamlessly blend in with the rest of the image. Here you can see exactly where the edits will be applied.

Circular GND Red

Makes global adjustments

So far, the image has been processed using only the Graduated and Radial filter tools for local adjustments (specific areas). Now we will make some final global (whole image) adjustments in the Basic Panel.

I brought up the overall contrast and shadows, and added in a little bit more clarity. Doing this made the highlights a little too harsh so I reduced the exposure by -10. This photograph was made in the waning golden hours of sunset, so I increased the total temperature (white balance) from 4400 to 5200, so that the tone better matched what I was feeling at the time of the exposure.

Global Adjustment

Add an edge vignette

As a final touch, I add in a small amount of vignetting.

Vignette

Vignetting is great because it serves to draw the viewer’s attention into the image. In the case of this photo it works well, but that is not always the case. Just as with any other effect used in post-processing, discretion is the name of the game. When using a vignette, make sure it fits the overall mood of the image. Experiment with the feathering slider (and others) until you achieve the desired effect. As a general guideline, very subtle vignetting usually works best.

See, that wasn’t difficult at all! We have went from a completely unprocessed RAW file to a fully developed image using relatively few edits in Adobe Lightroom.

Before and After

Processing a landscape image doesn’t have to be a massive undertaking. Everything you do to a landscape photograph should compliment the scene and add harmony. You have some incredible processing tools available today which can help you to achieve your creative vision. Be careful that you don’t go too far, though. Every photograph is as unique as a fingerprint, and should be approached individually. Use the techniques in this article as a guide to your processing, and have fun helping your photos reach their full potential.

Finished

If you have any additional landscape post-processing tips that work for you, please share in the comments below.

googletag.cmd.push(function() {
tablet_slots.push( googletag.defineSlot( “/1005424/_dPSv4_tab-all-article-bottom_(300×250)”, [300, 250], “pb-ad-78623” ).addService( googletag.pubads() ) ); } );

googletag.cmd.push(function() {
mobile_slots.push( googletag.defineSlot( “/1005424/_dPSv4_mob-all-article-bottom_(300×250)”, [300, 250], “pb-ad-78158” ).addService( googletag.pubads() ) ); } );

The post Lightroom Quick Post-Processing Tips for Landscape Photography by Adam Welch appeared first on Digital Photography School.


Digital Photography School

 
Comments Off on Lightroom Quick Post-Processing Tips for Landscape Photography

Posted in Photography


From another planet: Venus LAOWA 15mm F4 Wide Angle Macro quick review

13 Mar

Venus LAOWA 15mm F4 Wide Angle Macro lens
£325 / $ 499 | www.venuslens.net

Chinese company Venus Optics (Anhui ChangGeng Optical Technology Company Ltd.) is a new lens and camera accessory manufacturer started by a group of macro photography enthusiasts who design and create their own macro photography lenses. They began with the Venus 60mm 2:1 macro (which enables twice life-size reproduction), and have followed this up with the LAOWA 15mm 1:1 wide macro of this review. In addition to these lenses, they also offer a twin head macro flash unit, which we think looks quite a bit like an alien on top of a camera.

Features and specifications

The LAOWA 15mm lens is one of the widest full-frame lenses to offer a full 1:1 magnification ratio (meaning that the object in focus is projected at actual-size onto the film or sensor). Admittedly, this magnification only occurs when the object is 0.2 inches (4.7mm) from the rather large front element of this lens, but that’s the trade off between a wide angle of view and the desire for ‘true’ macro abilities.

In addition to the headline feature, this entirely manual lens (manual focus; manual aperture; no communication to the camera body) also includes a shift mechanism to physically move the optics up or down along the lens mount. This shift provides perspective correction for converging lines, as well as a way to create seamless panoramas (though the shift direction is fixed to the frame’s vertical axis).

Focal length  15mm
Max. aperture  F4
Min. aperture  F32
Angle of view 110° (135 frame) / 85° (APS-C)
Shift distances + / – 6mm
Aperture blades 14
Min. focus (1:1) 4.7mm
Filter thread 77mm
Dimensions 83.8 x 64.7mm / 3.3 x 2.5in
Weight 410g / 14.5oz
Available mounts

Nikon F / Canon EF / Pentax K /
Sony A, E, FE / Fuji X / m43

The lens is designed around 12 elements in 9 groups, with three High Refractive elements, and one Extra-low Dispersion lens.

Multi-layer coatings minimize flare and ghosting, while the overall optical design strikes a balance between close focus abilities and wide angles.

Of note is the 77mm filter thread around the non-protruding front element. This allows for easy filter use without requiring the more expensive square filter systems (although for ND grads, those are recommended). Given the wide angle of view, slim filters are still required.

The body surrounding the glass elements is made from aluminum and brass, with engraved aperture and distance scales that are necessary for the all-manual operation.

The aperture ring is ‘clickless’ and located toward the front of the lens, while the focus ring near the back has a relatively short throw for a macro lens (90° of rotation).

The lens comes with a shifting lens mount, allowing for perspective correction by adjusting the center of the image circle on the film or sensor. The range of adjustment is 6mm from the center, either up or down.

The small lever to engage the shift mechanism is just behind the focus ring, at the rear of the lens. There are no scales or gears to finely control the amount of shift.

Shooting experience

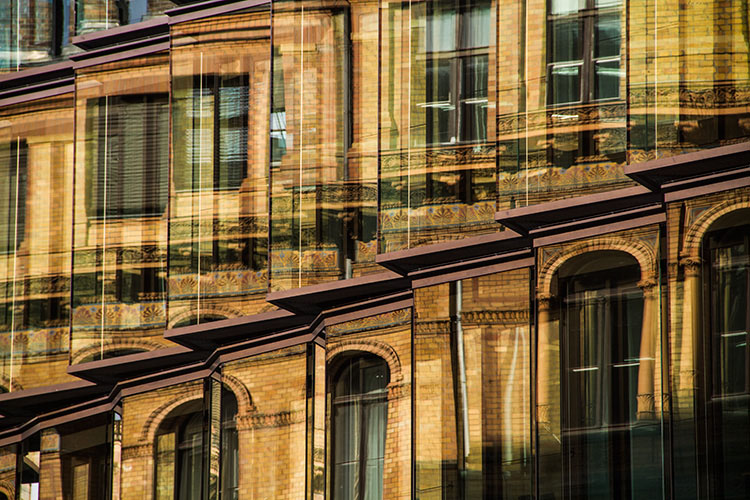
1:1 macro at F11. The flare comes from the combination of back-lighting and inability to use the hood at such close working distances.

The LAOWA 15mm is an entirely manual lens, but still easy enough to adjust and work with. This was aided somewhat by testing a K-mount lens on a Pentax APS-C camera body and a Sony a7 II (w/ Novoflex adapter), both of which provide image stabilization (from a manually entered focal length), stop-down metering, and focus confirmation/peaking, despite the low-tech, ‘slab of brass’ lens mount.

When ordering this lens in Micro Four Thirds, Sony E, or Fuji X mount, the folks at Venus bundle an appropriate adapter with either a Nikon F or Canon EF mount lens. (For single-system Sony shooters, there is the option of a native FE mount, without adapter.) However, as our friends at Lensrentals point out, testing a wide-angle lens with an adapter (regardless of manufacturer) can introduce issues, so much of the more technical analysis in this article is based on experience of using this lens on a native Pentax (APS-C) body. 

Ergonomics

The absence of autofocus is not much of a detriment when using this lens for wide-angle macro photography, since adjusting the subject distance while looking at the LCD or viewfinder is typically a much faster way to focus at these minute working distances. Stop-down metering and looking through a dim viewfinder or noisy LCD at smaller apertures (due to the lack of automatic aperture control), on the other hand, is a bit harder to adapt to.

The focus throw is somewhat short for a macro lens, requiring only a bit more than 90 degrees of rotation to go from the closest focal distance (and 1:1 macro) to infinity. Further, the helical is biased toward the macro and close-focus end, so there is only a tiny amount of travel between 2 meters and infinity. This took some getting used to, and initially resulted in enough mis-focused shots to warrant bracketing.

The biggest ergonomic difficulty was getting used to using an aperture ring positioned in front of the focus ring. Adding to the confusion is the fact that both rings are ‘clickless’ and identically sized. Of course, the lack of hard stops on the aperture ring, along with the wide angle and availability in many different lens mounts, combine to make this an interesting option for video work, but that’s beyond the scope of this article.
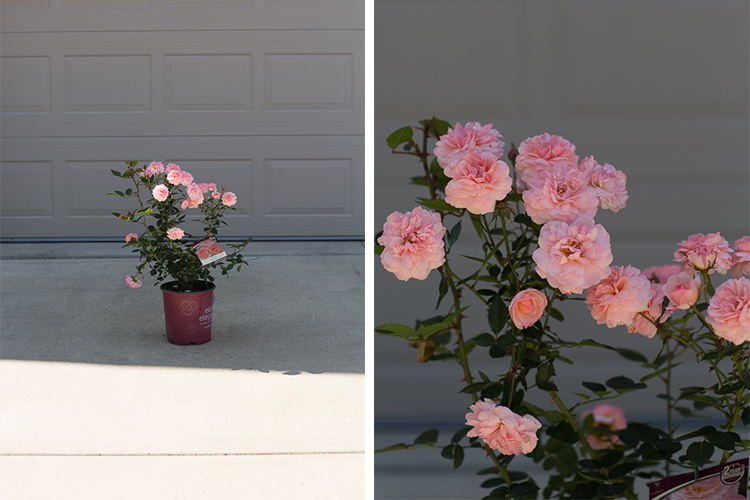
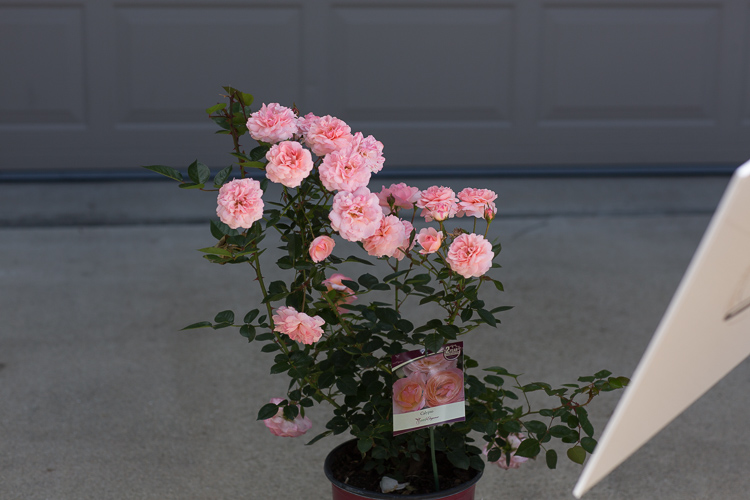
Macro

The image quality of this unique lens is excellent at closer focus distances, and shows the commitment of the macro photographers at Venus Optics for getting very close and very wide. There is a high degree of sharpness in the center of the frame, even at wider apertures, and the inevitable distortion and falloff along the edges doesn’t interfere at closer focus distances. Being very well corrected for aberrations is another plus as a macro lens.

However, this lens is differentiated by its 1:1 macro focusing, which, unfortunately, comes with some inconveniences. To keep the price of the lens reasonable, the LAOWA relies on manual focus and a manual aperture without linkage (resulting in the dim viewfinder when stopped down, as mentioned above), while the wide angle optical design means a minuscule 4.7mm working distance (for true 1:1) coupled with a rather large front filter ring and hood.

The petal-shaped hood prevents many subjects from reaching the tiny minimum focus distance for 1:1 macros, and furthermore blocks out light that becomes necessary for macros with acceptable depth-of-focus (narrow aperture). After a few experiments with macro flash rigs, resulting in images that looked like ‘flash party photos’ due to the lack of beam spread across the very wide angle of view, natural light (and a tripod for static subjects) was the order of the day. Thomas Shahan, of course, could probably overcome this with aplomb.
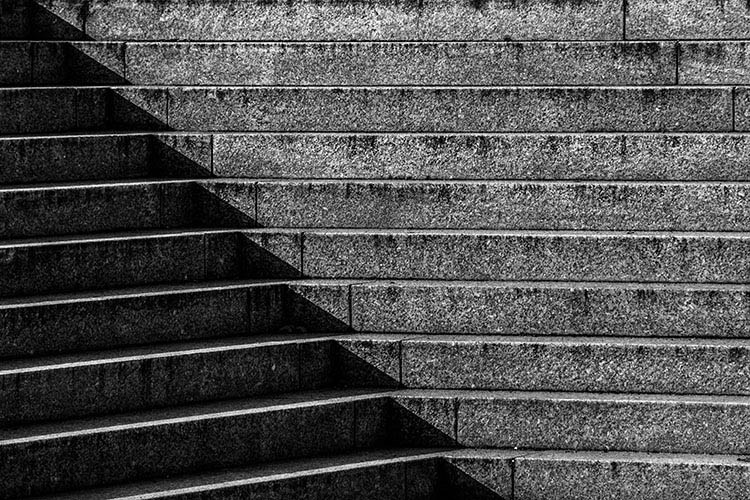
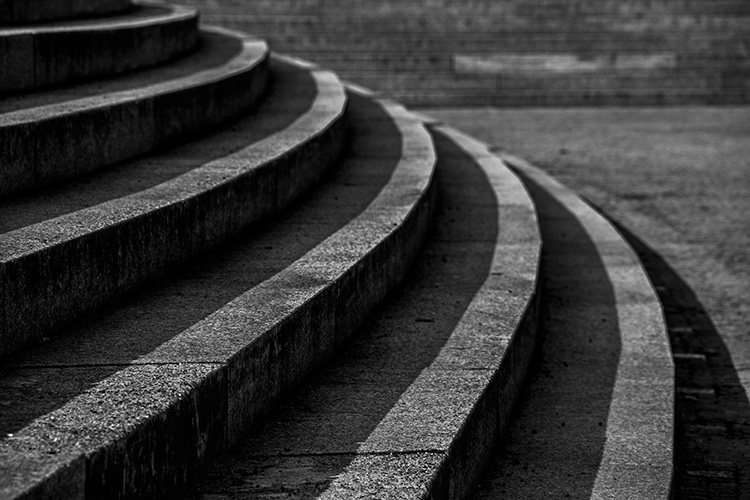
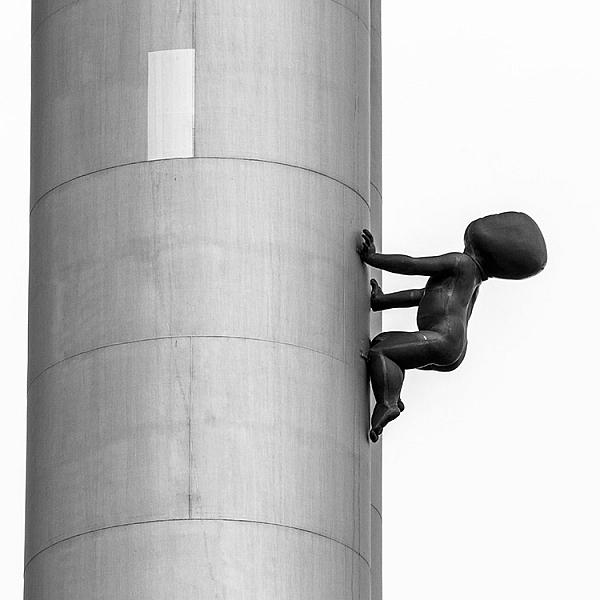
Shift ability

Unshifted Shifted +6mm

The addition of a shifting lens mount is a great bonus for a wide angle lens like the LAOWA 15mm, however the optical characteristics of the lens tend to make this function most useful on APS-C or smaller format sensors. In images shot with a full frame body (the Sony a7 II w/ Novoflex adapter), the vignetting and distortion at the edge of the image circle eclipsed the value of shifting the lens (although it is unknown how much of this is due to it being an adapted lens).

One troublesome aspect of the lens shift is that it lacks the gearing and markings for fine control of the shift found on most other perspective control lenses. Press the shift release button and almost immediately the lens slides up (or down) to the maximum shift amount. There is a detent in the middle to reset the lens to an unshifted position, but getting a small or precise amount of shift requires patience and a steady hand.
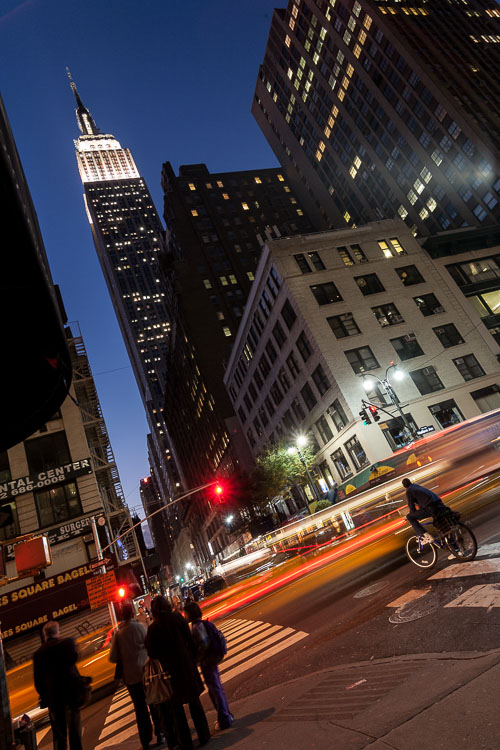
15mm wide angle

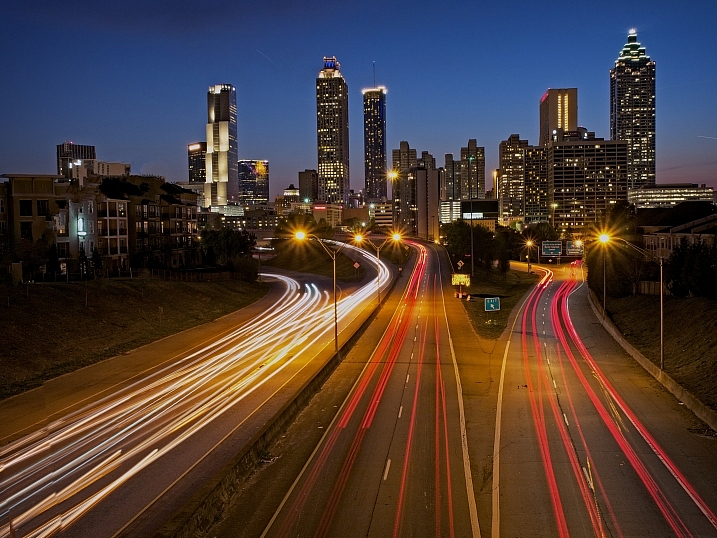
Toronto skyline, as seen from the islands offshore. On the full-frame Sony, the 15mm shows significant degradation at the edges, as evident in the lights on the right side.

When using this lens as a ‘normal’ ultra-wide angle, the results are something of a mixed bag. At close focus distances, the center is quite sharp (where most macro subjects tend to be) at all apertures, while at infinity the corner details appear smeared until the lens is stopped down significantly. Some night shots on the full-frame Sony, and attempts at astrophotography with the Pentax O-GPS Astrotracer, both show significant degradation of the lights at the edges. These examples are perhaps not quite as comprehensive as LensRentals’ OLAF system, but still illustrative. Check out the full resolution images in the gallery below.

Many macro lenses are designed to have a ‘flat field’ for the in-focus region. The LAOWA 15mm is not one of those lenses. Similar to other wide angle lenses, the field of focus curves radically, yet does not flatten out as focus is shifted toward infinity. Add in some edge distortion, and the resultant lack of corner sharpness at infinity is perhaps the biggest issue with the image quality from this lens on full-frame cameras. It requires some acceptance of the ‘dual nature’ of the lens (macro and ultra-wide) to work within this limit. Oddly enough, shifting the lens provides some relief for at least two of the corners, due to the curved field being off-center.

Distortion

Very few ultra wide angle lenses are free from distortion, and this 15mm is no exception. In most shots with the APS-C Pentax, curved lines were minimal (see the shift photos above) and could be corrected in processing if desired.

However, on the full-frame Sony, the barrel distortion along the edges reached a point where it was almost un-correctable. The image to the left shows doors that have very straight edges, but look organically curved in the (uncorrected) photo.

Chromatic aberrations

One area where the LAOWA 15mm is quite competitive is in the control of chromatic aberrations. While there definitely is some lateral CA, particularly visible at high contrast edges in the corners, it is fairly well controlled when stopped down, and quite consistent. A few clicks in most modern Raw processing software removes these distractions very easily. In addition, longitudinal CA (color fringing in the out of focus areas) is almost non-existent, which is excellent for a macro lens, even though many other wide angle lenses tend to be similarly devoid of this aberration.

(Note: none of the images in this article, or the samples, have had software lens corrections applied; whether for distortion, vignetting, chromatic aberrations, or fringing.)
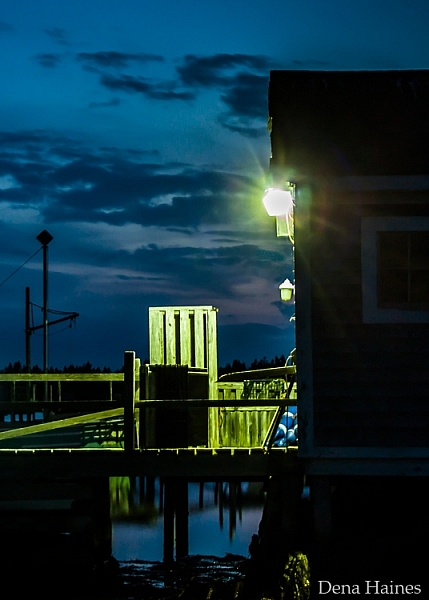
Bokeh

Close focus at F4 Close focus at F16

It’s a bit unusual to discuss the bokeh of an ultra-wide lens: considering the typical design for this kind of lens provides such wide depth-of-field, there is frequently little out of focus anyhow. However, the close focus and macro abilities of the LAOWA 15mm give quite a lot of room for shifting the focal plane, so bokeh is not only visible, it can be an integral part of the image.

With a 16-bladed aperture, the blur discs produced by this lens appear round at all stops, with a slight ‘onion-ring’ artifact when examined closely. More importantly, the falloff in the blur is smooth and gradual, as one would expect from a macro lens. This combines to make the exaggerated field curvature less bothersome at closer focal distances and wider apertures, and becomes another one of the strengths of this lens.

Summing up

The Venus LAOWA 15mm F4 Macro is an unusual lens, both in its pedigree (or lack thereof) and its unique features. With a relatively reasonable price and availability in many different lens mounts, there is now an ultra-wide option for anyone who likes to get really close to their subjects. The lack of autofocus and auto-aperture prevents this from being a ‘snapshot’ lens, and may make it frustrating to use on camera systems that do not support low-tech lenses very well.

There are some compromises in the optical design of this multipurpose lens, including wide field distortion, and some edge softness at infinity. However, wide-angle macro enthusiasts will definitely enjoy this lens, while anyone with patience and a desire to explore the options it provides will similarly find the Venus LAOWA 15mm to be a fun and rewarding addition to their system.

Things we like:

  • Very close focus (1:1 macro)
  • Sharp in the center, even wide open
  • Well built and smooth focusing
  • Shift option is useful for APS-C
  • Nice bokeh for a wide angle

Things we don’t like:

  • Extremely short macro working distance
  • No mechanical aperture linkage (K and F mounts)
  • Significant distortion on full-frame
  • Edges smeared at infinity with wider apertures

Real-world samples

$ (document).ready(function() { SampleGalleryGridV2({“galleryId”:”8066630650″}) })

Venus LAOWA 15mm F4 Wide Angle Macro samples

47 images • Posted on Oct 27, 2015 • View album
Sample photoSample photoSample photoSample photoSample photoSample photoSample photoSample photoSample photoSample photoSample photoSample photoSample photoSample photoSample photoSample photoSample photoSample photoSample photoSample photoSample photoSample photoSample photoSample photoSample photoSample photoSample photoSample photoSample photoSample photoSample photoSample photoSample photoSample photoSample photoSample photoSample photoSample photoSample photoSample photoSample photoSample photoSample photoSample photoSample photoSample photoSample photo

Articles: Digital Photography Review (dpreview.com)

 
Comments Off on From another planet: Venus LAOWA 15mm F4 Wide Angle Macro quick review

Posted in Uncategorized


Quick Look: Parallelism in Landscape Photography

12 Mar

Part of what can make an image both visually appealing and conceptually interesting is the connection between its different parts. An image is a whole made of differentiable elements, and these elements can either be separate or have a variety of relations between them. To make an image which is indeed a whole and not just different layers on top of each other, a photographer needs to make the layers (or elements) communicate with each other. But how? One way, which I will detail here, is parallelism.

A softly-lit iceberg resembles the contour of Mount Uummannaq, Greenland. An example of simple, low-level parallelism.

When pre-visualizing an image, especially its composition, one needs to take into account the possible similarities, or parallelisms, that the environment offers. For example, it’s very often that there is a lack of connection between the sky and the earth in a landscape shot. But a bold red-colored flower on the ground can parallel a setting sun in the sky, thus strengthening the connection between them and bonding heaven and earth in the image, which has clear philosophical and visual implications.

But it’s not only color – shapes, lines and textures can also parallel each other – light rays in the clouds with lines in the sand, lenticular clouds with rounded pools, the options are endless. The important thing to keep in mind is to make these parallelisms stand out, making the viewer realize our intention in including them in the image.

Parallelism can serve its goals even better if it is of a higher level: more than two parts of the image being parallel to each other in the same way or in different ways, or the same part being parallel in more than one way.

See for example the second image shown here. There are two parallelisms: firstly there’s the one made by the architects who chose to make the famous lighthouse of Kalfshamarsvik, Iceland resemble the basalt columns in the area it was built on. Secondly, the yellow patch in the midst of the dark: on the ground – the yellow vegetation. On top – the light coming out of the lighthouse. Both share color and both stand out of their dark, gloomy, lava-column-shaped surroundings. The choice of dark exposure made these elements stand out even more, strengthening the bond between them and the image’s integrity.

‘Light in the Dark’, Kalfshamarsvik, Iceland

Another good example can be seen in the third image. The parallelism between the shadow cast by the center tree and the flare caused by the sun bonds the ground and the sky, which are in turn both bonded to the main subject – the tree – in different ways: the flare touches and intersects the tree, while the shadow is caused by the tree. The three layers of the image are thus intimately connected, and the image is more interesting and appealing because of this connection.

‘The Valley of the Shadow of Death’, Deadvlei, Namibia

Erez Marom is a professional nature photographer, photography guide and traveler based in Israel. You can follow Erez’s work on Instagram, Facebook and 500px, and subscribe to his mailing list for updates.

If you’d like to experience and shoot some of the most fascinating landscapes on earth with Erez as your guide, you’re welcome to take a look at his unique photography workshops around the world:

Land of Ice – Southern Iceland
Winter Paradise – Northern Iceland
Northern Spirits – The Lofoten Islands
Giants of the Andes and Fitz Roy Hiking Annex – Patagonia
Tales of Arctic Nights – Greenland
Earth, Wind and Fire – Ethiopia

Selected articles by Erez Marom:

  • Behind the Shot: Dark Matter
  • Mountain Magic: Shooting in the Lofoten Islands
  • Behind the Shot: Nautilus
  • Behind the Shot: Lost in Space
  • Behind the Shot: Spot the Shark
  • Quick Look: The Art of the Unforeground
  • Behind the Shot: Watery Grave
  • Whatever it Doesn’t Take
  • Winds of Change: Shooting changing landscapes
  • On the Importance of Naming Images
  • Hell on Earth: Shooting in the Danakil Depression

Articles: Digital Photography Review (dpreview.com)

 
Comments Off on Quick Look: Parallelism in Landscape Photography

Posted in Uncategorized