RSS
 

Posts Tagged ‘Professional’

PhotoShelter releases free professional food photography guide

22 Oct

PhotoShelter has launched ‘The Professional’s Guide to Food Photography,’ a new free guide dedicated to the art and business of photographing food. The guide includes tips for breaking into the industry, in-depth interviews with food photographers and a how-to on building a portfolio. Read more

Articles: Digital Photography Review (dpreview.com)

 
Comments Off on PhotoShelter releases free professional food photography guide

Posted in Uncategorized


Lexar to launch 128GB capacity Professional 2000x SDXC card

15 Oct

Lexar recently introduced a 128GB version of its Professional 2000x SDXC UHS-II memory card. Once it launches, this new version will be the fastest 128GB memory card to utilize the Ultra High Speed II, UHS Speed Class 3 standard. The card is built to support capturing 4K video and other demanding content. Read more

Articles: Digital Photography Review (dpreview.com)

 
Comments Off on Lexar to launch 128GB capacity Professional 2000x SDXC card

Posted in Uncategorized


The Camera Bag of a Professional Traveler

29 Sep

“Travel is the best teacher.”

Have you ever heard this saying? As a photographer, travel teaches you more than you could ever imagine. It requires a lot of preparation and attention to details. Yet, it also requires you to be open, ready for the unexpected, and willing to take risks sometimes to get the best shots!

Whether you are traveling into your backyard or across the globe, knowing what to put in your camera bag can be daunting. There are so many great gadgets out there.

travel-bag-photographer

How do you know what’s most important to bring? How do you know what not to bring?

Choosing the best equipment to pack for any kind of adventure is challenging. It’s not about being the next national geographic photographer, it’s about being ready to create awesome experiences and capture those moments at the same time. You are first a traveler, second a photographer.

No matter where you go, what goes in your camera bag is just as important as what goes in your suitcase – maybe even more important! Too much equipment, or the wrong equipment, can make or break your memory making experiences.

Depending on your photography focus, you want to have a wide range of gear options, that take up as little space and weight as possible. That’s the number one goal. After traveling the world for over a year with only one 30 liter backpack and my camera bag, I’ve learned what’s absolutely necessary to bring, and what I can leave behind the next time. Let’s breakdown the camera bag of a professional traveler and lifestyle photographer.

The obvious equipment to pack:

  • Memory cards
  • Batteries
  • Camera charger
  • Universal Plugin
  • Camera body
  • Lenses

obvious-equipment-travel-camera-bag

These are the items you always want to carry as a photographer. Besides the camera body and lenses, these things are fairly light weight and don’t take up too much room.

Memory Cards:

Consider having multiple smaller memory cards instead of one big one. Carrying four 8GB memory cards is a safer bet than carrying one 32GB memory card. You don’t want to risk carrying all of your images on one card because there is always a possibility of that card being corrupted or lost.

Charger and Plug:

When we travel, we tend to take more photos than if we were just at home. Your camera battery will run through a full charge much quicker on the road. Make sure you bring backup batteries, and don’t forget your battery charger. Consider where you are traveling and the outlet plug necessary. A universal port with surge protection is not something to skimp on!

Camera Body:

This is personal preference. All of the best camera manufacturers have developed amazing high-end digital cameras that are light-weight, fairly small in size, and perform beautifully. Do your research ahead of time and choose the best option for you. These days, even the lower-end DSLR camera models perform beautifully compared to just a few years ago. Consider purchasing a mirrorless camera. These are the latest technological advance in the photography industry.

Lenses:

This is another personal preference, so which lenses are best for you? Many people choose to bring a telephoto lens for travel experiences. They allow you to zoom in to things really far away and capture details you can not see from a distance. But these are the heaviest lenses on the market, and when traveling you will use it way less than you think. I say skip the telephoto lens and stick to using portrait (medium telephoto) and wide angle lenses for your travel experiences.

The not so obvious equipment:

  • Prime lenses
  • Rapid Strap
  • Lens wipes
  • Graduated Neutral Density Filter
  • Backup hard drive
  • Laptop computer
  • Backpack camera bag
  • Waterproof camera
  • SmartPhone and photography apps

not-obvious-items

A Prime Lens:

I carry two lenses when I travel. As a portrait and landscape photographer it is important to carry lenses with focal lengths of 24mm or smaller for landscapes and 35-85mm for portraits. A fixed lens, like the 35mm or 50mm is, in my opinion, the very best lens to carry for any travel trip. It’s lightweight and very small. With a wider aperture of  f/1.2 – f/2.8, this lens will allow more light to come in, which is important when photographing in low-light scenarios. The wider apertures will create a shallow depth of field, giving you much more creative freedom to become truly connected to your scene.

The challenge with a fixed lens is that there is no zoom. This is where your adventurous mindset comes into play! Your feet become your zoom. You will explore more of the area because you must move around to capture different angles and areas. Indoors, or out, close-up or far away, a prime portrait lens is the ideal traveling lens.

A wide angle zoom is also a great addition to add to your traveling camera bag. Any 10mm-24mm wide angle lens will allow you to capture those fabulous landscapes that can’t be photographed as well with your portrait lens.

Rapid Strap:

The rapid strap is the best camera strap on the market today. This is absolutely worth the investment of about $ 100. Giving you the flexibility of a shoulder strap and a secure, safety harness, this camera strap never left my body for nine months! Use it to save your neck from the pain of the heavy camera, and to feel secure and safe knowing your camera will always hang right by your side.

Lens Wipes:

Lens wipes are great when traveling, I use Zeiss Wipes brand. They clean everything streak free and protect your camera and glass from dust and dirt. Use one every time you take the lens cap off. Plus you can use them to clean more than just camera equipment! Don’t leave home with out these little guys.

ND Filter:

Filters are also extremely lightweight and take up no room at all. They are a great addition to any photographer’s bag, traveling or not. Having different kinds of filters to use on your adventure will give you an even wider range of unique options for photographing your experience. My favorite is the Graduated Neutral Density Filter (GND). It is an inexpensive addition to your bag that opens up a world of exposure options, no lens can do on its own. GND filters reduce the amount of light that can pass through a lens, allowing you to expose more evenly for extreme lighting scenarios.

For instance, if it’s midday and the sky is really bright, but the valley in the landscape is much darker, you can use a GND filter to darken the exposure of the sky, while the lens reads the proper exposure for the valley.

travel-photography-germany

Backup Hard Drive and Laptop:

I carry a 2TB Western Digital Passport External Hard Drive and my reliable Macbook Pro everywhere I go. As a traveling photographer, the most important thing is to be able to upload and backup my images immediately. Although many photographers decide to leave these heavy items behind for obvious reasons, I say pack them and use them regularly. Make a habit of spending some time after each adventure to backup and edit your images. You will become a better photographer as you study your photos right away, and see what worked and what didn’t. This will make your entire adventure a great learning experience too!

Camera Backpack:

Backpack style camera bags are ideal. You can wear it on your back for easy transportation and hiking. You can carry it in front of you when traveling from one location to another, to keep your equipment safe and secure during your journey. Choose a backpack style that fits all of your equipment, and is also easy to unzip to get into right away. You will save a lot of time and energy by having a camera bag that is specifically designed for traveling.

Waterproof Camera:

One thing that I wish I had during this last trip was a smaller waterproof, shock proof camera. Though it might only be used a few times when jumping off waterfalls or out on a boat, these are experiences I don’t have photographs of because I didn’t have that extra piece of equipment.

If your budget allows for it, buy a nice point-and-shoot waterproof camera that fits in your pocket. You will be happy you did.

Smartphone and Apps:

Everyone has a smartphone now that takes pretty decent images. Although these gadgets will never be as great as your DSLR camera, they are convenient and always available. Don’t leave home with out your smartphone and check out these awesome photography apps:

  • Instagram – The most popular way to share your travel photography with the world.
  • Flipagram – Fun photo videos stories set to music you love. Share on many social media platforms.
  • Light Meter – On the go professional light meter with an easy interface to use on the go.
  • Dropbox – Easily sync and back up everything on your smartphone without having to do a thing.
  • Manual – Turn your smartphone into a DSLR with full control over Aperture, ISO and Shutter Speed and more.
  • Snapseed – Amazing editing on the go. Send your editing images directly to your favorite social media app right from Snapseed.
  • Hyperlapse – Amazing timelapse app by Instagram (iOS only). This app is addicting and will get you loving video!

The things to leave behind:

  • Big telephoto lens
  • Tripod
  • Selfie stick
  • Flash

leave-items

As a traveler, you want to minimize what goes in your camera bag. These are the things I recommend leaving behind.

Telephoto Lens:

Carrying all your lenses to capture the entire focal length range (8mm or less to 500mm or more) is unnecessary. Most people consider bringing a telephoto lens because you can zoom in really close to things that are far away. I say skip it. The point of travel is to explore, and create memories by enjoying each moment. Use your feet as your zoom, go to those places far away! You will be glad that you are not carrying this heavy lens and love the new fun things you discover along your journey.

Tripods:

I might get some negative feedback on this one. If you want to capture night scenes and long exposures, you might want one. However most of the time you can easily find something to set your camera on to capture these scenes just as well without a tripod. Tripods are heavy, awkward to carry, and tend to get in the way. Leave it at home and save yourself the trouble. Challenge yourself to find a make-shift tripod while out on your journey.

Selfie stick:

Use a make-shift tripod to capture yourself in a shot by looking for a nearby table, rock or ask a friendly traveler around to take the photo for you.

Every time a selfie stick comes out, you are bound to miss the beauty of the moment. I noticed this in every city I traveled to. Remember being a traveling photographer is all about balancing the experience of being in the moment and capturing it at the same time. Stay in the moment! Quickly capture a creative selfie of yourself and then capture the scene through your DSLR most of the time to stay connected to your entire experience.

Flash:

If you are a comfortable shooting with a flash, bring it. There is always an opportunity to use one. But, if you are not keen on using a flash regularly, don’t bring it just for the trip. I did not use a flash once while traveling the world. Capturing adventure and travel photography is about the beauty of nature and the diversity of cultures around the world. Using natural light and becoming intimate with your your scenes and subjects is the best way to create realistic and artistic images.

switzerland-lake

Traveling really is the best teacher. Being a traveling photographer challenges you to stay in the moment and capture it at the same time. Make this easier on yourself by packing light and taking risks. Pack your camera bag like a professional traveler and your adventures will become the best memories of your life.

I am on an endless journey to experience the world, and share it through my lens. As technology advances and more people take off on big adventures, there will always be new amazing things to consider adding (or removing) from your camera bag.

Do you have any other awesome tips for being a traveling photographer? I’d love to hear them! Share your thoughts in the comment section below.

googletag.cmd.push(function() {
tablet_slots.push( googletag.defineSlot( “/1005424/_dPSv4_tab-all-article-bottom_(300×250)”, [300, 250], “pb-ad-78623” ).addService( googletag.pubads() ) ); } );

googletag.cmd.push(function() {
mobile_slots.push( googletag.defineSlot( “/1005424/_dPSv4_mob-all-article-bottom_(300×250)”, [300, 250], “pb-ad-78158” ).addService( googletag.pubads() ) ); } );

The post The Camera Bag of a Professional Traveler by Danielle Werner appeared first on Digital Photography School.


Digital Photography School

 
Comments Off on The Camera Bag of a Professional Traveler

Posted in Photography


How to Become a Professional Travel Photographer – Two Paths

27 Jul
Ethiopian Meskel festival - By oded wagenstein

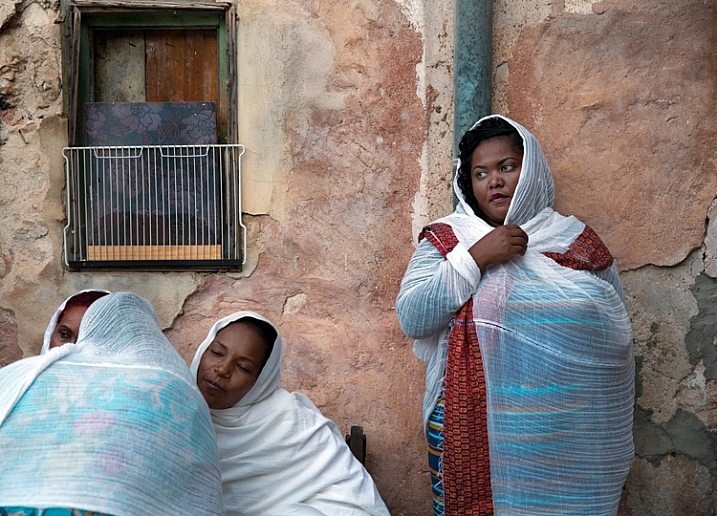
Ethiopian Meskel festival – by Oded Wagenstein

Many people are mistaken in thinking that travel photography is just about traveling and making photos. While, although that sounds like a dream job, not many people will pay you to just travel and take nice looking photos. Like any job, travel photography is work –  and usually, it’s very demanding.

Yes, you get to go to amazing places, meet exciting people, and the world is your office. But, it also has many downsides: sleeping in flea-infested guesthouses, never-ending bus rides from hell, harassment from corrupted policemen, loneliness, and lack of job stability to name a few.

Are you still here? Good! Let’s talk about how to become a travel photographer. There are two ways to approach this: finding a client, or finding a job that allows you travel.

Georgia - by oded wagenstein

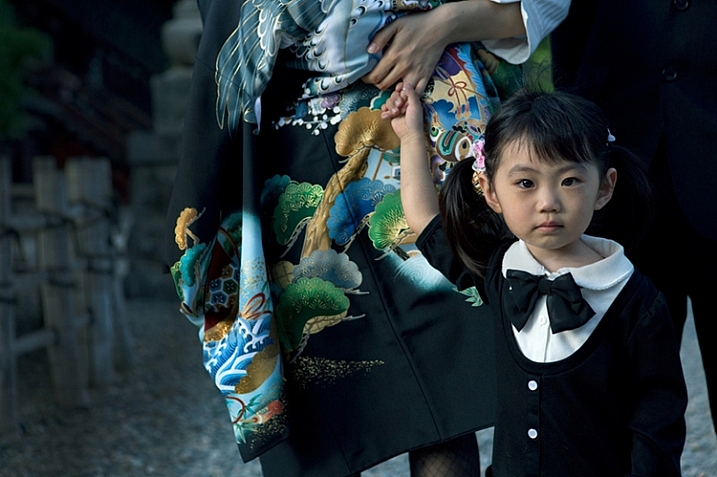
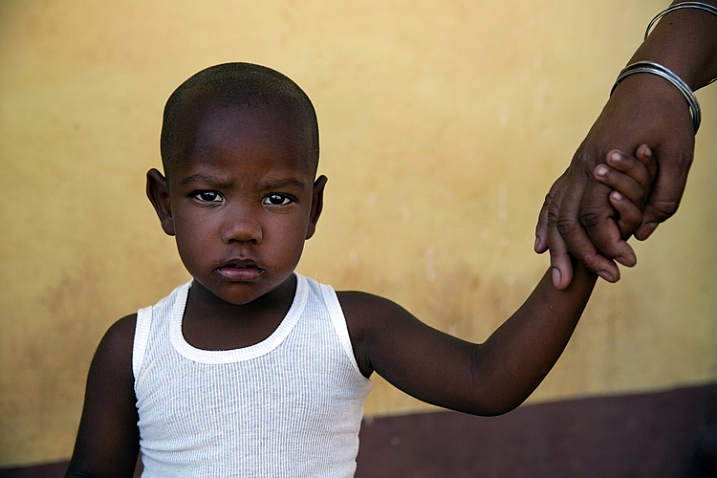
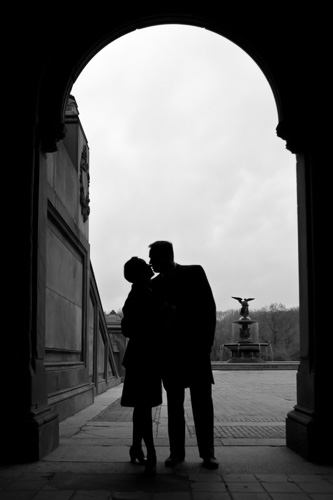
Aperture f/5.6, shutter speed 1/6000th, ISO 400. Exposure Compensation: -1.3
-Image by Oded Wagenstein-

First option – Find a client

As a travel photographer, you have many potential clients. Here I will discuss the most common: Governmental tourism organizations, NGOs, Commercial organizations and Media

Governmental tourism organizations

Many governments strive to promote tourism in their countries. To do so, they need photographs to show the things and activities tourists can see and do in their country. Budget-wise, they have usually deep pockets.

Pros: This is the most organized option, the client has a big-budget, and gives you access to places closed to the public.

Cons: It’s very hard to get your foot in the door. Usually these organizations prefer to work with big, well known magazines and newspapers that can promise not only good photographers, but wide exposure to their audience of readers.

hindukush - By oded wagenstein

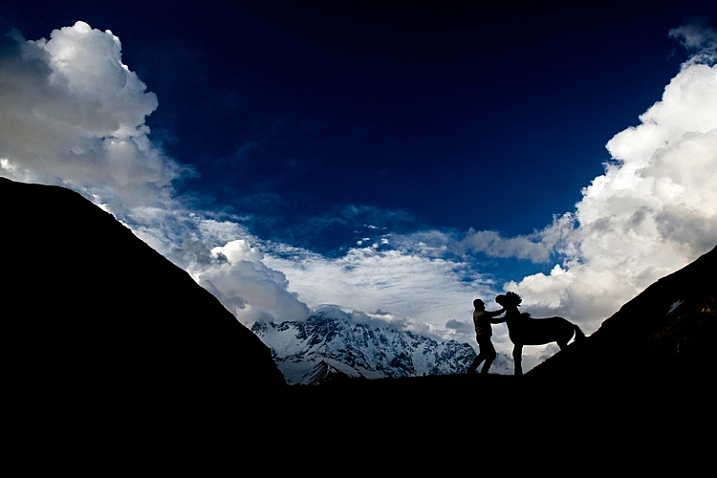
hindukush – by Oded Wagenstein

Tip from a pro: Instead of trying to work with a large media organization like a magazine or newspaper, become a small media icon yourself. If you have a large and influential presence on social media, such as Facebook and Twitter, you might be more appealing to these organizations than old school media. So, start a blog, gain followers, and who knows, you could be their next photographer.

Taking the first step: In most cases, working with governmental tourism organizations will never be your first career step. But starting a working relationship with a travel magazine or newspaper, or starting a blog and a Facebook page is a good idea. It’s best to specialize in a specific area of travel, such as adventure, food, etc.

Portrait from Cuba - By oded wagenstein

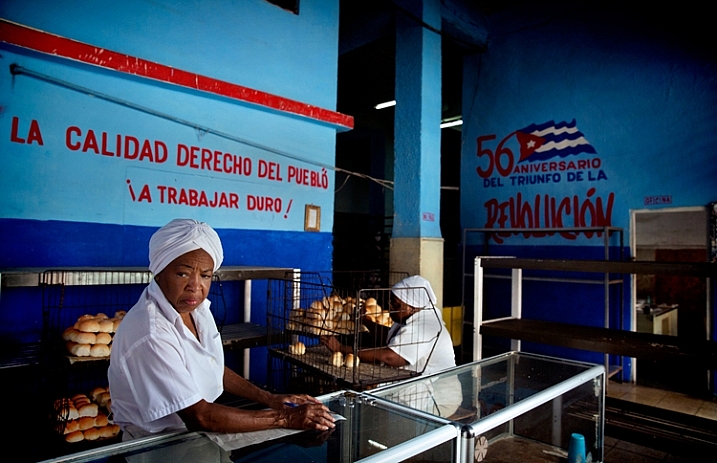
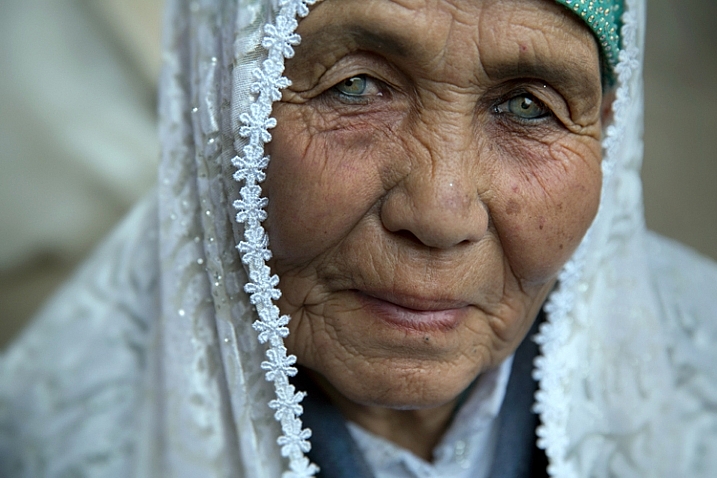
Aperture f/4, shutter speed 10th, ISO: 500, Exposure Compensation -0.3
-Image by Oded Wagenstein-

NGOs

Some large NGOs (non-governmental organizations) need visual material to help them support their cause and attract donations.

Pros: It depends on the organization, but the work usually deals with super interesting projects on subjects like: animal rights, public health, or any other hot topic that demands the world’s attention.

Cons: This is not the job where you will be asked to shoot lovely landscapes and flowers, as many NGOs need photography as visual proof of their cause. This means you might be asked to get photos of matters that the local government wants to hide from the public eye (animal abuse, theft of natural resources, child abuse, etc.)

Tip from a pro: You can start by volunteering with an NGO that supports a cause you believe in. Then, through your working relationships with people from the inside and demonstrated photography skills, you might get to become the official photographer of the organization.

Taking the first step: You don’t always have to start somewhere far away. If this is your first time doing volunteer work, it would be wise to start locally. A nursing home or an animal shelter are good examples. You will start establishing your portfolio, and work for a good cause at the same time.

japan - By oded wagenstein

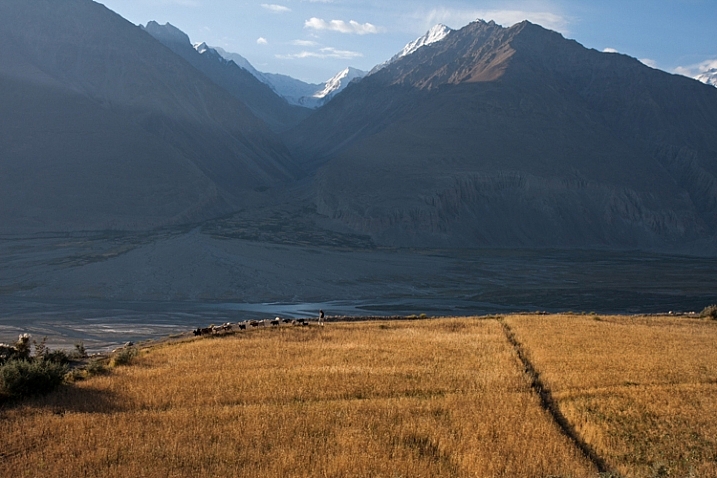
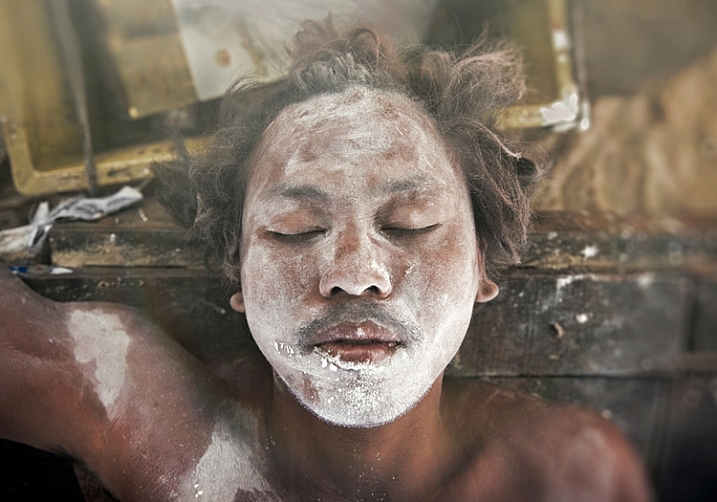
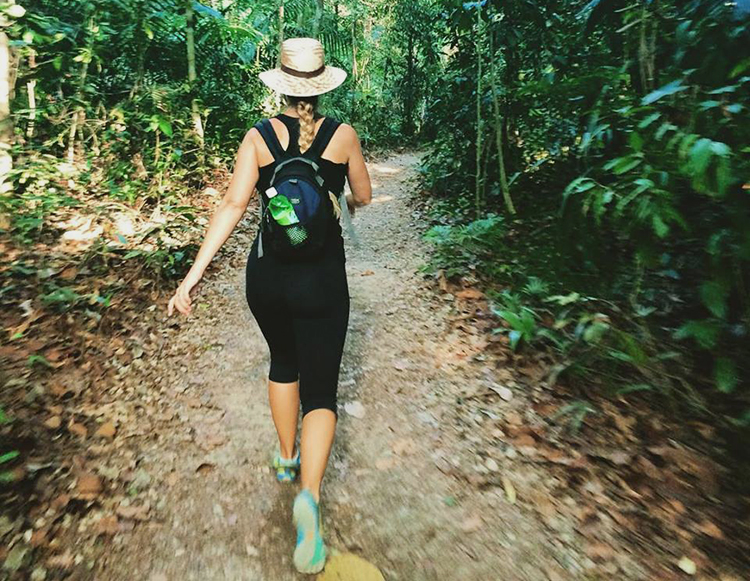
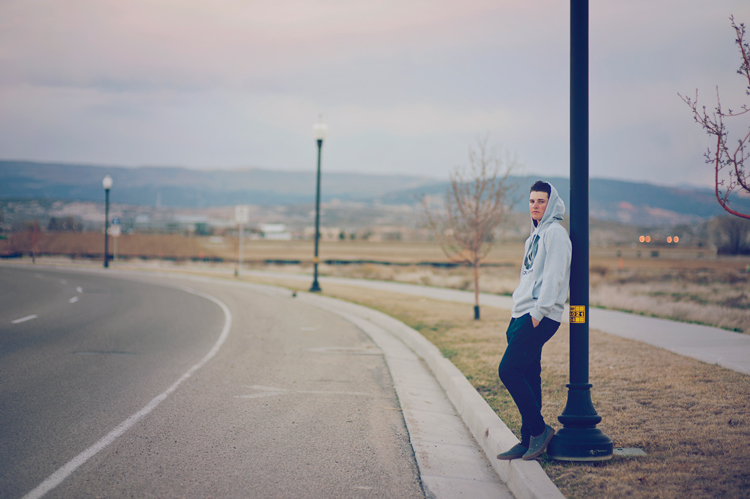
Aperture f/4, shutter speed 100th, ISO: 320, Exposure Compensation -1.7
-Image by Oded Wagenstein-

Commercial organizations

If you are a top notch, worldwide known photographer, it is very likely that customers from all over the world will want to use your services (for fashion, events, sports, architecture, products etc.). But as we are focusing on travel photography, commercial organizations that deal with traveling and tourism are more likely to hire you. Notable examples are hotels, tour companies, airlines and so on.

Pros: The commercial brands who hire a travel photographer are usually worldwide, and that can mean traveling a lot.

Cons: As traveling for free and shooting tourist destinations is a dream job for almost anyone, the fees offered for the job can be quite low. It’s common the photographer only gets paid with benefits like free flights or accommodation.

Tip from a pro: To work with the big brands, you need to market yourself in a way that will appeal to these types of clients. The kind of architectural or food photography a hotel chain needs is very different from what a tour company that specializes in extreme travel. Don’t try to work in all genres and styles. That’s a good path to becoming an inadequate photographer. Focus only on the genre and style you love and put all of your heart and effort into it.

Taking the first step: Approach the client with already made photos. Visited a nice hotel during your last vacation? The hotel’s management will probably be very happy to publish your images if they are good. Most likely they won’t pay you as they did not order the images from you, but they will give you a credit under the photo. But this would be a good start as you’re now published and have a working relationship with a known brand for your CV.

Bakery in cuba - by oded wagenstein

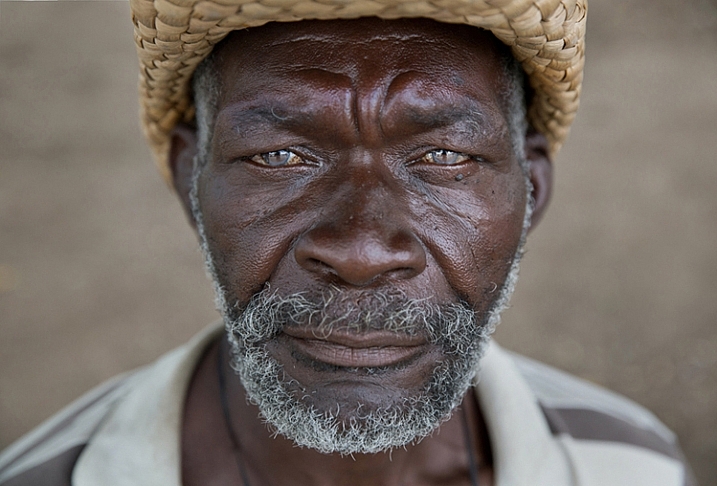
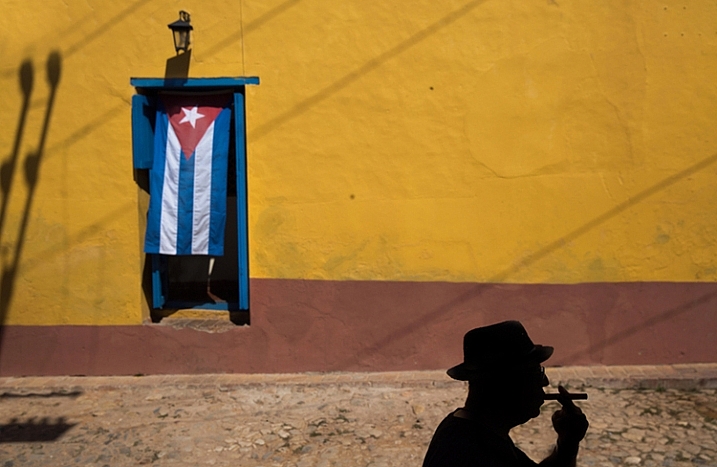
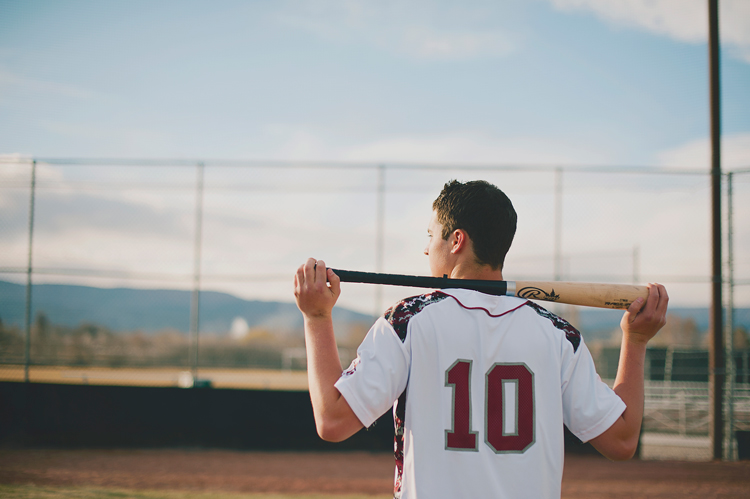
Aperture f/4, shutter speed 10th, ISO: 1000, Exposure Compensation -0.7
-Image by Oded Wagenstein-

Media

Having your travel photography printed on a glossy page of a well-known magazine…if that’s not a childhood dream, then what is? I will divide “media” into three areas: magazines and newspapers, digital platforms, and stock photography agencies.

Magazines and newspapers: Although they tend to be seen as old fashioned and don’t pay as well as other industries mentioned here, working for a newspaper (if you are into photojournalism) or a travel magazine is sure to be an interesting and creative job.

Digital platforms: These days digital platforms and websites are the leading source of information for most people. Although most well-known websites prefer to work with stock agencies (explained below) rather than directly through freelance photographers, some do have their own regular contributors and might send you to cover a story.

Stock photography: Shooting for stock photography is a subject for a different article (or five of them) but you can see stock agencies as the middle man between provider (the photographer) and buyer (magazines and websites). In order for news agencies or image bank websites to send you on assignment, you’re required to be a contract photographer. Each organization has its own contract and demands.  But some photo agencies will be willing to pay for your independent travel images if they are sellable. Do not expect large amounts. But hey, it’s better than nothing.

Thailand - by oded wagenstein

Pros: Dealing with the most interesting stories and places around the globe.

Cons: Of all the other clients, this one will probably pay far less than the commercial world. But hey it’s not all about the money, right? The work is usually as a freelancer as well.

Tip from a Pro: In order for a magazine or news agency to pay for your trip and fee, they need to be positive that you can deliver the job. Establishing a strong portfolio is a must.

Taking the first step: Again, like in other cases, starting locally is best. Ask to contribute photos, or propose a travel story, to your local newspapers.

Trinidad, Cuba - by oded wagenstein

Aperture f/5, shutter speed 100th, ISO: 100, Exposure Compensation -2.7
-Image by Oded Wagenstein-

Second option – Find a job that requires traveling or relocation

If the instability of the freelance photographer’s way of life isn’t for you, you can always find a day job that involves traveling. Then you can go to lots of places, be paid for it through your job, and do travel photography in your spare time. Jobs like flight attendant, global salesperson, English teacher (or a spy!) are just several of many professions that let you visit your dream locations, without being too risky on the financial side.

portrait of a dark boy - by oded wagenstein

Aperture f/3.5, shutter speed 100th, ISO: 200, Exposure Compensation -1
-Image by Oded Wagenstein-

Conclusion

This all may sound hard or even impossible. But, like in most arts, you need to be really good at what you do in order to make a living from it. You need to devote at least 50% of your time to marketing your portfolio, and above all, love your craft with all your heart.

Uzbekistan - by oded wagenstein

Aperture f/4, shutter speed 10th, ISO 160, Exposure Compensation 0
-Image by Oded Wagenstein-

The author would like to thank Nicholas Orloff for his assistance in writing this article

googletag.cmd.push(function() {
tablet_slots.push( googletag.defineSlot( “/1005424/_dPSv4_tab-all-article-bottom_(300×250)”, [300, 250], “pb-ad-78623” ).addService( googletag.pubads() ) ); } );

googletag.cmd.push(function() {
mobile_slots.push( googletag.defineSlot( “/1005424/_dPSv4_mob-all-article-bottom_(300×250)”, [300, 250], “pb-ad-78158” ).addService( googletag.pubads() ) ); } );

The post How to Become a Professional Travel Photographer – Two Paths by Oded Wagenstein appeared first on Digital Photography School.


Digital Photography School

 
Comments Off on How to Become a Professional Travel Photographer – Two Paths

Posted in Photography


3 Steps to Professional Looking Headshots Using One Flash

20 Jul

Ideally, every time we take photos of someone, there is a studio full of equipment at our disposal or wonderful sunlight that is perfectly diffused. This, however, is not reality. Usually, the sun is either too faint or too harsh. We don’t always have access to a studio, let alone one full of lighting gear that we can use. Sometimes, we also just don’t have the time to learn a new technique, rent more gear, or find the perfect location. Other times, the subject has very limited availability and locations. Still, we smile through the limitations and do our best to provide professional images every single time.

Do you feel prepared to compensate for these different light conditions that you may be forced to work with, though?

OneFlash-example4

Natural light is always wonderful for any type of portrait, including headshots. Bouncing that natural light around with reflectors or just finding a bright shaded spot all work well. If you have a flash at your disposal, though, you can create even, or dramatic lighting to accommodate headshot needs.

The following three tips will help you create headshots using only one flash to compensate for less-then-perfect lighting conditions:

1. Diffuse, diffuse, diffuse!

When using a flash, the last thing you usually want is for it to LOOK like you used a flash. To do this, you need to find ways to make the light disperse more, reducing any harsh look that it will otherwise produce. There are several ways to do this, and each on their own will help. Combining techniques works best, though.

  • Bounce it – If there’s a wall somewhere to your side, a ceiling within a couple of feet from you, or if you have a reflector of any kind, bounce it. Aim the flash towards the reflector so that it fills in shadows to compensate for any uneven lighting conditions.
  • Aim the flash behind you to help disperse the light –  This may sound counterintuitive, but aiming the flash BEHIND you helps to disperse the light quite a bit. It provides a front light on your subject, but much softer than would otherwise be if the flash were pointed directly at them.
  • Use a diffuser on the flash – Whether it’s a plastic cover, a fabric mini-softbox, a bendable reflector that attaches, or a homemade version of any of the above – a diffuser directly on your flash will instantly soften the light and allow you more versatile light on your subject.
  • Set zoom on flash to the widest setting possible – your flash can be set to adjust to match the angle of view of the focal length lens you are using. However, this can be manually adjusted regardless of the lens you are using. When the flash is set to 70mm, for example, the light will be more narrow and direct than when it is set to 24mm. While this alone doesn’t make a drastic difference, it is another tool to add for further light diffusion.
Left - No flash. Right - Single flash, on-camera, turned to right of subject for fill light.

Left – No flash. Right – Single flash, on-camera, turned to the right of the subject for fill light.

In the before and after photos above, the left image shows the result using only natural light from the window. It’s beautiful light, but not always what you want.

The right photo shows same location, same position, with a single flash used to fill in the shadows. The flash is on-camera and has a flash dome diffuser on it. It’s angled to left of photographer (right of subject) so that it will bounce off walls and ceiling, and manually set at 1/8th power.

2. Use remote triggers

If you have access to remote triggers, play with using the light to add drama or emotion. This alone will give you a studio look and can be done just about anywhere. Be sure that this type of look is appropriate for your subject’s needs, especially since it tends to have a very strong look. For example, the owner of a flower shop may want something that is more natural-looking and shows the outdoors or her shop, while the owner of a tech start-up may like the strong look of dramatic lighting. While each situation is different, a few options for flash placement are:

  • Directly behind client
  • At 45 degrees behind or in front of subject
  • Directly to side of subject
Left - No flash. Right - manual mode, underexposed several stops, single flash towards right of subject.

Left – No flash. Right – manual mode, natural light underexposed several stops, single flash towards right of subject.

The before and after photos above show how to use a single flash to create some dramatic headshots in any indoor situation. The left photo is properly exposing for the space, using natural light only. The photo on the right is manually controlled to greatly underexpose the natural light (so that the background disappears as much as possible), and then a single flash is placed towards right of subject to give concentrated and dramatic light.

3. Manual flash mode

While it is best to always use your flash on manual mode in order to have full control over the lighting, this is an often overlooked method. Manual mode on your flash will allow you to adjust the strength for any situation. Shooting indoors and bouncing the flash? Start your flash strength at 1/8 of full power and adjust from there. Shooting in full sun? Start at 1/2 strength and adjust down as needed. Need a soft bit of shadow to be filled while indoors? Set your flash strength to 1/16 and adjust from there. Note that you will get to know good starting points for different situations, but adjustments are always needed since every situation is unique.

OneFlash-example6

Left is using no flash, outdoors. Right photo is same position and location, using single flash on camera at 1/4th power.

The before and after photos above show you can use a single flash to compensate for shadows in daylight. The left photo shows direct daylight and no flash. The photo on the right is at the same time, same position, same sun condition, but with a single flash at 1/4 power to help fill shadows.

Regardless of what tools you have access to for each photo shoot, a big part of your job as photographers is to be able to adjust to any situation. While having lots of gear at your disposal is handy, it is not always necessary. Oftentimes, the gear you have on hand can do the job you need it to do; all it takes is some thinking outside of the box.

Do you have ways that you create beautiful headshot or portrait lighting on-the-fly? Please share in the comments below.

googletag.cmd.push(function() {
tablet_slots.push( googletag.defineSlot( “/1005424/_dPSv4_tab-all-article-bottom_(300×250)”, [300, 250], “pb-ad-78623” ).addService( googletag.pubads() ) ); } );

googletag.cmd.push(function() {
mobile_slots.push( googletag.defineSlot( “/1005424/_dPSv4_mob-all-article-bottom_(300×250)”, [300, 250], “pb-ad-78158” ).addService( googletag.pubads() ) ); } );

The post 3 Steps to Professional Looking Headshots Using One Flash by Natalia Robert appeared first on Digital Photography School.


Digital Photography School

 
Comments Off on 3 Steps to Professional Looking Headshots Using One Flash

Posted in Photography


What it Takes to Go Pro – Lessons from 10 Professional Photographers

26 May

The decision to go pro with your photography business is a big step. It’s a time when the future is ripe with possibility and fears tend to run high. In what we call a “crisis of confidence,” you may find yourself comparing your work to other photographers and wondering, “am I really good enough?” or “will people give me a chance?”

When you begin experiencing these thoughts, take a deep breath and remember this; almost everyone feels this way before they begin a new journey – especially if their dreams are on the line. In fact, those super successful photographers you keep comparing yourself to likely experienced those same emotions when they decided to go pro themselves.

I asked 10 experienced professional photographers to reflect on the early days of their careers – from finding their first clients, to marketing strategies they used to establish their brands. Read on to see how each of them was able to find success as a professional photographer — and how you can, too.

It all starts with relationships

750 CaseyKelbaugh

Photo by Casey Kelbaugh

When you decide to offer your photography as a professional service, you’ll need to find a few clients who are willing to take a chance on you. For many photographers, this means starting with friends and family members who already like and trust them. “In my 15 years in the business, I have never gotten a job out of thin air,” NYC-based photographer Casey Kelbaugh said. “ Every single break, every assisting gig, every big campaign, every meat-and-potatoes job has come to me through some kind of relationship.”

Alfred Eisenstaedt, famous Life Magazine photographer said, “It’s more important to click with people than to click the shutter.” and “People hire you because of the quality of your work, but will hire you again and again because they enjoy your attitude and manner both on and off the set.” says landscape and commercial photographer Michael Zide.

Steve Hansen, a headshot photographer from Los Angeles also began his career by leveraging his personal network. “My first client was actually a friend who needed headshots,” he said. “He couldn’t afford some of the more pricey photographers, and I needed clients, so we struck a deal.”

According to photo and video educator Marlene Hielema, networking is also critically important. “You have to get out and meet people! People like to work with people they like, so you need to make connections with people who need the type of work you want to do. Have your elevator pitch ready, because I have met a lot of future clients at parties.”

Marlene hielema 0347

Photo by Marlene Hielema

When networking, Kelbaugh also recommends looking beyond photo editors and art directors, since they’re already being bombarded with photography pitches. “Clients can be found anywhere, so think about reaching out to your friends that work at startups, universities, law firms and restaurants” she said. “When building your clientele, try to think outside of the box.”

Speak up

In addition to utilizing the power of your existing network, don’t forget to take advantage of opportunities as they arise – no matter the time or place. Take Cappy Hotchkiss, a New York-based wedding photographer who met her first buyer at a dog run (a park where dogs can run off-leash). “I had photographed weddings for a few friends and absolutely loved it” Hotchkiss said. “Someone at the dog run overheard me talking about it and asked me to shoot her wedding. I still remember what a thrill it was – and how scary and fabulous it was.”

750 CappyHotchkiss

Photo by Cappy Hotchkiss

Sports photographer Chris Marion had a similar experience when he happened to meet the editor of a local sports magazine. “I asked him if they had a need for additional photographers” Marion said. “He said yes and gave me what was most likely a test assignment. The assignment went well and it went on to become my first real sports job.”

Small wins lead to big ones

As your portfolio and word-of-mouth referrals begin to grow, so will the likelihood that you’ll land that one, great assignment. These assignments can be game changers for some professional photographers – leading to high-profile work and long-term relationships that ultimately lead to even bigger projects in the future. “I got my best client, Google, by landing a smaller event for them and delivering photos that they just loved” photographer Andrew Federman said. “Word spread and they asked me if I would come shoot the inaugural Google Science Fair out in Mountain View, California at Google HQ.”

750 AndrewFederman2 GoogleScienceFair

Photo by Andrew Federman

Marion landed his best client, the NBA, in a similar way. “My hometown of Springfield had an NBA development league and I was their team photographer for five years,” he said. “Through that experience I was able to capture the attention of the NBA, which then led to freelancing opportunities with Sports Illustrated, as well as others.”

Professionalism counts more than you realize

Sometimes that great assignment comes simply from being available. “One day I was at the library and got a phone call from a weird number,” said James Brosher, an editorial, commercial and wedding photographer in Bloomington, Indiana. “I answered, and I was glad that I did; it was a great job that paid my bills for an entire month. The client said he had called a couple other people but I got the job because I answered the phone. Ever since then, I’ve made a point to always answer my phone. You never know when a great client will call.”

Brosher has also landed several jobs because of his flexibility to take on last-minute projects. “One day I was on the couch and got a call from the Indianapolis Star needing an event covered in 15 minutes,” he said. “Being around, available, and being able to anticipate when a publication might need you goes a long way.”

Marlene hielema cycling 703

Photo by Marlene Hielema

According to Christina Van Dyke, the owner and founder of Van Dyke Design & Photography, something she’s found incredibly important is a focus on providing both great work and a great customer experience. “My best client found out about my photographic services from a word-of-mouth referral,” she said. “The lesson I’ve learned is to always treat each and every client as if they are your ONLY client. In return, your clients will reward you with wonderful referrals that keep your business growing and thriving.”

Play the long game

Hansen recommends focusing more on building your name, and less on your paycheck – at least in the beginning. “Don’t be afraid to take a pay cut in the early stages of building your business and name,” he said. “Yes, you may be worth a lot more, but having your work out there is invaluable to building a solid client list.”

750 AndrewFederman1 YouTubeBrandCast

Photo by Andrew Federman

“My advice for young photographers is to remember that it’s the photographs you actually deliver to your clients that set you apart – not how slick your website is, how many Instagram followers you have, or how many blog hits you get,” Federman said. “Marketing is important, but delivering photos that blow away your clients will generate a powerful word-of-mouth force.”

View the complete interviews on SlideShare (below)

Thanks to our contributing photographers:

  • Casey Kelbaugh
  • Michael Zide
  • Steve Hansen
  • Marlene Hielema
  • Cappy Hotchkiss
  • Chris Marion
  • Andrew Federman
  • James Brosher
  • Christina Van Dyke

googletag.cmd.push(function() {
tablet_slots.push( googletag.defineSlot( “/1005424/_dPSv4_tab-all-article-bottom_(300×250)”, [300, 250], “pb-ad-78623” ).addService( googletag.pubads() ) ); } );

googletag.cmd.push(function() {
mobile_slots.push( googletag.defineSlot( “/1005424/_dPSv4_mob-all-article-bottom_(300×250)”, [300, 250], “pb-ad-78158” ).addService( googletag.pubads() ) ); } );

The post What it Takes to Go Pro – Lessons from 10 Professional Photographers by Kelly Kingman appeared first on Digital Photography School.


Digital Photography School

 
Comments Off on What it Takes to Go Pro – Lessons from 10 Professional Photographers

Posted in Photography


What are the Real Responsibilities of a Professional Photographer?

24 Apr

The number of different roles that a professional photographer has to lead these days can be pretty intense and intimidating, but it’s just part of the job. From the creative, to the technical, to the business and marketing, here is a list everything that a professional photographer really has to do to make a living.

Portrait of a dancer

Share this with anyone who thinks you only push a button for a living!

1. A photographer is an artist and storyteller

Professional photographers are in the business of telling stories. They create images that are both beautiful on the surface, and give us a glimpse of what is underneath. Portrait photographers aim to capture a feeling of what the person is like with a single look. Wedding and event photographers aim to tell the story of what the day was like. Product photographers aim to give the viewer an idea of what using the product will feel like. Art photographers aim to make the viewer think and feel something.

There are artistic aspects to all types of photography. To be a good photographer you will often have to compromise to the needs of your client, but figure out how to infuse your spin on what you create whenever possible.

2. A photographer is a craftsperson

No matter how good of an artist and storyteller you are, there lies the underlying fact that photography is also a craft. You need to be good with your tools and technical abilities. You need to have the ability to successfully take what’s in your head and turn it into the final product. Spend an equal amount of time learning your tools as you do thinking about what to capture.

Bethesda Terrace Wedding

Engaged couple

You need to know how to use your camera. You need to know how to use light and color to your advantage. You need to know how to edit and retouch your work so that it can look its absolute best. You need to be able to organize your archive well and to work quickly and efficiently. You need to have a standard workflow. This is all part of becoming a good craftsperson.

3. A photographer is a businessperson

Not many people actually enjoy the process of selling. We all wish our work sold itself – that people would be able to see the talent in the images and would purchase something or hire you based on that alone. However, that rarely happens in the real world, no matter how good you are. Even top artists rely on galleries, representatives, and marketers to sell their work.

From the very beginning, you need to think as both a creative and a businessperson. You need to put equal time into each to succeed. You should read books on selling and marketing. Don’t make people uncomfortable of course, but don’t be afraid to sell. The worst words a photographer can say are, “Sorry for the shameless self-promotion.” Don’t feel shame for promoting what you do. If you’re proud of your product, then let people know about it! Social media, mailing lists, networking, SEO, web design, and branding are all tied into this idea. The more put together you are as a business, the easier it will be to market.

Being a successful businessperson these days means that you have to network. Let people know what you do, pass out your business cards when it’s appropriate, connect with similar creatives to share advice, and connect with people in your community and field. And for pete’s sake, respond quickly to inquiries! If you don’t, someone else will.

3. A photographer is an expert in logistics:

Executive group portrait

Pushing the button is only a tiny part of the process of any job. Photography is about creating an experience for your clients. From the beginning, you have to be good at communicating with them to understand what they want. You can lead clients in certain directions that you think are best, but you need to cater to their likes and interests at the same time. A photographer needs to listen and advise so that everyone has the right expectations and has an idea for how a job will go.

A photographer is a planner. They are in charge of organizing the assistants, travel, make-up artists, and everything else in a seamless manner. Job planning is difficult work and should be charged for. This is all part of being a good photographer. Some high-end photographers have production companies to do this work for them. If you are one of the many who does this yourself, charge for your production time.

A good photographer is meticulous about planning but then relies on serendipity. A photographer is an expert in contingencies and Murphy’s Law, and saves the day when things go wrong. I know wedding photographers who carry small sewing kits with their gear. Plan the day and the shots that you want to capture. Have backups for everything that can possibly break or go wrong. Go into a job comforted that you can handle anything and your confidence will soar. Then when the job happens, keep your eyes open to serendipity. That is where the magic happens. The better planned you are, the more comfortable you will be to veer off of the plan when the situation presents itself.

4. A photographer is an actor and a performance artist

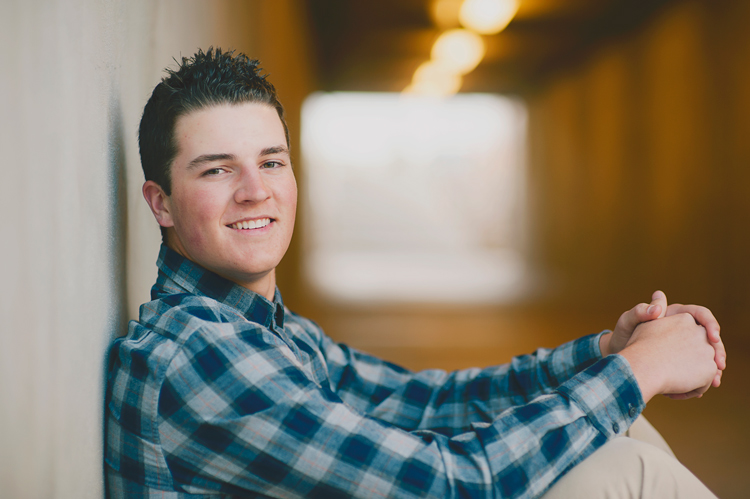
Worrying is good, but showing your worry is not. Plant a smile on your face and show confidence in the face of adversity. Inspire and comfort. You will come across to many clients who will be so nervous. Photography has the ability to make a lot of people nervous. There are many people who hate having their photograph taken.

You want to learn how to read people and get through to them effectively. Each subject is different and sometimes you have to play the role of therapist to figure out how to talk to them to get them to do what you need. I’m an introvert myself and have had to teach myself to do this over the years. It used to make me so uncomfortable but now it’s way far down on my list of worries.

Have a stash of jokes or comments to back you up. When I see people giving one of those awkward smiles to the camera I like to just call them out on it. “Give me your most uncomfortable smile. Well, we can only go uphill from that look!” Or “That’s just terrible.” I don’t use that for all types of people, but it works a lot.

People also like direction. It makes them think that you know what you’re doing. I personally try to capture my subjects in ways that feel natural, so if they look like they need direction, I’ll pose them even if I know I’m not going to use those photos, all to make them more comfortable. Then I’ll tell them to stand in a way that feels natural to them and we’ll go from there. That usually works.

Keep them moving. Tell them to change positions slightly every shot or two. If someone starts getting uncomfortable in their stance, point for them to move somewhere else to break their tension.

Ask them questions that make them think and open up! Get them talking about themselves so they loosen up and like you more. Smile at what they say. Sometimes I’ll even hold the camera up and tell them I want to shoot them while they’re talking. I’ll take some shots while they are and when they give the right look or mood I’ll tell them, “Hold that! Don’t move an inch!.”

A portrait for an engaged couple in Grand Central Station NYC (seen kissing in foreground)

Getting to the point of pushing the button, and all the editing afterwards, is where the real work happens for a photographer. When all of this is done well, the pushing of the button can almost feel like an afterthought. It will be so much easier to record those magical moments when you are able to create a magical environment.

Did I miss out on anything? What else do you think a professional photographer needs to do to be successful?

googletag.cmd.push(function() {
tablet_slots.push( googletag.defineSlot( “/1005424/_dPSv4_tab-all-article-bottom_(300×250)”, [300, 250], “pb-ad-78623” ).addService( googletag.pubads() ) ); } );

googletag.cmd.push(function() {
mobile_slots.push( googletag.defineSlot( “/1005424/_dPSv4_mob-all-article-bottom_(300×250)”, [300, 250], “pb-ad-78158” ).addService( googletag.pubads() ) ); } );

The post What are the Real Responsibilities of a Professional Photographer? by James Maher appeared first on Digital Photography School.


Digital Photography School

 
Comments Off on What are the Real Responsibilities of a Professional Photographer?

Posted in Photography


6 Things to Consider Before Becoming a Professional Photographer

15 Apr

192

So, you’ve got a nice camera, you really love photography, and you’ve been thinking that maybe it would be nice to make a little bit of money from this passion you’ve discovered. Before you decide to make that leap, read on. You may be convinced to throw that idea out the window, or you may find that you truly are ready, and it’s time to try your hand at photography as a career.

Before we go any further, I have to clarify something about the photos in this article. First of all, I had to include photos, because every article is better with pictures, right? Secondly, this session was inspiring, fun, and an example of every reason that I LOVE being a photographer. This client does not exemplify any of the cons of the business. Also, for this article “professional photographer” is defined as someone who gets paid to take photos, particularly portrait photographers.

137

1. You’re not good enough…yet

Maybe you love photography, and maybe you get a lot of compliments on your photos, but you may not be a good enough photographer to actually take money from people yet. Do you sometimes take a bunch of photos where the majority of them are garbage? Do you often say to yourself, “I’ll fix that later in Photoshop?” If your photos aren’t consistently in focus, exposed correctly, and great IN CAMERA, before you get to Photoshop, you’re not ready.

If you look at other professional photographers’ work and wonder how on earth they got their photos to look like that, you are not ready. I don’t mean that you have to be able to produce photos exactly like the photographers that you admire. I’m saying that you should have an understanding of how they achieve the look they get. You should know how light, depth of field, angles, etc., contribute to the photo. You should have an idea of how much of the photo is a result of post-processing.

Having a nice camera does not qualify you to be a professional photographer.

151

2. You don’t have enough experience

This goes along with not being good enough, but experience is important. You have to be consistent every time. You have to know that every single session you do will result in good photos, and that you can roll with the punches if conditions aren’t ideal. You have to know your camera settings inside and out, because when you’re chasing a naughty toddler around, you don’t have time to try to figure out what your shutter speed should be.

I’ll admit that I didn’t have enough experience when I started. I did some sessions for friends and family, then requests started coming in. I didn’t really have the goal of making money with my photography, but when people started asking me, I thought, “Hey, why not?” Some of my early sessions are dear to my heart, but some of them I look at and cringe. I feel bad that people paid money for me to experiment and find out who I was as a photographer.

182

3. You don’t want to lose the love of photography

Once you turn a passion into a job or career, you have a very real possibility of it turning into something you do because you have to, and not because you want to. I’m not saying this happens to everyone, but I’ve seen enough professional photographers burn out and quit, that I know it’s a very real thing. You may think that it will be fantastic to make money doing something you love, but are you ready for the possibility of not loving that thing anymore?

True confession here: I rarely get my camera out anymore for anything except a paid session. When I’m on vacation, sometimes the last thing I want to do is “work” while I’m there, and I certainly don’t want to drag my camera around when I’m supposed to be having fun.  Then, if I do take some photos just for the heck of it, they sit there on my computer forever, because I don’t really feel like sorting and editing yet another batch of photos. This doesn’t happen to every pro photographer, but I’m being real here. Sometimes I wish that I could just take photos because I love it, but the truth is, I’m often too tired after my paid sessions for the week to get my camera out again. I still love photography, but it’s more that I love my job; I love the photos and what I can create, I love working with people, but I don’t love photography just for photography’s sake anymore.

186

4. You don’t want to deal with business stuff

Taxes, business licenses, contracts, equipment upkeep, scheduling, email, phone calls – it’s all a very real part of running a photography business, and it takes far more time and effort than you’d like to believe. Being a professional photographer is not just happily snapping some photos, collecting money, and then spending all of that money on anything you’d like. There are expenses, lots and lots of expenses. There are boring, repetitive tasks. There are hours spent doing behind the scenes stuff.

No matter how great of a photographer you are, if you aren’t good at the business side of things, you are going to struggle as a photographer. It’s hard. It’s frustrating. Sometimes it’s overwhelming. Some days horrible things happen, like The Cloud losing your entire photography calendar (yes, speaking from experience). Sometimes you have to ask people for money, and that’s not easy for everyone. You have to be able and willing to run a pretty tight ship with scheduling, collecting money, and sticking to your policies. You have to decide your policies, and your fees, and how you are going to do business beforehand, because believe me, people will ask you to change all of it for them, and you have to be ready for it.

165

5. You don’t like to deal with difficult people

Luckily for me, I actually really love working with people, but even then, sometimes some people are hard to deal with. When people are paying you money to photograph them, sometimes they expect you to do anything and everything they want, and sometimes, even when you’ve done your best, they aren’t happy with you. If you are sensitive, like I am, that kind of criticism can be very hard to take.

Most of the people you will take photos for are fantastic, wonderful people, who love your work, and love you, which is why they hired you. That doesn’t happen every time though. Sometimes you have to spend lots of time on the phone talking to a worried client (what about the weather? what about junior’s bad haircut? what about clothes they’ll wear? what if they smile awkwardly?). Or someone who has lots of ideas they saw on Pinterest, and wants to discuss every one of them with you, in depth, even if they aren’t even remotely your style of photography. Sometimes you’ll show them their gallery and they’ll say they love it, except can you photoshop every single wrinkle off of their face? Questions are great, and most people don’t have unreasonable demands. But, you have to know that sometimes people are just not on the same page as you are, and you have to be able to work with them, and do your best to keep them happy.

155

6. It isn’t the fairytale job you think it is

I hear from people all the time about how much fun it must be to be a photographer, and how much they wish they could be a photographer too. Many people who jump into the photography business, without doing a lot of research and self-evaluation, get a harsh slap to the face when they realize that it’s work. A lot of work. Many people pop in the “professional photographer” scene on a whim, and pop right back out of it within a year or two, and sometimes don’t even last a few months. It’s work to get clients. It’s work to keep clients. They don’t just fall in your lap, waving hundred dollar bills and smiling their pearly whites for your camera.

You’re going to have competition, and sometimes criticism from others. Sometimes the world of photographers can get pretty nasty. You will find wonderful people to collaborate with, and those who encourage you, but you will also find some that will tear you down if they get the chance.

There are many benefits of running your own business, but it’s also hard. You have to know what you are doing, and if something goes wrong, it’s all on your shoulders. Being a professional photographer is much more than loving to take pictures. When you realize all of the work it’s going to be, you might decide that taking photos for the love of it, and because you’re an artist, may be much more fulfilling in the end.

169

Do I sound a little bitter? I know that I might, but I want to be realistic here. I think being a photographer is such a romanticized notion, that there are oodles of people just itching to jump into photography as a business, without really knowing what they’re getting into. I’ve learned so much over the years, and sometimes I wonder if I would have even started had I really understood all of the cons.

Then, remember why I do this. Yes, it’s a job, and it’s hard. Yes, I hate the business side of things sometimes. Yes, some days I want to go hide in a hole and bury my camera there. But most of the time I feel blessed beyond measure to be a photographer. I love the people I get to work with. I love creating beautiful photos, and capturing real personalities. I love happy clients, and I love that I can create memories for them that will last forever. Right now I wouldn’t trade this job for any other, because now, that I’ve learned and lived through the hard parts of my job, I know that it’s all worth it, for me.

Now you get to decide: will it be worth it for you?

googletag.cmd.push(function() {
tablet_slots.push( googletag.defineSlot( “/1005424/_dPSv4_tab-all-article-bottom_(300×250)”, [300, 250], “pb-ad-78623” ).addService( googletag.pubads() ) ); } );

googletag.cmd.push(function() {
mobile_slots.push( googletag.defineSlot( “/1005424/_dPSv4_mob-all-article-bottom_(300×250)”, [300, 250], “pb-ad-78158” ).addService( googletag.pubads() ) ); } );

The post 6 Things to Consider Before Becoming a Professional Photographer by Melinda Smith appeared first on Digital Photography School.


Digital Photography School

 
Comments Off on 6 Things to Consider Before Becoming a Professional Photographer

Posted in Photography


Review of the Mindshift Gear Rotation180° Professional Backpack

15 Apr

Screen Shot 2015-03-19 at 2.40.05 PM
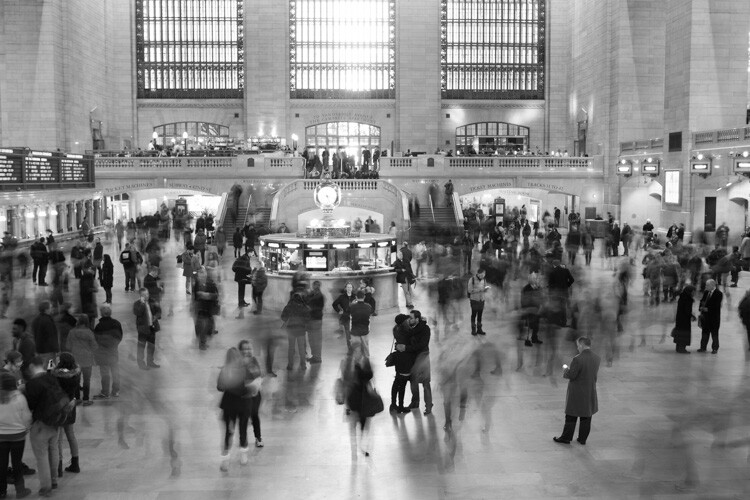
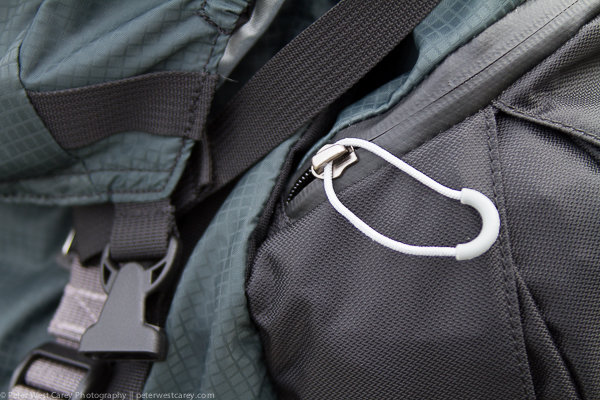
I thought the whole Rotation180 thing was a gimmick, and avoided the packs by Mindshift Gear because who needs a new gimmick, right? I wanted a useful pack and had it in the f-stop Gear Satori EXP that joined me trekking in Nepal more than once. That pack is amazing and fits all kinds of stuff for my longer trips in the backcountry.

The best way I can describe the Mindshift rotation180° Professional pack is that it’s more amazinger. The Satori EXP is an amazing pack and can take a beating, but I found the rotation180° Pro better suited to my style and shooting needs. But, it’s not for everyone. Instead of a boring, exhaustive review, let me point out the highlights that sealed the deal for me.

The Rotation Gimmick That is Actually Awesome

One of the biggest obstacles I find when I am out hiking with my camera is stopping to get it out my pack each time I want to use it. Not only that, but living in Washington half the time means hiking in inclement weather, which means leaving my camera on the outside is not much of an option. The same goes for trekking in the Himalayas; having a heavy camera around my neck or shoulder just doesn’t work for me.

The r180° Pro attempts to solve this problem by making the lower part of the bag into a huge waist pack that swings around when needed. It works quite well.

Peter-West-Carey-_PWC3982

The rotation feature requires that your hip belt is attached first, otherwise it won’t really work. The belt is nicely padded all the way around, and is as comfortable as I’d expect in a long distance pack. The clips in front are normal size, I found the adjustment straps a little more complex than they need to be, but they work.

On the right side of the pack is a quick release buckle.

Peter-West-Carey-IMG_7344

Peter-West-Carey-IMG_7345

The more I study it, the more I am impressed because the buckle can only be removed by sliding it down, yet it can be attached by simply placing both pieces close together and letting the magnetic, one-way buckle attach. This makes it remarkably easy to attach by sense of feel but still secure enough to keep things in place. It is very well thought out.

With the buckle detached, the entire waist pack section is free to rotate. There is a handle loop on the right side of the pack, as well as huge loops on the front of the belt to aid in rotation.

Peter-West-Carey-IMG_7340

You can see in the image above that a full size DSLR (Canon 7D with battery grip, in this case) will fit, even with a 28-300mm or 70-200mm lens attached. The compartment comes standard with those dividers you find in all the packs these days, and can easily accommodate a smaller DSLR or mirrorless camera, an extra lens and a flash.

Screen Shot 2015-03-19 at 2.36.25 PM

Peter-West-Carey-IMG_7341

Inside the compartment there is ample storage for the small things. Filters and cards have side and top pockets including one with a zipper and mesh to make finding articles easy.

The waist belt also comes with its own rain cover and pockets for spare batteries and cards on the belt, interior pockets for filters, and other items.

Peter-West-Carey-IMG_7342

Peter-West-Carey-IMG_7343

But Does it Work?

At its core, the rotation180° is all about the quick action of slipping the waist belt around to access your gear. So how well does it work? I tested the pack over the course of two months, on ten different hikes, covering over 52 miles, as well as seven airline flights.

To those ends, the pack works very well for the right audience. It’s not as easy to take through airports as a smaller bag, or a roller bag as I am accustomed to using. But on the trail, it is hands down the best pack for mixed use.

Peter-West-Carey-_PWC3984

By that I mean, when your goal is to cover some ground and also take some photos, especially in inclement weather. I found this pack extremely useful for taking photos while keeping up with other non-photographers in the group. Because the action of sliding the belt around, extracting my big old camera, taking a shot and returning it all in place is so easy, I take more pictures and fall behind less than when I have to remove my whole pack.

This action alone is what has made the rotation180° Pro my replacement pack for the f-stop Satori EXP.

A Technical Pack

Beyond the waist belt, the pack is a technical pack, meaning those who love options and comfort in their pack will be happy. There are dozens of attachment points for hiking, skiing, and photography gear. It comes with a rain cover and tripod attachment straps.

Peter-West-Carey-_PWC3993 Peter-West-Carey-_PWC3991

Peter-West-Carey-_PWC3989

The shoulder straps allow for a full range of adjustment for someone up to about 6’6″. Ice axe/trekking pole loops on the bottom match up with daisy chain loops on the back for the most adventurous. An outside stuff flap allows wet or oversized gear to remain away from precious camera gear.

Peter-West-Carey-_PWC3988

There are daisy chain loops on the bottom for affixing things like sleeping bags or pads. Compressions straps are also available to help hold the pack to your back.

Space!

The space in this pack! Inside the main compartment is a removable organizing bag. This is accessed from the part of the pack that goes against your back, which helps increase security while traveling. With this bag removed, as I often used the pack, there is ample room for a full day hike worth of food, clothes, first aid, etc.

Peter-West-Carey-_PWC3985

Screen Shot 2015-03-19 at 2.37.52 PM

While knocking around town I carry a few books, iPad, chocolate and other odds and ends in this space. There is also a large pouch on the back of the pack that fits flipflops or a larger map (pictured below on the right). Along the sides are large tube sleeves, one of which typically holds the raincover. On the left side the tube can hold a large water bottle or bladder (there is also a hydration hole to allow a bladder to remain inside the main compartment).

Peter-West-Carey-_PWC3987

Organization

This pack is not the best for carrying a home office, as I am often apt to do. There are zippered pockets on the outer top flap, inner top compartment, and inside the opening against your back. There are five pockets in all, that are perfect for filters, remote controls, card wallets and recharging cords. But it doesn’t have anything for pens or business cards or protection for a laptop/tablet.

Peter-West-Carey-_PWC3986

That being said, the rotation180° Pro Is not designed for the mobile worker. It does an excellent job of keeping your photo gear separated (the waist belt has pockets for cards, filters, and other small items as well). I’m quite happy with its ability in that case. It’s not the bag for you if you need a mobile office bag.

Thoughtfulness in Design

It’s the little things I keep finding, and appreciating on this bag, even two months later:

  • The back open sleeve is entirely removable.
  • There are straps to help balance the load of a tripod specifically.
  • There is a whistle in the sternum strap.
  • The big thumb loops to help rotate the waist belt (and to just hook your thumbs in while on long hikes).
  • Rubberized zipper covers to keep out the elements.
  • A hidden compression strap for even more gear on the back, or your tripod.
  • Loops on the waist belt, to attach water bottle holders or lens bags.
  • Velcro attachment on the rain covers so they don’t blow off, but can be removed to dry out.
  • Custom designed outer rain cover that works with the waist belt system flawlessly.
  • The waist belt magnetic clip.
  • It fits in overhead compartments of major airliners.
  • The waist belt is easy enough to remove when the pack is not on your back, but is harder than any other bag I’ve used.
  • Comfort.

All the zipper pulls have decent sized loops, and there are two zippers to make opening the main compartment easy. Inside there is enough room for a full size DSLR and longer lens (pictured is a Canon 7D with battery pack and 28-300mm lens, equivalent in size to a 70-200mm lens). The unit also comes with dividers for those with smaller cameras and multiple accessories.

Peter-West-Carey-_PWC3990

No pack is worth its weight if it is not comfortable to lug around. While the pack is not super light because of its substantial build quality, materials and stitching, the weight is carried well thanks to extra padding against your back and shoulders.

I would estimate that the pack has ridden on my back for about 60 hours. This includes city walks, forest hikes, snowshoeing, airports and just standing around waiting for transit. I have tested other packs for much shorter periods and that is because they didn’t feel right. I would not hesitate to take this pack on multi-week treks in the Himalayas, as I have done with the f-stop Satroi EXP.

What Doesn’t Work

The pack is not perfect, but it’s close. It really is not the right size pack to be schlepping through airports. While I have been doing it (so I can use the bag at my regular locations) I prefer the f-stop Guru instead, or the ThinkTank Aviator rollerbag.

Removing your camera when the pack is not on your back is not that hard but can make things dirtier than normal when on the trail, because you now have two pieces in the elements.

This may seems like a small thing, but I found that dog hair loves this pack and sticks quite easily. I know this is not normal review criteria, but this bag is more magnetic to dog hair (and probably llama, cat and zebra hair as well) than any pack I’ve used.

Conclusion

The Mindshift Gear rotation180° Pro is one heck of a great bag. It is also not cheap and retails for $ 389.99 USD. Thankfully that cost translates into care in design and a solid build (nothing on this bag feels cheap). A month after using the bag I was still finding helpful attachment loops and straps.

This bag is designed for the active photographer with any size camera, while noting it works well for large lenses. Mindshift also has smaller versions of this bag if you don’t need to carry so much gear.

Finally, if you have a family who has a mind of their own and tends to walk away even after you have muttered, “Hold on a sec, I need to get a photo of that!” for the 60th time during a trip, this bag is for you. I love the ability to quickly get my shot and return my camera to both a comfortable carrying position, and a safe spot out of the elements.

Disclaimer: Mindshift Gear furnished the author with a pack in order to review this product.

googletag.cmd.push(function() {
tablet_slots.push( googletag.defineSlot( “/1005424/_dPSv4_tab-all-article-bottom_(300×250)”, [300, 250], “pb-ad-78623” ).addService( googletag.pubads() ) ); } );

googletag.cmd.push(function() {
mobile_slots.push( googletag.defineSlot( “/1005424/_dPSv4_mob-all-article-bottom_(300×250)”, [300, 250], “pb-ad-78158” ).addService( googletag.pubads() ) ); } );

The post Review of the Mindshift Gear Rotation180° Professional Backpack by Peter West Carey appeared first on Digital Photography School.


Digital Photography School

 
Comments Off on Review of the Mindshift Gear Rotation180° Professional Backpack

Posted in Photography


What Defines an Amateur versus a Professional Photographer?

02 Feb

If you’ve been taking photos for a while, this question will undoubtedly cross your mind at some point: “Am I a professional photographer or an amateur?” The idea of what separates an amateur from a professional sparks many debates, and there are many ways of looking at it.

Bob Prosser

By Bob Prosser

What the Dictionary says

Perhaps the most straightforward way of separating amateurs from professionals is looking in the dictionary. By definition, an amateur is “a person who engages in a pursuit or activity for pleasure rather than for financial benefit.” On the other hand, the definition of a professional is a little less straightforward. Sources define a professional as simply as “one who earns a living for their occupation,” or as vague as “a person who is expert at his or her work.” Clearly, it’s this vagueness of what a professional is that is at the root of many debates. Still, by using dictionary definitions, we are left with the notion that if you are not pursuing photography for profit, then you are considered an amateur, and the reverse is true for professionals.

Tax Credits

By Tax Credits

What the Government says

Regardless of how you personally classify yourself as a photographer, it’s more important to understand if the government sees you as a professional or an amateur. Depending on where you live and conduct your photo shoots, there may be certain rules and regulations you need to abide by if you are a professional photographer. For example, American citizens who make money through photography are subject to paying federal and state income taxes on either an annual or quarterly basis, depending on the amount of income earned. There are also state and federal business licenses that must be obtained, and depending on the type of photography you do, you may even need to collect sales tax from your clients.

However, one bright side to being a professional photographer in the government’s eyes is the ability to write-off certain photography expenses to lower your overall tax obligations. These licenses, fees, and taxes will vary according to where you live, but it’s important to do your research and make sure you are operating within the laws to avoid future penalties. I recommend consulting with a local tax professional to make sure you are squared away. Bottom line: most governments say that if you are collecting a paycheck for your photography work, then you are considered a professional, and with this designation comes responsibilities.

EpSos .de

By epSos .de

As a Professional, Think of Yourself as a Business

Dictionary and government definitions aside, another way to distinguish yourself as a professional is to confidently present yourself as a business, not just a photographer. Think of any small businesses you patronize regularly, and all of the aspects that make them a respectable commercial entity. Everything from customer service and marketing, to accounting and operations are vital pieces that should be part of your own photography business.

One aspect that is particularly important for separating yourself as a professional photographer is the way you handle new client inquiries. Have a comprehensive process in place, such as a form or worksheet, that helps your client thoroughly and efficiently present the scope of work they have in mind. Also have your own rate sheets, contracts and invoices set up and ready to be filled out.

Photography inquiry form

Example work flow:

  1. Incorporate inquiry forms on your website’s contact page that allows clients to submit photo project details ahead of time to help prequalify them. Also, have a predetermined rate sheet that you can easily refer to if you need to come up with a price on the spot. Remember that confidence is key, especially when asserting your rates.
  2. Have a quote and contract for every job. Based on project scope, send the client a proposed photography evaluation form and a contract that outlines the services you can offer and includes details such as usage rights, delivery options, and proposed timelines. Get the contract signed by the client to confirm agreement.
  3. After the job is complete, send client an invoice using your accounting software or an invoice template you keep on hand. Also be prepared to send over any tax-related documents such as w-9 if the client requests it.

By making the initial inquiry process easy for your client, you are not only gaining their trust in you, but also making your own work flow easier.

So what do you think? How do you define the difference between a professional photographer and an amateur?

googletag.cmd.push(function() {
tablet_slots.push( googletag.defineSlot( “/1005424/_dPSv4_tab-all-article-bottom_(300×250)”, [300, 250], “pb-ad-78623” ).addService( googletag.pubads() ) ); } );

googletag.cmd.push(function() {
mobile_slots.push( googletag.defineSlot( “/1005424/_dPSv4_mob-all-article-bottom_(300×250)”, [300, 250], “pb-ad-78158” ).addService( googletag.pubads() ) ); } );

The post What Defines an Amateur versus a Professional Photographer? by Suzi Pratt appeared first on Digital Photography School.


Digital Photography School

 
Comments Off on What Defines an Amateur versus a Professional Photographer?

Posted in Photography