Post-processing can be a minefield. Beginners especially can feel overwhelmed when confronted by amazing software, that can do almost anything, like Photoshop for example. However, everyone starts from somewhere, and not everything is terribly confusing. I am personally a fan of simplicity, when it comes to technology. Let me share with you a few simple steps on how to get started batch processing using Adobe Bridge.
Editing in Bridge is super simple, and as easy as one – two – three. Open your file, edit your photo, save your file. I will walk you through it, and try to demystify the first step in post-processing, without touching Photoshop.
What is Adobe Bridge?
Bridge is part of Adobe’s Creative Suite, and is a media browsing application. It is an app that enables you to view your entire computer contents, manage and organize your digital files, and edit your photos without the need to import and file them in various catalogs elsewhere. For photographers specifically, Bridge simplifies the first step in the editing process, because within Bridge you can do the following easily, to name a few:
- Browse photos
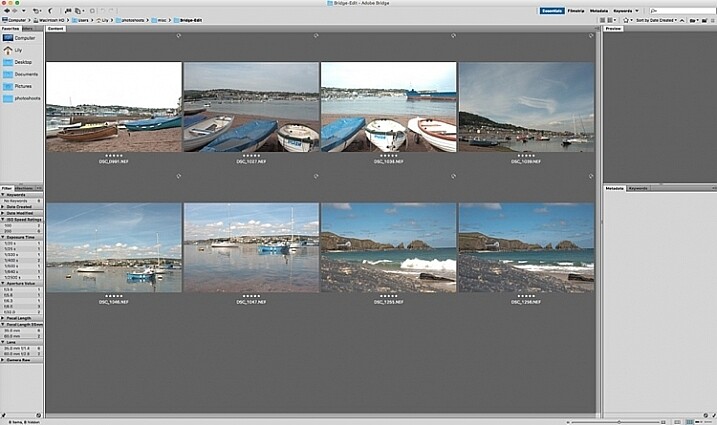
- Rate photos
- Delete photos
- Rename, move, or copy multiple files at the press of a button
- Organize your files using various filters so you can perform your desired function in batches
- Watermark, copyright and manage metadata information
Adobe Camera Raw
To edit photographs in Bridge, you need to have Adobe Camera Raw, a powerful plug-in that allows you to edit and enhance any photo, including JPGS. RAW files however, can only be opened, and read, in Adobe Camera Raw.
I would suggest that you shoot in RAW. Here is a good article about RAW vs JPGS which explains the benefit of shooting in RAW format. I shoot in RAW, and always edit from that format in Bridge, as my starting point. If you photograph in RAW, make sure you have downloaded Adobe Camera Raw, preferably the latest version, onto your computer before you can edit the files in Bridge.
A first word
This tutorial is a very basic suggested process of editing in Bridge, meant to aid your understanding if you have never used Bridge before. I do not claim it is the better way of editing nor the perfect way; it is one option, among many others available. Bridge is my personal preference over Lightroom, and I choose to use as much or as few of the functions in Bridge as I see fit for every image, or batch of images, that I edit. I like Bridge because, together with Adobe Camera Raw, it is straight-forward, hassle-free, and offers a non-destructive way of editing.
Loading your images
Before starting the batch processing, you need to load your images to a new folder on your computer.
My suggestion would be to download your images from your memory card, directly onto your computer. In my opinion, this is the safest, and most direct way, to copy over images from your memory card to your computer, without having to go through various software that potentially could complicate the copying process. Keep it as simple as possible to try and eliminate any malfunctions or errors right at the start. Use an external USB card reader to load your images into your computer, if it doesn’t come with a built-in one.
Put your images in a new folder clearly labeled so you know exactly where to find them. As an added step, when I copy a new set of images from a memory card on to my computer, I also immediately copy the same set to various external hard drives and cloud storage for back-up and safe-keeping. Always copy from the same memory card so you keep the transfer direct, and minimize potential errors. For example, if you copy your memory card images to a folder called Set A, do not then copy the images from Set A into another external hard drive folder; do not create this unnecessary step. Paste the same set of images from the memory card, directly where you want them stored on an external hard drive or on the cloud.
Once your images are safely copied, open Bridge. You will need to be subscribed to Adobe CC to have access to this. Subscriptions are now very affordable, compared to previous years when you had to buy a license of the very expensive full Adobe Suite just to use one software.
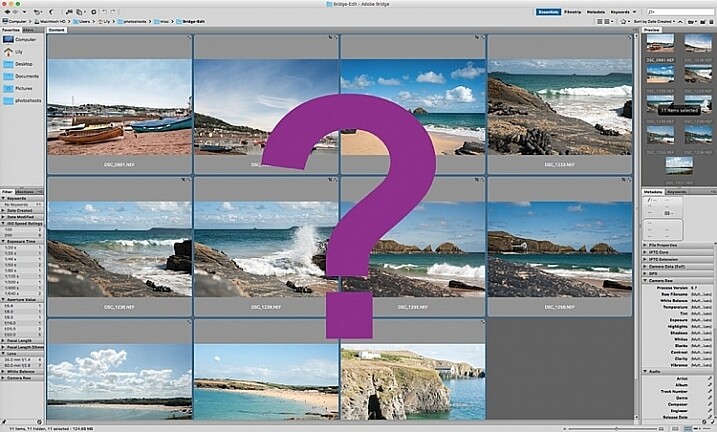
You will see the contents of your computer on the left side navigation menu. Find your folder, click on it and your images will be displayed on the main window. RAW files will be displayed as CR2 or CRW files for Canon cameras, NEF files for Nikon cameras and DNG for some other cameras (each manufacturer has a proprietary raw file format).
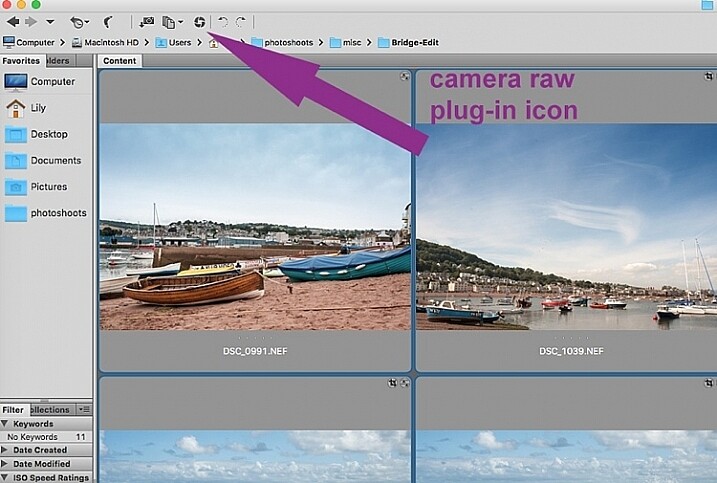
Select your RAW files, and open them by clicking the Camera Raw plug-in icon with the images selected.
As a RAW file is an unprocessed image containing all the information the camera sensor sees. It can appear very flat, and darker than what you may have seen on your camera’s LCD screen, which displays a JPG preview of your image, and as such has already been processed by the camera for preview purposes.
An important note to consider when batch processing, is that it is most effective when used on images that are photographed using similar light and settings. The main thing to remember is that you are able to apply global edits in a few steps to multiple images, but the reality is that you may still have to tweak each image as appropriate before you save it.
Batch processing
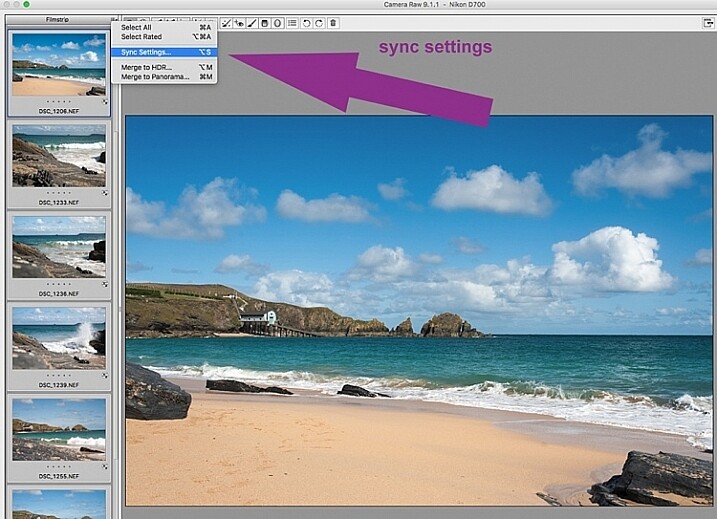
There are two ways of applying edits in batches. Below I make reference to selecting all images using cmd/ctrl+a, and making your adjustments by applying them to the images simultaneously – that is one way. The second way is to synchronize edits. To do this, use one image with all the adjustments made, then select all other images and click the synchronize button to apply the same adjustments to the rest of them.
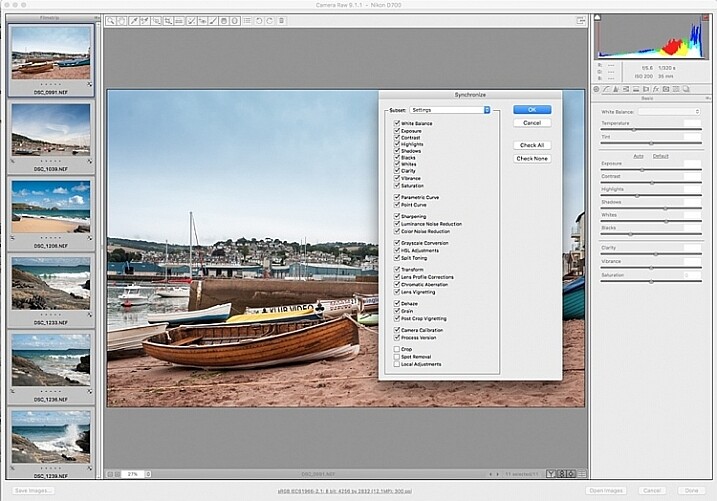
The idea behind batch editing is that you can apply a set of edits to multiple images, by only doing the adjustments once. To do this you can either select all the images you want to edit and make your adjustments while all the images are selected – or you can edit one image first, followed by selecting all the images (making sure the edited image is the one highlighted with the blue box around it) then synchronizing the edits across all the images. A new window opens up with a series of boxes so you can check the settings you want to synchronize across the batch. I tend to uncheck the crop and local adjustments as those settings usually need to be specifically applied to each individual image.
Here is a key point to bear in mind when synchronizing your settings across the batches: It is important to note that you only want to do this with global adjustments that you want applied to the entire batch, and do it at an early stage of editing. If you use the synchronize function at the end of your edits, when you may have made various local adjustments to each individual image, any synchronizing action done then will overwrite previous adjustments (depending on what you select in the Sync settings popup box).
Step 1: Correct Lens Distortion and Chromatic Aberration
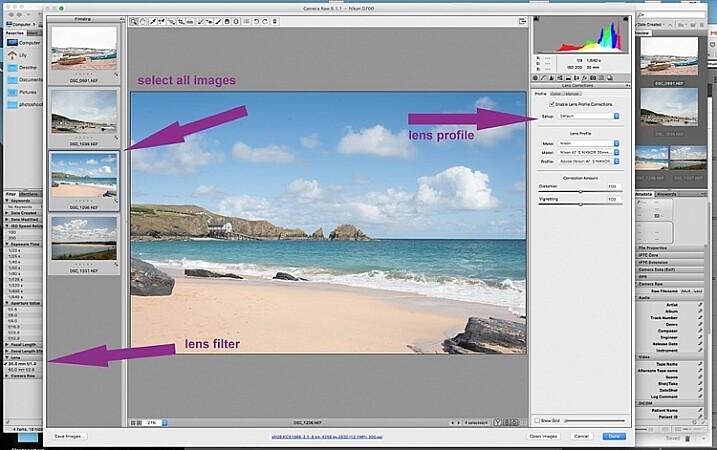
On the left hand navigation filter, choose Lens. A dropdown menu of the lenses used appears. I correct distortion on all images photographed around the 50mm focal length and under. By clicking on the specific lens, you are filtering the set so that only images photographed with that lens are shown in the thumbnail window. Select all the images by clicking cmd/ctrl+a . With the images selected, click the camera lens icon to open the Camera Raw plug-in and window. Select the images again by clicking cmd/ctrl+a, and go to the Lens Correction tab on the right hand navigation panel. On the Profile tab click the box that enables lens correction and choose your camera and lens details from the drop down menus. If your lens isn’t in the list, alternatively you can do this manually using the sliders on the Manual tab. Click done and your changes will automatically be saved.
Often with extreme lens distortions coupled, with straightening adjustments, you will need to crop your images. Type c (keyboard shortcut) and the crop box at the top will be highlighted. Hold down the crop icon to bring up the crop ratios. By doing this, your image will be constrained to the ratio you have chosenwhen you crop. Don’t forget to click done to save your changes.
Do this for all the lenses for which you want the distortions corrected. If you are only editing a batch photographed using one lens profile, you do not need to click done just yet. You can keep making further edits before clicking done.
Next correct any Chromatic Aberration. I only do this step if I know I have taken images in bright light using a very wide aperture such as f/2 or wider. The filtering and batch editing method is the same as above. However, I do this for each image individually at 100% view as each image would have various amounts of chromatic aberration and varyious color fringing.
Step 2: Correct your White Balance
Once all the distortions on various lenses and focal lengths have been corrected, open your images again in the same way. Now you are ready to make batch edits.
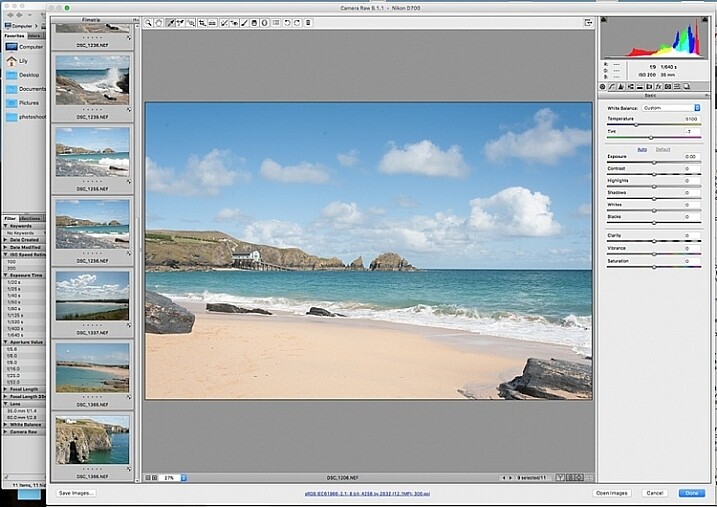
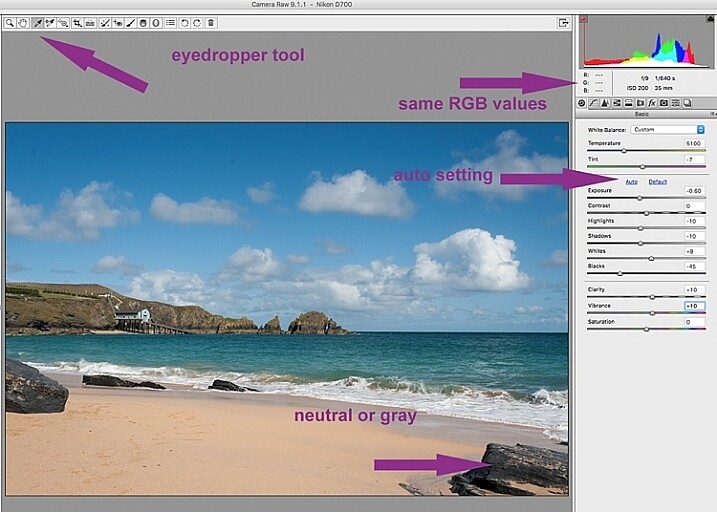
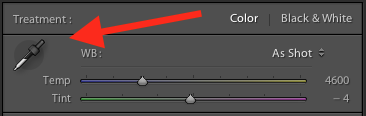
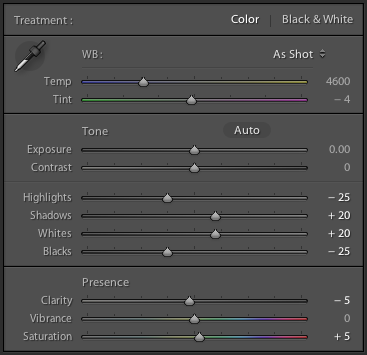
Once in Camera Raw, select a set of images that have been photographed in the same, or similar light. With the images selected correct the White Balance using the eyedropper tool. You need to find a neutral area (gray, or white) to click the eyedropper tool on and aim to get the RGB numbers to read the same, as much as possible. That way you know you are getting the most neutral color in the image. You can also correct White Balance by eye if you are confident enough to differentiate color temperature, although this will be less accurate than going with the RGB values.
You will notice that the White Balance changes on all the images you selected just by setting it on one image. Images that have been photographed in different light, or at varying times, will register a different White Balance. So, batch editing an entire set of images photographed in various places in this way, will produce irregular color results.
A solution to this is to use a gray card and have this set when photographing, or set your color temperature in-camera. By doing this the White Balance will be consistent throughout your images, for that time and setting. Here is a useful article on how to set your white balance in camera using a gray card. For more information on white balance and color temperature click here.
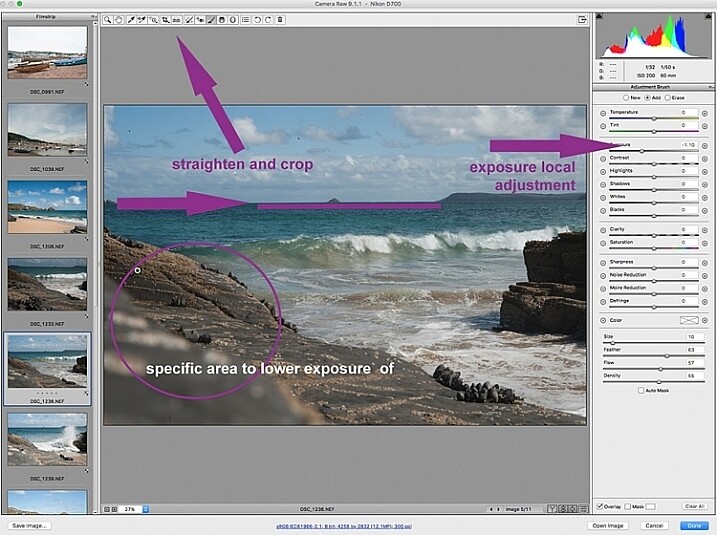
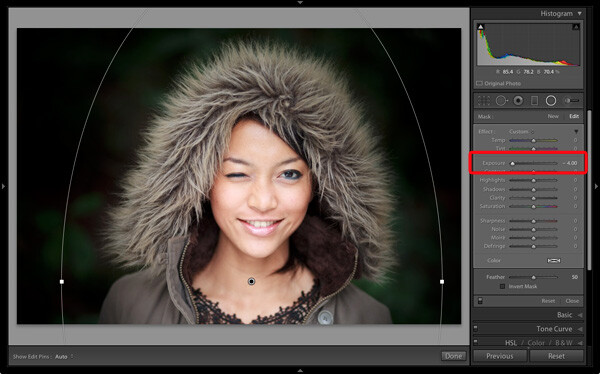
Step 3: Correct your exposure and make local adjustments
You may want to click Auto first, to see what Camera Raw’s suggested edits are, then start making your adjustments from there. To batch process, it is important to select sets of images shot in the same setting and light to make the most of this editing function. Batch editing images that have settings in opposite extremes will very likely add to your editing time, as you will need to go back and correct all the other images, thereby doubling your editing process. This is just one of the benefits of shooting in Manual mode where you have full control of your camera settings, rather than the camera making the decisions for you. If you are considering switching to Manual mode, in case you are still shooting in any of the other modes, see: How to Learn Your Camera’s Light Meter and Master Manual Mode.
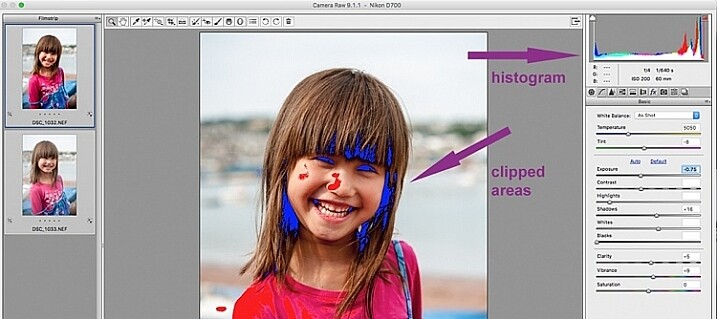
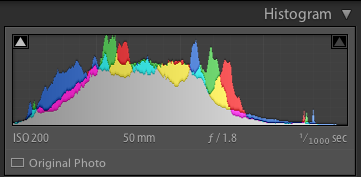
When making adjustments, it is important to keep an eye on the histogram, which is the coloured graph displayed on the upper right hand corner of Camera Raw. The histogram tells you if there is clipping occurring in the dark and light areas of your image. Clipping simply means that there is no detail left in that area, as the tonal values have fallen outside the minimum and maximum brightness boundaries, where detail can be represented in the digital image.
Type U and O together and the window will display any clipped bright areas in red. Type U and O together again to display clipped dark areas, and one more time to turn off the clipping warnings. You can then make adjustments by moving the sliders to eliminate the clipped areas. Remember to keep checking the histogram. You don’t want to clip either the blacks or the whites, you will see this on the histogram when the colours start climbing up on the left and right walls. Ideally you want the colours to be evenly distributed around the middle area until they are just touching the walls. Here is a link explaining: How to Read and Use Histograms.
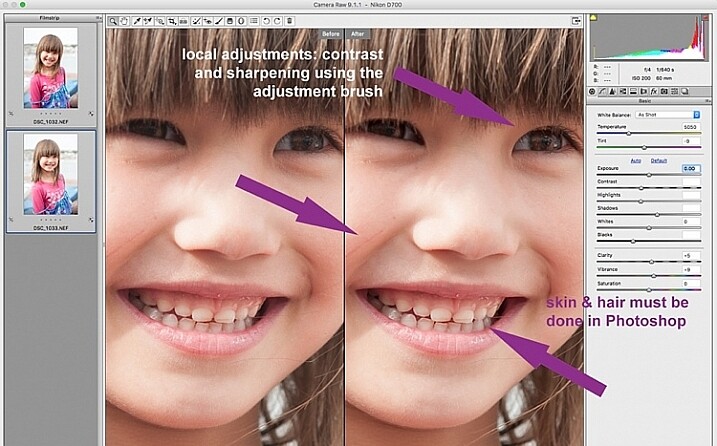
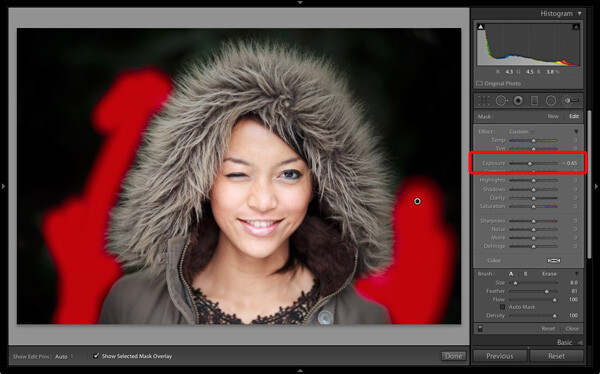
Local adjustments
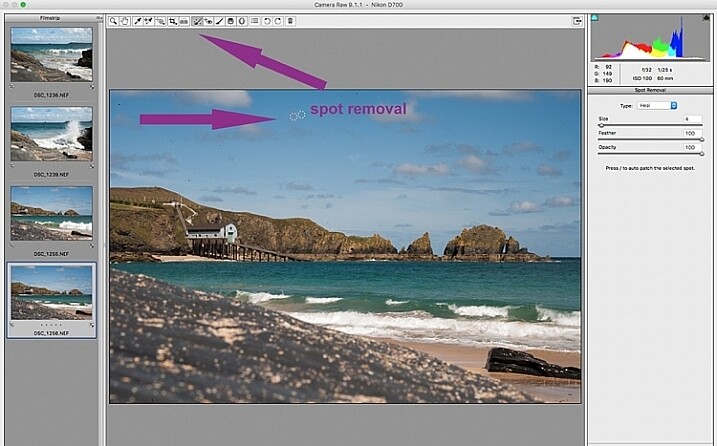
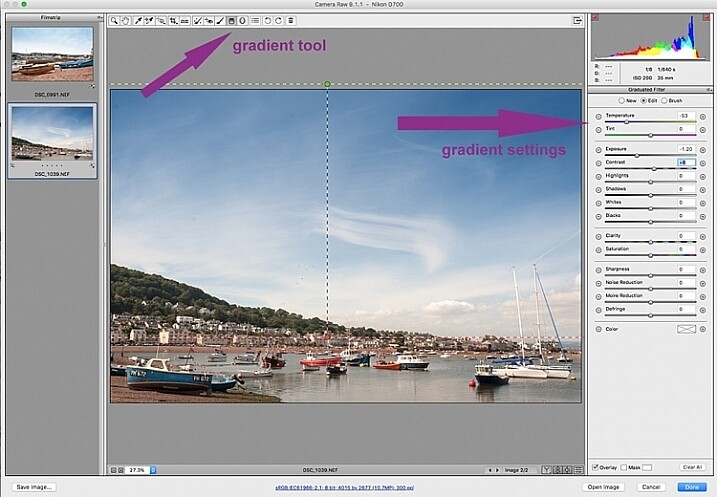
There are useful tools that you can use in Camera Raw, but which will not be beneficial in batch editing such as: spot removal and healing, adding gradients, straightening and cropping. However, you can edit smaller sets within the opened big batch, with ease using the same process. Regardless of the number of images, you can select consecutive images you want to edit in smaller groups, and apply specific batch edits to those images only, such as cropping and other local adjustments.
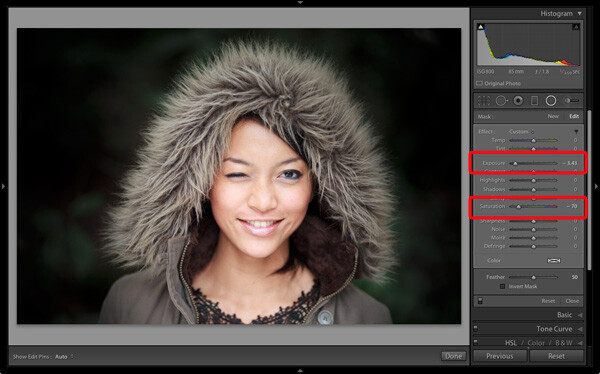
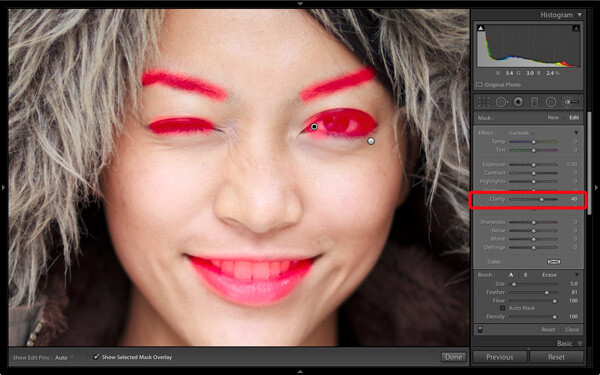
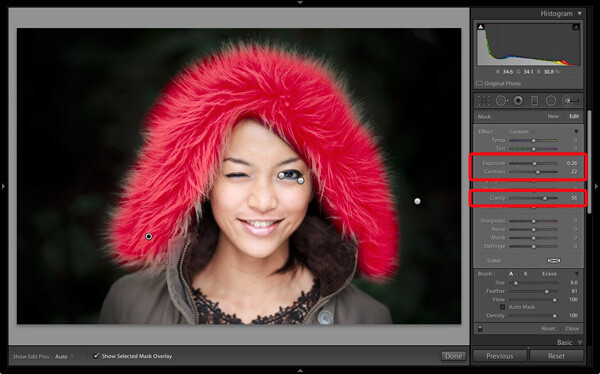
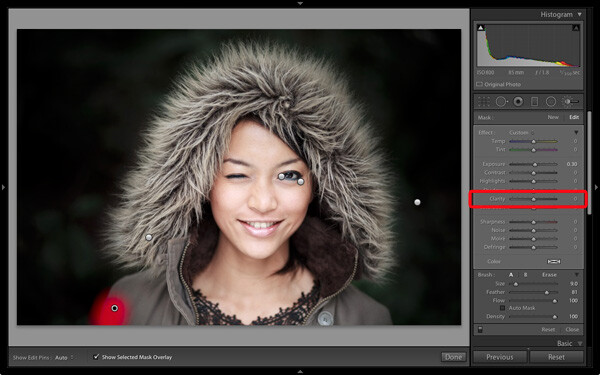
While I find local adjustments very useful, for instance brightening or darkening selected areas, warming up and cooling down specific parts of an image, and all the tools available on the adjustment brush panel, these tools need to be applied to each image individually, as necessary. Bridge and Adobe Raw can only go so far. If more fine tuning, and intricate edits need doing, you will need to take the image into Photoshop or a similar software to do so.
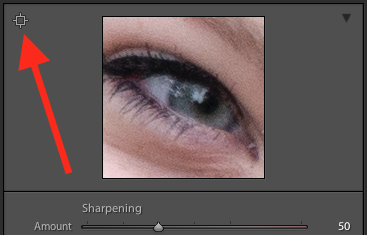
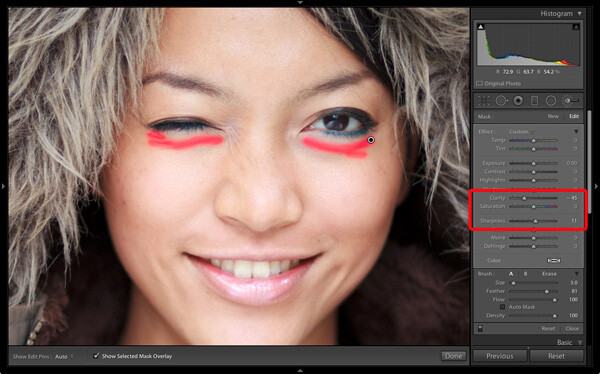
Step 4: Remove Noise and Sharpen
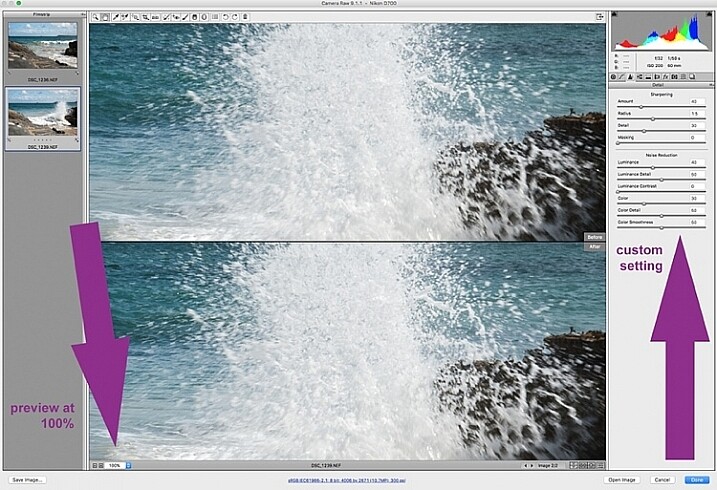
Adjusting the sliders to remove noise in an image is essential for all images, more so if you are shooting at a high ISO. Noise in a digital image is composed of the grainy look that you see, and the red, green, and blue spots that show through on the image, especially in the dark areas. The luminance slider fixes the grainy issue, and the color slider removes the dots, so move both sliders until you remove the noise.
An image shot at a very high ISO such as ISO 8000 will need a different noise reduction value than an image shot at ISO 400. If this is the case with your set of images, you can go back and filter your images again as in Step 1, but using the ISO speed ratings this time, then proceed with batch editing. This process can be tricky, but is worth the extra step, especially when dealing with higher ISOs. It is essential to view the images at 100% when removing noise, so the effects of the sliders are visible. A word of caution: do not go overboard with the noise reduction and sharpening settings when doing global batch edits. The danger is that you may end up removal detail and color. The best way to ascertain the noise removal settings appropriate for an image, is to do it on every single image, due to the ISO and exposure variables which greatly determine the amount of noise in an image. But there is no reason why you can’t apply a gentle global noise reduction setting to your batch of images, and adjust from there individually as needed.
It is always good practice to sharpen all your images, ready for output. Sharpening values vary according to the detail, and information in the image. You can apply your chosen sharpening values globally if you are confident that the values are gentle, and general enough for all the images in the batch. A little sharpening is better than nothing. Some images however, may need specific, more aggressive, sharpening values, and this is where you need to apply the appropriate value to each individual image. Similar to removing noise, the best practice is to custom sharpen each image one by one.
Step 5: Save your images
Once you have made global batch edits to your images, I suggest you go through them one at a time, in the same Camera Raw window, and make final local adjustments for each one. Type cmd+alt+p to toggle between before and after previews. There are a variety of preview formats, so play around with the options given, to choose your preferred format.
Now it’s time to save your images. This is one of the features of using Bridge with Camera Raw that, for me, trumps all others. Select all your images again, and click the Save image button. A window opens up where you can specify where you want the images saved, or create a new folder for them. You specify the format you want them saved in, as well as quality. You name the files once only, and voila they are saved. Don’t forget to click the done button to store all your adjustments. If you close the window without doing so, all your adjustments will not be saved. Always make sure your images are in sRGB and are saved in sRGB color profile.
Summary
These are only very basic steps to get you started, Bridge and Adobe Camera Raw have so much more to offer. Play around, experiment for yourself, and find out how your workflow can be even more simplified. Editing in Bridge and Camera Raw does have its limitations, especially when it comes to fine edits on skin, and blemish and hair removals, but with their batch editing functionality, you can get you to a place where you’re ready for finer edits in Photoshop, much faster than opening each image in Photoshop as a starting point, and applying the same edits one at a time.

There you have it – a few simple tips for batch processing. By saving your images in a different format, you will have your new set of edited images, while your RAW files are safe in the original folder. When you open these RAW files again they will show the adjustments you have made, but you can reset at any time if you want to re-edit from scratch. Your edited images are now ready to be further edited in Photoshop, should you want to do more creative and artistic edits, or if there are more edits necessary like head swapping, skin blemishes and hair removal as mentioned above. Bridge and Camera Raw are only the beginning, they gives you a good clean edited image to build on.
A last word
Batch editing is not for every photographer, nor for every photograph. Neither is batch processing necessary for every photography job that comes your way. But it is an option that can be easily learned, and might just save your sanity one day when you need to edit thousands of images within a short time-frame.
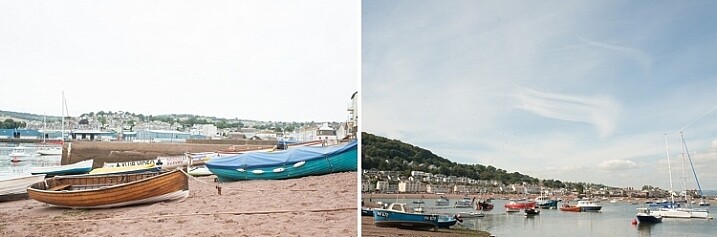
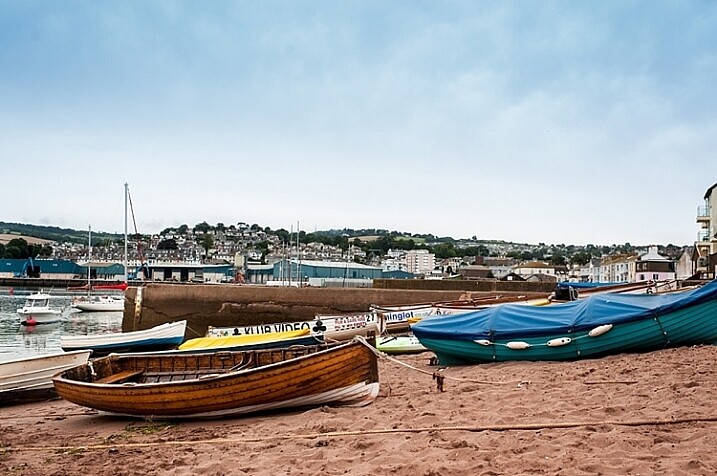
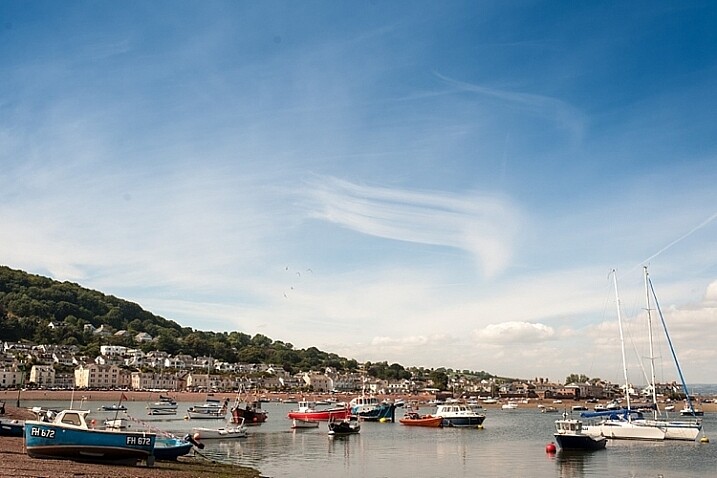
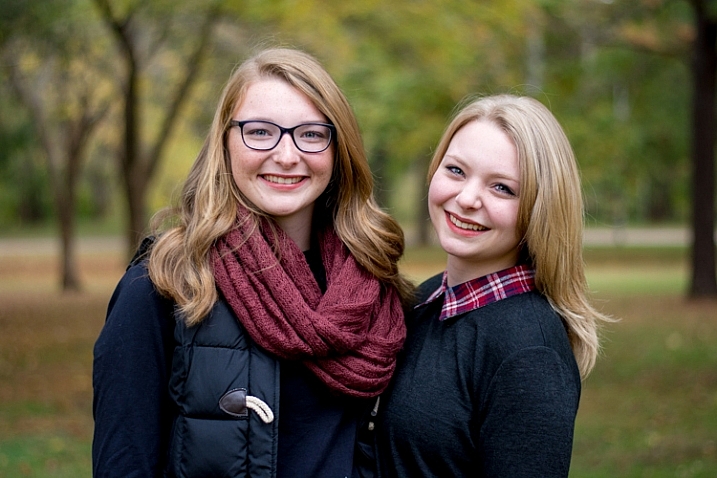
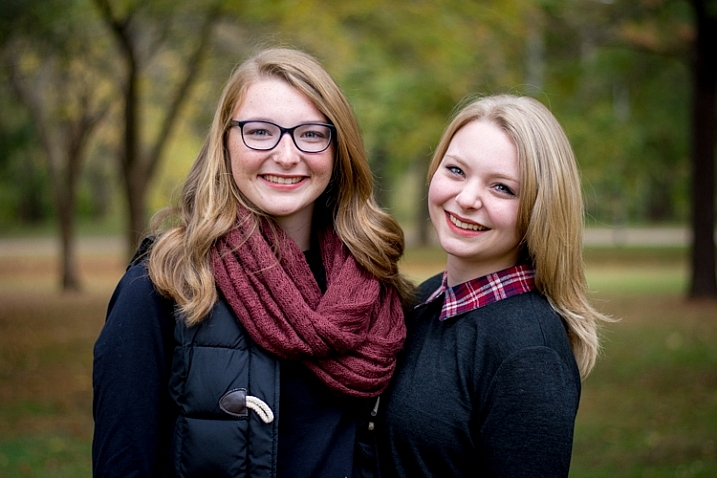
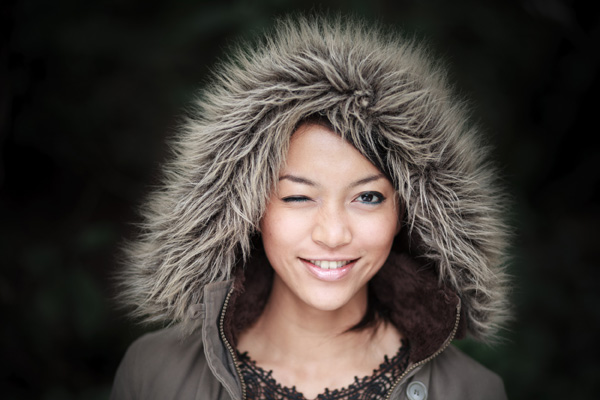
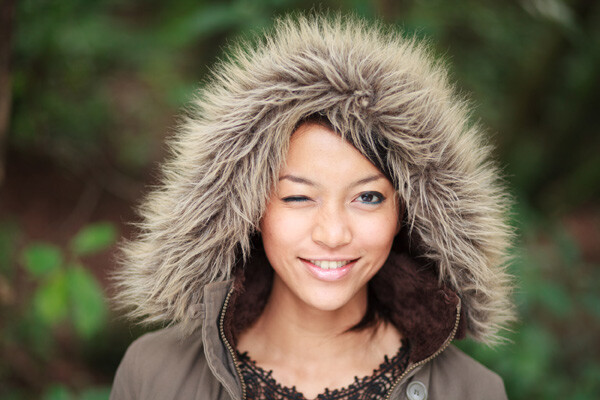
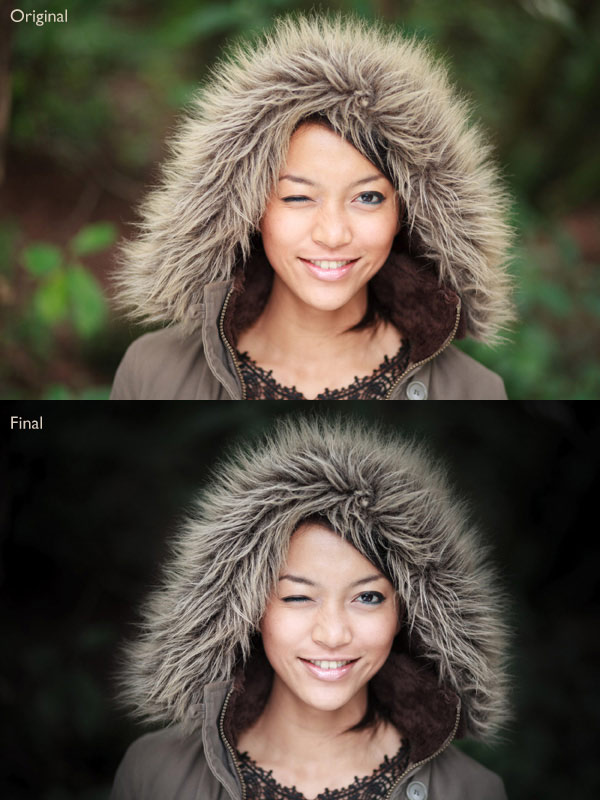
Here are the two images before and after editing in Bridge and Camera Raw.
Do you have other smart tips to share when batch processing in Adobe Bridge?
googletag.cmd.push(function() {
tablet_slots.push( googletag.defineSlot( “/1005424/_dPSv4_tab-all-article-bottom_(300×250)”, [300, 250], “pb-ad-78623” ).addService( googletag.pubads() ) ); } );
googletag.cmd.push(function() {
mobile_slots.push( googletag.defineSlot( “/1005424/_dPSv4_mob-all-article-bottom_(300×250)”, [300, 250], “pb-ad-78158” ).addService( googletag.pubads() ) ); } );
The post 5 Starter Steps to Batch Processing using Adobe Bridge by Lily Sawyer appeared first on Digital Photography School.

Digital Photography School


 Andrew’s ebook Mastering Lightroom: Book Four – The Photos is available now at a special price of 40% off for a limited time from Snapndeals. It’s an advanced guide to processing photos in Lightroom’s Develop module, explaining how to use Lightroom’s powerful processing engine plus Develop Presets and plug-ins to create beautiful images. This photo is one of ten case studies from the book.


You must be logged in to post a comment.