Where is the best place to put printed advertisement? You can print your advertisement on classifieds, hoping that newspaper readers will take a look at it and pay special attention to it. However, your expectation will soon vanish because your advertisement is just a tiny spot in the middle of the ocean of thousands of […]
Digital Photography Information Center
Posts Tagged ‘Print’
Advertise Your Business by Using Custom Print Balloons
06
Sep
Two Useful Lightroom Print Module Custom Layouts
14
Aug
On sale now at Snapndeals: August 11-25th get 20% OFF Andrew’s ebooks – Mastering Lightroom Complete Collection: Lightroom 6 & CC Update.
With a little imagination and know-how you can use the Lightroom Print module to create amazing layouts, which in turn you can use to create prints, postcards or even business cards. I’m going to give you a couple of examples, which you can copy or adapt to your own requirements. Let them inspire you to come up with your own creative designs!
Custom Layout #1: Single Image / Contact Sheet
This is the first custom layout we are going to create. It uses the Single Image / Contact Sheet Layout Style. With this Layout Style, each selected photo in the Collection is added to the layout just once, in the order that they appear.
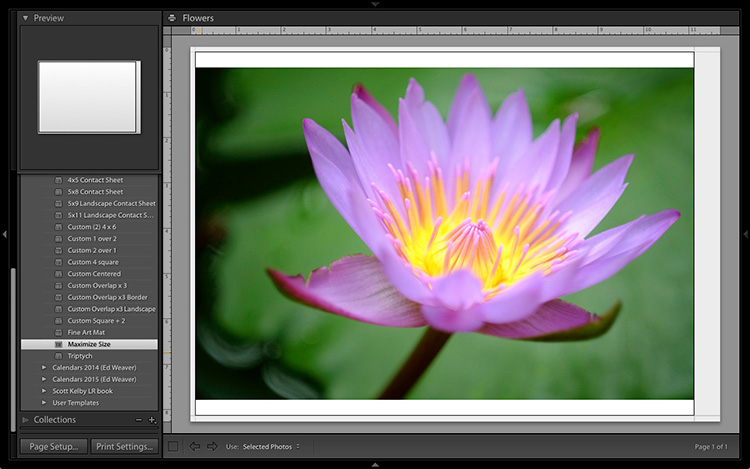
1. Maximize template
Go to the Template Browser panel in the Lightroom Print module and select the Maximize Size template. This simple template is an ideal starting point for creating your own layouts.
Note: I started with paper size set to A4 (click the Page Setup button to set paper size and orientation). If your paper size is different, you will require different measurements to those used here. The same applies if your page bleed area, which depends on the printer model, is different.
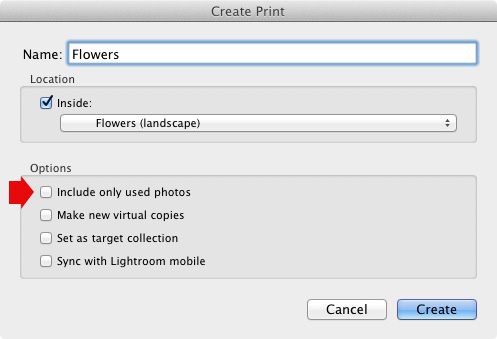
2. Save Print
Before you go any further, click the Create Saved Print button. The Create Print window appears. Give the print a name, and make sure the Include only used photos box is unticked. Click Create, and Lightroom creates a new Collection called a Print Collection (marked by a printer icon in the Collections panel) containing the photos in the original Collection. Now it’s impossible for you to lose your work – you can leave and come back to the Print Collection at any time.
3. Set up the page layout
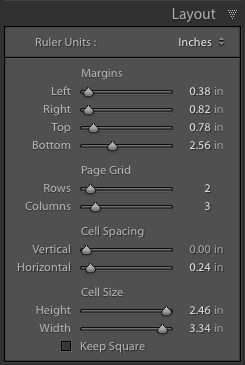
Go to the Layout panel and under Page Grid; set Rows to 2 and Columns to 3. Only selected photos appear in the layout, so in the Filmstrip, select the photos that you want to appear, clicking and dragging to rearrange the order if necessary. Note: If you select more than six images, Lightroom creates a second page to automatically fit them onto.
Adjust the Margins, Cell Spacing and Cell Size settings to add space between the photos and create the style you see below. The layout is shown both with the guides on and off (tick/untick the Show Guides box in the Guides panel) for clarity. Remember to centre the photos between the grey border representing the page bleed area, not the page itself.
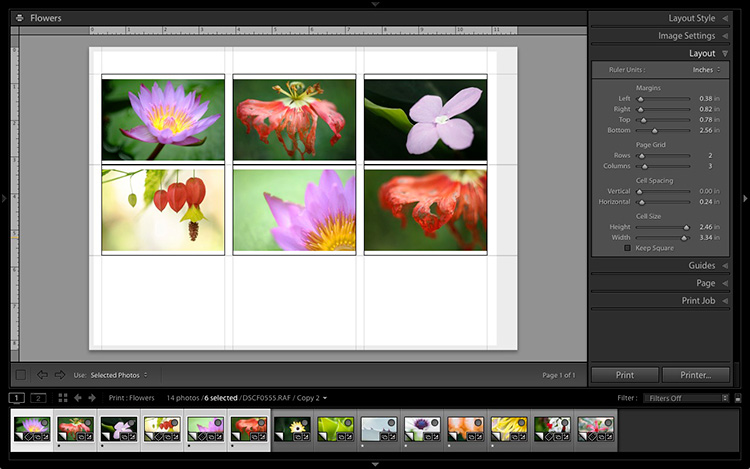
This screenshot shows the layout with Guides enabled. Note the page bleed area around the edge (shown in grey) and the black lines showing the dimensions of the Photo Cells.
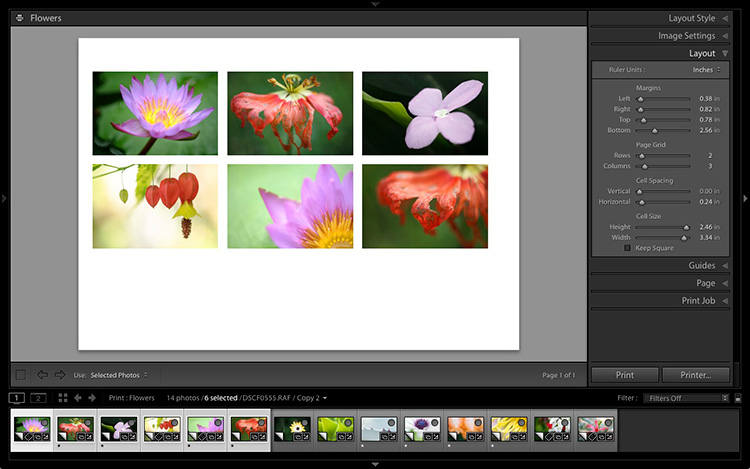
The layout is much easier to see with the Guides turned off.
The idea is to keep the spaces between the photos as even as possible (or as close as you can get according to the restrictions of your selected paper size). The settings I used are shown below, but yours may differ if you are using a different paper size, or if your photos have a different aspect ratio.
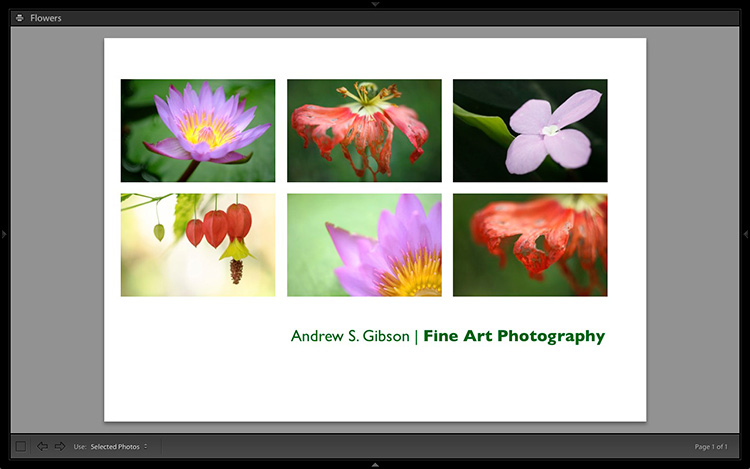
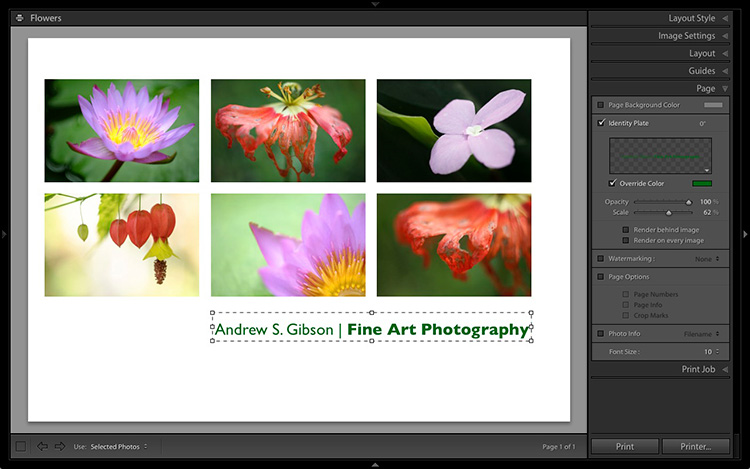
4. Set up the Identity Plate
Go to the Page panel and tick the Identity Plate box. Click the white arrow icon (down facing one) and choose a Styled Text Identity Plate to go at the bottom of the layout – if you don’t have a suitable one already, you can create a new one by selecting Edit from the menu. Tick the Override Color box and click the rectangle to the right of it to select a colour for the Identity Plate text.
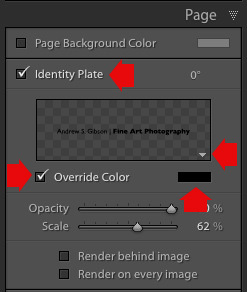
5. Set size of identity plate to match two columns
If possible, resize the Identity Plate so it is the same width as the last two columns. As long as the text doesn’t look too large or too small (you’ll have to exercise your own judgement), aligning it with the photos this way adds a professional touch to the design.
Custom Layout #2: Custom Package
The Print module contains nine templates that work with the Custom Package Layout Style. This Layout Style is like the Single Image / Contact Sheet Layout Style, except that it lets you add the same image to a page more than once, and also overlap photos.
Another difference between the Custom Package Layout Style and the others, is that Lightroom doesn’t add photos automatically to the layout. Instead, you add them yourself by clicking and dragging them from the Filmstrip. This makes it easy to move photos around without having to rearrange them in the Filmstrip, and to add the same photo to a page more than once.
1. Select the Custom Overlap x3 template
Go to the Template Browser panel and select the Custom Overlap x 3 template. Don’t forget to click the Save Print button to create a new Print Collection.
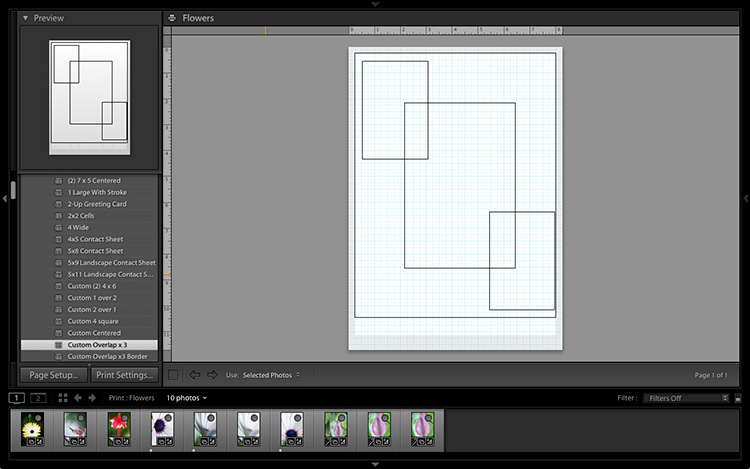
2. Add the photos by dragging and dropping them
Unlike the previous example the template doesn’t automatically populate with selected images. Instead, you have to click and drag photos from the Filmstrip. Here’s how it looks with photos added.
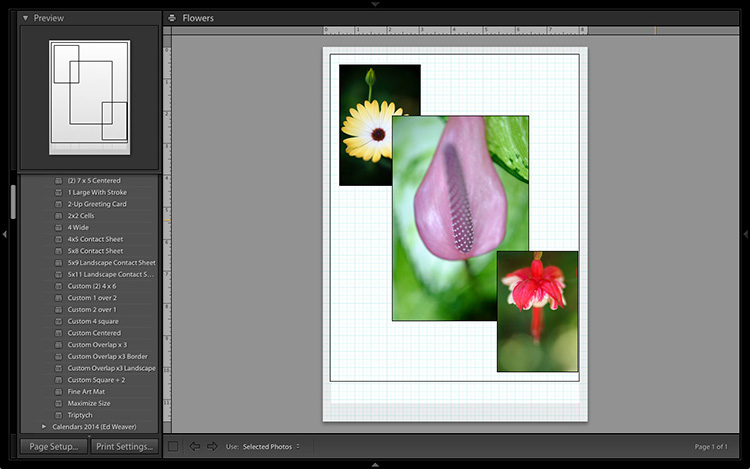
3. Resize images to suit
The overlapping images are less than ideal, but unlike the Single Image / Contact Sheet Layout Style used in the first example, you can drag and resize the Photo Cells to something that suits you. You can adjust the size of the Photo Cells precisely in the Cells panel (and add new ones), and keep them aligned by going to the Rulers, Grids & Guides panel and setting Grid Snap to Grid.
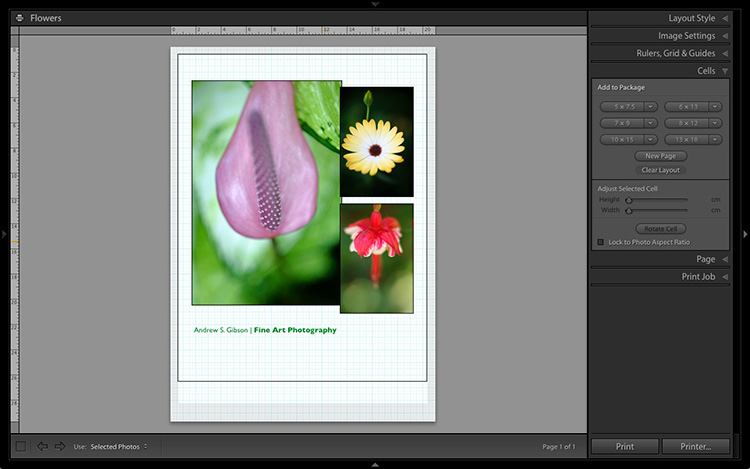
Right-click on a Photo Cell and select Send to Front to bring it on top of the others.
You can also add a Styled Text Identity Plate the same way as in the first example. A little tweaking enabled me to come up with the following design.
Hopefully these examples will show you just how flexible the layouts in the Print module are when you take the time to explore the possibilities. But did you know that you can also create triptychs and calendars quite easily in the Print module? The following articles show you how to do it.
- How to Create a 2015 Calendar in the Lightroom Print Module
- How to Make a Triptych in Lightroom
The Mastering Lightroom Collection
On sale now at Snapndeals: August 11-25th get 20% OFF Andrew’s ebooks – Mastering Lightroom Complete Collection: Lightroom 6 & CC Update.
googletag.cmd.push(function() {
tablet_slots.push( googletag.defineSlot( “/1005424/_dPSv4_tab-all-article-bottom_(300×250)”, [300, 250], “pb-ad-78623” ).addService( googletag.pubads() ) ); } );
googletag.cmd.push(function() {
mobile_slots.push( googletag.defineSlot( “/1005424/_dPSv4_mob-all-article-bottom_(300×250)”, [300, 250], “pb-ad-78158” ).addService( googletag.pubads() ) ); } );
The post Two Useful Lightroom Print Module Custom Layouts by Andrew S. Gibson appeared first on Digital Photography School.
Updated Kodak Moments app lets you share, edit and print your images
04
Aug
An update to the Kodak Moments app makes it a one-stop-shop for editing, sharing and printing, eliminating the need for a separate app to send images to Kodak’s Picture Kiosks. Read more
Articles: Digital Photography Review (dpreview.com)
Photography Magazines: Why Print Is Losing To The Internet
28
Jul

Hey there FashionPhotographyBlog.com readers. Recently, I received a request from a student fashion journalist on our FPBlog Facebook page asking me to offer opinions to help her out with her latest assignment. The question she posed was “Why online is overtaking print as the medium for hobby and trade magazines?” and more specifically those around the photography field.
I was really glad to have been asked this question, because, not many people are aware that I have been involved in the digital space for almost a decade and have observed communication trends evolve over this time. I’ve made predictions over the years that have since came true, funnily enough. What this means is that I’m able to share my insights in regards to why the internet is steamrolling print and other traditional forms of media and what this means for photography as an industry.
What we tend to forget as photographers is that photography as a craft, has always evolved with the technology at the time. It came into this world when painting was the respected art form, but gained its popularity after. From black and white film to photographs in color; from film to digital; from handheld cameras to smart phone photography. As you can see, the medium of photography is a product of human evolution.
The print industry, that includes book, magazine and newspaper publishing, are also susceptible to technological changes. Look how we read text these days; it’s through Kindles, smart phones, tablets, laptops and desktops. It’s how you are viewing this website :). This is why there are at least 3 reasons why I see photography trade and hobby magazines, jumping ship over the online threshold and providing their circulation on the web. These include being reachable, affordable and measurable.
Reachable:
– People can purchase and view hobby magazines online from the comfort of their homes anywhere in the world. Online publications are portable and accessible with the growth of smartphone usage.
– Nowadays anyone can access the internet in the palm their hands wherever they are.
– Online has a significant advantage in terms of reach, compared to products that are bound to physical locations, because consumers do not need to be in a specific location to purchase and interact with the product.
Affordable:
– The cost of production and distribution is significantly less in creating digital products than it is with physical products.
– Overheads such as warehousing and transportation logistics, are no longer expense factors and replaced with the price of portable hard drives and cloud hosting.
– The price tag on technology-based services continue to trend down making it even more possible for consumers to have access to household internet, and digital product creators can create virtual products, such as online magazines, at much lower costs than manufacturing these products in physical form.
Measurable:
– Interactions consumers make with online magazines or any virtual product, can be tracked. This means that data is more easily collected and decisions about the product can be made based on statistics rather than guess work.
– By analyzing the behavior of their customers, online magazine creators can evaluate what actually worked and what didn’t worked and make improvements based this feedback in time for the next issue, therefore continually improving and making changes in real time.
– With physical magazines, customer interaction and engagement is a lot harder to track.
The purpose of this article is not to discredit print mediums like photography hobby and trade magazines, or film. To this day I still love the smell of books and the feel of a glossy magazine in my hand, however as technology continues to evolve new doors open. Technology will make advancements whether we like it or not, so we should embrace it rather than trying to resist it and remember that, as photographers, we are participating in an art form that was born out of new technologies and innovation.
So what do you think of this discussion? Do you have an opinion on the future of printed photography hobby and trade magazines? Where do you see technology taking photography as a craft? Make your predictions the comment section below.
Get Mom an Engineer Print Kit (She’ll love it!)
04
May
 |
|||
Fun fact: Your mom adores photos. The more the better … and the bigger the better!
Today only (5/4) we’ve discounted our Engineer Print Kits by 10 smackeroos, so you can snag one on the cheap. Mom always did give prudent financial advice.
As her favorite child, she’ll obviously print a life-size photo of you with her Engineer Print gift card. Then, she’ll hang it will the mounting goodies that come in the kit. It’ll be like you’re always there, making monkey faces. Thanks, mom.
Order today and we’ll get it to you (or straight to her) in time for Mom’s Day!
Go BIG for Mom
(…)
Read the rest of Get Mom an Engineer Print Kit (She’ll love it!) (0 words)
© Erin for Photojojo, 2015. |
Permalink |
No comment |
Add to
Engineer Print Kit (She’ll love it!)”>del.icio.us
Post tags:
Print tattoos of your Instagram photos with INK361’s Picattoo service
29
Jan
Instagram Web interface provider INK361 has introduced a new service for Instagram photographers that allows them to create temporary tattoos from their pictures. Once logged in to Instagram via the Picattoo website, users can select up to 12 of their own images to have made into 3x3cm square format prints on sheets of transfer material. Read more
Articles: Digital Photography Review (dpreview.com)
How to Create a 2015 Calendar in the Lightroom Print Module
23
Dec
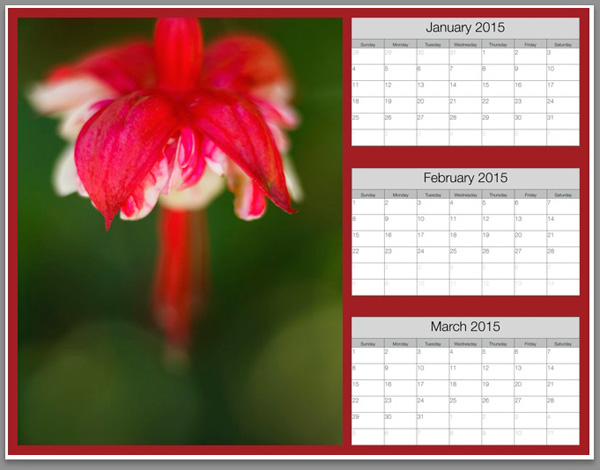
The Lightroom Print module is a great tool for creating print layouts, but one thing it is not designed to do is make calendars (hopefully Adobe will introduce this feature in future versions of Lightroom). Luckily, in spite of that it is not too difficult to create a calendar once you know how, and you are prepared to put the work in to create the month and day parts of the calendar.
Or – you can let someone else do all the hard work. That somebody is photographer Ed Weaver, who has created some Print module calendar templates that anybody can download from his website for free.
Ed updates the templates every year, and has recently added templates for 2015. There are two versions, one with the week starting on Sunday, and the other with it starting on Monday. Just select the one that is appropriate for your part of the world (the links are at the bottom of the web page) and download the files.
The download includes a set of calendar graphics and Lightroom Print Templates, along with instructions. All you have to do is import the calendar images into the Lightroom Catalog and add the Print Templates to the Print module. It only takes a few minutes and you’re ready to go.
Creating a calendar
Follow these instructions to make your first calendar using Ed’s templates.
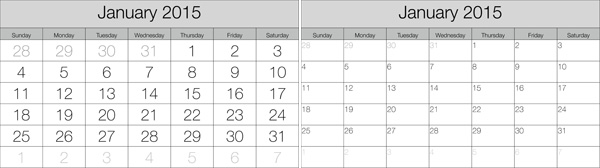
1. Open the folder containing the templates you want to use. Import the JPEGs into Lightroom. There are two JPEGs for every month in 2015, one with large numbers, the other with small numbers (see below), giving 24 in total.
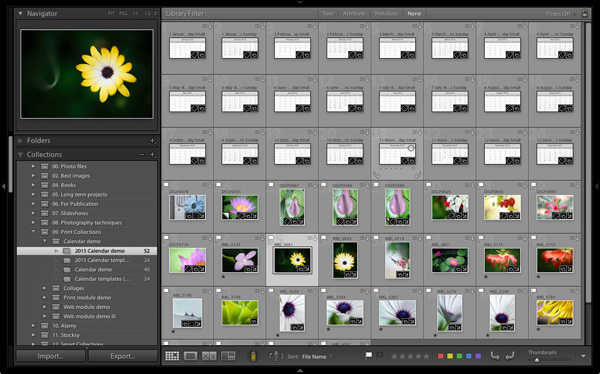
2. Go to the Library module and create a Collection for the calendar. Add both the calendar JPEGs you just imported plus any photos you may wish to use in the calendar.
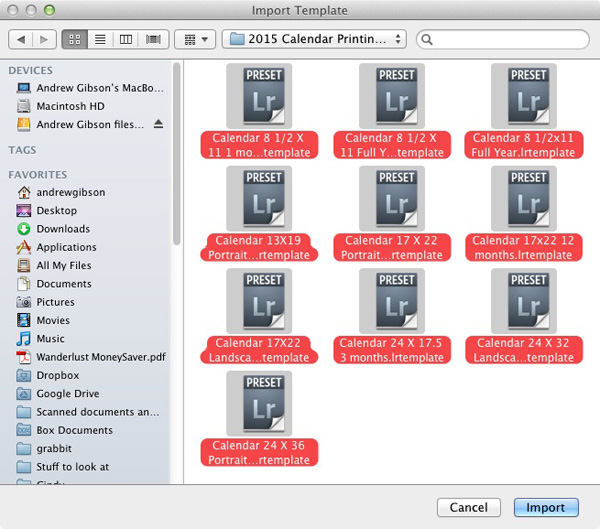
3. Go to Lightroom’s Print module, then select Print > New Template Folder from the menu. Give the folder an appropriate name (i.e. 2015 Calendar). Right-click on the folder name and select Import. Navigate to the folder where Ed’s calendar templates are stored, select them all and click the Import button.
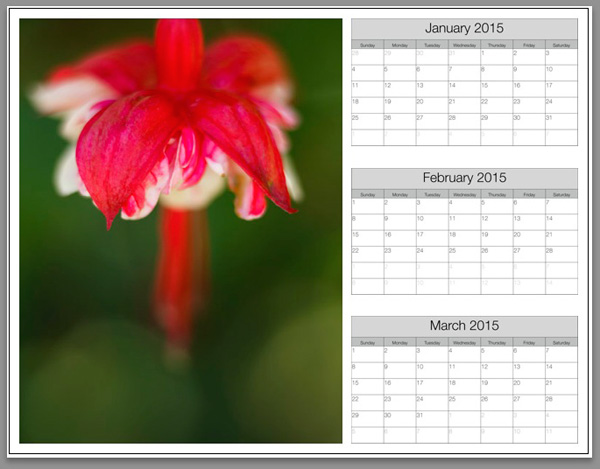
4. Open the Template Folder you just created. There are ten templates to choose from. When you click on a template, Lightroom displays it in the Content window (see below). The templates use the Custom Package layout style, which means that Lightroom doesn’t add photos to the layout automatically. Instead, you have to do it yourself by dragging the photos from the Filmstrip.
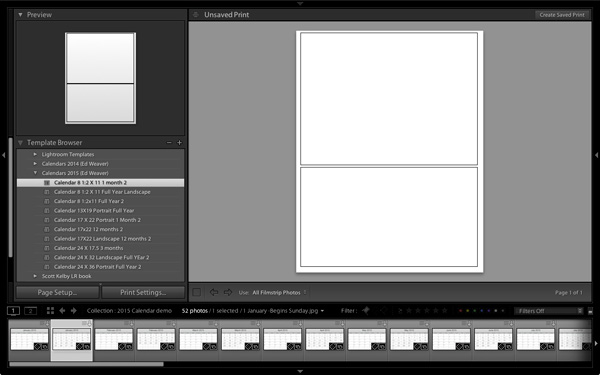
5. Drag photos and calendar templates as needed from the Filmstrip to create your calendar. With this template, you need just one of each.
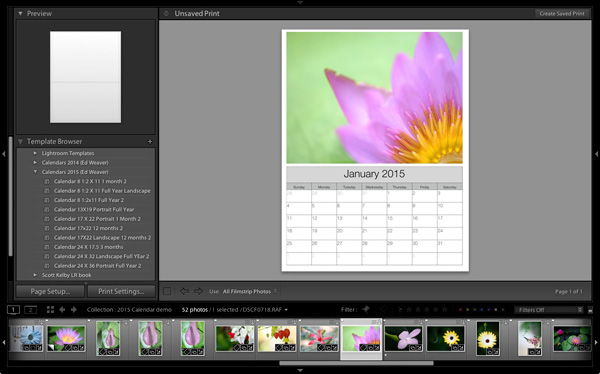
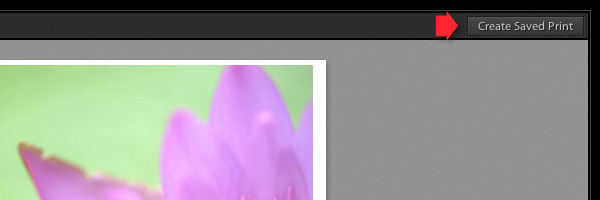
6. Click the Create Saved Print button in the top right corner of the Content window (see below). Give the print a name in the Create Print window and click the Create button. Lightroom creates a Print Collection (marked by a printer icon in the Collections panel) containing only the images used in the print. Now you can leave the Print module and return to your print at any time without losing any changes.
7. Repeat for the rest of the months in the year, and you have a complete calendar.
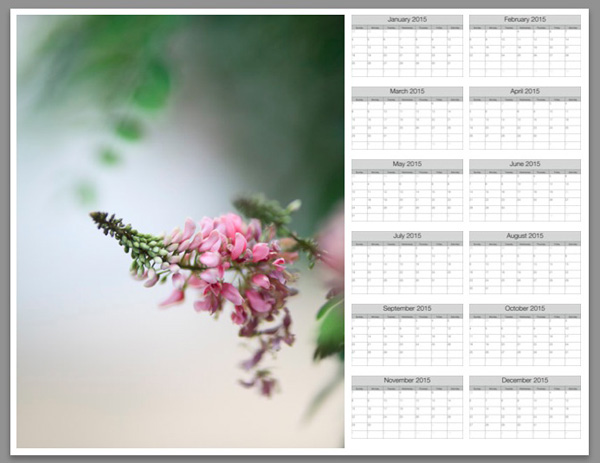
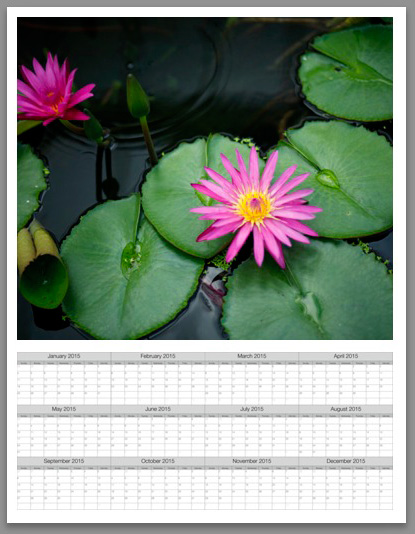
Here are some examples using some of the other templates:
Modifying template files
Ed’s templates are great, but there is no easy way to change the colours, fonts, or any other aspect of the design of the JPEG files, at least not in Lightroom. If you want to change the style, you should open the files in Photoshop or Photoshop Elements. Using layers, it is relatively straightforward to replace the font Ed used with that of your own choice, or change the colours. Of course, you could also start completely from scratch and create your calendar files to use with Ed’s templates.
Changing background colour
You can change the background colour of the calendar from its default white by going to the Page panel and ticking the Page Background Color box. Click the swatch on the right to choose a colour. Just bear in mind that adding a background colour uses more ink if you print the calendar on an inkjet printer.

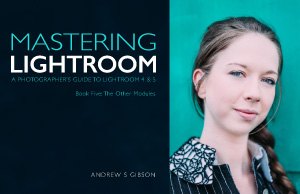 Mastering Lightroom: Book Five – The Other Modules
My new ebook Mastering Lightroom: Book Five – The Other Modules shows you how to use Lightroom’s powerful features to create fun and interesting projects using the Map, Book, Slide show, Print and Web modules. Whether it’s geotagging, putting together a photo book, printing your best photos or creating web galleries all the information (and inspiration) you require is right here.
googletag.cmd.push(function() {
tablet_slots.push( googletag.defineSlot( “/1005424/_dPSv4_tab-all-article-bottom_(300×250)”, [300, 250], “pb-ad-78623” ).addService( googletag.pubads() ) ); } );
googletag.cmd.push(function() {
mobile_slots.push( googletag.defineSlot( “/1005424/_dPSv4_mob-all-article-bottom_(300×250)”, [300, 250], “pb-ad-78158” ).addService( googletag.pubads() ) ); } );
The post How to Create a 2015 Calendar in the Lightroom Print Module by Andrew S. Gibson appeared first on Digital Photography School.
Print Charming: Safe, Simple 3D-Printing Comes Home To Play
24
Nov
[ By Steve in Gadgets & Geekery & Technology. ]

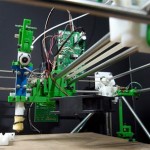
Following in the footsteps of the microwave oven, at-home 3D printing in the form of the Poieo3D Printer is ready for prime time, play time and study time!

Designed BY families FOR families, the Poieo3D Printer aims to make an exciting new technology as commonplace and worry-free as microwave ovens and other home appliances we now take for granted. While not quite “Tea, Earl Grey, Hot”, the Poeio3D Printer just might be the closest thing on Earth to home-based Star Trek tech.

Poieo3D is the brainchild of several families in the greater Toronto area who felt inspired by the wealth of opportunities offered by the amazing new world of 3D printing. The founders fervently believe an affordable, easy to use, and child-safe 3D printer should be available to ALL families and should be a vital component of every home, workplace and classroom.

The Poieo3D Printer isn’t just user-safe, it’s environmentally-friendly too – something you’d expect of a product that’s to be a permanent part of one’s lifestyle. The 3D printing process employs biodegradable print material derived from renewable resources such as corn starch and sugarcane. Unlike petroleum-based plastics, this material doesn’t give off foul-smelling, toxic fumes when the printer is used making it ideal for non-industrial use. Available in a rainbow of colors at a surprisingly low price, the material comes in the form of thin flexible filaments wound on spools for ease of storage.
Next Page – Click Below to Read More:
Print Charming Safe Simple 3d Printing Comes Home To Play
Want More? Click for Great Related Content on WebUrbanist:
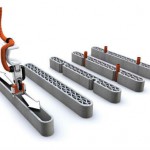
3D Printing Goes Giant: Print Your Own Home?!
Imagine programming a large-scale, 3D-printing robot to simply print your entire home, from top to bottom, within a matter of hours.
Click Here to Read More »»
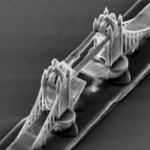
Castle in a Grain of Sand: Tiny Nanoscale 3D Printing
These amazingly detailed objects are smaller than a grain of sand, printed with polymers at record-breaking speeds using advanced 3D printing technology.
Click Here to Read More »»
Best Print This: 12 High-Tech & 3D Printer Design Ideas
Concept designs that use coffee dregs or pencil stubs instead of ink, forgo paper altogether or even produce 3D objects bring printers into the 21st century.
Click Here to Read More »»
![]()


[ By Steve in Gadgets & Geekery & Technology. ]
[ WebUrbanist | Archives | Galleries | Privacy | TOS ]
3 October, 2014 – Thomas Knoll Donates Print Sale to The Luminous Endowment
03
Oct

Thomas Knoll, the co-author of Adobe Photoshop and the designer of Adobe’s Camera Raw, is auctioning six large framed prints of his work, with proceeds going to The Luminous Endowment for Photographers.
Tom will be speaking at Adobe MAX this year about his photography and how he uses Photoshop and Lightroom to process his own photographs.
As part of his talk, Tom will showing raw capture / intermediate / final stages for a number of his photos. For six of these photos he has made large prints which will be displayed at the conference and then auctioned off, with the profits donated to The Luminous Endowment for Photographers.
Thomas is also using an on-line auction site to make the bidding
available to people outside the conference – including you!
http://www.32auctions.com/thomasknoll
You too can own one of these prints, and at the same time help support this important charity, which in turn supports photographers world-wide to pursue their photographic projects.
…
The Luminous Landscape – What’s New
You must be logged in to post a comment.