Lens Rentals Canada has announced that it is temporarily not accepting new orders. A brief notice on lensrentalscanada.com cites ‘serious issues’ with Canada Post Corporation, and states that current orders will be shipped using Purolator Courier. An email that a reddit user claims was sent to him by Lens Rentals Canada is more to the point, stating that a Canada Post employee has stolen equipment in transit. No estimated timeframe has been given as to when orders will be accepted again. Read more
Tag: Post
-
20 May, 2014 – Post Processing Panoramas

As a follow up to Kevin Raber’s recent article on Having Fun With Panoramas today we present an article by Tom Legrady on Post Processing Panoramas. This article for the most part focuses on the use go the Adaptive Wide Angle Filter in Photoshop. The use of this filter especially in panoramas corrects for much of the distortion that is introduced during the stitching.
Michael and I (Kevin) will be in Buffalo June 5-8 as part of the Silo City Workshop. This workshop conducted by Mark Maio will be photographing one of Michael’s and my favorite things; abandoned buildings. In this case these will be the abandoned Buffalo Childs Street grain elevators. If you are free and want to have a great few days shooting these amazing structures inside and out then go to the Silo City Web Page and register today. There are only a few spots left. Another bonus is Capture Integration will have a rep there with Leica Gear as well as Medium format digital gear if you are so inclined to try this gear out. Hope to see you there.
-
4 Tips for Post Processing Efficiency in Photoshop
A great deal of post processing can be done in Photoshop, more than most photographers realize actually. As a designer, I didn’t have Lightroom, and just wanted to adjust my photos to look a little nicer, little did I know the power behind Photoshop and its post processing capabilities.
Today I am going to give you some tips and tricks I learned that increased my efficiency within Photoshop.
1 – Photoshop Layout and Organization
The first way to increase efficiency before doing any photo editing, is to organize and optimize your Photoshop layout. Setting up and customizing your Photoshop layout is key to configuring exactly how you want your panels and canvas to look. It is also very easy to do, and can improve your workflow a lot.
Here are a few things to keep in mind when editing your Photoshop layout.
- Only keep the necessary, delete all panels that are superfluous to your photo editing process. They really just get in the way and clutter your workspace.
- Organize your panels based on your workflow. Keeping certain windows paired will help you work faster and make adjusting much easier.
- Adjust spacing and panels so you can have the largest size available for your image.
Here is a quick preview of my layout, in case you need some inspiration.
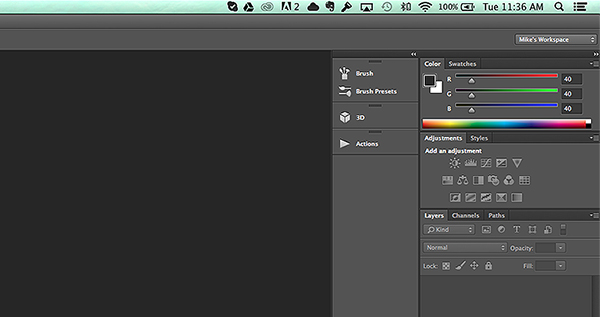
After you carefully adjust and tweak the panels to perfection, it is really simple to save your workspace. Simply go to the top right corner of your Photoshop Document, where is says Mike’s Workspace in the image above, and click to activate the drop-down menu. Then click new workspace and you can save it as your very own Photoshop layout. You can even save shortcuts and menus within the layout.
2 – The Basic Effects
Now that you’ve organized your layout, it’s time to start editing your photos. When I start editing any photo I have a few basic steps I do religiously. These don’t have to be the same for you, and it is totally ok to completely disregard them (or come up with your own), but it is sort of a habit that can help contribute to your photography style.
The first small task I complete is duplicating the image layer. To ensure I don’t damage my original photo. From there I add a few subtle Adjustment Layers to balance the light in the image. It looks something like the image below.
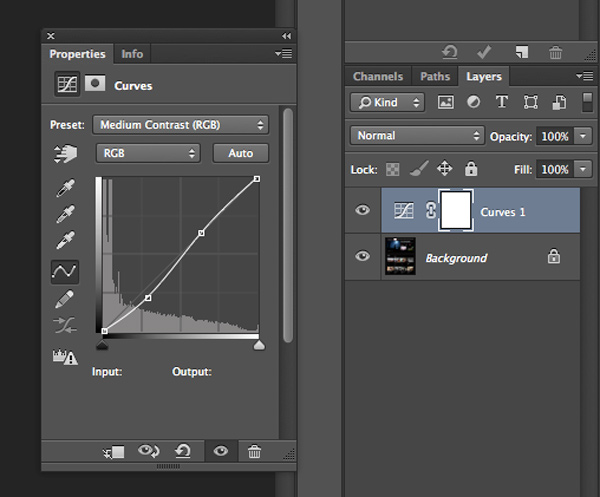
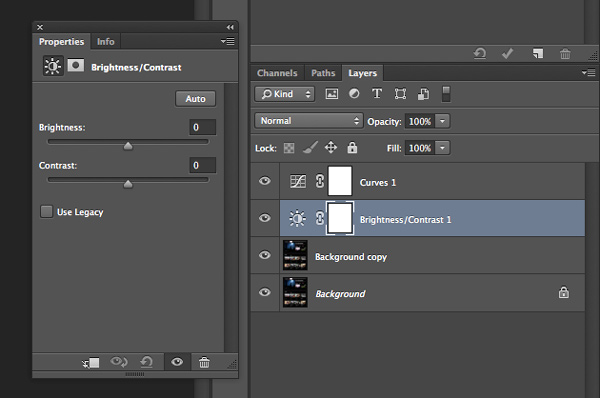
The above effect is a simple curves adjustment that helps balance light and tone down the colors in a subtle manner. After that I mess with the brightness and contrast just a little bit to get the image looking clean and balanced (as an Adjustment Layer as shown below).
Consider all the above steps as precursory steps to the actual photo editing process. These are simply done to balance light, prevent error, and it is like a little system I use to keep my style inline.
3 – Grouping and Organizing Layers
The next thing I do that really helps me work more efficiently is to organize and group my layers. It is really easy and not time consuming at all to rename layers so that you know exactly what effect they are applying to your photo. Then you don’t need to go through all your layers, switching them on and off, to find one you want to remove or readjust.
These are the key areas I group and label my adjustment layers and filters.
- Light and contrast adjustment groups
- Tints and color variations
- Strong filters such as HDR and blurs
- Gradients and vignettes
By labeling these I can easily go to certain effects and adjust them accordingly. This makes photo editing a much faster process, and makes re-editing a photo way simpler and fun.
4 – Subtle Adjustments that Make a Huge Difference
As a final tip for efficiency I am going to share a few subtle effects that work wonders for photo editing. The tools used include:
- Blend Modes
- The Levels adjustment tool
- Tints
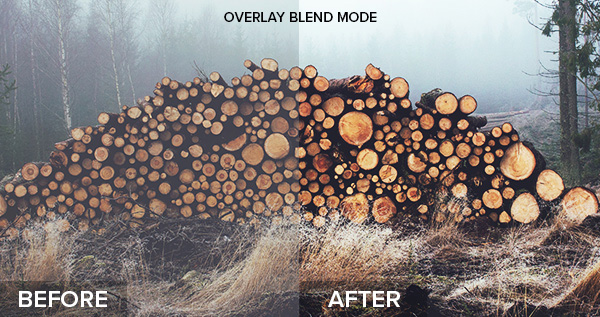
Take a look at the difference a simple blend mode can do to an image, with just the click of one button. In the example below I’ve used the Overlay blend mode. Remember to duplicate your original layer and play with the blend modes on the top, copy layer. Blend modes dictate how the pixels in one layer behave and react with the layer below it. Try them all and see what they do.
Blending modes can be applied in a few ways. The easiest way, and the way I achieved the above effect is to duplicate your image and select the blend modes drop-down by double clicking your layer (or selecting it right from the Layers panel)

Double click the layer to get this dialog box
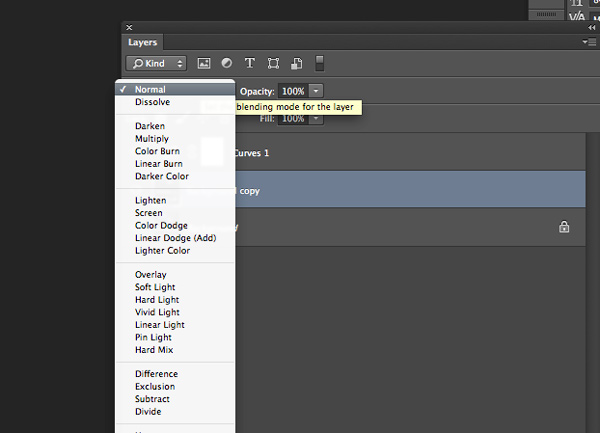
You can also find layer blend modes here on your layers panel
Simply pick the blend mode that looks best and adjust the opacity accordingly. Some of my favorite blend modes are – screen, overlay, soft light, and lighten.
I then use a Levels adjustment layer to adjust light and colors at the same time, adding a crisp and subtle tint. To add a new adjustment layer go to Layer > New Adjustment Layer > then choose the one you want. Or select it from the bottom of the layers panel as shown below.
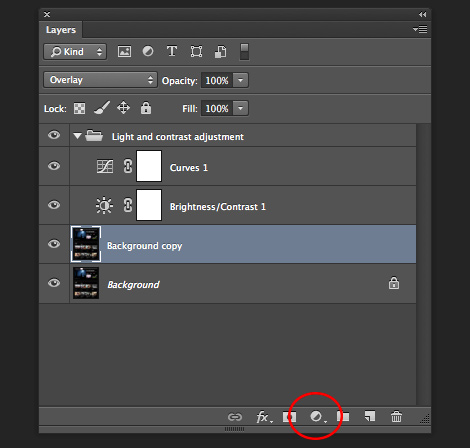
Adjustment layer icon location on the layers panel

Adjustment layer options
Adjust the various levels by clicking the drop-down and working on the red, green, and blue tones. It is very versatile and easy to use. Just remember – pulling top sliders the ones under the graph) to the left will darken, to the right will lighten. The bottom sliders under the black-white scale, do the opposite.
Summed Up
This is the process I used to create ultimate efficiency when I started editing my photos more frequently. These steps probably won’t apply to everyone, but they are helpful in getting organized when beginning. To wrap it up:
- Organize your Photoshop Layout to improve your workflow
- Use some basic effects for consistency
- Group and label your adjustments so you can easily find them for future reference
- Take advantage of the subtle, but highly effective adjustment layers such as photo tints, levels, and blend modes
Now it’s up to you
Got some interesting tips or tricks for efficiency? Share them in the comments and help other photographers improve the way they work and edit photos in Photoshop.
The post 4 Tips for Post Processing Efficiency in Photoshop by Mike Moloney appeared first on Digital Photography School.
-
Poll update – what post production software do you use the most?
We ran this poll last in February of 2009, so I thought it was time for an update to see if there have been any changes since last time. I’m especially curious about any Adobe offerings since the Creative Cloud too affect. Has that swayed your software choice?
Tell us what post production software you use the most. If you use more than one, indicate the one you use most often, for most of your editing needs. For example I use Lightroom and Photoshop CC, but LR5 is my primary tool as I use it for 90% of my editing.
By filling this in you will also be giving us direction in what types of articles and tutorials we post in the future. So please share and add a comment below if you want to give us additional information.
>I’ve included the eight most popular tools mentioned last time we asked this question to readers (I’ve combined all Photoshop versions into one for simplicity). I know others of you use Noise Ninja, Bibble Pro, ACDSee and others – feel free to tick the ‘others’ option and tell us in comments below what ‘other’ one you’ve chosen.
If you use more than one feel free to tell us about that too.
Note: There is a poll embedded within this post, please visit the site to participate in this post’s poll.
The post Poll update – what post production software do you use the most? by Darlene Hildebrandt appeared first on Digital Photography School.
-
Deal 9: Discover the Secrets of Post Production for Just $7
On the 9th day of our countdown we’re putting up for grabs our very own post-processing eBook “Photo Nuts and Post” for just $ 7.
To order before time runs out head here.

A little bit of info about this Post Processing eBook
The creative choices and opportunities in ‘post’ are almost as great as they are in the capture of the photo itself, and almost every photo can be improved with a little post-processing.
Photo Nuts and Post will help you tackle post processing head-on and give you the tools and the courage you need to make it work for you.
Today it’s a steal at just $ 7 (normally $ 29.99) — but the clock is ticking – this offer lasts for 24 hours only.
Want the Complete Neil Creek eBook Collection?

Photo Nuts and Post is just one of 5 dPS eBooks by Neil Creek.Today you can grab the entire photo nuts collection of 4 eBooks plus we’ll include our Trick Photography eBook for just $ 39.99 (normally $ 120).
That’s $ 8 per eBook and a pretty massive saving!
In the bundle you’ll get:
- Photo Nuts and Bolts – Know Your Camera and Take Better Photos
- Photo Nuts and Shots – Tools and Techniques for Creative Photography
- Photo Nuts and Post – A Guide to Post-Processing
- Photo Nuts and Gear – Know Your Gear and Take Better Photos
- Photo Magic – Special Effects Photography Made Easy
This bundle is ideal for anyone wanting to get creative control over their camera and create beautiful images.
Grab Yours Today
The choice is yours – you can grab Photo Nuts and Post for $ 7 or pick up the whole Neil Creek Collection – it’s totally up to you.
All the details can be found here – but don’t delay, this deal lasts only for 24 hours.
The post Deal 9: Discover the Secrets of Post Production for Just $ 7 by Darren Rowse appeared first on Digital Photography School.
-
Fujifilm, Sigma, and Pentax post firmware updates

Over the last few days a number of firmware updates have been posted. Fujifilm has new firmware for the following cameras: X-Pro1, X-E1, X-E2, and X100S. From Sigma, there are updates for the SD1 and SD1 Merrill. And finally from Pentax, the K-3 also has new firmware. Get download links and more information about each update. Learn more
-
Do you Edit or Post Process your Photos?
It is time for another reader poll – this time we’re going to talk ‘post production’.
Every time we talk about processing images we get a diversity of responses from readers. Some process every image, others some and some never edit any of their images – either because they don’t have the tools, are nervous or don’t believe in it.
So we thought we’d ask the question – do you edit or post process your photos?
Note: There is a poll embedded within this post, please visit the site to participate in this post’s poll.
Please tell us about your response in comments below – particularly if you’re in the ‘no’ camp.
Post originally from: Digital Photography Tips.
Check out our more Photography Tips at Photography Tips for Beginners, Portrait Photography Tips and Wedding Photography Tips.
Do you Edit or Post Process your Photos?
The post Do you Edit or Post Process your Photos? by Darren Rowse appeared first on Digital Photography School.
-
Samurai Girl Composite: Behind the Scenes Post Production Walk Through
by Tom Di Maggio
In this article I’ll show you how the “Samurai Girl” picture was done step by step. In addition there is a speed art video at the end of the article that shows the whole process from start to end in a 05:47 minutes Youtube video. It should make the whole process clearer.
Feel free to send me your questions via email at tom@purple-monkey.com

Here is the image as it was shot. Before I start to extract the subject I use a technique to create that look on my models that consists of 6 Layers. I will write a separate tutorial on that topic, as it will deviate too much from the point of this tutorial.

I started with cutting out Jessica from the background. When you know that you are going to extract the subject for a photo manipulation or composite, make sure you shoot them on a background that will create an nice contrast around the edges. It will make your life a lot easier for the extraction process. The method I use to extract my subjects varies a lot depending on the need and the situation. The tools I usually use are the Pen Tool, Brush, Refine Edge, Lasso, Quick Selection and the Blending Option effects. In this case I used a mixture of Pen Tool, Brush and Refine Edges.

Here is a picture of the finished mask. I like to check the mask for imperfections by “Alt” clicking on the layer mask.. What I also do a lot is to check the mask against a white and a black background. I will usually show you all the imperfections on the mask especially fringing. If the extraction looks good against both backgrounds, then you can be sure that you won’t need many adjustments anymore against your final background.

I usually work on picture in the 16:9 format. Sometimes I quickly sketch my ideas on a piece of paper or on the iPad. I basically gives me an idea about the composition of the image. As soon as Jessica was extracted from the background I moved her over to the canvas using the move too. I scaled her down and positioned here approximately. I slightly corrected her position once the background was inserted.

At this point I also imported my background in order to see what color corrections would be needed to integrate Jessica into it. When I opened the stock image for my background I saw some things that would need modification.

I didn’t like the doors on the right side as it would look weird when Jessica would be in position. So I just added some horizontal bars to solve that issue.

The first step I used to integrate Jessica was a Gradient map. The colors I used for the shadows was a sample of the wooden door frame (very dark brown) and for the highlights I used a sample of the Tatami. I lowered the opacity to about 45% to achieve an acceptable value. It’s important when you use this method that you use colors that are already present in the palette of the image.

Next step was to integrate the Samurai. I’ve build the Samurai out of several stock photos and used an adjustment layer to darken it to complete black. I used a layer mask to hide the wooden frame of the window.

In order to make it more realistic I’ve added a dirty texture on top of the Samurai with a blending mode Overly and I slightly blurred him, since what we actually see is a shadow on the fabric. I then added the eyes with the brush tool and some subtle outer glow effects.
Next step was to create the shadows on the floor and the wall. I duplicate the Samurai Layer and used distort and warp to adjust it’s shape. I also painted the shadows onto the barrel, in the original picture the barrel was brightly lit from the right side. Since the Samurai is standing in front of it, the light source would be blocked.

To blend everything together I use a simple technique that is not well known out there. I merge all the Layers together onto a new Layer ( Shift+Ctrl+Alt+E (PC) or Shift+Command+Option+E (Mac) ) and then use the Blur Average Filter. Switch the blend mode to overlay and reduce the opacity until the color matches. I then used the Tilt-Shift filter to align the average depth of field of Jessica to the background.

Finally I created a new layer on top of it change it’s blending mode to overlay and painted with a soft black brush around the samurai and around Jessica in order to direct the viewers eye through the picture. A last step was to lay a grungy texture in overlay over the whole image and reduce it’s opacity quite a bit.

I try to do a maximum in Photoshop in terms of light and shadows. But when I finish an image I always have some fun in Lightroom with some presets or simply play around with the sliders. Some times I end up not using any of it, but most of the time I find some settings that adds value to the overall image. Now there is no secret to this, I just play around with Clarity, Blacks, Temperature, and Contrast until I see it going somewhere. In this case I added some contrast, quite a bit of Clarity and slightly desaturated the image.

Here’s the video of the whole process dialed up to about 1000%
Check out more of Tom Di Maggio’s work at his websites at TomDiMaggio.com, Purple-Monkey.com” and on Facebook.
Post originally from: Digital Photography Tips.
Check out our more Photography Tips at Photography Tips for Beginners, Portrait Photography Tips and Wedding Photography Tips.
Samurai Girl Composite: Behind the Scenes Post Production Walk Through
-
Going Postal: 12 Stamped Out & Abandoned Post Offices
[ By Steve in Abandoned Places & Architecture. ]

Since the only thing rapid about “snail mail” is the speed it’s fading into disuse, no one should be surprised at the growing number of abandoned post offices. These once-proud centers of commerce and communication are, one by one, following video rental stores and record shops into irrelevance and extinction.United States Post Office – Gary, Indiana, USA
 (images via: American Urbex and RickDrew)
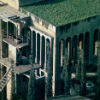
Like the 800-pound gorilla in the room, we need to get the enormous abandoned Gary Post Office out of the way… something the (remaining) residents of Gary would love to do in actuality. Opened in 1936 as a milestone of FDR’s New Deal construction program, this rambling wreck closed in the 1970s and is now a millstone around the long-suffering city’s neck.
 (image via: RickDrew)
Located at 601 Massachusetts St. at Sixth, this awesome Art Deco colossus was designed by architect Howard Lovewell Cheney. The building boasts a marble base marred by graffiti and the partial loss of its roof has allowed decay to rapidly accelerate inside. At least the trees have more light now.
Post Office – Glenrio, Texas/New Mexico, USA
 (images via: JuneNY)
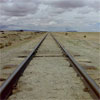
The unincorporated community of Glenrio sits astride the Texas – New Mexico state line with the now-closed post office on the New Mexico side. Built in 1935 when bustling Route 66 was funneling Dust Bowl refugees westward, the post office’s fortunes faded fast after September 1973 when I-40 bypassed the community to the north. Thanks go out to Flickr user JuneNY for documenting Glenrio’s long-shuttered post office as well as other features of the National Register of Historic Places-listed historic district.
Post Office – Kelso, California, USA
 (images via: l_c_m_tt_ and Drycyclist.com)
The Mojave Desert ghost town of Kelso regained some life in 2005 when the circa-1923 restored Kelso Railroad Depot re-opened as the Mojave National Reserve’s visitor center. This explains why the street separating the Depot and the Kelso Post Office is in a reasonable state of repair sporting freshly painted lines.
 (image via: Wikipedia)
A popular subject for photographers both amateur and professional, the Kelso Post Office closed in 1962 and looks as weatherbeaten as a half-century in the high desert would lead one to expect. This image, courtesy of Pierre Camateros, shows the warts-and-all rugged beauty of the structure, which still proudly displays Kelso’s original 90920 zip code.


[ By Steve in Abandoned Places & Architecture. ][ WebUrbanist | Archives | Galleries | Privacy | TOS ]


-
Going Postal: 12 Stamped Out & Abandoned Post Offices
[ By Steve in Abandoned Places & Architecture. ]
Since the only thing rapid about “snail mail” is the speed it’s fading into disuse, no one should be surprised at the growing number of abandoned post offices. These once-proud centers of commerce and communication are, one by one, following video rental stores and record shops into irrelevance and extinction.United States Post Office – Gary, Indiana, USA
(images via: American Urbex and RickDrew)Like the 800-pound gorilla in the room, we need to get the enormous abandoned Gary Post Office out of the way… something the (remaining) residents of Gary would love to do in actuality. Opened in 1936 as a milestone of FDR’s New Deal construction program, this rambling wreck closed in the 1970s and is now a millstone around the long-suffering city’s neck.
(image via: RickDrew)Located at 601 Massachusetts St. at Sixth, this awesome Art Deco colossus was designed by architect Howard Lovewell Cheney. The building boasts a marble base marred by graffiti and the partial loss of its roof has allowed decay to rapidly accelerate inside. At least the trees have more light now.
Post Office – Glenrio, Texas/New Mexico, USA
(images via: JuneNY)The unincorporated community of Glenrio sits astride the Texas – New Mexico state line with the now-closed post office on the New Mexico side. Built in 1935 when bustling Route 66 was funneling Dust Bowl refugees westward, the post office’s fortunes faded fast after September 1973 when I-40 bypassed the community to the north. Thanks go out to Flickr user JuneNY for documenting Glenrio’s long-shuttered post office as well as other features of the National Register of Historic Places-listed historic district.
Post Office – Kelso, California, USA
(images via: l_c_m_tt_ and Drycyclist.com)The Mojave Desert ghost town of Kelso regained some life in 2005 when the circa-1923 restored Kelso Railroad Depot re-opened as the Mojave National Reserve’s visitor center. This explains why the street separating the Depot and the Kelso Post Office is in a reasonable state of repair sporting freshly painted lines.
(image via: Wikipedia)A popular subject for photographers both amateur and professional, the Kelso Post Office closed in 1962 and looks as weatherbeaten as a half-century in the high desert would lead one to expect. This image, courtesy of Pierre Camateros, shows the warts-and-all rugged beauty of the structure, which still proudly displays Kelso’s original 90920 zip code.
Next Page:
Going Postal 12 Stamped Out Abandoned Post Offices
Want More? Click for Great Related Content on WebUrbanist:
Abandoned Cement Factory & Silos Transformed into Offices
An abandoned factory complex in Spain has been transformed into a massive office for an architecture firm, leaving much of the old machinery intact.
Click Here to Read More »»
6 Abandoned Railroads, Subways, and Train Stations
The age of the railroad may be over, but the marks of these powerful transport systems are evident everywhere you go – as well as abandoned train and subway stations.
Click Here to Read More »»
[ By Steve in Abandoned Places & Architecture. ]
[ WebUrbanist | Archives | Galleries | Privacy | TOS ]