RSS
 

Posts Tagged ‘Post’

Digital Photography 1 on 1: Episode 37: Post Production Workflow Part 1

11 Feb

This week is the first episode in a two-part series about post production workflow. In this episode, Mark will explain how to get images from the camera to the computer. Then he will show you how to keyword, group and organize the photos in Adobe Photoshop Lightroom.
Video Rating: 4 / 5


How To Create A Multiple Exposure Effect In Post

23 Dec

Using this technique you can create a stippled effect common to impressionist painters by blending multiple layers of a single image.

To do this technique, you will need to use a photo editor that supports layers. I use Photoshop Elements but you can also use Gimp, which is free, and many other photo editors.

Don’t let the layers thing scare you away, ok? In fact, if you are leery of layers trying this technique should, ironically, make it all become clear.

Pick an image to start. I particularly like this effect on flowers and foliage but it works for other subjects too. Here is the image I will use to start.

Red Flowers Original

Follow these steps:
1. Duplicate the background layer (Layer>Duplicate Layer)
Duplicate Background Layer


2. Reduce the opacity of the new layer to 30%
Reduce Layer Opacity


3. Use the move tool (usually an arrow) and move the layer slightly in any direction
Move Tool


4. Duplicate the background layer again (it’s on the bottom of the layer list)
5. Drag the new layer to the top of the layers list
Layer List 1Layer List 2


6. Reduce the opacity of the new layer to 30%
7. Use the move tool to move the layer slightly in a different direction
8. Repeat steps 4-7 any number of times
9. When you are happy with the result, use the crop tool to crop the edges of the image where you can see the borders of the moved layers.
Crop Tool

Here’s a little video that shows me performing these steps.

And the final image:

Red Flowers with Multiple Exposure Effect

There are many different ways you can accomplish a particular effect in photoshop (or your photo editor of choice). I try to use the simplest methods I can find to keep it simple.

Post originally from: Digital Photography Tips.

Check out our more Photography Tips at Photography Tips for Beginners, Portrait Photography Tips and Wedding Photography Tips.

How To Create A Multiple Exposure Effect In Post


Digital Photography School

 
Comments Off on How To Create A Multiple Exposure Effect In Post

Posted in Photography


I’m a ‘Typical Photographer’ and This Is How Much I Post Process

23 Dec

OK, I’m going to come right out and say it … there are a lot of lies in photography! It’s out there now and I suggest we all take some time to let it sink in before we do anything rash.

Of course we all know this but it’s not a subject that a lot of people openly talk about.  Before I say any more let me be completely straight.  I’m not saying that there are a whole load of photographers out there actively seeking to deceive you, more that most of us (me included) tell ‘little white lies’ about our images. Of all the subjects open for favorable interpretation is the amount photographers post process their pictures.

No Biggie?

I’m not saying for one minute that anyone is looking to be intentionally deceptive, most of the time all we are really talking about is the omission of a few minor finishing touches.  So what’s the big deal? Well there isn’t really any big problem as such, however I remember as a beginner how frustrating it was trying to work out how much of a great image was due to gear, processing or falling that the skill of the photographer.   Becoming a great photographer takes time, patience and practice and its understandable why more experienced photographers might want to protect their trade secrets.

Post Processing in Modern Photography

A common view is that post processing is a phenomenon that has only come about with the age of digital photography.  To a certain extent this is true however we need to be careful not to lump all forms of image manipulation into the same category.  In the age of film it was still possible to alter not only the basics such as aperture, shutter speed but also things like ISO, white balance and the overall aesthetic of the final image.   It’s true to say that these adjustments were less convenient than they are today (you had to physically swap out your film etc) but we shouldn’t confuse the convenience of modern technology with any form of deception.  It has always been necessary to ‘adjust’ the final image to achieve something more like reality and despite the capability of todays cameras and equipment this remains the case.  The reality is that even the best photographers make at least minor adjustments to their images.

So How Much?

So as a beginner what you really want to know is how much processing do most people and how do you know if you are doing too much?  When I started to get serious about photography this was a question that took up far too much of my time. To give you a sense of a typical photographers workflow here is a quick summary of my typical post processing routine and a few examples of how my images typically look before and after.

My Basic Workflow

My basic advice is this; only do as much post processing as necessary to achieve the look you want.  If your goal is to achieve an image that is realistic to real life then assuming you have a decent initial image you should be able to do this fairly quickly.  If however you want to achieve a more artistic result then you may need to take a bit longer.

The majority of my images are either travel or portraiture and therefore my basic post processing workflow is relatively simple.  Pretty much every image I take goes through the following five-step process, although for specific effects I will often do more.  Just so you know, I shoot all of my images in RAW with Lightroom being my editing software of choice.

  • Crop & Straighten – To clean up and correct any issues with composition.
  • White Balance – To correct any colour casts and ensure the image colour is as accurate as possible.
  • Exposure – To improve the overall tonality and dynamic range of the image.
  • Contrast & Clarity – To bring back any missing punch and bring out emphasis and detail.
  • Sharpening – Where necessary the last step is to apply selective sharpening to bring out any key details.

To give you an idea as to what this really looks like in the real world, here are a few examples of images I have taken and how they looked like before and after processing.

Example 1 – Travel Landscapes

Typical post processing for landscapes will include straightening and cropping to improve composition, followed by basic exposure and contrast adjustments. Finally I add some saturation and vibrance for impact.

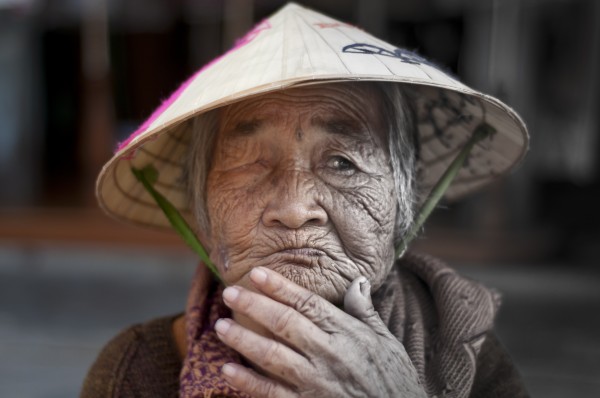
Example 2 – Street Portrait

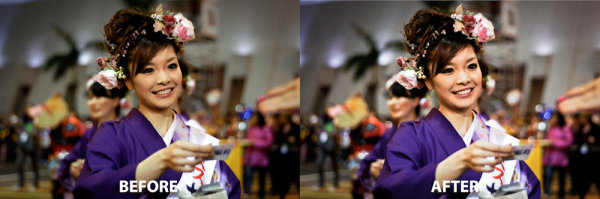
For travel portraits, its all about the white balance to ensure that the subject skin tones are spot on. After that I add contrast and boost detail with sharpening.

Example 3 – Studio Work

For studio portraits, white balance is again key followed by basic exposure and composition adjustments. In this case I may also spend more time working on more artistic effects and specialised image touch ups.

The Two Minute Rule

Obviously when you are starting out its important to spend time developing your processing skills, however as you start to get a handle on this its also very important to get efficient.  Not only will doing so stop you from wasting hours in front of your computer screen, but its also the best way limit the potential for over processing.  The ‘Two Minute Rule’ is the probably the best ‘pro tip’ I have ever heard and is something which has fundamentally changed my approach to photography.  The basic idea is to limit the time you spend processing any image to no more than two minutes.  Imagine that, just two minutes to do everything you need to get an image to look exactly as you want it to?  Basically you should be asking yourself if an images needs more than two minutes of work in post, is it worth the effort?  I’m not going to try and convince you that I follow this rule religiously but it is a really powerful way to focus your post processing efforts and I would certainly encourage you to consider building this into your own routine.  Limiting the time you spend in post will stop you from trying to rescue dud images and also give you a rough guide as to when you may have gone too far.

The ‘So What?’ for Beginners

If you are a beginner or someone getting started in post processing, what am I really telling you?  Simply it is this, most of this images you see will be post processed.  Whether this is to overcome the limitations of our equipment, correct mistakes or achieve a specific ‘look’ most photographers will process their photos. The important thing is not to worry about what others are doing, rather on if you are doing the right things to create the images you are looking for.  Focus on learning the techniques which will help deliver the photograph you want and use this as a way to hone your individual style and workflow to become an even better photographer.  If you get this right, then it won’t be long before you can start fibbing about your photographs too!

Post originally from: Digital Photography Tips.

Check out our more Photography Tips at Photography Tips for Beginners, Portrait Photography Tips and Wedding Photography Tips.

I’m a ‘Typical Photographer’ and This Is How Much I Post Process


Digital Photography School

 
Comments Off on I’m a ‘Typical Photographer’ and This Is How Much I Post Process

Posted in Photography


New York Post sensationalizes photo of man killed by subway train

13 Dec

new_york_post.jpg

A New York tabloid newspaper has caused controversy by publishing an image of a man about to be killed by a subway train on its front cover, along with a dramatic headline. The image shows a subway train bearing down on a man who’d been pushed into its path. The paper’s handling of the story has been widely criticized and it raises a range of issues over the actions of all the parties involved. Journalism school The Poynter Institute has an interesting summary, separating the different aspects about a controversy that brings a lot of difficult questions about photojournalism and news reporting. What do you think?

News: Digital Photography Review (dpreview.com)

 
Comments Off on New York Post sensationalizes photo of man killed by subway train

Posted in Uncategorized


New York Post sensationalizes photo of man killed by subway train

05 Dec

new_york_post.jpg

A New York tabloid newspaper has caused controversy by publishing an image of a man about to be killed by a subway train on its front cover, along with a dramatic headline. The image shows a subway train bearing down on a man who’d been pushed into its path. The paper’s handling of the story has been widely criticized and it raises a range of issues over the actions of all the parties involved. Journalism school The Poynter Institute has an interesting summary, separating the different aspects about a controversy that brings a lot of difficult questions about photojournalism and news reporting. What do you think?

News: Digital Photography Review (dpreview.com)

 
Comments Off on New York Post sensationalizes photo of man killed by subway train

Posted in Uncategorized


Creative Coloring in Lightroom – Weekly Lightroom Edit w/ Post Production Pye – Episode 7

06 Nov

Purchase the Season One Lightroom 3 DVD for at – www.slrlounge.com Season One Lightroom 3 DVD Includes: – 20 Episodes – All exercise and catalog files – Popup Shortcut Tooltips – Full HD 1080p – No advertisements View article at – www.slrlounge.com Welcome to Episode 7 of our Weekly Lightroom Edit. In this Lightroom Tutorial episode we are going to work on doing some creative coloring and enhancing on this image that was shot out in China.
Video Rating: 5 / 5

 
Comments Off on Creative Coloring in Lightroom – Weekly Lightroom Edit w/ Post Production Pye – Episode 7

Posted in Retouching in Photoshop


Post Processing an Image using CS4 and Nik Color Efex/Viveza

05 Nov

Just a quick video on how I transformed a flat image into one that really POPS with color and contrast just by using Photoshop and the Nik filters Color Efex pro and Viveza

 
Comments Off on Post Processing an Image using CS4 and Nik Color Efex/Viveza

Posted in Retouching in Photoshop


Photo Post Production Workflow

01 Nov

This video demonstrates my workflow for enhancing images during post production. I used Adobe Lightroom, Portrait Professional, and Adobe Photoshop in this video. The video is 5x faster than the actual editing speed. A before and after look is located at the end of the video. Lightroom achieves the basic image adjustments, such as white balance, contrast, and other overall effects. Portrait Professional is used mainly to smooth skin and hair. Adobe Photoshop is used to clean up some blemishes and unwanted shadows. I also applied a bokeh effect to the bottom left corner.
Video Rating: 4 / 5

 
Comments Off on Photo Post Production Workflow

Posted in Retouching in Photoshop


Photo Term Series Post #20: Bokeh

31 Oct

One of the more interesting terms in photography is bokeh (pronounced bo-keh). Bokeh is the aesthetic quality of the blur in the out of focus portion of an image. The word is derived from the Japanese word boke meaning blur or haze.

Bokeh can be an important quality photographers evaluate when choosing a lens. This is particularly true when a photographer strives for non-distracting and smooth backgrounds. Nature, portrait and event photographers for example often make use of bokeh to isolate their subjects from busier backgrounds by choosing a smaller f/stop setting and thus a larger aperture. By choosing a smaller f/stop setting a photographer chooses to narrow the plane of focus and create a shallower depth of field. By having a shallower depth of field more of the photographed scene is then placed out of focus.

Copyright Jim M. Goldstein, All Rights Reserved

Photo Term Series Post #20: Bokeh

flattr this!


JMG-Galleries – Jim M. Goldstein Photography

 
Comments Off on Photo Term Series Post #20: Bokeh

Posted in Equipment


Putting the Post in Post-Processing

01 Aug

When I switched over to digital photography from film there was a lot of discussion on new approaches and changing mindsets required to get good photographs (ex. Shooting or Exposing to the Right). While most photographers focused on techniques that could only go as far as the software or hardware of the time I always looked to the future. Never being satisfied with the current state of software or hardware I always knew that the technology powering the digital photography movement would catch up to what I had in mind. Much of what I was striving to accomplish revolved around improved image processing and higher resolution images. In a nutshell I knew that if I was using an 8 megapixel camera I’d be able to stitch multiple images together to make a 100 or 1000 megapixel image and so I started gathering images during my travels for giant digital panoramic photos. The same was true of images that might have been difficult or impossible to process to expectation with early raw converters. I took and sought after those challenging photos knowing I’d make them into something I had envisioned when the time was right. In both of these cases I knew that over time the software would improve and computers would get more powerful. While I held great optimism the technology would catch up over time I had to live with the fact that many of my images would have to sit idle for sometime. The gap between taking my photos and processing them would range from few months and to several years.

When I upgrade to new software, as was the case with my move to Lightroom 4, I like to revisit older photos to see what impact the new software can have on them.  I’m almost always wowed by the improvements I see across each upgrade for Lightroom and Photoshop, but the changes to Lightroom 4’s RAW converter (and Adobe Raw 7) has especially impressed me.  It’s truly astonishing to see how much more latitude there is in working with images that are not ideally exposed or contain a great deal of digital noise. Below are a couple of recent examples of images taken with my Canon 1D Mark II back in 2006. While these images aren’t particularly extreme to highlight how much Lightroom 4 or Adobe Raw 7 can do, they do work to highlight the general philosophy: take photos to satisfy what you envision, versus what you feel you can work with given existing post-processing limitations. The “post” in post-production has no time limit so always look back to your older work to see how newer technology can breath new life into your photographs. You might just rediscover a lost gem.

Example 1:
Canon 1D Mark II, Canon 70-200mm f/2.8, ISO 400, f/3.5, 1/2000 sec
Processed with Adobe Lightroom 4

Before Edits: Na Pali Coast and Surf

After Edits: Na Pali Coast and Surf

Example 2:
Canon 1D Mark II, Canon 70-200mm f/2.8, ISO 400, f/3.2, 1/2000 sec
Processed with Adobe Lightroom 4

Before Edits: Na Pali Coast Spire Detail

After Edits: Na Pali Coast Spire Detail

Note: Both images were taken from a boat in choppy surf hence the super fast shutter speeds

Copyright Jim M. Goldstein, All Rights Reserved

Putting the Post in Post-Processing

flattr this!


JMG-Galleries – Jim M. Goldstein Photography

 
Comments Off on Putting the Post in Post-Processing

Posted in Equipment