RSS
 

Posts Tagged ‘portraits’

Tips for Great Beach Sunset Portraits

28 May

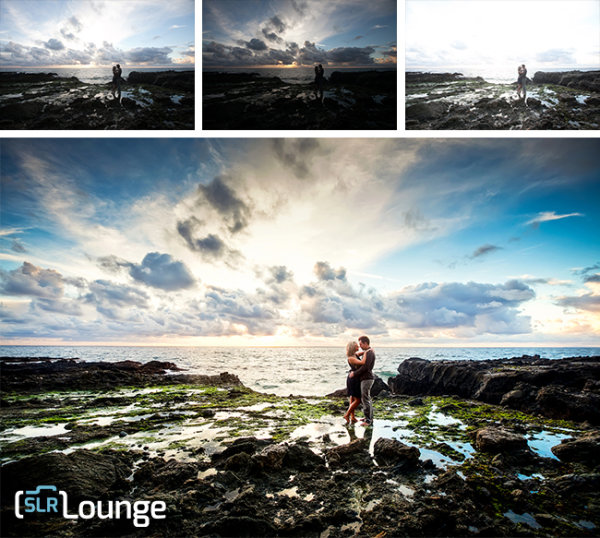
Beach sunset portraits are always so beautiful; they make for a unique backdrop as each sunset is a little bit different from the next. With an hour long portrait session photos with the sunset over and over can sometimes get a little repetitive. This article will show you how to create diverse images out of a beach sunset session, and also explain how to use off-camera flash to expose for the background and capture the true colors that you see.

IMG_9507-600

To plan this right, you first need to know exactly what time the sun dips behind the ocean horizon. The time and date website allows you to look up this exact time for different cities all over the world. For an hour long session, have your clients meet you at the beach 45 minutes before the sun goes out of sight. The lighting at this time is just perfect for photos, it is known as the golden hour because of the warm hues it casts.
The 15 minutes immediately after the sun sets also offers a wonderful soft light.

Before you begin posing your subjects you need to get your exposure right. Turn off all flashes, set your camera to Manual Mode, and simply expose for the sunset. If you take a picture of your subject in front of the background like this you will see that they are very underexposed, if not a silhouette. In order to get a proper exposure for the sunset, and for your subject, we need to add light to the subject. Since the sunset is so far away, your flash will not affect the exposure of the background.

You can use an on-camera flash for this, but an off-camera flash will make the lighting look more natural and is therefore the ideal. To setup an off-camera flash you will need a flash, a light stand, and a way to trigger the flash. There are many different ways to do this, but I would suggest wireless radio triggers. Once you have your light setup, place the stand about 10-15 feet away from where your subject will stand, and about 4-5 feet to the right of the camera position. This will have the light coming at your subject from the side, instead of straight on which will create a much more flattering picture.

diagram-600

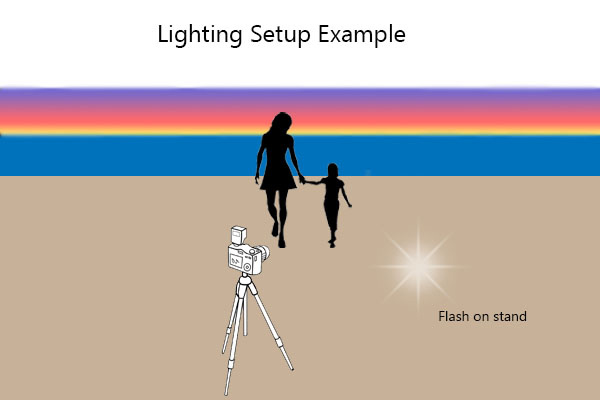
Turn your flash on and switch it to manual mode. Set the flash strength to half power and take a test shot. If your subject is too bright try moving the flash back a few feet. If the face is too dark increase your flash power or move the flash a little closer to the person. Adjust the flash power and distance from your subject until they are nicely exposed. Your flash can be bare, without any modifiers, or with a shoot through white umbrella for a softer light.

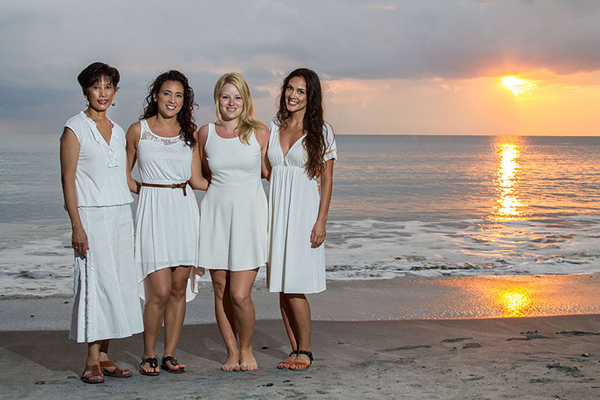
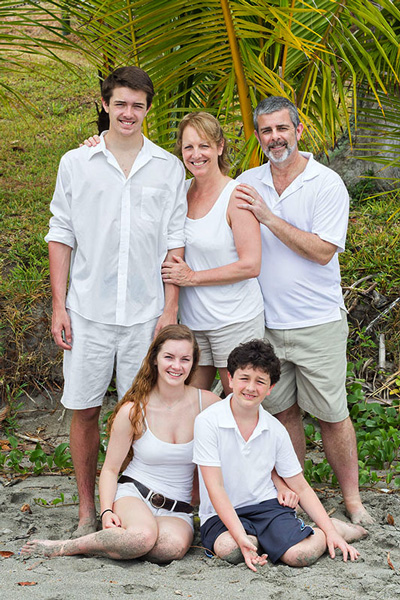
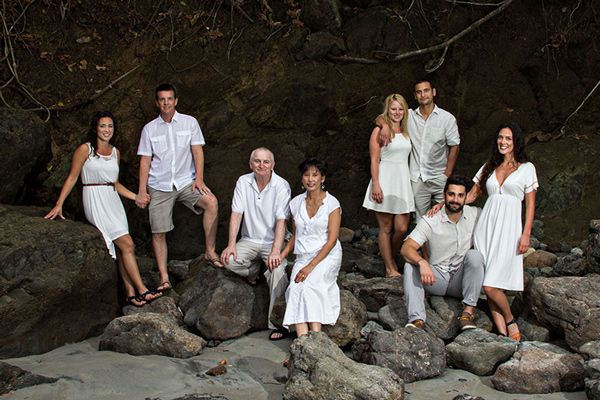
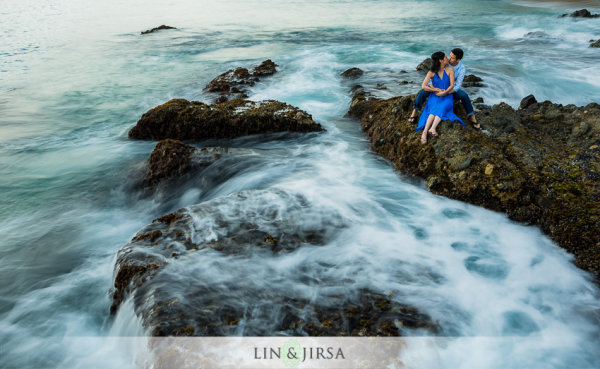
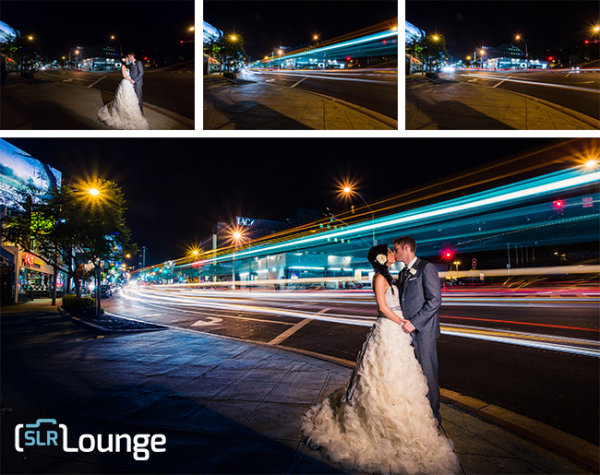
Once everything is setup you can pose your group or subject, facing away from the sunset, and take a set of images. Vary the pose and take a few more. Next look around and see what else is available to use as a backdrop. Large rocks, palm trees, sand dunes or greenery all make for diverse images. A boardwalk leading up the beach can also be a great spot. Aim to use two to three different backgrounds.

015-600

IMG_9360-600

By this time the sun has gone down quite a bit, and the colors have changed a lot from your first set of photos. Adjust your lighting and exposure to match the new conditions and take a few more portraits in front of the ever changing sunset.

IMG_9393-600

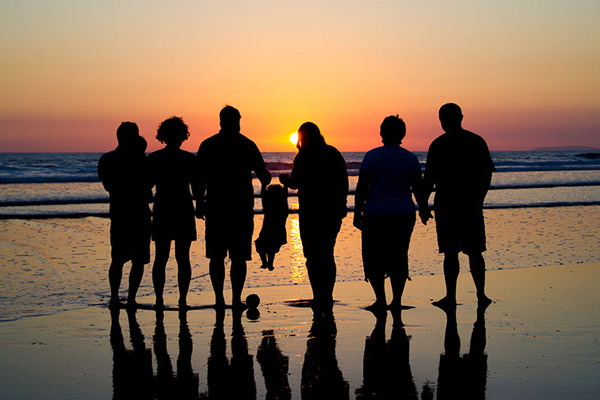
Turn your flash off, adjust your exposure and take some beautiful silhouette images of your subjects.

048-600

Just after the sun dips down below the horizon, turn your subject towards the sunset and capture the beautiful soft light that spills onto their face. Make sure your flash is off for this, as the natural light is perfect, and adjust your exposure as needed. This is a great moment for candid shots of the group walking along the beach and laughing, or of parents tossing their children up in the air.

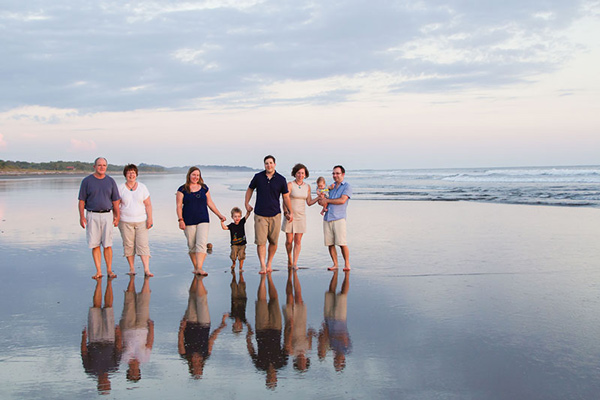
Lastly, try to look for where your subject’s reflection falls on the water when the tide pulls out. Capture an image with your subject and their reflection, or just their feet and the reflection.

042-600

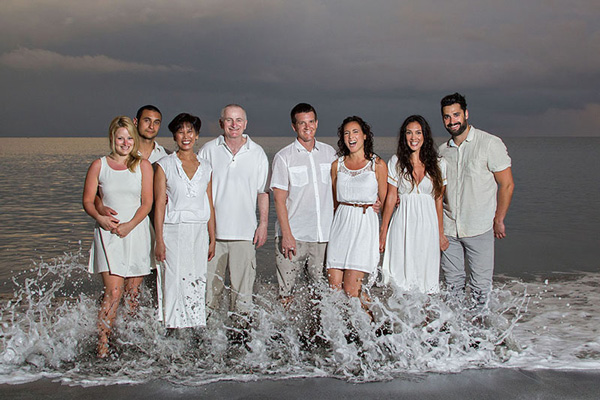
During a one hour session, at only one location, you can capture a diverse set of images for your customers (or friends) that they will love. Just remember to always be on the lookout for a different background, or unique area of the beach. Also if you will be taking pictures that will get them sandy or wet, make sure to save those for last so they their clothes aren’t wet or full of sand in the rest of the photos.

IMG_9522-600

Have you done any beach portraits? Do you have any other tips you can share, please do so in the comments below.

The post Tips for Great Beach Sunset Portraits by Madison Baltodano appeared first on Digital Photography School.


Digital Photography School

 
Comments Off on Tips for Great Beach Sunset Portraits

Posted in Photography


Die eigenartigen Portraits des Bryan Ferguson

21 May

Ich kann es nicht auf den Punkt genau beschreiben, doch es gibt eine Ausdruckweise der Fotografie, die mich anzieht. Sie erstreckt sich über unterschiedlichste Genres und kennzeichnet sich durch abgredrehte, komisch-stylische und spannungsgeladene Portraits, die bewusst mit den Grenzen des bedienten Sujets spielen.

So auch die Impressionen des Schotten Bryan Ferguson, die ich fürs Erste der Portraitfotografie zuordnen würde. Etliche Aufnahmen strotzen bisweilen so von Spontanität, dass sie sehr ungestellt und aus dem Alltag gegriffen erscheinen.

Das kann natürlich daran liegen, dass Ferguson selbst Filme macht und entweder direkt am Set oder unabhängig davon diesen unverwechselbaren Flair erzeugt. Seht selbst.

Eine Frau liegt auf einer Decke.

Eine Frau unter der Dusche, sie lacht.

Ein Portrait eines Mannes.

Tankstellenaufnahme mit zwei Menschen.

Die fliegenden Haare einer Frau.

Ein Portrait, das an 3D erinnert.

Eine Frau mit rotem Pulli sitzt an einem gelb-roten Tisch.

Zwei Frauen vor einem Gebäude.

Portrait einer Frau vor einem Drive Through.

Portrait zweier kämpfender Menschen.

Eine Frau im Wald mit einem Totenkopf in der Hand.

Portraitaufnahme von einem Mann in der Telefonzelle.

Den Ausdruck „mit der Fotografie Geschichten erzählen“ kann ich persönlich nicht mehr hören. Vielleicht, weil er mittlerweile abgelutscht und zu oft im Rahmen fotografischer So-macht-man-ein-gutes-Foto-Anleitungen benutzt wurde.

Doch bei Fergusons Abbildungen trifft es zu. Jede Aufnahme verstrickt mich – ohne dabei verkrampft eine Story zu suchen – in ein Momentum der Spannung, das sich in meinem Kopf als Geschichte fortsetzt.

Doch auf die Gefahr hin, die Bilder hier zu zerreden, lasse ich nun das Schreiben sein und ermutige Euch, die Bilder einfach noch einmal anzusehen.

Und wenn sie auch Euch so begeistern, wie mich, dann folgt ihm doch auf Flickr und Twitter.


kwerfeldein – Fotografie Magazin | Fotocommunity

 
Comments Off on Die eigenartigen Portraits des Bryan Ferguson

Posted in Equipment


6 Main Studio Lighting Methods to Master for Your Portraits

16 May

Understanding light is a concept that makes a good photographer, and an even greater skill to master is knowing how to recreate different light effects in the studio . Using lighting accessories like off-camera flashes or strobes, and studying how to trigger them from a different position than on top of the camera, will give an overall different aesthetic to Continue Reading

The post 6 Main Studio Lighting Methods to Master for Your Portraits appeared first on Photodoto.


Photodoto

 
Comments Off on 6 Main Studio Lighting Methods to Master for Your Portraits

Posted in Photography


Just Breathe: Portraits of adults with Cystic Fibrosis

10 May

ianp1.jpg

Cystic Fibrosis is an incurable, life-shortening genetic disease which affects roughly 70,000 people around the globe. Commonly thought of as a childhood disease, photographer Ian Pettigrew was diagnosed with Cystic Fibrosis at the age of 37. He is currently trying to raise money to support a project entitled ‘Just Breathe’, which will feature portraits of adults living with CF. Get more details and make a contribution

News: Digital Photography Review (dpreview.com)

 
Comments Off on Just Breathe: Portraits of adults with Cystic Fibrosis

Posted in Uncategorized


Just Breath: Portraits of adults with Cystic Fibrosis

09 May

ianp1.jpg

Cystic Fibrosis is an incurable, life-shortening genetic disease which affects roughly 70,000 people around the globe. Commonly thought of as a childhood disease, photographer Ian Pettigrew was diagnosed with Cystic Fibrosis at the age of 37. He is currently trying to raise money to support a project entitled ‘Just Breath’, which will feature portraits of adults living with CF. Get more details and make a contribution

News: Digital Photography Review (dpreview.com)

 
Comments Off on Just Breath: Portraits of adults with Cystic Fibrosis

Posted in Uncategorized


3 Ways to Get Killer Portraits Using a Tripod

21 Apr

As photographers, you’re all looking to “wow” the people we’re taking pictures of, whether they’re clients or just friends. When you show final images, there’s that sense of anticipation, excitement and nervousness as you gauge reactions. And when you hear the words “amazing” or “I love them,” it’s truly a great feeling. So how do you get the “wow” and avoid the “just okay?” Well that’s not always easy. With so many good photographers out there and so much of their work getting exposure via social networks, expectations for good photography is as high as it’s ever been.

shutter-drag-wedding-photography

Here are three ways to achieve killer portraits with the use of a tripod that we use in our studio. These include the following, all of which we’ll show you – keep reading:

  1. Shutter Drags
  2. Composites
  3. HDRs

Required Equipment

  • Sturdy tripod – that old hand-me-down tripod might not be stable enough, as any movement will show in the images
  • Shutter release – using a cable release will help you avoid touching the camera and causing movement
  • Wide angle lens – as you can see from the images in this article, a wider lens is going to bring out many of the “wow” elements like the clouds, the ocean, the streaking lights, and more
  • Camera – as with any type of photography, the camera is only as good as the photographer. You can get amazing results with both entry level DSLRs and full frame cameras.

1. Shutter Drags (Long Exposure Photography)

Dragging the shutter refers to using slower shutter speeds to capture movement. This captures motion of anything in your frame that is moving, while keeping the static objects in the scene nice and crisp. If you can get your couple to hold still, you have the opportunity to create awesome effects with moving people, cars or waves like you see in the image below. Additional saturation and contrast is added in post production using some Lightroom Presets.

wedding-photography-los-angeles

Shutter Drag Quick Tips:

  • How slow do you go? – well that depends entirely on how fast the other elements in the scene are moving. If cars are zooming by, you can get away with faster shutter speeds like 1/60 or 1/30, but if you are capturing moving people and they are slowly strolling, you may have to drop it even lower like 1/10th or even lower. For water, like the shots above, we are generally around 1/2 to 1 second.
  • Ensure that your subjects are holding really still – instruct your subjects to hold very still, avoid blinking during the shot or sequence of shots, and even hold their breath.
  • Utilize static poses –  posing for these types of photos will have to be static. Dips, jumps, and walks will add too much motion in the scene and result in blurry photos. However, static does not have to mean boring. You can still have them in flattering, romantic poses.
  • Snap a few extra shots to ensure you have one crisp photo – take a few extra shots because a photo may look crisp on the back of your camera, only to show noticeable motion blur as it’s taken into post production.

2. Composites

wedding-photography-composites-1

Compositing multiple photographs into one is sometimes the best solution when it’s unreasonable to have your couple hold still for as long as you need to achieve the desired effect. For example, if you’re looking to capture the beautiful stars in a night sky or if you’re looking combine multiple streaks of passing car lights –  the five, ten, or even 30 second exposure time is much too long to expect any live subject to be still. Below is an example where our couple would have had to hold still for around 15 seconds as we spin flaming steel wool just behind them.

wedding-photography

Composite Tips:

The tips for capturing composites are actually very similar as the tips for capturing shutter drags. For example, you still need a sturdy tripod and a shutter release; and you should certainly snap a few extras to make sure you have enough choices to work with in post-production. In addition, here are some more quick tips for capturing composite photos.

  • Expose for the couple’s skin tones first – your lighting can be anything from flash to constant lights; but the most important thing is to focus primarily on the subject.
  • Have the subjects exit the scene – after you’re sure you have a shot with a good pose and good lighting, you can have them exit the scene.
  • Then adjust your settings as needed to expose for the background and create your desired effects. For example, if you’re looking to capture the streaking lights, adjust your shutter speed down and wait for the cars to pass.
  • If you can keep the overall exposures identical between shots, compositing will be incredibly simple. Just layer the images in Photoshop, and then mask in and out elements on each layer. However, if the exposures and look of each image varies, then it will require quite a bit more advanced compositing work which would be beyond the scope of this article.

3. Try HDR Portrait Photography

hdr-wedding-photography-1

While HDR Photography gets a bad rap sometimes for being gaudy and fake, when done correctly, you have the opportunity to create memorable, distinct photography. This is especially true with outdoor scenes on a cloudy day. Grab your tripod, pose your couple in a static pose, dial in the right settings, and shoot away. What are the right settings? Well start with ISO 100 and a decent aperture (f/4 and up). From there, the shutter will vary depending on the brightness of the scene. For more information, feel free to check out some of these HDR tips on dPS.

hdr-architecture-wedding-photography

HDR Quick Tips:

Here are a few more things to keep in mind.

  • Study how to bracket exposures on your specific camera. Almost all cameras have the AEB (Auto Exposure Bracketing) feature, but you will need to know how to access it to dial in the correct settings.
  • Keep your minimum shutter speed at 1/200 or higher. Any movement in the couple or background can cause unnatural “ghosting,” so keeping the shutter speed high will really help you save time in post production.
  • Avoid strong and overpowering flares. If you’re shooting into the sun, strong flares can desaturate your image and create a loss of sharpness. If you are shooting into the sun for compositional purposes, choose an angle where the flare isn’t going to distract from the subject.
  • Choose the right time of day. Sunrise and sunset are still going to one of best times to shoot, as you are most likely to have amazing color in the sky during that time. Remember that the same general photography rules still apply when shooting HDR, we simply are using the HDR process to bring out more detail.
  • Watch the weather report. Partly cloudy days are great times to shoot HDR photography. Capturing all of the contrast and interest in the clouds, as you see in the sample images in this article, really add the “wow” factor.

Conclusion

intimate-hdr-poses

By no means are these three techniques enough for a solid session. In fact, the majority of the photos you take during any portrait session should revolve around candid posing, story-telling, and emotion. For us, we use these dramatic environmental shots to “set the stage” in a final album, canvas mural or other print medium. They are the big grand images that sets the scene, and they are followed by the close up candid images showing the couple interact in said scene and environment.

These techniques are also wonderful in creating “wow” shots, i.e. the shots they share on Facebook and the shots they end up printing on a canvas at their wedding. The shots that make everyone else go, “how’d they do that!?”

Do you have any other killer tips you’d like to share? Please do so in the comment section below.

sunset-hdr-wedding-photography

The post 3 Ways to Get Killer Portraits Using a Tripod by Post Production Pye appeared first on Digital Photography School.


Digital Photography School

 
Comments Off on 3 Ways to Get Killer Portraits Using a Tripod

Posted in Photography


5 Reasons for Doing Natural Light Portraits

15 Apr

Natural light portrait

With all the attention given to the art and craft of shooting portraits using flash, you could be forgiven for thinking that this is the only way to take a portrait. The truth is that while fashionable Speedlites get all the attention, there are photographers working almost entirely in natural light and creating beautiful portraits without a softbox or light stand in sight.

One of the most prolific is Eduardo Izq, a photographer based in the United States who has built an impressive portfolio of natural light portraits taken using local models and dancers. Eduardo takes natural light portraiture to an extreme, often photographing his models without make-up. He may not be creating beauty portraits in the conventional sense, but by concentrating on character he is capturing portraits that are beautiful in a deeper, more fundamental way.

Please take some time to look at Eduardo’s website, you will learn a lot from it. For another insight into his work you can also read my interview with Eduardo about his ballerina portraits.

Intrigued? Here are five more reasons why you should take some natural light portraits:

1. It teaches you about light

To get the best out of natural light you need to become an observer of light. How does the quality, and quantity, of light change where you live from hour to hour, and season to season? How is the light affected by weather and the location? To take good natural light portraits you need to work in the most flattering light, and that usually means finding the shade or going out and taking portraits at the end of the day during the golden hour and twilight (my article The Magic of Natural Light: Twilight will help). Doing so will help you appreciate the quality of light in your area. This knowledge will also help you in other areas of photography.

2. Light is linked to location

As you become more aware of light you will come to see that the quality of light is linked to location and season. When you take a portrait of somebody outside, the light provides a link between the subject and the place they are in, tying the two together. Light, location and subject are entwined: it was only possible to take a photo of that person in that place with that type of light at one particular time. It’s almost impossible to reproduce the effect afterwards – the uniqueness of the light becomes part of the image. That is something different (not necessarily better, just different) from the effect of using flash, which is easily reproduced.

Natural light portrait

The soft light of the setting sun links the portrait of the woman with her horse to the location. Both are lit by the same light, a type of light that occurs naturally in this location in certain conditions at the right time of year.

3. Natural light is simple

Natural light portrait

Natural light is also ideal for black and white portraits. Here the light is shaped by the archways on the right.

Flash is not complicated for everybody, but it takes time to master and that can get in the way when you are starting out. One of my friends told me a story about a portrait shoot that went wrong. She modelled for a photographer who was working outdoors, and he spent so long setting his lights up and measuring the light that the shoot never really got going. She wasn’t happy with the results and I guess neither was the photographer.

Natural light is different because it is simple. In fact, I often go on a portrait shoot with just one camera and a single lens. This simple approach to equipment lets you concentrate on composition, lighting, and building rapport with your subject. Another benefit is that it is quick and easy to move from one place to another if you don’t have much gear. It is much more difficult if you have flash because you also need to move the extra equipment.

4. Your relationship with the model is critical

The number one thing that determines the success of your portraits is your relation with your subjects. Building rapport is essential, especially if you’ve never worked with your model before. Simplifying your approach means that you have more time to concentrate on building the relationship. This is essential. Your model’s pose and expression are the prime factors that determine the success of the portrait.

A portrait shoot is a collaboration, two people working together to create a beautiful image. If you ignore your model at the expense of setting up lights, the results will suffer. It takes real skill to be able to set up your lights quickly and effectively, while building a relationship with your subject. That can come later. If you start off with natural light, it gives you time to learn how to build rapport, and you can introduce flash at a later stage. Master one skill at a time.

5. Natural light is beautiful

Natural light portrait

The subject of this portrait is lit by the extremely soft red light that appears briefly after the sun has set.

It’s hard to beat the beauty of natural light at its best. The photo to the right is a good example. We were taking portraits at the beach at the end of the day and the light became more and more magical as the sun disappeared over the horizon. For a few short minutes we experienced the beautiful red afterglow of the sunset, and I used it to take the last few portraits of the session. Moments like this don’t come often, but the results are worth it. Shooting in light that is beautiful, yet fleeting and difficult to find, elevates your portraits to another level.

Your turn

What is your experience of shooting portraits in natural light? Do you prefer to take the simple approach to equipment and lighting? Can you recommend any portrait photographers who work in natural light? Let us know in the comments.


The Natural Portrait ebookThe Natural Portrait

My ebook The Natural Portrait teaches you how to take beautiful portraits in natural light. This 240 page ebook, published by Craft & Vision, takes you through the entire process of natural light portrait photography through from finding a model, deciding where to shoot, working with natural light and post-processing your images. Click the link to learn more or buy.

The post 5 Reasons for Doing Natural Light Portraits by Andrew S. Gibson appeared first on Digital Photography School.


Digital Photography School

 
Comments Off on 5 Reasons for Doing Natural Light Portraits

Posted in Photography


Tips for Taking Street Portraits – Lessons Learned in India

26 Mar

On my trip to Rajasthan, India I packed my Canon 400D (Rebel XTi) with two lenses: my Canon EF 70-200mm f/2.8 IS USM (for long and candid photos) and my Canon EF 50mm f/1.8 II (for indoor portraits and low light photos) because I was aiming for portrait on the streets and specially head shots. Here are a few tips for taking street portraits, from my humble experience, and how to approach people before you take you shot.

#1 Always smile

11

You always want to let anyone who sees you with a camera know that you are a cheerful person and therefore they won’t mind being photographed by you. Even if they become angry because you asked, just smile and back off. You need to remember that being a photographer in the street is an image for all photographers in the public eyes.

#2 Avoid using the built-in flash on your camera

A common mistake that most beginners fall into is using the built in flash. For me this is meant only for quick shots of friends or family. But if you want to a portrait with great light, use natural daylight in the shade by making the subject face towards the light not the opposite.

21

#3 Don’t shoot in the sun

The reason is simple, hard light means hard shadows! Normally when you take a portrait for someone in the sun it creates hard shadows under the eyes, which is very bad for a portrait most of the time. Try to draw your subject to the nearest shady area available, or you can use a smooth board (or reflector) to make the light more even on the subject, that is if you dare to do all that with a stranger.

31

#4 Think about the light and shadows

It’s not enough just to take the shot in the shade during the day, away from the sun. You also need to consider how the light and the shadows are becoming on the subject’s face. You can do that by taking a test shot, then reviewing it on your camera screen by looking for the highlights and the shadows. If you don’t know how, practice it at home with your family or friends before going out to the streets.

41

#5 Don’t ask the person to smile

The good portrait comes first from the subject, then from you. So when you ask someone to smile, and they will, it won’t be a natural smile and sometimes it will bad for the shot. So don’t ask and they will reveal their true expression to the camera whether it’s a smile or sadness, sometimes you will be surprised.

51

52

#6 Use a large aperture for a blurry background

One of the key important things in portraiture is to focus on the eyes and blur the background, and sometimes part of the face. It will make a more dramatic and more attractive portrait to the viewer. And it also blur the background so it makes the viewer’s eye go only to the subject’s eye.

61

#7 Think about the background

What lies behind the subject is important, sometimes it’s good to have people in it and sometimes it’s better empty with no one. It really depends on how you intend to show your portrait.

71


Editor’s note: as I was searching Flickr for portrait images for the weekly inspiration collections (Portraits of men – portraits of women, I kept finding Zuhair’s portraits stood out among the rest. So I approached him and asked him to share some tips with us and he was gracious enough to do so. I hope you enjoy his images as much I do. If the eyes are the windows to the soul, I feel Zuhair’s portraits do a great job of showing us his subjects’ souls. 


The post Tips for Taking Street Portraits – Lessons Learned in India by Zuhair A. Al-Traifi appeared first on Digital Photography School.


Digital Photography School

 
Comments Off on Tips for Taking Street Portraits – Lessons Learned in India

Posted in Photography


Tips for Taking Street Portraits – Lessons Learned in India

25 Mar

On my trip to Rajasthan, India I packed my Canon 400D (Rebel XTi) with two lenses: my Canon EF 70-200mm f/2.8 IS USM (for long and candid photos) and my Canon EF 50mm f/1.8 II (for indoor portraits and low light photos) because I was aiming for portrait on the streets and specially head shots. Here are a few tips for taking street portraits, from my humble experience, and how to approach people before you take you shot.

#1 Always smile

11

You always want to let anyone who sees you with a camera know that you are a cheerful person and therefore they won’t mind being photographed by you. Even if they become angry because you asked, just smile and back off. You need to remember that being a photographer in the street is an image for all photographers in the public eyes.

#2 Avoid using the built-in flash on your camera

A common mistake that most beginners fall into is using the built in flash. For me this is meant only for quick shots of friends or family. But if you want to a portrait with great light, use natural daylight in the shade by making the subject face towards the light not the opposite.

21

#3 Don’t shoot in the sun

The reason is simple, hard light means hard shadows! Normally when you take a portrait for someone in the sun it creates hard shadows under the eyes, which is very bad for a portrait most of the time. Try to draw your subject to the nearest shady area available, or you can use a smooth board (or reflector) to make the light more even on the subject, that is if you dare to do all that with a stranger.

31

#4 Think about the light and shadows

It’s not enough just to take the shot in the shade during the day, away from the sun. You also need to consider how the light and the shadows are becoming on the subject’s face. You can do that by taking a test shot, then reviewing it on your camera screen by looking for the highlights and the shadows. If you don’t know how, practice it at home with your family or friends before going out to the streets.

41

#5 Don’t ask the person to smile

The good portrait comes first from the subject, then from you. So when you ask someone to smile, and they will, it won’t be a natural smile and sometimes it will bad for the shot. So don’t ask and they will reveal their true expression to the camera whether it’s a smile or sadness, sometimes you will be surprised.

51

52

#6 Use a large aperture for a blurry background

One of the key important things in portraiture is to focus on the eyes and blur the background, and sometimes part of the face. It will make a more dramatic and more attractive portrait to the viewer. And it also blur the background so it makes the viewer’s eye go only to the subject’s eye.

61

#7 Think about the background

What lies behind the subject is important, sometimes it’s good to have people in it and sometimes it’s better empty with no one. It really depends on how you intend to show your portrait.

71


Editor’s note: as I was searching Flickr for portrait images for the weekly inspiration collections (Portraits of men – portraits of women, I kept finding Zuhair’s portraits stood out among the rest. So I approached him and asked him to share some tips with us and he was gracious enough to do so. I hope you enjoy his images as much I do. If the eyes are the windows to the soul, I feel Zuhair’s portraits do a great job of showing us his subjects’ souls. 


The post Tips for Taking Street Portraits – Lessons Learned in India by Zuhair A. Al-Traifi appeared first on Digital Photography School.


Digital Photography School

 
Comments Off on Tips for Taking Street Portraits – Lessons Learned in India

Posted in Photography


DIY revolution: Donald Weber’s Molotov cocktail ‘portraits’

22 Mar

DW-20140226-1231.JPG

Photographer Donald Weber returned to his former home of Kiev during the civil unrest last month. Working without a commission, Weber avoided news-style images of the running battles between protestors and police, he says he attempted to take ‘a macro view of the situation.’ As well as architectural images of the homemade barricades and portraits of some of the participants, he also created a series of images detailing the protesters’ weapons of choice – homemade Molotov cocktails. See photos of Weber’s unique perspective

News: Digital Photography Review (dpreview.com)

 
Comments Off on DIY revolution: Donald Weber’s Molotov cocktail ‘portraits’

Posted in Uncategorized