
When you’re taking pictures of family and friends outdoors, you are often not in control of the light, and that can lead to poor portraits.
A few of the possible problems include:
- Raccoon eyes – deep shadows in the eye sockets (and other the nose) caused by bright overhead sunlight or light overcast skies
- Bright background obscuring the subject’s face – although some cameras automatically compensate for it, if you’re shooting in the shade and there’s a really bright background, that can mislead your camera into underexposing the image, leaving your subject’s face too dark.
- No control over direction of the light – the sun is here, and you are there. You can move around the person you’re photographing to get better light, but then you may lose the desired background.
With a wireless flash, these problems can be overcome, and it’s surprisingly easy. Canon’s Rebel line, D-series DSLRs and advanced G-series compact cameras let you control off-camera flash wirelessly, which opens up many possibilities when it comes to changing the quality and quantity of light that you use to photograph someone outdoors.
Raccoon eyes – below (left) is a typical portrait shot under direct midday sunlight with our model, Leanne. The sun, almost directly overhead, casts deep shadows over eye sockets, below the nose and chin, and wherever hair blocks the light. Gear: Canon EOS 70D, 85mm f/1.8 USM Canon lens. Exposure: 1/320 second at f/4.5, ISO 100.
Raccoon eyes fixed – (above right) the flash was mounted on the camera’s hot shoe and provided enough fill light to blow away the shadows, but the light is flat. Gear: same as above plus Canon 430 EX II Speedlight. Exposure: 1/250 second at f/10, ISO 100.
Raccoon eyes, cloudy skies (below left) the clouds move in and soften the light. Better, right? Well, sort of. Leanne’s eyes are still in the shadows. Gear: Canon EOS 70D, 85mm f/1.8 USM Canon lens. Exposure: 1/250th at f/3.5, ISO 100.
A lighter touch with light – (above right) in this case, less light was required to lighten the shadows, so I used the on-screen flash intensity control (on the Canon 70D, press Q and then touch the flash power icon to access this feature) and reduced the flash output. Determining the right amount of flash output is often a matter of trial and error. In this case, the default setting was too dark, +2 was too bright, but +1 was perfect. Gear: same as above plus Canon 430 EX II Speedlight. Exposure: 1/250th at f/7.1, ISO 100.
Balancing light when shooting in the shade
The ideal way to take a portrait in the shade without flash is to shoot with the bright area behind you (behind the camera). This will give you a wide light source and with nice, flattering light. However, you may not have this option, or you want to include interesting background elements that are, alas, drenched in sunlight.
While an on-camera flash will add enough light, you can add more dimensionality and features to your subject’s face by taking the flash off the camera and moving it around. By combining ambient (existing) light with your off-camera flash, you introduce infinite creative portrait-taking possibilities.
(Not sure how to use wireless? Scroll down to read our primer)
It’s best to have what flash guru Joe McNally calls a “voice-activated light holder” (also known as a human being, a friend, relative or cooperative stranger) to move around and hold the flash wherever you need it. If it’s just you and your model, however, an inexpensive light stand and shoe-mount flash adapter, such as the Flashpoint Heavy Duty Lightstand and Adorama Universal Swivel Holder, will do the job. Total cost? Less than $ 50!
Fixing harsh backlighting without flash
Exposed for the background – in the photo below (left), the background is perfectly exposed but Leanne, standing in the shade of a large Maple tree, is in deep shadow. Gear: Canon 70D, 85mm f/1.8 Canon Lens mounted on a Velbon GEO E535D Carbon Fibre Tripod. Exposure: 1/320 second at f/4, ISO 100.
Add one stop of exposure – (above right image) better, but Leanne’s face is still too dark. Gear: same as above. Exposure: 1/200th at f/3.2, ISO 100.
Spot meter on the subject – by taking a spot meter reading you can eliminate the misleading bright background from the exposure equation and get a pretty good exposure on the face (below left). But the eyes are still too dark, and the background is getting blown out. Gear: same as above. Exposure: 1/160th at f/2.8, ISO 100.
Exposed for the eyes – now you can see Leanne’s eyes clearly (above right), but overall the image is too bright, especially the background. So let’s introduce a flash and balance things out. Gear: same as above. Exposure: 1/125th at f/2.5, ISO 100.
Adding flash to balance with the ambient light
Balanced light, image below left. Now the exposure is spot on! If you hold a flash up a foot or so above your camera while shooting, you should get this kind of light. The slight angle gives Leanne’s face a bit of dimensionality. Gear: Canon 70D, 85mm f/1.8 Canon Lens, Canon 430 EX II Speedlight flash mounted on Flashpoint Heavy Duty Lightstand via an Adorama Universal Swivel Holder. Exposure: 1/200th at f/5.6, ISO 100.
Flash at a 45 degree angle (image above right). By moving the flash (now mounted on a light stand) further to the left of the camera and about a foot above eye-level you get this classic Loop pattern portrait lighting. Note how Leanne is turned slightly towards the light, and how the light falls off her left cheek, creating a more flattering, dimensional look. Same gear and exposure as above.
Flash at 90 degree angle (image below left). Now the flash is directly to camera left, and her face is divided into light and dark halves (also known as Split Lighting). This is a more dramatic look. Same gear and exposure as above.
Backlighting (above right) – even though the sun was to the right of the camera, after placing the flash above and behind and slightly to camera left, it looks like she is backlit by the sun. These are the kinds of effects you can get by moving the light around. Same gear and exposure as above.
Add a reflector
If one additional light source isn’t enough, you can easily, and inexpensively, add a second by using a reflector. The Glow 5-in-1 32-inch Reflector Kit, for $ 26, is a versatile option. This dramatically increases the possibilities for controlling and shaping the light, and bringing out the contours in your subject’s face.
One problem – running out of hands. The solution? Have your subject hold the reflector and compose a nice tight headshot.

The reflector adds a new dimension. Here Leanne is holding a silver reflector to her left, which is bringing light back to her face in an approximately 2:1 lighting ratio (the reflected light is half that of the direct light from the flash). Notice how the more angular cross-light brings out her facial features. Same gear as above plus Glow 5-in-1 32-inch Reflector Kit. Exposure: 1/160th at f/7.1, ISO 100.
What if you take away the reflector and put a flash in the model’s hands?

Flashie? In another setup, Leanne is holding the flash to her side as the sole light source. This is kind of like a “selfie” but with a flash.

She’s holding the light. In this tight headshot, Leanne is still holding the flash in the same position as above, but with a reflector to camera left adding light on the other side of her face.
Adding an umbrella
While a stand-alone flash (or one used in tandem with a reflector) is great for close shots, light falls off quickly and may not illuminate the person in a longer shot. To solve this, consider adding an umbrella to your arsenal. This will enlarge the light source and will result in more even illumination when shooting a full body or ¾ length portrait. Using an umbrella is worth an article of its own.

While a stand-alone flash (or one used in tandem with a reflector) placed near a subject can be great for close shots, it won’t evenly illuminate your portrait subject in a wider shot such as this one. Normally, the solution is to move the flash farther away, but in this scene, an outdoor porch, there was a wall immediately to the left of the camera. In this situation, bounce the flash off an umbrella. This will enlarge the light source to create more even illumination. Be sure to increase flash power approximately one stop to compensate for the light loss that results from bouncing the flash into the umbrella. (Using an umbrella is worth an article of its own!)
Step-by-step instructions on how to trigger Canon off-camera flash wirelessly
Here are the step-by-step directions for triggering a Canon 430 EX II wireless Canon flash from the Canon 70D. If you’re using another camera, check your manual for wireless flash instructions. Among other Canon systems, the directions will be similar.
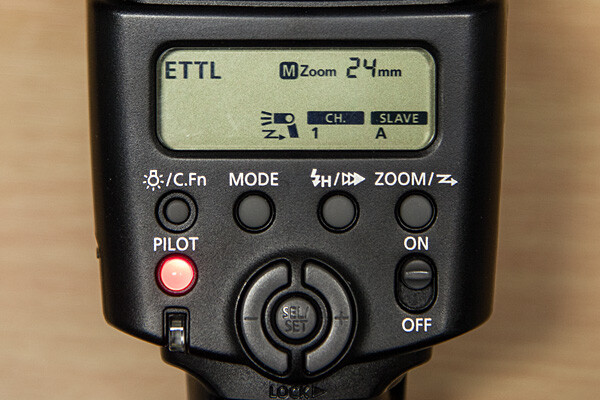
- Turn the flash on, then press and hold the Zoom button for a second or two. You’ll see a new flash icon and Ch 1 Slave A appear in the LCD screen (see photo above).
- Turn the camera on and pop up the flash
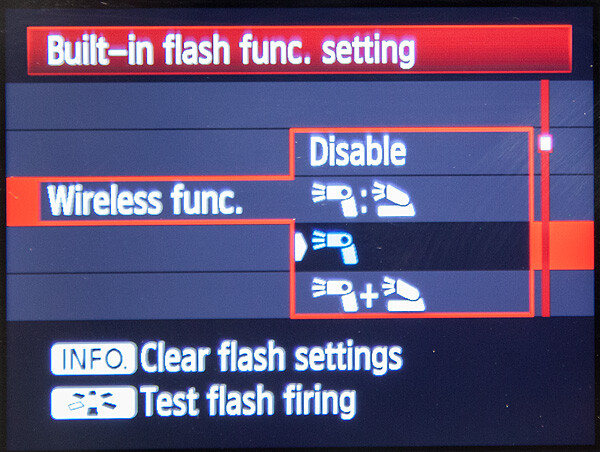
- Go to Menu; in the first tab (camera operation), choose Flash Control, then scroll down to Built-in flash function setting, select “Wireless Func.” and choose the middle setting of the single flash (see below) Note: Although the on-camera flash is flipped up, it will not fire during the exposure. Rather, it will flash a split-second before the exposure, which triggers the off-camera flash to fire during exposure, so your only source of flash illumination during exposure will be the off-camera flash.
Hopefully you can take these off-camera flash tips and apply them in your photography to help you make better portraits outdoors. If you have any additional questions or tips please share in the comments below.
The post Using Off-camera Flash to Fix Lighting Problems for Outdoor Portraits by Mason Resnick appeared first on Digital Photography School.

Digital Photography School
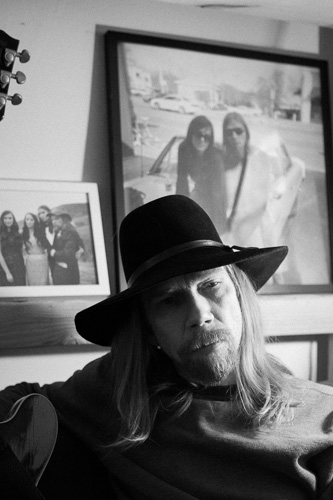 There is an important reason for taking your time to do a portrait session. It gives your subject time to get comfortable with you and the way you work. You can go through multiple backgrounds and ideas, and it is common for subjects to get over the initial portrait trepidation as the time goes on. That deer in headlights look will often (but not always) go away as they get used to how you work and what you want from them. This is the reason that you do not want to start off right away with your best idea because that will often be at their most uncomfortable moment. Wait until they seem comfortable and in the right mindset.


 Pick up Oded’s new Snapn Guide (a dPS sister company) Snapn Travel here for only $ 7. A lifetime of travel memories in a Snap.

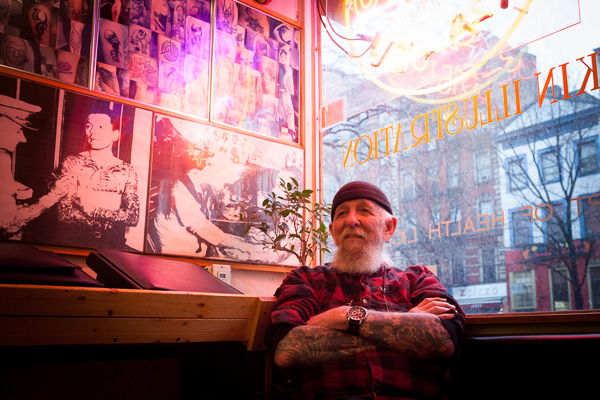
 But here is another fact: there is nothing like photographing someone from a close distance. The eyes, the feelings and the huge visual story potential within. Besides, when we work from a close distance while interacting with the person, we gain control of our tools as photographers: composition, background, the “decisive moment” and we also have that amazing ability to tell the photographed person: “you know what, let’s take one more shot”.


 Choose: choose a person you would like to photograph. Don’t use excuses like: “I can’t find anyone special”. Just make the shot, even if it’s only for practice. It is very important that you choose a person who is not on the move, because you need to get ready BEFORE approaching him, so it will be easier in a static situation (a seller in market stand, or someone relaxing at the park)


You must be logged in to post a comment.