RSS
 

Posts Tagged ‘portraits’

Work It! A Guide to Taking Astounding Portraits

28 Sep

People are beautiful, and as photographers we have the ability to show that in creative ways!

Photojojo reader and super talented portrait photographer, Hannah Arnzen, has put together her very best tips for snapping portraits.

Read her advice on what it takes before, during and even after a shoot to snap the perfect portrait.

Take it away Hannah…

(…)
Read the rest of Work It! A Guide to Taking Astounding Portraits (509 words)


© Taylor for Photojojo, 2015. |
Permalink |
No comment |
Add to
del.icio.us

Post tags:


Photojojo

 
Comments Off on Work It! A Guide to Taking Astounding Portraits

Posted in Equipment


6 Tips to Get Started with Portraits

23 Sep

591

People fascinate me. I love the diversity in personality and expressions, and I love using my camera to capture all those personalities! People are by far my favorite subject to have in front of my camera.

If you are new to photography and getting frustrated that you aren’t creating portraits like you hoped, I’m here to help! Let’s go through six tips to get started with portraits. You’ll be a pro before you know it.

183

1. Get yourself a 50mm lens

Are there better lenses out there for portraits? Yes. But the 50mm is inexpensive, versatile and great to get started! Once you’ve gotten the hang of this lens, you’ll know what other lenses to invest in later and you’ll never regret having a 50mm prime lens in your bag. Your camera probably came with a kit lens that zooms in and out. The drawback of this lens is that you can’t open the aperture very wide.

Have you noticed portraits that have a creamy blurred background, and the subject just pops? This is achieved by setting the aperture on a very low number, usually between f/1.8 and f/2.8. Look at your kit lens. It probably can only go down to f/3.5, and if you zoom in your lowest aperture number is probably f/5.0. You could get the 50mm 1.4 or, if you’re really unsure about what you want, give the 50mm 1.8 a try. It’s the least expensive lens out there, but it will still give you a lot of bang for your buck. Trust me on this one! If I could only choose one lens to have in my bag for the rest of my life, it would be this one.

187

2. Focus on the Eyes

Toggle your focus point of your camera until it’s right on the eyes; if your subject is close to you, put the focus point on one eye (if one eye is closer to you than the other, focus on that one). If you are still letting your camera automatically choose where to focus, change that in your settings now! Pull out that manual you hid away and put it to good use.

If your subject’s eyes are in focus, it will be a much more compelling portrait. After all, the eyes are the window to the soul! If possible, try to position your subject so they have some catchlights (or sparkle) in their eyes.

f164

Be cautious when you are shooting really close portraits. You want to make sure that you have your aperture number high enough that everything you want to be in focus will be in focus. If you are really close to your subject and your aperture number is really low, like f/1.8, you may notice that the eyes are in focus, but the nose is not. Just bump up the aperture a little at a time until you get the look you are going for. When you are learning and experimenting, it’s helpful to zoom in on the preview on the back of your camera after you have taken the photo. Sometimes it may look like everything is in focus, but later when you upload it to your computer, you realize that it definitely was not in focus. If you can find this out WHILE you are shooting, you have a chance to correct things and learn at a faster rate.

143

3. Experiment with Distance and Orientation

Sometimes as beginners we might get stuck doing things always the same way, like needing to put the subject’s whole body into a portrait, or having the face fill up the frame. Neither is right nor wrong. The important thing is not to produce the exact same photo over and over.

Try stepping back a bit and include the surroundings in your portrait. It might tell a great story about the person you are photographing. Then try getting really close. Now get even closer. Don’t worry about what grandma is going to say – it’s okay to cut off the top of someone’s head in a photo.

You might notice that you almost always shoot vertically (portrait), or maybe you’re stuck shooting horizontally (landscape) all of the time. Don’t let yourself get in a rut! Try close-up portraits horizontally and try vertical portraits that take in lots of the surroundings (and vice versa).

167

4. Create a True Portrait

We can stick anyone in front of a paint splattered backdrop, sit them on a stool, turn their shoulders at an angle, tell them to smile and call it a portrait. Or we can use our skills to make a portrait that truly shows who your subject is, and what they are about. I love the portraits that tell a true story about my subject because I know that I have captured something worth keeping.

Try to get to know your subject a little bit and use that knowledge to create a portrait that anyone could look at and know a little bit about who that person is. You could do this with props, expression or posing. If they’re passionate about something, they may want it included in the photo with them. If he’s a person who smiles all the time, a serious portrait may not capture who he really is.

Your job as the photographer is to make a portrait that will be treasured by everyone who knows your subject. They will know that you really caught who he is. It’s also your job to create a portrait that will be compelling to those who don’t know your subject. It should make them want to get to know him and let them know a little bit about who he is, even if they’ve never met.

131

5. Lighting First, Background Second

Good light on your subject’s face is most important in a portrait. I look for good lighting before I look for a good background. The easiest lighting to work with for beginners is an overcast day (if that’s the way the cards fall that day) or shade. On an overcast day, try having your subject facing toward the light source. Even if it’s cloudy, often the direction you have your subject face will either illuminate their eyes or put their face in shadow. If you’re not sure which direction to have him face, just rotate until you have that aha! moment when the light is just right.

You might find shade on the shady side of a building (subject facing out towards the light) or in the shade of trees, but if the light is patchy in the trees have your subject put her back towards the sun. You don’t want to have dappled light on her face, or half-shadow and half-sun. Try to have the light as even on her face as possible. Also, avoid having full sun on your subject’s face. This can cause harsh shadows and make it almost impossible for some not to squint their eyes.

Expose for the face for portraits, even if it causes your background to not be exposed correctly. In a portrait, the person is obviously the most important part, so this makes sense.

175


6. Don’t Worry About the “Rules”

It’s important to learn all you can about the rules of photography. Learn them, practice them, use them. Then be creative and have some fun without worrying too much about the rules. If you’re making a portrait, the eyes don’t have to be looking at the camera. The photo doesn’t always have to be divided into the rule of thirds. You don’t have to do what everyone else is doing, either. Be true to yourself and have fun with it! When you create a portrait of someone, it can be truly unique. Nobody else will be able to take that same photo in that same light with that same expression. Make sure it represents who you want to be as a photographer and make sure it represents the person you are creating a portrait for.

Do you have questions about taking portraits? I’d be happy to answer everything I can in the comments. I’d also love to see your favorite portraits you’ve taken!

156


googletag.cmd.push(function() {
tablet_slots.push( googletag.defineSlot( “/1005424/_dPSv4_tab-all-article-bottom_(300×250)”, [300, 250], “pb-ad-78623” ).addService( googletag.pubads() ) ); } );

googletag.cmd.push(function() {
mobile_slots.push( googletag.defineSlot( “/1005424/_dPSv4_mob-all-article-bottom_(300×250)”, [300, 250], “pb-ad-78158” ).addService( googletag.pubads() ) ); } );

The post 6 Tips to Get Started with Portraits by Melinda Smith appeared first on Digital Photography School.


Digital Photography School

 
Comments Off on 6 Tips to Get Started with Portraits

Posted in Photography


6 Tips for Taking Better Natural Light Classic Portraits

10 Sep

On now until September 22nd (2015) over on Snapndeals – 20% OFF Wayne’s eBooK – Portrait Tips and Techniques: Natural Light Black & White Portraiture. Grab it before the deal expires.

DPS STUDY 1

RETHINKING NATURAL LIGHT

Many photographers choose to use natural light as their chosen style, almost as a badge of honour. Natural light is a wonderful source, providing ease of use and flattering light to your subjects, but you should be using it the same way as you would studio lights. You need to create light and shade that will add emotion or mood, not flat lighting that gives no shape, texture or mood. Hopefully these tips will help you on a path to refining your natural light classic portraits.

#1 – FINDING QUALITY LIGHT AND SHADOWS

First, find good quality light – preferably open shade, as this offers soft flattering light and is lower in contrast. Avoid the sun as your main light as it will cause harsh shadows and squinting, which is undesirable for quality portraits.

Open shade can be found under awnings, the edge of trees or buildings, and inside doorways or windows, for example. In these images the girls are positioned approximately 1.5 metres (5 feet) inside the doorway of an old timber shed.

Look for the shadows; they are equally important. Shadows subtract the light and create shape and mood.

After you have established your location, check the background. Even if you have found the perfect, open shaded location, make sure the background isn’t too contrasty with sunlit areas. These can be visually distracting, so try and select uncluttered backgrounds that are lower in contrast and darker than the subject’s face. This will allow the face to project forward by being the lightest tone against the background (all the images in this article demonstrate this).

DPS STUDY 2

#2 – FIND THE DIRECTION OF LIGHT

Once you have found good quality of light, check its direction. You want the light to come across your subject’s face at approximately 45 degrees to the nose, and from a higher angle. That height should also be at around 45 degrees, as a basic starting point.

You can check the catchlight positioning by looking at the eyes; there should be one in both eyes at around 10-11 or 1-2 o’clock. (This depends on the side of the face that is being lit and the structure of the eye sockets). Deep-set eyes will need a slightly lower light source. You should also notice the nose shadow to be at around 45 degrees.

To lower the catchlights you need to change the angle of your subject’s head by tilting more or less. Even moving the subject further away from the edge of an overhang will lower the angle of the light. It’s the opposite of being in a studio where you can move the lights. Natural light is fixed and requires you to move the subject and/or camera to achieve good lighting.

DPS STUDY 3

#4 – EYES ARE WINDOWS TO THE SOUL

Catchlights are very important in portraiture. They not only guide you where the light is coming from, but also create a sense of depth. TIP: no catchlights = NO photo. When there are no catchlights, there will be minimal, if any, texture and colour in the eyes. Always study the eyes for guidance.

#5 – SIMPLE POSING

The portraits here are the basic classic style, looking into the camera. It’s usually more flattering to angle the shoulders away from the camera, again 45 degrees is a handy starting point. Leaning the bodies and heads toward each other gives an emotional connection. Upright or leaning away would show detachment from each other.

It’s also a good practice to have the noses turned slightly away from the camera, particularly with adults. Noses that point directly at the camera will look broader in many cases, particularly when combined with flat lighting. With kids, it’s not as critical and good lighting will create better shape.

Arms and hands need to be posed simply so as not to draw attention. In images #1 and #2 above (top of article), the lower arms are bent downwards and the hands clasped softly. Things you should avoid are open fingers, particularly draped over a shoulder, as this can make a portrait busy and untidy. Elbows bent at 90 degrees should also be avoided. Here’s a simple mantra to remember when it comes to posing people’s heads, arms, legs, hands, hips, shoulders, etc:

IF IT BENDS – BEND IT. IF IT CURVES – CURVE IT. IF IT TWISTS – TWIST IT.

Applying this will help you avoid static poses.

DPS STUDY 4

DPS STUDY 5

#6 – EXPRESSION

Above all else, expression is the most important element in a portrait. In most cases, a poorly lit and posed portrait with a beautiful expression will trump a technically perfect portrait with an average expression in most cases, but this is no reason to pursue a path of mediocrity.

Expression is a personal thing. A moody, soulful style is my preference, but your sessions should always include various expressions such as laughing, smiling, pensive, etc. To achieve this soulful style you can’t be jumping around in a hyperactive mood expecting soulful looks. The best approach is a more Zen-like style, quietly giving direction. These classic style portraits produce beautiful open eyes, relaxed facial muscles, and true shape to the lips. Truly timeless, heart and soul portraits, but it all takes PRACTICE.

DPS STUDY 6

SUMMARY

  • Treat natural light photography the same as studio lighting.
  • Find quality soft light.
  • Look for shadows to create shape and mood.
  • Place your subject at 45 degrees to the light as a starting point.
  • The light source is fixed, so move your subject and camera to reduce the height of the light in the eyes.
  • Check for catchlights in the eyes.
  • Simplify your posing.
  • Soft expressions work best for classic low-key portraits.

SPECIAL NOTES

With each of these images, other angles of the face (2/3 face and profile) can be achieved by simply moving the camera position. Although the pose and light would remain the same, you may have to adjust the head tilts slightly and check your backgrounds.

Clothing colours also play a big part with quality portraits. Darker clothing works best for low-key portraits. Your eyes should be drawn to the brightest tone in the portrait, therefore, light-coloured clothing would be visually distracting.

On now until September 22nd (2015) over on Snapndeals – 20% OFF Wayne’s eBooK – Portrait Tips and Techniques: Natural Light Black & White Portraiture. Grab it before the deal expires.


googletag.cmd.push(function() {
tablet_slots.push( googletag.defineSlot( “/1005424/_dPSv4_tab-all-article-bottom_(300×250)”, [300, 250], “pb-ad-78623” ).addService( googletag.pubads() ) ); } );

googletag.cmd.push(function() {
mobile_slots.push( googletag.defineSlot( “/1005424/_dPSv4_mob-all-article-bottom_(300×250)”, [300, 250], “pb-ad-78158” ).addService( googletag.pubads() ) ); } );

The post 6 Tips for Taking Better Natural Light Classic Portraits by Wayne Radford appeared first on Digital Photography School.


Digital Photography School

 
Comments Off on 6 Tips for Taking Better Natural Light Classic Portraits

Posted in Photography


Tips for Using Speedlights to Create the Right Lighting for Outdoor Portraits

08 Aug

In these two video tutorials brought to us by ExpoImaging, NYC photographer Erik Valind shows two different tips:

#1 – How to create artificial sun with a speedlight

#2 – Creating soft light during midday harsh light

Gear and things mentioned in the videos:

  • ExpoImaging ROGUEGELS-U Rogue Photographic Design Rogue Gels Universal Lighting Filter Kit
  • Rogue Photographic Design ROGUERELG2 FlashBender 2 Large Reflector, Bounce Flash, Snoot, Gobo (Black/White)
  • Other things available from Rogue Photographic Design

googletag.cmd.push(function() {
tablet_slots.push( googletag.defineSlot( “/1005424/_dPSv4_tab-all-article-bottom_(300×250)”, [300, 250], “pb-ad-78623” ).addService( googletag.pubads() ) ); } );

googletag.cmd.push(function() {
mobile_slots.push( googletag.defineSlot( “/1005424/_dPSv4_mob-all-article-bottom_(300×250)”, [300, 250], “pb-ad-78158” ).addService( googletag.pubads() ) ); } );

The post Tips for Using Speedlights to Create the Right Lighting for Outdoor Portraits by Darlene Hildebrandt appeared first on Digital Photography School.


Digital Photography School

 
Comments Off on Tips for Using Speedlights to Create the Right Lighting for Outdoor Portraits

Posted in Photography


3 Steps to Photoshop Retouching for Natural Looking Portraits

26 Jul

In the world of photography, editing and retouching are just as important as the imagery itself. Every image that you see published has been through its fair share of post-processing before it is seen by the public. If photographers didn’t retouch their images, it would be like a painter presenting his sketches instead of the finished painting.

portrait retouching techniques

With the fast moving technology of today, extraordinary images are everywhere, every day. Even with perfect lighting, and preparation work, a final image always receives some post-production attention. The trick to post-processing is to make it look as if it hasn’t been retouched at all, or as I call it, “refreshed”.

With the endless possibilities of Photoshop retouching techniques available, how do you know what tools to use when, and why? In this article, you will learn professional photoshop tricks that work for any portrait, any time. This is a simple recipe to give your subjects a naturally refreshed look, letting their genuine beauty shine, while keeping the integrity of their expressions, their features, and the clarity of the digital image itself.

Key Steps in the Refreshing Process

  1. Evaluate
  2. Eliminate
  3. Reduce
  4. Repeat

The specific tools and techniques discussed here are tried and tested with over 10 years of retouching experience. It is best to experiment with these concepts, and with practice, develop your own style of retouching.

This process has been designed as a routine that will eventually create habits in your mind, train your eyes to see the details more clearly, and create an overall efficient and effective retouching process. The goal is to spend less time in front of the computer and more time behind the lens (where the real magic takes place).

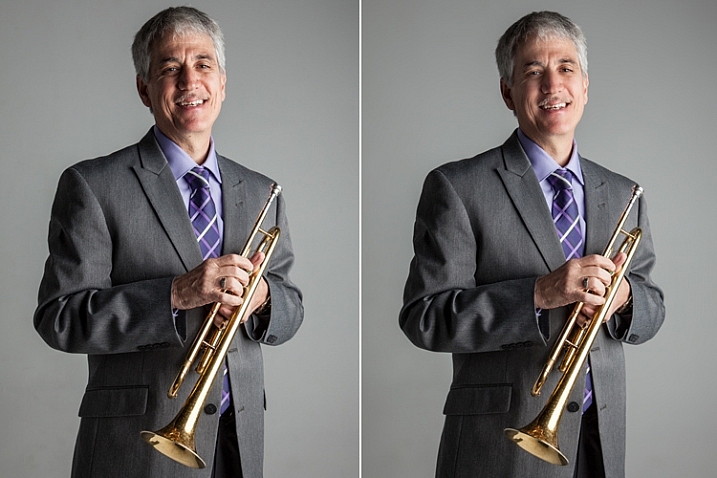
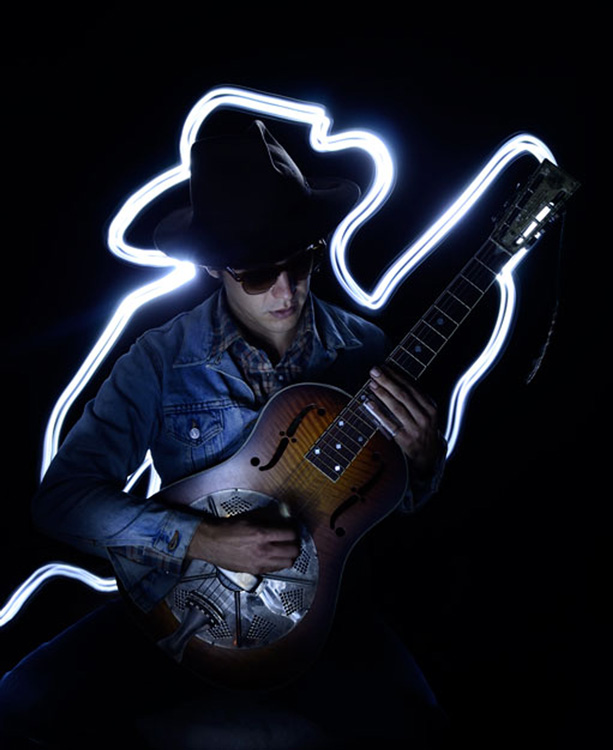
Let’s look at each one of these steps in order. We will use a studio image of a musician as the example throughout this article.

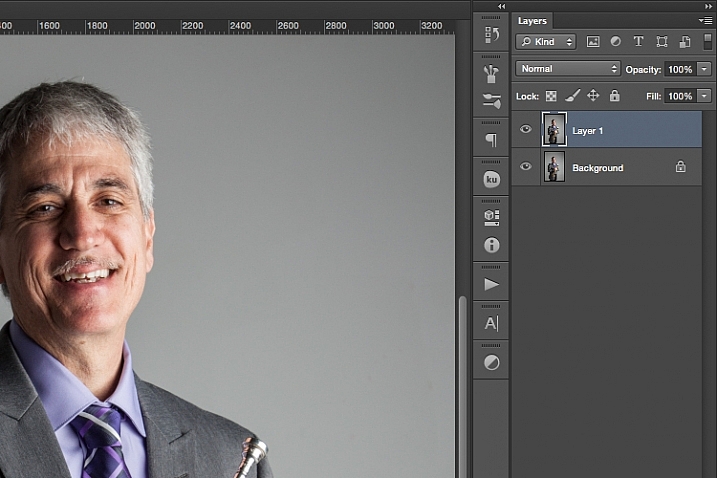
A great tip to keep in mind during this entire process is that with each new step, or even sub-steps, it is best to duplicate your layer before beginning to use the next tool. This way you are creating a back-up of each step for you to return to, if you notice that you are retouching too much on any particular step. It also allows you to see the progression of your workflow in Photoshop.

portrait retouching techniques

Step One: Evaluate

Immediately analyze the image you are about to retouch. How is the lighting? How do the subjects look? What is going on in the background?

When you see the areas of the image that will need your attention ahead of time, you can quickly assess what you will want to accomplish with the retouching process. This is the beginning of training your eye to seek out the details, and look at your image differently, than when you first took the shot.

Look at your image as if it’s not a photograph of a person, but instead consider that it is just shapes, colors, and light. Identify where the light is coming from and how it is affecting the subject.

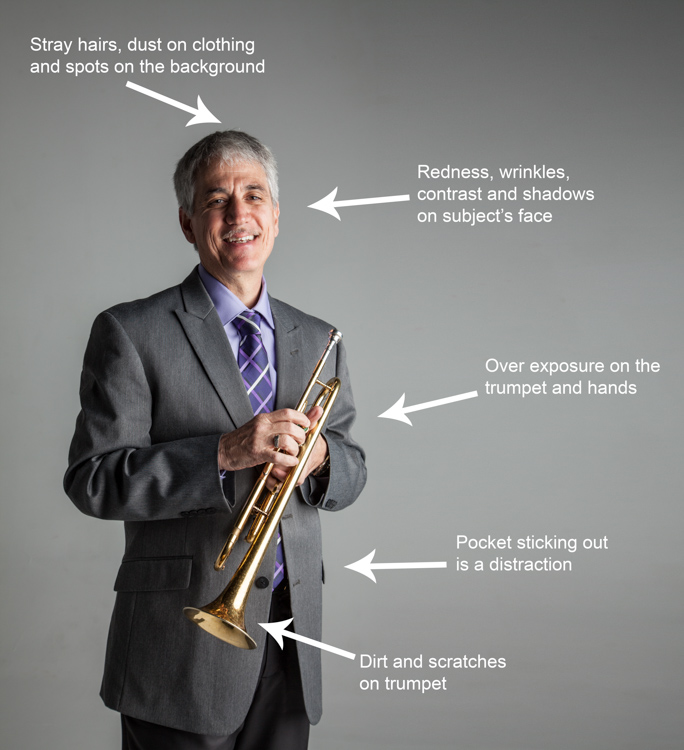
In this example, the direction of the light is causing more definition, creating harsh shadows across the subject. This was done intentionally to give a more characterized, artistic portrait for this musician.

However, its effect can be overpowering at times and cause distraction to the viewer. This is noticeable in the darker shadows around his right eye, and the highlights shining across the left side of his face.

portrait retouching techniques
Here are some additional elements to be aware of.

  • Different textures: The subject is an older man wearing a suit and playing an instrument. All of these textures are different and will require various tools and techniques when the retouching process happens in those areas.
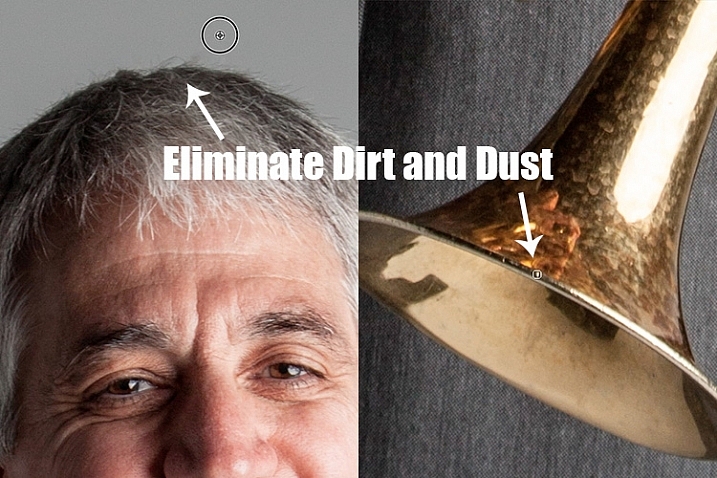
  • Zoom in close: As with any image, zooming in close will allow us to see any skin imperfections, dirt, dust, or scratches that you will want to eliminate all together.
  • Make judgements on distracting elements: There are some parts of the image that could stay or be eliminated, it becomes your choice as the retoucher. What is a distraction? What is a part of the purpose of the image? For instance, the scratches on the trumpet and the left side pocket sticking out could potentially be distractions, but maybe this client would like them to stay.

Once you identify the elements that need attention, decide if each will be removed altogether, or if it needs to be reduced. For instance, the stray hair and the dust on his jacket need to be removed, but the redness and wrinkles are only to be reduced, not eliminated completely. This difference is important for the next steps in the process. So ask yourself, will it be eliminated or reduced?

Step Two: Eliminate

Once you have made your initial evaluation of the image, you can begin the elimination process. This includes but is not limited to: dust, dirt, scratches, pimples, food in teeth, and anything else that doesn’t belong. Zoom in and examine your image up close. Think of each area as shapes and color, allowing yourself to be as accurate as possible when removing these details.

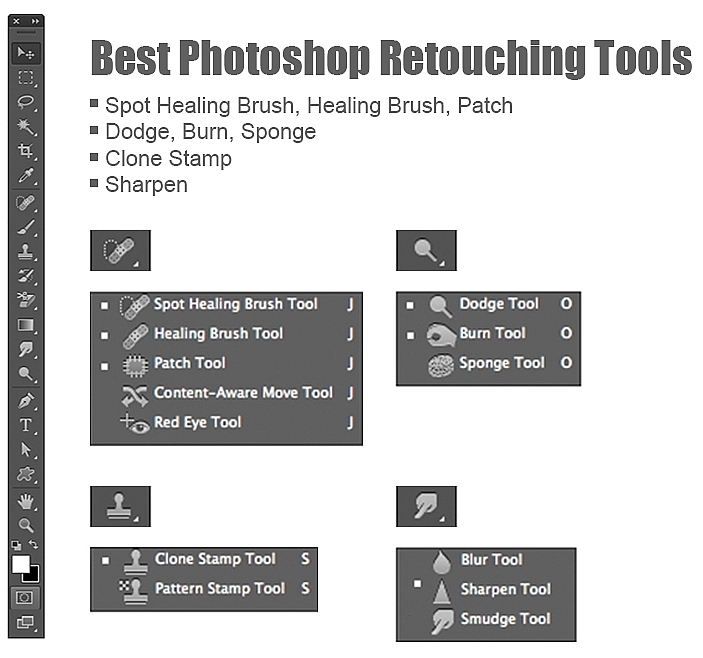
For this first elimination step, it is best to use the spot healing brush, the healing brush tool, the spot tool, the patch tool, and/or any other tool that completely removes things. Don’t rely on just one. Learning how each tool works different will help you use a combination of these removal tools effectively, and efficiently.

For instance, the clone stamp tool copies exactly what you click. The healing brush blends the color and texture of what you click on, with the area you want to fix. The spot healing brush is a genius tool. It has its own way of deciding if you want to blend the area you click on, or remove the unusual pixels within that area (like a stray hair against a solid background).

portrait retouching techniques

The more you make effects to a digital image, the more destructive you can be to the clarity of the final file. Using these tools is crucial to the integrity of the image. If you can click it away in less than a few clicks, then this is the time to do it.

Once the “spots” are removed, you can focus your attention on reducing or “refreshing” the imperfections we all know we have, but don’t want to notice in the permanence of a photograph.

Step Three: Reduce

This is where your artistic eye, and attention to detail come into play. Pimples go away, dust and dirt are just distractions, but our wrinkles, smile lines, scars and facial expressions are the details that make each of us unique. Those are the things you will focus on in this stage of the “refreshing” process.

Every subject you see in an image has great qualities that they might not be confident about accentuating. It is your job as the retoucher to keep not just the integrity of the digital image, but the integrity of the special moment and the emotional expressions that have been captured in that image.

For this reason, this second step is crucial. Train yourself to pay attention to the details, the purpose of the image, and the personality of your subject. If you are retouching a very smiley bride who laughed a lot, you don’t want to remove her laugh lines, but you do want to reduce the shadows and shine as her makeup wears off and the night wears on.

In this specific example of the musician, the character lighting has created great contrast that add to the personality of the subject. But in some areas it over accentuates his wrinkles by creating deep shadows and harsh highlights of overexposure.

The Best Trick in Portrait Retouching

portrait retouching techniques

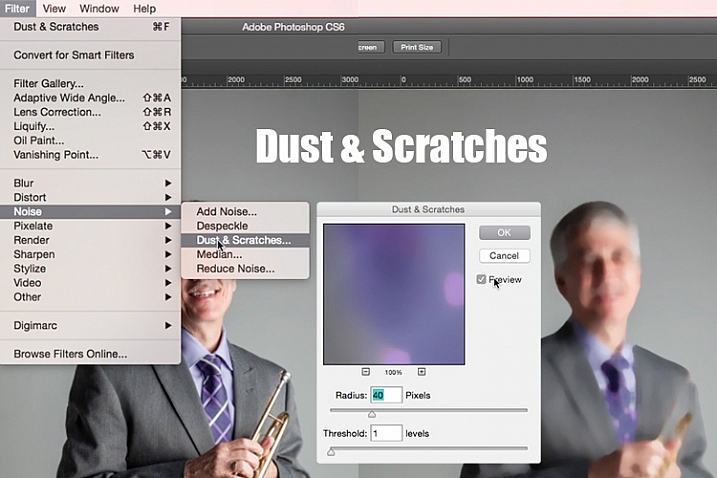
Duplicate your layer after completing step one. With this new top layer highlighted, select from the main photoshop menu: Filter > Noise > Dust & Scratches. A window will pop-up with settings options, and you will notice the image behind that window now shows a preview of this filter effect.

In the Dust & Scratches window, change your Radius to 40px and Threshold to 1. Experiment with these settings and see what works best for your images.

Once you have applied the Dust & Scratches filter (on the top, duplicated layer), you will notice how it blurs the image. But, this is not like using the blur tool. The method that this filter uses specifically identifies differences between pixels and their surrounding area. The Radius is what removes the “dust” and the Threshold is what brings back the details. Dissimilar pixels are modified to achieve a balance between sharpening and hiding defects.

The Dust & Scratches filter provides a more powerful way to remove noise from an image than any other noise removal tool. This is key to keeping the integrity of the textures, color, and overall feel of the digital image as you see it in print or on a screen.

Now that you have a layer with the right effect applied, you are going to add a layer mask to this newly altered layer, and invert the mask. Do this by clicking the icon “Add layer mask” at the bottom of your layers panel. Notice the layer mask shows up as a white box next to your highlighted top layer. Now invert this layer mask by holding the command button and clicking the letter, “i”. This will now change the layer mask to black and bring the original image come back into view.

portrait retouching techniques

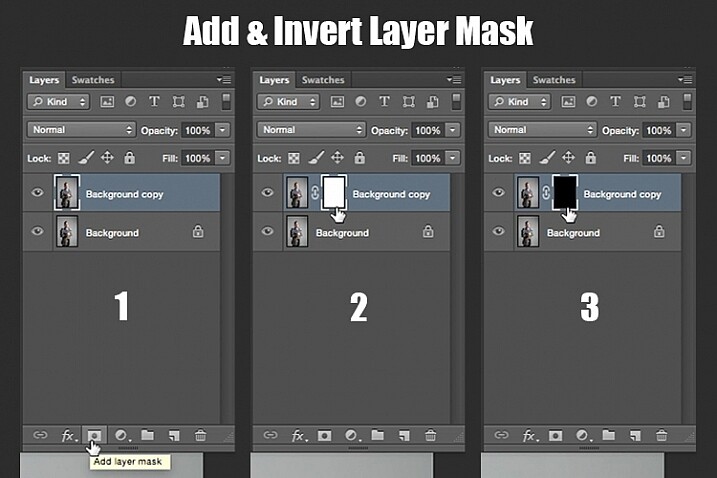
Step 1: duplicate the layer
Step 2: add a layer mask
Step 3: invert the mask so it is black

You can see how the image looks unaffected by the Dust & Scratches filter. Really, it is just hidden under the layer mask. Now you can paint back into the areas where you want to reveal the Dust & Scratches filter. The trick is to do this precisely, and not too much.

Select your brush tool (keyboard shortcut is B). Making sure the layer mask is selected (not the layer – square brackets will show around the mask when it is selected like shown above), noticing its color is black, paint with the color white to bring back the Dust & Scratches filter effect.

The key to using the brush tool on an inverted layer mask is to experiment with the brush opacity strength. When focusing on the skin areas, start by brushing back at only 30% opacity. Remember, you can always brush back over an area again more or less by toggling back and forth between painting with black or white. Painting with white will reveal the effect, while painting with black with hide it.

Steer clear of teeth, lips, eyes, nostrils, ear folds, and edges like the jaw line and hair lines during this time. These areas have specific edges and textures that are important to the overall image.

Once you have completed the skin areas, you can smooth the background. Change the opacity to 100% to completely smooth out this solid color background. This only works on solid backgrounds that are seamless. Using the brush at 100% will remove any dust spots that show up from the camera lens, or dirt that is actually on the studio backdrop.

portrait retouching techniques

Tips to Keep in Mind During This Step

  1. In general, keep your brush below 50% when painting the effect on skin. This allows more than 50% of the original textures and features to still be noticeable. If you paint more than 50% in these areas, you will see a putty-like effect starting to take over, causing your image to be more retouched than refreshed.
  2. Using the bracket keys on the keyboard [ and ], frequently change the size of your brush as you paint. Keep your brush hardness at 0 unless absolutely necessary. This allows you to move in and around smaller and larger areas of the skin and background with more efficiency and accuracy.
  3. The zoom tool is your best friend during this part of the refreshing process. Remember, instead of thinking of this image as a portrait, consider that you are just seeing shapes, color, and light. Zoom in close and pay attention to the changes you are creating. Force yourself to go too far with some brush strokes so that you know the limit. When you have gone too far, just toggle back to painting with black (set your opacity to 100%) and remove that last brush stroke all the way before beginning again (or use Command+Z to undo the last step).
  4. Be careful around fingers and edges of arms and legs where there are small curved areas. If you paint near these edges the Dust & Scratches will run over the edge and remove the curved areas all together, altering the look of elbows, fingers, shoulders, ankles and knees.
  5. Men can have beards and tend to have rougher looking skin than women. Be careful not to soften too much on a man’s skin. The same goes for grandparents.
  6. With babies and children, who have much smaller features, it is important to be aware of the shadow areas that you paint over. If you change the shape of their skin too much, it will no longer look like them. This is particularly important around the nose, eyes and mouth – their tiniest features.

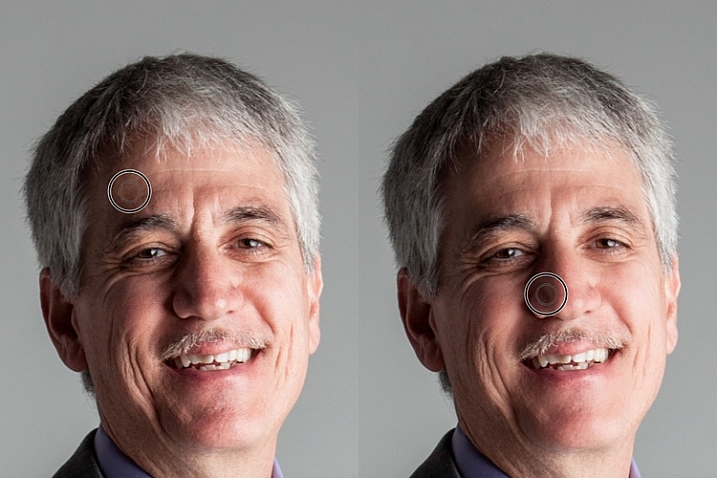
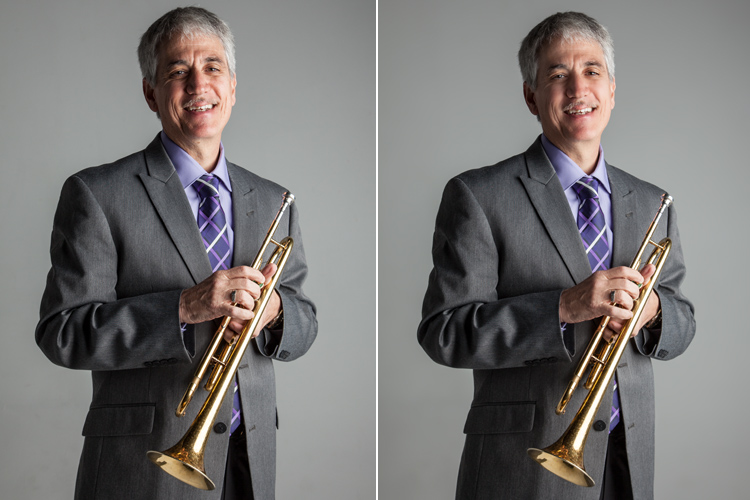
Here is the before and after of the Dust & Scratches filter effect on the musician’s face:

portrait retouching techniques

Notice the softening of the skin and reduction of the shadows in the wrinkles, yet he still looks untouched with most of the original texture still visible.

Now that you have completed the most important task of this post processing technique, it is time to repeat the steps from the beginning. Start again by evaluating the image as a whole. Notice any other areas that need attention. Remember to duplicate the top layer once you have completed any step in the process. Allow yourself to duplicate your layers as many times as you want. It’s always a safe bet.

Next, eliminate. This is your chance to eliminate any larger parts of the image that take more time. Elements to consider removing are:

  • Some (not all) of the scratches across the trumpet.
  • His left-side jacket pocket.

After eliminating for the final time, move on to step three again. In this case, instead of using Dust & Scratches as your reduction tool, you can use other popular items in the toolbox. Tools to consider using are the Healing and Spot Brushes, Dodge and Burn, and Sharpen and Saturate/Desaturate.

photoshop brushes for portrait retouching

Eliminate then Reduce – Repeat.

First, don’t forget to duplicate your layer before starting this step! If you don’t duplicate, this step will not work.

To lighten the shadowed area of the musician’s right eye, the Dodge Tool used at 50% on shadows would look too overly processed. But by allowing it to be over done on this newly duplicated top layer, you can then reduce the opacity of the layer to bring back the layer underneath at 50% or more. Now the over processed shadows look naturally lighter than the original.

This technique is great for all the tools mentioned above. The Sharpen tool can be used on eyes and jewelry. The Healing and Spot tools can be used for under eyes, and shadows that need a bit more attention. Desaturate and Dodge tools can be combined to whiten teeth. Anytime you want to reduce using these tools, just remember to duplicate the layer; make your changes, then reduce the opacity of that newly affected layer until the effect looks natural.

At this point in the retouching process, you have walked through each step of the process twice. It is time evaluate your finished image. This is where all those duplicated layers comes in handy. Keeping the top most layer turned on and the bottom original layer on, turn off every layer in between. Then zoom-in to 100% (accurate view of pixels), and click on and off of your top layer to see all the changes you have made.

If necessary make any other slight adjustments, like cropping to the correct size, then save your image. It’s best to always save the Photoshop layered copy (save as a PSD file) as well as a flattened JPG file, in the quality size you want.

We all know photoshop is full of endless possibilities, and we all love to learn. If you have other techniques that are great for “refreshing” your portraits, please share.

As with all things in life, this process takes practice to perfect. With practice you will gain accuracy, efficiency and train your eyes to see your images (before and after post-processing) in a whole new light, giving you better control over the look and feel of your retouched portraits.

portrait retouching techniques

Remember, as you learn and grow as a photographer, the goal is to always create your best images in the camera, and not just assume that you can just fix it in post. Keep this in mind, and with every click of the shutter you will become a better photographer, and spend less time in front of the computer.

Of course, you will always edit and retouch your very best images. When you do sit down to do so, now you will have a whole new range of techniques you can apply.

googletag.cmd.push(function() {
tablet_slots.push( googletag.defineSlot( “/1005424/_dPSv4_tab-all-article-bottom_(300×250)”, [300, 250], “pb-ad-78623” ).addService( googletag.pubads() ) ); } );

googletag.cmd.push(function() {
mobile_slots.push( googletag.defineSlot( “/1005424/_dPSv4_mob-all-article-bottom_(300×250)”, [300, 250], “pb-ad-78158” ).addService( googletag.pubads() ) ); } );

The post 3 Steps to Photoshop Retouching for Natural Looking Portraits by Danielle Werner appeared first on Digital Photography School.


Digital Photography School

 
Comments Off on 3 Steps to Photoshop Retouching for Natural Looking Portraits

Posted in Photography


Paper People: Hand-Cut Zig-Zag Photorealistic Portraits

24 Jul

[ By Steph in Art & Sculpture & Craft. ]

paper cutout portraits 2

Tiny slivers are sliced away from a single, oversized sheet of white paper in a zig-zag pattern to reveal portraits of public figures, from Audrey Hepburn to Michael Jackson, in this series of photorealistic portraits by Korean artist Yoo Hyun. There’s no ink, graphite or paint involved – just an X-acto knife to cut out the negative space and tweezers to carefully peel those pieces away.

paper cutout portraits 8

paper cutout portriats 1

Take a close look at Hyun’s works and you realize how strikingly simple this process is, working a similar way to pixels. All you’ll see, when examining a small strip of one of these portraits, is a bunch of diagonal white lines. It’s amazing to see how much detail comes through, the portraits somehow revealing nuances in skin and hair texture, when you look at them from farther away.

paper cutout portraits 6

paper cutout portraits 5

paper cutout portraits 4

The trick is in ever-so-slight variations of the thickness of each diagonal line of paper. Even the smallest cut-out can convey a shadow, while uncut areas make highlights pop. Pulling this off requires incredible precision, as a mistake the width of a human hair can affect the final outcome.

paper cutout portraits 3

paper cutout portraits 7

Check out more of Hyun’s work on his Instagram, @yoo.hyun, or on Facebook.

Share on Facebook


[ By Steph in Art & Sculpture & Craft. ]

[ WebUrbanist | Archives | Galleries | Privacy | TOS ]


WebUrbanist

 
Comments Off on Paper People: Hand-Cut Zig-Zag Photorealistic Portraits

Posted in Creativity


Panasonic Osaka offers 3D figurine portraits via imaging booth fitted with 120 Lumix GH4s

24 Jul

The Panasonic Center in Osaka has installed a photo booth that uses 120 Lumix DMC-GH4 cameras to create a three-dimensional impression of the occupants, which can then be turned into a plaster figurine. Panasonic claims that what makes its booth stand out is that the ‘scan’ is created in just 1/1000sec. That means the subjects can be in motion and the image will still be sharp. Read more

Articles: Digital Photography Review (dpreview.com)

 
Comments Off on Panasonic Osaka offers 3D figurine portraits via imaging booth fitted with 120 Lumix GH4s

Posted in Uncategorized


How to Make Unique Portraits Using Light Painting

19 Jul

Using the surprisingly simple technique of light painting you can create a wide variety of portrait styles using only a small flashlight as your light source. I should warn you though, light painting of all kinds can be highly addictive. Once you start, you may not be able to stop.

Light painted portrait

Light painted portrait

One of the main things to understand with light painting is that the camera sensor only reads light, if there isn’t any light hitting the person shining the flashlight, they simply do not show up in the image. This allows you to move around in front of the camera while the shutter is open, and gives you ultimate control of what areas of your subject are lit. This is great for portraiture, especially in situations where you might have a complicated background, or one where you only want to light certain sections.

light painting a portrait

Below is a list of what you will need for any light painting, and a guide on how to use the technique specifically for portraiture. For a more detailed information on light painting have a look at this two part tutorial .

What you will need:

A hand held light source. Any cheap flashlight or LED light will do, you can even use your mobile phone.

Tools of the light painting trade

Any small LED or flashlight will do, even your mobile phone.

For light painting a portrait subject a directional beam of light is best, non-directional (or diffused) light will illuminate you as well. Different flashlights give off different types of light. Some have blue cast, which isn’t great for portraiture so you might want to experiment with your white balance, or add a warming filter in post-processing. You can also add color to your light source with cellophane (colored gels) or colored sheer fabric.

Tripod and camera settings

Light painting needs a long exposure, so you will need your camera set up on a tripod. Setting your shutter speed somewhere between 10 and 30 seconds is a good place to start, then play around from there. Your ISO should be at its lowest to avoid the grain (noise) caused by a long exposure.

The cover of darkness

You’ll need a completely dark room or studio, or you can shoot outside at night. If shooting outside, you’ll have to be careful of incidental light, such as street or car lights, overexposing your image. But these things can be used to your advantage in creating interesting backgrounds for your portrait subject.

Light painting a portrait outdoors

Light painting a portrait outdoors

Ready, set, light paint

Have your portrait subject in position and turn all lights out. Shine your light source on your portrait subject to help you get focus. You’ll want to focus on the face, so it’s possibly best to have your subject close their eyes before you shine your light directly into their face.

Note: to keep the focus locked when you press the shutter button, you will either need to switch it to Manual Focus or use back button focus.

Then click the shutter, and try not to trip over anything in the dark as you move in toward your subject. How close you get to your subject depends on your light source strength, how fast you move it, and the effect you are after. You’ll have to experiment, but for a small LED, a few inches from your subject is a good starting point. Keep the torch (flashlight) moving constantly, and pointed away from the lens.

Getting sharp images of people when you are using long exposures usually doesn’t work so well due to people’s inability to sit perfectly still. With light painting, you are only exposing a small part of them at a time, and only for a brief moment, so while it can be a bit tricky with fidgety subjects, for the most part you will be able to get sharp images. Sometimes a bit of motion blur can also be effective.

Making the most of motion blur

Making the most of motion blur

Help your subject stay still during the exposure by letting them know when you release the shutter, and when you are about to shine your light on them. They’ll be in the dark, literally, so they won’t know what you are doing.

Have them take a deep breath in and out just as, or after, you release the shutter. Don’t have them hold their breath, you don’t want them to look strained. Start your light painting with the face so they don’t have to hold their head still for your entire exposure.

Letting your portrait subject have a look at your camera preview can help them to understand what you are trying to do. If they are unfamiliar with the technique, it can seem a bit odd, all this waving a torch in their face in the dark.

You can set a flash to a slow sync so it fires off at the beginning of the exposure (or you can just set your flash to manual mode and fire it using the Test button), sharply lighting your subject, and then move in with your light source or have your model wave it around. Alternatively you can give a quick burst from a studio light.

Slow flash sync combined with light painting

While still technically a light painting portrait this method is more of portrait with some light painting added in as opposed to light painting the portrait subject themselves.

It will probably take you and your portrait subject a few attempts to get the hang of it, but once you’ve got the general idea, and have tested out how your light source plays on your subject, you can then experiment. Below are some ideas to try out.

Creating light trails

Adding light trails

Adding light trails

To get trails of light, shine the torch directly at the lens as you move it. You can move it anywhere, including in front of your subject.

Multiple sources of light

portrait-light-painting08b

In the first image above I’ve used a small LED light to paint the face, and a laser pointer for the red patterns. The laser pointer shines in very short bursts creating the broken lines. In the second image on the right, I put fairy lights in the model’s hair. The subtle movement as I light painted the rest of the model caused the fairy lights to take on the wiggly forms.

Using an iPad or tablet

portrait-light-painting09b

For this effect I downloaded an app for my tablet that lit the screen with a solid block of bright color. The colors could be changed with a slider, so with a few attempts I managed to get coordinated enough to change the colors as I moved the tablet around the subject.

Have fun with movement

portrait-light-painting11b

For both these images I shone the light over the model in one position, then had her move to the side and lit her again. As you can see, two fairly different effects using exactly the same process.

I confess I am thoroughly addicted to light painting portraits. I love that no two shots are alike, there’s plenty of room for getting creative and having happy accidents. You can use it for many styles of portraiture, and it costs basically nothing in lighting gear. So what are you waiting for? Grab a flashlight and get started! Share your results in the comments below.

googletag.cmd.push(function() {
tablet_slots.push( googletag.defineSlot( “/1005424/_dPSv4_tab-all-article-bottom_(300×250)”, [300, 250], “pb-ad-78623” ).addService( googletag.pubads() ) ); } );

googletag.cmd.push(function() {
mobile_slots.push( googletag.defineSlot( “/1005424/_dPSv4_mob-all-article-bottom_(300×250)”, [300, 250], “pb-ad-78158” ).addService( googletag.pubads() ) ); } );

The post How to Make Unique Portraits Using Light Painting by Lea Hawkins appeared first on Digital Photography School.


Digital Photography School

 
Comments Off on How to Make Unique Portraits Using Light Painting

Posted in Photography


Deal: Portraits eBooks $7 Each [or $21 for the Whole Set of 5 eBooks]

08 Jul

Wow, we’re already up to our final offer of the sale — how the week has flown!

You’re going to love this lucky last deal, it’s BIG…

Our best-selling Portraits ebooks by the amazing Gina Milicia only $ 7 each!

portraits

Covering all aspects of portrait photography, the ebooks on offer are:

  • Portraits: Making the Shot
  • Portraits: Lighting the Shot
  • Portraits: Striking the Pose
  • Portraits: After the Shot (plus 12 FREE Lightroom presets)

And at just $ 7 each, you save an incredible 65%!

Can’t stop at one?

4
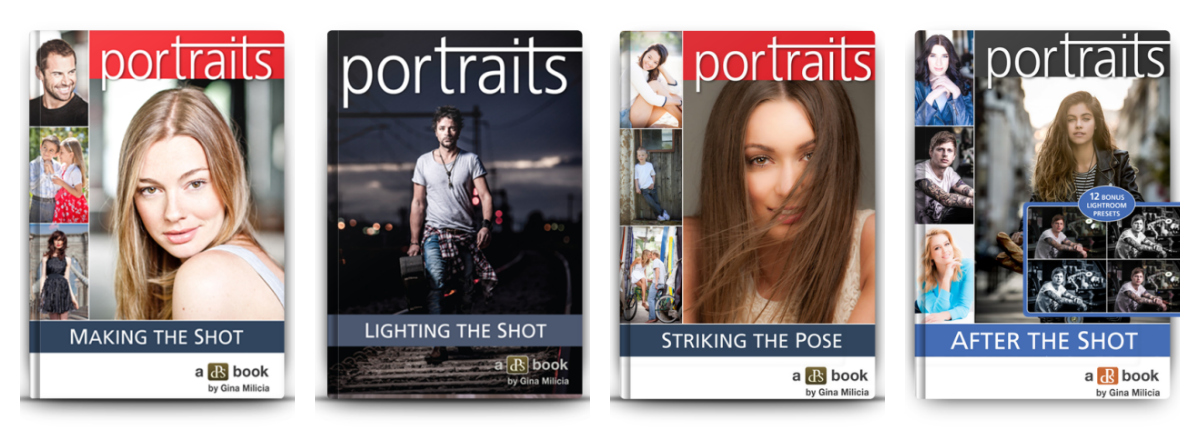
You can pick up each Portraits ebook separately for $ 7, or…

Grab the whole set for an amazing $ 21!

Tens of thousands of photographers from all around the world have significantly improved their portrait photography with this series, and this is your chance to own them all.

We’ll even include our 14 Recipes for Amazing Portraits ebook as an added bonus, too.

So that’s 5 great dPS ebooks and close to $ 90 worth of value!

Individual Portraits titles, or the whole set plus bonus ebook. Whichever you decide, just be sure to get in before the deal ends in 24 hours’ time!

googletag.cmd.push(function() {
tablet_slots.push( googletag.defineSlot( “/1005424/_dPSv4_tab-all-article-bottom_(300×250)”, [300, 250], “pb-ad-78623” ).addService( googletag.pubads() ) ); } );

googletag.cmd.push(function() {
mobile_slots.push( googletag.defineSlot( “/1005424/_dPSv4_mob-all-article-bottom_(300×250)”, [300, 250], “pb-ad-78158” ).addService( googletag.pubads() ) ); } );

The post Deal: Portraits eBooks $ 7 Each [or $ 21 for the Whole Set of 5 eBooks] by Darren Rowse appeared first on Digital Photography School.


Digital Photography School

 
Comments Off on Deal: Portraits eBooks $7 Each [or $21 for the Whole Set of 5 eBooks]

Posted in Photography


Now You Can Have Perfectly Posed Portraits

21 Jun

Over the last week at dPS our writing team have focused their efforts on creating a great series of tutorials on the topic of posing subjects for portraits. They’ve covered 8 fantastic topics that have had some great feedback.

In case you’ve missed any I’ve listed them below but am also including 8 more portrait posing tutorials below from our archives.

Photograph Books Gives Us Wings by Maxim  Guselnikov on 500px

Books Gives Us Wings by Maxim Guselnikov on 500px

Also – if you’re looking to go even deeper into this topic check out our best selling Portrait Posing eBook – Striking the Pose by Gina Milicia and her Portrait Posing Printables Set for more great teaching.

Here are out 8 Portrait Posing Tutorials

  • Portrait Posing Tips- How to Help People to Relax and Take Better Photos
  • 5 Unposing Tips for Kids for More Natural Photos
  • How to Pose People for Headshots
  • 24 Photos of Perfectly Posed Portraits
  • Portrait Tips for Posing Women
  • How to Pose Groups for Portrait Photography
  • 10 Fantastic Natural Wedding Posing Tips
  • Tips for Posing Muscular Female Body Types

8 Great Portrait Posing Tutorials and Guides from our Archives

  • 8 Posing Guides to Inspire Your Portraiture
  • 5 Fail Proof Portrait Poses
  • Beginner Tips for Posing People with Confidence
  • Tips for Posing Men
  • Unposed Posing: Tried and True Tips for Photographing Families in Natural and Fun Ways
  • Posing Tips – Waistlines, Thighs and Bust lines
  • How to Pose Hands in Portraits
  • Pose for Effortlessness

Portraits posing 468x190px

googletag.cmd.push(function() {
tablet_slots.push( googletag.defineSlot( “/1005424/_dPSv4_tab-all-article-bottom_(300×250)”, [300, 250], “pb-ad-78623” ).addService( googletag.pubads() ) ); } );

googletag.cmd.push(function() {
mobile_slots.push( googletag.defineSlot( “/1005424/_dPSv4_mob-all-article-bottom_(300×250)”, [300, 250], “pb-ad-78158” ).addService( googletag.pubads() ) ); } );

The post Now You Can Have Perfectly Posed Portraits by Darren Rowse appeared first on Digital Photography School.


Digital Photography School

 
Comments Off on Now You Can Have Perfectly Posed Portraits

Posted in Photography