RSS
 

Posts Tagged ‘portraits’

How to Pose and Angle the Body for Better Portraits

07 Mar
anglesfinalimageSM

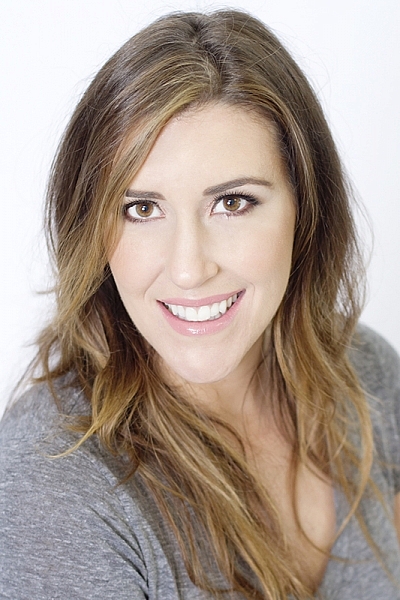
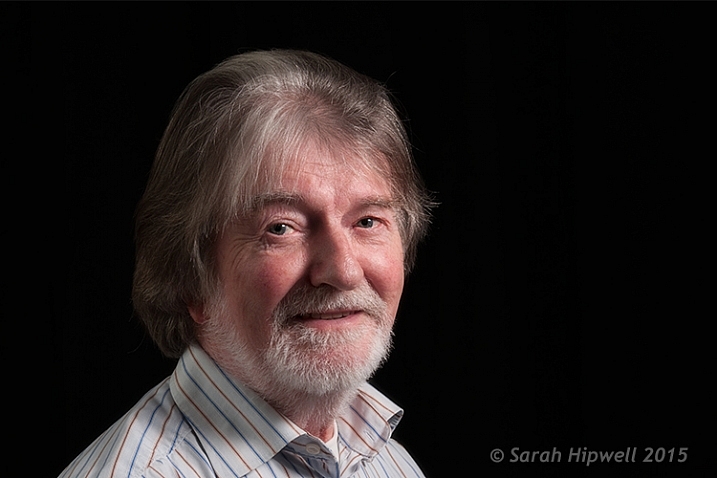
This is the final, edited image given to the client.

One of the best ways to make a living with photography is to photograph people. People need photographs of themselves for their business, conferences, publications, acting, and more. When they come to you to have their photo taken, they trust you to make them look good. That is really one of the biggest parts of your job as a photographer, to make your subject look great.

When someone hires you to take portraits or head shots of them, it’s important you understand how to pose them, and angle the body toward the camera. By understanding this, you will also be able to work more efficiently, which will benefit both you and the client. You have to remember that most people don’t like to have their photo taken, so you want the process to move along swiftly.

I have compiled a series of photos, to give you a visual of the slight changes that can be made to create a more pleasing portrait. These are straight out of the camera, no post-processing or touch ups have been done. The model in the photographs had professional make-up done before we shot. I recommend if you are photographing a female client, that you refer them to a make-up artist you like to work with, to have their make-up done prior to the shoot. This will make a big difference in the final look.

Okay, let’s get started.

Shift their weight

With the first set of images the model on the left is standing straight on, or square to the camera. Her body weight is on both of her feet equally. As you can see with the image on the right, a subtle shift in her weight makes a difference. All she did was put the majority of her weight on her right leg. This immediately creates a subtle s-curve with her body. The model is still facing the camera straight on, but already looks slimmer.

1 hippush

Lean forward from the waist

The model is still facing you straight on or square but we will now have her lean from the waist. With the photo on the left she is leaning away from the camera or backwards, and it’s very unflattering. This angle creates a double chin, and makes her look heavy. Anytime a client does this, correct them right away.

To make this photo better, just have them lean slightly forward from their waist, toward you. You can see when she did this, in the image on the right side, that she automatically angled her head and shifted her weight on her legs. You now have a much more flattering pose.

2 leanback

Weight on the back leg

Now adjust the model once more. Have her shift her weight to her back leg. In the examples below the model shifts her weight to her left leg bringing the right one in front. With the image on the left you again see how when she leans backwards or away from the camera it looks awkward and unnatural. Have the model make the simple adjustment of either standing up straighter or have them add a bit of lean toward you as seen in the photo on the right.

3 leanbackforward

Cross arms

A very popular pose for business head shots, is having your model cross their arms. This creates a feeling of confidence and strength for the viewer. It can go wrong though. With the image on the left side below, the model angles her head backwards. This mistake is more common in women since they seem to like to tilt their head for photos. Communicate clearly with your client/model to bring their chin down slightly and forward. This easy adjustment makes a big difference and is the shot your client will want.

4 armscrossed

Lean forward again

From the crossed arm pose you can get a very nice close up headshot. The image on the left was shot wider to show you how, and where ,the model is angling her body. Ask them to lean forward from the waist. Most people will think this feels weird, just let them know that it looks great in the final image. Remember most people are insecure with how they look, so always take time to reassure them they look amazing! Then either zoom-in tight with your lens, or step in closer to get a beautiful portrait.

5 leanforward

Sitting poses

Let’s move on to portraits while your model/client is sitting down. Having your model/client in this sitting position places you at the angle above them. That means you will be shooting at a downward angle, which is very flattering for most people.

The first step you have to take, is to have your model sit on the edge of the chair. You do not want them to be sitting comfortably, where they lean all the way back. With the image on the left (below), the model is sitting on the edge of the seat, feet on the floor and shoulders square at the camera. Even though it is not the best angle, if you crop in tight, you can still create a nice portrait with the focus being on the eyes, as seen with the image on the right.

6 chairpose

With your model still sitting in the chair, have him or her place their elbows on their knees. Arms can be crossed or not, play around with both. This forces the model to have to look up at you, taking away any issues with the neck. Make the image better by having your model angle their face slighting to the left or right as shown with the right side image. Remember these are tight crops, focusing on the eyes and smile.

7 sitandleanforward

The last example shows the model’s “good side”. We all have one side that is better than the other. It is not usually visible with the naked eye, so please be sure to always photograph your model from the left, and the right sides. This is clearly shown with the model below. Her good side is when she angles her face to the right, and her left side is more visible (the image on the right). You can see more of her face, her neck looks better, both eyes are visible, the hair falls naturally, and her nose has a more flattering angle.

8 goodside

When repositioning your model, remember to shoot that pose from each side. Until you get good at recognizing which is your client’s good side just by looking at image preview on the camera, always shoot from the left and the right.

It’s easy to see how a simple adjustment of angling the body can result in better portraits. An good rule of thumb to remember, is to have the model angle one shoulder toward you, and have them place their weight on the back leg. This will immediately make them look slimmer. Of course, the best way to get better is to get out and practice, practice, practice!

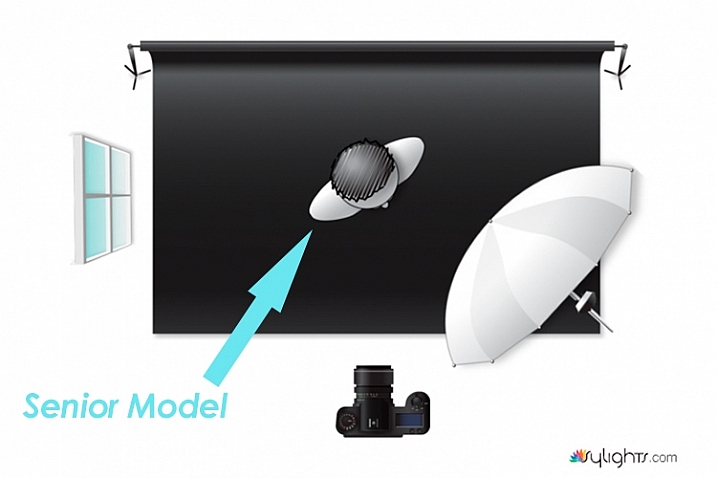
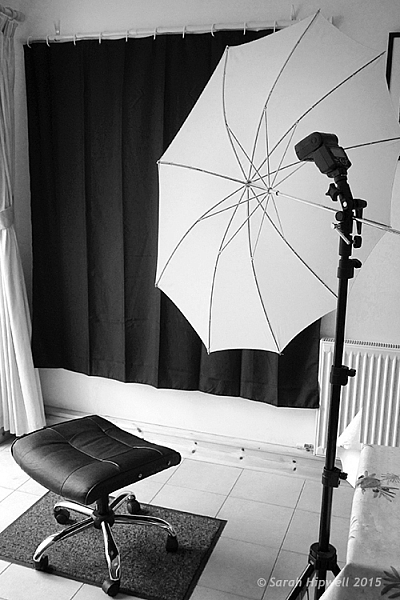
Have fun shooting! All images were shot in a studio with a 50mm lens, on a white paper backdrop, with one strobe light.

googletag.cmd.push(function() {
tablet_slots.push( googletag.defineSlot( “/1005424/_dPSv4_tab-all-article-bottom_(300×250)”, [300, 250], “pb-ad-78623” ).addService( googletag.pubads() ) ); } );

googletag.cmd.push(function() {
mobile_slots.push( googletag.defineSlot( “/1005424/_dPSv4_mob-all-article-bottom_(300×250)”, [300, 250], “pb-ad-78158” ).addService( googletag.pubads() ) ); } );

The post How to Pose and Angle the Body for Better Portraits by Alexis Arnold appeared first on Digital Photography School.


Digital Photography School

 
Comments Off on How to Pose and Angle the Body for Better Portraits

Posted in Photography


How to Find Good Locations for Family Portraits

28 Jan

When you’re shooting a family portrait, about nine out of 10 times the client will ask, “Do you have a place you typically like to shoot?”

We all do, of course, but if you take every portrait client to the same location, your portfolio will develop an undesirable, repetitive consistency. So, it’s important to thoroughly scout the area where you live and work, to build a list of go-to spots for any scenario, circumstance, and style.

2015 12 26 0002

Think about your city, and build a list of these places where you can shoot:

  • A field or shoreline with broad vistas to capture the aura and glow of twilight
  • A similar outdoor venue with features like tall grass or trees to provide backdrop
  • An outdoor area with full shade, appropriate for shooting midday
  • A covered outdoor space like a gazebo or covered porch, for shoots in inclement weather
  • An indoor space with high ceilings and lots of windows for natural light

Because most family portrait sessions will include a variety of backdrops and poses, the perfect shooting location contains all of these elements. But that’s rare to find.

Finally, make sure that you have the required permits, permissions, and licenses to shoot in your desired locations, whether they’re public or private (many municipalities require a business license to shoot in public places like parks and beaches).

2015 12 26 0003

Once you’ve built your list of go-to locations, you’re ready to schedule a session with a client. Here are the two scenarios that could play out:

1 – The client has already chosen a location

It’s surprisingly rare for a client to be dead set on a location, but sometimes there’s a family home, or a special place with memories where they’d like to be photographed. Or perhaps there’s extended family gathered together already, and they’d like to keep the photo shoot as easy as possible by having you come to them. If you’re shooting for next year’s holiday portrait or another special event, they may also choose a place that fits the theme, such as an evergreen forest or a snowy landscape.

If you’re not familiar with the location, ask questions about it while confirming the shoot. You may discover that you need to bring extra equipment like lighting to fill in shadows, if they’re hoping for a family portrait underneath a moss-strewn oak tree at two o’clock in the afternoon.

Likewise, indoor shots — such as people gathered around the fireplace or the Christmas tree, for example — may present difficulties with lighting that you’ll want to work out and be prepared for, prior to the actual shoot. When feasible, visit the site of any shoot before arriving for the actual job.

2015 12 26 0005

2 – The client is open to your location suggestions

This is the more common scenario, where you pull out that list of locations you’ve already scouted.

Start by getting a sense of the feeling the family wants to capture in their photos. If it’s a holiday family portrait, they may prefer a warm and rustic theme over something bright and urban, for example. Or they may want a look that’s relevant throughout the year.

Timing will also have a lot of influence over your decision on where to shoot. When possible, schedule sessions for an hour, to an hour-and-a-half before sunset, giving you time to arrive and chat, get the family comfortable with your presence and style, and then be fully ready to capture beautiful, stunning portraits just when the changing light is at its peak.

2015 12 26 0004

Sunset (and sunrise) shoots

For golden hour sessions, just after sunrise and before sunset, choose a location that ideally has both broad vistas, and objects of interest. For example, if you’re shooting on the beach, don’t just choose a spot with wide open beach (plus houses and passersby) – aim to find a section of beach with sand dunes, tall grass, driftwood, or even distant trees. These objects help frame the image and make it more interesting, without distracting from the subjects of the photograph. The same rules apply in a desert, lake, or city park scenario.

Midday shoots on a sunny day

The challenge with shooting at midday is shadows. You don’t want your subjects to squint in full sun, and you don’t want shadows from tree branches, or manmade obstructions, blocking portions of their faces. The key to shooting in midday on a sunny day is to put your subjects fully in the shade.

2015 12 26 0006

When a client wants to schedule midday, I often lean toward urban areas with architectural interest. If your city or town has a historic neighborhood, seek out alleyways, parks, cobblestone streets, or even sidewalks that are shaded at midday, but present a beautiful surrounding for subjects.

Cloudy day shoots

It’s a huge misconception that overcast days are bad for family portraits. Clients may be discouraged by the threat of rain, but encourage them with the news that even cloud coverage actually makes for beautiful outdoor shots — there’s no squinting and nice even light.

But, if there’s no drama in the sky (dark clouds swirling on the horizon), an overcast day may be less exciting when shooting with broad vistas and open spaces. Turn to your surrounding objects (trees, historic buildings) to provide the intrigue in the photograph. Or bring in a pop of color with balloons or other props.

2015 12 26 0007

On an overcast day, a local mural can actually make a perfect backdrop — just make sure your subjects wear muted tones (black, white, gray, beige) rather than colorful attire that might clash with the art.

2015 12 26 0001

Final tips and tricks

Start by putting together your list of places. Keep the same principles in mind that helped you choose those spots, when giving feedback to a client on their suggested locations. In addition, make sure that wherever you decide to shoot won’t be crowded at the time you’re there — the last thing you want is a bunch of strangers in the background.

Finally, be flexible. Not every shoot will be perfect, but it’s your job as the photographer to ensure that your clients have an enjoyable experience. Have confidence in your skills, and work around obstacles as they arise. If you are engaged and the subjects are happy, it’s possible to create gorgeous family portraits that your clients can share on cards, calendars, and gifts throughout the year.

Do you have any other location scouting tips? Please share in the comments below.

googletag.cmd.push(function() {
tablet_slots.push( googletag.defineSlot( “/1005424/_dPSv4_tab-all-article-bottom_(300×250)”, [300, 250], “pb-ad-78623” ).addService( googletag.pubads() ) ); } );

googletag.cmd.push(function() {
mobile_slots.push( googletag.defineSlot( “/1005424/_dPSv4_mob-all-article-bottom_(300×250)”, [300, 250], “pb-ad-78158” ).addService( googletag.pubads() ) ); } );

The post How to Find Good Locations for Family Portraits by Hunter McRae appeared first on Digital Photography School.


Digital Photography School

 
Comments Off on How to Find Good Locations for Family Portraits

Posted in Photography


Lighting Up the Dark Side: Star Wars Shadow Art Portraits

24 Dec

[ By Steph in Drawing & Digital. ]

star wars shadow 1

Balls of aluminum foil transform into Darth Vader and irregular chunks of chocolate cookies covered in rainbow sprinkles become the Star Wars logo when a single light source is shined upon them in just the right way. Artist ‘Red’ Hong Yi of Malaysia created an entire series of Star Wars shadow art with a range of materials, from feathers to discarded computer guts.

star wars shadow art 7

The artist turns on a lamp and begins attaching her bits of materials to pieces of wire embedded in a base, watching the shadows on a plain white wall until her seemingly random compositions start to make visual sense. Some of the portrait are more complex than others; a Stormtrooper made of cotton is simple and graphic while a Yoda silhouette crafted of nothing more than a handful of leaves  and weeds seems as if it could spring to life.

star wars shadow art 5

star wars shadow art 3

star wars shadow art 4

“It started with a spark of curiosity and then a lot of tweaks and experiments,” says the artist on her Instagram. “As an artist/designer, I’ve learned to not be afraid of experimenting and failing; you’ll get better at what you do with each step you take. Our responsibility as creators is to sit down and create again and again. May the force be with you!”

star wars shadow art 2

star wars shadow art 6

Get inspired with 24 more amazing works of shadow art, and follow Red Hong Yi on Instagram for more creations made from unexpected materials, like tea bag portraits and intricate arrangements of edible items.

Share on Facebook


[ By Steph in Drawing & Digital. ]

[ WebUrbanist | Archives | Galleries | Privacy | TOS ]


WebUrbanist

 
Comments Off on Lighting Up the Dark Side: Star Wars Shadow Art Portraits

Posted in Creativity


10 Tips for Taking Stunning Winter Portraits of Your Kids

03 Dec

Just because it’s winter doesn’t mean we can only shoot indoors. It may be cold (and rainy if you’re in London) most days, but when the winter sun shows its face, it fills the earth with a beautiful warm glow, especially late in the day. This bring us to what is known as the golden hour – typically about an hour before sunset. The further you are from the equator, the more time you would need, in my case about 1 – 1.5 hours, before sunset.

Winter portrait1

Here are my 10 top tips on how to get stunning winter portraits of your own kids:

#1 Choose the right day and time

Choose a sunny day and plan to get to your shooting location a good hour or so before sunset.

#2 Dress them warmly and make it fun

Wrap your children up nice and toasty so they won’t complain. Tell them you are taking them out for one hour to the park or the playground (or your chosen location) but that you would like to take a few photos of them before you get to the actual promised site. The easiest for us was the playground, as we have to walk about 10 minutes from the entrance to the park to get to there. It is a good idea to choose a halfway point to stop.

Winter portrait3

#3 Have warm beverages during or after the session

Either bring a snack or warm drinks in a thermos (keep it light and simple though), promise to take them for a nice warm drink in a nearby cafe after your little trip to the playground, or make them hot chocolates when you get home (whatever works for you).

#4 Find the good light and start shooting

Halfway to the playground, your kids would already have been having fun running and chasing each other. Remind them of the photos you want to take, and show them the light is so beautiful and perfect. Ask for their suggestions where you could stop and take some nice picture. Make sure there is light coming from one side, but that they are fully in the shade of a tree (open shade) to avoid hotspots and mottled faces.

Winter portrait2

#5 Be fast

Keep it quick! Kids get bored if you take too long so just aim for a few portraits. Ask them to stand, cuddle and tickle, or make each other laugh, swap places, do their own poses and click away like nobody’s business.

Techie tips: If shooting in semi-automatic mode, choose a wide aperture or set it to Aperture Priority (and choose a large aperture, small f-number) so you get the blurry background effect. Always focus on the child’s eyes if possible.

Winter portrait5

#6 Use backlight to your advantage

Shoot with the kids backlit. The best time to do this is during the golden hour. The sun is low, the sky is a reddish blue and the light is softer, more diffused, and indirect.

Shooting backlit is really quite a difficult technique which requires some mastering. This is when the sun or light source is in front of your camera, and behind your subject. The late sun gives stunning soft light, that illuminates your child’s hair or clothing like it has just been kissed by the sun.

Winter portrait4

You would also need either a really wide aperture, a flash, or a reflector to bring light back into your child’s face. A reflector can be a large white/silver/gold sheet that you angle towards their face, to bounce the light back into it. Or, you can choose a location with a natural reflector such as a white, or light coloured wall, facing the sunset and position your child in front of it, at an angle, so that part of their face gets the reflected light. I suggest a wide aperture for portraits as that helps give a nice glow to the skin, spot metered, and focused on the eyes.

#7 Go for lens flare

This is really quite difficult as you don’t want to be looking straight at the sun. When you see the sun’s rays streaming through the viewfinder of your camera, that’s a sure sign that you are capturing flare. Flare floods your camera with light and everything else becomes a muddy, hazy silhouette. So try to get only a very small bit of flare right at the top or side of the viewfinder, and you will still get some good details, rather than a completely hazy image, devoid of any definition or detail.

Winter portrait6

#8 Embrace the imperfections

From personal experience, my imperfections, mistakes, and lack of skills fuel creativity. So don’t be afraid to make mistakes and have imperfections; they are a blessing. Use them and learn from them.

Winter portrait7

#9 Capture some scene details after the portraits are done

When the portraits are done, capture some contextual details such as the sky, trees, plants, grass, flowers, etc. Years down the line, when you look back at these photographs, details will help you remember the mood, the time, and the emotions of that day. Now that there’s no need to rush and the kids are playing, take your time and choose which details grab you, and take your breath away.

Techie tips: Don’t forget to change your aperture when shooting the sky and trees to a much smaller one, in this case around f/5.6 or smaller. I find that while you can shoot wide opened it is more prone to have chromatic aberration than if you shoot at a smaller aperture. Really, it’s personal preference, but this is what I recommend.

Winter portrait10

#10 Last but definitely not least, reward and celebrate

Promise your kids not just the playground, but extra treats like snacks and hot drinks, and even a small surprise. It reinforces having a photoshoot as a positive experience, and ends it on a happy note. Then top it with a movie night at home!

Have you done any winter portraits of your kids? Please share your images and any other tips you have in the comments below.

googletag.cmd.push(function() {
tablet_slots.push( googletag.defineSlot( “/1005424/_dPSv4_tab-all-article-bottom_(300×250)”, [300, 250], “pb-ad-78623” ).addService( googletag.pubads() ) ); } );

googletag.cmd.push(function() {
mobile_slots.push( googletag.defineSlot( “/1005424/_dPSv4_mob-all-article-bottom_(300×250)”, [300, 250], “pb-ad-78158” ).addService( googletag.pubads() ) ); } );

The post 10 Tips for Taking Stunning Winter Portraits of Your Kids by Lily Sawyer appeared first on Digital Photography School.


Digital Photography School

 
Comments Off on 10 Tips for Taking Stunning Winter Portraits of Your Kids

Posted in Photography


Tips for Creating Outdoor Portraits

27 Nov

On now at Snapsdeals is Wayne’s ebook: Portrait Tips and Techniques: Timeless Portraits. Sale ends December 8th (2015) get it now and save 20%.

These tips are a follow-up to my previous article about 6 Tips for Taking Better Natural Light Classic Portraits, and the process of creating simple posing and composition for outdoor portraits. To me, these things are what refines a portrait. You can have the perfect lighting conditions and location, but if the subject looks awkward or the composition is unbalanced, the image will fail aesthetically.

Each of these images will give you some tips and understanding of the creative process for creating outdoor portraits:

#1 – Creating back-view portraits

DPS 1

Creating interactive back-view portraits is fairly easy. In the portrait above I asked the two older boys to put their hands in their pockets, and start walking slowly in a specific direction. Of course the youngest one followed and mimicked his big brothers.

Ideally you want to get your subjects to talk to each other while walking and watch for the unexpected reactions. Getting them to talk about sports, school holidays or any interests they have, will make them more cooperative and loosen them up, making the portrait more natural looking.

I suggest you use continuous autofocus and a zoom lens for these types of portraits. This was taken with a 70-200mm lens at f/4. The original image of the three boys was the normal 3:2 rectangle, but in post production I decided on a square.

#2 – Interactive poses

DPS 2

Same three boys in an interactive pose. I set this shot up like a movie director, by simply giving them some direction of what to do, then let them go, and recorded their reactions. Just letting them walk around and happy snapping doesn’t work for me. I prefer to place them in the scene I want, based on background and lighting, tell them what to do and then record their natural reactions.

In this study I placed the boys away from the headland, so they were against the sky, and let them kick a piece of driftwood around. A ball would have been another option. The composition I used is the Rule of Thirds which can be seen at the bottom of this article.

When doing these types of environmental portraits, I suggest you create it like a landscape, then place the subjects into it.

#3 – Find the light and pose for the subject

DPS 3

After establishing the location, background, and direction of light, I placed the the young girl near the edge of the path, her body turned away from the camera at approximately 45 degrees to the camera, her head turned back to camera.

There was a building to her left, which was subtracting light from the left hand side of her face. The umbrella was the client’s prop, which I decided to use. I felt that her hair would have blended into the background otherwise, but this way her head is framed by the contrast of the umbrella. I like the way she was holding on to the umbrella, it simplifies her hands from being a distraction.

If she had been older, I would have asked her to bend her front knee, therefore placing her weight on the back foot, creating an s-curve through her body. There was a temptation to place her to camera right, thereby in the RH third, but I chose the opposite side for a different look. No right or wrong reason, just my preference.

#4 – Connect people to each other and the background with posing

DPS 4

In the portrait of the children above, I wanted to place them between the old shed and the fence line, allowing their heads to appear against the soft muted tones of the out of focus trees. Having secondary backgrounds like the shed and fence against the distant background of trees can add extra depth, giving a more three dimensional look.

The pose is natural, with a small amount of refinement. I like the subjects to turn away from the camera, then look back, rather than shoulders square on to camera. Also by leaning the outside subjects to the centre, it creates more emotion through body language, which also creates a slightly more triangular composition (by luck matching the shed roofline).

The varying heights of the children allows each of them to have their own space. Often you will see heads in a row on the same plane. Note the simplicity of the hands, curled away from camera or in their pockets, not draped over the shoulders. Also with the two girls holding hands, and the youngest one leaning across towards her brother, it creates a connection within the group.

#5 – Match tones for high or low key portraits

DPS 5

When creating high key or pastel portraits, it’s important to “key-in” the clothing colours to the background. For example: white against white, or cream against cream, or soft muted tones against other muted tones, NOT light on dark. The idea is to be drawn to the face, not the contrast between backgrounds.

This young boy (above) has great eyes, so we don’t want to be looking anywhere else but his face. His karate outfit is white, but for my artistic license, I changed it slightly to harmonize more with the background. In the black and white version for the client, I left it white.

The pose is simple, and he is square to camera, with his body and head leaning more to his left. His head is also tilted slightly down, which allows us to see the full roundness under his eyes. I find this pose more engaging for him. Composition is close to the Rule of Thirds but I do prefer the Golden Triangle. (See below)

#6 – Camera angle is important

DPS 6

A low camera angle was selected for this portrait to bring the viewer down to the child’s level. Also by lowering the camera, this places her head above the gates in a neutral uncluttered area, allowing her face to stand out from the background. Another advantage is that the low angle causes the lens to blur the foreground so much, that it leads you directly to the sharp subject.

Again the subject is angled away from the camera and her head is turned back to camera. Her hands are naturally placed.

It’s very important to remember when posing children or adults, to turn the body and legs away from the camera to avoid unflattering crotch shots of all ages. If you don’t know how to pose hands, give a child something to hold, failing that, hide them as much as possible. Personally I recommend learning how to pose them to look natural, and then you will recognize when they’re not correct, and be able refine the pose.

Summary

DPS 7

  • Avoid the body and face being posed in the same direction.
  • Try keeping the face at about 45 degrees to the body as a starting point.
  • When seated, avoid knees and feet/shoes pointing directly at the camera. Turn them away.
  • Direct children to do natural things when creating interactive portraits such as talking to each other, kicking a ball, reading, etc. This will create realism.
  • Always watch your background, and give your subjects their own space to avoid a busy image.
  • Use hands to touch, and overlap bodies to create poses that have a connection between people. (E.g. the three kids above)
  • Try to shape poses to replicate objects that may be in the composition.
  • When possible, key-in clothing colours to harmonize or compliment background tones. (E.g. photo # 5)
  • Select a low camera angle when photographing kids. Get down to their level or below.
  • Use foreground blurring to make your subject pop. (E.g. photo #6)
  • Use the Rule of Thirds or the Golden Mean as a starting point for improving your composition.

On now at Snapsdeals is Wayne’s ebook: Portrait Tips and Techniques: Timeless Portraits. Sale ends December 8th (2015) get it now and save 20%.

googletag.cmd.push(function() {
tablet_slots.push( googletag.defineSlot( “/1005424/_dPSv4_tab-all-article-bottom_(300×250)”, [300, 250], “pb-ad-78623” ).addService( googletag.pubads() ) ); } );

googletag.cmd.push(function() {
mobile_slots.push( googletag.defineSlot( “/1005424/_dPSv4_mob-all-article-bottom_(300×250)”, [300, 250], “pb-ad-78158” ).addService( googletag.pubads() ) ); } );

The post Tips for Creating Outdoor Portraits by Wayne Radford appeared first on Digital Photography School.


Digital Photography School

 
Comments Off on Tips for Creating Outdoor Portraits

Posted in Photography


Low-Key Lighting for Dramatic Portraits

19 Nov
Becky-in-witch-outfit

Young girl dressed up for Halloween. Low-key portrait using one speedlight, against a typical black background.

I dare say that nothing is quite like the effect of low-key lighting to show drama in an image. So what does low-key lighting mean in terms of photography? A good definition is found here.

Low-key lighting often uses only one key light, optionally controlled with a fill light or a simple reflector.

The term “low-key” is used in cinematography to refer to any scene with a high lighting ratio, especially if there is a predominance of shadowy areas. It tends to heighten the sense of alienation felt by the viewer, hence is commonly used in film noir and horror genres.

To simplify the term further, low-key lighting focuses on the shadows by using usually one light source. Therefore, shadows are now the primary element of the composition.

What you should know about low-key lighting

The nice thing about low-key lighting is that it’s quite experimental. There are no hard and fast rules that you need to adhere to. You can vary the position, and the distance, of the one light source more to the front or side of the subject, depending on how much contrast you want your model to have. Or ask the subject to turn more into light source or away from it. Here are a few more guidelines:

  • A black seamless background is the classic low-key look.
  • As this type of lighting is quite strong and contrasty, it’s probably suited for the very young, who in general have flawless skin and subjects (seniors 65+) where the emphasis is on the character of the person. For people who don’t have great skin, this type of lighting won’t be the most flattering.
  • You can move the light more to the front and use a reflector to control the light and act as a fill.
  • Creates drama and mystery to your portraits.
  • This type of lighting is probably not best to do wedding portraits!
  • Keep ISO low to 100/200 so that ambient light doesn’t reach the sensor. This will keep the quality of images high by reducing noise.
  • Set your flash to manual and start on a low setting of 1/8th power.
  • Use a small aperture setting of f/8 and upwards (f/11 and smaller).
  • Keep the shutter speed at 1/125 second or higher (not to exceed the native sync-speed of your camera).
senior model low key lighting

A senior model poses with his body turned more towards the light source to provide less extreme shadows while emphasizing the model’s facial character.

Senior-model

Lighting diagram to show the position of the model in relation to the light source.

Young girl low key photography in Halloween costume

In this particular shot, I wanted more shadow on the model’s right side to give more drama to the shot.

Lighting diagram low key photography

Keeping the light source in the same position, I got the model to look directly at the camera.

What’s involved in a low-key setup?

You may be surprised, but this type of setup doesn’t require a proper studio. You can do a low-key portrait in a relatively small area, or anywhere in fact. This setup requires the minimal of gear:

  • A camera and lens (whatever lens is your choice for portraits)
  • One speedlight
  • One lightstand
  • One light modifier (a shoot through umbrella is a great and inexpensive modifier that acts like a softbox)
  • A subject or model, or willing participant
  • Preferably a black background. See my DIY solution below.

Low-key low cost

I am a great believer in practicing what I preach. So I came up with a DIY solution for shooting a low-key setup, using a black shower curtain, in your own home. It is inexpensive, and doesn’t require a lot of time to implement.

First item was the black background

  • I sourced a black shower curtain for less than $ 10USD. Size L180, W180cm. It also comes with plastic rings. Don’t worry that the curtain doesn’t reach the floor. Remember, this is for portraits only. I already had a telescopic white shower rail.
  • 1 ½inch in diameter x 10ft. length of white PVC tubing will do equally well. It works out at $ 2.10 from Home Depot. I would cut this down to 8ft.
  • One pair of White Command Cord Clips that cost from $ 3 to $ 5. These clips have a self-adhesive backing and can stick to most surfaces. So they are easy to put up, and are also removable. They can hold up to 900g or 2 lbs.

So that is your background sorted. The shower curtain, when taken out of the packaging, has obvious pleats. Don’t worry about these. This is easily sorted in post-production.

As I really enjoyed using this DIY method. I have left the Cord Clips up on the wall in my kitchen. They are relatively discreet. I intend to use this setup again. It is so simple and a perfect solution if you can’t get to your studio, or if you don’t have one!

Black-shower-curtain-setup

A DIY low-key solution that you can set up at home.

Post-production to get rid of pleats or wrinkles

You don’t want any light to hit the black background, this is called contamination. Plus you want the black background to be texture, and wrinkle free. In some of my shots, the pleats were a little obvious in the background.

black-shower-curtain

Black shower curtain with pleats visible.

Getting rid of them was relatively easy. In Adobe Camera Raw (ACR), I adjusted the Shadows and Blacks sliders,
until I had a wrinkle free black background. However, as this is a global adjustment, you may need to an Add Adjustment Brush to areas on the subject to bring back some detail.

Another alternative in Photoshop, is to apply a mask to isolate the subject. For the image of the senior man, I used Select>Color Range rather than using the Quick Selection tool or the Refine Mask tool. The Color Range is a color-based selection tool which was ideal in this case, as my subject was much lighter than the background making selection relatively easy. A few clicks on the background and I had a near perfect mask, except where the two eyes were. I applied the mask and filled in areas that were needed in black with the brush tool.

color-range

Choosing the Color Range under Select in Photoshop to create a mask.

I then applied a Levels Adjustment layer, and moved the black slider ever so slightly to the right, until the background was completely black.

color-range-dialog-box

The Color Range dialog box.

Of course shooting lo-key isn’t restricted to indoors, nor do you need a black background. You can achieve similar effects outside. Check out this great video on the topic of creating an invisible black background to portraits using the same techniques.

Caution: You may possibly experience lots of fun shooting low-key! So let’s see your examples in the comments below.

Sponge-Bob-costume

My daughter’s friend dressed for Halloween as Sponge Bob.

googletag.cmd.push(function() {
tablet_slots.push( googletag.defineSlot( “/1005424/_dPSv4_tab-all-article-bottom_(300×250)”, [300, 250], “pb-ad-78623” ).addService( googletag.pubads() ) ); } );

googletag.cmd.push(function() {
mobile_slots.push( googletag.defineSlot( “/1005424/_dPSv4_mob-all-article-bottom_(300×250)”, [300, 250], “pb-ad-78158” ).addService( googletag.pubads() ) ); } );

The post Low-Key Lighting for Dramatic Portraits by Sarah Hipwell appeared first on Digital Photography School.


Digital Photography School

 
Comments Off on Low-Key Lighting for Dramatic Portraits

Posted in Photography


Good Crop Bad Crop – How to Crop Portraits

16 Nov

All images © Gina Milicia 2015

“Learn the rules like a pro, so you can break them like an artist.” ? Pablo Picasso

When it comes to knowing what is right for me there are a few things I know for sure: First, garlic and ice cream are never meant to be mixed together. Secondly, even if I colour my hair blonde I’m never going to look like madonna, and finally when my mechanic warns me that the timing chain in my car should be fixed as soon as possible, I need to listen up and act.

If who have read my other articles or ebooks, you will know that I’ve also learned many lessons in my photography career from stupid mistakes, or lapses in judgement. It’s through learning from failure, and trial and error, that I’ve managed to discover what works best for me.

When it comes to how I crop my portraits there are a few cropping styles I try to avoid because just like eating garlic ice cream I have learnt what works best for me.

How I crop my portraits is just as important to defining my style as the lens I use, the way I light, and how I process my files. I believe the way an image is cropped can change the look from “meh” to “amazing”.

Goodcrop 2B

I always crop a shot below the knee, mid-thigh, at the waist, across forearm, or through the top of head. If I’m going to crop through my model’s waist I will usually ask my model to bring their arms up so I don’t have to crop through their arms.

BadCropW

I avoid cropping at any of the joints of the body. This includes fingers, toes, elbows, knees and wrists. I also think cropping through the model’s chin looks odd.

It took me many years of trial and error, and studying the work of my favourite photographers, to learn that there are actually a few golden rules of cropping worth following. Ones that make a huge difference to the visual impact my portraits make, and how flattering these portraits can be for the subject.

Like all rules there are always exceptions, and the art world would implode if these rules were not constantly tested and broken. Pablo Picasso, Vincent Van Gogh, and Jackson Pollack are examples of artists whose styles broke every rule in the, “how to paint book” and in their time they were mocked and ridiculed by other artists and critics alike, yet today their paintings are priceless. Having said that, they all studied conventional painting rules of their time, and then went on to break those rules, and create their own signature styles. I wonder if they ever considered changing their hair colour to look like Madonna…

My shooting,lighting,posing, and post-production style has developed and evolved over the years, but the way I crop my images has remained the same.

Here are my top five tips for how to crop portraits:

#1 Crop In-Camera

Tightcrop A

Cropping in-camera basically means that you compose your image exactly how you want your final crop to look when you are taking the photo, rather than shooting loosely and cropping the shot in post-production. There are two reasons for this:

  1. Firstly, images cropped in-camera look totally different to images that are cropped in post-production. Filling the frame and cropping tight means that you will create great background blur (bokeh), which removes any background distractions and focuses more attention on your model, which is always a good thing.
  2. The other advantage of cropping in-camera is that your file size is not affected. A loosely photographed cropped image may only leave you with 10-15% of your file size, so a file that was originally 30MB as a full size image, is reduced to 3MB with a tight crop. Lower resolution images have less detail and won’t be as sharp as a full size image.

#2 If it bends don’t crop it

BadCrop 2Bad crop Crop3Good crop

I think cropping mid thigh looks visually more pleasing than doing so at the knee. Seeing just part of the knee where the dress ends also looks untidy.

There are also certain ways to pose models that are more flattering to the body. I’m always looking for ways to pose my models that elongate, rather than shorten, their body parts. I try and emphasize their best features, and hide or diminish the features that are not as strong.

As a general rule I crop in a way that will elongate and flatter the body. Cropping at the knees, waist, elbows, toes, fingers, ankles, or wrists can make your model look stumpy. Cropping off the arms or legs can make your model look square, or larger than they really are.

#3 Avoid cropping into the chin and keep the eyes in the top third of the frame

BadCrop 6Bd crop Crop6Good crop

Keeping the eyes in the top third of the frame is visually better than cropping into someone’s chin, which to my eye looks like I wasn’t paying attention when I took the shot, and visually this crop (above left) looks awkward.

I find my portraits look much stronger visually when the eyes are positioned in the top third of the frame. Cropping into the chin is visually jarring in the same way that garlic ice cream was jarring to my tastebuds.

Rulethirds

This is the original framing of a shot I took for the cover of my dPS book, Portraits – Striking the Pose. I wasn’t sure how much of the shot we would be using, so I deliberately shot wider, and left space on the left of my frame to allow for text and other images.

Rulethirds 1 Rulethirds 1B

Rulethirds 2B

Rulethirds 2

The final shot for the cover was cropped very tightly because I felt including the hands looked a bit messy. I cropped this image with the eyes in the top third of the frame because this was visually the strongest option.

#4 Give yourself options

The explosion of social media has radically changed how I shoot my portraits. When a client booked me for a session a few years ago, I would shoot the majority of their portraits as vertical images. Now I make allowances for websites and social media platforms that run both vertical, square, and horizontal images.

I will usually start with portraits framed as vertical images and then rotate my camera to shoot some horizontal frames.

I generally position my model to fill the left or right hand third of the frame. This adds interest to the portrait, and makes it visually more dynamic. Having said that, there are times when I will frame my portrait in the centre of the shot because I personally love the way it looks.

I also love cropping into people’s heads, but this is not everyone’s cup of tea, so I always shoot a few frames with space above the head just in case.

You never know where the final image may end up in a few weeks or a few years, so I think it’s a good idea to plan ahead. It only takes a couple of minutes to shoot slightly wider, vertical, and horizontal at the end of each setup.

#5 Crop like you mean it!

Use these suggestions as a starting point, and find a style that works for you. Start with a full length portrait and first try cropping using traditional rules, then try breaking the rules and see which way you prefer the most.

Each person, location, and pose you shoot will always be different, so don’t be afraid to mix it up a bit and create your own signature style. The one question I always ask myself when I’m cropping my images is, “Does this crop look deliberate or does it look like a mistake?”

Tightcrop 2 Tightcrop 3

Sometimes following cropping rules to the letter will still leave my portraits looking visually jarring. An example of this is if I photograph a model wearing 3/4 sleeves and crop at a point which is technically correct, leaving a tiny amount of arm showing just below the sleeve. This looks like a mistake and would look better if I cropped a little higher to remove the skin.

The more you shoot, the more you will start to get a feeling for what looks right to you. If you’re still not sure, do two versions and compare them.

You might like to deliberately create a series of portraits that are visually jarring because they will evoke an emotional reaction.

How do you like to crop your portraits? Do you like to crop in-camera or in post-production? Do you think a tighter crop looks best ,or do you like to let your portraits have lots of space around them? Is there anything I’ve missed? I’d love to hear your thoughts and see your images. Please feel free to share in the comments section below.

This week on dPS we’re featuring a series of articles about composition. Many different elements and ways to compose images for more impact. Check out the ones we’ve done so far:

  • Using Framing for More Effective Compositions
  • 7 Tips to Improve Your Skyline Photos
  • 33 Images that Exemplify Compositional Elements
  • Weekly Photography Challenge – Composition Craziness
  • How to Take Control of Aperture and Create Stronger Photos
  • How Cropping in Post-Production Can Improve Composition

googletag.cmd.push(function() {
tablet_slots.push( googletag.defineSlot( “/1005424/_dPSv4_tab-all-article-bottom_(300×250)”, [300, 250], “pb-ad-78623” ).addService( googletag.pubads() ) ); } );

googletag.cmd.push(function() {
mobile_slots.push( googletag.defineSlot( “/1005424/_dPSv4_mob-all-article-bottom_(300×250)”, [300, 250], “pb-ad-78158” ).addService( googletag.pubads() ) ); } );

The post Good Crop Bad Crop – How to Crop Portraits by Gina Milicia appeared first on Digital Photography School.


Digital Photography School

 
Comments Off on Good Crop Bad Crop – How to Crop Portraits

Posted in Photography


5 Tips to Help You Take More Natural Looking Portraits

09 Nov

You’ve probably seen those beautiful portraits where couples are embracing, and laughing naturally off-camera, or two children are skipping up the beautiful country lane-way, bathed in the most perfect light. Everything in the image looks flawless, yet it still seems like the photographer just happened to be walking past at the exact right moment to capture the perfect shot.

So why is it when I try and capture those perfect candid moments someone always has their eyes closed, hair is covering half of their face, or the lighting is wrong, or worse still an unsuspecting passerby in bright pink sweat pants walks through the background of the shot.

Lifestyle 2

In this image I gave each model one action to repeat over and over, to achieve a natural candid feel. (The Footy Show cast – image courtesy Nine Network Australia)

Getting realistic and natural looking shots can be really tricky. If I set up the shot, and try and direct certain poses and reactions, the shots can look really stiff and contrived. If I try and get people to laugh on cue, it tends to look fake.

I can always leave it to chance in the hope that the people I’m working with do something worth photographing but this isn’t always an option. So what’s the best way to get people to look natural on camera? Here are my five favorite and most successful techniques to help you take more natural looking portraits:

1. Check your mood

People tend to mirror, and reflect the mood of the photographer, so if you are having a bad day or feeling grumpy, then your models are going to pick up on that vibe. If you want happy and excited looking expressions, then you need to have that vibe yourself. If you are not feeling it before the shoot, for whatever reason (stuff happens right?) then do whatever it takes to put yourself in a good mood. Listen to a funny podcast on the commute in, call a friend who makes you laugh, read funny stuff. Eat half a jar of Nutella (don’t judge me).

WW14 192

2. If you want people to laugh genuinely, then give them something to laugh about

I’m constantly wisecracking through the shoot, and ever ready to capture the expressions as the joke hits. The best way to do this is to set up your models in the position you want them, start with serious poses, and then throw in a funny remark between frames.

You don’t even need to be that funny for this technique to work. You only really need two or three good jokes, or lines, that will crack a group of people up. I’ve been using the same lines for years and they still work. The important part is that you make them your own, and it’s something you would say, or feel comfortable saying.

3. Laugh with people

GB MEL14 750 Lifestyle 3

To get this image of the Dalton family (above) I actually just started laughing with them. Laughing with your models is infectious. I felt a bit embarrassed doing it at the start, but soon discovered it was totally worth the genuine laughs, and reactions I got. (The Dalton Family/Foxtel)

Another great trick to make models laugh is I actually ask my models to laugh, and will start laughing with them. This always starts out really awkward, everyone laughs uncomfortably, and at first they are laughing at me. But, after a while, everyone is laughing with me, and I’m always able to capture some genuine and beautiful laughing shots.

4. Give each person something to repeat

Lifestyle 4

In this image, I gave each of the girls a specific action and eye-line, while they walked toward my camera. The client wanted a fun, positive, natural-looking shot. If this sort of image is left to chance, all the girls end up looking in the same direction, or have the wrong facial expression.

Try and give everyone in the group a set of actions to repeat as you shoot. This makes it easier to control the group, and keep the shape of the shot you are trying to get. I find I have greater success when I give each model only one action to repeat, and a direction to look toward.

An example of the direction I gave for the girls walking above would be:

  • Girl A (use their real names or course!): Walk towards me, look into the camera and smile at me like you’ve just seen your best friend
  • Girl B: Walk towards camera and smile over at girl A
  • Girl C: Tell a story, and gesture with your hands and look over at girl B
  • Girl D: Laugh to yourself and walk towards camera

5. Keep talking, coaxing, encouraging, directing

People perceive silence from a photographer as a sign that you are unhappy with what they are doing.

PPTS Women 0035 PPTS Men 0026W

What’s your favorite technique for getting natural looking portraits? Do you have any great tricks we could all try? I’d love to hear about them. Please share any others in the comments below as well as your images of natural looking portraits you’re proud of.

googletag.cmd.push(function() {
tablet_slots.push( googletag.defineSlot( “/1005424/_dPSv4_tab-all-article-bottom_(300×250)”, [300, 250], “pb-ad-78623” ).addService( googletag.pubads() ) ); } );

googletag.cmd.push(function() {
mobile_slots.push( googletag.defineSlot( “/1005424/_dPSv4_mob-all-article-bottom_(300×250)”, [300, 250], “pb-ad-78158” ).addService( googletag.pubads() ) ); } );

The post 5 Tips to Help You Take More Natural Looking Portraits by Gina Milicia appeared first on Digital Photography School.


Digital Photography School

 
Comments Off on 5 Tips to Help You Take More Natural Looking Portraits

Posted in Photography


Like father, like son: Hawkeye Huey’s knee-high portraits of the American West

18 Oct

Hawkeye Huey’s photos don’t follow traditional photography conventions of composition or exposure. They’re often blurry, cut off subjects, and use hard flash. The National Geographic-represented photographer is launching his first photo book with a little help from a Kickstarter campaign and a lot of help from his partner in crime – his dad, Aaron Huey. Read more

Articles: Digital Photography Review (dpreview.com)

 
Comments Off on Like father, like son: Hawkeye Huey’s knee-high portraits of the American West

Posted in Uncategorized


Tips for Doing Fall Portraits

16 Oct

Autumn provides photographers with an abundance of colours and amazing light. When captured right, autumn can create images which are the envy of everyone.

For family photos, autumn can provide you with amazing backdrops, and a variety that can be matched by no other season. For this article, I took my own two children for a walk in the woods to do some fall portraits. Photographing other people’s children is always easier than your own, so I thought it would be a great exercise, and we may also even get some nice pictures of our own children for once. So here are some fall portrait tips to get you started.

Gannon-Studios-2

Autumn Portraits 4

Preparation

Preparation is the key to any successful shoot. Of course ensuring your camera equipment is charged, you have clear cards, and your gear is clean seems like a no brainer, but it’s often the fundamentals that we overlook. Clearing cards can be daunting for those starting out, but just double check that you have downloaded everything, then use the Format function (in the camera) that will give you a completely clear card. There are rumors that deleting single images in-camera can lead to corrupting the card, so it’s best to use the Format function.

Make sure you check the weather. Here in the UK, as well as many other parts of the world, it can change quickly at this time of year. Check with a few sources about local weather. It’s such a pain to get everyone together, get in the car and travel for some time, only to be rained out. Although, even rain in autumn can provide some great image opportunities, if you are dressed correctly.

Gannon-Studios-1

Sunrise and sunset can give us the best light. However, dragging your family out of bed for a photo shoot is always going to be tough. Aim to start your shoot about an hour before sunset. This Golden Hour is favored by many professional portrait photographers, as the light is more flattering and you may even get a great sunset. You can look up sunset times for your local area. It can be surprising how early it gets dark, and you want at least a good hour of shooting before the sun goes down.

Make sure everyone dresses appropriately. It’s getting colder, and it’s one less thing to worry about if everyone is warm during the walk back to the car. While we still think it’s lovely and warm outside, believe me, it gets cold pretty quick when the sun starts to go down. Also have a change of clothing available for everyone. It can be wet and muddy and some of us are prone to falling over!

Make sure you bring snacks and drinks. Especially if you are photographing children. They will get bored and hungry way before you do, so anything to help keep them going while you master that perfect shot the better.

Editor’s note: if you are photographing other people’s kids have the parents bring snacks that the kids like. Never give food to other people’s kids without asking the parents, there may be allergies or special diets.

Clothing advice for portrait photographers:

Clothing choices are always important for portraits, but in fall it can really make a difference to your image. Try and have everyone wear natural tones that will either compliment the colours of the leaves and trees, or blend in. My son wore a dark red sweater, as we knew the area had very vivid reds in the trees. My daughter wore black and white which is a timeless combination that blends in well. My son also wore a grey hood that coordinated with his sister.

Autumn Portraits

Try and avoid clashing patterns or colours amongst your subjects by discussing it in advance, and maybe come up with a colour theme that everyone can include. Also avoid t-shirts or sweatshirts that have dominant logos. If he could, our son would have Star Wars logos on everything. This can of course date an image, and is also very distracting.

Try and have a few changes of clothes available. This will not only provide variety in your images, but in the wet and possibly muddy conditions, you may well need them, especially for any children.

Location

Location is essential for any shoot, but for autumn you want to find the best colours and textures you can. Things can change really quickly. The leaves can change over a couple of days, but it often doesn’t happen until later than you think. For this article, we actually struggled to find autumn colours despite it being early October. You also need to check that the leaves are still there. A heavy wind can take them down overnight, so don’t wait too long after you have scouted your spot to shoot.

We searched online for arboretums, these are great places that have collections of interesting trees. Of course, your local forest would be great too.

Autumn Portraits 2

Use social media for location tags to see what other people have photographed over the last few days, at or near the same location. Instagram, Twitter and even Trip Advisor are fantastic for this. You may also get to see a great place that you may not have found otherwise.

The technical bits

For my shoot, I was using a Canon 5D Mark 3 and took the 24-70mm f/2.8 Mark 2, and the 70-200mm f/2.8 Mark 2. These of course are professional cameras and lenses, but any modern camera whether a DSLR, point and shoot, or even a smart phone should provide great images. In fact, I find the iPhone 6 has great range of colours and light.

If you are using a DSLR, you can really play with the aperture (f-stops) to get a range of looks without moving location. To get a super blurry background, set your aperture to the lowest number. On my lens, this is f/2.8. Some lenses can go lower and some are limited to higher setting. Even with a kit lens that comes with your camera, you should be able to get to around f/5. If you want the leaves and your family in focus, try increasing the aperture to f/8 or even f/22. Do be careful though because at f/22 your shutter speed will be significantly slower, and you may well need to increase your ISO to compensate.

Depth of field guide f2 8

Depth of field guide f8

Depth of field guide f22

I photographed the images above in Aperture Priority (AV on a Canon, and A on a Nikon). This is when you decide the aperture and the camera sets the shutter speed. Keep an eye that the shutter speed doesn’t geet too slow (1/60 as a minimum). If it does, increase your ISO.

Personally, I always shoot in RAW. For me it just allows me that flexibility afterwards. However, with modern cameras, JPEGs are very versatile, and don’t break up as much as they used to. Some cameras allow you to capture a RAW and JPEG at the same time. This is great so you have the RAW to go to if need be.

White Balance: for these images, I shot in cloudy White Balance. It warmed up the colours, although I did alter these in Camera RAW processing later, it did give me a great starting point. If you are using your manufacturer’s own software, you should be able to change the white balance quite easily.

Getting natural smiles and reactions from children

You know your own children very well. You know the songs they like and what gets them interested. However, they are also very comfortable around you, and may decide to walk off just as you get your camera settings right. Here are a few tips to get a natural reaction.

As in the images in this article. I asked my children to laugh hysterically for no reason at all. This got a huge overreaction which although is a great animated image, is not what we were after. What did happen is that as they calmed down from that, they had natural smiles. They thought it was funny and continued smiling naturally.

Posing Idea 1

If you have more than one child, ask one to tell the other a secret. This will always get them giggling.

Posing Idea 2 Posing Idea 3

With just one child, ask them to tell you or the camera anything that they are interested in. Our son will talk for hours about anything Star Wars or Marvel. With our daughter we can ask her math questions, which gets a range of reactions.

Sing them a song but get it wrong. For some reason, this is the funniest thing ever to kids. Basically, do anything to distract them or get a reaction, but not by saying CHEESE!

Editing your images

For editing, I used Camera RAW processor which is part of Photoshop. However, most cameras come with editing software, or you can use something like Lightroom which is quite affordable. I actually kept the editing quite simple. The main thing I did was to go to the saturation panel and increased my Reds, Greens and Yellows. This really brought some punch to the image.

Before and After Editing

And finally…

Please print your images in some way. As parents, we are great at taking images, but not doing anything with them. Don’t worry about capturing the most amazing image, just get something that captures your family and print it some way.

googletag.cmd.push(function() {
tablet_slots.push( googletag.defineSlot( “/1005424/_dPSv4_tab-all-article-bottom_(300×250)”, [300, 250], “pb-ad-78623” ).addService( googletag.pubads() ) ); } );

googletag.cmd.push(function() {
mobile_slots.push( googletag.defineSlot( “/1005424/_dPSv4_mob-all-article-bottom_(300×250)”, [300, 250], “pb-ad-78158” ).addService( googletag.pubads() ) ); } );

The post Tips for Doing Fall Portraits by Sean Gannon appeared first on Digital Photography School.


Digital Photography School

 
Comments Off on Tips for Doing Fall Portraits

Posted in Photography