RSS
 

Posts Tagged ‘portraits’

Painting with Paper: Quilled Portraits Reveal the Expressiveness of Aging

13 Sep

[ By SA Rogers in Art & Sculpture & Craft. ]

brodskaya quilled paper 4

Expanding upon a previous body of work that’s more graphic in nature, paper artist Yulia Brodskaya presents a new portrait series capturing the expressive qualities of aging faces in vibrant hues. The Russia-born artist and illustrator is known for rolling strips of paper into ‘quills’ and painstakingly gluing them together into colorful, three-dimensional designs. The new portraits are named Jade, Topaz and Amethyst, and reveal a more painterly method that tightly packs folded pieces of paper into each composition.

brodskaya quilled paper 7

brodskaya quilled paper 5

The effect mimics the look of brushstrokes, with wrinkles, folds and other sculptural details rendered in lush jewel tones for an expressionistic result. The former graphic design major discovered her love for the tactile qualities of paper art and abandoned computer programs, producing hundreds of projects and commissions over the last 7 years.

brodskaya quilled paper 8

brodskaya quilled paper 3


“The new expressive way of using the strips of paper that I discovered recently (and first time used as a primary technique in the Wimbledon artwork) is really exciting – it allows me to achieve more ‘sketchy,’ artistic look for the paper art and I’m excited to keep experimenting with it (though it’s a shame that this method is not much faster than the neat and refined way of gluing strips one by one)… Despite the slow process I enjoyed working on this portrait tremendously: the abundance and richness of colors makes me feel good,” says Brodskaya.

brodskaya 9

brodskaya 10

brodskaya 11

brodskaya 12

“I used to say that I’m ‘drawing with paper’, now I found a way of ‘painting with paper.’ These artworks are all about color and the unique tactile feel that paper strips add to it. The portrait resembles an oil/acrylic painting (especially from the distance,) but with a paper twist…”

Share on Facebook


[ By SA Rogers in Art & Sculpture & Craft. ]

[ WebUrbanist | Archives | Galleries | Privacy | TOS ]


WebUrbanist

 
Comments Off on Painting with Paper: Quilled Portraits Reveal the Expressiveness of Aging

Posted in Creativity


GivePhotos gifts instant portraits to impoverished families

10 Sep

$ (document).ready(function() { SampleGalleryV2({“containerId”:”embeddedSampleGallery_7887944249″,”galleryId”:”7887944249″,”isEmbeddedWidget”:true,”standalone”:false,”selectedImageIndex”:0,”startInCommentsView”:false,”isMobile”:false}) });

For many of us, the phrase ‘family photo’ can stir up memories of long, uncomfortable sessions, being made to wear clothes we didn’t like, sitting with siblings we liked even less. But despite the reputation they’ve gotten for being awkward and sometimes weird, we still kind of love them. And when you think about the fact that a lot of people fleeing a house fire will likely grab their family photos on the way out, it’s fair to say that we count them among our most prized possessions. 

So you can imagine the impact it might have if you’d gone your whole life never having a family photo or portait taken, and suddenly a stranger hands you one. That’s what GivePhotos is all about. Born in Kolkata, Hollywood film editor Bipasha Shom grew up in New Jersey but made many trips back to India to visit family. On these trips she encountered many people living in poverty, and discovered that they often didn’t have photos of themselves or their families. It was a seemingly small thing, but something she had the power to change, and she vowed to do so.

Three Fujifilm Instax wide cameras and 1,000 prints later, she’s met countless strangers, learned their stories and given them a priceless gift. The reaction? Well, a photo’s worth a thousand words, and the smiles in the images above say it all.

Shom’s mission continues and you can help keep it going – check out her page on Generosity.

Learn more at Resource Travel 

Articles: Digital Photography Review (dpreview.com)

 
Comments Off on GivePhotos gifts instant portraits to impoverished families

Posted in Uncategorized


Scratching the Surface: Expressive Portraits Chip Away at City Walls

08 Sep

[ By SA Rogers in Art & Street Art & Graffiti. ]

vhils scratched mural 10

Set in neglected parts of the city, scratched into deteriorating surfaces, expressive portraits loom large, often created with nothing more than a chisel. Alexandre Farto, better known as Vhils, creates art through destruction in a process some might consider vandalism – but this is street art, so what else is new? Vhils first caught the public eye when one of his portraits appeared beside a work by Banksy at London’s Cans Festival in 2008, and since then, he’s been taking his work to the next level.

vhils scratched mural 1

vhils scratched mural 2

The portraits splash the faces of anonymous city residents onto concrete, brick, plaster and other surfaces on buildings and walls throughout the world, particularly in the artist’s home city of Lisbon, Portugal. Nobody else is creating large-scale urban artwork quite like this.

vhils scratched mural 5

The process literally cuts through the outermost layers of wall surface, often utilizing scraps of faded billboards to provide contrast with the rougher surfaces hidden underneath. Sometimes, a little bit of paint is strategically used to highlight the image. Some of the works are even applied on top of much older murals completed way back in the ‘70s and ‘80s after the Carnation Revolution, as if the remains of the older ones are fertilizing new growth.

vhils scratched mural 6

vhils scratched mural 7

“As a kid, I remember seeing how these murals would peel,” says Vhils in an interview with The Atlantic. “I started thinking about how my work could use the layers of the past to reflect the city, to show people living in it and how their identity was lost, or forgotten. I started to paint these billboards white, then carve away the negative spaces. It’s not illegal, because that sort of advertising was illegal already. Carving these walls, peeling away these layers, it’s like contemporary archaeology.”

vhils scratched mural 9

vhils scratched mural 8

Vhils divides the images into three colors to create a three-dimensional effect, scratching out the darkest parts of the portraits and highlighting the lightest. Electric drills and chisels make the process easier on hard walls, and in one extreme example, the artist even used explosives to break away some of the plaster, capturing the process for a music video called M.I.R.I.A.M. Follow Vhils on Instagram to catch his latest works.

Share on Facebook


[ By SA Rogers in Art & Street Art & Graffiti. ]

[ WebUrbanist | Archives | Galleries | Privacy | TOS ]


WebUrbanist

 
Comments Off on Scratching the Surface: Expressive Portraits Chip Away at City Walls

Posted in Creativity


Photographing People: To do Styled Portraits or Not?

25 Aug

When I was a senior in high school, there was one local photographer that nearly everyone went to for their portraits. Part of her process included each person bringing in a bag of clothing to model for her. She would then help select the outfits that would ultimately be worn for the portraits. She also gave specific instructions for hair, makeup, and grooming. Quite often, the photographer hired a makeup artist to be present for the portraits – in effect she was doing styled portraits.

styled portraits two girls

The end result was portraiture that was extremely consistent in style. Even to this day, I can look through my high school yearbook, and pick out exactly whose portraits were taken by that particular photographer. Parents loved her because her output was high-quality, consistent, and you knew exactly what you were getting aesthetically when you booked a session. Essentially, the photographer was offering what has since become known as a “styled session”.

Similar to debating how much (or how little) to post-process images, whether or not to style sessions when photographing people is hotly debated. Let me make one thing very clear – the point of this article is not to take an ultimate stance as to whether or not you should style your own sessions. Rather, this article will discuss circumstances in which it may be beneficial to style sessions, as well as some of the possible disadvantages. Hopefully, this will also start some discussion about what works well for you.

styled portraits newborns

A styled newborn session. I provided the blanket, flowers, and newborn wrap.

Styled Portraits – Definition

In general, a styled session can be defined as being any time the photographer selects the clothing, hair, location/backdrop, and props for a particular session. In other words, the photographer has control and decision making power in all aspects of the session, and controls the end aesthetic look or style of the session.

Pros to Styled Portrait Sessions

  • As the photographer, you have complete control over all the sessions with your name on them.
  • It’s easy to create a signature style or look to your photography.
  • Clients (paid or unpaid) know exactly what to expect when they book a session with you.
styled portraits - A styled child portrait session.

A styled child portrait session. I selected the dress, flower crown, location, and lightly curled her hair.

Circumstances That Lend Well to Styling

In my experience, some types of photography lend themselves to styling more than others. For example, newborn photography is one genre of photography in which the clients often have a desired aesthetic that may be difficult (though not impossible) to capture organically in the client’s home. Many times, newborn photographers have a studio setup with all their blankets, posing bags, and backdrops. If they shoot on location, they often bring blankets, hats, headbands, and various other props to style the sessions to fit their individual style of photography.

styled portraits couples

An image from a styled session with a 1940s theme. I provided the hat, and helped select the makeup and outfits to fit within the theme.

Another instance in which photographers may elect to offer a styled session is when they’re trying to break into a new genre of photography. For example, it’s not uncommon for a photographer looking to break into the wedding business, to hold a styled bridal session in order to create images to use for advertising. The photographer will arrange for various vendors to provide a wedding dress, flowers, a cake, furniture, and other prop items for the purpose of photographing, as if it were an actual wedding. This allows the photographer (and other vendors) a way for their work to be seen via social media and similar venues, before they’ve even booked their first wedding. It’s also a good opportunity to try something new and push yourself in a relatively low-risk scenario.

A third instance in which styling can be appropriate is when you’re trying to create (or recreate) a specific artistic vision. If you’ve been tasked with photographing a 1920s themed engagement session, or one based on a particular book, painting, or movie, then providing a styled session may be the best way to ensure an end product that is consistent with the desired aesthetic.

A senior portrait session that was not styled.

A senior portrait session that was not styled.

Cons to Styling Sessions

On the other hand, going back to the initial example of the senior portrait photographer, the drawback to selecting that one photographer was that the end portraits all looked basically the same, and in some cases, the portraits looked very little like what the person looked like in real life. This anecdote perfectly captures two of the potential drawbacks to offering styled sessions:

  • Sessions can tend to look very similar to one another.
  • Sessions do not always adequately capture the person’s or family’s personality.

Child portrait session that was not styled.

Circumstances That May Not Lend Well to Styling

Although children can be photographed well in any scenario, I prefer not to photograph kids in styled sessions. In my own experience, when I try to style children’s sessions I can become so focused on the outfits, props, and the look of the session, that I can easily overlook capturing the genuine emotion and personality of the child, which is really where my passion lies.

I don’t have this same issue with newborns, engagements, senior portraits, or other types of people photography, but have noticed it particularly when photographing children. As with any genre of photography, there are no absolutes – I’ve seen styled children’s sessions that are unique to each child, and absolutely do capture their personalities, but in my personal practice, I’ve found that my preference is not to style children’s sessions.

style-not-style-8

An newborn photo that was not styled – I used their own blanket, swaddle, and knit rabbit.

When I’m talking with clients prior to a session, if I hear them say the words “candid” or “lifestyle”, it’s a good indicator for me that they probably aren’t interested in a styled session. There’s definitely a range of what people are really asking for when they use those terms in regards of photography, but regardless of where they fall on that particular spectrum, they are probably not looking for images in which every aspect has been carefully curated. This is where knowing your client – whether they’re paid or unpaid – and understanding their needs, is absolutely key to a successful portrait.

Meeting in the Middle

Most often I find that clients really want something in between a styled session and photojournalism. These clients want me to capture the best version of themselves and their lives, which requires a bit of guidance, but not necessarily styling.

They may need some guidance regarding what to wear, but they don’t want or need me to select their outfit for them. They may need me to suggest moving a group of bottles and pacifiers visible on the coffee table during a newborn session, but they don’t need or want me to bring a box of books and succulents to completely stage their home. There’s a balance between the two ends of the spectrum that seems to meet the needs of most of my clients, while also allowing me to have some creative control as the photographer.

styled portraits

For this session, we talked about having each girl wear a white dress and a flower crown, but their moms ultimately selected both the dresses and the crowns. This is an example of “meet in the middle” styling.

Just like any area of photography, there’s a range of beliefs and practices in regards to styling sessions. Some photographers elect to exclusively style sessions, because it gives them the most control over the final image. Other photographers prefer to take more of a photojournalism approach and capture their clients exactly as they show up. Still others land somewhere in the middle.

What about you? Do you offer styled sessions, a photojournalism approach, or are you somewhere in between? What works well for you? Please share your thoughts in the comments below.

googletag.cmd.push(function() {
tablet_slots.push( googletag.defineSlot( “/1005424/_dPSv4_tab-all-article-bottom_(300×250)”, [300, 250], “pb-ad-78623” ).addService( googletag.pubads() ) ); } );

googletag.cmd.push(function() {
mobile_slots.push( googletag.defineSlot( “/1005424/_dPSv4_mob-all-article-bottom_(300×250)”, [300, 250], “pb-ad-78158” ).addService( googletag.pubads() ) ); } );

The post Photographing People: To do Styled Portraits or Not? by Meredith Clark appeared first on Digital Photography School.


Digital Photography School

 
Comments Off on Photographing People: To do Styled Portraits or Not?

Posted in Photography


How to Tell a Story with Portraits by Using Creative Composition

21 Aug

In this article, we will explore new ways of using composition and creative framing to tell a story in your portraits. We’ll do so by understanding the marvellous ways our brain (as viewers) construct a sense of story.

The common principle of the techniques I will describe here, is that they are all based on our mind’s ability to fill in missing gaps of information. A skill that helps us survive in a world of uncertainty.

F11A2018

Two things to note about creativity before we start

Skill, is not just a talent: Just like working on the flexibility of a muscle, I believe we can work on our creativity, with the “muscle” being our vision.

Being creative for the purpose of being creative: Creative compositions should be a vehicle for a purpose – an emotion or a story you want to evoke in the image. If you choose to add creativity to your images, just to be more creative, it will be an empty gimmick.

Half close up portrait – a full story

By showing only half of a close-up portrait, you stimulate the viewer’s mind and almost force it to delve into the image. We do so by activating their mind’s need to fill in gaps of missing information. This ability is rooted in us since ancient times, from which we evolved to understand that the two blurry spots between the trees, could be the hidden face of a tiger.

F11A6628

Good to know:

For best results, you can practice framing this kind of composition by using the crop tool in your editing software. Once you become comfortable with this technique (and framing); it will be easier to achieve a “half close-up portrait” in the field, without the need to crop it in the post-processing stage.

This kind of framing is like an exclamation mark, which one cannot ignore. Therefore, use it only on the most interesting faces, and not on every portrait.

F11A8534

Environmental portrait – a person in context

For me, this the most challenging and rewarding portrait framing style, the environmental portrait. This shows not only the person, which is the hero of your image, but also his or her environment: home, work place, country, etc. By doing so, you use the mind’s ability to conclude and understand a situation by connecting pieces of information.

14 the sleep

Good to know:

The biggest challenge in this type of composition is the balance between the main figure (hero) and environment. Keep in mind that the main figure must be dominant, and not overtaken by the background. Use light, color, and sharpness to make your subject significant.

Using a wide lens (below 50mm) is recommended for the environmental portrait framing, as it will allow you to capture the environment of your hero, even in small spaces.

F11A4931

Detail portrait – telling the story with small details

Like with the half portrait technique, in the detail framing we use the brain’s ability to fill in the gaps, by showing only a small fraction of the entire story. For a good detail shot, choose some with a connection to your subject. It can be a connection of similarity or difference. For example: take a close-up shot of his or her hands, shoes, the reading books on the shelf, the subject’s regular chair or smoking pipe, you name it! As long as this object, represent something which is bigger than the object itself.

12970960 1147522381976706 3379301587067512747 o

Good to know:

A good place to start is by examining your subject from head To toe. Looking for anything that other people might miss in that person. Did you spot anything special? Like a unique piece jewelry, a tattoo, or just a hole in their shoe.

Some of my best ideas came from my subjects. Ask your subject to show you an object to which he or she feel a strong connection. You do not even need to have any human presence in the detail shot, as long as the object represents or tell us something about its owner.

IMG 4005

Kuleshov effect – creating a meaning by interaction

In this technique, based on the groundbreaking experiment by the Soviet filmmaker Lev Kuleshov, we will use the brain’s ability to derive meaning from the interaction. Kuleshov demonstrated that the audience constructs the story not only by the content, but also by the order in which the images appear, and the connection between them.

In the experiment, Kuleshov used two different shots, which he put in sequence one after the other. The first shot, a close-up shot of the face of silent film actor Ivan Ilyich Mozzhukhin, remained the same throughout the experiment, while the second shot was replaced with every round of projection; a plate of soup, a dead young girl, a woman on a divan (sofa).

The audience praised the actor’s ability to express different feelings such as sadness and even hunger, using only his facial expressions, without knowing that they watched the same shot over and over, and the only thing that was changed was the second image.

Page 18

To use this effect in your work, just place two images side by side and try to evoke a connection between them. In the example, I combined between the portrait of Net, which I did with the half close-up composition, with an image of a swirling sea. Where does it take you?

Good to know:

You will be amazed by the power of creative composition. Challenge your audience. Don’t be afraid to create a connection which is too complicated to understand.

A good creative exercise which you can do is by collaborating with a different photographer. You will provide the first image, he or she will provide the second. In there you will have a connection, not only between the two side-by-side images but by two different points of view.

The author would like to thank Nicholas Orloff for his assistant in writing this article.

googletag.cmd.push(function() {
tablet_slots.push( googletag.defineSlot( “/1005424/_dPSv4_tab-all-article-bottom_(300×250)”, [300, 250], “pb-ad-78623” ).addService( googletag.pubads() ) ); } );

googletag.cmd.push(function() {
mobile_slots.push( googletag.defineSlot( “/1005424/_dPSv4_mob-all-article-bottom_(300×250)”, [300, 250], “pb-ad-78158” ).addService( googletag.pubads() ) ); } );

The post How to Tell a Story with Portraits by Using Creative Composition by Oded Wagenstein appeared first on Digital Photography School.


Digital Photography School

 
Comments Off on How to Tell a Story with Portraits by Using Creative Composition

Posted in Photography


How to Find Great Backgrounds for Outdoor Portraits

11 Aug

Outdoor portrait photography involves going outside, and utilizing the beauty (or the ugliness) of your surroundings. You probably already know some local beauty spots, and can think of some good places to take portraits right away. But once you start observing your local area with the aim of making portraits in mind, you will begin to see the potential, even in mundane locations. But how do you find great backgrounds for outdoor portraits?

Portrait taken outdoors

Here are some ideas to get you started.

1. What lens are you going to use?

This is important because, broadly speaking, there are two different ways to take portraits. Both involve the use of different types of lenses.

The first is to to use a wide-angle lens to take an environmental portrait. This may be documentary in approach, or it may be more fashion or beauty orientated. Either way, the idea is that you use a wide-angle lens to take a portrait, and that the setting is as important as the model.

The second is to use a longer focal length, and shoot with a wide aperture to throw the background out of focus. In this situation the requirements for the background are different, because you are looking for something that looks good out of focus. Also, because longer lenses have a narrower angle of view, you are using less of the setting in your portrait.

Of course, it is more than likely that you can find opportunities to take both types of portraits, in the same setting. You may also make up your mind, once you have scouted a location and assessed its potential. But it helps immensely if you know what your approach to the shoot will be, while searching for a spot to shoot.

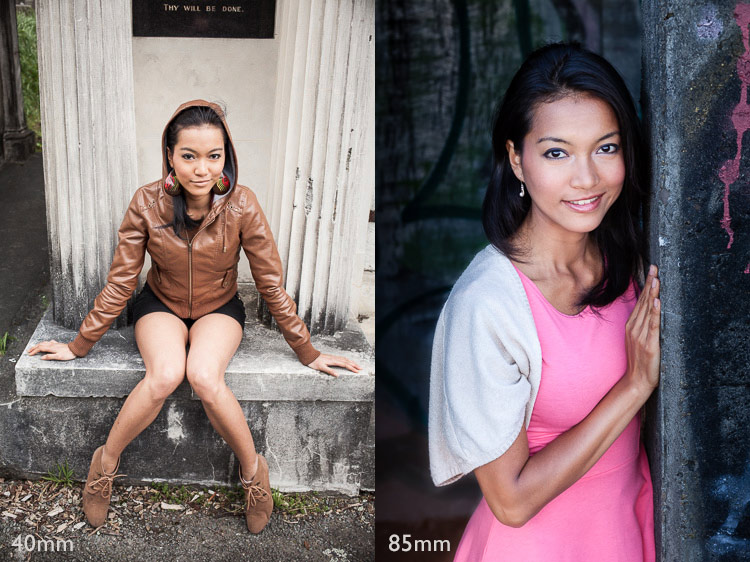
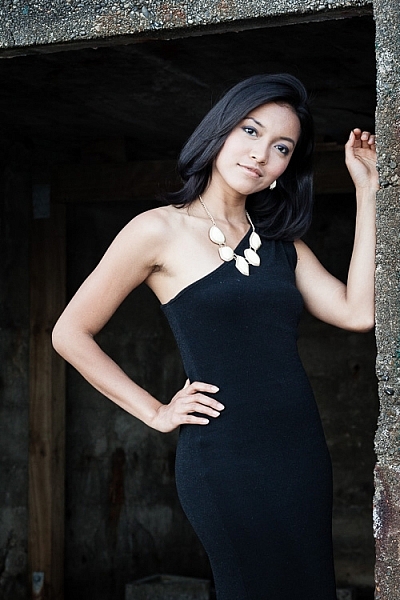
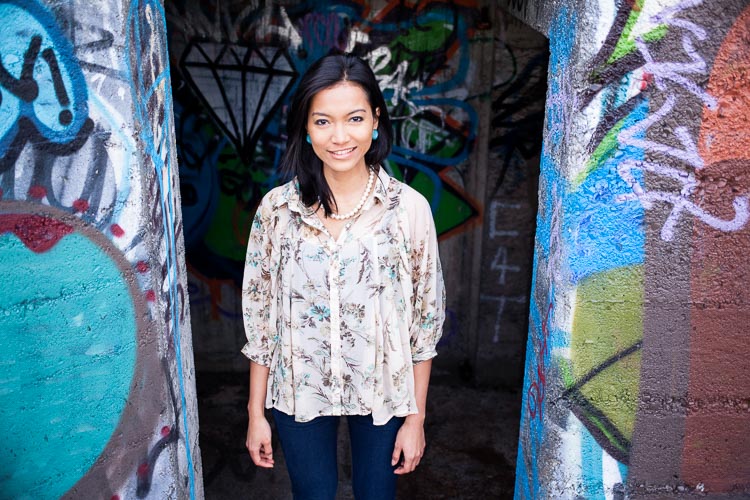
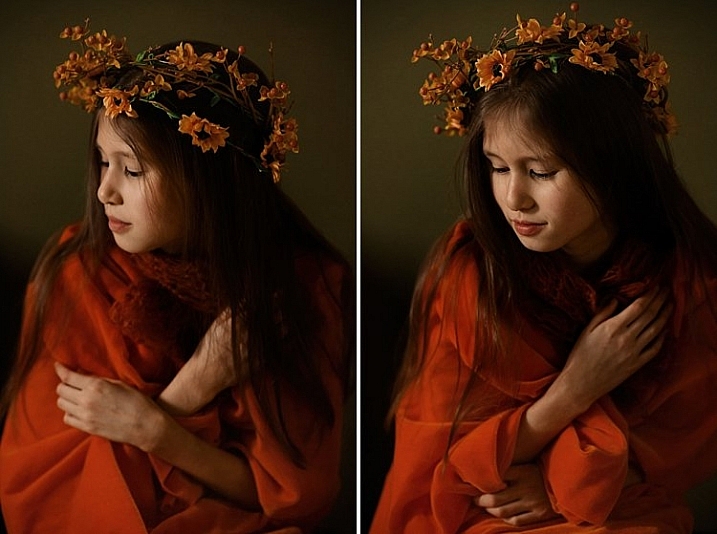
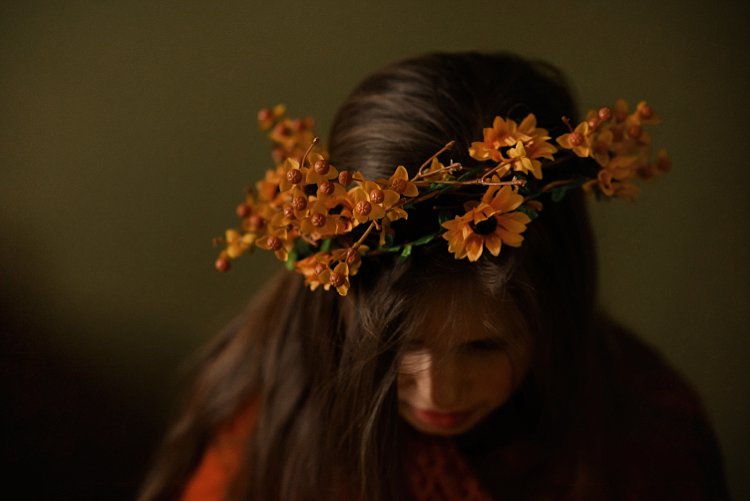
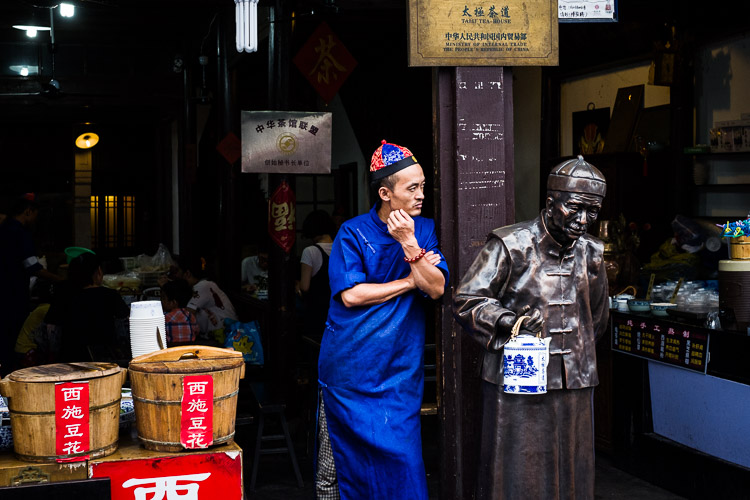
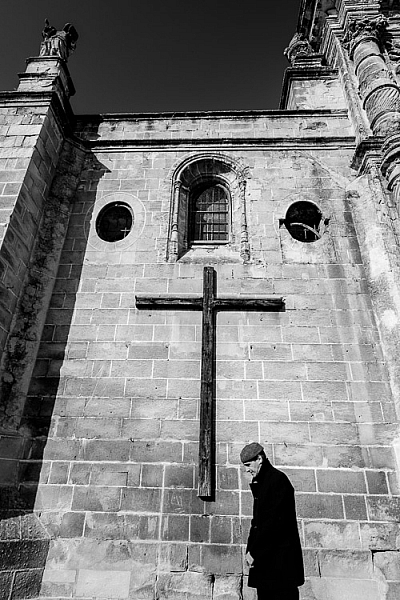
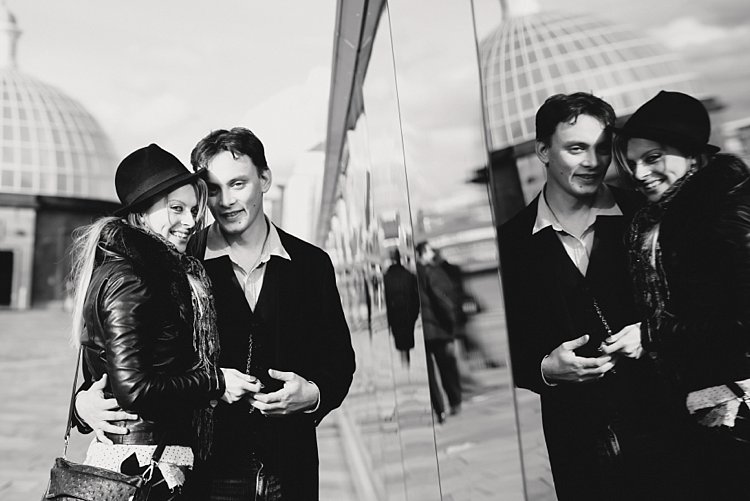
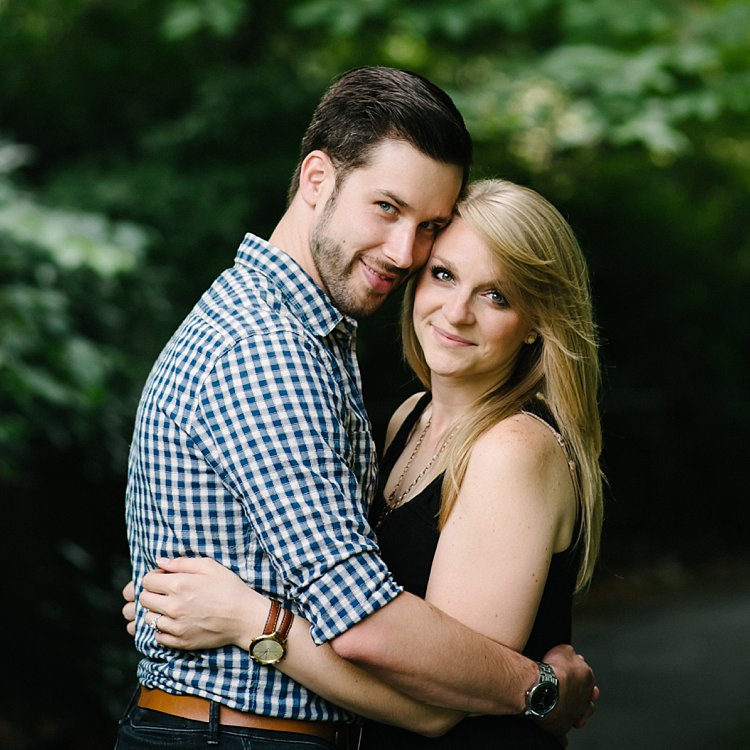
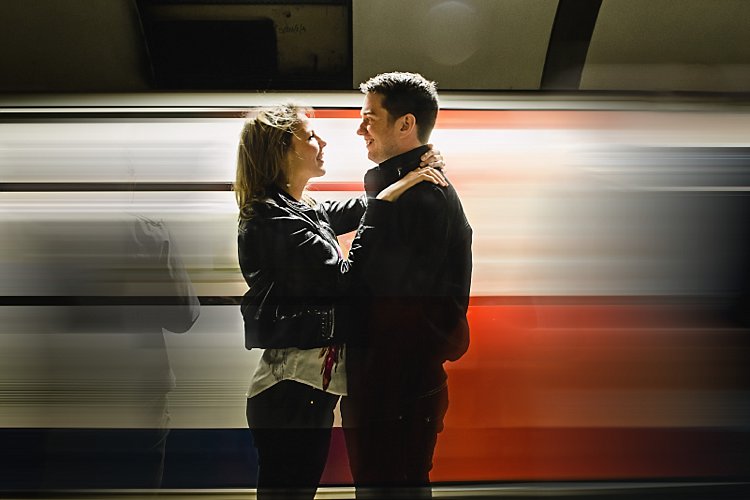
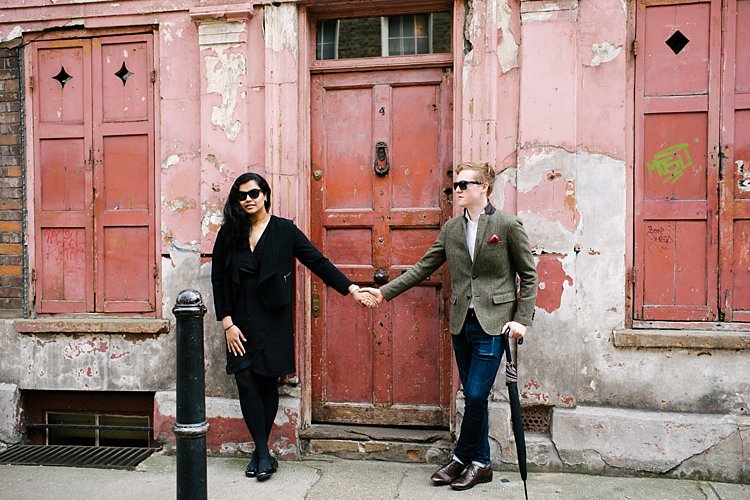
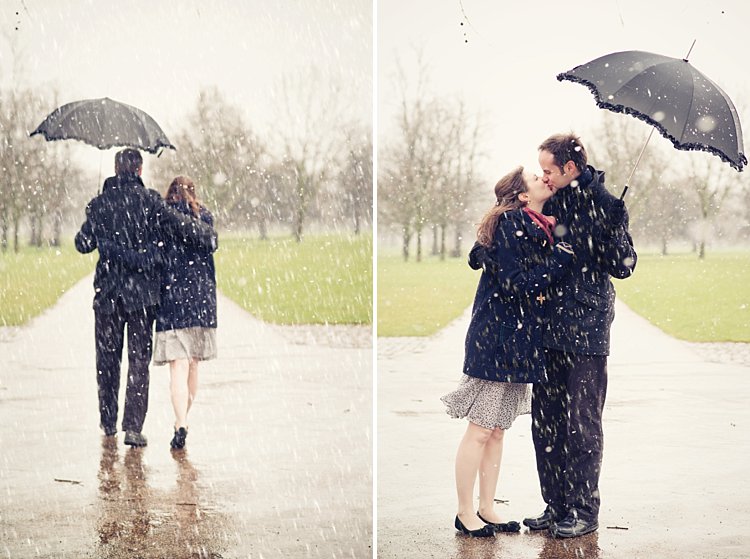
These two portraits show the differences in the two approaches. The first was taken with a 40mm lens (on a full-frame camera), and shows the setting as well as the model. The second was taken with an 85mm lens (also on a full-frame camera) and shows much less of the setting.

Portraits taken outdoors

2. Where does the light fall?

Some photographers tend to shoot portraits entirely in natural light; others use flash to supplement it. Whichever approach you take, it is still important to assess the quality of the light in your given location.

Take into account the time of day you plan to do the shoot. To take full advantage of natural light you should aim to shoot in late afternoon or evening, during the golden hour, when the sun is close to the horizon. For this reason it helps if you do your scouting at the same time of day, so you can see how the location looks in this beautiful light.

Another option is to take photos on a bright sunny day, but in the shade. The light bounces off nearby surfaces, which acts as a giant reflector. This is another type of natural light with beautiful qualities.

Alternatively, you might like to shoot on a cloudy day. This means that time of day is not so important, but it does mean that the light is most likely to come from above, and may create shadows under your model’s eyes and chin. In this situation you can use a reflector or fill-flash to minimize shadows. So think about whether there is room to set up a light-stand (if using flash) or for somebody to stand and hold a reflector (if using natural light).

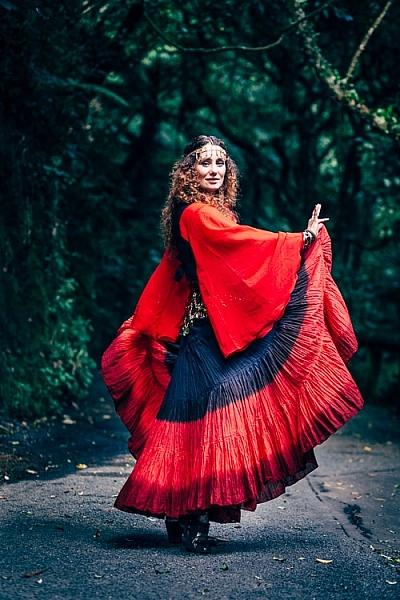
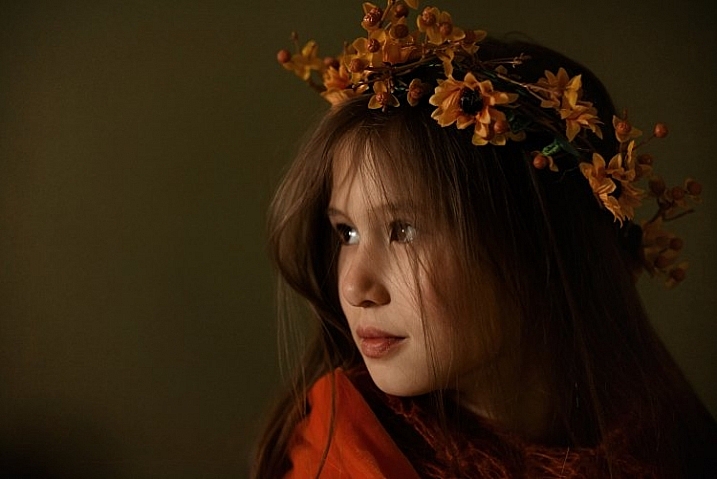
This photo was taken in Wellington Botanical Gardens, and the model is illuminated by light coming from above, through the tree tops. As she is in costume, I thought the direction of the light was reminiscent of a spotlight on a stage, and appropriate to the style of portrait. I used a short telephoto lens (85mm, full-frame camera) to separate the model from the background.

Portrait taken outdoors

3. Use a smartphone to take photos

You can use a smartphone to take photos of locations to help you remember what they look like. Of course, you can do this with any camera, but the advantage of a smartphone is that most of them have GPS, and this helps you remember, and find, the exact location again later. This could be important if you are out in the countryside somewhere. There is nothing more frustrating than finding a great place to take some portraits, then not being able to remember where it is.

You could also import the photos into a specific Collection in Lightroom, and go to the Maps module to see the locations displayed on a map.

Here are some types of location you can search for. Remember, it’s important to think about what type of lens you are going to use for your portraits, as well as to assess the quality of light.

Backgrounds by the coast

Any location by the sea is full of potential. The same place can look very different every day, thanks to changing tides, weather patterns, and light. If the coastline is rugged, look for locations where you can use the rocks and cliffs as a background. Each bay or beach has its own character, so get out and explore. You are likely to find a good variety of beautiful locations, even in a relatively small area.

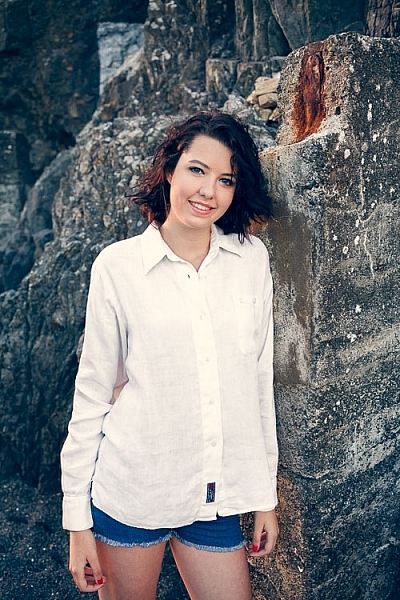
This photo was taken on a local beach, which has become one of my favorite locations for taking portraits, using a 40mm lens on a full-frame camera. This lens has a slightly wider angle of view than a 50mm standard lens, and allowed me to include a little of the beautiful location, but still make the model the focal point of the photo.

Portrait taken outdoors

Graffiti backgrounds

It may be bit of a cliche, but there’s no doubt that graffiti or street art, can make an interesting and colorful background.

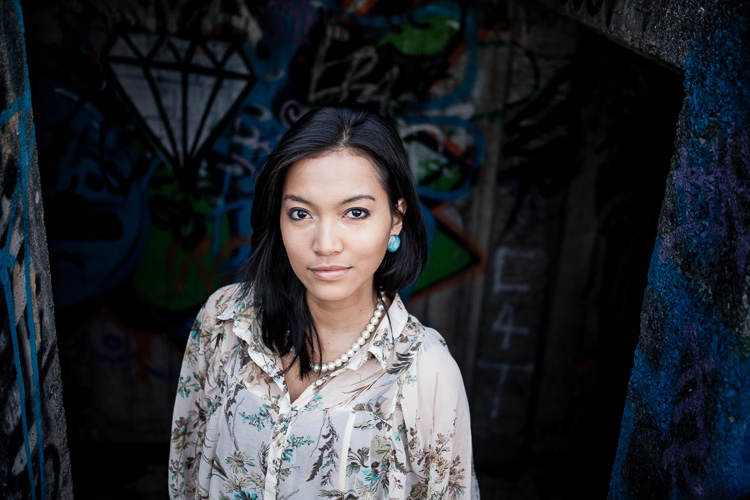
This photo was taken on a local beach with a graffiti covered, concrete bunker in the background. I used an 85mm lens (on a full-frame camera) to include just a little of the artwork in the frame.

Portrait taken outdoors

Field and forest backgrounds

Fields and woodlands often make good locations for taking portraits, especially in the spring and summer. Fields of flowers are gorgeous locations. Try using a telephoto lens, and shooting through the flowers so they are out of focus.

The light in a forest is usually most suitable for portraits on a cloudy day. The light is soft, and unlike on a sunny day, your camera can easily cope with the brightness range. The one thing to watch out for is the direction of light. It comes from above, through the trees, and is highly directional. You will have to search for the places where gaps in the trees let light through. You may have to use a reflector to fill in the shadows created by the top light, or ask your model to tilt her face toward the light.

On sunny days, try shooting at the end of the day, when the light is softer, and use backlighting.

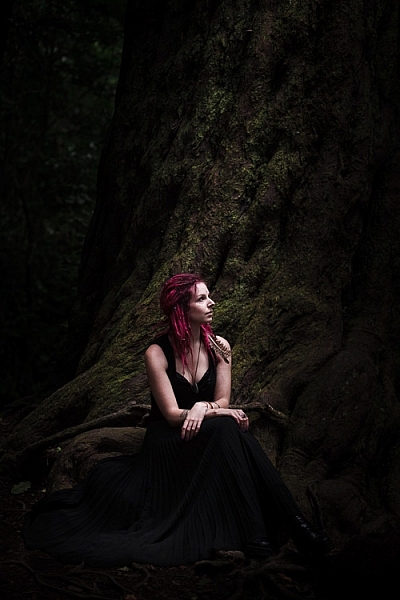
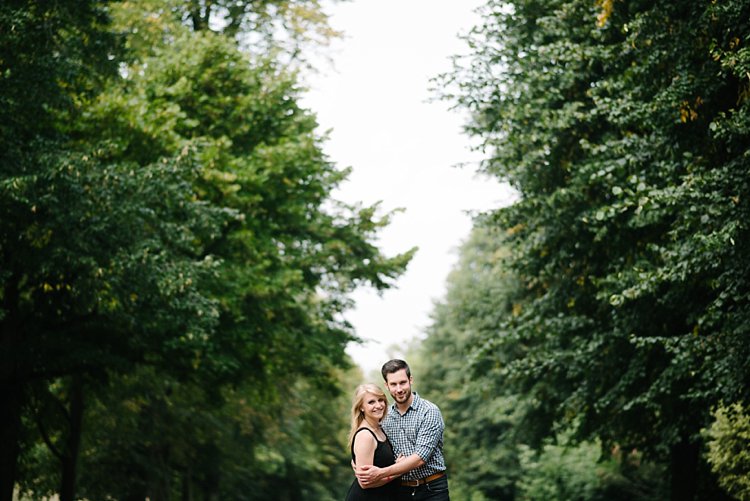
This portrait was taken on a cloudy day, in a thick forest where not much light penetrated through the trees. We found a clearing next to a large tree that we were able to use as a background. I used an 85mm lens (full-frame camera) to pull the tree in close to the model, and exclude most of the forest from the frame.

Portrait taken outdoors

Local buildings for backgrounds

Keep an eye out for local buildings with public access that you can use for photos. I’m not talking about busy locations, as they are difficult places to work, unless both you and your model are very experienced. Let me give you some examples.

Here’s an abandoned boat shed on a lonely beach. 

outdoor-portrait-locations-12

Test shot

outdoor-portrait-locations-13

This is the portrait we made at that location.

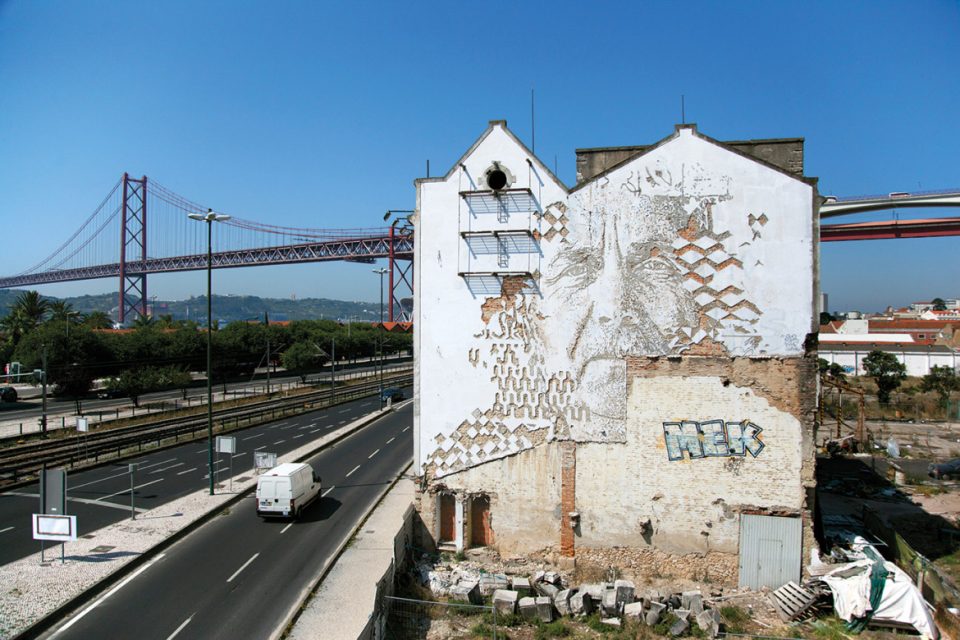
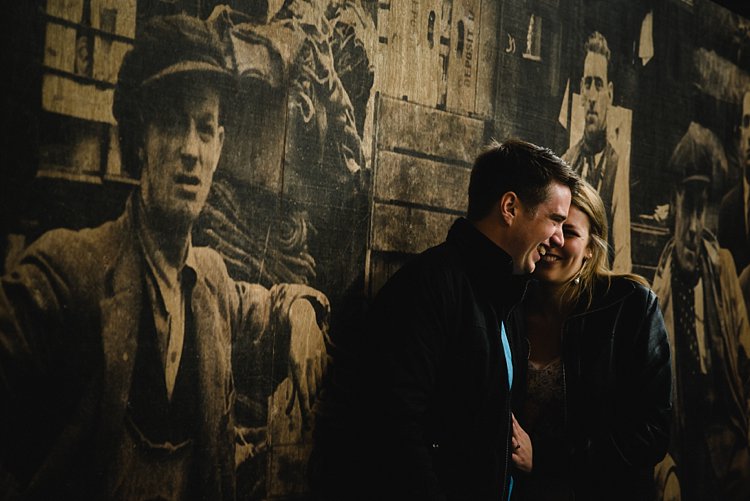
The second example is a graffiti covered concrete bunker left over from WWII.

Test shot.

Test shot.

Here’s a portrait we made there.

Here’s a portrait we made there.

In both examples I used a small part of the building as a background. You can see the same technique in the other photos in this article. The idea is to make sure the background complements the model in your portraits, and doesn’t overwhelm her.

Summary

The outdoors is a bit like a giant stage set, just waiting for you and your model to use. Wherever you live, I am sure that there are plenty of great locations for portrait photography nearby. It’s just a matter of learning to spot their potential, and thinking about which lens (or lenses) you will use for your portraits. 

Share some of your images from your favorite spots in the comments below.


Mastering Lenses

If you want to know more about buying and using lenses then please check out my ebook Mastering Lenses: A Photographer’s Guide to Creating Beautiful Photos With Any Lens.

googletag.cmd.push(function() {
tablet_slots.push( googletag.defineSlot( “/1005424/_dPSv4_tab-all-article-bottom_(300×250)”, [300, 250], “pb-ad-78623” ).addService( googletag.pubads() ) ); } );

googletag.cmd.push(function() {
mobile_slots.push( googletag.defineSlot( “/1005424/_dPSv4_mob-all-article-bottom_(300×250)”, [300, 250], “pb-ad-78158” ).addService( googletag.pubads() ) ); } );

The post How to Find Great Backgrounds for Outdoor Portraits by Andrew S. Gibson appeared first on Digital Photography School.


Digital Photography School

 
Comments Off on How to Find Great Backgrounds for Outdoor Portraits

Posted in Photography


How to Use Two LED Lights to Achieve Moody Portraits

02 Aug

Any kind of light is a must for photography. You just cannot photograph without light. There are various types of light that no doubt you are familiar with:

  • Natural light from the sun
  • Ambient light (could be natural or manmade)
  • Artificial light such as strobes, incandescent or tungsten, fluorescent, flash and LED lights
  • Infrared light

achieving-moody-portrait-2-LEDs-tips

This article will give you tips for using two LED lights to achieve moody portraits.

Tip #1 – Modify your light

The best light is always modified. Even sunlight is better with a diffuser. Direct sunlight produces hard shadows and harsh light. Clouds soften and diffuse sunlight (by making it spread over a larger area). On a bright cloudless day, shooting in open shade minimizes the harshness, but still takes advantage of the beautiful natural light. Shooting in shadows, located next to reflective surfaces, also leverages any bounced natural light. These techniques are simply modifiers of natural and available light.

Modifiers are more obvious for artificial light. There is a plethora of choice when it comes to these: soft boxes, diffusers, reflectors, foam cores panels, umbrellas, flags to name a few.

The same is true for LEDs when it comes to the need for modifiers. There are many types of LED lights, including ones that you can adjust their brightness as well as colour temperature. But, just like the above, regardless of brightness intensity of the continuous light, it is essential to modify LEDs to get soft, pleasing, beautiful light -overall a better quality of light.

I’m going to show you a setup using modified LEDs to create moody portraits.

achieving-moody-portrait-2-LEDs-tips

Using a window to camera left and an LED, bounced into a diffusion panel, to the right.


The main light I used here is the Magic Tube, the cheaper alternative to Westcott Ice Light. You can adjust the brightness of the light, and it comes with a tungsten gel if you need it. Apart from looking lightsaber Star Wars cool, the Magic Tube also comes with a charger that allows continuous charging while it is being used. So you can always have access to power by just plugging it in if the battery charge runs out.

You can also use window light and just one LED for this setup. Substitute the main light with your window light, but make sure you are diffusing the light coming from a window with a sheer voile, or fabric to soften it.

To diffuse the main light, I covered it with the Rogue Bender diffuser for the strip light. This is just a piece of rectangular translucent material which simply covers the light.

Tip #2 – Position your lights for contrast

Position the main light at 45 degrees to the subject, up high to emulate light coming from a tall window. Use a diffusion panel or a piece of sheer fabric. The less opaque the fabric, the more diffuse your light will be. To further modify the Magic Tube after I have attached the Rogue Bender diffuser, I also used the diffusion (translucent part) panel of a 5-in-1 reflector and had an assistant hold the panel in front of the main light. Having these two diffusers together reduces the strength of the light, but also greatly softens its quality.

achieving-moody-portrait-2-LEDs-tips

The second light is also an LED, this time a small video light positioned to camera right, at 45 degrees, but at the same height as the subject. However, instead of using a diffuser to modify this light, you can turn it around so the light faces away from the subject, and put a reflector in place to bounce the light on. The subject (filling in the shadows) gets illuminated by the soft bounced light from the reflector.

achieving-moody-portrait-2-LEDs-tips

For a moody look it is essential to have both light and shadow in the portrait. You need to watch where the main light falls, and the shadow it’s creating. You want the shadowed area to still have some detail, instead of being completely black. The bounced light from the reflector takes care of this.

Tip #3 – Use a dark background

I tried the exact same setup, although the lights were positioned the opposite way, with the main light on camera right. This setup had a lighter background, in this case lightly patterned, and the results were far from moody. I did not want to shoot at a smaller aperture as I wanted to blur the pattern of the wallpaper in the background. I also wanted to emulate sunlight shining through a window illuminating a dark room, and this setup just did not work to achieve that look.

I’m sure if I had gridded the main LED to avoid spill into the light background, while increasing my shutter speed, the background would have gone darker, but I would have lost the soft and atmospheric look I was after. Compare this photo below to the one underneath it, and it’s pretty obvious the darker background is most definitely better at achieving the moody look.

tutorial-using-2-led-lights-for-portraits-photography

achieving-moody-portrait-2-LEDs-tips

I hope this article gave you new ideas to try. Do share other tips you have to achieve moody portraits!

googletag.cmd.push(function() {
tablet_slots.push( googletag.defineSlot( “/1005424/_dPSv4_tab-all-article-bottom_(300×250)”, [300, 250], “pb-ad-78623” ).addService( googletag.pubads() ) ); } );

googletag.cmd.push(function() {
mobile_slots.push( googletag.defineSlot( “/1005424/_dPSv4_mob-all-article-bottom_(300×250)”, [300, 250], “pb-ad-78158” ).addService( googletag.pubads() ) ); } );

The post How to Use Two LED Lights to Achieve Moody Portraits by Lily Sawyer appeared first on Digital Photography School.


Digital Photography School

 
Comments Off on How to Use Two LED Lights to Achieve Moody Portraits

Posted in Photography


Tips for Taking Candid Portraits of People

28 Jul

Get Andrew’s ebook The Candid Portrait at 43% off, now over at Snapndeals, for a limited time only (August 9, 2016 AUS time).

A candid portrait is often defined as one which you take without the subject being aware that you have done so. The idea is to capture a natural moment, that shows the person’s character or something interesting about them.

A candid portrait

Wedding and portrait photographers often strive to capture candid portraits, so do street photographers. It is the latter form of candid portrait photography that I will concentrate on in this article.

I prefer to take candid portraits when I am travelling, it is rare that I do so at home. There is something about the excitement of travelling and seeing a new place with fresh eyes, that makes me want to take photos that capture life in the streets.

The question is, how do you take photos of other people safely when you are travelling, and how do you create evocative images that capture the spirit of that place? Good photos aren’t taken, they are made by the photographer. The following tips will help you create candid portraits.

All the photos in this article were taken while I was traveling, but you’ll find the principles hold true when you are working close to home as well.

1 – Think about your equipment

Part of the craft of photography is selecting the most appropriate tool for the job. There are two approaches you can take here. One is to use a telephoto lens and take photos from distance. You are unlikely to be spotted by your subject, especially if you are quick, but your photos may also have a lack of involvement in the scene as they are taken from some distance away. Having said that, you can use a telephoto lens to create a cinematic look that pulls the background in closer to the subject, or throw it out of focus.

A candid portrait

I took this photo with a 50-150mm Sigma lens. It’s an enormous lens that I no longer own, but it enabled me to take photos like this from a distance, without being noticed.

The second approach is to use a small camera with a small lens, and get in much closer to the action. The idea here is that the small camera gives you the perception that you are less intimidating, than somebody using a large digital SLR and lens setup. You are much more likely to be able to take photos without being noticed, or to be ignored if you are.

A candid portrait

I used a small 35mm lens on a Fujifilm camera to take this photo. The smaller size of this gear lets me get much closer to people than I ever could with the Sigma 50-150mm lens.

The ideal small camera could be a small digital SLR (such as the Canon EOS 100D), a mirrorless camera (such as the Fujifilm X-T1, my personal favorite), a compact camera (like the Ricoh GR II) or a smartphone.

If you are using an interchangeable lens camera, then a prime lens may be a good choice. Primes are usually smaller than zooms, and the wide apertures come in handy in low light.

2 – Slow down and explore

Become an observer of life. Go somewhere interesting and just watch what happens. Every city and town have their own rhythms. The tide of people ebbs and flows as the hours pass by. Where are the most interesting parts of the city? The most picturesque? Where is life lived on the streets?

What are the unique aspects of that city? A photo of somebody taken in front of a shop could be created almost anywhere, but a photo taken with a well known landmark or typical building in the background (such as the Eiffel Tower in Paris, or the Forbidden City in Beijing) has the potential to be much more evocative.

The key is to relax, take things slowly, and enjoy yourself. A small camera helps because it is easier to carry around all day than a large system.

A candid portrait

This photo could only have been taken in Beijing. The ancient buildings in the background are unique to this city.

3 – Enjoy the process

Don’t put too much pressure on yourself. An empty memory card can be as terrifying for a photographer as a blank piece of paper (or empty computer screen) is for a writer.

One way to get started is to take a photo of anything remotely interesting. It doesn’t really matter what it is, but I find that taking the first photo gets my creativity going and puts me in the right frame of mind to start seeing other images. Remember that you are there to enjoy the day, the sights, and the process of exploration and meeting new people, as well as photography.

4 – Don’t be afraid to talk to people

Talk to people, not necessarily only the people that you want to photograph, but anybody, particularly in shops, markets or working in cafes, who may be open to a conversation. You may have to forget about this option if you don’t speak the language. But don’t let that stop you from using non-verbal communication. Smile, and be open and friendly.

Talking to people lets you get to know the area, and the people who live there. Afterwards, you may be able to ask the person you spoke to if you can take a photo of them, or if there is anywhere that is a good place to take photos. Local people often like to make recommendations, especially if they are proud of their city.

If you can’t speak the language don’t let that put you off even rudimentary attempts at communication. Last year in China, I came across a group of men playing a game of Xiangqi (Chinese chess). I stopped to watch, and held up my camera with a questioning look. One of them nodded to say yes, and I took a few photos before saying thank you and moving on. This is my favorite photo from the set.

A candid portrait

5 – Use a wide-angle lens

The beauty of wide-angle lenses is that you can get in close and photograph somebody, without them even being aware that you are doing so. How? Simply place them at the edge of the frame, or on one of the thirds. The camera will point away from them and they may not even be aware that they are being photographed.

As long as you don’t look at them or make eye contact they will think you are photographing whatever is behind them. This works best when there is something interesting there that a tourist would naturally take a photo of.

A candid portrait

I was taking a photo of the church when I noticed the man was about to walk in front of me. The wide-angle focal length (14mm, APS-C camera) meant that he became part of the photo without realizing it.

6 – Find a rich environment

Sometimes all you have to do is find an interesting location, and observe how the local people behave as they pass through. While in Beijing last year, I became fascinated at the different ways that the local people interacted with the city’s historical buildings. All I had to do was wait, observe, and take photos of interesting moments.

A candid portrait

While visiting Prince Gong’s mansion, a historical building in Beijing, I noticed that people like to walk by these Tibetan style prayer wheels. I stayed there for a while and took photos as people passed by. The incongruous message on the woman’s bag adds a little extra to this photo.

7 – Go when the light is beautiful

Beautiful light is key to creating evocative portraits that capture the spirit and atmosphere of a place. You’ll increase your chances of creating beautiful images exponentially by going out when the light is beautiful. That means getting out at the end of the day during the golden hour. There is also lots of potential during dusk, especially with the mix of artificial and natural light that you find in urban environments.

A candid portrait

The orange light cast by tungsten light bulbs adds atmosphere to this photo taken in Xi’an, China.

Can you think of any other tips for taking candid portraits of people in the street? Please let us know in the comments, I’d like to hear your thoughts.

Get Andrew’s ebook The Candid Portrait at 43% off, now over at Snapndeals, for a limited time only (August 9, 2016 AUS time).

googletag.cmd.push(function() {
tablet_slots.push( googletag.defineSlot( “/1005424/_dPSv4_tab-all-article-bottom_(300×250)”, [300, 250], “pb-ad-78623” ).addService( googletag.pubads() ) ); } );

googletag.cmd.push(function() {
mobile_slots.push( googletag.defineSlot( “/1005424/_dPSv4_mob-all-article-bottom_(300×250)”, [300, 250], “pb-ad-78158” ).addService( googletag.pubads() ) ); } );

The post Tips for Taking Candid Portraits of People by Andrew S. Gibson appeared first on Digital Photography School.


Digital Photography School

 
Comments Off on Tips for Taking Candid Portraits of People

Posted in Photography


Stylized Techniques for Editing Portraits Using Lightroom

25 Jul

This is the promised follow-up to my article on Creating Compelling Wide-Angle Portraits Using One Off-Camera Flash. While part one discussed equipment, composition, lighting and posing, this article focuses exclusively on post-processing.

1 Romanian Woman

Let me start by stating the obvious. Everyone has their own unique preferences regarding post-processing. Just read the comments below a posted image that is somewhat heavy on processing and you will see the variety of opinions out there. Personally, I like creating portraits that look somewhat surreal. I achieve some of this look by lens choice and composition and the rest in Adobe Lightroom and Photoshop.

2 Malawian Guy

Rather than go through my entire workflow, I’ll focus on five steps in Lightroom that form the foundation for my portrait processing. If you also like portraits that look a bit surreal, my hope is that you will learn a technique or two here that you find helpful.

This article assumes that you already have some familiarity with the menus and tools in Adobe Lightroom or Bridge.

3 Chinese Guy Hat

Let’s look at the work I did in Lightroom for the above portrait, shot in rural China. First, here is the image right out of camera.

4 Out Of Camera

Step 1. Move the contrast to the mid-tones

One of the first steps was to reduce the overall contrast in the image using the Highlights, Shadows, Whites and Blacks sliders. The image is fairly contrasty, but weighted more towards dark tones. I moved the Highlights and Whites sliders left (only a minor adjustment to Whites) to reduce some of the highlights (bright areas) in the background. I then moved the Shadows and Blacks sliders right (only a minor adjustment to Blacks) to make sure detail can be seen throughout the image, even in the gentleman’s hat.

These initial adjustments gave the image a flat (non-contrasty) look as a starting point. This was intentional, as I planned on building contrast back into the image.

Notice in the image below that the light area in the background is somewhat less distracting, and that there is more visible detail in the background shadows.

5 Global Luminosity

While I removed some contrast at the outer ends of the spectrum, I then added contrast into the midtones by pushing up the Clarity slider. This varies by image, but in this case I moved it to +60 in Lightroom, in order to accentuate facial features. The Clarity slider focuses on the mid-tones while mostly leaving the luminosity of the brighter and darker areas of the image as is. Here are the results:

6 Clarity

Step 2. Reduce saturation globally

For my portraits, I always make an initial global reduction (applies to the entire image) to Saturation and Vibrance. In this case, I reduced Saturation to -10, and Vibrance to -5. The shirt is still too blue in my opinion, but I’ll target that in the next step.

7 Reduce Saturation

Step 3. Make local adjustments using the Adjustment Brush

Using the Adjustment Brush, I made changes to luminosity, saturation and sharpness in targeted parts of the image:

Adjustments to Luminosity – Your eyes usually gravitate towards the brightest areas of an image. So, I used the Adjustment Brush to draw more attention to the subject, especially his face, and less attention to other areas.

I started by brushing over brighter areas that were competing with his face, and darkening them slightly using the local Exposure and Highlights sliders. I also brushed over some darker areas that were missing detail, and pulled the local Shadows slider up slightly. Lastly, I added some overall brightness to the face and a little more to the eyes.

Adjustments to Saturation – I used the Adjustment Brush and local Saturation slider to further desaturate the man’s t-shirt. In this case, I also darkened it, while de-saturating.

Adjustments to Sharpness – I added a bit of additional sharpness to the eyes, eyebrows, and hair using the Adjustment Brush with the local Sharpness slider.

After these local adjustments, here is the image at its next stage:

8 Local Adjustments

Step 4. Create a vignette using the Gradient Tool

In photography, when someone speaks of a vignette, they are usually referring to the darkening of the outer areas of the image, relative to the center of the image. The standard vignette darkens the outer edges equally, usually in an oval shape. However, using several gradients allows you to control the direction, size and strength of the vignette on each side independently.

I clicked on Lightroom’s Gradient Tool, then clicked and dragged from outside the image towards the center, overlapping the subject slightly. Then, I pulled the local Exposure slider down, until I created a subtle edge vignette. I then added a gradient from the opposite side, and a very subtle one from the bottom. Conversely, if the edge of your image is darker than you’d like, you can also increase exposure with the gradient.

Here is the image after adding a subtle gradient vignette:

9 Vignette

Step 5. Create a virtual copy of the RAW file for the background

To add more dimension to this image, I used a different processing treatment between subject and background. I created a virtual copy of the file in Lightroom (Photo > Create Virtual Copy, or use the keyboard shortcut CMD/TRL+’) and named it “Background”. If you use Adobe Bridge, you can create a copy of the RAW file instead. Then, for this second copy, I simply pulled the Clarity slider back to zero, and backed off on the global Sharpness slider as well. No other changes were made.

I then opened both of these file copies into Photoshop as layers, with the sharper rendition as the top layer. With the top layer active, I made a careful selection of the subject and created a mask so that the less sharp bottom layer becomes visible in the background areas. This adds a bit more dimension and helps keep your focus on the subject, as seen below.

10 Imported Photoshop

Background edits applied in Photoshop

4-Out-Of-Camera.jpg

Original out of camera for comparison

Note: If you do not have Photoshop, you can also use the Adjustment Brush inside Lightroom to paint in less Clarity and Sharpness to the background areas.

Although it is beyond the scope of this article, I continued on with processing in Photoshop, including additional adjustments to luminosity and contrast.

3-Chinese-Guy-Hat.jpg

I hope this short overview of my five steps in Lightroom has been helpful and that there was a technique or two that will help you in your workflow.

googletag.cmd.push(function() {
tablet_slots.push( googletag.defineSlot( “/1005424/_dPSv4_tab-all-article-bottom_(300×250)”, [300, 250], “pb-ad-78623” ).addService( googletag.pubads() ) ); } );

googletag.cmd.push(function() {
mobile_slots.push( googletag.defineSlot( “/1005424/_dPSv4_mob-all-article-bottom_(300×250)”, [300, 250], “pb-ad-78158” ).addService( googletag.pubads() ) ); } );

The post Stylized Techniques for Editing Portraits Using Lightroom by Ken Koskela appeared first on Digital Photography School.


Digital Photography School

 
Comments Off on Stylized Techniques for Editing Portraits Using Lightroom

Posted in Photography


Tips for Taking More Natural Engagement Portraits

25 Jul

Engagement portrait sessions can be awkward especially for couples who are expected to display their affection publicly and worse, in front of the camera. Often they feel uneasy and don’t know what to do, let alone how to pose. Left to their own devices, especially if they feel they are not naturals in front of the camera, the probability is that they won’t love their photos at the end of the session. They will look back at the session with regret.

3-tips-natural-engagement-sessions_0000

3-tips-natural-engagement-sessions_0002

Your job as the photographer is to avoid the above at all costs. Your main goal is for them up be thrilled with their photos, and delighted with the experience.

The benefits of engagement portraits are many. The couple able to practice in front if the camera before their big day, so they can throw off their inhibitions. But also, and more importantly, it builds trust with you, so that on the day if the wedding they won’t even have to think about how to look good in their photos. Instead they can concentrate on being with their guests and family, and enjoy their day.

3 Tips for natural engagement sessions

3 Tips for natural engagement sessions

Here are my top three tips in making your engagement session a breeze for your couples.

#1 Prepare them

Before the session, send them a guide offering tips on what to wear, what to bring, and how to decide on location. Assure them it’s going to be lighthearted and fun, and that it’s totally okay to laugh at themselves and be silly. Assure them that their photos will look natural, and that you have some secret tips for that to happen.

In the guide I give my couple I ask them to wear layers if it’s winter or autumn, then depending on the weather we can take a layer off and have another look. If there is a changing room nearby then they can bring extra outfits.

3 Tips for natural engagement sessions

I encourage them to choose a couple of props that they both love, be that a picnic basket with a bottle of bubbly, balloons, bikes, books, etc. The aim is to make them feel at ease, using things that they already love and which come naturally to them. Some couples can’t easily think of props. I always suggest a bunch of flowers – they’re timeless and will suit any style.

3 Tips for natural engagement sessions

Regarding locations, suggest choosing something meaningful to them. It could he their rendezvous spot when they were dating, where they got engaged, a spot they both have a great fondness for, or where something memorable happened.

Couples also appreciate if you ask them for their preferences to style, colors, and look. It makes them feel listened to and assures them you are open to their ideas.

3 Tips for natural engagement sessions

3 Tips for natural engagement sessions

#2 Direct them

This may seem opposite to the idea of candid shots and natural-looking photos, but let me tell you a secret. After having photographed numerous engagement sessions in eight years, I can tell you that natural shots are often posed. That’s right they are. Your job is to make the final image look natural, and to do whatever it takes to make that look happen.

Couples don’t know where to place their hands, where to put their weight and how to stand, what to do with their arms, where to look, what expressions to have on their faces, etc. Basically, compositions that look good and natural in front if the camera, even if that were to be a photo where they aren’t looking at the camera, and expressions that you elicit and draw out of them.

3 Tips for natural engagement sessions

3-tips-natural-engagement-sessions_0010
When I direct couples I give them 3 rules:

1. Connection – There always has to be a connection between them, be that a physical one where parts of their bodies are touching, or a non physical one such as gazing at each other, laughing at a shared joke, or thinking of a shared memory. Connections matter and show. The authenticity of your image rests on the depth and strength of the connection between the subjects.

3-tips-natural-engagement-sessions_0017

2. Angles – Try to pose them at angles where you always see a bit of their faces instead of the back of their heads, unless your intention is to capture them from behind. Avoid straight lines, unless that again is your intention. I generally ask them to stand in a V position, at an angle instead of square on, with their weight on one leg so everything isn’t too even, or with a little body twist (for women) for some shape. Get men to not put their full hands in their pockets, just the thumbs instead, otherwise they look like cut off limbs up to their wrists.

Look for triangular and irregular compositions rather than straight and square. This adds interesting lines and dynamic to your images compared to a very flat and static look.

3. Laugh instead of talk – Two things to always avoid: taking photos mid-talk and mid-eat. Instead of talking to each other, ask them to laugh at each other’s silliness, and at how awkward they are feeling. That usually gets them laughing naturally. Getting them to think of special memories always puts a smile on their faces. This is not to say all the photos you take must be smiling ones, but this tip works every time. Laughter makes them warm up and shake off their inhibitions. Always a good trick!

3-tips-natural-engagement-sessions_0012

3-tips-natural-engagement-sessions_0011

#3 Encourage activity

This is where the props come in. An activity breaks the ice instantly, takes their focus off any awkwardness they may be feeling, creates an experience for them, and sets the scene for a memorable shoot.

Activities include having a picnic, popping a bottle of champagne, going on a bike ride, playing the guitar, reading books, having coffee at a favorite cafe or drinks in a favorite pub, going for a stroll by the sea, horse-riding, browsing flea markets, etc. If they can’t think of an activity, as mentioned above, having a bunch of flowers to hold always help. You can focus on posing them in ways that look natural, and making sure that they connect emotionally with lots of laughter and fun moments, like running and jumping, that don’t require props or any special preparation.

If you have a couple who are up for a shoot under any conditions – that’s awesome. You can capture unique photos in extraordinary weather conditions, like during a blizzard in the photos below, or perhaps freezing raindrops using flash, or in a downpour. The possibilities are endless!

3-tips-natural-engagement-sessions_0012

3-tips-natural-engagement-sessions_0012

I hope you find these tips helpful. Do share in the comments below if you have any more tips to add to the list.

googletag.cmd.push(function() {
tablet_slots.push( googletag.defineSlot( “/1005424/_dPSv4_tab-all-article-bottom_(300×250)”, [300, 250], “pb-ad-78623” ).addService( googletag.pubads() ) ); } );

googletag.cmd.push(function() {
mobile_slots.push( googletag.defineSlot( “/1005424/_dPSv4_mob-all-article-bottom_(300×250)”, [300, 250], “pb-ad-78158” ).addService( googletag.pubads() ) ); } );

The post Tips for Taking More Natural Engagement Portraits by Lily Sawyer appeared first on Digital Photography School.


Digital Photography School

 
Comments Off on Tips for Taking More Natural Engagement Portraits

Posted in Photography