RSS
 

Posts Tagged ‘portraits’

How to Pose People for Group Portraits

03 Jan

As someone who does a lot of family and child photos, one of the most rewarding but also the most challenging scenarios I encounter, is that of classic group portraits. You know, the one where you’ve got the whole family together and the kids all dressed up and it’s the first time in three years that the everyone was able to get in one place for a picture. Someone is fussing over an un-tucked shirt, another is texting his buddy, the kids are crying, and grandma and grandpa are patiently smiling away because they’ve been down this road many times before.

It’s a tricky situation to be sure. While every family is unique and there is no one single method that will work for every situation, there are a few tips and tricks you can use to pose the whole gang. Get everyone to chill out long enough so you can get the type of frame-worthy shot that may end up as a giant print on the wall or above a fireplace mantle.

pose group portraits mom and dad and kids

Put the crowd at ease

As a photographer, it can be tempting to get right down to business at the beginning of a photo shoot. You want to show everyone how serious you are about your work, and start barking orders to all parties involved. “Okay Grandma, you sit down over there. Now uncle Jimmy, you go here. And you…what’s your name? Claudia? Can you do me a big favor and get your hands out of your pockets?”

The feeling of authority and power that can creep in when wielding your expensive gear and big lenses can be as intoxicating as it is nerve-wracking. But unfortunately, it’s not the best way to get the shots you want.

pose group portraits family

It’s easy to get so caught up in the idea of getting the perfect picture that you forget about the people whose photos you are taking. You don’t know what happened before they arrived at the session. They are probably a little trepidatious regarding what is about to take place with this photographer and all the fancy cameras and lenses.

The adults are likely on pins and needles because they have invested time, energy, and possibly a lot of money into the ensuing photo session and they just want things to go right. The last thing they need is more stress from a photographer (who can’t even remember their names) telling them where to sit, stand, and look.

pose group portraits bridge family

Take it slow – talk to them first

To solve this problem, I like to spend five or 10 minutes at the beginning of a family or group portrait session not shouting orders or even getting my camera out, but talking with everyone and getting to know them a bit. And for goodness sakes, learn their names!

Learn some other things too. Where do they work? What do they enjoy doing in their spare time? What movies do the kids like? Sure it will add some time to your shoot, and yes I realize the sun is going down soon and you need to get moving. But if you really want to up your game when it comes to family and group portraits try taking some time to get to know the family or group.

They will feel more at ease and want to work with you. Then when you need Claudia to get her hands out of her pockets you can call her by her correct name (Olivia, to be exact) and give her the Vulcan Salute with a wry grin because you just found out that she, like you, is really into Star Trek.

Focus on the kids

While not all group photos involve children, many of them do and in those situations, it’s vitally important to make sure you prioritize the little ones over the grownups. Not that you don’t care about the adults, but they are much more compliant when it comes to following directions and working with you. Kids are another matter entirely, which is why it’s so important to get them on your side early on and then pay extra attention to them during the photo shoot.

I usually make this clear to the grown-ups too, and blatantly tell them that I expect them to smile, hold a pose, etc., because all my attention is going to be aimed at the little ones. I often start by showing my camera to the children and letting them hold some of my gear. This can be especially useful if you are using longer lenses like a 70-200mm that might feel kind of intimidating to them. The process helps acclimatize them to you as a photographer, dispel some of the nervousness that often results during a session, and usually makes the kids more open to following instructions.

pose group portraits family

I also like to joke around with the kids, ask them about their favorite movies, toys, video games, and TV shows even if I have no idea what they’re talking about. (If someone can explain the difference between Peppa the Pig and Spongebob Squarepants I’d sure like to know. Cartoons these days make no sense at all to me.) This makes the kids let their guard down and smile while also putting the parents at ease, and believe me, if the kids are stressed the parents sure will be also. But if little Timmy and Alice are having fun, you can bet mom and dad are too.

Tips for posing

Astute readers will note that by this point I have said almost nothing that relates to the title of this article, which is ostensibly about posing people for group portraits. That’s because posing isn’t really the point here. If you show up with your Canon 5dMark III and 85mm f/1.2 lens and expect to take frame-worthy shots simply by going through a checklist of poses, you’re going to have a hard time.

Portrait photography is built on the foundation of a good professional relationship between you and your subjects. Taking the time to develop this at the outset is critical to getting good images when you start clicking away with your camera. However, when it is time to actually take pictures here are some tips to keep in mind.

pose group portraits large family

Do the must-have shots first

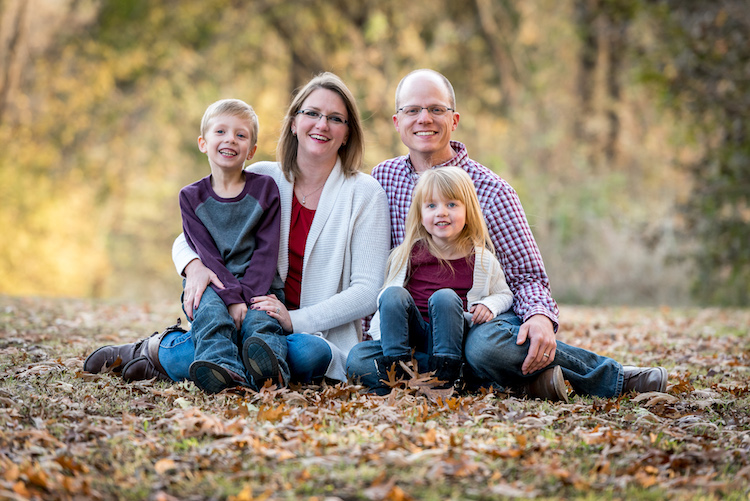
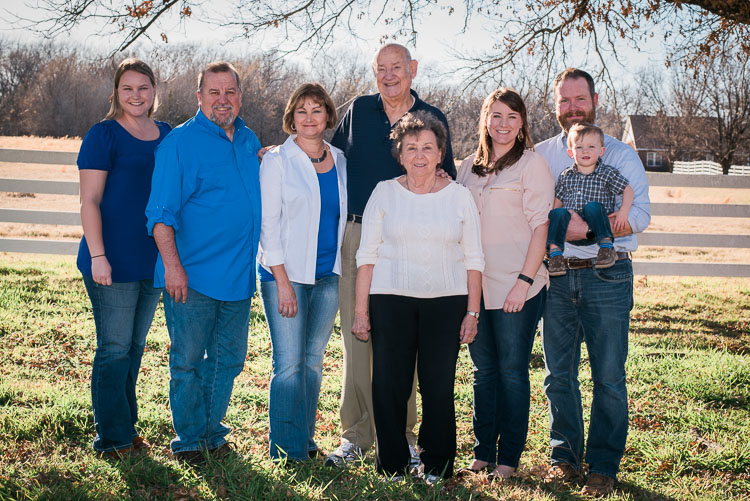
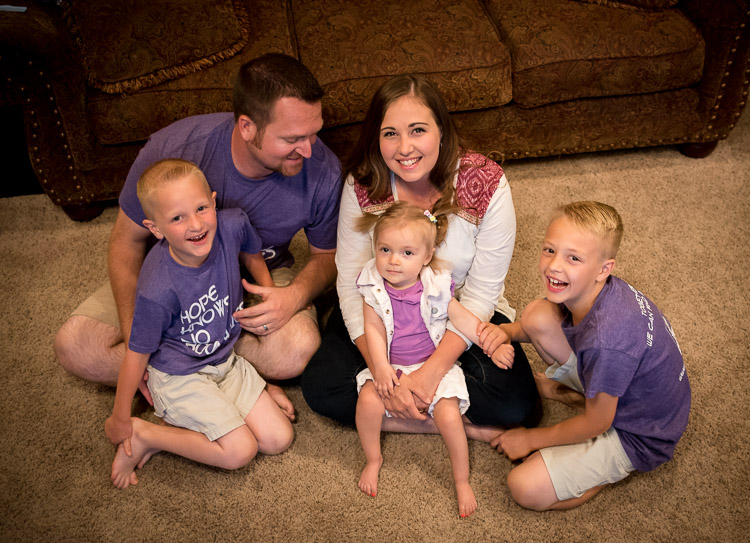
Get the must-have shots done first. These are the ones where you need the whole group in the picture, including the kids, and you need everyone to be at their best and brightest. If it’s a generational picture, put the eldest members (i.e. Grandma and Grandpa) in the middle, sitting down if possible. Surround them with kids. Put the little ones on their laps with any tweens and teens standing next to them. On the sides of the picture place the middle generation, or the children of the grandparents.

As you start taking pictures talk with the people, crack jokes, ask them to say odd things to get them laughing (e.g. “On the count of three everybody say Pepperoni and Pickles!”). In the process, you will not only get the little ones to produce genuine smiles, but the adults usually will too.

Keep it comfortable

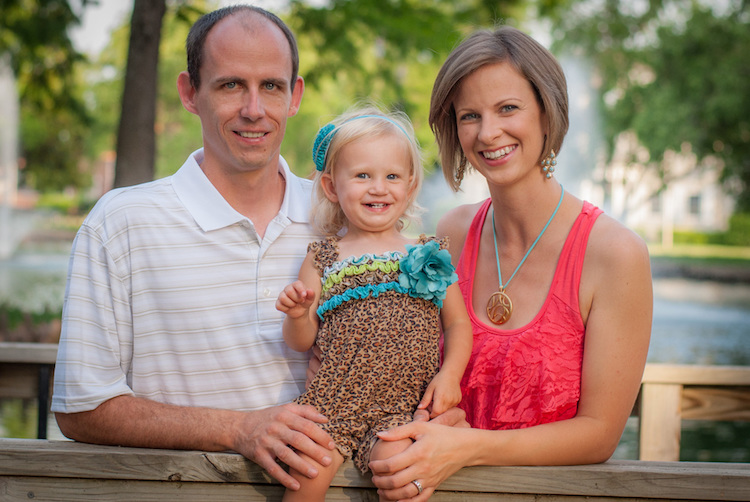
Throughout the session, whether there are kids or not, you want your subjects to be comfortable with you and with each other so don’t make them do things that feel awkward or unusual. If you’re working with adults, have them stand up with their hands around their loved ones. (Position hands on backs, not wrapped around waists, or else you end up with floating fingers that look unflattering and unusual).

Use the scenery for seating or to stagger the heights of your subjects in order to get more interesting pictures. If women are on the edge of the frame (outer edge of the group) have them put one hand on their hip with the elbow out.

pose family group portraits

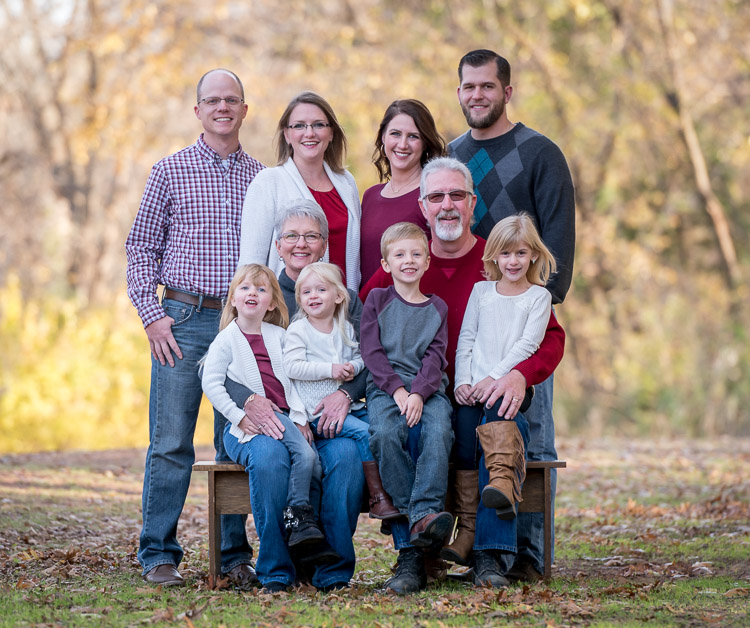
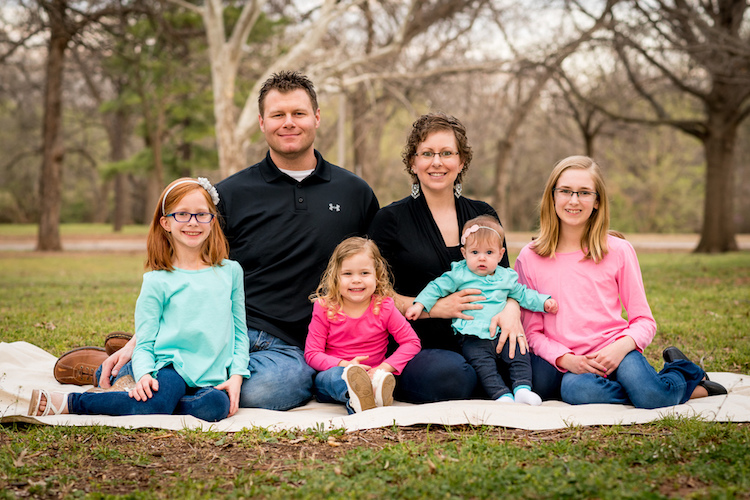
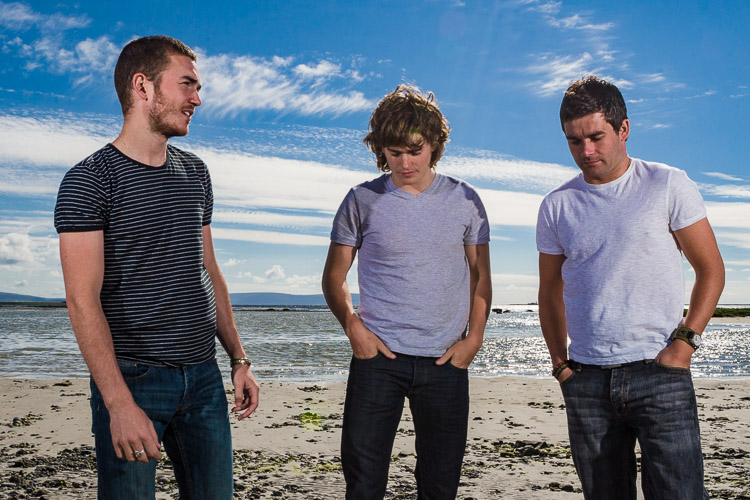
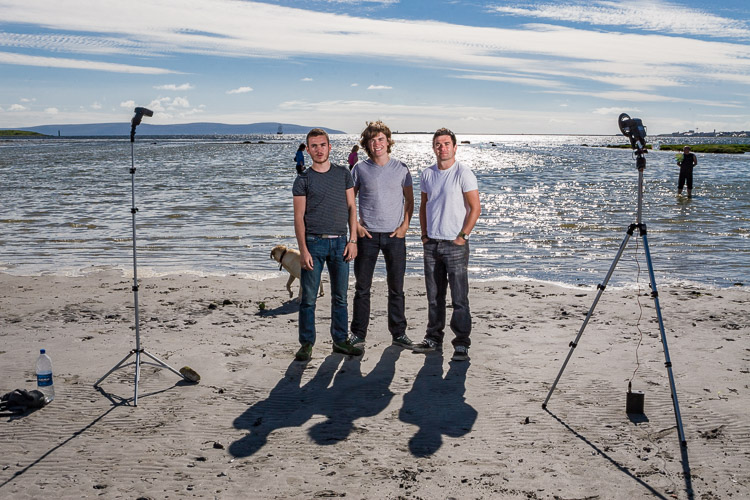
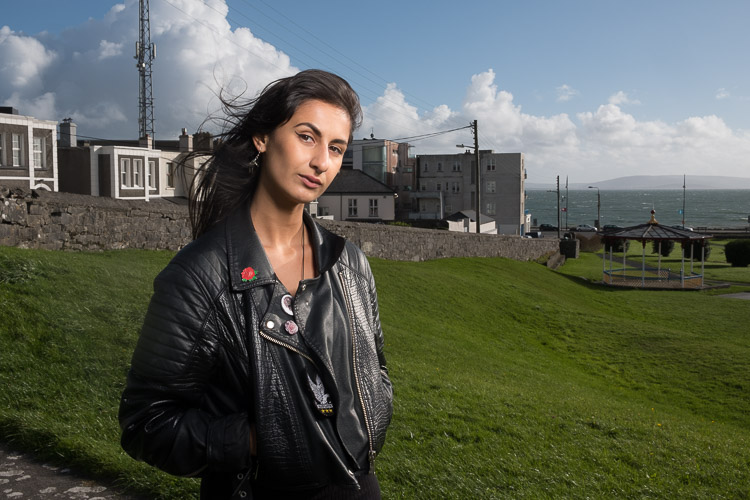
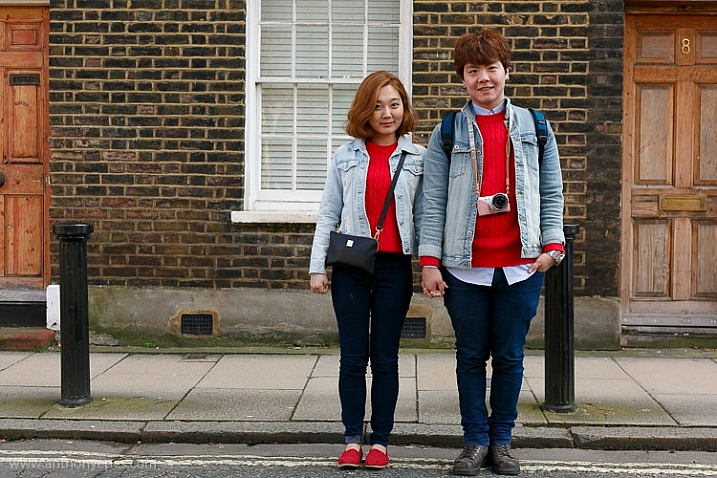
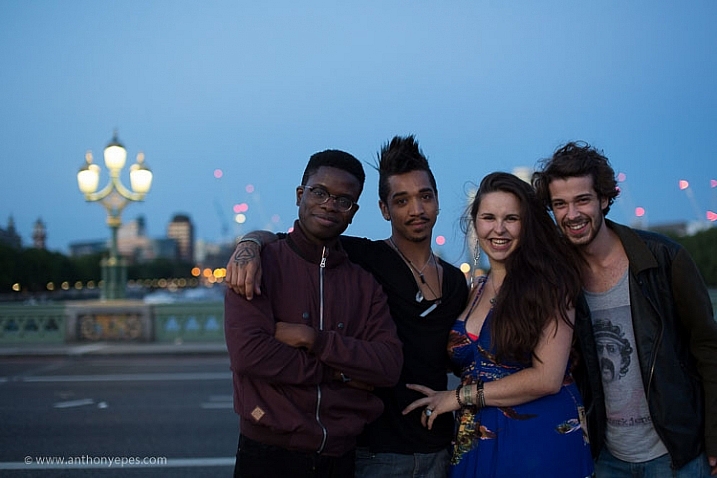
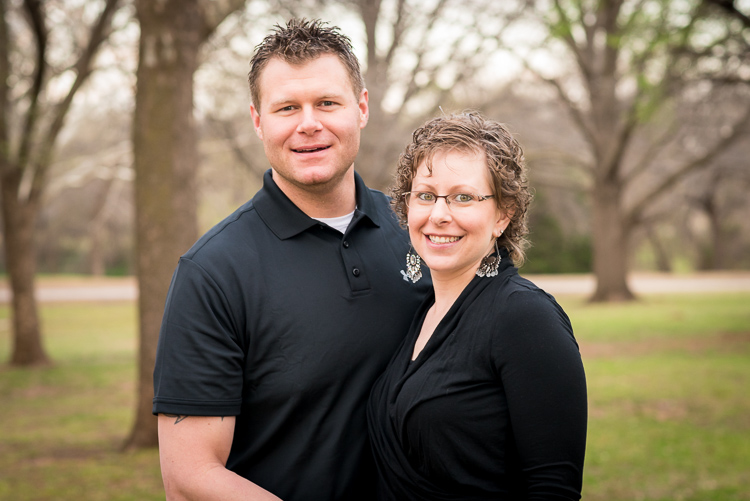
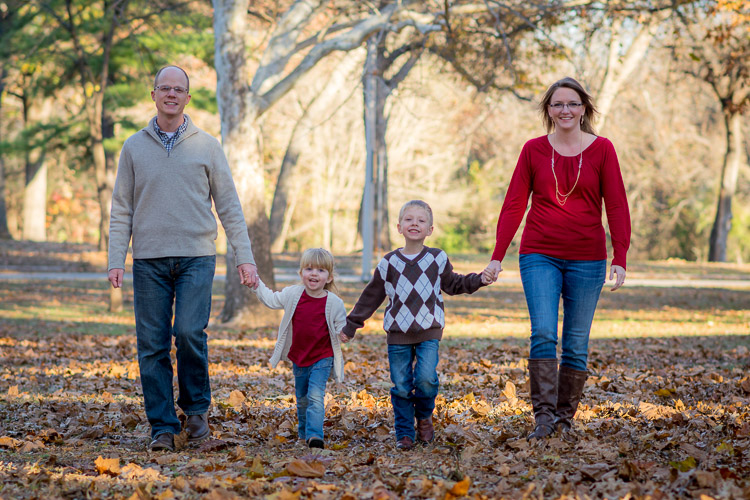
Another tip is to put the tallest person in the center and go down in height from there, but pay attention to relationships too. You’ll notice in the group photo above that the two men are on the edge instead of the middle, which creates a somewhat concave shape to the portrait.

That was an intentional choice on my part since the two young women are daughters of the couple sitting on the bench. I deliberately chose to break a posing rule because I wanted to emphasize the relationships present in the picture, which is something you need to keep in mind when posing for group photos.

pose-groups-for-photos-large-family-living-room

For this picture, I was more concerned with capturing a sense of emotion and family bonding than pixel-perfect posing.

Technical stuff

In terms of raw technical details, know that you need a decently fast shutter speed to freeze motion. So even if your group is standing relatively still I recommend using a shutter speed of 1/125th of a second to minimize blur that often happens due to moving hands or blowing breezes.

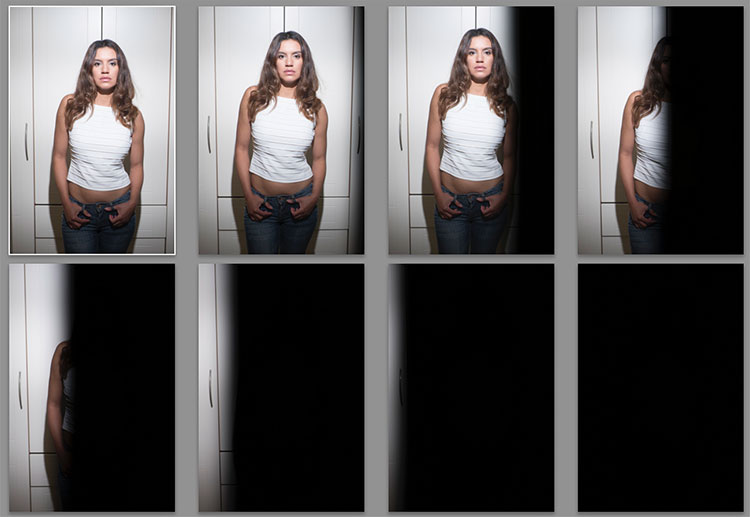
As a general rule, I like to shoot at f/4 or smaller (remember that larger f-numbers mean smaller apertures) to get a wider depth of field. Shooting at f/2.8 might give you a nice blurry background, but it could also mean someone in the group will be out of focus due to a shallow depth of field. Finally, off-camera speedlights can be a great way to compensate for harsh or dim lighting and help eliminate shadows on faces.

Finally

One final tip that comes in handy when doing group sessions is to have a shot list prepared with their actual names if possible instead of just placeholder pronouns like Mom, Grandpa, Little Sister, etc. You don’t want to get back to your computer and realize you forgot a crucial shot because you were too focused on getting the hand placements correct.

I hope some of these tips are useful for you, and I’m eager to know what techniques you have found to be helpful in your own shooting too. Leave your thoughts in the comment section below, and may you live long and prosper.

googletag.cmd.push(function() {
tablet_slots.push( googletag.defineSlot( “/1005424/_dPSv4_tab-all-article-bottom_(300×250)”, [300, 250], “pb-ad-78623” ).addService( googletag.pubads() ) ); } );

googletag.cmd.push(function() {
mobile_slots.push( googletag.defineSlot( “/1005424/_dPSv4_mob-all-article-bottom_(300×250)”, [300, 250], “pb-ad-78158” ).addService( googletag.pubads() ) ); } );

The post How to Pose People for Group Portraits by Simon Ringsmuth appeared first on Digital Photography School.


Digital Photography School

 
Comments Off on How to Pose People for Group Portraits

Posted in Photography


How to do Tilt-Shift Portraits

14 Dec

Photography gives you an awesome opportunity to present to the world your vision of it rather than its absolute reality. At their best, photos can evoke the feel of a moment without being an exact representation of it. Think of the last time you fell in love. Most likely, your memories aren’t clear, linear progressions, but rather a series of moments, blurred together by a high-dose cocktail of dopamine and romance. Life can be a blur and feel so good. For me, that’s where tilt-shift portraits come in.

tilt-shift-photography-8-of-1-13

tilt-shift-photography-8-of-1-6

Tilt-shift lenses are most commonly used for architectural purposes, meant to fix converging verticals when shooting tall buildings in order to reduce distortion in the final photo. You’ve also probably seen the miniaturized versions of city streets shot from above where even a city as grand as New York can seem positively dainty. Tilt-shift portraiture however, involves carefully selecting focus and letting anything that isn’t the subject of your photo fade into obscurity. This allows the viewer to be swept into your alternative realty. In my view, it’s a portrait that can be a truer representation to how a moment actually felt.

Tilt-shift portraiture however, involves carefully selecting focus and letting anything that isn’t the subject of your photo fade into obscurity. This allows the viewer to be swept into your alternative realty. In my view, it’s a portrait that can be a truer representation to how a moment actually felt.

Tilt-shift portraits = high risk, high reward

tilt-shift-photography-4-of-1

Most of my tilt-shift portraits are taken wide-open (using the largest aperture setting) with the lenses shifted as far as possible. This means that my focus point is tiny and the chances of me missing it are huge. This means that if I want the eyes in focus, I have to slow down, concentrate, play with my focus ring and maybe take a few shots just in case.

When the focus is even just a little bit off, you lose the ability to the guide the viewer. That said, when you do nail the focus, the subject jumps out of the frame surrounded by bokeh.

Note: if you do not own a tilt-shift lens, look into renting one from a local camera store.

Wait, what’s a tilt-shift lens?

tilt-shift-photography-8-of-1-10

The tilt-shift is a specialty lens that allows the photographer to bend and distort light by tilting and/or shifting the lens itself.

Shifting implies that the lens actually shifts its position (and the view through it) either up or down, left or right. This can minimize distortion especially with wider focal lengths. Tilting is when the front lens elements literally tilt (again, up or down, left or right) to get selective focus in a given plane.

tilt-shift-photography-8-of-1-12

So how do you use this lens to take an interesting portrait? Here is a step by step guide:

Step #1 – Visualize it

tilt-shift-photography-8-of-1-11

Because of the precision and manual focus, you need to visualize your shot before you take it. You need to know exactly what story you want to tell. Do you want the viewer to zoom in to the subject’s eyes or perhaps your shot is about the flow of her dress or how he’s placed his hand. Most of the time, with tilt-shift, you gotta pick one thing to tell your story. What do you want that to be?

Step #2 – Shift it

tilt-shift-photography-8-of-1-8

Tilt-shift lenses can become rather mundane without a shift. Sure, you can use your tilt-shift to take shots straight on with neither tilt, nor shift, but where’s the fun in that? I recommend shifting your lenses before framing your shot as your sweet spot on your lens will help determine your framing. With that, I should mention…

Step #3 – Know your lens’s sweet spot

tilt-shift-photography-8-of-1

Every tilt-shift has parts of the lens that it captures better when tilted or shifted. Know where to place the subject in your frame to get it in focus.

Step #4 – Manual focus

tilt-shift-photography-8-of-1-5

If you’re used to relying on autofocus, switching to manual focus can feel like jumping into the driver’s seat of a stick shift car after years of only using automatic. You’ll be a rusty at first and are sure to stall out once or twice, but soon enough, you’ll get the hang of it.

On most dSLRs you have two options to view your focus. The first is right through the viewfinder, just make sure that the dial (the diopter) next to the viewfinder is set to match whatever your eye needs or you will have a hard time getting focus pinned down. The second is through Live View Mode on the back of your LCD.

At times, Live View is a better option as it provides a larger screen but also it allows you to zoom in to your precise focus point and make sure you’re right on.

Step #5 – Take a deep breath

tilt-shift-photography-8-of-1-9

Tilt-shifts are not quick and easy lenses to use. You need to spend time to set up your shot. Relish in its slowness. Just before taking the shot, take a deep breath. Not only will it help steady your shot, but you’ll feel darn good after clicking that shutter.

Step #6 – There’s more to life than just faces

tilt-shift-photography-8-of-1-2

Portrait artists can get overly fixated on eyes. Yes, eyes are incredibly satisfying and captivating things to focus on, but so are fabrics, texture, movement, etc. In life, all of these things at times can be the sole focus of our attention and that story needs to be told too.

tilt-shift-photography-3-of-1

Conclusion

Tilt-shift lenses make it so we can’t get anxious about precision but rather let the feel of photograph take center stage. They can open up a whole new way of viewing not only the world but your photographic style. Now go forth and play!

googletag.cmd.push(function() {
tablet_slots.push( googletag.defineSlot( “/1005424/_dPSv4_tab-all-article-bottom_(300×250)”, [300, 250], “pb-ad-78623” ).addService( googletag.pubads() ) ); } );

googletag.cmd.push(function() {
mobile_slots.push( googletag.defineSlot( “/1005424/_dPSv4_mob-all-article-bottom_(300×250)”, [300, 250], “pb-ad-78158” ).addService( googletag.pubads() ) ); } );

The post How to do Tilt-Shift Portraits by Laura Sullivan appeared first on Digital Photography School.


Digital Photography School

 
Comments Off on How to do Tilt-Shift Portraits

Posted in Photography


Simple Studio Technique: Pet Portraits

03 Dec

Perfect pet portraits

A few weeks ago we visited an animal adoption center in Seattle, to shoot some portraits of the dogs (and cats) awaiting owners at The Motley Zoo. When we published our video feature recently, many of you wanted a little more information about how we shot the images, so we’ve put together a slideshow of some of our favorite shots, including some bonus images not used in the video.

Click through to see the photos, and for those of you who were curious, we’ve included more information on the lighting and setup we used on the shoot. Also, they’re pictures of pets, what more do you want?

Lighting

For lights we used three Sony HVL-60M flashes, two of which were attached to softboxes and positioned on stands.

The flash on the camera played the role of TTL trigger, while the other two off-camera flashes fired through the softboxes to provide illumination.

Lighting

The key light, which was placed just slightly above eye-level for the dogs and off to the left, was fired through a Westcott Rapid Box 26″ Octa Softbox.

The second light was an overhead fill bounced off the silver inside of a 60″ umbrella, to save space in the relatively small room in which we were working. This light was placed off to the right of the setup, aimed to cover both the backdrop and the subject, to provide a bit of fill light and illuminate the backdrop. 

Get their attention

When working with animals it’s very important to bring something to grab their attention.

For dogs, treats are always a great way to have them look wherever you want, as long as they’re well behaved. With Ginger Rogers, the sweet little blind Poodle pictured above, we borrowed a squeaky toy that the shelter calls the ‘Photo Pig’. They call it that because it’s shaped like a pig. And they use it to get the dogs’ attention for photos.

Photo Pig.

Shoot from eye-level

Shooting from a pet’s eye level helps in a few ways. 

First, it’s a better angle for classic ‘head and shoulders’ shots when combined with a longer focal length, presenting the dog as a more ‘human’ subject, giving the image more personality.

Second, it can help with intimidation, or rather avoiding intimidation, especially with smaller breeds. Just watch out, some dogs love to give kisses when you squat down to their level. Keep your front element covered, or have something handy to clean it.

Posing your pet

Profile shots are a great way to add variety in sets of shots taken at the same time.

Be sure to keep the subject facing the side that the light is on, so their face isn’t lost in shadow and they still get ‘catch lights’ in their eyes.

What about cats?

Cats are a bit more tricky than dogs. We tried, but our hit-rate wasn’t quite as high as we needed it to be. It’s harder to get a cat’s attention, and they can get aggressive and skittish if they’re not in a co-operative mood.

Toy with them

Getting cats to sit still can be a nightmare. Sound tends to startle cats, so for this kitten portrait we ditched the Photo Pig in favor of feathers attached to a string on the end of a pole. Dangling it just out of shot kept his chin up for the picture.

Watch your settings

We were using the Sony a6300 for this shoot, and overall the camera worked well. Off-camera TTL lights made setting up the exposure quite easy. 

When using flash on a mirrorless camera, make sure you’re not in exposure preview mode, otherwise, at typical flash exposure settings you’ll just be looking at a completely dark, underexposed preview image.

Also, be aware that battery-powered flashes can have quite long recycle times, especially when fired through modifiers. The modifiers, while necessary for this soft diffused look, sap light, requiring the flash to be used at a higher power level.

Focus tips

When stopped down past F8 the a6300’s switches to contrast detection in AF-C mode, slowing down the ability to keep up with skittish pets. To avoid this, we switched the camera to AF-S to get rid of the distracting hunting. Inevitably, this left us with some shots that aren’t entirely sharp in the right place. But with a bit of processing, even the shots that aren’t 100% sharp on the animals’ eyes are still perfectly usable for a web gallery.

Pet Portraits

If you’re interested in adopting any of the animals you’ve seen here, we’re sure The Motley Zoo would love to hear from you. We hope you enjoyed this quick look behind the scenes of a fun photo shoot. Check out the video, if you haven’t already and share your tips for pet portraits in the comments!

Articles: Digital Photography Review (dpreview.com)

 
Comments Off on Simple Studio Technique: Pet Portraits

Posted in Uncategorized


7 Smart Lighting Setups for Portraits Taken at Home

30 Nov

Let’s get one thing clear – you’re not going to learn how to shoot perfect portraits overnight. There are many things you need to learn first. When it comes to portrait-shooting, no factor is more important than lighting. Even if you’re planning a home portrait session, you can still make the most from various lighting setups to achieve great results. Continue Reading

The post 7 Smart Lighting Setups for Portraits Taken at Home appeared first on Photodoto.


Photodoto

 
Comments Off on 7 Smart Lighting Setups for Portraits Taken at Home

Posted in Photography


Video: Shooting Dog Portraits with the Sony a6300

28 Nov

Here at DPReview, we love dogs. They’re great. But they’re notoriously hard to photograph. Even the best-trained are unpredictable and fast-moving, and when they’re not running around they’re unable to sit still.

In this video, DPReview’s Sam Spencer takes one of our favorite cameras – the Sony a6300 – to shoot some of our favorite pups. During a busy day of shooting, we gave both the animals and the a6300 a good workout, culminating in a studio portrait session for the lucky dogs at the Motley Zoo animal rescue center, in Seattle.


This is sponsored content, created in partnership with Sony. What does this mean?

Articles: Digital Photography Review (dpreview.com)

 
Comments Off on Video: Shooting Dog Portraits with the Sony a6300

Posted in Uncategorized


How to Make Beautiful Portraits Using Flash and High-Speed Sync

04 Nov

The scene: Outdoors with full sunlight. The gear: Your camera, lens, and flash. The problem: You find that your flash only works at 1/200th or below so you need to be at f/16 or f/22 to get the shot. Everything is in focus, including all the cars and other distractions in the background. Those dust spots you keep meaning to clean are also perfectly visible. Why won’t it work with a higher shutter speed so you can have a wider aperture? Well, it’s all down to the issue of sync speed, more specifically using flash and high-speed sync.

A typical portrait shot with off camera flash. To overpower the sun and stay below the camera’s sync speed, you’re forced to use a narrow aperture. Here we’re at f20 just to stop the backlight overpowering the hair and stop the sky blowing out. The resulting aperture means that everything is pretty much in focus, leaving the background looking cluttered. This shot is for example only, you should generally make a point of choosing clutter free backgrounds

A typical portrait shot with off-camera flash. 

To overpower the sun and stay below the camera’s sync speed, you’re forced to use a narrow aperture. Here I’m at f/20 just to stop the backlight overpowering the hair and the sky from blowing out. The resulting aperture means that everything is pretty much in focus, leaving the background looking cluttered. This shot is for example only, you should generally make a point of choosing clutter-free backgrounds

Sync Speed

Sync Speed is the fastest shutter speed where the camera exposes the whole frame at once. When you fire any shot below this speed, the first shutter curtain opens fully, revealing the entire sensor to light. At the end of the exposure time, the second shutter curtain moves across the frame to finish the capture. Both curtains then reset together (this means you get no light leaking in).

Generally, the sync speed varies between 1/125th and 1/250th, depending on your camera. You’ll find some quoted sync speeds are not indicated correctly. For instance, the Canon 5D series are rated at 1/200th but often show a black band at the bottom of the screen at this speed when it’s used with flash.

When you go above the sync speed, the second curtain starts to move before the first one has completed its journey. As your shutter speed gets shorter and shorter, the gap between these curtains narrows to a tiny slit. Despite this, all parts of the sensor receive light, and a full exposure is made. On a bright day, with a prime lens, you can easily shoot at 1/8000th at f/1.4 and have a perfect exposure. All parts of the frame still receive light, because it’s continuous throughout the exposure.

The Sync Speed Problem

It’s when you introduce flash that you start to have problems. You see, when a flash is fired (usually when the first curtain is opened) all the light from it comes out in a very short space of time (in order of milliseconds). When you go above (faster than) the sync speed, the position of the curtains doesn’t reveal the entire frame at the time the flash fires. The means the shutter curtain blocks part of the flash and prevents it from reaching the sensor. Any ambient light will expose normally, but the flash gets hidden in part of the frame. As your shutter speed gets faster and faster, more and more of the flash is blocked until it’s no longer visible in the shot.

portraits with flash and high-speed sync

Here’s a set of images taken at 1/3 stop increments with a flash. Shot on the Fuji X-T2, the first is at 1/250th, the native sync speed of the camera. In order (left to right, top to bottom) 1/250th, 1/320th, 1/400th, 1/500th, 1/630th, 1/800th, 1/1000th, and 1/1250th. Even 1/320 is useable if the subject being lit is away from the edge.

Everything in Focus

Normally when you use flash outside in daylight, you end up having everything in focus. Remember the Sunny f/16 Rule? If your subject is in direct sunlight during the day, you can set your aperture to f/16 and your shutter speed will be one over your ISO value. So if your ISO is set to 100, your shutter speed would be 1/100sth (and f/16). As another example, if your ISO is 200, then the shutter speed would be 1/200th. To get a richer sky, you’d really need to be at f/22, making it a tough job for your flash. Because you can’t get faster than 1/250 (sync speed), you have to increase the aperture to expose the shot correctly.

portraits with flash and high-speed sync

Shooting at f/20, 1/160 to get a richer sky for this band promo shot. It’s quite an old shot, so there were few options for reducing the aperture at the time. Even the hills in the background are in clear focus. The beach isn’t exactly pretty either.

portraits with flash and high-speed sync

A behind the scenes shot – two flashes on full power.

Softer light

Most speedlights at full power, bare bulb, in close, can give you just enough power to look natural at these settings. Bare flash is not flattering, though it can add character. If you want softer, more flattering, light, you need more power. Most modifiers that give soft light will take two stops of power compared to the bare flash. That’s a lot of power. You could use a more powerful light, like the Godox AD360, the Elinchrom Quadra, or the Profoto B1. Alternatively, you could use a bracket that takes multiple speedlights. Either option allows you to get soft, flattering, light while outdoors.

portraits with flash and high-speed sync

A higher power option is the Godox AD360. This is coupled with the Godox 120cm Octa for softer light. This is shot at f/2.8, ISO200 and 1/125th. Because it’s after sunset, you can easily get wider apertures. just one of the options you have for the shallow depth of field look.

This solves the soft light issue, but it doesn’t solve your aperture issue. For creamy bokeh (the soft out of focus background look), you need to get our aperture down. If you’re shooting in the early morning or late evening, you can do this easily, but during the day it’s an issue.

The Solution: High-Speed Sync

You’ll need to find a way to get around the issue of sync speed for daytime shooting. Fortunately, there is a solution. It’s not perfect, but it does work. It’s called High-Speed Sync, also known as Focal Plane Sync. High-Speed Sync (HSS) works in a unique way. Instead of firing the flash at the start of the shot, HSS pulses the flash throughout the whole exposure, trying to simulate the effects of a continuous light.

portraits with flash and high-speed sync

The AD360 set to High-Speed Sync. Usually, there’s a single button hold, or a double button combination to turn HSS on.

It works well, but it comes at the expense of power, and heat. HSS works the flash really hard. After a few shots, the flash may even shut down for cooling. For HSS to work, you need the camera to transmit HSS to flash, and for the flash have HSS built-in. All major brands allow it, though Fuji only just introduced it. Cactus Image makes a trigger called the V6II which allows you to use any HSS flash with any camera. Read my review of the Cactus V6II trigger here.

portraits with flash and high-speed sync

The Cactus Image V6II allows power and zoom control over a wide range of speedlights, as well as offering High-Speed Sync abilities.

The Look of HSS

You can use HSS to go over the sync speed barrier, so settings like 1/4000th at f/1.4 are achievable with flash. You get the complete control of the light using flash, but with the wide aperture you usually associate with natural light photographs. Yes, please!

Photographers like Dylan Patrick use this technique to create cinematic portraits. By shooting wide shots with shallow depth of field, you really have the option to create images that look like they were stills from the silver screen.

Settings for High-Speed Sync

Let’s look at a typical setup and settings for a shoot using HSS. This shoot happened to be done on an evening, but I really wanted shallow focus. The camera was set to f/1.4 for super shallow depth of field. To get the clouds properly exposed, I had to drop the shutter speed to 1/4000th. To get the flash (an AD360) to work I had to set it to HSS. Using a Cactus V6II trigger, I could easily get my Fuji X-T10 to shoot with HSS.

portraits with flash and high-speed sync

An evening HSS photo shot at 1/4000th, ISO200, f/1.4. Notice the shallow depth of field in the image.

portraits with flash and high-speed sync

The BTS, an AD360 with 120cm Octa, shot by my assistant Ola.

If you use Canon, the Cells II trigger provides HSS with the AD360. It would also work speedlights like the v850.

portraits with flash and high-speed sync

Using HSS on the AD360, I captured this shot at about 3:00 in the afternoon with the sun high in the sky. Shot with an 85mm lens at 1/2000th at f/2.5, ISO100 on a Canon 5DIII. The sun acts as a second light in the shot. Again the background is nicely out of focus.

Another High-Speed Sync portrait example.

portraits with flash and high-speed sync

1/1000th, f/4, ISO800. An issue with shooting outdoors on overcast days is your shutter speeds can be low enough to cause camera shake. By bumping up the ISO, you can get a faster shutter speed, keeping you safe from camera shake. Using HSS then lets the flash do the work. I’ve shot to keep the flash looking as natural as possible here.

The Alternative

High-Speed Sync isn’t the only way, you’ve got other options. The first has been mentioned. Shoot at the beginning or end of the day. You can get great sky color and you’re not fighting strong sunlight. Of course, if you’re doing any work, even as favors, you often have to work to the subjects schedule rather than your own. So, you may have to shoot at midday to suit them. That leads to the next option.

portraits with flash and high-speed sync

A shot of the band Drown for The Thin Air magazine. The evening light makes the shot. I needed a higher aperture to get the whole band in focus, so opted not to use HSS here.

Using Neutral Density Filter

If you shoot landscape photography, you will be familiar with Neutral Density (ND) filters. This filter allows you to slow the shutter speed down to get nice silky water. Neutral means that it adds no color, while the density part refers to blocking light. You can get them in a range of values from 1 stop to 16 stops.

For portraits, these allow you to drop the aperture down instead of shutter speed. So a 4 stop ND would take you from f/16 to f/4. The drawback is that as you block light, focusing can become harder. Another potential issue is that not all ND filters are actually neutral. Some tend to have a color cast. I have a Firecrest 10-stop for landscapes, which is neutral, but the older 4-stop I have from the same company is slightly pink.

portraits with flash and high-speed sync

Without the ND filter applied, the entire scene is in focus. ISO 200, f/16, 1/250th.

portraits with flash and high-speed sync

With the 4-stop ND filter applied, the background can be rendered out of focus. The flash is still at the same power as the shot above without the filter. The filter does have a color cast, which is hard to remove completely. ISO 200, f/4, 1/250th.

Conclusion

I hope this gives you some options and ideas for how you can make portraits outdoors even when the sun is bright, by using flash and high-speed sync. Please put your questions and comments below, and share your high-speed sync portraits as well.

googletag.cmd.push(function() {
tablet_slots.push( googletag.defineSlot( “/1005424/_dPSv4_tab-all-article-bottom_(300×250)”, [300, 250], “pb-ad-78623” ).addService( googletag.pubads() ) ); } );

googletag.cmd.push(function() {
mobile_slots.push( googletag.defineSlot( “/1005424/_dPSv4_mob-all-article-bottom_(300×250)”, [300, 250], “pb-ad-78158” ).addService( googletag.pubads() ) ); } );

The post How to Make Beautiful Portraits Using Flash and High-Speed Sync by Sean McCormack appeared first on Digital Photography School.


Digital Photography School

 
Comments Off on How to Make Beautiful Portraits Using Flash and High-Speed Sync

Posted in Photography


3 Tips for Taking Portraits with a Kit Lens

27 Oct

One of the first things that new photographers often hear is “your kit lens is garbage.” While there are certainly benefits to upgrading your glass as your budget allows, it’s also important to know that there is so much you can do with your kit lens if you understand how to use it to your advantage! In this case, let’s talk about portraits.

Most photographers quickly upgrade to a 50mm or 85mm prime lens for portraits, and with good reason. These lenses are sharp, and can typically shoot as wide as f/1.4 or f/1.8, which means that it’s easier to achieve that nice blurred background in portraits.

Taking Portraits with a Kit Lens

Canon 50mm lens at f/2.0, 1/160th sec, ISO 100.

If you plan to spend any significant amount of time taking portraits, I would absolutely recommend upgrading to at least a Nifty Fifty lens. When it comes to portraits, I almost always find myself reaching for my 50mm prime lens, and I really do think it’s worth the money. That said, when we’re living in the real world, there are a whole plethora of reasons why you might not upgrade lenses right away. Perhaps it’s a budget issue. Perhaps you’re still trying to decide which type of photography really interests you. Or maybe you just opened the camera box for the first time today and want to have a better understanding of your camera before you purchase anything else. Regardless of the reason, I’ve got good news for you–you can take great portraits with a kit lens!

In this article, we’ll explore a couple of limitations when it comes to taking portraits with a kit lens, as well as some tips for working around those limitations and capturing the best portraits possible with the equipment you already have.

1. Use Depth of Field to your advantage

As I mentioned before, one of the benefits of using a prime lens for portraits is the ability to shoot as wide as f/1.4 or f/1.8 to easily achieve that nice blurry background (called bokeh) in almost any location. Most kit lenses can only shoot as wide as f/3.5 (at 18mm) and f/5.6 (at 55mm) which won’t blur the background as much as new photographers are typically hoping. That is unless they understand that aperture isn’t the only important factor in creating that nice blurry background for portraits.

Taking Portraits with a Kit Lens

Another key aspect in creating a blurry background is the distance from the subject to the background. The further the subject is from the background, the blurrier the background will be in the photograph.  So, to create the blurry background when using your kit lens, one of the easiest things to do is to position your subject as far away from the background as possible.

Typically, when I use a 50mm lens to photograph my kids in the backyard, I have them sit on the grass about two or three feet away from our back fence. When using a kit lens, I have them sit about 30 feet away from the fence, as you can see in the image above. Then, I zoom-in to somewhere between 35-55mm, and shoot at the widest aperture the lens will allow for that focal length, in order to produce the most blur in the background possible.

Taking Portraits with a Kit Lens

Canon Kit Lens that came bundled with the Rebel XS. This image was shot at 37mm and f/4.5.

2. Change your perspective

Taking Portraits with a Kit Lens

Both images were taken with a kit lens at f/5.6.

If you can’t place your subject far away from the background and/or the background isn’t something you’d like to incorporate into your photograph, another option to consider is to change your perspective. Stand up, and have your subject sit on the ground, photographing them from above. Grass, cement, asphalt, and sand all photograph well from above, and can often be more visually pleasing in a portrait than a background that cannot be blurred as much as you’d like.

Taking Portraits with a Kit Lens

Shot with a kit lens at 55mm, f/5.6.

Bonus Tip: When shooting from above, try converting to black and white! When converted to black and white, grass reads as a dark background that can be a nice contrast for lighter skin tones. Likewise, concrete often reads as a light background that can be a nice contrast for darker skin tones. Converting to black and white when shooting from above can be a great way to work around the inability to blur a background as much as you’d like in portraits.

3. Try candid or semi-posed portraits

Taking Portraits with a Kit Lens

Shooting at f/4 or f/5.6 means that more of each image is going to be in focus than it would be if you were shooting at f/1.4 or f/1.8. Rather than consider this a disadvantage, think about the things that are easier to capture at those apertures.

For example, at f/5.6, you have the freedom to capture images with a little more movement without risking a lot of blur from motion. This is a great opportunity to try taking portrait-style images that are candid or semi-posed. Try photographing kids running toward you or siblings mid-hug. Have your subject twirl or jump. Ask mom or dad to tickle their child. Though these images may be slightly different than the head-and-shoulders images that the word “portrait” often brings to mind, they often invoke emotion and movement in a way that is really compelling and valuable in photographs.

Taking Portraits with a Kit Lens

Shooting from a slightly wider angle than just head and shoulders also allows you to incorporate aspects of the surroundings into your images to tell a story. Perhaps it’s a handful of flowers at the park, a bunch of balloons for a child’s birthday, or even an ice cream cone on a hot summer day. The cold hard facts are that the story and emotion make the portrait, not the bokeh in the background.

Using a kit lens in a nutshell

My suggestion to you is to fudge the expectation of head-and-shoulders images when it comes to kit lens portraits. Instead, focus on capturing emotions and telling a story, while getting as close as you reasonably can. If you can move the subject far away from the background in order to create a nice blur, absolutely do so. If you can’t, consider changing your perspective to create a more uniform background that’s reasonably free from distractions so that the viewer will be able to focus solely on your subject.

Taking Portraits with a Kit Lens

Does a kit lens have limitations when it comes to portraiture? Absolutely. However, recognizing the limits of a kit lens when it comes to portrait photography isn’t prohibitive. Rather, it allows you to recognize the situations and applications that will be most effective in creating the images you want with the equipment you already have, and that’s always a good thing!

Do you have a great portrait taken with a kit lens? Please share it in the comments below!

googletag.cmd.push(function() {
tablet_slots.push( googletag.defineSlot( “/1005424/_dPSv4_tab-all-article-bottom_(300×250)”, [300, 250], “pb-ad-78623” ).addService( googletag.pubads() ) ); } );

googletag.cmd.push(function() {
mobile_slots.push( googletag.defineSlot( “/1005424/_dPSv4_mob-all-article-bottom_(300×250)”, [300, 250], “pb-ad-78158” ).addService( googletag.pubads() ) ); } );

The post 3 Tips for Taking Portraits with a Kit Lens by Meredith Clark appeared first on Digital Photography School.


Digital Photography School

 
Comments Off on 3 Tips for Taking Portraits with a Kit Lens

Posted in Photography


5 Tips for Portraits of Musicians That Will Help You Hit All the Right Notes

25 Oct

I’d like to share a few tips for portraits of musicians that will help you avoid the awkward photos that make any musician cringe.

portraits of musicians

Sometimes we are lucky enough as photographers to be asked to photograph someone with one of their most prized possessions: their musical instrument. Most people that want to be photographed with their instrument really and truly love it, and it’s a part of who they are. As a musician myself, I love photographs with gorgeous instruments in them, and I am especially bothered by photos that don’t capture those instruments naturally. Sometimes I’ll come across a photo that makes me cry out, “Why?? Nobody would EVER hold their instrument like that!!” You can still be creative with your photos without making them awkward.

portraits of musicians

1. Trust the musician

If you aren’t familiar with the instrument you’re photographing, it is especially important to trust the musician. This isn’t the time to try every posing trick that you can come up with, ending up with flutes on top of the head, or cellos held under the chin.

Ask your subject how they hold their instrument naturally. You can ask how they hold their instrument while playing, or when they’re relaxing between songs. If it’s a big instrument, like a piano, ask them how they would stand next to it before they perform, or how they sit by it when they’re thinking about what to practice. Ask them to demonstrate how they carry their instrument from one place to another. These might seem like silly questions, but you can really get a sense of what positions and holds are natural, then you can build from there.

portraits of musicians

As an example, a violinist may tell you that she holds her violin under her right arm when resting. You could take that position, ask her to sit on a chair in a formal pose holding the violin under her arm and get a beautiful portrait of a girl and her violin. The key is to remember that they are much more expert at how to naturally pose with their instrument than you likely are. However, if you do happen to know their instrument well, feel free to use your knowledge to get beautiful natural poses.

2. Do your homework

portraits of musicians

Before a session with a musician, you could watch some videos on YouTube to see how people interact specifically with the instrument you’ll be photographing. Find a professional musician who plays the same instrument. Look at their website to see what kind of photos they have with their instruments. You may have a client who is very shy and need more guidance posing, so it’s helpful to have a few ideas ahead of time. Be prepared for challenges that an instrument might bring, such as unwanted reflections in brass, immobility of harps or pianos, sensitivity to temperature or weather, and have a plan.

3. Ask the musician to play for you

portraits of musicians

If you can get your subject to give you a little performance during the photo session, you will get some great action shots. It usually helps loosen them up a little bit too, and brings out some natural smiles. Remind them that it doesn’t matter if they make mistakes because your camera doesn’t catch any audio. It will only capture the perfect moments of their playing. Also, remind them that you aren’t there to judge their skill, you just want to capture the relationship they have with their instrument. Move around as they play, and catch the beautiful moment from every angle you can, close, and far.

4. Get close-ups of the action

portraits of musicians

Hands are the main part of playing most instruments. Get in close on the hands as they play. These shots often end up being some of my very favorites. Try focusing on the hands as you shoot down the neck of a guitar, the fingers on a flute, or hands that are frozen in mid-air during a drum solo. Getting in close on these details can create beautiful action photos that really tell the story. If their hands are moving too quickly for you to focus, ask them to freeze for a moment in that position while you get the shot.

5. Make the instrument the star

portraits of musicians

Take a few photos of the instrument by itself, too. Musicians love their instruments, and they will love photos that show their beauty. Make sure to ask permission to touch their instrument, and to set it down, move it, or anything you might want to do for the shot that could potentially harm it in any way. You can even ask the owner to do all of the touching and moving, and you can move yourself around to get the photo that you want.

Tell the musician what you have in mind, and they will most likely be on board, and be happy to help you get some amazing instrument photos. Instruments can be extremely expensive, and even more importantly, can have sentimental value that can never be compensated. Keep this in mind throughout the session, whether your subject is in the photo with the instrument, or not. Never ask them to do something that could harm or damage the instrument.

portraits of musicians

portraits of musicians

Conclusion

Every time I’ve been asked to create photos for album covers for musicians, head shots for websites, art to print and frame, or just to capture someone’s favorite hobby, my goal is to create a photo that they will love. One that will stay true to what they would naturally do with their instruments.

I hope these tips can help you create beautifully genuine musician portraits too. I would love to see your musician portraits in the comments!

googletag.cmd.push(function() {
tablet_slots.push( googletag.defineSlot( “/1005424/_dPSv4_tab-all-article-bottom_(300×250)”, [300, 250], “pb-ad-78623” ).addService( googletag.pubads() ) ); } );

googletag.cmd.push(function() {
mobile_slots.push( googletag.defineSlot( “/1005424/_dPSv4_mob-all-article-bottom_(300×250)”, [300, 250], “pb-ad-78158” ).addService( googletag.pubads() ) ); } );

The post 5 Tips for Portraits of Musicians That Will Help You Hit All the Right Notes by Melinda Smith appeared first on Digital Photography School.


Digital Photography School

 
Comments Off on 5 Tips for Portraits of Musicians That Will Help You Hit All the Right Notes

Posted in Photography


9 Tips for Creating Great Street Portraits

02 Oct

I love taking street portraits. Whether the people you are photographing are posing or just going about their day-to-day life, humans are the most captivating, strange and interesting of subjects.

9-tips-for-creating-great-street-portraits-01

Most of my portraits taken out on the street are shot with the permission of the subject. That’s my style. I love looking for people who intrigue me. I often signal them with a smile and gesture of my camera, then watch for their reaction. But I also shoot unposed portraits and life on the street, whatever catches my eye.

I know from my workshops that a lot of people find photographing strangers difficult and even, sometimes, terrifying. What is important to remember though, is that most people like to be noticed. It’s a compliment to be seen and thought of as interesting. But if they don’t like it, then the worst that can happen is that you have to delete the photo. Simple. Plus the more you do this, the easier it gets.

9-tips-for-creating-great-street-portraits-02

Here are some tips for creating interesting and evocative street portraits:

#1 – Simplicity

“The one guiding idea was to strip away the visual noise of the street so that the people emerge in a different and hopefully more surprising way.” Eamonn Doyle

I am a lover of simplicity in my composition and when it comes to street portraits, simplicity really is your friend. One thing that ruins so many portraits is a busy, complicated background. A background that’s too busy will make your image look flat because your camera can’t capture the depth that your eye can. You have to create depth yourself with your composition. A busy background will swallow up your subject and distract your eye.

One of my favourite types of backgrounds for street portraits is something clean, colourful, and strong, like the image below. The line in the middle creates a really strong balancing element for the subject. The strength of the colours and line contrast nicely with this older man, who with that slight smile looks like he knows a thing or two about life.

7-tips-for-creating-great-street-portraits-03

#2 – Break the world down into elements

You can simplify the purpose of composition into the idea that you are simply breaking down the world into elements and organizing them in an interesting way.

I find it really helpful to look at composition with this in mind – that all you are doing is organizing the world’s elements. It helps because our eyes make things very complicated for us photographically as we see everything in 3D. Not only do we see and sense hundreds of thousands of pieces of visual information every minute from all around us, but our senses can pick up on things happening behind us as well.

street-portrait-tips-6

To break this visual overload created by your eyes when you are bringing the world into your frame, start by breaking down what you see around you into elements – an interesting mural, strong lines on the road, beautiful shadows, etc. Then build your composition up from there. You only need one or two interesting elements to make a photo. Ones that work together and say something through their balance, shape, or placement.

An example

This photo below is super simple. Very little going on, but I like it. What do you think makes it work? There are a couple of strong elements here that make it an interesting photo. Firstly it’s the hand holding the newspaper with a glimpse of the face reading. Then the man farther ahead walking.

Now these two men, combined with that strong line of the wall, makes it look to me like a conveyor belt. You know that it’s morning, partly because of the sun, and then the newspaper, that’s the kind of thing you do on the way to work right? So now you have a little story, perhaps about the repetitiveness and the monotony of the human experience?

street-portrait-tips-2

I don’t always see a story in an image when I am shooting; often that comes after when I’m looking at my photos and sharing them. But what I do concentrate on is looking for interesting elements and figuring out how to place them together to make an interesting composition.

#3 – It’s all in the eyes

“The face is a picture of the mind as the eyes are its interpreter.” Marcus Tullius Cicero

When you are starting out taking photos of people it can be a scary experience. So much so that you often rush too much – perhaps in an effort to get it done as quickly as possible and to not offend or upset anyone. But the more you shoot street portraits, and the more effort you make to relax into the experience, the more you can work on revealing the deeper emotions of your subject.

When you take a more relaxed and patient approach you give people the space to unfold and reveal their thoughts and feelings through their bodies, faces and, most powerfully, their eyes. Eyes tell you how the subject is feeling, and often thinking.

7-tips-for-creating-great-street-portraits-07

This is where having a camera is an advantage. As humans we don’t usually look into someone’s eyes for long periods of time. It’s too powerful! It takes the interaction with that human to another level. If you have a camera between you and your subject though, it acts as a sort of safe barrier. So you can then spend time observing them, seeing what their face is doing, looking into their eyes, and seeing how they really feel.

7-tips-for-creating-great-street-portraits-13

#4 – Be patient humans do funny things

“You don’t have to enhance reality. There is nothing stranger than truth.” Annie Leibovitz

9-tips-for-creating-great-street-portraits-09

street-portrait-tips-23

For me taking photos of people on the street is all about opening yourself up to, and noticing the comedy of being human, as Elliot Erwitt calls it.

“You can find pictures anywhere. It’s simply a matter of noticing things and organizing them. You just have to care about what’s around you and have a concern with humanity and the human comedy.” Elliott Erwitt

#5 – Find a great background and wait

There is a tradition in street photography that you find an interesting location; a background, a road, or sign, and then you wait for someone or something to happen in front of it. It requires patience, which is a very good thing to develop. I’ve noticed that patience is something that beginners often lack. Possibly because we live in a world that is so used to immediate gratification that we expect good shots to come in abundance.

It rarely works like that. I therefore like this idea of finding something interesting out on the street – some elements, or a place that fascinates you, then waiting for something to happen. It’s a great way to train your eye, and perfect your timing. Plus, when you continually gaze at one place you become very familiar, very intimate with it. You’ll notice things that initially you didn’t see.

street-portrait-tips-8

#6 – Use colour

“I paint because colour is a significant language to me.” Georgia O’Keeffe.

Colour is also a significant language for me and I have always preferred shooting colour over black and white. I love the feeling you can communicate with colour and I think it moves me as much as light. So for me it’s an integral part of my style.

Street photography is often dominated by black and white photography. Although what I am doing is often not strict street photography (however, Bruce Gilden, controversial street photographer extraordinaire, did say “If you can smell the street by looking at the photo, it’s a street photograph.”).

street-portrait-tips-26

Whether you use colour or black and white, do what excites you the most. The more excited you are by your subject and what you are creating, the more you’ll imbue your photos will feeling and depth.

Colours communicate different feelings and ideas (e.g., yellow is warm and happy, green is peaceful, red signals confidence and aliveness). I love to use them to contribute to the story that I am telling with my images.

street-portrait-tips-14

#7 – Your camera is your licence to be curious

“I love that having a camera basically gives you a license to go up to anyone and ask them what they’re doing and why.” Andrew Hinderaker

Most people are perfectly happy to be photographed. That’s the key when you’re going out and about. My mantra when taking photos of strangers is – be confident (this comes with practice), friendly, curious, and ethical. In other words, I prefer to photograph people who are okay with the experience. I don’t generally photograph kids and the obviously vulnerable, etc. That’s my ethical line. For me photography is an exchange and I respect everyone whom I photograph.

7-tips-for-creating-great-street-portraits-10

Humans are built to want to connect with other humans, and photography is a powerful form of connection when you use it as such. When you are taking someone’s photo you are basically saying – I see you, you interest me. And for most people that’s a wonderful compliment.

For me the portrait above is about two things, the light and the couple smiling. The warmth of their smiles match the warmth of the light, as well as the lush, summery background of grass and trees. I took this photo by just smiling at the couple and gesturing with my camera. Of course the fact that it was a beautiful summer’s evening and we were in the park helped. People who are relaxing and enjoying themselves are, of course, easier subjects to approach.

#8 – The power of the gesture

The more closely you watch humans the more you see how they reveal themselves in so many ways. This was a photo I took for a project I was doing on people’s bellies. Each photo was totally different because the way that people presented their bellies and the gestures they made, showed so much about their personalities, what they felt about themselves, and their bodies.

street-portrait-tips-18

Keep watch of people’s gestures. Along with the eyes, hands are very revealing of people’s feelings and thoughts (and apparently hands are easier to read than eyes if you want to tell if someone is lying).

#9 – The key to original, interesting photos is to be yourself

“I’m photographing myself out there. Not myself physically, but mentally. It’s my take on the world.” Bruce Gilden

A lot of people in workshops worry about how over-photographed the world seems now and will they ever have anything interesting or original to contribute? Hasn’t it all been done before? Well, this is the wrong way to think about it. Of course the world is very photographed now. Especially places that I visit, London, Paris, Venice, Istanbul, etc.

But the world isn’t a staid thing – it’s an ever-changing, ever moving, organism. Nothing stays the same. Having humans moving around the world makes the possibilities for original and interesting photos infinite.

street-portrait-tips-4

More importantly though, photography is an expression of who you are. When you start out perhaps you’ll take photos like everyone else. But the more you do it, the more you’ll create something unique and original that’s a total expression of who you are – your passions, experience, style, and way of seeing the world. This creates the unique and interesting photographs that you are aiming for. It’s just like famous jazz musician Miles Davis says:

“Sometimes you have to play a long time to be able to play like yourself.”

Conclusion

I’d love to know what you think. What do you do to create interesting street portraits? Comment below, I’d love to hear your ideas!


Taking street portraits and exploring the street life of cities with your camera is an exhilarating experience. Learn how to conquer your fears of street photography and to create compelling compositions with Anthony’s popular street photography workshops in some of the most vibrant cities Europe.

googletag.cmd.push(function() {
tablet_slots.push( googletag.defineSlot( “/1005424/_dPSv4_tab-all-article-bottom_(300×250)”, [300, 250], “pb-ad-78623” ).addService( googletag.pubads() ) ); } );

googletag.cmd.push(function() {
mobile_slots.push( googletag.defineSlot( “/1005424/_dPSv4_mob-all-article-bottom_(300×250)”, [300, 250], “pb-ad-78158” ).addService( googletag.pubads() ) ); } );

The post 9 Tips for Creating Great Street Portraits by Anthony Epes appeared first on Digital Photography School.


Digital Photography School

 
Comments Off on 9 Tips for Creating Great Street Portraits

Posted in Photography


How to Choose Your Camera Angle to Take Better Portraits

18 Sep

Taking portraits involves so many variables that it can feel overwhelming for a new photographer. What lenses do you use—zoom, prime, or a mix of both? Do you shoot full-frame or cropped sensor? Will you shoot indoors or outdoors. Even the subject matter can be tricky, with some portrait photographers working exclusively with families, others who only shoot high school seniors or newborn babies, and still more who do a mix of everything.

all-about-angle-husband-wife-outdoors

Nikon D750, 85mm, f/4, ISO 900, 1/250 second

While you are pondering all these variables it can be easy to lose sight of the forest for the trees and forget about a few key basics such as posing and lighting, and no matter what style of portraits you choose to pursue there is one thing that always comes into play which may not seem obvious: the camera angle from which you shoot. This can make all the difference between happy clients and complaining customers. Understanding how you can use camera angles and points of view can greatly enhance any portrait session.

Point of view – up high or down low

Understanding how your camera angle, or point of view, can affect your shots will go a long way towards improving not just your portraits, but your photography in general. How you position yourself in relation to your subjects can have a dramatic effect on the resulting pictures. As an illustration of how this works, here are two pictures of a family from a recent home-based session I did. Both show a very similar scene, and yet the different angles from which I shot them results in two vastly different images.

all-about-angle-family-indoors-low

Nikon D750, 35mm, f/4, ISO 5600, 1/90 second

As I shot the image above I was very low to the ground. Crouching down on my hands and knees, I got very close physically to the family while the mother and father watched the boys play with their sister. It feels like the viewer is part of the scene, right there with them as they all share a fun moment together. This is entirely due to the low angle from which the picture was shot. Now take a look at virtually the exact same scene but shot from high above.

all-about-angle-family-indoors-high

Nikon D750, 35mm, f/4, ISO 3600, 1/90 second

To get this picture I grabbed a dining room chair and stood on it to get a shot from a much higher angle. The result is a picture that feels quite different from the first one. It doesn’t seem like you are a part of the scene, but an outside observer looking at the family as they gather together.

While I like both images, each one creates a very different emotional response on the part of the viewer. Even though both were shot with the same camera and lens, at the same location, with the same subjects, the result is two pictures that are vastly different from one another all because of the angle from which they were taken.

Even subtle changes make a difference

You can see a similar, but more subtle, effect in this pair of portraits I took of a young girl near her birthday.

Shot with a Nikon D750 and 85mm lens.

Nikon D750, 85mm, f/4, ISO 800, 1/500 second

The angle here isn’t as low as the first one of the family, but it’s low enough to be on the girl’s eye level. To get this I had to kneel down and stand a few meters back as her mother talked with her from my right-hand side. It gives a similar sense of intimacy as the first picture of the family and feels as though the viewer is near the girl and part of the scene.

This changes a bit when the girl is shot from an adult’s eye level looking down (below).

all-about-angle-child-playing-high

Nikon D750, 85mm, f/4, ISO 560, 1/250 second

While the effect here is not as dramatic as the example with the family, you will still note a similar result in terms of emotion and tone. Instead of getting down on eye level I shot this while standing up about the same distance away. It doesn’t feel like you, the viewer, are a part of the scene and instead it seems like you are merely an observer. Notice how the sidewalks in the background cut across the frame at odd angles whereas in the first one the sidewalks neatly cross in horizontal lines, adding a subtle touch without being too obvious or gaudy.

Once again I don’t think either picture is necessarily better or worse, but both are quite different as a result of the camera angle.

Kids – break the rules

This is, incidentally, one of the most common issues I see with people who are taking casual snapshots of their kids, whether with a fancy DSLR or just their mobile phone. Taking a few seconds to crouch down and get on eye level with the children can make all the difference in the world between an intimate moment frozen in time, and a boring snapshot.

However, I don’t want to give the mistaken impression that shooting from a high angle is necessarily a bad thing. It can be a very good thing indeed, and quite effective when used intentionally, such as this image of a girl with her two-week-old baby brother (below).

Shot with a Nikon D750 and 50mm lens.

Nikon D750, 50mm, f/4, ISO 400, 1/125 second

This picture was a bit tricky, but the results were well worth it. I was doing this on location in the family’s home so I didn’t have a lot to work with, but I wanted to get something a bit unique. I put the two kids on a blanket on the floor, got a chair to stand on, and positioned myself directly above them while bouncing my flash off the ceiling.

It resulted in an image that feels more fun and playful as if the viewer is peeking in on a fun moment between the two siblings. The equipment here was nothing all that special (I could have just as easily used my old D7100 and 35mm lens to get the same shot) but paying attention to the angle made for a picture that stood out quite a bit from the rest of the image I shot that day.

Other camera angles to consider

Sometimes finding the right angle involves something as simple as choosing where to put yourself in relation to your subject, not necessarily whether to shoot from high above or down low. You can see this in the example below. After an hour of taking a variety of traditional portrait-style

After an hour of taking a variety of traditional portrait-style shots, I stood back while the family walked back to their car and took some pictures with the sunset casting a warm glow through the trees above.

Shot with a Nikon D750 and 85mm lens.

Nikon D750, 85mm, f/4, ISO 180, 1/400 second

There are some elements that I could do without, such as the tree branches coming from the left-hand side. But overall the picture feels warm, cozy, and conveys a sense of comfortable intimacy as if I have captured the family in a quiet and sincere moment. It puts you, the viewer, as an outside observer to the scene and almost feels like you are watching from afar as the family shares a special time together.

This is in stark contrast to the next picture, which despite being at a different location is composed in almost exactly the same manner except for one variable: the angle.

Shot with a Nikon D7100 and 85mm lens.

Nikon D7100, 85mm, f/2.8, 1/250 second, ISO 100

This picture feels like it’s full of energy, excitement, and enthusiasm as the family holds hands and walks towards me. I like both pictures quite well, but changing the angle resulted in two images that are vastly different from one another.

Summary

Hopefully, these examples give you an idea of how your camera angle and point of view can dramatically affect the types of portraits you take. If you are looking to try something new and kick your photography up a notch without spending any money on more gear, try doing something as simple as changing your angle and see what happens.

In fact, this now makes me wonder about your favorite tips and tricks for shooting portraits at different angles. Leave your thoughts in the comments below, and feel free to share pictures as well!

googletag.cmd.push(function() {
tablet_slots.push( googletag.defineSlot( “/1005424/_dPSv4_tab-all-article-bottom_(300×250)”, [300, 250], “pb-ad-78623” ).addService( googletag.pubads() ) ); } );

googletag.cmd.push(function() {
mobile_slots.push( googletag.defineSlot( “/1005424/_dPSv4_mob-all-article-bottom_(300×250)”, [300, 250], “pb-ad-78158” ).addService( googletag.pubads() ) ); } );

The post How to Choose Your Camera Angle to Take Better Portraits by Simon Ringsmuth appeared first on Digital Photography School.


Digital Photography School

 
Comments Off on How to Choose Your Camera Angle to Take Better Portraits

Posted in Photography