RSS
 

Posts Tagged ‘Portrait’

Mastering Family Portrait Part II: How to Deal with Clients

06 Oct

So you had your pre-shoot consultation, and you’re ready to go. You get to your location, and the family are all there on time, in happy moods, excited to shoot, and looking great. Except for that toddler who just wouldn’t go down for his nap. (Note: NEVER shoot a toddler during his naptime…EVER!!!) Or that grandfather who doesn’t want to Continue Reading

The post Mastering Family Portrait Part II: How to Deal with Clients appeared first on Photodoto.


Photodoto

 
Comments Off on Mastering Family Portrait Part II: How to Deal with Clients

Posted in Photography


3 Simple Ways to Create Stunning Eyes in Your Portrait Photography

03 Oct

EYE MONTAGE

Image model credits, clockwise from top left: Chris Milligan/Fremantle Media, Rachael Lever, Danny Spannerz/East Brunswick Tattoos, Tiffany Diaz

“Here’s looking at you, kid.”

Reclusive Hollywood legend Marlon Brando would always close his eyes when paparazzi tried to take his photo. He knew that without his eyes open an image wasn’t worth publishing.

The eyes are the single most important feature of any portrait. Beautiful eyes can make even the dullest portrait mesmerizing. Poorly lit, out of focus eyes, or eyes that lack connection, will weaken the impact of a portrait.

Here are my three favorite techniques to make eyes really stand out in your portraits.

#1 – Light

Light makes photography. Embrace light. Admire it. Love it. But above all, know light. Know it for all you are worth, and you will know the key to photography.” – George Eastman

Eyes look best when they are lit well, with beautiful catch light. Catch lights are the reflection of a light source in the eyes. The size, shape, and brightness of your catch lights depend on the light source you use.

WindowLight

Two large, frosted windows from my studio create beautiful catch lights. Model: Bryana Karanikos

Naked Flash on camera

Diffused flash on-camera creates a slightly softer, rectangular catch light.

Med Soft off camera

Medium softbox, off-camera, positioned at 2 o’clock gives a soft, natural catch light.

ChasingLight 2250

Poorly lit eyes without catch lights look cold, and a bit creepy.

#2 – Expression

You are what you think. All that you are arises from your thoughts. With your thoughts you make your world.” – Anon.

EyesBA

In the image on the left (above), Tiffany’s eyes are cold, and she looks nervous. After I gave Tiffany a visualization exercise, her eyes appear warm, confident, and connected (right image above) Model: Tiffany Dias

How you communicate, connect, and direct your model is key to capturing a great expression in the eyes. If your model’s smile isn’t genuine, his or her eyes will appear cold and dull-looking. If your model is nervous or distracted, this too will be reflected in his or her eyes.

One technique I use to create a great expression is visualization. I ask my model, If you could be anywhere doing anything right now, where would that be? Tell me about that moment. Who is there? What does it feel like? Once they are in the moment of their visualization, their entire body language and expression changes.

#3 – Post-production

Be willing to give that extra effort that separates the winner from the one in second place.” — H. Jackson Brown Jr.

Post-production can lift your images from good to great, when it’s done well. The key to great post-production is not overdoing it. It’s easy to get excited with all the tricks and enhancements that post-production software offers. It’s addictive and much like opening a jar of Nutella – very difficult to control yourself once you’ve begun.

I try and use the overnight rule when it comes to retouching. Once I’ve worked on an image, I won’t look at it again for at least a day. I find my eyes constantly adjust to the modifications I’m making, so it’s more difficult to see when I’ve gone too far (much the same way I dressed in the ’80s).

Here’s a step-by-step technique to enhance eyes using Adobe Lightroom:

EYESBP 10

Before and after: I’ve used Lightroom to make the eyes sharper and brighter and enhanced their color.

a) Import your image into Lightroom and use the basic development panel to develop the shot. In this case, I’ve used one of my own beauty presets.

EyesBP 2

EyesBP 2B

Here are the basic adjustments I’ve made for this image.

b) Zoom in to the eyes (B.) and select the adjustment brush tool (A.) You can also select the brush using keyboard shortcut K. See image above.

EyesBP 4

c) The next step is adjusting the eye color:

EyesBP 5

  • Increase the temperature slider (A.) to make the eyes appear warmer in tone.
  • Increase the exposure slider (B.) to brighten the iris.
  • Increase the shadow slider to bring more detail into the shadow area (C.)
  • Increase the sharpness slider to make the eyes appear more detailed.

Adjusted only the colored part (the iris) of her eye (highlighted in red) and set the brush to have a slight feather and low flow so you can build up your adjustments slowly.

d) Next, select a new adjustment brush (A.), increase the sharpness slider (B.) by +22 and paint over the colored part of the eyes, eyelashes, and eyebrows. This will really make the eyes stand out.

EyesBP 6

e) Finally, select a new adjustment brush. Set the exposure slider to -29 and increase the clarity to +10. Paint around the edge of the iris. This will darken the area slightly and give the eye more definition.

f) The final image has been imported into Adobe® Photoshop®, where I have done a basic skin retouching to remove a few small blemishes.

EyesFINAL

I’d love to hear about your techniques for enhancing eyes and see some examples.

Gina has a new dPS ebook just released – Portraits: After the Shot – check out out here!

The post 3 Simple Ways to Create Stunning Eyes in Your Portrait Photography by Gina Milicia appeared first on Digital Photography School.


Digital Photography School

 
Comments Off on 3 Simple Ways to Create Stunning Eyes in Your Portrait Photography

Posted in Photography


New: The dPS Guide to Portrait Post Production and Workflow

02 Oct

Our Exciting News in a Nutshell

Today I’m excited to announce the launch of a brand new eBook – Portraits: After the Shot – a Guide to Portrait Post Production and Workflow by Gina Milicia.

It’s available for a limited time with an early bird bonus of a collection of great Lightroom and Photoshop presets. Get your copy here.

The Story So Far

  • In January 2013 we released our first Portrait Photography eBook by Gina Milicia – Portraits: Making the Shot – a fantastic overview of taking beautiful portraits with soul.
  • In September 2013 we released Gina’s second eBook – Portraits: Lighting the Shot – a guide to lighting portraits with both natural and artificial light.
  • In January of this year we added to Gina’s library of eBooks with a 3rd – Portraits: Striking the Pose – an eBook all about working with your portrait subjects to get natural looking portrait poses.

Portraits ebooks

To say Gina’s first 3 eBooks have been popular would be a gross understatement. They’ve each outsold the previous one and have received fantastic reviews from many of our readers.

But we’re not finished yet. So far Gina has focused her eBooks on taking beautiful portraits. Here at dPS we’re big believers in getting the best photo you possibly can in-camera – but we also know there’s a lot you can do after you take the shot.

It’s for this reason that we’ve been working with Gina over the last 6 months on a new edition to this wonderful little collection of eBooks and today can introduce to you… Portraits: After the Shot

Portraitspostproduction

This eBook is all about giving you the confidence and skills to work with the portraits you take and bring them to life using the wonderful tools available to us today.

Inside Portraits: After the Shot you’ll discover topics such as:

  • The fundamental rules of portrait post processing
  • How keeping your processing simple can be much more profound
  • How to develop your own post processing style
  • All the gear you’ll need to support your processing
  • Storage and backup solutions
  • Detailed run though of Ginas exact workflow
  • Lightroom fundamentals and shortcuts
  • Lightroom ‘go to’ recipes
  • Photoshop essentials and recipes

There’s much more too.

See the full table of contents, some screenshots from the eBook and learn more about the early bird bonus here on our Portraits: After the Shot page.

For those of you who’ve not invested Gina’s previous eBooks you’ll also find a great bundle deal that gets you 38% off the full collection!

The post New: The dPS Guide to Portrait Post Production and Workflow by Darren Rowse appeared first on Digital Photography School.


Digital Photography School

 
Comments Off on New: The dPS Guide to Portrait Post Production and Workflow

Posted in Photography


Step by Step Portrait Processing in Lightroom

21 Sep

Andrew’s ebook Mastering Lightroom: Book Four – The Photos is available now at a special price of 40% off for a limited time from Snapndeals. It’s an advanced guide to processing photos in Lightroom’s Develop module, explaining how to use Lightroom’s powerful processing engine plus Develop Presets and plug-ins to create beautiful images. This photo is one of ten case studies from the book.

Portrait processing in Lightroom

The story

When you are photographing someone who enjoys being in front of the camera, take advantage of it. This was a simple portrait to take and its strength comes from the model’s spirit, not fancy technique. I’ve worked with her before and know that she is good at creating different facial expressions. I asked her to give me a series and every time she changed her expression I took another photo. Experienced models will pose, pause until you take the photo, and then move onto the next one, making your job as a portrait photographer much easier.

You can’t see it in this photo but the model was holding a silver reflector slightly beneath her shoulders. The reflected daylight created a wonderful clean lighting effect that made processing the portrait much easier.

First steps

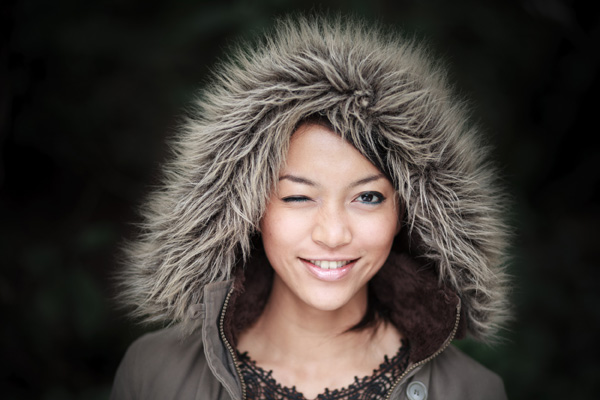
Here’s the original portrait as it appeared straight out of the camera. It was taken with an 85mm lens set to f/1.8, throwing the background out of focus.

Portrait processing in Lightroom

I knew from the start that I wanted the model’s expression to be the focal point of the portrait. The use of a short telephoto lens and a wide aperture has partly achieved that, but the photo required more work. The first task was to tackle the background. Although out of focus, its brightness was a big distraction. My main job here was to make the background darker so the viewer’s eye goes straight to the model.

My hope today is that by following this tutorial and applying the techniques I used to your own photos, you will learn how to create better portraits in Lightroom.

Step 1: Basic adjustments

I prepared the photo by going to the Camera Calibration panel and setting Profile to Camera Portrait. Next I went to the Lens Corrections panel and enabled Chromatic Aberration removal and Profile Corrections, setting Vignetting to zero.

I wanted clean, neutral skin tones, so I went to the Basic panel and moved the Temp slider slightly (from 4850 to 4520) to remove the warm tint.

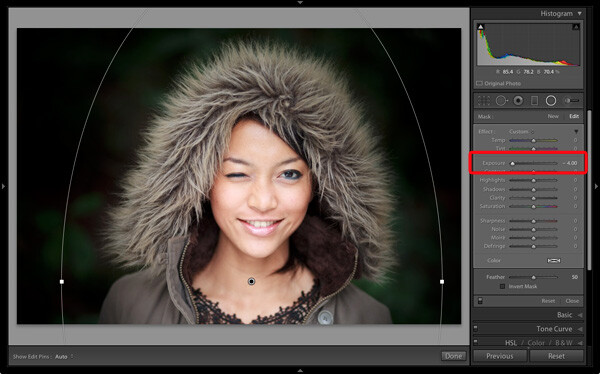
Step 2: Add a vignette using the Radial Filter

Next I used the Radial Filter tool to make the background darker. I placed the filter so that the top half surrounded the model’s face and shoulders. In this position the Radial Filter can be used to make the area either side and above the model darker, without affecting the bottom part of the portrait. I set Exposure to -4.0 to see the area affected by the adjustment.

Portrait processing in Lightroom

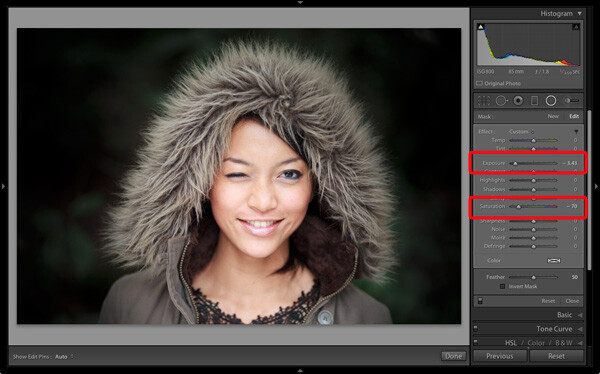
When I was happy with the position of the Radial Filter I reset Exposure to zero, then reduced it until the background went quite dark. I also set Saturation to -70 to remove colour from the background. How much you push the Exposure slider in this situation is always subjective. Some of you will want to retain a fair amount of detail in the background, others will be content to make it go completely black.

Portrait processing in Lightroom

Note: Radial filters are new to Lightroom 5. In earlier versions the best way to achieve a similar effect would be to place a Graduated Filter on either side of the model, and use Adjustment Brush adjustments to fill in the gaps. An alternative technique is to use the Post-Crop Vignetting tool, and lighten any areas that are too dark (such as the model’s shoulders in this example) with the Adjustment Brush tool.

Step 3: Refine the vignette with the Adjustment Brush

While the Radial Filter is an excellent tool for making backgrounds darker, it’s not perfect. The feathering required for a gradual transition may leave some areas of the background close to the subject too light. In this case there were still areas around the hood that were a little bright.

So I used the Adjustment Brush tool to select those areas and reduced Exposure (to -0.65) to make them darker. I didn’t have to be precise with the placement of the Adjustment Brush as the background was already quite dark and out of focus.

Portrait processing in Lightroom

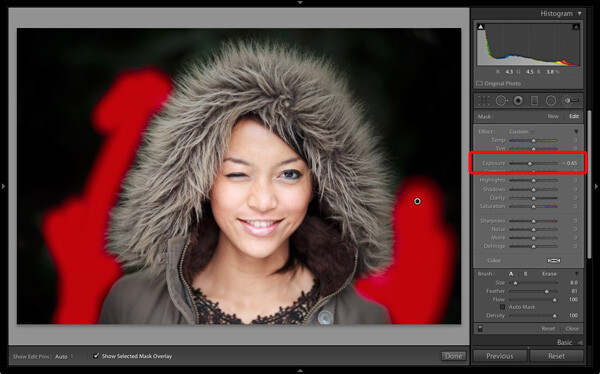
Tip: If you find that the use of the Adjustment Brush is obvious, try setting Feather to 100 and Flow to 50%. This lets you build up the effect little by little instead of doing it all in one brush stroke.

Step 4: Retouching with the Adjustment Brush

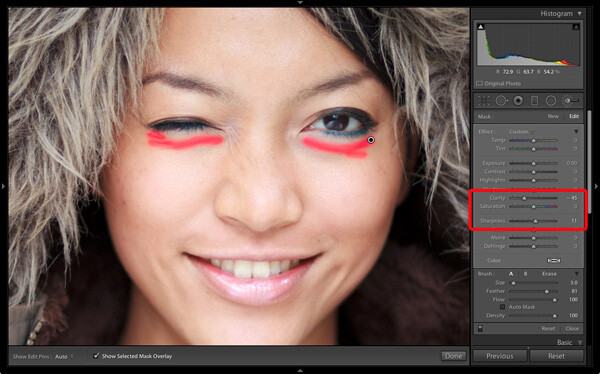
This portrait didn’t need much retouching, but there were still a couple of things I wanted to do. The first was to minimize the lines under the model’s eyes. Note that I didn’t want to get rid of them completely, as they are a natural part of her expression. The lines were created by her smile and winking action, and removing them would look unnatural.

I used the Adjustment Brush tool (zoomed in), and carefully painted over the lines under her eyes. I kept the brush size small so as not to affect the neighbouring areas.

Then I selected the Soften Skin preset from the Effect menu. Lightroom applied the skin smoothing effect at full strength by setting Clarity to -100 and Sharpness to +25. This was too strong. To reduce it, I clicked on the pin that marked the Adjustment Brush, held the left mouse button down and dragged the mouse left. Lightroom reduced the intensity of the effect by moving the Clarity and Sharpness sliders in proportion (this technique works with any setting from the Effect menu). I stopped when it looked right (Clarity -45, Sharpness +11).

Portrait processing in Lightroom

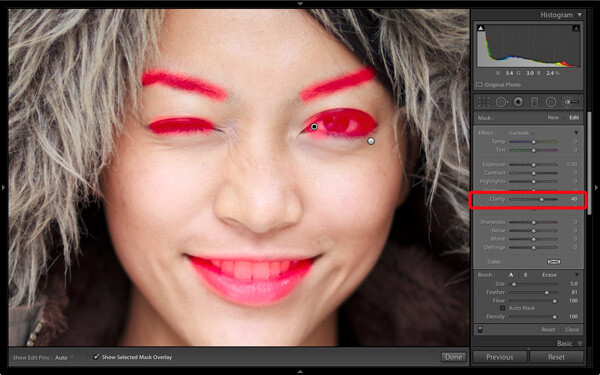
I created a new Adjustment Brush to cover the model’s eyes, mouth and eyebrows. I pushed the Clarity slider to +40 to bring a bit of extra sharpness and contrast to those areas. The screen shot shows the areas covered by the Adjustment Brush.

Portrait processing in Lightroom

Step 5: Framing the portrait

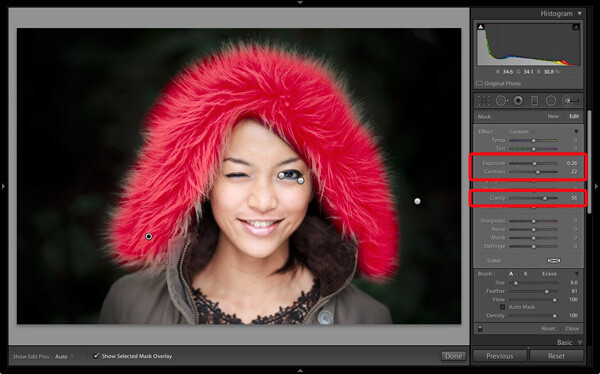
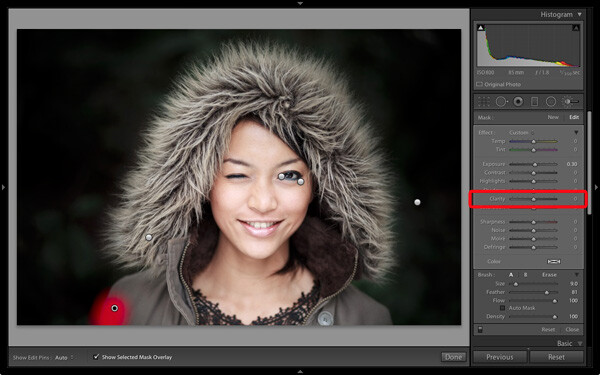
The model’s hood creates a natural frame for her face and is an essential part of the composition. I decided to emphasize it by using Clarity to bring out the texture of the fur.

I created another selection using the Adjustment Brush tool and increased Clarity (to 56), Contrast (to 22) and Exposure (to 0.26). The hood is a frame that draw the viewer’s eye to the centre of the frame, and these adjustments help to emphasize it. I needed to find the balance between emphasis and distraction; highlighting the beautiful texture of the fur lined hood without pulling too much attention away from the model’s expression. This screen shot shows the area covered by the Adjustment Brush.

Portrait processing in Lightroom

Next I went to the Basic panel and reduced Vibrance to -14 to de-emphasize the colours a little more. Finally, I used a small Adjustment Brush to lighten the edge of the model’s right shoulder, which had been darkened by the Radial Filter adjustment earlier. The area covered by the Adjustment Brush is shown in the screen shot.

Portrait processing in Lightroom

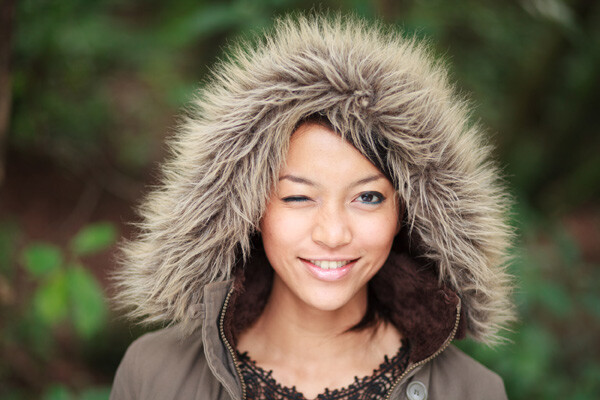
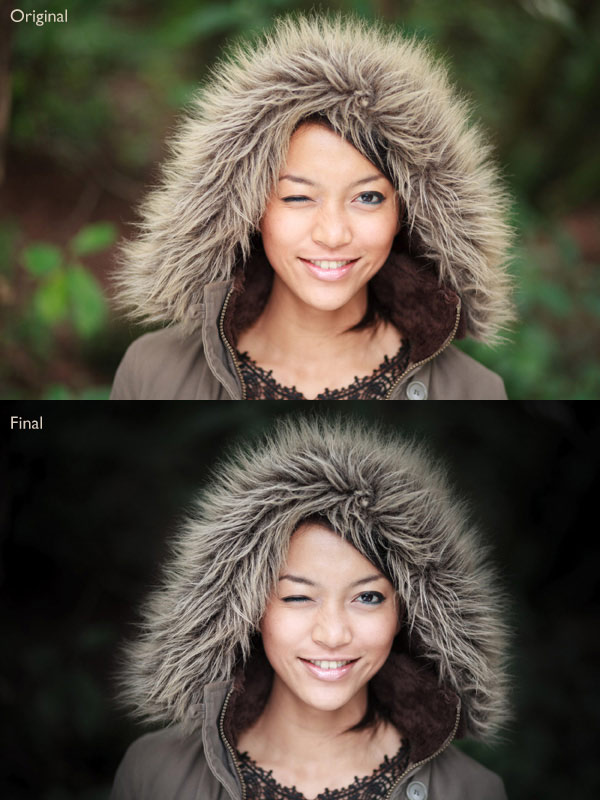
Comparing before and after results

Here are the original and final versions together so you can compare them.

Portrait processing in Lightroom

What do you think of these processing techniques? There’s more than one way to process most photos – do you have any suggestions for an alternative interpretation of the original Raw file? Please let me know in the comments.

Mastering Lightroom: Book Four – The PhotosAndrew’s ebook Mastering Lightroom: Book Four – The Photos is available now at a special price of 40% off for a limited time from Snapndeals. It’s an advanced guide to processing photos in Lightroom’s Develop module, explaining how to use Lightroom’s powerful processing engine plus Develop Presets and plug-ins to create beautiful images. This photo is one of ten case studies from the book.

The post Step by Step Portrait Processing in Lightroom by Andrew S. Gibson appeared first on Digital Photography School.


Digital Photography School

 
Comments Off on Step by Step Portrait Processing in Lightroom

Posted in Photography


3 Essential Photoshop Tools for New Portrait Photographers

29 Aug

Opening Photoshop for the first time is kind of like going on your first date; your hands sweat, your eyes glaze over, you completely lose all sense of direction and time. At least that was the scenario for me.

Portrait

Photoshop is an incredibly complex program that can be used as an artistic tool for positive enhancement, or gross distortion when it comes to portraiture. It’s all too easy to over-edit, get carried away with the sheer number of the tools at your fingertips, or attempt elaborate cover-up schemes for poorly shot images when first starting out. There are certain tools I grasped at the beginning of my learning curve, however, that were essential for editing clean and simple portrait images. Three years after my initial dumb-struck encounter, and countless hours of reading and practicing later, there are three tools that I still use in almost every photo I push through Photoshop. I’ve since discovered that users at every stage continually apply these tools to their photography workflow, as well.

Everyone has to start somewhere, so if you know nothing else about it yet, start by familiarizing yourself with these three Photoshop tools and you’ll build a solid foundation for taking your portrait photography editing to the next level.

1. Curves

The “S-curve” is one of the most common techniques in editing that packs an instant punch. I guarantee that a large majority of photographers working on everything from landscapes, to boudoir images, use this tool at some step in their Photoshop workflow. There are many different effects that you can achieve using the Curves tool, so the trick is to just play around with it a little to see what works best per image; there’s no specific settings within the tool that will always achieve great results. Much of it is about preference. You can achieve bold, colorful, contrast or a soft matte finish, simply by just readjusting the points on the curve. Extreme curves will give some strange discolorations, though, so for clean portrait editing, stick to small adjustments.

Curves

before-after-curves

2. Clone (stamp) Tool

Clonetool

This is especially helpful for fixing blemishes or small imperfections on skin, but has countless other applications as well. To use, just hover your mouse over the area you want to copy, press the Option key for Mac (Alt for Windows) and click. This “clones” the area you want to replicate. Release the option/alt key, navigate your cursor over the area you wish to fix, then click again. This will replace the “bad” area with the “good” area.

Lesson learned: don’t try to do all your skin smoothing with the clone tool. It will look way over-done and it’s far too time-consuming to match up every pixel. This was clearly not my smartest idea, I admit. Save yourself the trouble—there are better ways!

As I got better with my precision of this tool, I was able to use it for things like removing stray hairs, filling in patches of sand or grass, and other little pesky details as well. It really is a crucial tool to master.

Before after clone

3. Dodge and Burn

Dodge and burn

Dodge and Burn are technically two different tools but are often used in conjunction with each other. They are a power duo with subtle but impressive impact. I use it most commonly on eyes to give them that extra sparkle. To understand the function of each, think of it this way: when you “dodge,” you’re dodging the shadows in order to brighten your highlights and when you “burn,” you’re burning in the shadows and making them darker.

Befor eafter dodge burn

When I use these tools for eyes, I decrease the opacity to about 30% and “dodge” the iris, then I “burn” the shadows in the ring around it as well as the eyelashes. Again, make sure you don’t go overboard and give your client ghostly bright eyes, but a little adjustment goes a long way in those close-up shots! You can also use these tools to add color and contrast to skies, or add interesting light to specific areas of your image.

As with all the Photoshop tools, the successful edit hinges on the user knowing what to use when, and how to use in moderation. If you are a beginner, I hope this helps give you some direction about where to begin and rid you of the deer-in-the-headlights look for good!

The post 3 Essential Photoshop Tools for New Portrait Photographers by Leah O’Connell appeared first on Digital Photography School.


Digital Photography School

 
Comments Off on 3 Essential Photoshop Tools for New Portrait Photographers

Posted in Photography


Self portrait: Olympus PEN E-PL7 First Impressions Review

28 Aug

At first glance the Olympus PEN E-PL7 looks like yet another compact, selfie-friendly mirrorless camera — but looks can be deceiving. The innards of the camera come largely from the excellent OM-D E-M10, and Olympus touts the E-PL7’s autofocus system as its best yet. For all the details on the latest PEN, check out our First Impressions Review.

Articles: Digital Photography Review (dpreview.com)

 
Comments Off on Self portrait: Olympus PEN E-PL7 First Impressions Review

Posted in Uncategorized


Robotic Printer Creates Artist’s Portrait Using His Blood

28 Aug

[ By Steph in Art & Drawing & Digital. ]

Robotic Blood Printer 1

Blood streams from Ted Lawson‘s arm into a CNC printer, which uses it like ink or paint to robotically create the Brooklyn-based artist’s image. ‘Ghost in the Machine’ is a life-sized nude self-portrait rendered in just about the most graphic way possible, the whole process captured on video as an alarming amount of blood is applied to a blank white surface.

Robotic Blood Painting 2

Visibly drained by the process, Lawson sits beside the machine as it works, replenishing himself with juice as his blood streams out in little squiggles. At first, the image is abstract, slowly coming together as the robot follows the guidelines of the illustration.

Robotic Blood Painting 3

“I’m generally not into doing selfies, particularly nude ones, but when I came up with the idea to connect my blood directly to the robot (CNC machine), it just made too much sense to not try one as a full nude self-portrait,” Lawson told the Associated Press.

Robotic Blood Painting 4

“In this series I’m really just trying to make a good drawing, which requires a lot of process and spontaneity to achieve. I do consider these works to be drawings and not prints, in that I allow the robot to make certain mistakes or leave in certain glitches on purpose.”

Robotic Blood Painting 5

The final print will be on display at the Joseph Gross Gallery in New York City from September 11th through October 4th as part of Lawson’s solo exhibition, “The Map Is Not the Territory.”

Share on Facebook


[ By Steph in Art & Drawing & Digital. ]

[ WebUrbanist | Archives | Galleries | Privacy | TOS ]


WebUrbanist

 
Comments Off on Robotic Printer Creates Artist’s Portrait Using His Blood

Posted in Creativity


How to Improve Your Portrait Photography in Five Minutes

31 Jul

People often ask me for tips on taking better photos of their friends and family.

After much thought on photography tips that can apply to various experience levels and equipment — from DSLRs to smart phones — I present to you a short article with tips you can learn in five minutes to help you improve your portrait photography. If you have more time and would like more specifics, I’ve noted additional articles on each tip that may interest you.

Annie-Tao-Photography-DPS-article-Improve-Portrait-Photography-perspective

Tips that will instantly improve your portraits:

1. Don’t put everyone in the center

That person may be the center of your life, but they don’t always need to be in the center of all the photos.

Aside from corporate headshots, positioning your subjects directly in the center of your frame for every image can be… yawn. And don’t just substitute it with the “rule of thirds” either. Think how boring everything would be if they were always in the same place, whether that is the center of every frame or at a third mark.

Be adventurous once in awhile – mix it up!

Annie-Tao-Photography-DPS-article-Improve-Portrait-Photography-dont-center

Annie-Tao-Photography-DPS-article-Improve-Portrait-Photography-dont-center-2

If you can’t break the rules because you have never heard of the Rule of Thirds, you can read this article.

2. Keep one eye on the background

If your subject is right in front of a lamppost or a tree, reposition yourself or your subject, so it doesn’t look like he is growing a lamppost out of his head.

Another example:  if your subject is wearing a green dress and sitting on the grass, have her move where the background is a different color, so she doesn’t look like a floating face in a sea of green.

Also, be mindful of distracting elements behind your subjects, like a garbage can. The background can turn a good photo into a bad one, so keep one eye on the background.

Annie-Tao-Photography-DPS-article-Improve-Portrait-Photography-background-2

If you want to read more about the impact of backgrounds, check out Improve Your Background, Improve Your Photography.

3. Capture the story, not just a smiling face

Of course we all prefer a photo of someone smiling, but we aren’t always in a constant state of joy. Consider taking shots when someone looks pensive or serious, for example, or engrossed in an activity.

Try to resist the “look at me and smile” routine. I guarantee that photo will tell more of a story than one where people stop what they are doing to flash a fake smile.

Annie-Tao-Photography-DPS-article-Improve-Portrait-Photography-not-smiling

Annie-Tao-Photography-DPS-article-Improve-Portrait-Photography-capture-story-2

Annie-Tao-Photography-DPS-article-Improve-Portrait-Photography-capture-story

For more tips on this, read: Don’t Wait For A Smile.

4. Change your perspective

Did you know you can create the tone or mood of an image by the angle of your camera and your closeness to your subject?

Your perspective when you take the photo influences the viewer’s perception of the image. Taking a shot from the top, looking down can paint a picture that someone is small. A tight shot of a teardrop can provide a sadder tone than a shot that was taken from a distance.

So next time, before you click the shutter button, think about what tone you want to give and what story you want to tell.

Annie-Tao-Photography-DPS-article-Improve-Portrait-Photography-perspective-4

Annie-Tao-Photography-DPS-article-Improve-Portrait-Photography-perspective-3

To see examples of different perspectives and when you would use them, you must read The Power of Perspective.

There are many things you can do to improve your portrait photography. I narrowed my list to four because these were the ones that came to mind first.

Do you have a good tip to share? Please comment below. We’d love to hear it.

The post How to Improve Your Portrait Photography in Five Minutes by Annie Tao appeared first on Digital Photography School.


Digital Photography School

 
Comments Off on How to Improve Your Portrait Photography in Five Minutes

Posted in Photography


14 July, 2014 – Portrait of an Emerging Photographer

15 Jul

I (Kevin) have thousands of friends on Facebook.  I know a few hundred.  These friends are mostly fellow photographers who share their passion and recent images.  I have always enjoyed sharing my images and getting feedback.  A few years ago I took notice of a certain photographer Valerie Millett on Facebook.  She seems a natural when it came to landscape photography and over the years I watched her images mature and take a beautiful form using color, light and excellent composition.  I asked Valerie to tell us her story and we share that today. Portrait Of An Emerging Photographer.  It’s wonderful to see in our adventures and workshops how many women are enjoying and making incredible landscape images.  We have previously published Eleanor Brown’s work and Jackie Ranken’s.


The Luminous Landscape – What’s New

 
Comments Off on 14 July, 2014 – Portrait of an Emerging Photographer

Posted in News


How to Choose a Great Portrait Photography Location

14 Jul

There’s an expression in the photography world called ‘ESP’ which stands for ‘Expressions sell photographs’. It’s true, a lovely expression is the single most important thing in any portrait photo (unless it’s a silhouette).

However, portrait photography isn’t as simple as teasing out a beaming smile, or haughty laugh from your subject. If your captivating expression is complemented by delicious light and an intriguing environment then you have all the ingredients for a cracking image.

Whenever I photograph portraits these are some of the things I’m looking for when I scrutinize the location.

How to choose a great portrait location

Meaningful location

Is it a meaningful location?

The first thing to do is ask yourself if the location adds to the story you’re trying to tell. For example, when I’m hired to create family portraits I always ask the family if there’s anywhere they like to go, a location to which they have a strong emotional connection. Sometimes they’re proud of their home or garden and we do the session there. Other times it will be in a wood where they walk their dog, or where they go picnicking on lazy summer days. This is far more meaningful to them than some sanitized image on a white background.

Your goal is to either choose a location that helps tell the story of the people in the portrait, or that gives the photo more emotional meaning to the people you’re photographing.

Areas of open shade

Open shade

Every time a bride tells me they’re praying for a gloriously sunny wedding day I don’t have the heart to tell them I’m praying for some lightly diffused cloud cover with intermittent dashes of sunlight upon my express request.

Glaring sunshine causes harsh shadows, particularly in the most important part of the portrait – the eyes.

Open shade is ideal because it doesn’t have harsh sunlight falling directly on the subject, but because the shade is ‘open’ it means there’s still enough light to give the eyes some sparkle. A tree is a perfect example of open shade, so is window light. The subject is in shade but they’re not completely closed off as they would be in the centre of a room, or in a forest. Open shade offers you some nice, soft directional light that creates enough shadow on the face to create depth, but without being harsh.

Lead in lines

Lead in lines

Lead in lines are just as helpful to portrait photography as they are to landscapes. They create depth to a photograph, lead you towards your subject and give the image a three-dimensional feel.

You can use fences, paths, a long twisting tree branch, the lines in a cornfield – anything that draws the viewer’s eye towards your model.

Lead in lines 2

Twinkly leaves

If you position your subject so there are back-lit leaves behind them then you’ll get a beautiful mosaic of green twinkles behind your subject if you use a low f-number on your camera (like f/4 for example).

With backlit subjects like this it’s often wise to use the spot metering mode to help your camera expose correctly for the face and avoid having a silhouette. Using a reflector to bounce some extra light into their face will help even more.

Twinkly leaves

Tantalizing textures

A barn door may not sound like a very exciting background, but rough textures can help the smoothness of your model’s skin pop out of the photograph. I also like rustic walls, and the repeating parallel lines of reeds.

Tantalising textures

Geometric shapes

Our brains like order. We like the pieces of the puzzle to fit together, which is probably why we get so frustrated when putting together flat-pack furniture! This is why our brains like the elements of a photograph to fit together like a completed jigsaw. I look for triangles, circles, rectangles and squares; and compose the image in a way that helps them fit together in harmony. This is also why we like clean, uncluttered hotel rooms that subtly use defined shapes, like the folded triangle of a bed sheet, or the repeating rectangles of a stack of towels.

When you start looking for shapes you’ll see them everywhere. Geometric shapes are often the basis for modern art and when you deconstruct many great photos into line drawings they’ll often look like that.

Geometric shapes

Foreground, mid-ground and background

To give your images depth and a three-dimensional feel you need the viewer’s eye to find interest in the front, middle and background of the photo. Diffused blades of grass could be the foreground, a smiling toddler can be the mid-ground and sunlight sparkling through a tree could be the background.

Foreground midground background

Avenues of trees

I love the effect you get when photographing people in an avenue of trees, using a long lens, because it ticks nearly all the boxes in one go. The leaves provide the necessary shade while the path provides a lead in line and creates depth in the photo. The long lens helps produce a fabulous tunnel vision effect that draws you in and helps to frame the photo, along with the trees themselves.

Long avenue of trees

The next time you decide to photograph someone use these tips and place your subject in the best position to ensure great light and cracking composition. If you have any questions then I’ll be happy to answer them below.

The post How to Choose a Great Portrait Photography Location by Dan Waters appeared first on Digital Photography School.


Digital Photography School

 
Comments Off on How to Choose a Great Portrait Photography Location

Posted in Photography