RSS
 

Posts Tagged ‘Portrait’

How to Use Hard Lighting to Create a Dramatic Portrait

15 Dec

When was the last time you did not primarily light your scene using a large soft source, such as a soft box or umbrella? Large soft sources easily create a beautiful, wrap-around quality of light. Just pop one up and you have instant “good” light.

before-after-lightroom-adjustments-01.jpg

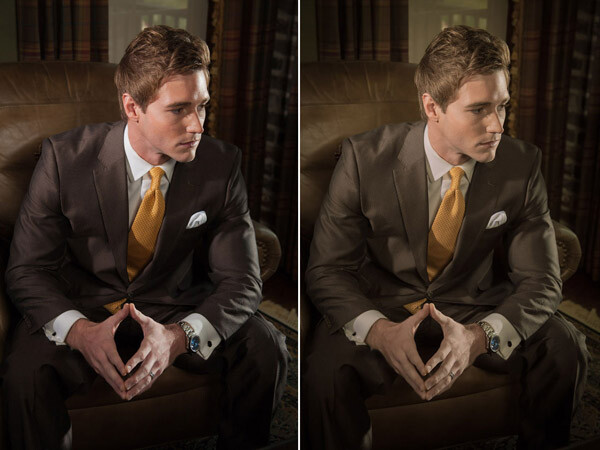
Final image: before and after in Lightroom

Though soft light is beautiful and has its place, it represents only one part of the artist’s palette. In this article we are going to dissect the lighting setup for a men’s fashion shoot, and look at how using hard light can add dramatic impact to your photographs.

I think two-time Academy Award-winning cinematographer Haskell Wexler said it best when it came to using hard light:

“Everybody should still work in hard light as well. Not to do it and to say that it has to be all soft light is like throwing away part of the artist’s palette. I think the more variety you can have, the better it will look. To be able to light well in hard light makes the soft lighting a piece of cake, because soft light is very forgiving. Soft light, uncontrolled, is still acceptable photographically. It is really hard for soft light to look bad, but it is really not hard for hard light to look bad.”

The feel the magazine wanted was a dramatic, high-contrast look. One of the problems with soft light is that it can be hard to control and can easily kill the contrast of your scene – especially in small spaces. The location for our shoot just so happened to be one of those small spaces, so I decided that reflectors and honeycomb grids were the best tools for the job.

Location picture

The shoot was held at a local area builder’s office. The office provided the perfect backdrop for the shoot, but did not offer a lot of room for equipment.

In the pre-planning phase, I chose to use a simple three light setup which included a key light, a fill light and kicker. I had room on camera left to place the main key light, but did not have much room for a kicker opposite camera right; however, there was a window.

As luck had it, the office window overlooked a back patio that had electrical outlets, so I did not have to rely on a battery pack or generator. The only problem was that the patio was a lower in elevation than the office window, so I had to extend my 13′ light stand up to its near maximum height.

To secure the stand, I fastened several 10 pound ankle weights to the legs. Ankle weights are a great and inexpensive alternative to sandbags. The set I use cost about $ 20 at Walmart, and came with Velcro straps for easy attachment to light stands or boom arms.

Since the strobe was outside the window and placed a distance from the model, I attached a radio slave and set it to full power. (The strobe was rated at 600ws)

Back in the office, I took a meter reading using a light meter with the dome retracted and pointed towards the light. The meter gave me a reading of f/5.6 at ISO 100. I decided the reading would be a good base to build my lighting ratios, so I set my camera to f/5.6 at ISO 100. As far as the shutter speed, I set my camera to 1/160th of a second because I did not want to capture a lot of ambient light. When using strobes, the shutter speed only controls the brightness of the ambient light.

This first light would act as the kicker light, in the scene.

Kicker light placement

Position of the kicker light

Kicker test shot

Test shot of the model with just the kicker light

When lighting with hard lights, you will often find the need to bring up the shadows, since they can easily go black. A large soft light source, placed close to the camera, is great for filling in shadow areas, because it resembles directionless ambient light.

The fill light in our scene was fitted with a medium soft box and placed behind and slightly to the right of the camera.

Fill light placement

Position of the fill light

Since most of the elements in the scene were dark brown, including the suit the model was going to wear, I could not set my fill light much lower than my base exposure of f/5.6. If I had set it lower the elements in the shadow areas would quickly go black. I set the fill light to 1 1/3 stop lower than my base exposure, which read f/3.5 on my light meter.

Kicker and fill test shot

Test shot of the model with both the fill and kicker lights.

The last light I set up was the key (main) light. I placed this light in an open doorway, towards camera left and slightly above the model. I wanted to keep the light on the model and off the walls, so I fitted the light with a 20 degree grid to control the spill.

Key light placement

Position of the key light.

Since most of the scene was dark brown, I decided to have the key light one stop over my camera’s base exposure of f/5.6. I adjusted the light until it read f/8 on my light meter.

Kicker and key test shot

Test shot of model with the key light and kicker, no fill. Notice how the shadows go completely black without the fill light.

You may have noticed that the key light on the left side of the model’s face does not appear as bright as the window kicker light on the right side of his face, despite it being one stop brighter (left: f/8 vs right: f/5.6) This is because the kicker is placed more behind the subject, while the key light is placed more towards the side. You might have heard the photography term “the angle of reflection equals the angle of incidence”? This is basically that principle in action. Since the kicker light is slightly behind the model, the angle at which the light is being reflected off the skin is causing the highlight to appear brighter.

Key fill kicker diagram

Positions and settings for key, fill and kicker lights. Notice the camera positioning at the bottom left of the desk.

Before after lightroom adjustments 01

Shot with all three lights set and in place. Before and after adjustments in Lightroom.

Once the lighting was in place, the model was dressed and the shoot began.

A nice benefit of the positioning of the key and kicker lights was that they pulled double-duty, switching roles whenever the model turned his head. A nice short lighting pattern was created, whichever direction he faced. You can see this in the variations above and below.

Before after lightroom adjustments 02

Shot with all three lights set and in place. Before and after adjustments in Lightroom.

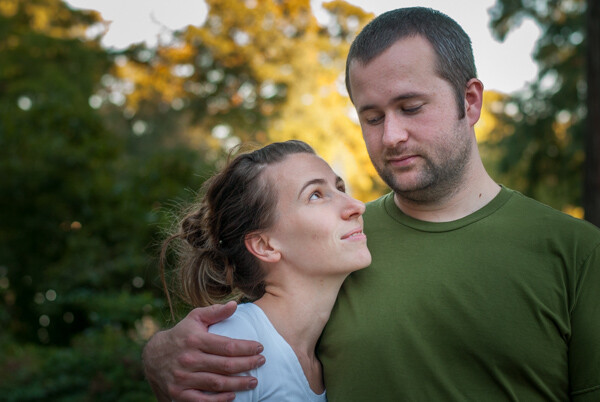
In closing, I would encourage you to think of creative ways to use and experiment with hard lighting in your photographs. Hard lighting is not just limited to men. The photo below was lit in the same fashion as the photo of the male model. A word of caution, though. Hard light is unforgiving when it comes to wrinkles and blemishes, so you will have to be very careful with your light positioning when your are lighting women.

Hollywood glam 7056 Edit

googletag.cmd.push(function() {
tablet_slots.push( googletag.defineSlot( “/1005424/_dPSv4_tab-all-article-bottom_(300×250)”, [300, 250], “pb-ad-78623” ).addService( googletag.pubads() ) ); } );

googletag.cmd.push(function() {
mobile_slots.push( googletag.defineSlot( “/1005424/_dPSv4_mob-all-article-bottom_(300×250)”, [300, 250], “pb-ad-78158” ).addService( googletag.pubads() ) ); } );

The post How to Use Hard Lighting to Create a Dramatic Portrait by Joel Dryer appeared first on Digital Photography School.


Digital Photography School

 
Comments Off on How to Use Hard Lighting to Create a Dramatic Portrait

Posted in Photography


Tips to Help You Prepare for a Successful Portrait Session

08 Dec

One of my favorite types of photo shoots is families with kids. It’s fun to spend an hour talking and laughing with people while taking photos. I enjoy being a small part of creating images that will preserve their precious memories for the rest of their lives. But these types of sessions don’t always work out as you might like, and even when you think you have all your ducks in a row something might pop up at the last minute that sends everything into a tail spin. Fortunately, with a bit of planning and preparation you can put a few things in place that will help your portrait sessions be freeing, fulfilling, and fun for everyone involved.

kids-bridge

Set Expectations

Whether you are taking photos of friends, family, clients, or even your own kids, one of the most important things you can do is make sure you are going to deliver what they want. Your subjects will have their own preconceived notions of what types of pictures they are looking for, and they might not always be the same as what you have in mind. If you can make sure everyone is on the same page before you even take out your camera, the entire process from posing, to shooting, to editing, will be much, much smoother.

Whether you know your subjects or not, it’s important to make sure they are familiar with, and approve of, your own picture style and portrait process. Showing your subjects some of your existing work is a good way to give them an idea of your style and help them see if you would be a good fit. This can be as simple as sending them some sample photos by email, directing them to an online portfolio, or sitting down and having a conversation about the type of photo shoot they are wanting.

Every photographer has a unique approach to his or her craft, and interacts with people in their own way. Do you take classic headshot portraits or do you like to experiment with various poses? Do you let subjects, especially kids, run around and play or do you like to control every element of the photo shoot? Do you shoot outdoors, in a studio, or a mix of both? Will they be able to share the photos online with a watermark, or do you require them to order physical prints? This might seem a bit too nitty-gritty, but dealing with these issues up front will save you a lot of hassle and headaches down the line.

couple-sunset

Not all photographers have their own website, but if you do you can include information such as the types of sessions you normally do, how much you charge, where you are willing to travel, etc. This information is good to know, but it often takes a little more to see if you are really the right person for your subjects. Think of the last time you went to a restaurant: did you just order right from the menu, or did you ask your waiter some questions about the food before deciding what you want? To address this, it’s good to have some sort of dialog with your subjects before you take a single photo. You can encourage people to contact you via email or a form on your website, send you a text or tweet, or post questions on a public Facebook page. It might seem like a lot of work to go through all this, but the more you work to set proper expectations for your subjects, the smoother the entire process will go.

One of the best ways to safeguard yourself against liability in case your subjects are unhappy, is to use a contract. This is especially important if you plan on charging money, and critical if you are doing something big like a wedding or bar mitzvah. If people are paying big bucks for your services, it’s essential that everyone is on the same page upfront. Without a formal contract wherein all parties involved agree on the services to be provided, things can devolve into he-said-she-said after your clients get the photos. Don’t think of this as a punitive measure, though – approach the contract as an opportunity for both you and your clients to help safeguard against miscommunication and make sure what you are going to provide aligns with what they want.

kids-flowerpot

Scout the Location

If you shoot indoors, this step is obviously not all that important. But if you plan on taking pictures outdoors it is critical that you know the area first. Just because you drove past a nice park or a friend told you about a rustic barn, doesn’t mean these places will be good locations for photo shoots. Go to the locations in person, get out of your vehicle, and walk around to see what things are like. If at all possible, do this at the same time of day you plan on taking pictures to make sure the light is similar, and ask yourself questions such as:

  • Where is the light coming from?
  • What features of the location are shaded?
  • What background elements can I use in the shots?
  • What existing features (fence, wall, bench, pond, tree, staircase, etc.) can I use for posing my subjects?
  • Are there lots of people around, and if so, what angle can I shoot from to avoid them in the background?
baby-basket

Normally this spot is full of people, but we picked a time to do the shoot when it was relatively quiet.

Even if you have already been to a location such as a field, beach, or alley, it’s still a good idea to check it out before your photo session if you have never used it specifically for taking pictures. If you approach the location with a critical photographer’s eye you will notice many things that have probably escaped your gaze previously, but could severely impact the photo session if not taken into account. It’s also a good idea to have a backup location in mind in case of bad weather, but make sure your clients are well aware of this and are able to meet you there if you do have to change plans.

Bring Blankets (and more)

This last tip might sound trite, but it has saved me on many occasions. And every time I forgot to bring blankets, I wished I had. Since I do most of my photo sessions outdoors there are many things simply out of my control. Some of these can be mitigated, like using reflectors or a flash if the light is poor, or having your subjects wear warm clothes if a cold front comes through the night before, but it’s amazing how many times a simple blanket has saved the day when all hope seemed lost.

Blankets can give your subjects something to sit on, wrap themselves up in, or just play with as you are snapping their photos. Blankets can comfort fussy children, diffuse a tense situation, or even (and yes this has happened to me more than once) cover up the mess left behind by a flock of geese the day before. They can also serve the practical function of adding a bit of color to your photos, or complementing the clothes that your subjects are wearing.

There are other items that come in handy as well. Recently I was photographing a couple and their infant son, and though I had already scouted the location at the specific time the shoot was to take place, I did not take into account one critical element: dew on the ground. I wanted to get some shots of their son holding his head up and looking around, but since the grass was all wet it nearly turned our fun photo shoot into a chore for the parents as well as the child. Thankfully I brought an old piece of canvas along, which not only gave the boy a soft dry surface to lay on, but was also big enough to accommodate the whole family on some wider shots.

baby-canvas

The ground was too wet to lay on, so I asked his parents if we could use a simple piece of canvas. They obliged, and the final result turned out quite well.

If you are taking pictures of children, bring some toys that they can play with, or kid’s books for them to read. Better yet, contact their parents beforehand and have them bring their own favorite toys and books from home. I also like to have some sundry joke items like fake teeth or googly eyes to help make kids smile, which tend to work well for teens and adults too. If your subjects are a bit older, they might want to wear a favorite jacket, bring an artifact such as a football or set of golf clubs, or even have their photo taken with a pet. While you might not be able to provide all of these yourself, a little bit of preparation beforehand will give you an idea of what they want and help you go about planning for the shoot so you are not caught off guard.

child-book

This boy’s favorite book not only gave him something to do while taking photos, but it will be a nice reminder when his parents look back on this picture years later.

These tips are things that have worked for me, but are there other tips you have for successful photo shoots? Share your ideas in the comments section below.

googletag.cmd.push(function() {
all_slots.push( googletag.defineSlot( “/1005424/_dPSv4_mob-all-article-bottom_(300×250)”, [300, 250], “pb-ad-78623” ).addService( googletag.pubads() ) );
} );

googletag.cmd.push(function() {
mobile_slots.push( googletag.defineSlot( “/1005424/_dPSv4_mob-all-article-bottom_(300×250)”, [300, 250], “pb-ad-78158” ).addService( googletag.pubads() ) );
} );

The post Tips to Help You Prepare for a Successful Portrait Session by Simon Ringsmuth appeared first on Digital Photography School.


Digital Photography School

 
Comments Off on Tips to Help You Prepare for a Successful Portrait Session

Posted in Photography


Go Au Naturel: Shooting Portrait in Natural Light

08 Dec

When I first bought my little Canon AE1 back in 1993 and started shooting, I couldn’t afford a flash. I shot everything in natural light, and I think I made every mistake known to mankind, so for those who would like to learn from my mistakes, this one’s for you!! Backlight When I was a little girl, my mother would Continue Reading

The post Go Au Naturel: Shooting Portrait in Natural Light appeared first on Photodoto.


Photodoto

 
Comments Off on Go Au Naturel: Shooting Portrait in Natural Light

Posted in Photography


Kristina Zvinakeviciute: Winnner of Defrozo Portrait Photography Contest 2014

05 Dec

About a week ago we posted the interview with the first winner of the Defrozo Photography Contest 2014. Today, we’re glad to introduce you to Kristina Zvinakeviciute, a photographer from Manchester, UK who won the Staff Pick Award in the photo contest held by Defrozo. Learn more about Kristina and her unique approach to photography inspired by the Renaissance art Continue Reading

The post Kristina Zvinakeviciute: Winnner of Defrozo Portrait Photography Contest 2014 appeared first on Photodoto.


Photodoto

 
Comments Off on Kristina Zvinakeviciute: Winnner of Defrozo Portrait Photography Contest 2014

Posted in Photography


How to Create a Unique Bokeh Portrait for Under $10

28 Nov
1

This shot was lit with one light on the subject along with the Christmas lights.

You can have a luxurious bokeh in any of your images for the low cost of $ 4.99. Yes, you heard me right, just $ 4.99. How, you ask? I’ll tell you, but you won’t believe me – Christmas lights.

Just a single strand of Christmas lights and a couple of flash units are all you need to immerse your subject in full-blown bokeh bliss. This isn’t a double exposure or a Photoshop trick. It can all be done in camera in a single exposure. I bought a strand of cheap Christmas lights from the store, draped them over a C-stand arm so that the lights were layered and overlapping. I used a Canon 100mm f/2 lens that I had borrowed from my buddy for the shoot.

I also had two flashes. The background light was set to 1/8 power (in manual mode) and gelled red, aimed at the red wall behind the subject. The second light was set to 1/16 power and shot into a silver umbrella about seven feet away from the subject.

2

Note that the output on both speedlights was set rather low so that I could shoot with a wide open aperture. The large aperture, combined with a slower shutter speed of 1/30th, helped me attain a proper exposure when shooting the low watt Christmas lights. In order to properly pull off this technique, the room you are shooting in can’t be too bright, whether it be overhead lights or window light – the ambient light can’t overpower the Christmas lights or this won’t work.

3

Once I was ready to start shooting, I made sure that I was standing within two to three feet of the lights and the subject was five feet beyond the lights. Depending on how close I was standing to the Christmas lights, the size of the bokeh would change. When I was closer to the lights, the bokeh spots were larger and, accordingly smaller when I was further away from them.

Focus issues

One issue that you may encounter when shooting through an object is that the lens will try to focus on anything in the foreground. This is a problem, since what you want to focus on is behind the Christmas lights. There are a few ways to get past this. The first is switching to manual focus. But I don’t trust my eyes enough for this option.

The second option is the enabling back button focus on your camera. This is the option that I use. Enabling this feature is a bit different for each camera, so you’ll have to look up how exactly to do it on your specific camera body. Basically what it does is allows you to shoot without the interruption of autofocus, and when you want to re-focus, you simply press the assigned button on the back of your camera and resume clicking.

The third option is only available if you have a zoom lens that allows you to set your focal distance. For example, I have a Canon 70-200 f/4L IS which has a switch that, when flipped one way says 1.2m to infinity, and the other way says 3m to infinity. That means that if I don’t want to focus on the object in the foreground, I would select the 3m to infinity option so the lens doesn’t look for anything closer than 3 meters, which saves the lens and battery some focusing time.

4

This shot was lit with one light on the subject and one light gelled red on a red background.

Now you’re ready to shoot. Play around with your camera’s placement in relation to the Christmas lights. As you move around, pay attention to where the colored bokeh is falling in the frame. Is it on the subject’s face? Maybe move an inch to the left so their face isn’t green. Or maybe you want it to be green. Take a shot and then move a bit and take another. Play around with size and placement of the bokeh and have fun!

5

Standing further away from the Christmas lights makes the bokeh smaller.

6

Standing closer to the Christmas lights makes the bokeh larger.

The post How to Create a Unique Bokeh Portrait for Under $ 10 by Nick Fancher appeared first on Digital Photography School.


Digital Photography School

 
Comments Off on How to Create a Unique Bokeh Portrait for Under $10

Posted in Photography


Roman Robroek: Winnner of Defrozo Portrait Photography Contest 2014

21 Nov

Last month our friends at Defrozo held a photography contest on their Facebook page. The contest was a success with some amazing works submitted by entrants. There could only be two winners, though. The first one would be selected by Facebook users who voted for their favorite photos, the other winner is Defrozo’s Staff Pick. In this post we’re interviewing Continue Reading

The post Roman Robroek: Winnner of Defrozo Portrait Photography Contest 2014 appeared first on Photodoto.


Photodoto

 
Comments Off on Roman Robroek: Winnner of Defrozo Portrait Photography Contest 2014

Posted in Photography


Portrait Consultations: Two Questions That Make A Big Difference

21 Nov

Consult (1)
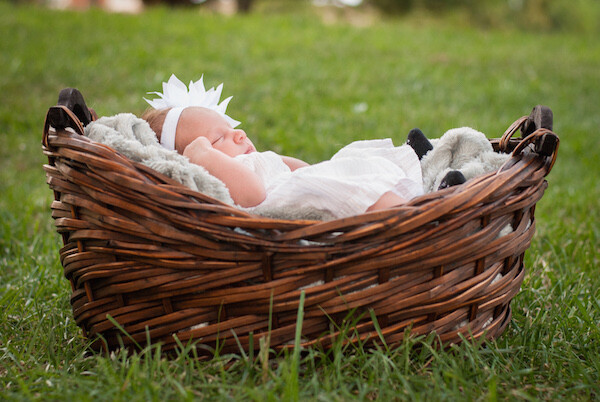
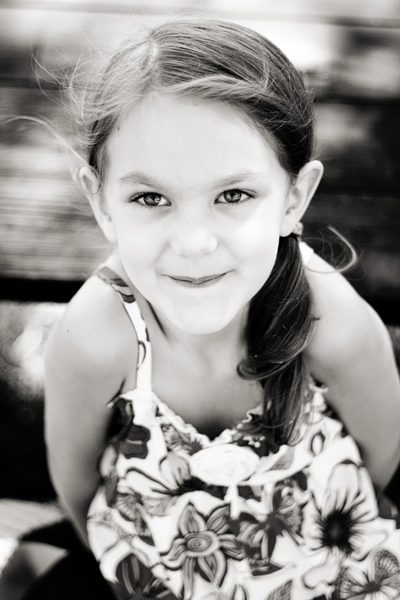
I vividly remember the first time I was asked to take photos for someone that I didn’t know. We had friends in common, and she had seen some of the photos that I had taken of friends and family, but we had never met. We talked over the phone, and arranged a time for me to come to her home and take some photos of her daughter. The big day arrived a week or so later, and I was SO nervous. I wasn’t sure what her home looked like, or what the lighting situation would be, or whether her daughter was sitting up by herself yet or not. I didn’t know how long I should stay, whether I could ask to rearrange furniture, or how the photos that I took would be used. Going into the session, I didn’t feel like I was in control, and I didn’t like it one bit.

After that, I began doing portrait consultations with new clients. We would meet for coffee, and I’d casually ask questions about their favorite things to do as a family, favorite colors, favorite books, and whether they liked candid photos. My hope was that this type of a consultation would let us get familiar with each other, and feel like a casual coffee date between new friends. This was a major step in the right direction compared to having no consultation at all, but I still wasn’t getting the information that I wanted, and it was largely because I tended to dance around the questions that I really wanted to ask, rather than asking them directly.

Now, I approach consultations much differently; including a list of specific, direct questions that I ask each and every potential client. I ask what they’re planning to wear. If the session includes children, I ask about the kids’ favorite songs, TV shows, or books. I ask whether they prefer more formally posed images or candid images. Do they prefer color photos or black and white photos?  Are there any locations that have special meaning to their family? I ask a LOT of questions during portrait consultations, but have realized that there are two questions in particular that are the most crucial in allowing me to better understand my clients’ wants and needs for a session, which in turn allows me to produce a better end product for them.

#1 – Is there anything you want to make absolutely sure we capture during your session?

Consult (4)

One mom shared with me that while she had called me for family portraits, she was also getting ready to apply for a new job and wanted a photo of her by herself that she could use for her LinkedIn profile. Another mom told me that she was working on special memory books for her children and wanted a photo of herself with each child individually. I’ve had requests for newborn sessions to feature specific hats or quilts made by family members, and I’ve even had requests to feature specific tattoos during portrait sessions. One family asked if they could bring along a bunch of crazy hats, goggles, and glasses for a silly photo or two. Almost every single time I ask the question, I’m blown away by the concrete information about the client’s hopes for our session that I may never have known had I not asked the question specifically and directly.

Consult (6)

Very rarely, asking this question also reveals that I’m actually not the best fit for that particular family’s wants and needs. For example, during a consult with one potential client, she told me that their family was very casual, and that they really wanted some lifestyle photos in their own home, maybe with them and their children baking or drinking hot chocolate in their kitchen. I LOVE that style of photography, and kept thinking that we were really on the same wavelength and that it would be a great session.  Later on during the consult, I asked if there was anything that she wanted to make sure we captured during her family’s session. At that point, she pulled up a Pinterest board that contained images of a family drinking hot chocolate and baking. The problem was that her inspiration images were actually all from a stylized session from another photographer, and as we continued to talk, I realized that they weren’t actually “inspiration” – she actually wanted me to recreate that session exactly, down to every pose and every prop, which I was not willing to do. I am so thankful that we had a consultation prior to her session, and that I asked some very direct questions which allowed us to get past the general and on to the specifics of what that potential client really wanted, because it simply wasn’t something that I could offer.

2. How do you plan to use the images from our session?

Consult (5)

Again, such a simple question that can give you such helpful information going in to a session. Upon asking that simple question, one dad told me that they had a wall in their house that they’d like to fill with portraits of each of their four children, also that they’d like them to be an 11×14 canvas print in vertical format and they’d like all four to be black and white images. Knowing this in advance was so helpful because I was able to really be intentional about creating portraits of the four kids that would look cohesive when grouped together by making sure that the background, lighting, and posing were similar for all four children. In addition, I knew that it was probably wise to include more vertical black and white images in the end gallery than usual, because it was the most important thing for that particular family.

Other clients have told me that they already have their Christmas card picked out, and are just waiting for a photo to complete the card. Being able to see the card template in advance can help me visualize the “feel” that want. There has been at least instance when I’ve suggested switching locations once I saw the card that they had selected – family portraits in a field would have worked well for a shabby chic card, but just didn’t seem as well suited for the ultra modern, minimalistic design the family had chosen. A simple location change really made a big difference in the cohesiveness of the session and their end goal!

Consult (2)

In general, I prefer to meet in person for pre-session portrait consultations. Sometimes, that doesn’t happen due to my schedule (or theirs) and we end up doing a consultation over the phone or via email. In those instances especially, I think it is absolutely vital to ask a few specific, direct questions. Don’t beat around the bush – ask the questions clearly and concisely, and then listen. Really listen. Don’t be afraid to reiterate what you think you’ve heard, back to them. I often say something like, “I’m hearing that you care about capturing the candid moments more than having a photo where everyone is looking at the camera and smiling, is that right?” Which then gives them the opportunity to either affirm that idea, or to tell me that they do really love candid photos, but would like one with everyone looking and smiling as well. Either way, I’m given the opportunity to understand my client’s hopes and expectations a bit better, which makes it easier for me to give them a session that they will really love and treasure for years to come.

Do you hold consultations prior to your sessions?

Are there any questions that are on your must-ask list?

The post Portrait Consultations: Two Questions That Make A Big Difference by Meredith Clark appeared first on Digital Photography School.


Digital Photography School

 
Comments Off on Portrait Consultations: Two Questions That Make A Big Difference

Posted in Photography


Mastering Family Portrait Part III: Posing Guide

11 Nov

It might be the redheaded stepchild of photography, the gum under your shoe, the backwash left in the glass when you think you’re drinking champagne, but posing is one of the most important parts of any photograph. I am not a traditional poser, so I’m not going to get into thumbs in or out of pockets, or serious or smiley, Continue Reading

The post Mastering Family Portrait Part III: Posing Guide appeared first on Photodoto.


Photodoto

 
Comments Off on Mastering Family Portrait Part III: Posing Guide

Posted in Photography


Portrait Salon ‘rejects’ exhibition opens in London

06 Nov

An exhibition of images that were rejected by the UK’s National Portrait Gallery is about to go on show in London, organized by Portrait Salon. In its fourth year, the organization will display 70 portraits from a submission of 1184 photographs, all of which have failed to make the shortlist for the 2014 Taylor Wessing Photographic Portrait Prize – a global portrait competition hosted by the National Portrait Gallery. Read more

Articles: Digital Photography Review (dpreview.com)

 
Comments Off on Portrait Salon ‘rejects’ exhibition opens in London

Posted in Uncategorized


4 Killer Tips To Nail Your Next Portrait Shoot

10 Oct

If you’re a portrait photographer perhaps you’ve found yourself in the position of carrying bulky, heavy gear around. That’s unnecessary though. With these 4 easy tips you’ll be able to get the best results at your next portrait session without the hassle and the back pain afterwards. These tips also help you save a fair amount of money that you Continue Reading

The post 4 Killer Tips To Nail Your Next Portrait Shoot appeared first on Photodoto.


Photodoto

 
Comments Off on 4 Killer Tips To Nail Your Next Portrait Shoot

Posted in Photography