RSS
 

Posts Tagged ‘Portrait’

How to Pose Groups for Portrait Photography

16 Jun

Group Main

For many years the gold standard for posing groups looked just like my first grade school photo. Everybody would be lined up and asked to stand as awkwardly as possible, feet together and for the lucky ones in the front, hands clasped together in their laps.

The photographer would shoot two frames (one for safety) and count every one in with a “1..2..3…say cheese” my grade one teacher Mrs. Witchell was way too cool to do cheese. She busted out her own version of Blue Steel instead. Respect.

Sadly this style of posing large groups is still pretty much the norm. But with some careful planning, and a little imagination, portraits of large groups can look far more dynamic than my grade one school photo.

Group 1

The classic school or sports style group photo is rigid and posed awkwardly. Introducing some variation in height, pose and shape of the group with give your portraits more life and energy making them far more interesting and dynamic.

There are four main styles I like use to shoot my groups:
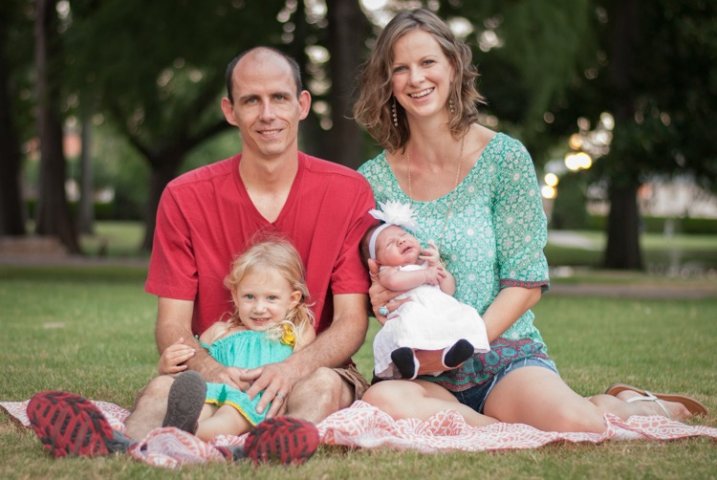
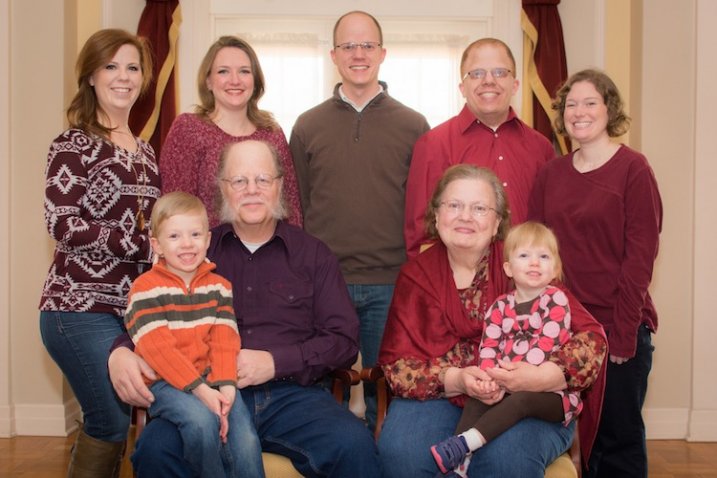
1. The 90210

I learned this style of posing groups by studying the publicity shots of the American teen drama from the 90s, 90210 (I had a huge crush on Dilan). I have now developed, and modified, this technique and it has become my go to pose for many of the cast shoots I do.

I like to create interest in these group shots by staggering the levels of all my models. I will have the back row standing. Middle row seated at various heights including high stools, chairs, lower ottomans or boxes. I then have a third level either on the floor or seated on very low stools or boxes. Lastly I pose each person individually and bring them onto the set one at a time, so I can see how the overall shot is looking.

90210 2 3 90210 2 4
90210 2 90210 2 6

Checklist

  • Shoot at 50mm or longer, as wider lenses will distort the group and make people in the front appear larger than those at the back. I usually shoot at around 100-150mm.
  • Ensure everyone is clearly visible.
  • Try and space everyone out so the image does not feel too constricted.
  • Shoot at least 10-15 frames. This is harder than it sounds because large groups can be intimidating and many people in the group tend to lose interest after two or three frames. The way around this is to warn everyone that you will be shooting at least 10 frames.
  • Keep the dialogue going. Be complimentary. Never single anyone out for doing the wrong thing.
  • If you need to, stop the shoot and give more direction.
  • Don’t be afraid to make people wait. I used to rush through my group shots (particularly with corporate males and athletes) because they intimidated me. I now realize that when I rush I don’t get great shots. Be confident and explain that you want to get this right, and if everyone does their bit it should all be over in five minutes.
  • Keep the dialogue going. Silence is a cue that you are unhappy with the shot or are finished shooting.
  • Lower your tone and speak calmly. This is a great trick I learned from my teacher training. Whenever I’m speaking to a large group I lower my voice rather than raise it. This way everyone becomes silent to hear you. I also find that women’s voices tend to go up and sound shrill when they try and raise it. This doesn’t sound very assertive or authoritative.

90210 3

The 90210 style also works for larger groups like this shot of the entire cast of the Australian Soap Opera, Neighbours ( above) or the cast and crew shot of the musical Moonshadow (below). I use the exact same approach and set up my shot in groups of three and five, staggering the head heights to keep the shot from looking too square.

Big Groups

2. The Reservoir Dog

This shot was inspired by the opening sequence of a Quentin Tarantino movie, Reservoir Dogs.

Resdog

This is a great option to photograph groups if you are pressed for time, need something more dynamic, or have a group of people that have trouble posing or taking direction.

I like to shoot very low to the ground (sitting or laying) and ask the group to walk towards me. It works best when I give each person individual direction before we start. Eg., Person 1 put one hand in your pocket;,Person 2 walk and fix your tie as you go, Person 3 button your jacket up as you walk, Person 4 walk with a strut and attitude.

Reservoir Dog 2

If this shot is left to chance you may get lucky, but a little direction will really take it to another level.

When shooting set your camera to autofocus (AI servo for Canon or continuous for Nikon) and shoot with a long lens 150-200mm (to remove background distraction). I recommend aperture of f/5.6, a shutter speed of 1/250th of a second or higher, and focus on the face.

3. The Cartier-Bresson

This style is named after Henri Cartier-Bresson, a French photographer who took snapshots of everyday life and made them look extraordinary. He was a true master of candid photography.

I love photographing groups in is this fly on the wall style, which is posed to look like a candid snap-shot of life. I often get my inspiration for these poses from popular culture.

Cartier Bresson

This photo of the cast of The Footy Show is homage to the famous 1932 image Lunch atop a Skyscraper.

When I’m directing a shoot like this I give everyone a role and ask him or her to repeat it over and over again. Poses are varied only minutely. For example: Billy and Shane (far left) were directed to look at the newspaper and eat the sandwich. Sam and JB (center) were asked to have an animated conversation and Garry (far right) was asked to laugh off camera. Expression was varied slightly but the pose was kept the same.

Lastsupper

This image was inspired by DaVinci’s Last Supper, and was photographed using a very similar technique to the Footy Show image.

4. The lineup and “v” posed group shot

Small Time Gangster

I photographed the cast of Small Time Gangster individually for this movie poster and then the shots were Photoshopped to create a “V” shape that is really popular in advertising and the entertainment industry.

Husbands A

The Cast of House Husbands was shot individually for this group shot, then the best expressions and poses were selected to create this image.

Project Runway S4

This style of photography works really well for large families and corporate groups, and really lets the individual personalities come through. I thought this was the ideal way to capture the cast of Project Runway Season 4.

This style of shooting was born out of necessity. Many of the TV shows I shoot cast shots for can’t schedule all their talent to be on set at once so I shoot them individually, and combine the shots in post-production. This is a great technique to capture everyone’s personality and it always looks dynamic.

Finally, don’t forget to have fun when shooting group portraits and let their personality (and yours) shine!

Lifestyle

These images were all posed to look like they had been taken candidly. The problem with candid photography is that you are relying on too many variables to be just right before you can get your shot. You need good light, location and expression. Miss out on one of these and your shot may turn to caca. If you set up the shot and give everyone great direction, you are guaranteed a great shot.

What are your favourite ways to pose and direct groups? Is there anything I may have missed or do you have a group portrait you are really proud of? I’d love to hear from you.

All images copyright Gina Milicia 2015

googletag.cmd.push(function() {
tablet_slots.push( googletag.defineSlot( “/1005424/_dPSv4_tab-all-article-bottom_(300×250)”, [300, 250], “pb-ad-78623” ).addService( googletag.pubads() ) ); } );

googletag.cmd.push(function() {
mobile_slots.push( googletag.defineSlot( “/1005424/_dPSv4_mob-all-article-bottom_(300×250)”, [300, 250], “pb-ad-78158” ).addService( googletag.pubads() ) ); } );

The post How to Pose Groups for Portrait Photography by Gina Milicia appeared first on Digital Photography School.


Digital Photography School

 
Comments Off on How to Pose Groups for Portrait Photography

Posted in Photography


Portrait Tips for Posing Women

15 Jun

Editor’s note: this week we will be featuring a series of articles on posing for portraits. Look for a new one each day. If you miss any make sure you subscribe to our newsletter and you’ll get a reminder of all our articles once a week.

Let’s face it – unless you are working with professional models who know exactly what to do, and how to pose in front of the camera with little to no direction from the photographer, most of your clients, especially women are self-conscious and stiff the moment they get in front of the camera. Nervous laughs and fidgety hands are all signs that they are uncomfortable; they need to feel at ease and are looking for a lot of direction from the photographer. As photographers that is our primary job – to make the client feel comfortable with us, being in front of the camera, and also give them beautiful photos of themselves. To that end, there are some simple tips and poses that work wonders especially for posing women in portraiture.

DPS Articles for posing tips for women 07

#1 Put them at ease and make them laugh

Even before you start taking their pictures, make small talk; ask them about their day and try to get them to relax. Find out what they think is their good side, and why, and keep that in mind while photographing them. If all else fails and they are still very uncomfortable and stiff, have them close their eyes, and at the count of three, open them and give you a very natural smile. This works almost 100% of the time. When they have their eyes closed, they relax their body and face and are able to gather their composure for a few seconds. If you have a continuous photographing mode in your camera (i.e. burst mode), use that to take a quick series with their eyes closed and when they open them. There is bound to be one that will work.

DPS Articles for posing tips for women 06

 #2 Avoid stiff limbs

Choose poses that avoid awkward angles to their hands and feet. Have them sit down on a chair, on the floor, or even on the sidewalk. With older women, have them sit on a chair and cross their legs. This gives a little poise and grace to the image. With younger women, or if you are outside, have them sit down on the ground, or lean against a wall or a fence, and cross their legs at the ankles. Always make sure there is a little bend in the limbs to soften the stance.

DPS Articles for posing tips for women 05

#3 Give them something to do with their hands

Often when posing people if the hands are awkwardly hanging on the side of their body, it looks weird and unnatural. Instead direct your clients by giving them something to do with their hands. Touching their face lightly, putting their hands through their hair, twirling the ends of their hair with their hands, holding the folds of their dress, interlacing their fingers, and putting their hands on their lap all work well. This gives women something to focus on, and helps them relax.
Give your clients something to do with their hands.

Give your clients something to do with their hands.

#4 Find the right angle to point the camera

Women always want pictures that make them look slimmer. This is easily achievable by a small change in the angle of the camera. Photographing from slightly above the client with the camera pointing downward, elongates the neck and gives a long lean effect to the face. This also helps define the jaw line. One caution, don’t photograph down at a 90 degree angle to the face. Not only is this an uncomfortable pose to hold when the client is looking straight up, but you don’t want to photograph down someone’s nose!

If you have to photograph women straight on where the camera is parallel to the face, have your clients slightly tilt their head to the right or left. Again, this relaxes the face, neck, and shoulders and gives a little twist to the normal straight-on portrait photo. Sometimes standing behind the client and having them look over their shoulder at you also works. To me this is a very natural and candid pose – as if they were doing something and turned to take a casual candid photo. One thing to be watch out for here is unflattering creases around the neck.

DPS Articles for posing tips for women 02

Looking up at the camera

DPS Articles for posing tips for women 03

#5 Environmental elements

There is just something really magical about the wind blowing and lifting the hair, or even beautiful catchlights in the eyes. This almost instantly adds a wow factor to a portrait. If you happen to be outside, try and use such environmental factors to your advantage. If you are indoors, the same effect can be achieved with a small fan, simple hair dryer, or even an extra reflector used to create some wind.

For catchlights, if you are outdoors, place your client in an open shade area and look towards a light source (the sun or even an off-camera flash). If it happens to be a cloudy day, or if you are photographing inside in a studio, catchlights can be achieved with reflectors. If you have a reflector that has multiple colored sides, use the sliver side and hold it at a 90 degree angle, or less, to the face. Play with the reflector placement to get the right look you want.

DPS Articles for posing tips for women 04
To me, all these tips have a common thread – pose your client such that they are comfortable in the pose. An uncomfortable pose or stance will show itself  obviously in your images, no matter how lovely you think the pose is. Never force a client into a particular pose.

Feel free to share tips that work for you when posing women for portraits.

Check out more in this week’s posing series here:

  • Portrait Posing Tips- How to Help People to Relax and Take Better Photos
  • 5 Unposing Tips for Kids for More Natural Photos
  • How to Pose People for Headshots

googletag.cmd.push(function() {
tablet_slots.push( googletag.defineSlot( “/1005424/_dPSv4_tab-all-article-bottom_(300×250)”, [300, 250], “pb-ad-78623” ).addService( googletag.pubads() ) ); } );

googletag.cmd.push(function() {
mobile_slots.push( googletag.defineSlot( “/1005424/_dPSv4_mob-all-article-bottom_(300×250)”, [300, 250], “pb-ad-78158” ).addService( googletag.pubads() ) ); } );

The post Portrait Tips for Posing Women by Karthika Gupta appeared first on Digital Photography School.


Digital Photography School

 
Comments Off on Portrait Tips for Posing Women

Posted in Photography


Portrait Posing Tips- How to Help People to Relax and Take Better Photos

11 Jun

Editor’s note: this week we will be featuring a series of articles on posing for portraits. Look for a new one each day. If you miss any make sure you subscribe to our newsletter and you’ll get a reminder of all our articles once a week.

One of the trickiest parts of doing a portrait photo shoot has nothing to do with operating your camera, mastering your lenses, controlling the light, or even dealing with uncontrollable weather. Getting your clients to relax, take it easy, and enjoy themselves during your time with them is just as important as making sure you have all the technical aspects of your equipment figured out.

This is often the key to a successful photo shoot, and yet it’s so easy to get caught up in learning about your camera equipment and buying new gear that many people forget to invest time in developing the human element of a photo session. Portrait posing and how to help your subjects relax is key to taking better people photos.

parent-holding-baby

If this aspect of your craft is not managed properly you could easily find yourself in the middle of a photo session where your clients are confused, agitated, bored, or worst of all, frustrated and angry. Every photographer has their own unique style, but generally speaking if you can get your subjects to get comfortable and relax, you can get more of the photos you (and they) are really looking for. It’s a tricky situation to be sure, and every photo shoot is different, but here are three techniques that may be helpful:

1. Get to know your clients beforehand

At its most basic level taking photos for clients is a simple business transaction wherein they pay you money for a service you provide. But it’s really much more than that: people are inviting you to record a point in their lives that they will hold dear for decades to come. When you order a sandwich or cup of coffee it doesn’t matter who you are, what hobbies you enjoy, what professional goals you have, or whether you woke up on the wrong side of the bed that morning. You hand over some cash, get what you ordered, and go about your day. However, taking portraits is almost the polar opposite because everything matters. A good portrait photographer will strive to capture the essence of the people they are working with, and getting to know them first is a key element of making this happen.

family-sitting

On my website I have three simple questions on my Contact page:

  1. Families: What was the best family vacation you ever went on?
  2. Children: If you could have the perfect birthday party, what would it be like?
  3. High School Seniors: If you had $ 1000 to spend, and a week off from school, what would you do?

The answers to these questions help me understand more about my potential clients, but also send a message to them that they mean more to their photographer than just a pay-check. This helps with any pre-session discussions we might have, as well as the photo shoot itself, because the seeds have already been sown for good conversation and a relaxed atmosphere.

I’m a teacher by trade, having taught in K-12 schools as well as at the college level (in addition to six-week classes for other teachers), and one common thread that I have found among people of all ages, is that most of them just want someone who will listen to and take an interest in them. With this foundation laid, classes are always much more productive for me and my students. So it goes for the photographer as well: if you show your clients that you are interested in them as people, you will find them to be much more cooperative as photography subjects. It might take some time to get to know them before you photograph them, but this will pay off handsomely for you and your clients throughout the entire picture-taking experience.

senior-brick-wall

2. Don’t treat the photo shoot like a photo shoot

I did a photo session recently for a bright, intelligent, outgoing young man who simply did not want to have his picture taken. He was nearing the end of his time in high school and his parents wanted to get some nice photographs before graduation, particularly of him in his cap and gown. He would much rather have been at home playing video games or hanging out with friends, but instead was obliged to spend the late afternoon with me taking photos – a prospect that was about as much fun for him as getting a tooth drilled. How on earth can you possibly get someone like this to relax, have fun, and enjoy a photo shoot? Simple: don’t make it about the photos.

One of the first things I said to this student as I hoisted my camera bag to my shoulder was “What video games are you playing right now?” He immediately relaxed and started telling me about one of his current favorites, which then branched into discussion of what his friends were playing, which then led to a dialogue about the recent school year and even his career goals. All the while I was snapping photos, while giving him subtle directions without interrupting the flow of our conversation. I got more good shots than I ever thought I would, and he enjoyed our time together far more than he had anticipated.

This girl was a bit nervous about having her picture taken so instead we just talked about music. I don't know much about the clarinet, but she was more than happy to tell me about it, and in the process gave me plenty of good photo opportunities.

This girl was a bit nervous about having her picture taken so instead we just talked about music. I don’t know much about the clarinet, but she was more than happy to tell me about it, and in the process gave me plenty of good photo opportunities.

This is just one example, but I have seen the same scenario repeat itself over and over: people tend get nervous and self-conscious when getting their photos taken, so if you want them to relax, have fun, and enjoy the photo shoot, try treating it as an hour of just hanging out. They’ll enjoy it much more and you’ll be surprised at the nice results you can get.

3. Build long-term relationships

When you order a pizza or pick up a tool from the hardware store you’re not looking for any type of lasting personal commitment. It’s merely a simple business transaction that serves a functional purpose, whereas photography is quite the opposite. Because you are dealing with people, and not objects, you should not only get to know your clients and seek to build a rapport with them, but find ways to build a professional relationship with them after money and pictures have changed hands. This won’t necessarily improve a current photo session, but it will pave the way for many successful future sessions while also helping to spread the word to the client’s friends, family, and co-workers about your photography services. A few ideas to try include:

Send a real thank you card

Send a thank-you card to the client (not an email, but a physical handwritten card) a few weeks after they receive their photos. Let them know how much you enjoyed working with them and appreciated their business, which is a good way to build a positive professional relationship that will last for years to come, and help make future photo sessions much more relaxed and enjoyable. You can also slip in a discount for a future photo session, which will give them even more incentive to do business with you again. This is especially important if you work with children or families, as you can easily lay the groundwork for many years of photo sessions by letting them know how much you appreciate them and enjoy working with them.

child-bench-book

This boy’s parents had such a positive experience on his photo shoot that they asked me to take pictures for their whole family a few months later.

Post about the session on social media

As more clients share their lives online, you can take advantage of the medium to publicly say how much you enjoyed working with a particular client, how good the photos turned out, or how you are already looking forward to a future session. Clients often respond quite positively, and this type of public recognition helps to reaffirm their good opinion of you as a photographer. Note that you will want to get your client’s permission first, and posting about a client on Facebook is not the same as friending a client. I don’t necessarily recommend that, though I know several photographers who do.

Scratch their back, and they’ll scratch yours

Many of your clients (or their parents) are working professionals and would appreciate your patronage as much as you like to have theirs. Remember the father of the cute kid from last week’s session who is a local plumber? Give him a call the next time your sink overflows. What about the upcoming wedding shoot with the couple who owns a local deli? Take your family there the next time you go out to eat. Building these types of professional relationships is a good way to help ensure that future photo sessions are relaxed and comfortable for your clients. They will start to trust you, be at ease around you, take directions from you, and also recommend you to their friends and family. This also sends the message that you are interested in more than just taking pictures, but are an active and supportive member of your local community, which is filled with people who might be looking for a photographer to do their next portrait session!

family-portrait

Getting to know this family, finding out about their interests, and building on experiences from previous photo shoots helped make this session fun and enjoyable for them and much easier for me as a result. The children knew me from their photo session earlier in the year, which not only helped them relax but put the adults at ease too.

These are just three ways to help you get people to relax in your photo sessions, but there are many other ideas as well. What about you? What tips and tricks have you learned over the years to help your clients relax, enjoy themselves, and help you get the best shots you can? Leave your thoughts in the comments below.

googletag.cmd.push(function() {
tablet_slots.push( googletag.defineSlot( “/1005424/_dPSv4_tab-all-article-bottom_(300×250)”, [300, 250], “pb-ad-78623” ).addService( googletag.pubads() ) ); } );

googletag.cmd.push(function() {
mobile_slots.push( googletag.defineSlot( “/1005424/_dPSv4_mob-all-article-bottom_(300×250)”, [300, 250], “pb-ad-78158” ).addService( googletag.pubads() ) ); } );

The post Portrait Posing Tips- How to Help People to Relax and Take Better Photos by Simon Ringsmuth appeared first on Digital Photography School.


Digital Photography School

 
Comments Off on Portrait Posing Tips- How to Help People to Relax and Take Better Photos

Posted in Photography


Understanding Light for Better Portrait Photography

29 May

A solid understanding of light can make you stand out from an average photographer. In fact, in portrait photography, light is even more important than the subject and location. This is because without the proper use of light, you can ruin the shot, even with the best looking subject, at the most awesome location in the world!

In this article, I’m going to break down the understanding of Light for you into six simple terms. Once you understand and apply these concepts, you will immediately notice the improvement of quality in your portrait photographs.

The six principles of light are: intensity, dynamic range, direction, diffusion, White Balance and reflection.

1) Intensity of Light

Intensity of light resized

Intensity is the brightness level of light and it brightens up your subject. For both natural light and studio light, you can modify the light source to change the intensity. I’ll cover the basics of light modifiers later, but the most important fact about intensity is that the distance between the light source and your subject has a massive impact on the intensity of light.

This is also known as the Inverse Square Law.

It is an equation that dictates the intensity of light produce at a given distance. It states that the intensity of light changes in inverse proportion (one over that number) to the square of the distance from the source. Meaning:

  • At one foot it is 1 over the square of one or 1/1 or 100%
  • At two feet it is 1 over the square of 2 (2×2) or ¼ or 25%.

In plain English, that means if you double the distance from one to two feet, the light intensity will decrease by 75%. On the other hand, if you bring the light source closer from two feet to one foot the intensity of light is going to increase by four times.

With the knowledge of inverse square law, you will be able to determine the placement of your subject for better portrait photography.

2) Dynamic Range

Dynamic range and stops have a very close relationship. Dynamic range is the difference between the lightest and darkest tones of an image, and a stop is the measurement of this range. Since a stop measures light in representation of numbers, what’s the relationship between the two?

The difference of one stop of light means the light is twice (or half) as intense. Human eyes can detect roughly 10-14 stops of light, while a DSLR camera can only detect around 8-10. With that said, your camera sees a lot less than your eyes. Dynamic range issues occur when this range goes beyond what the camera can record in details. These areas come out as pure white or pure black in the photograph.

Generally, most people tend to avoid pure white and black in portrait photography unless it is for artistic reasons. Otherwise, it may look like as if you exposed the picture incorrectly.

Dynamic range resized

3) Direction of Light

The position of your light source is very important because it determines how light hits your subject. It has a great affect on the quality of your photograph and a few small inches of light misplacement could bring your shot down to a snapshot.

A common question people always ask is, “Why do I need to worry about the direction of light when the subject is properly exposed?” Everyone has different opinions, but my point of view is that this is how you create mood, define shadows, and shows depth to your subject.

The biggest thing to avoid in portraits is flat images (which is created by lighting your subject directly from your camera angle). Reach into your wallet now and grab your driver’s license. That is an example of a flat image. The picture is either too bright or too dark; there is no shadow on your face (or a very harsh one) because the flash was pointed straight at you; and the worst thing is you probably look 10 years older! Without saying any further, I am almost certain that it is one of the worst pictures of yourself.

So what are some ways to light your subjects? Below are two of the most common ways:

Split Lighting – This direction of light divides the face equally in half so one side is in shadow while the other is toward the light. You can simply place the light source 90 degree to the left or right of your subject. If you are using natural light, just ask your subject to turn to such an angle. It creates a very deep dramatic shadow that casts strong moods for your subject. It is great for artistic type portrait shots.

James Willamor

By James Willamor

Loop Lighting – Perhaps the most common lighting method for portraits. Simply place the light source about 45 degrees to your subject. The shadow it casts is going to show nice depth; this method is great for single portraits. Make sure you place the light just slightly above eye level to make the best of this lighting style.

Dragos Jianu

By Dragos Jianu

There is no right or wrong direction of light in portrait photography. They are more personal preference, mixed with different style and purpose. The main thing is that you make your subject look good in front of the camera.

4) Diffusion of Light

Diffusion relates to hardness and softness of light. It also determines the intensity of the shadow. As a general rule, the bigger the light source and the closer it is to the subject, the softer the light.

When photographers talk about hard light, it means there is a rapid falloff between bright and dark areas in the photograph creating harsh, sharp-edged shadows. As such, the photograph doesn’t look as appealing to the viewer.
An example of hard light would be taking picture under a bright sunny day or when you overexpose studio light photographing your subject. Generally, hard light is not something you should be looking for in portrait photography unless for artistic reasons.

Diffusion of light resized

As you might have guessed, opposite hard light, there is soft light. This kind of light has mild falloff between bright and dark areas in a photograph. The light is evenly spread and it looks like it wraps around the subject.
An example of soft light would be taking pictures under an overcast day or using studio light with modifiers. The portrait looks more pleasing to the viewer and the photograph does not show much contrast.

5) White balance

White balance is the color temperature of your camera’s setting. Matching the right color temperature in the environment you are shooting is very important. This is how you remove an unrealistic colorcast, so that your photograph represents true color that you see in real life.

Depending on your camera model, you should have a different white balance presets to choose from: Tungsten, Fluorescent, Daylight, Flash, Indoor, Cloudy, Shade, Custom (PRE), and Kelvin (K).

As the photographer you need to make sure white appears white and not yellow/orange on the hot end, and blue/green on the cold end on the Kelvin scale.

If you shoot RAW, you can modify the white balance during post-processing of your images. This can also be changed easily in Adobe Lightroom or Photoshop. By the way, this is one of the reasons why it is important to shoot RAW instead of JPEG.

6) Reflection of light

Light has one very distinct behaviour; it travels in straight lines. Which means no matter whether you are using natural light or studio light, it is only going to travel in one direction until it reaches a surface.

Once the light reaches a surface it reflects off at the same angle it hits. The amount of light being reflected is going to be determined by the color and texture of the surface.

So why is reflection of light important for portrait photography?

Once you understand light behaviour you can then modify it to control how much light you want for your subject. For example, if you want soft light and you have no other equipment, you can bounce light off a wall. As mentioned before the larger the light source the softer the light, you can now control both the direction and intensity of light for your portrait photographs by doing so.

Reflection of light resized

Another common way to modify light is using a softbox such as a brolly box (umbrella softbox). This is a type of softbox where the external flash is placed inside of it. When the flash fires, light bounces all around inside the box until it exits out the white diffuser on the front. If you have an assistant to hold the brolly box you now have a portable light source producing soft light everywhere you go. This is a must-have for portrait photography.

I hope by breaking down the understanding of light into six categories they are going to be able to level up your skills as a portrait photographer. Be sure to practice as much as you can, but most importantly, enjoy this process and have fun in photography.

googletag.cmd.push(function() {
tablet_slots.push( googletag.defineSlot( “/1005424/_dPSv4_tab-all-article-bottom_(300×250)”, [300, 250], “pb-ad-78623” ).addService( googletag.pubads() ) ); } );

googletag.cmd.push(function() {
mobile_slots.push( googletag.defineSlot( “/1005424/_dPSv4_mob-all-article-bottom_(300×250)”, [300, 250], “pb-ad-78158” ).addService( googletag.pubads() ) ); } );

The post Understanding Light for Better Portrait Photography by Gary Lun appeared first on Digital Photography School.


Digital Photography School

 
Comments Off on Understanding Light for Better Portrait Photography

Posted in Photography


Indoor Photography: Ultimate Guide to Kids Portrait

22 May

One of the things I have specialized in over the years is getting natural, great expressions from kids in photos. It’s not the easiest thing, and I’ll tell you why. Children are naturally curious, interested creatures. They move. They are used to interacting with people by looking at them in the eye, not down a scary round black hole, and Continue Reading

The post Indoor Photography: Ultimate Guide to Kids Portrait appeared first on Photodoto.


Photodoto

 
Comments Off on Indoor Photography: Ultimate Guide to Kids Portrait

Posted in Photography


5 Secrets to Create a Perfect Silhouette Portrait Outdoors

22 May

DPS Silhouette 1

1) SHOOT LOW AND HEAD TO TOE

Place the subject’s entire body, from head to toe, against the sky. In order to do this, you will need to be lower than the subject. You can do this by laying on your back, or stomach, while taking the shot.

If you are unable to get low enough, you may need to have your subjects get higher, such as on the very top of a rock, small hill or sand dune. This will hopefully allow you, in most circumstances, to get an angle that places the subject’s entire outline against the sky. You can see a variety of landscapes utilized in the examples below.

DPS Silhouette 2

Hint: It’s so, so, SO important that their feet are against the sky! Legs in a silhouette portrait that are cut off above the feet look like weird, short stumps. If you can’t find a suitably spot at a location, you can play with silhouettes of a closer composition.

DPS Silhouette 3

2) IT’S ALL IN THE TIMING

Silhouettes work best around 20-30 minutes before sunset. However, it does vary with the angle you are able to achieve – the greater the height difference between you and the subject(s), the earlier you will need to take the shot.

If you wait any longer, the sun will be hidden behind whatever your subjects are standing on, and the sky might not be bright enough to make a silhouette. If you do it too early, the sky’s colours can be a bit boring and you will be dealing with other issues, such as sun flare.

DPS Silhouette 4

Tip: Silhouettes can be taken earlier before sunset if the sun is partially blocked or filtered through strong clouds.

3) SILHOUETTE SETTINGS ARE SIMPLE

Set your camera to Aperture Priority (AV) mode, with an aperture of f/2.8, and ISO of 400. Have Evaluative Metering selected, which means that the camera will take into account the whole scene when deciding how to find a balanced exposure.

If you fill the frame with your subjects’ faces or bodies, then the camera will expose for their skin, even with a bright background (see example below).

If you fill the frame mostly with a very bright sky, than the camera will expose for the bright sky, brining out the natural sunset colors and making everything else in the photograph dark.

So, if you place your subject directly against the sky (bright), than the subject (which is darker) will be heavily underexposed. The result – a silhouette!

DPS Silhouette 5 DPS Silhouette 6

Both photographs were taken on the exact same setting mentioned above, only seconds apart. The difference? Composition, and what is filling the frame – subject or sky.

4) SILHOUETTE PORTRAIT POSING IS SPECIFIC

Silhouettes are very forgiving of poor facial expressions (simply because you cannot see them), but very harsh when it comes to outlines. After taking each shot, check to make sure that nothing looks odd in the photograph.

Here are a few things to keep in mind when posing subjects in a silhouette:

  1. Hugging poses do not work – A hug silhouette looks like a great big blob monster. All subjects need to be clearly defined, which means they need to be at least a couple of inches apart from each other. It’s nice for subjects to still be connected, through holding hands, or kissing, but their bodies should still be defined.
  2. Have your clients look away from camera – It’s much nicer and more natural to have poses where the faces are profiled.
  3. Watch the clothing – Very baggy clothing will not work as well for a silhouette, as the shape can become unflattering. It is best for females to wear dresses or skirts in silhouettes, as it brings a feminine shape and helps clearly define them against the male’s figure. – Very baggy clothing will not work as well for a silhouette, as the shape can become unflattering. It is best for females to wear dresses or skirts in silhouettes, as it brings a feminine shape and helps clearly define them against the male’s figure.

DPS Silhouette 7

5) SILHOUETTES SELL

Try to capture at least one silhouette at every photo shoot, whether it is a family portrait, maternity, engagement or wedding. Why? Because they sell!

Here are some reasons why clients love to purchase silhouettes:

  • Silhouettes add variety to your shoot. Silhouettes are so different in nature, in their colouring and style, that the variety they give instantly makes any shoot more interesting and saleable. As the silhouette is quite unique from all other photographs, it also makes it easy to sell individually as a unique piece of artwork.
  • Silhouettes are perfect for shy clients. Some clients hate the idea of their faces hanging up on their walls, making silhouettes the perfect objection handler. As the focus of the photograph is not on the subjects’ faces at all, it can be marketed to them as the perfect piece of personalized artwork, without battling their self-conscious nature.
  • Silhouettes look better bigger! If you capture silhouettes on a wide composition, it’s all too easy to sell them as very large piece of artwork. Because the subjects are relatively small within the frame, silhouettes can encourage a larger, more impressive piece of artwork for the client and a more profitable sale for you.

DPS Silhouette 8

We hope this guide gives you the confidence to go out and try your own silhouettes.

googletag.cmd.push(function() {
tablet_slots.push( googletag.defineSlot( “/1005424/_dPSv4_tab-all-article-bottom_(300×250)”, [300, 250], “pb-ad-78623” ).addService( googletag.pubads() ) ); } );

googletag.cmd.push(function() {
mobile_slots.push( googletag.defineSlot( “/1005424/_dPSv4_mob-all-article-bottom_(300×250)”, [300, 250], “pb-ad-78158” ).addService( googletag.pubads() ) ); } );

The post 5 Secrets to Create a Perfect Silhouette Portrait Outdoors by Alana Orth appeared first on Digital Photography School.


Digital Photography School

 
Comments Off on 5 Secrets to Create a Perfect Silhouette Portrait Outdoors

Posted in Photography


The Bridal Portrait: Everything You Need to Know

11 May

Everyone knows that a woman is the most beautiful she’ll ever be on her wedding day. She’s in love, and happy and excited about the wonderful day she’s about to have, and, if you did your job and insisted that she has a wedding planner, she’s stress free. The Bridal portrait is one of those shots that’s just as important Continue Reading

The post The Bridal Portrait: Everything You Need to Know appeared first on Photodoto.


Photodoto

 
Comments Off on The Bridal Portrait: Everything You Need to Know

Posted in Photography


How to do Frequency Separation Portrait Retouching in Photoshop

27 Apr
The goal of portrait retouching is to bring out the most naturally pleasing image of the subject. This image is the finished result of Frequency Separation Retouching in Photoshop.

The goal of portrait retouching is to bring out the most naturally pleasing image of the subject. This image is the finished result of Frequency Separation Retouching in Photoshop.

Portrait retouching may be accomplished using many different methods. Still, how often have you seen a portrait image that has been retouched to the point that the subject’s face looks unnatural? Even many of the software packages available for portrait retouching result in an airbrushed effect to skin tones.

What if the detail and color of a portrait could be separated for retouching? Frequency Separation Retouching will allow you to do just that! It will allow you to fix all the usual facial issues like removing wrinkles, bags under eyes, and blemishes. By dividing your image into two separate frequency layers, one layer being high frequency digital data, which contains the information of detail in the image, and a low frequency layer which contains the tonal and color information of the image.  However, the neat thing with Frequency Separation Retouching is that it allows you to make these corrections and retain the natural textures of the skin. By separating the colors and the details you can work on one aspect without affecting the other. Sure, some people will prefer the usual retouching methods, including airbrushing, but Frequency Separation Retouching gives you another option to use for enhancing your portraits. If you have a working knowledge of Photoshop, here’s how to get started:

Setup

#1 Make two copies of the background layer

In Photoshop, open your image, then make two copies of the background layer. Label the first layer “color” as this will be your low frequency layer, then name the second layer “detail” to become your high frequency layer.

#2 Apply a blur to the color layer

Turn off the detail layer and select the color layer. Apply a Gaussian Blur (found under the Filter menu>Blur) to a setting that blurs all the detail of the image, but leaves features intact (see sample below). This setting will vary from one image to another depending of the size of the image.

3-7-2015-2-21-56-PM750

#3 Setup the detail layer

Turn the detail layer back on and select it, then go to Apply Image under the Image tab. Depending on which color depth you are working with, 8 bit or 16 bit, see settings below for Apply Image.

apply-image3Set your Layer to color. For 8 bit images set the Blending to Subtract, Scale to 2 and Offset. For 16 bit images set the Blending to Add, Scale to 2, Offset to 0 and check the Invert box.

Set your Layer to color. For 8 bit images set the Blending to Subtract, Scale to 2 and Offset. For 16 bit images set the Blending to Add, Scale to 2, Offset to 0 and check the Invert box.

  1. Change the blending mode of the detail layer to Linear Light.
  2. Create a layer group, and drag the color and detail layers into the new layer group.

Once you get the hang of this setup, it’s easy to make a Photoshop action to take care of these steps with one click. Download my Photoshop action for the setup HERE (the file is zipped, just unzip and load into Photoshop)

Now you’re ready to start the fun part!

Retouch the Color layer

By retouching the color layer, you are going to even out all the color tones of your subject’s complexion and to remove dark and light areas.

Clone Tool – the Clone tool can be used to even out the color tones or experiment with different blending modes. Normal, Darken and Lighten are very good effect modes to use on the color layer. You may also need to adjust the opacity (the degree of transparency) of these blending modes.

Dodge and Burn Tools are a couple of other useful tools to even out dark and light tones of the skin tones.

As with almost any Photoshop function, there are various ways to get the results you desire. The tools mentioned above are good starting points for working on the color layer, but the possibilities are endless! Don’t be afraid to experiment.

Retouch the Detail layer

Click on the Detail layer, which contains every detail of your portrait image. There are a wide variety of tools you can use to fix skin imperfections, ranging from wrinkles to acne.

Clone Tool – Use the Clone tool with mode set to normal and just clone out imperfections, sampling (ALT/OPT key click) from a desirable area to paint over an imperfection in another area.

Healing Brush Tool –  The Healing Brush tool works similarly to the Clone tool and will sample textures from nearby areas to make a seamless patch.

Spot Healing Brush –  Spot Healing Brush works similarly to the Clone tool and Healing brush, but does not require you to sample a source area. It will automatically sample from another area to repair the target imperfection. Use the adjustable brush sizes to paint over spots and remove them.

Patch Tool – Like the Healing tool, the Patch tool will match the texture of the near-by area for a seamless repair. Make a selection over the area to be repaired and drag the selection over a good area. For best results work on small areas at a time.

Content-Aware Patch –  Similar to the Patch Tool, but with the Content-Aware Patch you select a good area and drag it over area to be repaired, and the tool will match the texture.

After image

After image

Once you have finished retouching the color and detail layers of your image, you can simply turn off the layer group to see the before and after of your work. (This is also a handy review tactic as you are working, to see how your adjustments are affecting the image.) Because all the retouching you have done are applied to the two new layers, it is completely non-destructive to the original image.  So, if you are unhappy with your first results, you can simply delete the retouched group and start over.

frequency-retouching-2-750

A – Original image B – Air-Brushed look retouching C – Frequency Separation retouching


Conclusion

Portrait retouching can be accomplished by using many different methods, and various software and plugins designed especially for that purpose. This article is meant to give you a Photoshop option for retouching and enhancing your portrait photography. The great feature of this method is the ability to separate the detail from the color and tones before retouching. Do you have any tips for portrait retouching?

googletag.cmd.push(function() {
tablet_slots.push( googletag.defineSlot( “/1005424/_dPSv4_tab-all-article-bottom_(300×250)”, [300, 250], “pb-ad-78623” ).addService( googletag.pubads() ) ); } );

googletag.cmd.push(function() {
mobile_slots.push( googletag.defineSlot( “/1005424/_dPSv4_mob-all-article-bottom_(300×250)”, [300, 250], “pb-ad-78158” ).addService( googletag.pubads() ) ); } );

The post How to do Frequency Separation Portrait Retouching in Photoshop by Bruce Wunderlich appeared first on Digital Photography School.


Digital Photography School

 
Comments Off on How to do Frequency Separation Portrait Retouching in Photoshop

Posted in Photography


Mitakon Speedmaster 85mm f/1.2 ‘dream’ portrait lens announced

18 Apr

Zhong Yi Optics has released information about an 85mm f/1.2 lens it intends to make available in May. The Mitakon Speedmaster 85mm f/1.2, which the company is calling ‘The Dream’, is aimed at still photographers as well as videographers, and has a covering circle suitable for full frame sensors. Click through for more information

Articles: Digital Photography Review (dpreview.com)

 
Comments Off on Mitakon Speedmaster 85mm f/1.2 ‘dream’ portrait lens announced

Posted in Uncategorized


Portrait of a City: 31 Photographic Street Art Murals

06 Apr

[ By Steph in Art & Street Art & Graffiti. ]

wrinkles of the city main

Residents of cities like Tokyo, Havana and Los Angeles see their own faces blown up to monumental proportions and pasted onto all sorts of urban surfaces when photography, street art and architecture come together. These 31 images from artists working all over the world cover the humorous and the poignant, bringing photography to the most unexpected places.

2 Girls Building in Melbourne by Samantha Everton
photographic murals 2girls 1

photographic murals 2girls 2

photographic murals 2girls 3

A fine art image by Australian photographer Samantha Everton spans the entire facade of the ‘2 Girls Building’ in Melbourne by KUD Architects. The concrete of the building is printed with a wallpaper texture and where it cuts away, the photo (printed on glass) is revealed. The image becomes three dimensional in the form of the three-story lamp mounted to the outside of the structure, mimicking the one in the original photo.

Inside Out Project by JR in Tokyo

photographic murals JR Tokyo 2

photographic murals JR Tokyo 1

The most well-known street artist working with photographic imagery is JR, who creates collages of portraits of residents in each of the cities in which he works. Based in Paris, the artist pastes up gigantic images of faces on buildings, bridges, rooftops and trains all over the world and gets in his subjects’ faces with a 28mm lens to capture unguarded expressions. The work pictured here is part of the Inside Out Project, which welcomes people to submit their own black and white photographic portraits to be exhibited in their own communities.

Humorous Photographic Images by Mentalgassi

photo murals mentalgassi 4

photo murals mentalgassi 3

photo murals mentalgassi 2

photo murals mentalgassi 5

photo murals mentalgassi 1

mentalgassi 6

mentalgassi 7

Trash cans mounted to poles become backpacks, ‘metal heads’ appear on domed recycling bins and faces appear to be squashed in windows as artist trio Mentalgassi bring their photographic imagery to the streets. The anonymous young Berlin artists met at school and became interested in how new media techniques could be applied to three-dimensional objects.

Next Page – Click Below to Read More:
Portrait Of A City 31 Photographic Street Art Murals

Share on Facebook


[ By Steph in Art & Street Art & Graffiti. ]

[ WebUrbanist | Archives | Galleries | Privacy | TOS ]


WebUrbanist

 
Comments Off on Portrait of a City: 31 Photographic Street Art Murals

Posted in Creativity