There is perhaps no more important tool in composition than lines. The eye will virtually always follow an actual or implied line across the picture. Because of this tendency, many lines are referred to as leading lines They are actual, or implied lines that control the eye of the viewer through the frame.
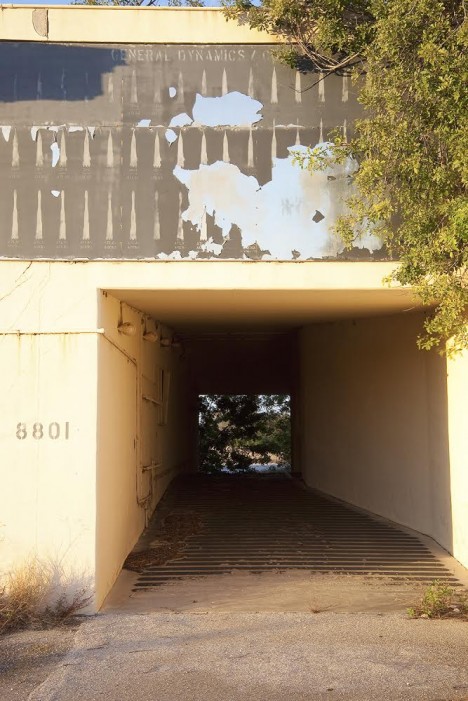
Some leading lines guide the viewer entirely through the frame. Some lines are the subject of the photo themselves. But others, and my favorite sort of leading lines, are the ones that draw the viewer into the picture. They add depth to your image. So today I want to focus on that particular kind of leading line, giving you some examples and ideas for how to create them.
1. Plan for opportunities
Lines that you can use to lead into your viewer into the frame are everywhere, but you’ve got to look for them. In fact, it is a good idea to plan a few shots ahead of time so that you can consider what to use as a leading line. Leaving it to chance when you are out shooting will often result in the idea of leading lines being overlooked while you are focused on other things.
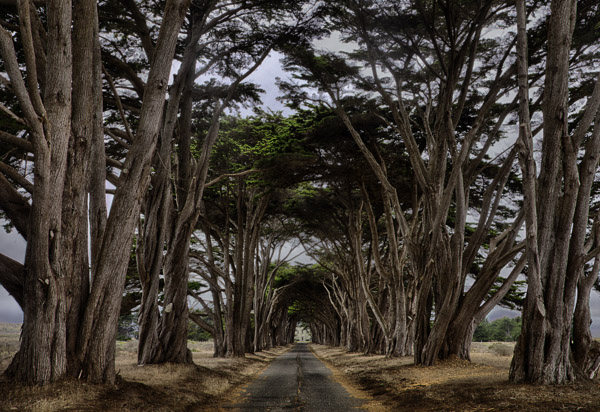
When you are thinking about possible lines leading into the frame, think about roads and paths, which work great. Plus they are everywhere so you almost never have to search for them. The edges of the road will converge in the distance, thereby pointing the viewer to the center of the frame. Although certainly not as prevalent as roads, railroad tracks also work great. Finally, don’t overlook the use of shadow to create a line toward the center of the picture.

2. Finding and using urban opportunities
In an urban environment, besides roads, you can use buildings and other structures. Obviously rows of buildings can work. Perspective will make the buildings appear smaller as they become more distant, resulting in lines pointing to the center of the picture. Fences are another good choice.
Keep your eye open for rows of streetlights, which we often overlook, but which can work great. In addition, don’t forget to look up, as the natural convergence of buildings toward the center of your frame (due to the distortion of your lens) can actually work for you in this context, and create lines that point to the center of the frame.

3. Opportunities in nature
When you are out in the wild, nature often provides you with the leading lines you seek. Patterns on the ground, whether it be paved, sand, or grass, can often provide markings that lead to the center of the frame. In addition, similar to the convergence of buildings mentioned above, looking up into tall trees will create the same effect.

Leading lines on the ground can be difficult if not impossible to see with the naked eye though. There are times you have to walk around with the viewfinder held to your eye (or looking through your LCD with the camera in Live View) in order to see the lines on the ground. Moving water can also provide lines toward the center of the frame. Again, however, these might not be visible to you. Frequently looking at a a long exposure after the fact is the only way you can actually see these lines. Take test shots when you can.
4. Manufacture your own lines
Sometimes there are no leading lines tha to use and you have to make your own. There are many ways to do this. One of my favorites is by adding streaking lights that go into the frame. Taking a long exposure of moving water will also result in lines.

5. Stay cognizant of lines when shooting
Once you identify leading lines to draw your viewer into the frame, you need to take your picture in such a way that it will show them. We already mentioned shutter speed, which is particularly important when you are allowing lights or water to flow through your frame to show a leading line. But you will also want to keep an eye on your aperture setting. Most of the time you will want the entire leading line sharp, along with the subject that you are leading the viewer’s eye toward. You’ll want to use a small aperture in that case, which will create a large depth of field for your shot. On occasion, however, you want to blur out the background by using a large aperture. In any case, the important thing is to have a plan for showing the leading line in the final picture.

6. Accentuate the lines in post-production
Finding and using leading lines to draw your viewer into the picture does not end when the shutter closes. Usually you can accentuate them in post-processing. The main way is through selective brightening and darkening. Oftentimes you will want to brighten your leading line to draw the viewer’s eye to it. Sometimes you might want to darken other parts of the frame for the same reason. You also might want to increase the contrast in, and around, your leading lines since the eye is attracted to contrast.
The best way the accomplish this selective lightening and darkening is through curves adjustment layers. Just create a curves adjustment layer (Layer – New Adjustment Layer – Curves). Then brighten the picture by pulling the middle of the curve upward bit. Use whatever selection tools you are most comfortable with to mask away the brightening everywhere you don’t want it (which will be pretty much everywhere except for your leading lines). To darken portions of the picture, just do the same thing on a new adjustment layer, but instead of pulling the curve up, pull it down. Again, mask away the effect where you don’t want it (which, this time will be areas away from your leading lines).

Effort and reward
The use of leading lines to draw the viewer into the frame is a great way to add depth to your pictures. Rather than looking at the picture the viewer is looking into the picture. But it isn’t always easy. It requires thought before, during, and after the shot. But with the right pre-planning, a little attention while shooting, and some accentuation during the post-processing, you can add an element to your photos that sets them apart.
googletag.cmd.push(function() {
mobile_slots.push( googletag.defineSlot( “/1005424/_dPSv4_mob-all-article-bottom_(300×250)”, [300, 250], “pb-ad-78158” ).addService( googletag.pubads() ) );
} );
The post 6 Tips for Creating Leading Lines to Make Your Photos Stand Out More by Jim Hamel appeared first on Digital Photography School.


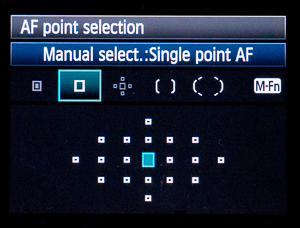 When you look through your viewfinder, you should see an array of little dots or squares laid over the display. These are your focus points, and they show you where in the frame the camera is capable of finding focus. In single-point AF area mode, you can use the camera’s direction pad to select one of these dots, and the camera will always focus on that point and that point alone.

 Extra photos for bloggers: 1, 2, 3


You must be logged in to post a comment.