RSS
 

Posts Tagged ‘Photos’

How To Transform Your Photos In Just One Click

06 Aug

We’re super-excited to let you know about a brand new dPS product that’s just launched, to help you transform your photos into stunning images with a single click:

A mega pack of 101 Lightroom® presets (Please note: a copy of Adobe Lightroom is required to use these presets.)

NewImage

Best of all, for a limited time, the pack can be yours for the special introductory price of just USD $ 20 (that’s 60% off).

Check it out now!

Final Portraits 1

Following the incredibly popular preset offerings in our 12 Days of Christmas and Mid-Year Summer sales, we’ve been inundated with requests for more…

So we decided to bring in pro photographer and Lightroom expert, Cole Joseph, to handcraft the first ever dPS set, including 7 high quality collections:

  • Plush Portraits – bring the “wow” factor to your portraits while preserving natural skin tones
  • Lively Landscapes – add vibrance to your lush landscape images
  • Street Grit & Grunge – give your photos a unique and cutting-edge look
  • Bangin’ Black & White – for images with classic charm, romance and soul
  • Sleek Sepia – stylize with a cross-toned black and white edit
  • Classic Vintage – step back in time and relive the good ol’ days
  • Quick Adjustments – quick and easy fine-tuning to simplify your editing process

Final quick adjustments

With 101 presets to choose from, Cole’s done the hard work for you so you can get the perfect edit for every photo without any fuss.

Simply apply the effect and adjust as desired… It’s that easy!

Final Vintage 2

You’ll save a whole heap of processing time, while giving your images an instant “pop”.

See Cole demonstrate in this video:

If you haven’t used presets before? No worries. Full instructions are included in the pack and as with all our products if you pick it up and don’t find it’s for you – you can ask for your money back anytime within 60 days and we’ll give you a full refund.

Transform your photos in just one click.
Pick up our 101 Lightroom Presets Pack today!

*Please note: a copy of Adobe Lightroom is required to use these presets.

googletag.cmd.push(function() {
tablet_slots.push( googletag.defineSlot( “/1005424/_dPSv4_tab-all-article-bottom_(300×250)”, [300, 250], “pb-ad-78623” ).addService( googletag.pubads() ) ); } );

googletag.cmd.push(function() {
mobile_slots.push( googletag.defineSlot( “/1005424/_dPSv4_mob-all-article-bottom_(300×250)”, [300, 250], “pb-ad-78158” ).addService( googletag.pubads() ) ); } );

The post How To Transform Your Photos In Just One Click by Darren Rowse appeared first on Digital Photography School.


Digital Photography School

 
Comments Off on How To Transform Your Photos In Just One Click

Posted in Photography


Take Photos, for Science!

05 Aug

You’re usually out snapping away at flora and fauna, so why not use those photos to help document our world?

Add your nature shots to iNaturalist and help increase the already huge online database of plants, furry creatures and creepy crawlies.

Upload your photo, tag the location and name the organism if you can. No worries if you don’t know the name, iNaturalist is teeming with people eager to help classify.

It’s a cool way to connect with other nature-lovers, learn about the life around you and add your talent to scientific research!

Photo by RJAdams55


© Erin for Photojojo, 2015. |
Permalink |
No comment |
Add to
del.icio.us

Post tags:


Photojojo

 
Comments Off on Take Photos, for Science!

Posted in Equipment


Amazing Aerial Photos of LA and NYC Reveal Urban Geometry

04 Aug

[ By Steph in Art & Photography & Video. ]

Screen Shot 2015-08-03 at 4.55.33 PM

No matter how far and often you might wander around your city, there’s one way you most likely never get to experience it: from above. Approached from directly overhead, the bird’s-eye-view renders virtually any urban scene unrecognizable, reducing landscaped streets and towering skyscrapers to mere shapes within an abstract composition, as if it’s a work of art. And perhaps, for some urban planners, it is. Thanks to photographer Jeffrey Milstein, we can all appreciate New York City and Los Angeles from a new perspective.

Screen Shot 2015-08-03 at 4.56.48 PM

Screen Shot 2015-08-03 at 4.56.41 PM

Screen Shot 2015-08-03 at 4.56.28 PM

Screen Shot 2015-08-03 at 4.56.03 PM

Screen Shot 2015-08-03 at 4.54.55 PM

Captured from a helicopter both at night and during daylight, Milstein’s aerial imagery of these two iconic American cities presents entire neighborhoods as tapestries of geometric shapes. New York’s Stuyvesant Town looks like a bunch of crosses embedded in greenery, and the Statue of Liberty is strikingly jewel-like on its island. 

Screen Shot 2015-08-03 at 4.53.40 PM

Screen Shot 2015-08-03 at 4.53.00 PM


Some of LA’s most posh neighborhoods are unsurprisingly picturesque from above, laid out in their carefully-arranged grids and often centered upon parks. In comparison, the shots of downtown look downright bleak, sort of like you’re looking at a circuit board rather than a full-scale city. The photographs are on display now at New York’s Benrubi Gallery and LA’s Kopeikin Gallery.

Screen Shot 2015-08-03 at 4.53.58 PMScreen Shot 2015-08-03 at 4.54.06 PM

Screen Shot 2015-08-03 at 5.52.30 PM

If looking at the pictures gives you vertigo, good, says Milstein. That’s the effect he’s going for. “That’s exactly what I want. To get a visceral reaction from it,” he told City Lab. 

Share on Facebook


[ By Steph in Art & Photography & Video. ]

[ WebUrbanist | Archives | Galleries | Privacy | TOS ]


WebUrbanist

 
Comments Off on Amazing Aerial Photos of LA and NYC Reveal Urban Geometry

Posted in Creativity


Top 10 Features to Bring Your Seascape Photos to Life

31 Jul

Seascapes are awesome opportunities for photography. In fact, it will probably be your first impulse upon seeing the ocean to pull out your camera (or wish you had it with you). It takes some skill, however, to turn a beautiful coastal scene into something more than a snapshot. If you are not careful, your coastal photo can be a boring picture of sand and water.

One of the keys to success for coastal photography is finding something interesting along the coastline to put in your picture. It would be great if there was an abandoned boat every 100 meters, but there isn’t. And we don’t all live near Big Sur or the Cliffs of Moher. Therefore, you often have to hunt for features to make your seascapes come alive. When you find such a feature, look at it from different angles, often with your camera to your face (you’ll be surprised at how different things sometimes look through the viewfinder or through the LCD). 

To get you started, here are some suggestions of coastal features to look for:

1. Old piers and docks

Abandoned piers and docks solve a huge problem with most coastal photography in that they add a center of interest to your photos. Many times you have a beautiful background created by the coastal scenery, but nothing else. You want an actual subject for your photo, the pier gives you that.

Top Coastal Formations - Pier

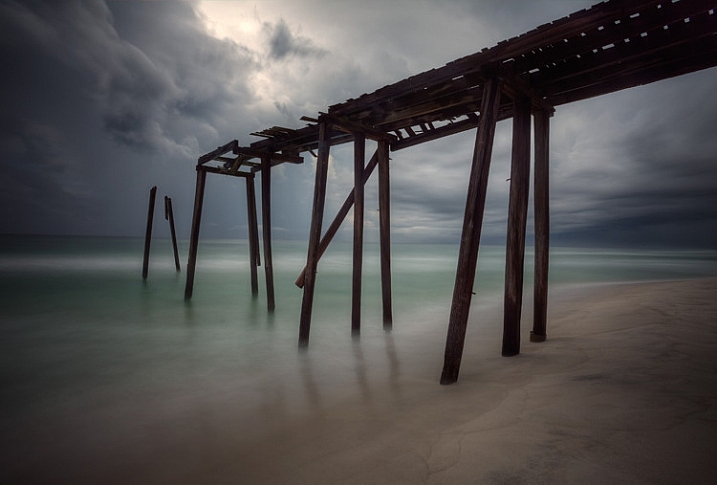
Abandoned piers and docks also provide a great opportunity for you to blur out the water, which creates a strong contrast between the blurred water and the sharp pier. To do this, make sure you have a 10-stop neutral density filter. Using this filter will reduce the amount of light allowed into your camera, and cause the camera to use a much longer shutter speed than it would otherwise. That long shutter speed blurs (or smooths) the water.
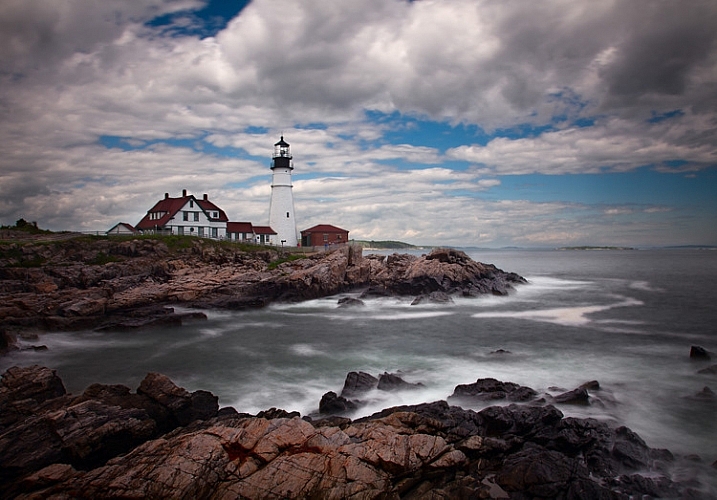
2. Lighthouses

A less common feature, but one that you should always look for, is a lighthouse. These add a great subject to an otherwise uninteresting scene.

Obviously, you won’t find lighthouses everywhere, but you’d be surprised how many there are if you look for them. In the U.S., the state of Maine alone has over 60 lighthouses, California has about 30. You can check to see if there is a lighthouse near your destination by using the map created by the Lighthouse Friends.

Seascape features example -  Portland Head Light

Oftentimes access to lighthouses is restricted to certain hours because they are on public property. This can be an issue if you want to shoot before sunrise or after sunset, as most of us do. Be sure to check the access and/or opening times.

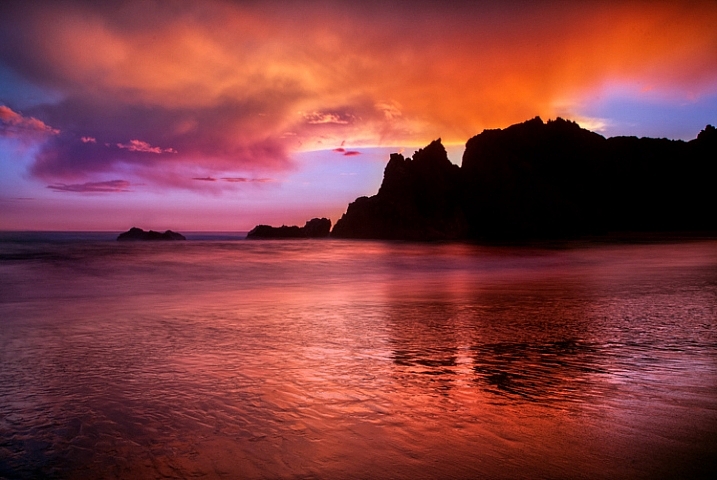
3. Sunrise and sunset

Whereas your location may not have something like an abandoned pier or a lighthouse, no matter where you are there will always be a sunrise and sunset. You may not get the most dramatic of sunrises or sunsets on the day you are out shooting, but you will always have one. If you are not doing this already, it is the number one improvement you can make to your photographs, and it costs nothing.

If you don’t ordinarily shoot into the sun, do so on occasion to add drama and interest. You can also use the sun as a center of interest.

Top Coastal Formations - Sunset at Pigeon Point

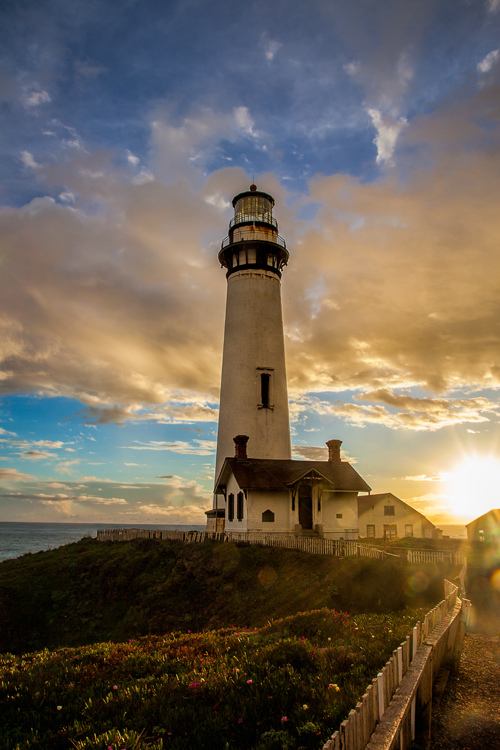
Be sure to arrive well before sunrise or hang around after sunset. The skies are often more dramatic during these times than during the actual sunrise or sunset itself.

4. Interesting rock formations

Remember that in coastal photography, the top half of your picture is often a given; it will be the water and sky. In those cases, the only variable is the foreground. Therefore, you should spend a lot of time looking down to get the best foreground possible.

When you do that, one thing to look for – which is available no matter your location – is interesting rocks, or rock formations. Spend a lot of time looking for them, and as you do so, look through your camera frequently. The camera sees things differently than you.

Seascape features example -  Green rocks at Acadia

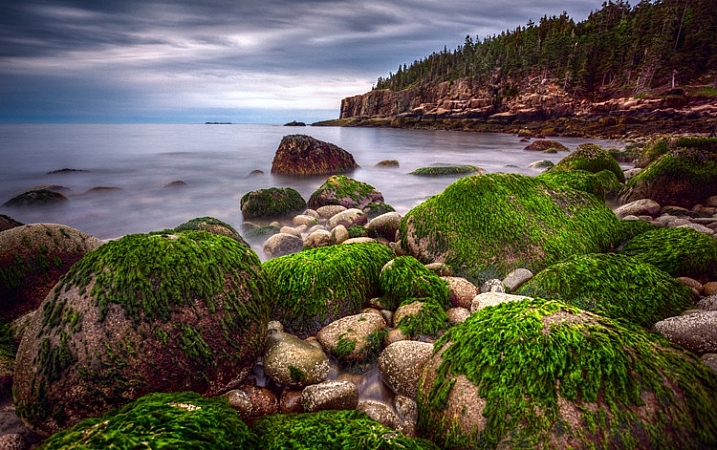
To make the rocks stand out, get let low to the ground and get right behind them. This is sometimes inconvenient or uncomfortable, but it is worth it. Be sure to use a wide angle lens to capture the whole scene.

5. Patterns in the water

Sometimes the water itself is enough to create an interesting photo. For this to be the case, you will need to capture the pattern of the waves or the currents in the water.

top Coastal Formations - Ocean at Night

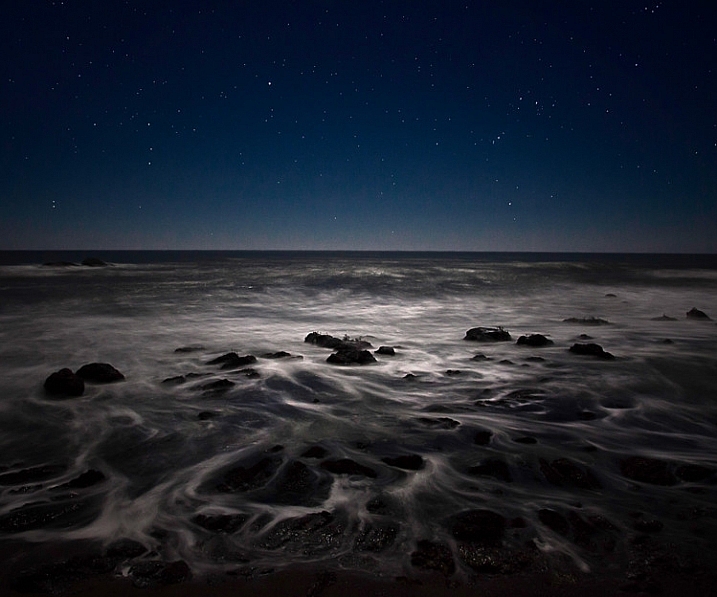
Use a slow shutter speed to capture the patterns of the waves and currents. At night, your shutter speed might naturally be slow enough to do this because of the low-light environment. During the day, however, you will need a 10-stop neutral density filter to use a slow enough shutter speed.

6. Animals

Seacoasts are home to a vast array of wildlife. In some places, livestock are allowed to roam freely along coastal regions. If nothing else, you can count on birds being present at the coast. Use one of these animals as a center of interest for your photo when you capture the scene.

Seascape example - Valencia Island with Sheep

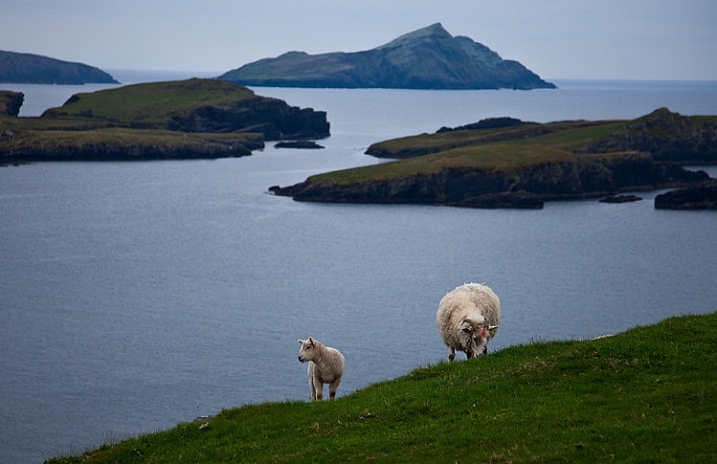
You will need to use a reasonably fast shutter speed to capture the animal and make it sharp. If you like to shoot from a tripod and use a neutral density filter when capturing coastlines, you will have to change things up. Creating a blur to the water will also blur the animal, which will ruin the shot.

7. Powerful waves

On some days, the waves are enough to create a nice photo. In particular, after a storm or high winds, the waves may come crashing in and give you something interesting to work with.

Top Coastal Formations - Crashing Waves

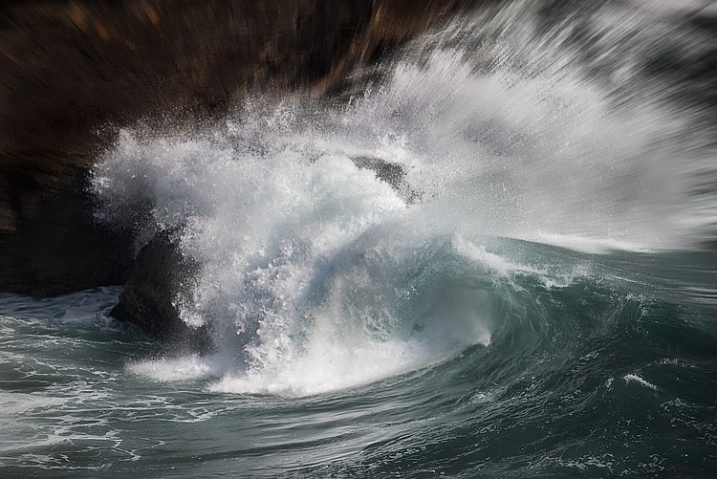
Use a fast shutter speed (at least 1/250th) to capture the power of the waves. If you use a slower shutter speed it will blur the wave, which will create a sense of movement, but not show the power of the wave. This will probably not be a problem most days, but if you are working in low light you will need to increase your ISO, or open up your aperture a bit to get the shutter speed fast enough.

8. People (for a sense of scale)

You can have the most dramatic scenery in the world in your picture, but if your viewer cannot instantly determine the scale of the scene, it might be lost. Nothing solves this problem more than having a person in your picture. We all know how big people are, and seeing a person in the picture instantly helps put the size and scale of the scenery in perspective.

Seascape features example -  Photographer at Davenport cliffs

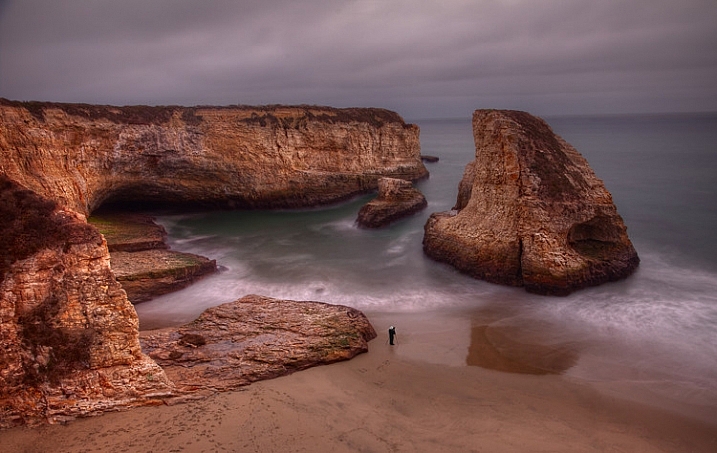
Next time, rather than cloning out that person who wandered into your picture, leave them in. Better yet, look for opportunities to include a person in your scene to add a sense of scale.

9. Reflective water

If you are shooting up or down the coastline (i.e. perpendicular to it), land features will sometimes reflect on the water or wet sand. These reflections can make a nice foreground for your picture. Capturing reflections usually requires that:

  1. You are photographing just before sunrise or after sunset
  2. You use a long exposure, which will blur the water and make the reflection show up

Seascape features example -  Reflections at Pfeiffer beach

It need not be a perfect reflection (it rarely will be, since the water is moving so much), but just something that captures the colors and tones in general. You will use these to create a foreground that is more interesting than just a bunch of sand. Slow down your shutter speed and see what develops.

10. Clouds

Another item found along the coast that does not depend on your location or geography is clouds. More often than not, the clouds will give you something to work with. Coastal regions – being a transition between land and sea – often develop the most interesting clouds anywhere, and conditions can change rapidly.

Seascape features example -  Davenport clouds

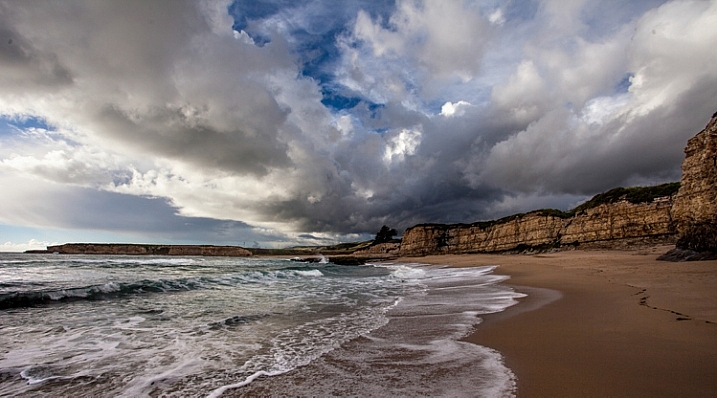
If you are focusing on the clouds as the subject of your picture, make sure that the top two-thirds (2/3) of your picture (at least) is above the horizon line. Be sure to use your polarizing filter if you are shooting near midday.

Next steps

There is nothing to do now but get out there and photograph the coast. Start with the features in this article, then go find your own. There is no end to the interesting things you can find along the coast. If you have a favorite that I didn’t list, be sure to leave it in the comments below.

googletag.cmd.push(function() {
tablet_slots.push( googletag.defineSlot( “/1005424/_dPSv4_tab-all-article-bottom_(300×250)”, [300, 250], “pb-ad-78623” ).addService( googletag.pubads() ) ); } );

googletag.cmd.push(function() {
mobile_slots.push( googletag.defineSlot( “/1005424/_dPSv4_mob-all-article-bottom_(300×250)”, [300, 250], “pb-ad-78158” ).addService( googletag.pubads() ) ); } );

The post Top 10 Features to Bring Your Seascape Photos to Life by Jim Hamel appeared first on Digital Photography School.


Digital Photography School

 
Comments Off on Top 10 Features to Bring Your Seascape Photos to Life

Posted in Photography


Photos of former Vice President Dick Cheney on September 11, 2001 released to public record

25 Jul

A collection of images featuring then-Vice President Dick Cheney on September 11, 2001 have recently been released to the public in response to a Freedom of Information Act request. Part of the National Archive, the images are available on Flickr and show Cheney traveling on Marine Two and at the President’s Emergency Operations Center. Read more

Articles: Digital Photography Review (dpreview.com)

 
Comments Off on Photos of former Vice President Dick Cheney on September 11, 2001 released to public record

Posted in Uncategorized


28 Refreshing Photos of Ordinary Things

25 Jul

As photographers we like to get out and travel to find unique and interesting things to photograph. But there are photographic subjects everywhere – all you need to do is look around and get creative.

Here are some photos of every day, ordinary objects – where the photographers have gotten creative with lighting, cropping, and composition. Take note – you can do this too!

~lzee~bleu~

By ~lzee~bleu~

JLS Photography - Alaska

By JLS Photography – Alaska

Maria Teresa Ambrosi

By Maria Teresa Ambrosi

Hiroyuki Takeda

By Hiroyuki Takeda

Holley And Chris Melton

By Holley And Chris Melton

Giusi Barbiani

By Giusi Barbiani

Flavio~

By Flavio~

Theilr

By theilr

Darlene Hildebrandt

By Darlene Hildebrandt

Tom Roeleveld

By Tom Roeleveld

Jo Christian Oterhals

By Jo Christian Oterhals

Michael Porter

By Michael Porter

Harry (Howard) Potts

By Harry (Howard) Potts

Johann Coetzer

By Johann Coetzer

Herr Hans Gruber

By Herr Hans Gruber

DorkyMum

By DorkyMum

Caro Wallis

By Caro Wallis

Georgie Sharp

By Georgie Sharp

Roland Peschetz

By Roland Peschetz

Benjamin Lehman

By Benjamin Lehman

Pascal Bovet

By Pascal Bovet

Michael Pardo

By Michael Pardo

Mbgrigby

By mbgrigby

Jared Tarbell

By Jared Tarbell

IMorpheus

By iMorpheus

William Warby

By William Warby

Daniel Wehner

By Daniel Wehner

Javier Morales

By Javier Morales

googletag.cmd.push(function() {
tablet_slots.push( googletag.defineSlot( “/1005424/_dPSv4_tab-all-article-bottom_(300×250)”, [300, 250], “pb-ad-78623” ).addService( googletag.pubads() ) ); } );

googletag.cmd.push(function() {
mobile_slots.push( googletag.defineSlot( “/1005424/_dPSv4_mob-all-article-bottom_(300×250)”, [300, 250], “pb-ad-78158” ).addService( googletag.pubads() ) ); } );

The post 28 Refreshing Photos of Ordinary Things by Darlene Hildebrandt appeared first on Digital Photography School.


Digital Photography School

 
Comments Off on 28 Refreshing Photos of Ordinary Things

Posted in Photography


On top of the world: Photographer faces fears to capture rare wedding photos

24 Jul

Photographer Brian Rueb was approached by two friends to shoot their wedding – a familiar proposal for many photographers. However, there was a slightly unusual twist in this case, as the couple planned to tie the knot on top of Half Dome in Yosemite National Park. Read more

Articles: Digital Photography Review (dpreview.com)

 
Comments Off on On top of the world: Photographer faces fears to capture rare wedding photos

Posted in Uncategorized


How the Switch from DSLR to Mirrorless Changed How I Edit Photos

22 Jul

When I started in photography more than 10 years ago, the only viable option for editing images was Adobe Photoshop. At that time, 100% of my photo editing was done there.

A few years later, Adobe introduced Lightroom and I embraced it right away for its speed and organizational features. I immediately adopted it into my photo processing workflow and it was the first big transition that drastically changed my processing.

The next big change in my processing happened when I discovered HDR photography. As a photographer with a background in graphic design, I quickly saw the potential in the new processing technology and, again, I incorporated it into my workflow.

Images How Switch to Mirrorless Change Photo Edit 1

Canon 60D, HDR processed

By the end of 2014, after 10 years of shooting with a Canon DSLR, I had established my own photo editing workflow – one that I was comfortable with, that reflected my style of photography, and covered different scenarios of travel and landscape photography. Below is a list of four main processing techniques in my editing workflow, with the percentage of the total use for each.

HDR Processing in Photoshop HDR Pro and Lightroom – 50%

The foundation of my natural looking HDR photography style, this technique is based on merging bracketed photos in Photoshop HDR Pro and later editing the new HDR image in Lightroom. The beauty of this method is that Photoshop HDR Pro does not change the pixels (luminosity, contrast, saturation) of the original images. Instead, it combines data from the bracketed photos into one enormous 32-bit TIFF image.

I outlined this technique in detail in one of my previous articles: Natural Looking HDR in Photoshop and Lightroom in 5 Easy Steps.

Images How Switch to Mirrorless Change Photo Edit 2

Canon 60D, HDR processed with Photoshop HDR Pro

HDR Processing in Photomatix – 30%

Photomatix is the most popular, and matured standalone HDR program. It has a completely different approach compared to Photoshop HDR Pro. Besides standard HDR features like image alignment, de-ghosting and merging for HDR, it has unique image editing tools that allow me to create distinctive looks in my photographs.

Images How Switch to Mirrorless Change Photo Edit 3

Canon 60D, HDR processed with Photomatix

Luminosity Blending in Photoshop – 10%

This technique is based on blending multiple images together in Photoshop using transparency masks. It gives me the most flexibility and control over image processing but, at the same time, it is the most involved and time consuming. I use it in the most complex cases when everything else has failed.

Images How Switch to Mirrorless Change Photo Edit 4

Canon 60D, digital blending with Luminosity Masks

Single RAW processing in Lightroom – 10%

When the light is not very dynamic, I use a single image and process it in Lightroom.

Images How Switch to Mirrorless Change Photo Edit 5

Canon Digital Rebel, single RAW image processed in Lightroom

The Switch

The biggest change in my photography happened at the end of 2014 when, after shooting with a Canon DSLR for 10 years, I switched to Sony mirrorless. It was quite an adjustment. After shooting for so long with one brand, I had become extremely comfortable with it. During the switch, I had to learn how to work with something very different (more details on that topic here: 5 Lessons Learned Switching from DSLR to Mirrorless for Travel Photography).

But, I did not expect that the brand switch would dramatically change my editing. I was wrong.

After I returned from my first photography trip to Hawaii and California, where I put my new equipment through the test of real life scenarios of travel photography, I had 3000 brand new photos shot with the Sony a6000.

When I started to edit the new photos, I could see some differences. In general, the images were much cleaner and sharper with a higher amount of detail. These changes did not surprise me because the a6000 has a new generation sensor with a higher pixel count, and in combination with quality lenses from Sony and Zeiss, it could easily resolve a staggering amount of detail.

What surprised me was how the images behaved when I started to edit them. I could immediately see that the images were more responsive, meaning that I could push them much further, with more aggressive editing, and that I could recover more shadows and highlights from a single RAW image. I realized that I could process some images without using HDR techniques, which was not possible before.

This is when I started to look around trying to find the reason for the different behaviour. I found my answers on the DoX Mark website when I compared camera sensors. The dynamic range of the Sony a6000 sensor is wider by almost 2 stops (11.5EV vs 13.2EV) or 14%.

Images How Switch to Mirrorless Change Photo Edit 6

The difference is probably not a big deal if you are a wedding or street photographer but, for someone like me who specializes in travel and landscape HDR photography, this was a game changer. I saw the opportunity to streamline and optimize my digital techniques once again.

Now, six months later, below is my new modified digital photography workflow.

Single RAW Preset Based Lightroom Processing – 50%

A major shift toward the single RAW Lightroom editing made me realize that it could be the perfect opportunity to optimize my workflow in order to save time on processing. I organized my Lightroom presets into four collections: Landscapes and HDR, Cross Processing, People and B&W. Now, I start the process of editing by applying different presets to the image trying to find the right look. When I find the one I like the best, I tweak it with standard Lightroom and Photoshop editing tools.

Images How Switch to Mirrorless Change Photo Edit 7

Sony A6000, Sony 10-18mm lens, Lightroom Preset Based Processing

HDR Processing in Photoshop HDR Pro and Lightroom – 20%

With Adobe introducing Merge to HDR in Lightroom 6, I find myself using it more and more but I still use Photoshop HDR Pro.

Images How Switch to Mirrorless Change Photo Edit 8

Sony A6000, Zeiss 16-70mm lens, Lightroom 6 HDR Processed

HDR Processing in Photomatix – 20%

Cleaner digital files allow me to push the images even further in Photomatix.

Luminosity Blending in Photoshop – 10%

Nothing has changed here.

Conclusion

The switch from Canon DSLR to Sony mirrorless had unexpected consequences that drastically changed the way I edit my photos. In the end, the change was very positive, it allowed me to save time on processing and editing photos. Also, the extended dynamic range of the new sensor resulted in me taking fewer photos. I do not have to take five or seven bracketed shots anymore; in most cases, three brackets are all that is needed.

Have you made the switch? Have you noticed any changes in your processing workflow? Share with us your thoughts in the comments below.

googletag.cmd.push(function() {
tablet_slots.push( googletag.defineSlot( “/1005424/_dPSv4_tab-all-article-bottom_(300×250)”, [300, 250], “pb-ad-78623” ).addService( googletag.pubads() ) ); } );

googletag.cmd.push(function() {
mobile_slots.push( googletag.defineSlot( “/1005424/_dPSv4_mob-all-article-bottom_(300×250)”, [300, 250], “pb-ad-78158” ).addService( googletag.pubads() ) ); } );

The post How the Switch from DSLR to Mirrorless Changed How I Edit Photos by Viktor Elizarov appeared first on Digital Photography School.


Digital Photography School

 
Comments Off on How the Switch from DSLR to Mirrorless Changed How I Edit Photos

Posted in Photography


Google to phase out Google+ Photos

22 Jul

Google launched the stand-alone Photos app with unlimited storage in May. Now it has announced it will be phasing out its predecessor, Google+ Photos. On August 1, the Google+ Photos Android app will stop working and soon afterwards the iOS and web versions will cease to be operational as well. Read more

Articles: Digital Photography Review (dpreview.com)

 
Comments Off on Google to phase out Google+ Photos

Posted in Uncategorized


Meet Ralph, the New Horizons probe imaging tool responsible for Pluto photos

21 Jul

Over the last week or so, images from the New Horizons mission have been arriving back at Earth as the probe begins the 16-month task of returning data from its July 14th Pluto flyby. Take a look at the imaging systems responsible for the impressive photos of the dwarf planet. Read more

Articles: Digital Photography Review (dpreview.com)

 
Comments Off on Meet Ralph, the New Horizons probe imaging tool responsible for Pluto photos

Posted in Uncategorized