RSS
 

Posts Tagged ‘Photos’

5 Questions to Help You Make sure Your Photos are Safe Inside Lightroom

29 Nov

Lightroom quiz lead image

New Lightroom users often get into trouble because of a lack of understanding as to how Lightroom works. Unfortunately the result of these misunderstandings is often that their precious photos are lost, either permanently or temporarily. When you are new to Lightroom it can help if you understand some basics about how Lightroom works to ensure that your precious photos are safe.

Here’s a quick five question quiz to see if your photos are safe in your hands.

Question 1: True or False?

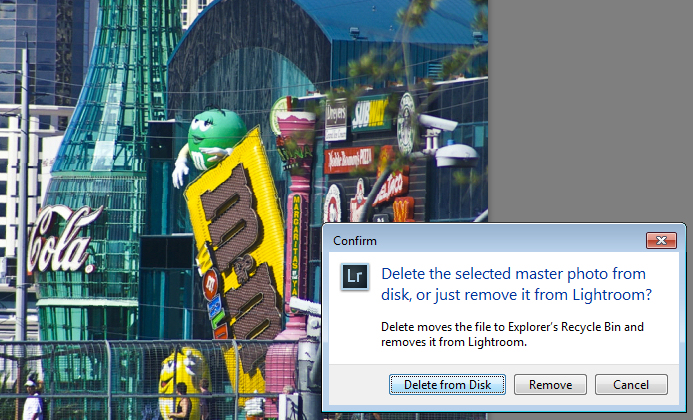
Lightroom stores a copy of your photos for you. When you delete a photo from Lightroom even if you opt to delete it from disk, the original is still safe.

What happens when you select to Delete from Disk in Lightroom

Answer: False

Lightroom simply keeps an record of where your images are on your hard disk. It does not actually store any images. So, if you remove a photo from Lightroom, and when prompted select Delete from Disk, then then you’re deleting the original of that image. If that was your only copy you’ll have deleted that forever.

Question 2: True or False?

You have deleted all the photos from a folder inside Lightroom. This means that there are no photos left in that folder so it’s safe for you to open Finder or Windows Explorer and delete the folder itself.

Is an empty folder in Lightroom really empty?

Answer: False

Lightroom can only handle photo and video file formats. Even if you delete all the photos and videos from a folder in Lightroom there may still be other files in that folder that Lightroom can’t handle, such as PDF files, Microsoft Word, Excel and Quicken files. You cannot know that a folder is empty of files unless you check it by opening it in Finder or Windows Explorer.

Question 3: True or False?

Your photos are safe because every time you see a prompt to backup Lightroom you always click to do so.

Does Lightroom backup your photos when you select to Backup?

Answer: False

When you choose to backup upon exiting Lightroom, all you’re doing is backing up the Lightroom catalog, NOT your photos. Your photos are never backed up by Lightroom, so you will need to set up some other routine for backing up your image files. Also note that, in most cases, Lightroom saves the catalog backup on the same drive as the original catalog is stored so, if your drive crashes, you’ll lose the original catalog and all backups – so make sure you change it to save the backup on an external drive. (Note: you can only do this in the dialog box above when it pops up)

Question 4: True or False?

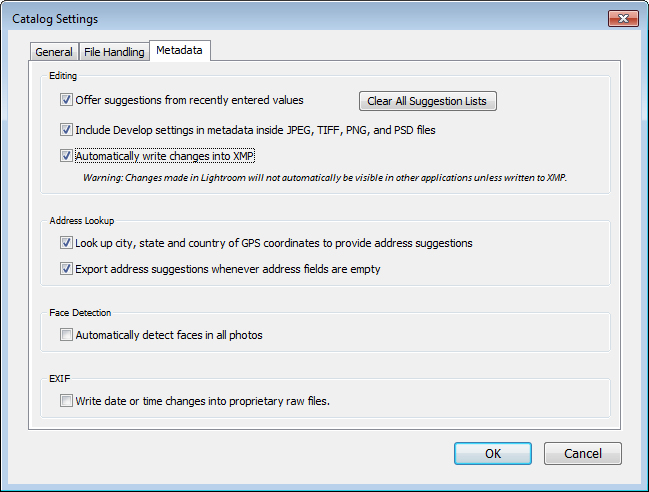
When you make changes to a file in Lightroom those changes are written to the file so, if you open the file in Bridge, Photoshop or some other graphics program you will see the image as it was edited in Lightroom

Are edits always saved to your Lightroom files

Answer: Not necessarily True

Whether or not the changes that you make to a photo in Lightroom are written to the photo files will depend on how your Lightroom preferences are configured. Choose Lightroom > Catalog Settings (Edit > Catalog Settings, on the PC) and select the Metadata tab. There are two settings of concern here: Include Develop settings in metadata inside JPEG, TIFF, PNG, and PSD files and Automatically write changes into XMP – for the edits you make in Lightroom to be written to the files themselves, both checkboxes should be checked.

Question 5: True or False?

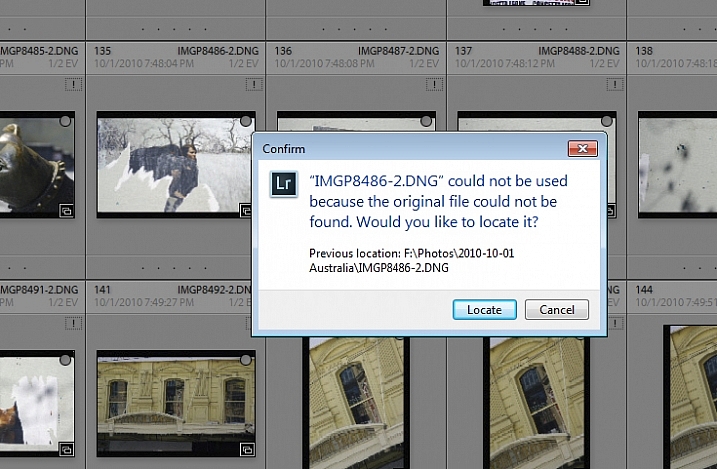
You have moved or renamed some folders on your drive which contain photos. When you next open Lightroom you see that Lightroom can’t find those photos any longer. You must now reimport those photos into Lightroom.

how to resolve issues where you changed files outside Lightroom

Answer: False

When you move or rename folders outside Lightroom it is true that Lightroom will report the images as missing. However, instead of importing the images again, you simply need to tell Lightroom where the images now reside. To do this, click the exclamation mark icon, and choose Locate. Navigate to the folder that you renamed or moved, and select the image that matches the one that was missing (you need to find the exact image that was marked as missing). Click the image, and make sure that the Find nearby missing photos checkbox is checked, then click Select. The Lightroom catalog will be updated with the new location of the image and any other images that are in close proximity to it.

Note: You can also do this by right-clicking on a missing folder in the left panel of the Library module. Then navigate to find the entire folder and relink it to Lightroom.

In future, it is best to move images and folders, as well as rename folders, inside Lightroom. Changes such as this, that you make inside Lightroom, are written to your drive automatically. The benefit is that when Lightroom makes the changes, it always knows where your photos are, and won’t report them as being missing.

How did you do?

If you answered any of these questions incorrectly, your lack of understanding of how Lightroom works might be putting your photos at risk. Spending some time learning how Lightroom operates will help you keep your photos safe.

Now if you got all these questions right and if you are a Lightroom expert – what questions would you ask of a new user to help them keep their photos safe? We invite you to pose these as True/False questions – but remember, to help folks out – you should give them the answer, as well as pointing them in the direction of keeping their photos safe.

googletag.cmd.push(function() {
tablet_slots.push( googletag.defineSlot( “/1005424/_dPSv4_tab-all-article-bottom_(300×250)”, [300, 250], “pb-ad-78623” ).addService( googletag.pubads() ) ); } );

googletag.cmd.push(function() {
mobile_slots.push( googletag.defineSlot( “/1005424/_dPSv4_mob-all-article-bottom_(300×250)”, [300, 250], “pb-ad-78158” ).addService( googletag.pubads() ) ); } );

The post 5 Questions to Help You Make sure Your Photos are Safe Inside Lightroom by Helen Bradley appeared first on Digital Photography School.


Digital Photography School

 
Comments Off on 5 Questions to Help You Make sure Your Photos are Safe Inside Lightroom

Posted in Photography


LifePrint portable printer uses augmented reality app to bring photos to life

20 Nov

A portable photo printer called LifePrint, now seeking funding on Kickstarter, creates ‘living’ photos by combining a printed photograph with a digital video. An augmented reality app makes this possible, so that when a print is viewed through a smartphone’s camera, the video appears where the photo is located, making it seem as if the image – called a HyperPhoto – has come to life. Read more

Articles: Digital Photography Review (dpreview.com)

 
Comments Off on LifePrint portable printer uses augmented reality app to bring photos to life

Posted in Uncategorized


How to use Focal Length and Background Compression to Enhance Your Photos

17 Nov

One of the most common uses for zoom lenses is, as their name suggests, to zoom in on objects that are far away. These lenses are fantastic for getting close-up views of nature, architecture, wildlife, or anything else that might be little more than a speck to the naked human eye.

Some cameras like the Nikon Coolpix P900 let you get a close-up view of objects a few miles away. While this flexibility might seem like a rather tempting proposition for getting close to objects without physically moving yourself, there is another often-overlooked benefit of zoom lenses when taking portraits or other types of pictures with one clear subject in front of a vast spread of scenery – background compression. Understanding how this works, and how you can manipulate it, can transform your approach to portrait photography and give your pictures the type of visual boost that you might have always wanted, but never knew how to achieve.

background-compression-senior-photo

The basic idea with background compression is that you can take photos of something relatively close to you, such as a high school senior as shown in the image above, and bring elements of the background closer as well. This gives a more constrained feeling to the overall composition, and helps focus the viewer on your subject while not only bringing the background in, but often blurring it at the same time.

As an illustration of how this works, here are several photos of my dad taken at different focal lengths. Notice how he is framed similarly in each shot, but the background changes dramatically as I adjust the zoom on my camera lens.

18mm focal length, f/7.1, 1/80th of a second, ISO 100

I used an 18-270mm zoom lens to take these shots, and this first one (above) at 18mm shows my dad along with a massive background: utility poles, houses, trees, mailboxes, and all sorts of other elements make up the picture in addition to the subject. Take note of the car several hundred yards behind him, as indicated by the red arrow, and notice what happens as I change focal lengths, but keep my dad similarly framed.

18mm, f/7.1, 1/125 second, ISO 320

70mm, f/7.1, 1/125 second, ISO 320

Here you can already see several differences from the original image. The scene is now slightly claustrophobic with many of the elements along the perimeter of the original photo disappearing altogether. Mailboxes and utility poles have been brought closer, and notice how the same stationary automobile far in the distance has appeared to creep forward, and is now much larger. The background, in essence, is getting squeezed together or compressed.

154mm, f/7.1, 1/250 second, ISO 800

154mm, f/7.1, 1/250 second, ISO 800

At 154mm the vehicle in the background seems significantly closer, and various other elements such as trees and utility poles are now filling almost the entire frame. As I zoom in, while keeping my dad consistently framed in the shot, even the distance between the individual utility poles seems to be shortened, which further enhances the overall feeling of compression. It’s not just that things appear closer, but that the distances between all the elements of the frame look much smaller as well. This can be a powerful, and extraordinarily useful way to compose a picture, and you don’t even need a fancy camera or lens to do it. Most pocket cameras have optical zooms that can be used to accomplish the same effect.

270mm, f/7.1, 1/400 second, ISO 1600

270mm, f/7.1, 1/400 second, ISO 1600

In this final shot, the background elements virtually dominate the frame and almost overpower my subject. The vehicle just over his shoulder is about a quarter of a mile (0.4 km) away, though it appears as if it’s a mere stone’s throw behind him.

Background compression can be a good or bad thing, depending on the type of picture you are taking. The key takeaway here is to know what it is, and how to utilize it to get the type of composition you are going for. The longer your focal length, the more you will be able to add this sense of compression to your background. But, it also helps if you have a great deal of distance between your subject and the elements behind it. If my dad were standing a few feet away from something, like a tree or a brick wall, there would be virtually no compression at all, even with a very long focal length.

18mm, f/7.1, 1/80 second, ISO 100

18mm lens

18mm, f/7.1, 1/125 second, ISO 320

70mm lens

background-compression-dad-154mm-f71

154mm lens

background-compression-dad-270mm-f71

270mm lens

If the final example in the above series seems a bit extreme, here’s another set of images that show how background compression can be used effectively to enhance the overall composition, rather than overpower your subject.

35mm, f/2.8, 1/750 second, ISO 200

35mm, f/2.8, 1/750 second, ISO 200

This is a perfectly serviceable portrait, although I purposely left a bit too much space on the right-hand side in order to illustrate the compression concept. Shot at 35mm, with a wide aperture of f/2.8, the background is nice and blurry, the focus is clearly on the smiling woman, and the background is not too distracting or bothersome. However, re-taking the same picture with a longer focal length, leads to a much more pleasing picture all around.

85mm, f/2.8, 1/750 second, ISO 200

85mm, f/2.8, 1/750 second, ISO 200

The same compression shown in the first series of pictures is clearly evident here, though it is used to a much better overall effect. Even though the tree and cars create a background that is somewhat busy, shooting with a wide aperture blurred things out enough, that the focus is still clearly on the woman, while the background serves to add a bit of context to help put the overall composition in perspective.

One final note about compression: it doesn’t just work for foreground elements too as you can see in the following pictures.

35mm, f/11, 1/125 second, ISO 400

35mm, f/11, 1/125 second, ISO 400

I purposely shot this with a much smaller aperture in order to minimize the degree of background bokeh, lest compression be confused with blur. Notice how this woman is sitting squarely in the middle of the bench with plenty of room to her right, and about 50 yards (46 meters) between her, and the trees and cars in the background. Most of the picture is in focu,s which is a direct result of the small aperture.

85mm, f/11, 1/90 second, ISO 400

85mm, f/11, 1/90 second, ISO 400

Here the foreground and background have both been brought nearer to the subject. The trees and cars behind her are much closer, while the bench appears to take up almost no room on the woman’s right side. It might as well be little more than a chair in this picture, and yet, this is merely an illusion created by using a longer focal length while keeping my subject framed appropriately. Most of the picture remains in focus due to the small aperture, and you can clearly see that background compression is not always synonymous with background blur.

As one final example, here is the same woman, on the same bench, shot wide open at f/1.8 with my 85mm lens.

85mm, f/1.8, 1/1000 second, ISO 400

85mm, f/1.8, 1/1000 second, ISO 400

The overall compositional elements remain the same in this final image as the two above, except that I moved myself physically closer to the subject, while shooting at a very wide aperture of f/1.8. The background is severely compressed, and quite blurry, which leads to a rather pleasing portrait.

Background compression can be a bit tricky to understand, but if you play around with different focal lengths you should get the hang of it quickly. Then it’s just a matter of figuring out how to use it to your advantage to create the type of shot you want–especially when doing portraits.

Have you tried using this technique in your own photography? What other tips do you have to share about creative uses for background and foreground compression? Leave your thoughts in the comments below, and feel free to share any example images you have as well.

This week on dPS we’re featuring a series of articles about composition. Many different elements and ways to compose images for more impact. Check out the ones we’ve done so far:

  • Using Framing for More Effective Compositions
  • 7 Tips to Improve Your Skyline Photos
  • 33 Images that Exemplify Compositional Elements
  • Weekly Photography Challenge – Composition Craziness
  • How to Take Control of Aperture and Create Stronger Photos
  • How Cropping in Post-Production Can Improve Composition
  • Good Crop Bad Crop – How to Crop Portraits

googletag.cmd.push(function() {
tablet_slots.push( googletag.defineSlot( “/1005424/_dPSv4_tab-all-article-bottom_(300×250)”, [300, 250], “pb-ad-78623” ).addService( googletag.pubads() ) ); } );

googletag.cmd.push(function() {
mobile_slots.push( googletag.defineSlot( “/1005424/_dPSv4_mob-all-article-bottom_(300×250)”, [300, 250], “pb-ad-78158” ).addService( googletag.pubads() ) ); } );

The post How to use Focal Length and Background Compression to Enhance Your Photos by Simon Ringsmuth appeared first on Digital Photography School.


Digital Photography School

 
Comments Off on How to use Focal Length and Background Compression to Enhance Your Photos

Posted in Photography


How to Take Control of Aperture and Create Stronger Photos

14 Nov

aperture and composition

The focal length of the lens you use, combined with the aperture setting, determines how the camera sees whatever you point it at. This has profound implications for composition. Let’s look at them one by one.

Selective focus and bokeh

Selective focus occurs when you focus on your subject, and use a wide aperture to make the background go out of focus. Bokeh is the blurred parts of your photo. It originates from the Japanese word boke, and has come into use because we don’t have a word in English for it.

aperture and composition

This photo shows both selective focus and bokeh. I focused on the model’s eyes, and selected an aperture of f/1.4, to blur the background as much as possible.

There are several factors that affect bokeh.

1. Aperture

The wider the aperture, the less depth-of-field there is, and the more bokeh you get. Photographers that like to use selective focus buy prime lenses, as they have often wider maximum aperture settings than zooms.

But, you can still obtain nice bokeh with zooms, if you pay attention to the following points.

2. Camera to subject distance

The closer you are to the subject the less depth-of-field there is. This is a useful tip if you have a zoom lens with a limited maximum aperture (such as an 18-55mm f/3.5-5.6 kit lens). Just set the focal length to longest available setting, the aperture to its widest setting, and move in as close as you can. You’ll be surprised by what you can achieve.

aperture and composition

This photo was taken with an 18-55mm kit lens set to 55mm and f/5.6, the widest available aperture at that focal length. It’s not nearly as close to how little depth-of-field there would be if I had used an 50mm prime lens at f/1.4 – but it’s still enough to blur the background.

3. Subject to background distance

The more distance there is between subject and background, the more out of focus the background will get, at any given aperture setting.

4. Quality of light

Light affects bokeh. Soft light (like that on an overcast day) produces smooth, even bokeh. Sunlight or reflections, create a different type of bokeh with more texture.

aperture and composition

I took this photo on an overcast day. The bokeh is very smooth.

aperture and composition

I took this photo in the early evening. The artificial lights reflecting from the shiny objects in the background have created a different type of bokeh.

5. The aperture blades of the lens

The more blades the lens has, the rounder the shape of the aperture, and the smoother the quality of the bokeh. Less expensive lenses tend to have fewer aperture blades, and may not produce the same quality of bokeh as better ones.

6. Other optical characteristics of the lens

Some lenses, such as the Helios 58mm f/2 lens, used to take the photo below, have optical characteristics (or more likely, flaws) that produce a certain type of bokeh. Lensbaby is a company that makes lenses that produce a specific type of bokeh.

Aperture and composition

f/2.8 on a prime lens

I’ve singled this aperture setting out because it hits a sweet spot when it comes to composition, especially for portraits.

If you have a normal or short telephoto prime lens, and use the widest aperture setting (generally f/1.2, f/1.4 or f/1.8) then the depth-of-field is very narrow indeed. Sometimes that works really well, but other times you need a little more depth-of-field to create a stronger image. It’s like any technique – overuse it and it becomes a gimmick.

The solution is to mix it up a little by using aperture settings like f/2, f/2.8, and f/4. You’ll still get a narrow depth-of-field and create some beautiful bokeh, but a little more of your subject will be in focus.

Using f/2.8 (or thereabouts) shows subtlety, restraint, and maturity.

aperture and composition

I took this photo with an 85mm lens (full-frame) at f/2.8. The depth-of-field is still shallow enough to blur the background nicely.

The middle apertures

Now we get into the middling apertures, those from around f/4 or f/5.6, to f/8, depending on your lens.

The effect of these apertures depends on the focal length of your lens and how close you are to your subject. For example, you could use a super telephoto lens (300mm plus) and shoot from farther away from your subject to create images with shallow depth-of-field at f/5.6, or get the entire scene in focus at the same aperture with a wide-angle lens (35mm and less) if you focus on the right spot and are much closer to your subject.

These middle apertures represent the transition between photos where some of the image is out of focus, to those where everything is in focus.

You can still use selective focus at these apertures (although perhaps not with wide-angles), although the effect is much gentler than with the widest aperture settings of your lens. Use these apertures when you want good depth-of-field but don’t mind if the background is out of focus a little.

aperture and composition

I used an aperture of f/4.5 for this photo. The depth-of-field is sufficient to get the man, the statue, and the wooden baskets in focus. The background is unimportant and doesn’t need to be in focus.

The smaller apertures

These are the ones you use when you need everything within the frame to be sharp, like with landscape photography. This can be anything from f/8 on a wide-angle lens, to f/11 or f/16 on longer focal lengths. With telephotos and macro lenses you can stop down to f/16 and still not get everything in focus.

The thing you need to be aware of here is diffraction. When the aperture gets too small, the light passing through it spreads out, and softens the image. Thanks to diffraction, images taken at f/22 are usually visibly softer overall, than those taken at f/8 or f/11. Noticeable diffraction may start at f/16 or f/22 on a full-frame camera, and around f/11 on an APS-C camera.

aperture and composition

An aperture of f/11 ensured everything in this photo, taken with a 14mm lens (APS-C), was in focus.

Take control

Every time you take a photo you should be thinking about what the optimum aperture is for the composition you want to make. Do you want to open the aperture and throw the background out of focus? Do you want to stop down and get as much as possible in focus? Or somewhere in between?

What aperture settings do you like to use with your photos? Do you use a Lensbaby or other lens that gives a certain bokeh effect? Please let us know in the comments – I’d love to hear your thoughts and see your images.

This week on dPS we’re featuring a series of articles about composition. Many different elements and ways to compose images for more impact. Check out the ones we’ve done so far:

  • Using Framing for More Effective Compositions
  • 7 Tips to Improve Your Skyline Photos
  • 33 Images that Exemplify Compositional Elements
  • Weekly Photography Challenge – Composition Craziness

Mastering Composition ebookMastering Composition

My new ebook Mastering Composition will help you learn to see and compose photos better. It takes you on a journey beyond the rule of thirds, exploring the principles of composition you need to understand in order to make beautiful imag

googletag.cmd.push(function() {
tablet_slots.push( googletag.defineSlot( “/1005424/_dPSv4_tab-all-article-bottom_(300×250)”, [300, 250], “pb-ad-78623” ).addService( googletag.pubads() ) ); } );

googletag.cmd.push(function() {
mobile_slots.push( googletag.defineSlot( “/1005424/_dPSv4_mob-all-article-bottom_(300×250)”, [300, 250], “pb-ad-78158” ).addService( googletag.pubads() ) ); } );

The post How to Take Control of Aperture and Create Stronger Photos by Andrew S. Gibson appeared first on Digital Photography School.


Digital Photography School

 
Comments Off on How to Take Control of Aperture and Create Stronger Photos

Posted in Photography


One Compositional Technique to Transform Your Landscape Photos

09 Nov

GreenRocks

Turning the corner from taking snapshots into taking actual compositions is a hard thing to do. It doesn’t come naturally, and it takes experience. Another reason it is difficult to learn composition is that there is no one, hard and fast rule. You can get caught up in looking for various shapes, patterns, leading lines, and other compositional elements until your head is spinning.

To avoid all of this, I want to share one concrete technique for you to use when you are out shooting landscape photos. It is one way to go about setting up your shot, that will give you a path to setting up a successful composition. Of course, it isn’t the only way to set up your shot, and you won’t use this all the time, but it is great for helping when you are stuck.

Mushrooms

And the tip is . . .

. . . the next time you are out shooting it a scenic location, just put on your widest angle lens and get right behind something on the ground to take the shot.

I mean right behind it. That something on the ground can be anything from a flower, to a rock, to a pattern in the sand. It does not matter. What matters is that you are down on your knees with your wide-angle lens right behind it.

Clogher

Why it works

The wide-angle lens will give the foreground object an exaggerated sense of proportion, but will also pick up the background. By getting right behind something, you are adding a subject to your picture. You are creating a center of interest. You are going beyond just showing the general scenery. The background will still be in your picture as well, you just do not need to focus on that.

Another benefit is that it gives the viewer a sense that they can walk into the picture. It is providing a real foreground, that adds depth and interest to your photo.

HydePark

What typifies a snapshot, is standing at eye level trying to capture the entire scene before you. For many of us when we are just starting with photography, that just intuitively seems like the way to take pictures. We want to capture the whole scene, and not have it blocked by something on the ground immediately in front of us. The problem is that there is no foreground, subject, or center of interest to speak of. In addition, you are presenting the world in the exact same way as the viewer is used to seeing it, which is bound to be rather boring to them.

Acadia-low

Putting the tip into action

How you determine what items on the ground will work as your foreground elements, that is the hard part. There is no right answer. You will just have to look. In fact, it will not be obvious even when you are out in the field looking around. There are times when you might have to walk around while looking at the LCD in Live View mode, or with the viewfinder to your face to find something on the ground to use as a foreground.

BigBend

Here are some examples of things you can use as foregrounds in different contexts:

  • When photographing water – use a reflection in the water
  • When at the beach or desert – find a pattern in the sand
  • When photographing creeks or coasts – use rocks
  • At midday – use shadows
  • In the fall – use leaves

There are obviously a variety of subjects you can use. Go out and try it next time you are shooting, and if you come across a good item to use in the foreground, leave it in the comments and share your images with us.

googletag.cmd.push(function() {
tablet_slots.push( googletag.defineSlot( “/1005424/_dPSv4_tab-all-article-bottom_(300×250)”, [300, 250], “pb-ad-78623” ).addService( googletag.pubads() ) ); } );

googletag.cmd.push(function() {
mobile_slots.push( googletag.defineSlot( “/1005424/_dPSv4_mob-all-article-bottom_(300×250)”, [300, 250], “pb-ad-78158” ).addService( googletag.pubads() ) ); } );

The post One Compositional Technique to Transform Your Landscape Photos by Jim Hamel appeared first on Digital Photography School.


Digital Photography School

 
Comments Off on One Compositional Technique to Transform Your Landscape Photos

Posted in Photography


Pack your gear: Lonely Planet’s Top 10 must-visit countries in photos

08 Nov

Travel and photography are two pursuits that are often intertwined. While photographers who’ve been bit by the travel bug will usually have a long list of destinations they plan to visit in their back pocket, others may need a little inspiration or encouragement to head in a particular compass direction. Lonely Planet is happy to help out, as always, with its annual list of top travel destinations. Read more

Articles: Digital Photography Review (dpreview.com)

 
Comments Off on Pack your gear: Lonely Planet’s Top 10 must-visit countries in photos

Posted in Uncategorized


20 Tips to Improve Your Travel Stock Photos

20 Oct

Here are 20 tips to help you take the best stock photos while traveling or around your hometown. Even if you don’t do stock photography, you can use these tips to help you get better images.

NEAR SKOGAR, ICELAND - JUN 19:  Skogafoss waterfall on June 19, 2015, was in the film The Secret Life of Walter Mitty in 2013.

NEAR SKOGAR, ICELAND – JUN 19: Skogafoss waterfall on June 19, 2015, was in the film The Secret Life of Walter Mitty in 2013.

1. Check stock photo websites to see popular locations

In addition to doing some web searches for areas of interest, a great way to know which locations are popular is to check popular stock photo websites, such as Shutterstock or iStockphoto. You’re not looking to recreate any existing shots, but it helps to know what’s been done well already and, more importantly, what is missing.

2. Check the itinerary of sightseeing buses

A great way to see what popular locations are is by reviewing any websites for sightseeing buses. Make a note of their stops and add them to your shot list.

3. For international travel, learn the basic words of the language

Iceland rushing water 750 px

Learning some key words like, “please”, “thank you”, and “Okay?” can make communication much easier abroad, and help spur friendships. uTalk is a terrific app to learn a new language, and Duolingo is great to refresh a language you are already familiar with.

4. Check out popular postcards

Taking a peek at postcards in tourist shops will give you an idea of the popular sites. Again, you are not looking to recreate shots, but you might be able to add a few locations to your shot list.

5. Get recommendations from locals

Check with the clerk at the grocery store, or gift shop, at your current stop for nearby locations that would be worth photographing. You may learn about some lovely hidden gems that will enrich your experience.

6. Consider renting a car to have greater control of your travel plans

Iceland goats 750 px

You never know what you’ll encounter on the road

Public transportation is fine within many cities, but if you’re going between towns renting a car allows you to pull off by the side of the road, and take those random shots that were not on your itinerary.

7. Take photos when you have a chance, you might not go back the way you came

Don’t figure you’ll catch something on your way back, you never know when serendipity will take you in a different direction than you intended. Get the shot now.

8. Take the sightseeing bus (or boat)

A sightseeing bus is a great way to get to the popular destinations, and if it’s a double decker bus, or a boat, you get views you couldn’t get otherwise.

9. If shooting for editorial stock always note the location of the photo

An editorial stock photo is going to require a location in the caption, so always note the name of the town. Take a quick shot of the welcome sign as you enter the town, or take a photo of a store with the town’s name. Of course having the location saved on your photo itself helps a lot too, but having it embedded within your photos makes it easier to quickly remember where you were. As another reminder, save all handouts from tourist spots, maps, and travel guides you pick up along the way to refer to later when processing your photos.

Iceland car GPS 750 px

10. Check your photo settings frequently

You don’t want to look back on your photos for the day and realize you had set your ISO to very high for an indoor shot, and forgot to reset it when you went out into a sunny location so your outdoor photos are grainy. Or you set your photo size to small when you need a big file to get photos large enough to be accepted by the stock photo sites. If this sounds like the voice of experience, it is. We all make these mistakes – don’t be too tough on yourself if you make them too, just live and learn.

11. Ask the experts

You’ll sometimes find professional photographers taking shots. If they seem approachable, ask them, politely, what they are photographing. Some will be very eager to discuss what they are doing, others not so much, but it’s worth a shot. You might get some great insights.

12. Give yourself time to get the shot right

You’ve traveled thousands of miles to get there, you won’t be able to go back and reshoot, so give yourself the time to get the shot right. Work the photograph to clean up the background, to remove distractions so the focus is on the area of interest. Sometimes just taking a few steps to the side, or turning a bit can make a dramatic difference by removing distracting elements in your background, or focusing the eye on the area of interest.

Iceland Glacier Lagoon big blue side 750 px

Glacier on the side, not noticeable

Iceland Glacier Lagoon big blue 750 px

Glacier is the main focus of the shot

Hanging around also allows you to absorb the atmosphere of the place, and keeps you from rushing from photo to photo.

13. Think layers

While you’re waiting for that right shot, think in terms of three layers: The area of interest as the middle layer, with a clean background layer to set it off. Wait for an interesting foreground to present itself, maybe people, or animals in this case, going past your area of interest. This makes the photograph come alive, gives it some depth, adds to the interest.

Iceland Glacier Lagoon geese 750 px

Geese add a sense of proportion to the glacier and bring the scene to life

14. Think like a guidebook author or a nature artist, or…

Pretend you are writing for a tourist guidebook – what kind of shots do you want in your guidebook? What would your potential readers like to see? How about if you were an artist preparing for a nature exhibit – what photographs would you want as part of your exhibit? Look at each location from different perspectives to get new ideas.

15. Take a variety of shots

Give your clients as many options as possible. Take 15-20 shots at any one location, walk around and check different positions, try different angles, think close-ups, wide shots, vertical as well as horizontal shots. You’ll then have plenty of options to choose from for your final photographs.

Iceland puffin with fish left 750 px

Iceland puffin with fish and buddies 750 px

Close-up and wide shots gives you and your clients options

16. Look behind you as you leave your location

Don’t leave the best shots behind your back. As you leave a location turn around and see what shot you might be missing.

Iceland Seljalandfoss exit side 750 px

Don’t miss the great shot behind you

17. Offer to take photographs for others

Share your skills – if you see a group of people taking a group photograph, offer to take the shot for them. It makes for another chance to interact with people, and if you learned a bit of the language, all the better.

18. Be mindful of other people’s desire for privacy

People will make it pretty clear whether they are okay with being included in your photographs. Stay away from editorial photos of little children, and if you accidentally take a photo of someone who clearly doesn’t want to be in your photo, let them know you have erased the shot. On the other hand, many people will be eager to have you take their picture, and oblige happily.

19. Back up your photographs every night and cull as you go

Upload your photographs to your laptop and/or to the cloud, you’d hate to have your camera stolen or lost mid-travel, and lose all those shots. While you’re at it, delete the photos you know are not going to work out, those with people blocking the view, or out of focus, etc. Don’t wait until you get home to the daunting task of sifting through thousands of photographs.

20. Process your photos right away upon your return

The longer you wait to process your photos the harder it will be to get to it. Unprocessed photos tend to get heavier with time and sink to the bottom of your to-do list. It’s best to process them while you remember what the sights really looked like, so you remember to uncover that rainbow you know was there but might not be so visible before Photoshop.

Iceland Gulfoss rainbows 750 px

Don’t forget to uncover the rainbow.

Best wishes on your photography adventures. Please share in the comments below if you have any questions or additional tips.

googletag.cmd.push(function() {
tablet_slots.push( googletag.defineSlot( “/1005424/_dPSv4_tab-all-article-bottom_(300×250)”, [300, 250], “pb-ad-78623” ).addService( googletag.pubads() ) ); } );

googletag.cmd.push(function() {
mobile_slots.push( googletag.defineSlot( “/1005424/_dPSv4_mob-all-article-bottom_(300×250)”, [300, 250], “pb-ad-78158” ).addService( googletag.pubads() ) ); } );

The post 20 Tips to Improve Your Travel Stock Photos by Susan Montgomery appeared first on Digital Photography School.


Digital Photography School

 
Comments Off on 20 Tips to Improve Your Travel Stock Photos

Posted in Photography


3 Tips for Taking Photos of Flowers

16 Oct

Flowers are everywhere, and sometimes just the thought of going out to take pictures of their pretty petals can seem downright cliché, because so many people do it. However, one reason flower photography is so popular is because these kinds of pictures can capture incredible beauty, without a great deal of effort. It’s fun to go outside and document the incredible array of colors that can be found in flowers, but it’s just as common to look at your photos later and discover that they might not be as good as you had hoped.

Fortunately there are a few easy steps you can take to not only improve your own flower photography, but help you get out and enjoy the beauty of nature while you’re at it.

3-tips-flower-photos-coneflower

50mm f/1.8, 1/640 second, ISO 200

Everyone has their own unique style when it comes to photography, and taking pictures of flowers is no exception. Some people like flowers in isolation, whereas some like to see a whole field of blossoms in one shot. Some like to use techniques such as over-saturation or selective coloring, while others find these approaches distasteful. Therefore the following tips are not to be considered universal, or the be-all-end-all when it comes to taking pictures of flowers. They are a few lessons I have learned over the years that work for me, and hopefully they will give you something to think about the next time you step out to capture the beauty of nature.

Give your image a clear focal point

All good photos have a subject, or something on which the viewer’s attention is to be fixed. Some pictures can have multiple subjects, but rarely will you find a good image (flower or otherwise) with no subject at all. Where flowers are concerned, you might want to focus on just one flower, or have your viewers see many of them at once, but at the end of the day it should be readily apparent to anyone who sees your photo just what they are supposed to be looking at.

For example, the following image is decent, but as a viewer it’s difficult to notice the flower in the center amidst all the other blooms in the background. In essence, there is no one clear focal point even though there is a flower in the center of the frame.

3-tips-flower-photos-dof-wide

50mm f/4.8, 1/60 second, ISO 100

There are several things that can be done to fix the problem, but one of my favorite techniques is to simply use a wider aperture on my lens. I re-shot the same image using a much bigger aperture, which resulted in a shallow depth of field, rendering the flower in focus while the rest of the background shows up as a silky smooth blur. Looking at the second image, there is no doubt at all as to what the subject of the photo is, and what viewers are supposed to focus their attention on.

f/1.8, 1/350 second, ISO 100

50mm f/1.8, 1/350 second, ISO 100

Another way to make sure your image has a clear focal point is to utilize colors that complement or contrast with one another. The purple flowers in the image below stand out because they contrast quite nicely with the green background, which draws the viewer’s attention immediately and creates a nice focal point for the picture as a whole.

NEED EXIF

50mm f/1.8, 1/200 second, ISO 100

You can use multiple techniques to achieve the desired effect, such as the picture below of an orange lily that stands out clearly from the background thanks to contrasting colors, while also using a wide aperture to make the background appear blurrier. Be careful not to use an aperture that is too wide, though: depth of field can be a fickle mistress, and shooting at f/1.8 or f/1.4 might seem like a good idea, until you realize that only half of your flower is in focus and the rest is a fuzzy mess.

NEED EXIF

50mm f/2.8, 1/400 second, ISO 200

This last picture (below) is similar to the one above, but ultimately fails because there is no obvious focal point. Notice how the flower itself almost blends in with the background, and the inclusion of two additional blossoms just behind the red one and in the bottom corner of the frame. These problems cripple the image and keep it firmly in my “Rejected” category in Lightroom, but I’m using it here as an example of what not to do.

NEED EXIF

50mm f/1.8, 1/1000 second, ISO 200

I could have easily fixed this picture by looking at the flower from a different perspective, but alas, I did not and am left with an image that is almost unusable because the subject, what should be the focal point, blends in so much with the rest of the image that it’s difficult for the viewer to know what to see. Finding a clear focal point for your images might take a bit of practice, but the results will be well worth your efforts.

Find the right camera angle

It’s not uncommon to see people taking pictures of flowers with their cameras pointed down from eye level. While doing so may produce decent results from time to time, you will often find that selecting a different angle will yield much more interesting results. The red blossom in the picture below was a few feet off the ground so I did what most people would do: I pointed my camera down and pressed the shutter button.

f/1.8, 1/320 second, ISO 100

f/1.8, 1/320 second, ISO 100

There’s a couple of things wrong with this picture, but to me the most critical problem is that it’s just not very interesting. Looking at flowers from your normal eye level can sometimes produce pleasing photos, but often you will get better results if you move around a bit, and seek out a more interesting angle. After taking the initial picture I crouched down and shuffled among the plants for a bit until I found a better perspective from which to shoot the photo.

3-tips-flower-photos-angle-comparison-side

While not perfect, this is certainly a much better composition than the original shot, and it shows the flower in a whole new light. You can not only see more detail on the petals, but it stands out more from the background, and even utilizes a bit of foreground elements to add depth. The drop of water on the left side which is an afterthought in the original, is now featured quite prominently, and adds a nice accent to the rich red tones of the flower petals. All this was made possible because of a quick and simple change in my perspective. While this doesn’t always guarantee better photos it is a fun way to try something new, and even explore a bit more of your surroundings than you otherwise might.

Shooting macro-style pictures is another fun way to get creative with choosing the angles on your shots, provided you are willing to look for some unusual perspectives. My cousin Beth took the following picture of a cosmo flower with nothing more than her iPhone 5s, and a $ 50 Olloclip lens attachment, that lets her get extraordinarily close-up photos of just about anything. By shooting from a creative perspective instead of straight down, and using complementary colors of yellow and purple, she was able to take a gorgeous picture that might otherwise have looked quite mundane and ordinary. Her Instagram account is filled with images just like these that she took with her phone, which also illustrates that you don’t need to spend a great deal of money to get incredible photos of flowers.

3-tips-flower-photos-iphone

Compose with the whole scene in mind

Taking good flower pictures is about more than just a few pretty petals, but everything in front of and behind them as well. Finding creative ways to avoid conflicting colors between your subject and the background or foreground is nice, but you can step things up a notch by actively using these elements to enhance your shots.

For example, I had many options available when I took the following shot of some yellow kosmeyas. I could have just focused on the flower in the foreground, but by taking all the other elements of the scene into account, I was able to create a much richer and more interesting picture. I shot into the early morning sun, before the dew had evaporated, so I could make creative use of backlighting, and was so pleased with the result that a large print of this is now hanging in my living room.

3-tips-flower-photos-morning-sun

50mm f/2.8, 1/750 second, ISO 100

Even the background elements themselves can add interesting colors and patterns that you might not otherwise consider, as long as you pay attention when shooting, and use a careful eye with regard to composition. As I took the photo below, I saw a sidewalk running through the background, so I spent several minutes not just adjusting my camera settings, but also looking at the sidewalk and using that as an intentional compositional element. I like the way it cuts horizontally through the image and serves to accentuate the oranges in the flower at the center.

3-tips-flower-photos-bokeh-dark-orange

50mm f/1.8, 1/8000 second, ISO 100

I want to leave you with one final example when I did not use this technique, and was quite disappointed with the photo that I almost got. Several months ago I spent a while following a butterfly around on a sunny day. When it finally landed on a flower and let me get close enough to take a photo, I eagerly snapped away without taking the rest of the scene into account.

3-tips-flower-photos-insects-butterfly

50mm f/2.8, 1/3000 second, ISO 200

If only I had scooted mere inches to the right I would have isolated the flower and the butterfly against a nice green background, but instead I did not take the whole scene into account, and got an image with no clear focal point and a big splotch of blurry orange right behind my subjects. I could have used the background elements to my advantage, but instead I was careless and overeager. This was actually a good learning experience for me though, as it helped me take much better photos in the time since.

As I mentioned at the outset, these are just a few examples and tips that you could employ to get better flower pictures but I’m curious to find out what has worked for you. What are your favorite tips and tricks to get better images of flowers? Leave your thoughts in the comments below.

googletag.cmd.push(function() {
tablet_slots.push( googletag.defineSlot( “/1005424/_dPSv4_tab-all-article-bottom_(300×250)”, [300, 250], “pb-ad-78623” ).addService( googletag.pubads() ) ); } );

googletag.cmd.push(function() {
mobile_slots.push( googletag.defineSlot( “/1005424/_dPSv4_mob-all-article-bottom_(300×250)”, [300, 250], “pb-ad-78158” ).addService( googletag.pubads() ) ); } );

The post 3 Tips for Taking Photos of Flowers by Simon Ringsmuth appeared first on Digital Photography School.


Digital Photography School

 
Comments Off on 3 Tips for Taking Photos of Flowers

Posted in Photography


Backing Up Your Digital Photos: Is Cloud Storage Right for You?

04 Oct

In today’s digital era, it’s so simple to copy your photos onto your laptop hard drive and forget about them, thinking they’ll be there whenever you need them. But if your laptop crashes or gets stolen, and you haven’t backed up your photos in another place, then they’re gone forever. Most forms of digital storage are unreliable in the long term. Hard drives crash, computers die, and CDs and DVDs get scratched up and become unusable.

If you want to preserve your digital photographs then it is important to develop a strategy to back them up. Many people have started looking to the cloud as a place to store their photos. Could cloud storage be right for you?

2015 08 24 providence 8

Here are a few questions you should ask yourself if you’re considering cloud storage:

  • Do you want to use a free storage service, such as Google Photos or Apple Photos? Or are you willing to pay for a service with more features? If so, how much are you willing to pay?
  • Do you want to use cloud storage as a backup solution for all of your photos or just some key ones? How much data do you have? How often will you need to access your photos?
  • What types of files do you have? Camera raw files? Tiff files? JPEGs? All of the above?
  • How fast is your internet connection? Uploading files to the cloud can be very slow.

There are a few free applications, such as Google Photos and Flickr. These services could be a good option to back up your digital photo library if you don’t want to spend any money. The problem with a lot of them is that they either compress your photos, which means a loss in resolution and quality, or dditionally they don’t support RAW or TIFF files. So if you’re a raw shooter then this isn’t a great solution for archiving your photo library.

Luckily there are a number of services which will store your digital photographs for a small fee. There are many different companies that provide cloud storage, so I’ve decided to focus on only a few in the rest of this article. Be sure to do your research and find a service that fits your backup needs.

A Few Options for Cloud Storage

Google Drive

Google Drive is a relatively cheap and reliable cloud storage service. All Google accounts are given 15GB of free storage. From there you can pay as little as $ 1.99/month for 100GB, $ 9.99/month for 1TB, and up to $ 299.99/month for 30TB. Google Drive allows you to organize your own folders and supports all photo file types.

Amazon Cloud Drive

Amazon Cloud Drive touts an impressive unlimited photo storage plus 5GB for video and other file types for only $ 11.99/year. Additionally, if you have an Amazon Prime account, then this service is already included as part of your subscription. The one catch is that file uploads are limited to 2GB per individual file, so if you have files that are larger than that then you may not be able to upload them.

Microsoft One Drive

Microsoft One Drive has plans that offer 15GB for free, 100GB for $ 1.99/month, and 200GB for $ 3.99/month. Additionally, Microsoft is currently running a deal where you can get the Office 365 application package and 1TB of storage for $ 6.99/month. A big disadvantage to this service is that you cannot store more than 200GB without purchasing additional apps from Microsoft. But if you have less than 200GB, then One Drive is a really cheap option for back up.

Dropbox

The Basic plan gives you 2GB of storage for free. Upgrading to a Pro account will give you 1TB of storage for $ 9.99/month. The highest level plan is a Business account which will give you unlimited storage for $ 15/month per user. Dropbox doesn’t offer the most competitive prices among cloud providers but it’s a popular option that you may find reliable. However, if you have more than a terabyte of data, and files that break the size limits of some of the other unlimited providers, then Dropbox may be the best option for you.

Mediafire

Mediafire is one of the cheapest cloud storage options among the major players in the market. They offer 10GB of storage for free and up to a terabyte for only $ 2.49/month. Most impressively, their Business accounts offer up to 100 terabytes of storage for $ 24.99/month. If you’re looking to get into cloud storage for relatively cheap, then Mediafire is definitely a good bet.

2015 07 01 chestnut hill reservoir 19

Alternatives to Cloud Storage

Cloud services are not the only option you should investigate as a place to store your digital photos. Like any other digital backup, cloud storage isn’t full-proof. A quick internet search will show you numerous horror stories of peoples’ data being lost in cloud storage glitches and failures. This section of the article will explore a few other possibilities for saving your digital photos.

External Hard Drives

External hard drives are a good option if you need a lot of readily accessible storage for an affordable price. I use one terabyte Toshiba drives that only cost about $ 60. There are many other brands that offer similarly priced drives. One advantage external hard drives have over cloud storage is speed of access. You can store these files and keep them in your home or office, meaning they are readily accessible. Trying to download files you have stored on the cloud can be extremely time consuming.

Another advantage is cost; hard drives are relatively cheap when compared to continuously paying for monthly fees for cloud storage over the longterm. The drawback of hard drives is that they will eventually fail. Many are only reliable for 2-5 years, so it is important to back up your files to multiple places. But if you can’t afford a RAID hard drive system and you have a lot of data to backup, external hard drives are a good place to start.

2015 08 27 tufts obsoletemedia 5

Flash Drives

USB flash drives are another option for backing up data in your home or office. Prices are continually dropping on flash drive storage. Flash drives don’t have a lot of storage capacity, but 16GB flash drives are as cheap as $ 6. This makes them one of the most inexpensive options to back up your most prized images. I use them to back up my portfolio and store the memory sticks at a relative’s house. It’s not a solution for all of my data, but it gives me an added layer of backup that could save some of my best photos in the event of a disaster.

CDs/DVDs

You can also back up your data on CDs or DVDs, but at this point I wouldn’t recommend it. This kind of media is quickly becoming obsolete, and while it’s cheap, CDs and DVDs are easily damaged or corrupted. Additionally, you can’t store that much data on discs. Most CDs have a capacity of 700MB and DVDs cap out at less than 5GB. On top of this, many computer manufacturers, such as Apple, aren’t including disc drives in a number of their products. This means you’ll have to purchase an external drive just to read your discs in the future. You’re better off storing files on a hard drive or flash drive with a USB connection.

2015 06 03 alaskaday05 matanuskaglacier 22

Conclusion

Ultimately, there is no holy grail, one-size-fits-all solution for backing up your digital photos. The main theme is that you should not rely on a single source of backup because it can easily become a point of failure. If you haven’t stored your photos in more than one place and that one backup fails, you’re likely going to be out of luck.

Backing up your photos doesn’t need to be expensive; it just requires that you be strategic. I believe that cloud storage is best utilized as part of an overall storage strategy for your digital photographs, rather than the only point of backup.

Is cloud storage right for your backup needs? That is for you to decide. I hope this article gives you a starting point to get you on the path to reliably backing up your digital photos.

googletag.cmd.push(function() {
tablet_slots.push( googletag.defineSlot( “/1005424/_dPSv4_tab-all-article-bottom_(300×250)”, [300, 250], “pb-ad-78623” ).addService( googletag.pubads() ) ); } );

googletag.cmd.push(function() {
mobile_slots.push( googletag.defineSlot( “/1005424/_dPSv4_mob-all-article-bottom_(300×250)”, [300, 250], “pb-ad-78158” ).addService( googletag.pubads() ) ); } );

The post Backing Up Your Digital Photos: Is Cloud Storage Right for You? by Dan Bullman appeared first on Digital Photography School.


Digital Photography School

 
Comments Off on Backing Up Your Digital Photos: Is Cloud Storage Right for You?

Posted in Photography


8 Tips to Help You Come Home with Great Travel Photos

02 Oct

In this article I will talk about travel photography and how you can take great images of everything when you travel. I’m not talking about camping out at sunrise with bags full of lenses and filters to take epic landscape photographs; I’m talking about taking really nice shots of EVERYTHING! The food, people, details and landscapes combined – and all without turning your holiday into a photo shoot. With some simple tips you can come home with an album full of memories that stretches beyond a few hero shots.

Editor’s Note: The following article is written to be a fun guide to different types of documentary style travel photography. The author was exploring Vietnam as a guest of Helloworld Australia and Insider Journeys. She considers herself a jack-of-all-trades, master of none in the photography world.

8 Tips for great travel photos

#1 Landscape photography

1DaytimeLandscape

As much as I love waking up for a sunrise and utilizing all of the photography tools available to me to get a killer shot, sometimes I just want to take some snaps and have them be nice. When shooting landscapes during the day I look for vibrant colors, leading lines and simple compositions.

If you want to come home with a handful of nice landscape images from your holiday but you don’t want to spend all your time out in the field at the break of dawn then look for simple compositions, vibrant colors and leading lines. Using the most basic techniques like the Rule of Thirds (imagine your photo broken down into thirds both horizontally and vertically, and place points of interest on these third lines, for example the horizon) and the light that is available to you, it’s possible to come back with some keepers. Good examples can include the narrow laneways of old Dubai, the canals of Venice, the rivers of Alberta and the irrigation lines of the rice fields of Vietnam.

#2 Photographing the locals

I’m sure that you love to meet the locals from whichever exotic location you’re visiting, but find it can be intimidating to ask for a photo. The trick to photographing locals is to have your camera absolutely ready to go before you even ask. I’m talking the right lens, the right light, and the right settings. Photographing strangers often means you don’t have the benefit of multiple shots to get it just right. A great focal length for photographing people is 85mm, it’s very flattering and it also means you don’t have to be in people’s faces when you shoot. Shooting in the morning or late afternoon means you’ll have soft, consistent light, on your subjects’ faces, and f/2.8 is a great aperture for shallow depth of field. For handheld shooting keep your shutter speed above 1/200th to minimize camera shake.

2PortraitOfLocals

I desperately wanted to take a photo of a mother and daughter I had just watched rounding up their water buffalo in Ninh Binh, but I knew the chances of them speaking English were slim. I didn’t have my portrait lens with me so I made do with my 24-70 f/2.8 at 70mm, and I had it ready to go for the ambient light before I even asked. I snapped off three quick bursts and nabbed a keeper.

#3 Shoot the details

If you ever find yourself quietly admiring the small details of a new destination, then you might like to play around with isolating and photographing them. A great place to try your hand at detail shots is the local market. Using a shallow depth of field (f/2.8 – f/5.6) you can play around with photographing all manner of small details; the textures of a new fruit, a close-up of a flower, or even a line of colorful fabrics. Some photographers consider these filler shots but you might find they bring back wonderful detailed memories after time has passed.

3TDetailsMarkets

I personally love the small details of a new destination and often take my most favorite shots at bustling markets, or in the garden of a palace, instead of the palace itself. I always look for bright colors and new textures, then isolate what I love from a cluttered background by either zooming in or using shallow depth of field.

#4 Use juxtaposition

In a new destination you can’t help but notice that often things aren’t the same as they are at home, and sometimes a fun way of photographing that is through juxtaposition. This is when two very different things are shot close together of contrasting effect, for example ice cream with a steak, or a beautiful field of wildflowers with an urban factory in the middle. New locations can offer unlimited potential for photographing two things with juxtaposition together, that you might not see at home. Think new versus old, natural versus artificial, nature versus industry, etc.

4JuxtapositionStreetScenes

During an incredible morning exploring the Hanoi flower markets I enjoyed photographing the juxtaposition of the flowers besides the scooters, rubbish and chaos of Hanoi.

#5 Photograph animals

You might be fortunate on your travels to make some furry friends. This is often the case in South East Asia where cats and dogs roam the streets freely, and the smart ones know how to get a scrap of food or a cuddle. Photographing animals can be tricky at the best of times, let alone photographing animals that you don’t know very well. The first thing to remember if you want to increase your chances of getting a clean shot is to have a fast shutter speed, 1/1000th is ideal. Animals also benefit exceptionally well from having a sharp focus on their eyes, so a single focus point trained on the eye closest to you will work wonders. Other than that it’s really a matter of a little patience to capture a personality trait, or cute moment.

5FurryFriends

I don’t consider this photo a triumph of photography, by any stretch of the imagination, but I thought this puppy was adorable. I was able to quickly shoot a sharp image of him looking goofy, with a fast shutter speed and shallow depth of field.

#6 Photograph your resort or accommodation

If you want to take a great photo of your resort to show off to friends and family you might quickly notice that resorts are usually quite populated. Rather than waiting for scores of people to move out of your way it’s possible to make them a part of your image without being the focus of your image and you can do this by using a distracting foreground. Rather than straight out taking a photo of the pool, garden, or communal area of your accommodation, scout around for a nice foreground such as a garden bed, a great path, grass or flowers or even a reflective puddle.

6YourResortGrounds

In Mai Chau I stayed at the stunning Eco lodge in Mai Chau valley, and I desperately wanted to photograph the pool, but hordes of swimmers weren’t going anywhere. After playing around with various compositions I realized that the flowers planted around the pool made a distracting foreground when I focused on them, but used a fairly wide depth of field using f/11.

#7 Food photography

If you are a foodie, and let’s face it aren’t we all these days, then you’re going to want to take photos of some of the delicacies that await you when you travel. Food photography can be very hard, or very easy, depending on what you are trying to achieve – but for holiday snaps you should K.I.S.S. (keep it simple silly).

The hottest food photography trend to hit the market these days is the flat lay, or simply photographing food from above. You can do this with a simple snapshot, or take a few minutes to improve your shot. Firstly a single focus point trained on a plate of food nearest to the middle is best. Unless you want to stand on a chair and lean precariously over the table the best way to get this shot is by holding your camera above the table facing straight down. A reasonable depth of field like f/5.6 will mean you’ll still get enough food in focus, even if you slightly miss your planned focus point. Taking a few minutes to arrange the food and utensils on the table can also pay off in the final shot.

7Food

I am a massive fan of the flat lay. I think it looks great in most instances, plus it has the added bonus of showing everything you’re eating and drinking in a single frame. In Vietnam we made a roadside stop and I enjoyed boiled eggs, sticky rice in a bamboo pipe, purple corn on the cob and fiery hot bird’s eye chilies. I loved all the broken eggshells on the dirt floor and worked them into my composition with a wider vantage point.

#8 Photograph your travel companions

I’ve saved the best for last, photographing your family, friends, or loved ones. I’m sure you love the simple gift of taking a nice photograph of your travel companion(s) in an exotic location, without making a major production out of it.

The best way to do this is by beating the crowds, just that. Wake up early and have the pool, beach, or street to yourself, and get the shot you want without the distraction of hordes of people. Take a minute to think about composition so that your subject is well framed by the location; use local props if you want to be a real tourist. Then it’s a matter of referring back to basic portraiture rules like flattering focal lengths and good light, a given if you make the effort to wake up early.

8FriendsOrFamily

In Mai Chau I wanted a nice shot of my travel companion, Simone, and I wanted the scene to be noticeably Vietnamese. We borrowed a hat from the resort, and set an early alarm hoping for mist in the valley. We weren’t disappointed.

So there you have it: How to take great photos of just about anything while you’re traveling, without destroying your holiday to do it. Always keep a camera close at hand, and enjoy showing off the many aspects of a new destination through your own unique photography: people, landscapes, food, animals, details and all the special moments that pass you by.

googletag.cmd.push(function() {
tablet_slots.push( googletag.defineSlot( “/1005424/_dPSv4_tab-all-article-bottom_(300×250)”, [300, 250], “pb-ad-78623” ).addService( googletag.pubads() ) ); } );

googletag.cmd.push(function() {
mobile_slots.push( googletag.defineSlot( “/1005424/_dPSv4_mob-all-article-bottom_(300×250)”, [300, 250], “pb-ad-78158” ).addService( googletag.pubads() ) ); } );

The post 8 Tips to Help You Come Home with Great Travel Photos by Lauren Bath appeared first on Digital Photography School.


Digital Photography School

 
Comments Off on 8 Tips to Help You Come Home with Great Travel Photos

Posted in Photography