RSS
 

Posts Tagged ‘Photos’

10 DIY Valentine Ideas Featuring Your Photos

10 Feb

There are a certain three little words everyone wants to hear this Valentine’s Day.

But aren’t 1,000 words even better?

Use a photo (they’re worth 1,000 words!) to make a Valentine this year, and you’ll say so much more than “I love you.”
(…)
Read the rest of 10 DIY Valentine Ideas Featuring Your Photos (385 words)


© laurel for Photojojo, 2017. |
Permalink |
No comment |
Add to
del.icio.us

Post tags:


Photojojo

 
Comments Off on 10 DIY Valentine Ideas Featuring Your Photos

Posted in Equipment


9 Mistakes That Can Cause Blurry Photos

09 Feb

While I agree that sharpness is a bourgeois concept, to become a better photographer you will need to learn how to take sharp shots. The key to capturing these sharp photographs is to learn about all of the pitfalls that can cause blurry photos. Once you know all of the ways you can make a mistake, the only thing between you and sharpness is your hand-eye coordination.

The 9 Mistakes That Can Cause Blurry Photos

1. Back focus

Back focus is the bane of almost every photographer’s existence. This occurs when you think you are autofocusing on your main subject, but the camera misreads the situation and focuses on what is behind them instead, ruining the image. This happens primarily in situations where the focus is placed near an edge between your subject and the background.

Gowanus, New York Street Photography

The only way to fix this is to be aware of situations where it could happen. If you are photographing near an edge, be more careful, or lock the focus in a safer area before recomposing. Constantly pay attention to whether you think the focus is accurate or not, and if you have a keeper image, it can’t hurt to capture a couple photographs just to make sure the focus is correct.

2. Shutter speed too slow for shooting handheld

The rule of thumb is that your shutter speed must always be ONE divided by the focal length of your lens to offset handheld camera shake. So if you have a wider angle lens such as a 30mm, then you need a slower shutter speed of 1/30th of a second to guarantee sharpness. If you have a telephoto lens such as a 200mm this tip is even more important since you will need a 1/200th of a second to offset the shake in your hands.

Photographers shooting on aperture priority mode often get caught by this when they do not pay attention to their shutter speed, which can easily dip below the acceptable number.

The 9 Mistakes That Can Cause Blurry Photos

Keep in mind that if you have a cropped or micro 4/3rds sensor, you will need to figure out your full-frame equivalent focal length to calculate the minimum shutter speed necessary. For example, if you have a cropped sensor with a factor of 1.5x, and you are using a 200mm lens – the minimum shutter speed required is:  200mm x 1.5 = 300 or 1/300th of a second.

3. Shutter speed too slow to freeze motion

To freeze motion you need to use a fast shutter speed. The number that I use is 1/250th of a second for people who are walking. Running and sports can be between 1/500th and 1/1000th depending on the speed, but it all depends on how fast your subject is moving. Make sure to pay closer attention to your shutter speed when photographing something in motion (especially if you shooting in Aperture Priority mode).

4. Not focusing on the eyes in portrait photography

The 9 Mistakes That Can Cause Blurry Photos

If you are photographing someone’s face, particularly with a shallow depth of field and close up, the focus needs to be on the subject’s eyes (unless you decide otherwise due to creative reasons). The nose or the chin is not good enough – it needs to be on the eyes. I can’t tell you how many portraits I ruined early on where the person’s ear was sharper than their eye.

5. Not raising your ISO high enough

The 9 Mistakes That Can Cause Blurry Photos

In situations when you are not trying to capture a shallow depth of field, raising the ISO is often a very good strategy, even up to 1600, 3200, or 6400 depending on your camera and the light. Raising your ISO will allow for a faster shutter speed to offset handheld camera shake and freeze motion, and for a smaller aperture so you can have a larger depth of field. The added grain/noise will usually be very worth the added sharpness in the scene.

6. Not stopping fully to take a photograph

The 9 Mistakes That Can Cause Blurry Photos

This is my biggest pet peeve, and I see it done particularly when people are traveling and overstimulated by their environment. If you are going to take a photograph, make sure to stop yourself. Take a second to frame the photograph before you shoot it. If you capture a photograph while you are in motion, it will be slightly blurry unless you are using an insanely fast shutter speed.

7. Not cleaning the front of your lens

Smudges on your lens will reduce the sharpness and can ruin some of your photographs. Carry a lens cloth or use a thin soft t-shirt to clean it.

8. Missing the focus in dark situations

The 9 Mistakes That Can Cause Blurry Photos

Your camera’s autofocus capability, particularly with entry-level cameras, will diminish significantly in darker places. Make sure to pay even more attention to where the camera is locking its focus, and try to look for white, shiny, or contrasty objects to lock the focus on. If all else fails, go to manual focusing.

Using a lens with a larger aperture (like the 50mm f/1.8) will help, as will using the center most focusing point in your camera. It is a cross-point type and as such is more accurate and can often focus better in lower light situations.

9. Tripod mistakes

When using a tripod, you want to make sure to never touch it while a picture is being taken. Even holding it to keep it steady will introduce blur. Use a remote shutter release or set your camera on a 2-second delay before you take the photograph.

The 9 Mistakes That Can Cause Blurry Photos

Pay particular attention to your tripod when photographing on a windy day. The wind can also shake the camera and add some blur. To combat this, try to capture your photographs in-between wind gusts and even consider raising your ISO up so that your shutter speed will be faster. It is much easier to take a 10-second exposure in between wind gusts than a 30-second exposure.

Finally, make sure to turn your image stabilization off when photographing on a tripod. This might not matter with certain newer cameras, but it is always a good habit to get into. The stabilizing system has the potential to add minor vibrations to the camera when it is fully still.

You may also want to read: 5 Tips to Get Sharp Photos While Using a Tripod.

Conclusion

If you follow these nine tips you should be better equipped to avoid getting blurry photos. Do you have any other tips to add? Please post them and any questions you have in the comments section below.

googletag.cmd.push(function() {
tablet_slots.push( googletag.defineSlot( “/1005424/_dPSv4_tab-all-article-bottom_(300×250)”, [300, 250], “pb-ad-78623” ).addService( googletag.pubads() ) ); } );

googletag.cmd.push(function() {
mobile_slots.push( googletag.defineSlot( “/1005424/_dPSv4_mob-all-article-bottom_(300×250)”, [300, 250], “pb-ad-78158” ).addService( googletag.pubads() ) ); } );

The post 9 Mistakes That Can Cause Blurry Photos by James Maher appeared first on Digital Photography School.


Digital Photography School

 
Comments Off on 9 Mistakes That Can Cause Blurry Photos

Posted in Photography


How To Cover Everything Ever in Photos!

03 Feb

The Polaroid ZIP Mobile Printer makes super sticky tiny prints of all your best photos.

They’re so sticky in fact, that they can stick to almost anything.

Anything you say?

We couldn’t believe it either, so we took to covering some of our favorite things in our favorite pictures. Ya know, to prove it (not just because we wanted to cover everything in adorable, miniature snapshots).

(…)
Read the rest of How To Cover Everything Ever in Photos! (284 words)


© Meg for Photojojo, 2017. |
Permalink |
No comment |
Add to
del.icio.us

Post tags:


Photojojo

 
Comments Off on How To Cover Everything Ever in Photos!

Posted in Equipment


An Unconventional Composition Technique to Improve Your Photos

01 Feb

Last month I sat down and reread Michael Freeman’s book, “The Photographer’s Mind.” which I do occasionally. I find that by revisiting the words of other photographers I remind myself of the multitude of tools available to us. There’s so much we can do to create fresh and amazing photographs.

One of those ways is to push our skills and update our thinking. I think I’ve read through Freeman’s book about two or three times now. Every few years I take it off the shelf again. His books are insightful and interesting to read. Freeman offers up unique ideas for composition using both conventional and unconventional techniques. The books are readily available. You can also check out our review of one of Freeman’s other books here; “The Photographer’s Eye”. In this article, let’s journey through one of the concepts he discusses in his book, “Engineered Disorder”.

An Unconventional Composition Technique to Improve Your Photos

The details of the image are broken up into sections by the heavy shadows.

What is Engineered Disorder?

Freeman explains that Engineered Disorder is the active effort of a photographer to use non-conventional methods of composing photographs. Essentially, we are breaking the rules to create interesting images. Engineered Disorder means that we forget about conventional methods like unifying elements within the frame. We might allow ourselves to create uncluttered compositions. In one chapter Freeman talks about different methods of creating Engineered Disorder and bucking the system. He mentions using techniques such as disconnects, disruptive foreground, breaking the frame, superimposed layers and extremes of contrast. Maybe these terms sound complicated and a little too complex to understand, but they don’t have to be.

Let’s break down one of these techniques and see what’s involved in creating Engineered Disorder. We will discuss the use of extreme lighting or chiaroscuro to create disconnect within an image. It’s one of my favorite techniques. I love to include deep blacks and bright highlights in my compositions.

Chiaroscuro

Chiaroscuro – chi·a·ro·scu·ro – the treatment of light and shade in drawing, painting, and photography.

Using this technique means that we employ very hard lighting to break up the unity of a composition. The image becomes a series of pieces that communicate meaning but are broken up by dark shadows and bright highlights. Conventional composition techniques would say that using this type of technique makes for a bad photograph, but remember we are pushing the elements of composition.

An Unconventional Composition Technique to Improve Your Photos

The strong shadows in this image hide some details from the viewer. The leaf can only be viewed in pieces. This means a viewer has to pause and take in each part of the image separately and then piece together the whole scene. Making a viewer stop and study your image is important. Given the number of photographs out there you want to make viewers take some time to digest your images rather than scan through and move on. 


Experimenting with dark and light

Consider my careful experimentation with Chiaroscuro. This image portrays the common Canada goose in a much more unique fashion. In the opening moments of golden hours, these geese become elegant shadows. The different sections of light and dark create interesting graphic qualities within the image.

An Unconventional Composition Technique to Improve Your Photos

In this second image, I’ve used auto tone to create a more conventional image. While the actual shot is very similar, these two different treatments create considerably different photographs. Which one do you prefer?

An Unconventional Composition Technique to Improve Your Photos

A more conventional exposure.

Other examples

Here’s another example of Chiaroscuro. This is a photograph of a unique area near my home. Everyone calls this place The Badlands. The red and gray clay create these beautiful graphic designs which draw visitors to the area. The hills are in danger of being destroyed by visitors, but the area is truly beautiful. The shadows and the light create beautiful diagonal lines in this particular image.

An Unconventional Composition Technique to Improve Your Photos

This are is now off limits to visitors because of the damage caused by walking on the hills.

In this final image, the light and darks highlight different circular objects. Perhaps this image isn’t as disconnected as the others but it still presents a unique treatment for the door of a fishing boat. The image focuses on graphic design elements of the boat rather than the uses of the vessel. The image has been turned into an abstract and most viewers will need to analyze the image before they can determine the exact subject matter.

An Unconventional Composition Technique to Improve Your Photos

Conclusion – your turn

Experimenting with different techniques is never a bad thing. You can learn and improve your photos by playing with unconventional techniques. Creating these images certainly pushed the dynamic capabilities of my camera. Exposing for deep shadows can be a challenge all on its own, but it’s a lot of fun to try out these different techniques.

While we’ve only discussed one of the methods for creating Engineered Disorder, these three examples clearly highlight the technique. It’s better to fully understand just one compositional method rather than scratching the surface of several techniques. Give it a try, and go a little bit extreme. Break away from the conventional and search for ways to compose images that harness the power of Engineered Disorder in your photography. Please share your results in the comments below.

googletag.cmd.push(function() {
tablet_slots.push( googletag.defineSlot( “/1005424/_dPSv4_tab-all-article-bottom_(300×250)”, [300, 250], “pb-ad-78623” ).addService( googletag.pubads() ) ); } );

googletag.cmd.push(function() {
mobile_slots.push( googletag.defineSlot( “/1005424/_dPSv4_mob-all-article-bottom_(300×250)”, [300, 250], “pb-ad-78158” ).addService( googletag.pubads() ) ); } );

The post An Unconventional Composition Technique to Improve Your Photos by Erin Fitzgibbon appeared first on Digital Photography School.


Digital Photography School

 
Comments Off on An Unconventional Composition Technique to Improve Your Photos

Posted in Photography


How to Take Amazing Night Photos

01 Feb

Have you ever been interested in taking night shots, but never known where to begin?

Night photography can be intimidating, even for seasoned photographers who are used to taking shots during the day.

Well, now you can learn how to take amazing photos from dusk till dawn with our brand new Night Photography video course – launched in the last few hours.

Night photography course eml 01

In this online video course by regular dPS writer Jim Hamel you will learn:

  • How to master exposure at night to take your photos from average to amazing
  • The secrets to finding the best subject matter and locations
  • The must-have gear to get these stunning shots
  • Detailed retouching techniques to make your photos pop
  • What to look for and how to set up your shot
  • All the technical aspects to nailing the shot

This is our biggest course ever – with 9 learning modules, 11 practical ‘field work’ videos and over 6 hours of videos so you can learn everything you need to know to take beautiful photos at night.

Here’s just a taste of what’s inside:

Best of all – if you pick it up today you can take advantage of a wonderful early bird offer.

Early Bird Offer – Save 50% and receive a Bonus

As part of our early bird special on this course, we’re offing 50% off the regular price. Normally $ 99 – today you can pick up our new night photography course for just $ 49!

In addition to that great saving we are also including a “The Complete Guide to Shooting the Night Sky”, a 40 page ebook dedicated to photographing stars. This great eBook is yours free if you buy but only for a limited time.

Discover the Secrets to Great Night Photography Today

We’re so excited to share this course with you today. Everyone we’ve shown it to loves what Jim teaches.

The early bird price and bonus is only available at this price for the next 3 weeks, so grab it while you can here and start your journey to learning how to take amazing night photography images.

We Guarantee You’ll Love this Course

Like all dPS products our Night Photography Course comes with a 60 day money back guarantee. While we’re confident you’ll love this course if for any reason you decide it isn’t for you please just contact our support team within 60 days and we’ll refund your money – you can even keep the bonus eBook as our gift to you for checking out the course.

googletag.cmd.push(function() {
tablet_slots.push( googletag.defineSlot( “/1005424/_dPSv4_tab-all-article-bottom_(300×250)”, [300, 250], “pb-ad-78623” ).addService( googletag.pubads() ) ); } );

googletag.cmd.push(function() {
mobile_slots.push( googletag.defineSlot( “/1005424/_dPSv4_mob-all-article-bottom_(300×250)”, [300, 250], “pb-ad-78158” ).addService( googletag.pubads() ) ); } );

The post How to Take Amazing Night Photos by Darren Rowse appeared first on Digital Photography School.


Digital Photography School

 
Comments Off on How to Take Amazing Night Photos

Posted in Photography


Some Options for Backing Up Your Photos Online

27 Jan

Backing up your data is an essential part of your photography workflow. While many photographers still advocate for using physical external hard drives, there are also many online services where you can store your images. In this article, I will go over the pros and cons of several popular sites to backup your photos online. Please note that these photo solutions are constantly changing their features, so always check with them directly to verify any details.

Photo backups versus photo sharing sites

Some Options for Backing Up Your Photos Online

It’s important to note the differences between a designated photo backup services and photo sharing websites. Traditional photo backup services such as Backblaze and CrashPlan focus purely on backing up data and can be set to backup an entire computer or hard drive. This is good in the sense that you can have everything you’ve ever created on your computer saved to the cloud. However, these backups end up being extremely large files and they take extra time to retrieve. So if you need to constantly and quickly access your backed up photo data, it may not be wise to rely solely on these types of providers.

Photo sharing sites, on the other hand, are not meant to be comprehensive backups of your entire computer. Many of these sites impose limits on the types and sizes of files that can be uploaded. Thus, photo sharing websites are best used to upload, store, and share edited photos.

How I backup my photos

My advice is to have a backup for your backup. As a professional photographer who shoots primarily in RAW, I have terabytes of data to store, but I don’t generally need frequent access to those original files. I opt for CrashPlan to do automatic backups of my RAW images, in addition to storing them on external hard drives.

Charles Wiriawan

Image By Charles Wiriawan – external hard drive method of backing up.

My photography business is such that I constantly need to dig up old high-resolution photos to present to clients, and CrashPlan doesn’t give me easy, immediate access to those files. So I save edited, high-resolution copies of every photo I take and upload them to SmugMug. This way, I have quick access to the photos and can easily prepare an online gallery to share and sell images to clients. I also have Google Photos set to do automatic online photo backups anytime I save a new JPG image to my computer. In the end, I have four ways of backing up my photos.

Backup Services

These are comprehensive backup and cloud storage solutions meant to hold large amounts of data. Set them to automatically backup your entire computer or hard drive, and practically any file type or size will be accommodated. On the plus side, these backup solutions are pretty affordable for what they offer. However, it can take a long time to backup huge files, and file restoration can also take a bit of time.

Backblaze

One of the most popular backup solutions, Backblaze can automatically backup an unlimited amount of data from a single computer (note; it will connect and backup external drives as well). There’s no restriction on file type or size, and there’s only one pricing plan. It costs $ 5.00 per month or $ 50 USD per year for a Backblaze account. You can even pre-pay $ 95 for a 2-year plan. It’s an affordable and reliable solution for making sure everything on your computer is backed up.

Some Options for Backing Up Your Photos Online backblaze

CrashPlan

Virtually the same as Backblaze, CrashPlan also offers automatic computer backups. The main difference is that CrashPlan offers several different subscription plans. Included in the free plan is an automatic backup to a local hard drive or another computer. If you want to backup your data to CrashPlan’s cloud, the cost is $ 5 per month to backup one device for unlimited cloud storage and mobile file access. To add an extra device (as many as 10), the Family Plan is available for $ 12.95 per month.

crashplan Some Options for Backing Up Your Photos Online

Amazon Cloud Drive

At $ 11.99 a year for unlimited photo storage (or free for Amazon Prime members), Amazon offers competitive cloud storage solutions, but at some expenses. The main downside to Amazon Cloud at the moment is its lack of features when compared to other more established solutions. For example, a desktop client must be used to upload files larger than 2GB, there are no automatic backup features, and stored files are not automatically updated. Given these underdeveloped features, Amazon Cloud Drive at this moment seems more like an off-site hard drive rather than a true backup solution.

amazon-online-photo-backup

Microsoft OneDrive

Formerly known as SkyDrive, OneDrive is Microsoft’s cloud storage solution that works with Windows, Mac, iOS, and Android devices (but still no Linux). Base plans include a generous 15GB of free storage. Paid plans start at $ 1.99 a month for an extra 100 GB, or $ 6.99 for 1TB of space. The main downsides are a slow upload and download speed, a 10GB size limit per file, and the need to have a Microsoft, Outlook, or Xbox Live account in order to access OneDrive. This may be a hurdle for those who don’t use any Microsoft or Windows products.

onedrive-online-photo-backup

Google Photos

The photo storage solution offered by Google takes a slightly different approach than that of Dropbox or Flickr. Google Photos offers unlimited backup of a wide variety of file formats (including RAW images). You can also set automatic backups to occur whenever a new photo is taken on your mobile device or saved to your computer. However, all photos and videos must be under 16 megapixels or 1080p HD video.

If you upload larger files under the unlimited plan, your files will be compressed to fit these maximum size requirements. The only way to upload original, full resolution images is to opt for a plan with limited storage. In a way, this makes sense. You pay for more storage space if you need it.

google-photos-online-photo-backup

Photo Sharing and Image Hosting Websites

These websites were not originally meant to be comprehensive backup solutions. However, many photographers have begun using them as such. Most of these websites have limitations when it comes to data storage or file types that you can upload. Thus, they may not be the best all-around backup solution for your photos, depending on your needs.

Dropbox

One of the most popular tools to backup photos online is Dropbox. It exists in the form of a mobile app, website, and desktop app and allows you to store all types of media including photos, documents, videos, and other files. Anything you add to Dropbox can be immediately accessed anywhere when you log in via the corresponding website or app.

Using the free version gives you 2MB of storage space, but you can purchase additional space. Dropbox made an attempt at pushing an automatic photo backup feature in the form of Dropbox Carousel. However, this app along with Dropbox’s email app Mailbox shut down in early 2016. Thus, it’s questionable if they will make future investments into further feature development.

dropbox-online-photo-backup

Flickr

Yahoo’s venerable photo solution, Flickr, has withstood the test of time and continues to be popular among amateur and professional photographers. Even with a free account, you get 1TB of photo storage space. However, you cannot get more than 1TB of space, even with a paid Flickr Pro account. Instead, the paid account just removes ads and gives you access to your account stats. While Flickr isn’t the best for sharing photos with clients, it does give you the option to license and sell your photos.

The main downside to Flickr has to do with file size limits. Uploaded photos cannot be more than 200MB and videos must be 1GB or less in size. Additionally, RAW images cannot be uploaded.

flickr-online-photo-backup

SmugMug, Zenfolio, and Photo Shelter

These three paid photo-sharing websites are popular for presenting and selling photos to clients:

  1. SmugMug
  2. Zenfolio
  3. PhotoShelter

However, the push for offering unlimited photo storage has elevated these sites into becoming viable ways for photographers to backup images. All three sites also offer components that help you build your photography website. SmugMug and Zenfolio are among the most affordable, while PhotoShelter is more expensive.

In Conclusion

So which photo backup solution is best for you? It truly depends on what media you are looking to backup, how often you will access it, and your budget. Whichever solution you choose, remember to always have a backup for your backup. Also, please remember that these services are constantly offering new promotions and features. The information in this article may change, so always check directly with the provider to verify details.

How do you backup your photos? Let us know in the comments below.

googletag.cmd.push(function() {
tablet_slots.push( googletag.defineSlot( “/1005424/_dPSv4_tab-all-article-bottom_(300×250)”, [300, 250], “pb-ad-78623” ).addService( googletag.pubads() ) ); } );

googletag.cmd.push(function() {
mobile_slots.push( googletag.defineSlot( “/1005424/_dPSv4_mob-all-article-bottom_(300×250)”, [300, 250], “pb-ad-78158” ).addService( googletag.pubads() ) ); } );

The post Some Options for Backing Up Your Photos Online by Suzi Pratt appeared first on Digital Photography School.


Digital Photography School

 
Comments Off on Some Options for Backing Up Your Photos Online

Posted in Photography


How to Create Magic in Your Photos with the Pixelstick

26 Jan

Who doesn’t want special super powers? Popular culture is awash these days with characters with added extras. To date, these include wizards with magic wands, Jedi’s with light sabers, and now there are photographers with pixelsticks! That’s right, welcome to the future because the pixelstick is here and it’s going to change the way you do photography if you embrace it. The pixelstick enables you to make amazing light paintings in camera, so let’s take a look at it and see why it’s an essential purchase for those who like creative photography.

The light from the pixelstick perfectly framed my friend and fellow DPS write, Pete DeMarco.

The light from the pixelstick perfectly framed my friend and fellow DPS writer, Pete DeMarco.

What is light painting?

Light painting is a technique you can use to create fascinating images. To do it you need to photograph at night, use long exposure, and have a light source. You can divide light painting into two types, those that you do in front of the camera, and those you do with the camera.

  1. Light painting with the camera: Using the camera to light paint is called kinetic light painting and involves techniques such as zoom bursts, or camera rotation.
  2. Lighting painting in front of the camera: You can also move lit or glowing objects in front of the camera during a long exposure, to paint the scene in front of the camera.

In many cases the first time you do any light painting it will be to spell your name using sparklers or a flashlight. The next step if you became more serious would usually be making light orbs, and other light painting shapes with things like fairy lights. Now there is the pixelstick, which makes light painting both easier to do, and more sophisticated.

Light orbs are a lot of fun to create, it's even more fun to light paint with the pixelstick as well.

Light orbs are a lot of fun to create and it’s even more fun to light paint with the pixelstick as well.

The game changer, introducing the pixelstick

The pixelstick is the result of the inevitable evolution of light painting, and the advancement of technology. The pixelstick is a product designed and produced by bitbanger labs, following a successful Kickstarter fundraising campaign. The neat thing about the pixelstick is that you can program it to create any light pattern you want, in fact, you can even use it to create light painted pictures.

How to Create Magic in Your Photos with the Pixelstick

This is possible through importing BMP files onto an SD card, which can then be slotted into the pixelstick’s operating system. You have control of many useful aspects, brightness of the light, the speed of the pattern transmission, repeat firing of the pattern, white balance, and delayed fire, are some of the useful functions.

The pixelstick comes with a controller that you can change the light painting with.

The pixelstick comes with a controller that you can use to change the light painting design.

Vital stats, what you need to know about the pixelstick

The pixelstick at full length is great for light painting, but not so good for traveling. It’s fortunate that the design allows you to break it down to half its length, and store it in the bag. But, the length is still too long for hand luggage on a plane, which presents a problem if you plan on using it in more exotic locales. The essential information about the pixelstick and what comes with it are:

  • Comprised of a strip of 200 RGB LED lights, allowing for a combination of 16 million colors.
  • Has an aluminum case housing, to protect the LEDs from damage.
  • Full-length 187cm (73.5 inches), and a storage length of 109cm (43 inchses).
  • Weight is 1.8kg (4 pounds).
  • The device uses 8 AA batteries.
  • There is a control center with a battery pouch that attaches to the stick, with cables to connect everything together.
The 200 LED lights on the pixelstick come enclosed in a light weight metal case, this protects them from damage.

The 200 LED lights come enclosed in a light-weight metal case which protects them from any damage.

How to do light painting

Light painting is a long exposure technique, which you’ll need a tripod to achieve. You can follow the steps set out below, or for a more detailed guide check out: Beginner’s Guide to Light Painting .

  1. Choose a location and time of day that will be dark. You need to be able to expose for at least 10 seconds in most cases, so locations with less ambient light are ideal.
  2. Dress in black clothes, this will minimize the chance of you showing up in the photo.
  3. Place your camera on a tripod, and compose your scene. As you’re light painting, make sure there is enough space within the composition set aside for the design. In other words, plan where and how big the light design will be, then make sure it will all be contained inside the frame.
  4. Take the light source into the scene you composed, turn it on, and leave it in front of the camera.
  5. Turn on your camera’s LiveView function, and focus on the light source using manual focus (use the + or zoom button to show a magnified view which will make it easier for you to focus). Leave the camera in manual focus to make sure your focus point remains the same.
  6. Set the camera’s self-timer to 10 seconds, and begin the countdown. If you have a remote shutter release you may prefer to use that to trigger their camera.
  7. While the camera is counting down, move into position in front of the camera with your light source in hand.
  8. Just before the shutter releases, begin your light painting pattern.
  9. Carry out any light painting you wish to do. Then, once you have finished painting, turn off your light source and move out of the frame.
  10. Go back to your camera and wait for the exposure to finish. Check your result and repeat if necessary.
A lot of people have fun using sparklers to create light paintings. These can look nice, the pixelstick takes you to the next level.

A lot of people have fun using sparklers to create light paintings. These look nice, but the pixelstick takes it to the next level.

Using the pixelstick to create abstract light paintings

There are many different types of light sources, the pixelstick is just one example. However, these effects can also be achieved by using something as simple as a kid’s toy light saber. The focal point of your image is going to be the light painting itself, or perhaps an architectural feature that you’ll emphasize with light.

How to Create Magic in Your Photos with the Pixelstick

The main thing is to keep it simple, with the light flowing through the scene. If you over-elaborate and make too many movements then it’s the digital equivalent of scribbling on a piece of paper, and it usually doesn’t turn out well. So when you’re making abstract light paintings, keep these things in mind:

  1. Keep the line flowing. You probably know leading lines work well in photos, and light painting is a great way of introducing some into your frame. Have a plan for the direction the line will flow in your frame, and how it will lead the viewer’s eye to the point of interest.
  2. Use repetition. Having a pattern in your frame and repeating it makes a nice light painting. Repetition often works well for photographs, and the control you have with the pixelstick allows you to do this more easily.
  3. Keep it simple. There is a temptation to overcook (do too much) a light painting. With practice, you’ll find the strongest scenes use a more minimalist approach. A simple rotation of the pixelstick or light saber is often all that’s needed.

The pixelstick is really good for abstract work. The preset light patterns that come with the stick will help get you going quickly.

The most effective light paintings can often be when things are kept simple.How to Create Magic in Your Photos with the Pixelstick

The most effective light paintings happen when things are kept simple.

The pixelstick for portraits

The pixelstick can be used to frame a model, and/or create leading lines towards the subject making it a powerful tool for portrait photographers. The difficulty you will encounter when shooting long exposures with a model is freezing them so they’re sharp. The pixelstick itself isn’t any better than other light painting tools you can use, but the following tips can help.

In this photo a Jinbei 600 flash was used to light the model, while the pixelstick produced the light painting.

In this photo, a Jinbei 600 flash was used to light the model, while the pixelstick produced the light painting around her.

  • Keep the exposures short. The shorter the exposure, the less chance there is your model will move. This will mean shorter, simpler light paintings.
  • Use strobes to light the model. Using a strobe (flash) to light your model means that any movement in the model is less likely to show.
  • Ask the model to hold still. This is easier said than done, but if your model can hold really still for 20 seconds, then you can create longer more complicated light paintings.
  • Have the model face away from the camera. Any movement of the model’s face will show in the image. So, having the model face away from the camera helps it look less obvious.

Where the pixelstick really works well is how you make it interact with your model. This may mean that the colors in the light painting contrast with the color of the model’s clothes. Or maybe you can make the model appear to be holding some of the painted light. The creative potential of light painting combined with a model is vast, so you should have fun.

Asking the model to face away from the camera makes it much easier to mask any movements there may have been. How to Create Magic in Your Photos with the Pixelstick

Asking the model to face away from the camera makes it much easier to mask any movements there may have been during a long exposure.

Light painting for product photography

The customization available with the pixelstick makes it a fantastic choice for product photography. One of the main niche genres is car photography, where the ribbon lines or checkered flag designs can be used.

This technique is similar to photographing a model, only your product won’t move, which allows for longer exposures. You can program in the name of the product, or even the company’s logo. The pixelstick really beats other types of light painting hands down, as the light design can be made to specifically match the product or branding.

Cars are great subject for light painting of all forms, the pixelstick gives you even more scope to experiment.

Cars are great subjects for light painting of all forms. The pixelstick provides more options for experimenting.

Personalizing your light design

The ribbon presets, and the downloadable BMP files that come with pixelstick provide a lot of creative variety. But the real fun starts once you begin to add your own designs into the pixelstick. It’s this feature more than any other that gives this tool its power. The creativity is really infinite so here are a few ideas for you:

  • Find images through creative commons of national flags.
  • Edit the color scheme of some of the downloadable patterns that pixelstick provides.
  • Photograph textures shots of leaf beds or brick walls and use them to light paint.
  • Use your own landscape photos.
The texture and patterns of traditional Korean roofing looks beautiful, and made for a great light painting pattern.

The texture and pattern of this traditional Korean roof made for a great light painting pattern.

Converting your files for use with the pixelstick could not be easier. Pixelstick has a drag and drop service on their website where you can do this easily. Alternatively, you could design and edit your image with Photoshop. Your image needs to be sized to 200 pixels high, with the length being as long as you desire. Once this is done the file needs to be flipped counter clockwise and saved as a BMP file. When creating a new file, any black areas will appear as blank (no light) when the light painting occurs.

In this photo the statue of a buddhist grandmaster has been light painted around using traditional Korean patterns as the light source.

In this photo, the area around the statue of a Buddhist grandmaster has been light painted using the traditional Korean pattern I created (above) as the light source.

Vibrant videos with the pixelstick

The pixelstick’s scope of creativity goes beyond still photography, and it can do amazing things for animation. You are going to create a stop motion video with the pixelstick, and use a series of long exposure photos to make this. Think of an animation flipbook, only this is the digital version of that.

Steps to create an animated GIF

Animating a single scene with the pixelstick could not be easier. Follow these steps to make an animated gif (like the one below) or perhaps a short video. You don’t need a pixelstick to create this type of animation of course, but you have a lot more options at your fingertips if you do.

The pixelstick can also be used for make smaller gif animations. The creative potential here is huge.

The pixelstick can also be used for make smaller gif animations. The creative potential here is huge.

  1. Set your camera on a tripod, and ensure it doesn’t move.
  2. Compose your scene, and decide where your light painting animation will occur.
  3. Use a remote cable shutter release, this will prevent any movement of the camera.
  4. Allow a long enough exposure for you to complete the light painting.
  5. Begin the exposure, and move into the frame to start and complete the light painting.
  6. Repeat the exposure and the same light painting at least 10 times.
  7. Take your camera home, and import the photos to your computer.
  8. You now need to import the files to photoshop. To do this go to file>scripts>load files into stack.
  9. Open the timeline window, and select “create frame animation”. This will import one frame into your animation.
  10. On the right-hand side of the timeline window click the menu option, and select “create frames from layers”. Now reverse the order of the frames.
  11. Hit play and remove any frames that interrupt the flow of your animation.
  12. The file is now ready, export it as a gif file.

Stop-motion videos

Creating a longer stop-motion video is very similar to making an animation, in essence, you’re just making an extended version. As opposed to repeating a light painting many times, you may well simply move through a scene when making this type of video.

It’s better to use a dedicated stop-motion app for making this type of video, with stop-motion studios for windows, and istopmotion for mac being a couple examples of options.

pixelstick

One frame from the series used to make the stop-motion video below.

Conclusion

The pixelstick really is a magical tool. You can create spellbinding images that will wow your friends if you decide to purchase one. The size of the stick is something of a double-edged sword, thought. It allows for bigger more dramatic light paintings, but it is also harder to transport, even when broken down into its carry bag. Is the pixelstick worth dropping the extra cash on, versus a cheaper D.I.Y. light stick? If you’re serious about improving your light painting, then yes it’s worth the money in my opinion.

The ability to customize the type of light emitted gives you so much control. Doing this with a DIY light-stick would take many hours, and in many cases would be impossible to replicate what the pixelstick does. At around $ 350, you could spend more money on other photography gear without getting the same level of creative energy you get from this tool. Whether you’re interested in still photos or animation, this will quickly become a vital part of your setup.

The way you make light interact with it's surrounds can be highly effective.

The way you make light interact with the surroundings can be highly effective.

The light paintings the pixelstick is capable of are highly sophisticated.

The light paintings the pixelstick is capable of are highly sophisticated.

In this image the pixelstick was used to add repetition to the scene, and an otherworldly feel.

In this image, the pixelstick was used to add repetition to the scene, and create an otherworldly feel.

The flow and lines that you can create with the pixelstick make the photo stand out much more.

The flow and lines that you can create with the pixelstick make the photo stand out much more.

The petronas towers in Kuala Lumpur are framed using light from the pixelstick, adding a lot of interest to this photo.

The Petronas towers in Kuala Lumpur are framed using light from the pixelstick, adding a lot of interest to this photo.

The light weaves in and out of the pillars, adding direction to this photo.

The light weaves in and out of the pillars, adding direction to this photo.

googletag.cmd.push(function() {
tablet_slots.push( googletag.defineSlot( “/1005424/_dPSv4_tab-all-article-bottom_(300×250)”, [300, 250], “pb-ad-78623” ).addService( googletag.pubads() ) ); } );

googletag.cmd.push(function() {
mobile_slots.push( googletag.defineSlot( “/1005424/_dPSv4_mob-all-article-bottom_(300×250)”, [300, 250], “pb-ad-78158” ).addService( googletag.pubads() ) ); } );

The post How to Create Magic in Your Photos with the Pixelstick by Simon Bond appeared first on Digital Photography School.


Digital Photography School

 
Comments Off on How to Create Magic in Your Photos with the Pixelstick

Posted in Photography


How to Use Photoshop to Create Milestone Photos of Babies

22 Jan

Buried deep in my parents’ basement are boxes of slides with pictures of my siblings and I, when we were kids, all taken with my dad’s Minolta DSLR that has long since been lost to the ages. I have a few scans of those early photos but most of them won’t see the light of day anytime soon. Thus the images that marked the passage of time for me, my sister, and my three brothers are few and far between.

Baby milestones Photoshop background

This picture taken with a pocket camera and the fabric was purchased at a thrift store.

Thankfully modern technology and the prevalence of digital cameras means babies born today will likely have no shortage of images to mark their early years. One of the most common methods of documenting milestones is to take pictures at weekly or monthly intervals. Often these are augmented with some type of decoration or adornment to indicate the passage of time (e.g. a small chalkboard, a giant sticker on the kid’s tummy, or a number stamped in the corner of the picture).

There is an incredibly easy, fun, and highly effective way to do this in Photoshop. It only takes a few minutes and produces great results, even if you have never used this program before you should be able to figure it out.

Preparing for the photo shoot

My wife and I got this idea after reading a post on the popular do-it-yourself blog Young House Love but have tweaked it to fit our style. To get started you will need a few things, many of which you probably already own:

  • Fabric with big colorful prints; Finer-detailed prints are okay, but the bigger and more prominent the pattern, the better it will look when paired with your baby. Don’t spend much money on these since you’ll need a lot if you do a different fabric each week. Pro tip, let the grandparents know you’re in need of fabric. Ours were thrilled to go shopping at thrift stores and send us what they found.
  • White onesies; A t-shirt works better after the first year, but until that time onesies are best because they stretch nice and even across the baby’s body leaving you with fewer wrinkles to contend with in the post-processing phase.
  • Blue painter’s tape;  Used to hold the fabric down to the ground.
  • A big window; Or a glass door, or another similar surface to let in a lot of light.
  • A step stool; so you can get a higher angle.
  • Tape to hold the fabric in place; Blue painter’s tape will work but I like to use Gaffer’s tape (I recommend this brand which is stronger and leaves no residue on the carpet when you pull it off.)
  • A reflector;  We didn’t buy one of these until well into our second child and it’s amazing how much a reflector helps get nice even lighting.
How to Use Photoshop to Create Milestone Photos of Babies - setup

It doesn’t take much to prepare for this type of photo shoot.

The session

The process works best with two people; one to take pictures and someone else to do multiple jobs like hold the reflector, smooth the blanket, and soothe the baby. Position your child with his or her feet near the light source (i.e. giant window or glass door) and have your helper hold the reflector by the baby’s head to bounce light back. Then get up on the stepstool and start taking pictures! Babies wriggle and squirm around a lot so don’t worry about quantity. It’s better to have too many good ones than to have to redo everything because you only took three shots and the baby was frowning in all of them.

Photoshop time

After your pictures are done it’s time to head to Photoshop where the real fun begins. You will need two fonts: Fyra for the numbers and one that you want to use for the letters. I like Fertigo Pro, but almost anything will work, it’s largely a matter of personal taste here.

Open your photo in Photoshop and it will appear as the background layer. You can leave it as is unless you plan to do any editing such as color adjustments or retouching, though my advice is to keep it simple and avoid all that if possible. You’ve got a newborn and you can’t spend hours editing your photos every single week when there are diapers to change and clothes to wash!

Add the text

photoshop-baby-milestones-fyra

Click the “T” button in the tool palette to activate the Text Tool, then click anywhere in the picture to create a new text layer. Use the Fyra font and type a letter which will show up as a big circular number – perfect for marking the weeks or months of time that have passed.

Use the toolbar at the top of your screen to adjust the size of the number, and if you don’t get it perfect you can always change it later using the Transform Tool. Press [enter] to lock in the number, then repeat most of the process for “weeks” by clicking the Text tool, selecting a font, clicking on your baby, and typing the label (weeks, months, etc.) you want.

How to Use Photoshop to Create Milestone Photos of Babies adding the text

At this point your picture might look like something the neighbor kid made in Microsoft Paint, but you’re just getting started. The finished version will look much better thanks to the magic of Photoshop.

Resize and warp the text

The next step is to customize the size and position of each of the elements. Using the Layers palette select the layer with a single letter, which is actually the number in the picture, and choose “Edit > Transform”. You can now reposition the number where you want it, and resize it by clicking and dragging on one of the corners. Hold down the [shift] key while doing this to maintain the proportions (shape) of the number or else your finished product will look all stretched out. You can even rotate the number by hovering your cursor near one corner until it turns into a cornered arrow and then click and drag.

How to Use Photoshop to Create Milestone Photos of Babies transform the text

Repeat the same process for the word you’ve used then with that layer still selected, click the Text tool in your toolbar and manually select the word (in this case “weeks”) itself. Then choose; Layer > Type > Warp Text… and add an Arch style. (You can also click the “Warp Text” toolbar button to do the same thing, see red arrow below.)

How to Use Photoshop to Create Milestone Photos of Babies warp text

I like to use just a couple of degrees here, which helps the text simulate a more natural curve that you might see if it were printed across the white onesie directly. Usually, +5 gets the job done just fine.

How to Use Photoshop to Create Milestone Photos of Babies warp text tool

Text color

After that, the next step is to change the color of the text so it complements the fabric on which your baby is laying. Use the Text tool to select either the number or the word (weeks) then click the black box next to the Warp Text button to change the color of the text.

How to Use Photoshop to Create Milestone Photos of Babies text color

Use the eyedropper to select a color from the fabric and tweak as necessary. you will also see the color of your text or number, whichever is selected, change as you try out different options. When you find one you like you can click the “OK” button to lock it in place.

But, before you do that select the six letters and numbers in the # box at the bottom and press [ctrl+c] to copy it. This is the hex code that tells your computer what color is in use, and you will use it again in the next step.

How to Use Photoshop to Create Milestone Photos of Babies text color

Repeat the same process for the other layer of text. To get the same color you can either hover the eyedropper over the newly-colored text on the picture or paste the color code (6-digits you copied) into the box at the bottom. When you are finished you will have an image that is close to the final product, but you’re not quite done yet.

How to Use Photoshop to Create Milestone Photos of Babies

Blend mode

Two final editing steps remain before your image is done, the first involves blend modes. These have to do with the way in which layers work together and how one layer’s color can be altered based on how it is combined with the layer below.

Use the Layers palette to highlight a text layer and change its blend mode to “multiply” with an opacity of 75%. This will allow some of the texture of the white onesie to show through, and make the text seem like it naturally printed on the fabric instead of just pasted on afterward in a computer program.

How to Use Photoshop to Create Milestone Photos of Babies blend mode

Masking

At this point, you may be thinking about using the eraser tool to fix parts of your image where the baby’s hands obscure the number or text. But trust me, this is not what you want to do!

Photoshop has a fantastic feature called layer masks that let you hide (erase) parts of a layer and even recover (show) them again later if you erase too much. In the example above, you will note that the baby’s arm should be covering up the 20, so the solution is to use a layer mask to remove (hide) that portion of the 20. How to Use Photoshop to Create Milestone Photos of Babies masking

Click the text layer that you want to edit then choose “Layer > Layer Mask > Reveal All”. Now you will see a white box next to the layer that you can use to show and hide different parts of the layer itself. When you add anything dark to this layer mask it will erase (hide) that part of the layer, and when you add anything white to the mask it will show that part of the layer. This is an incredibly useful feature in Photoshop that you can use in all sorts of ways to edit your images, not just snapshots of your baby with milestone stickers.

Click the brush tool and start painting over the portion of the layer mask you want to erase, but keep one finger on the “x” key of your keyboard to switch between erasing mode and adding mode. If you accidentally brush over something that you want to keep, press “x” and add it back by painting it back in white! Then press “x” again to go back to deleting (painting with black).

Press the “z” key to zoom in on your image (and option-z to zoom out) and then “b” to go back to the brush tool. After a few strokes of your brush, your image is ready to share with family and friends!

How to Use Photoshop to Create Milestone Photos of Babies

When to stop

Right here is where I like to stop because the image is, as I like to say, good enough. There are some imperfections that could be cleaned up like using a displacement map to alter “weeks” so it follows all the contours and folds of the fabric, but I have found that these are just not worth my time. To be honest, most people won’t even notice.

You can easily spend hours using warp transforms, color tweaking, and spot removal to get each picture looking pixel-perfect and ready to print in Baby Cosmopolitan. But parents of newborns have to find a balance between time spent on the computer and time spent with their families.

How to Use Photoshop to Create Milestone Photos of Babies

After 52 weeks of doing pictures we used a slightly different setup and reduced our images to once a month with our child standing or sitting instead of lying down.

Conclusion

If you have an infant or are expecting one, pictures like this are a fantastic way to mark the passage of time. My wife and I did shots like these with our two boys every week for the first year of their lives, and then every month until they turned two.

At the time it seemed like a huge hassle to get out the fabric, put a white onesie on, and try to soothe a fussy infant long enough to snap a few pictures every single week. Looking back through them we are so glad we did. When shown in an album side by side these images provide a priceless way of seeing how our kids both grew so much during those early times of their lives.

If you have a small baby and give this a try, please share your images and/or questions in the comments area below.

googletag.cmd.push(function() {
tablet_slots.push( googletag.defineSlot( “/1005424/_dPSv4_tab-all-article-bottom_(300×250)”, [300, 250], “pb-ad-78623” ).addService( googletag.pubads() ) ); } );

googletag.cmd.push(function() {
mobile_slots.push( googletag.defineSlot( “/1005424/_dPSv4_mob-all-article-bottom_(300×250)”, [300, 250], “pb-ad-78158” ).addService( googletag.pubads() ) ); } );

The post How to Use Photoshop to Create Milestone Photos of Babies by Simon Ringsmuth appeared first on Digital Photography School.


Digital Photography School

 
Comments Off on How to Use Photoshop to Create Milestone Photos of Babies

Posted in Photography


Take flight over Australia: aerial photos by Scott McCook

21 Jan

Take flight over Australia: Aerial photos by Scott McCook

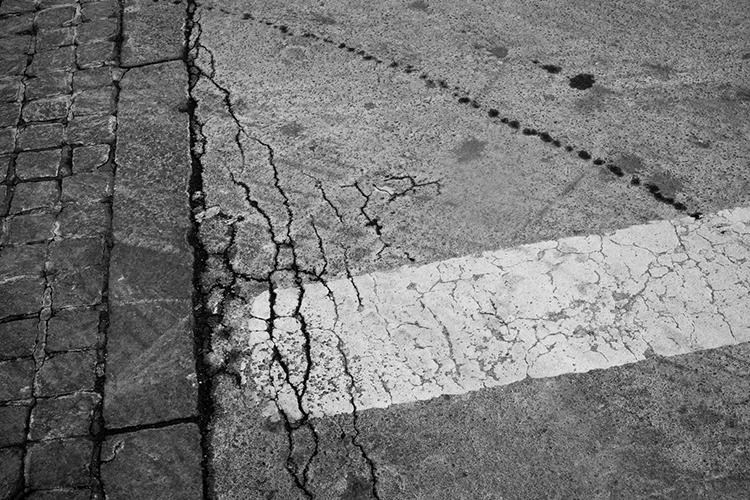
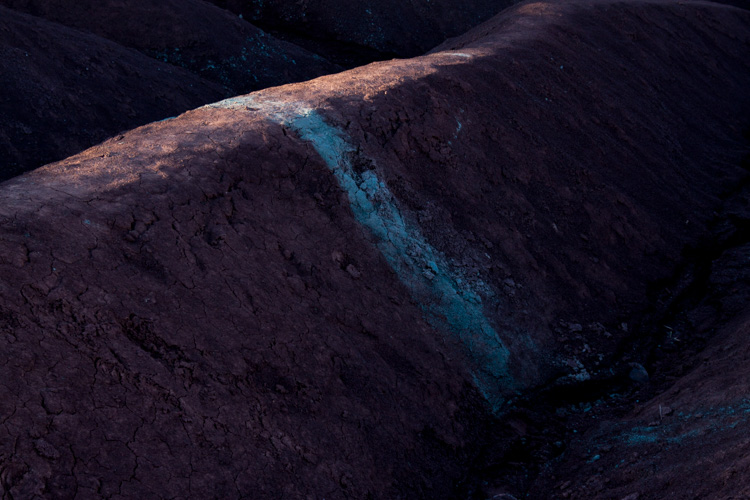
Originally a tailing pond image, I have created a fictional piece of work to convey a story about Australia riding the mining boom, Boddington Western Australia

Scott McCook is a native Australian and an award winning landscape photographer with a serious passion for aerial photography. All of the images that you see in this article were shot from the skies high above remote areas of Australia and New Zealand. His goals are to not only highlight the beauty in areas that are remote and far removed from the public eye, but also to illustrate the impacts that industry can have on the world around us.

To see more of his work, check him out on Facebook and Instagram.

What inspired you to begin your aerial work?

Big Lagoon Shark Bay, an isolated birrida, these birridas are gypsum clay pans that used to be saline lakes

I have two main sources of inspiration, the first of which is my drive to photograph what hides in plain sight. This started many years ago with astrophotography, which was something I pursued in my earlier days of landscape photography. The idea of something so beautiful hiding above cities and street lights every night with many people never even seeing the Milky Way with their own eyes drove me to the dark spots of Western Australia (of which there are many) to capture the incredible beauty of the Milky Way and show people here in Western Australia what’s in their backyard every night.

This concept of showing people, via my imagery, what hides just below the surface (or above your head) is what fanned my obsession for aerial photography. It’s the very same principals, the idea that these beautiful and sometimes abstract landscapes that we see every day from the ground can explode into life from the air.

My second source of inspiration is to show people the impact of mankind on nature, as in the case of my mining aerial imagery. It’s showing people areas that they would never normally be able to see on that scale. It has the possibility to empower people to make their own opinion on these landscapes and how far man will go to chase our precious resources.

I should also mention that there are a number of truly amazing landscape photographers based out of Australia that inspire me on a daily basis. The collective of landscape photographers from ND5 put life back into the aerial genre here in the last 10 or so years and their work sparked my interest in what our beautiful country has to offer from the air. Photographers like Tony Hewitt, Christian Fletcher and Peter Eastway have not only supplied inspiration over the years but have been great mentors for myself and many other budding landscape photographers here in Australia.

What’s your favorite aspect of aerial photography?

Shark Bay Western Australia, coastal floodplain

It really comes down to two questions: Is it the unique photography? Or the thrill of being in a plane or chopper?

I think it’s the pure thrill and enjoyment of flying that keeps bringing me back and then it’s the excitement of having no idea what incredibly unique moment or landscape you’ll capture from the air. Often with aerial photography, it feels like you’re an early explorer, going over uncharted territory, the feeling is quite amazing because often we are lucky enough to be the first people shooting a location from the air.

This is often the case because you can travel to very remote locations in a short amount of time. You can really feel the excitement come over you when you know you’re shooting something completely new. So let’s go with 50% the thrill, 50% the photography, how’s that for a safe answer?

What lenses and equipment do you normally shoot with?

Perth, Western Australia. Alcoa Tailing Ponds

Everything!!! Would be my short answer, but the slightly extended answer is as follows:

My Full-frame Go to Kit:

  • Nikon D810
  • Nikon 24-70 F2.8
  • Nikon 70-200mm F2.8 VR2
  • Sigma 35mm F1.4 Art

My Medium Format combo:

  • Phase XF + IQ150
  • 80mm blue ring Shnieder
  • Mamiya 35mm

When it comes to aerial photography I have found shooting large sensor MF images really helps with not only print but the editing process, but the extra data can make all the difference to your creative vision and post processing.

How do you go about composing a shot from that high up in the sky?

Useless Loop salt farm, the different colors coming from varying stages of the process and product, Western Australia

You often have a very small window space to shoot from and you’re traveling 160km an hour at around 1500 ft, so the ground is going fast, very fast! This means you need to be on your game, with the camera settings tuned into something you would possibly find in sports photography: high shutter speeds, high ISO and looking for that sweet spot aperture.

Research using Google Maps is the key to this scenario – often I will know what is coming up, so I’m preparing myself physically (putting my arms in positions thought not humanly possible) and mentally as well, thinking ‘What orientation do I want this area in?’ Then in a matter of seconds your shooting window comes and before you know it, it’s gone. You can ask the pilot to lock into a loop pattern over the area, but time is money and I find if you can nail it first go, you can be onto the next location and maximize your shooting time and minimize your wallet taking a beating.

How much planning goes into a single aerial photography trip?

Southern Alps, New Zealand, this is an image of the ice that feeds the Fox Glacier in the South Island

Weeks or months. I did two very different aerial expeditions last year which I’ll touch on because of the difference in planning. The first was to Shark Bay Western Australia, a World Heritage Listed area and a location that is totally mind-blowing from the air. I spent around four weeks using Google Maps (My Maps) to scan areas of Shark Bay to shoot. Once I found a potential location I would run a screen grabbed image through Lightroom and the de-haze filter, along with some minor color balance adjustments – this helps me envision what I will be shooting when I arrive to the location.

The satellite images provided by Google are pretty good but with a little tweaking you can really get some detail from them and this helps me know what I’ll be coming across when we’re in the air. I would then save these screen grabs along with the location drawn onto a map, these will then be loaded onto my iPad and used when I’m discussing the flight plan with the pilot. This is extremely helpful because it allows our pilot to see exactly what we want to shoot and where it is, allowing him/her to be more precise.

The other shoot I did was in the Southern Alps of New Zealand in May last year. This was from a Hughes 500 Helicopter with all the doors off. Now, this shoot was different because using Google Maps to do reconnaissance is very limited. Why? Well because it’s a mountainous region it’s a lot harder to use the aerial perspective for a gauge on what you’re going to see. Adding to the difficulty is the fact that the snow in such areas is highly reflective, meaning large areas of Google Maps data can be blown out.

Being in a chopper allows us to hover and hold locations, so there’s no need to try and capture that one moment in a split second. We can now spot an amazing location and tell our awesome pilot (thanks Michael from Mountain Helicopters Fox Glacier, complete legend!) to head on over and bank the chopper in just the right spot. This type of aerial expedition feels far more like exploring on foot, just with the added bonus of a multi million dollar piece of machinery giving us the gift of flight wherever we want.

Okay, so slightly different than traveling by foot but I have to admit it’s an incredibly beautiful experience when you fly with all the doors off in such a location.

How do you think drones will impact aerial photography?

Shark Bay, Western Australia

How do I think drones will impact aerial photography? EVERYWHERE! That happened fast didn’t it? I’m still waiting on drone delivery of alcohol in bars, so I feel they haven’t quite achieved their full potential yet.

On a more serious note it’s impacting photography right now, the whole aerial genre has exploded in the last few years. The effect I think is largely positive, if anything it’s sparking the passion of photography in more and more people. I notice many drone operators will start off just wanting to fly drones as their primary objective and in time they develop a love for photographing the world from above, and proceed to learn the photography side of things properly.

On the not-so-positive side I’ve seen it very rapidly develop a bad name in some areas due to pilots breaking the rules and flying dangerously. This puts a bad spin on aerial photography, and in most cases the actions of very few are ruining the potential for some amazing shots for many people. But in general, I think drones are having a positive impact. Do I fly drones? Not yet, I still need my buzz! Looking at the world fly past via an iPad or iPhone just doesn’t quite do it for me yet, I like to be up there experiencing it.

What’s your favorite aerial image to date and how did you go about getting the shot?

Dirk Hartog Island, Western Australia. Coastal Sand Dunes, spot the Kangaroo tracks coming in from top of frame

It’s really hard to pick just one image, but I’m going to have to go with an image I captured near Dirk Hartog Island Western Australia. It was around 7:30am in the morning on our 5th and last day of shooting the an area called Shark Bay. Paul Hoelen and I had decided that we would burn some fuel and head over to a remote strip of sand dunes. This particular area wasn’t shot often because you had to spend a fair bit of time and money to just get there so we were pretty excited about finding some untouched landscape.

Upon our arrival we found what we were after, beautiful clean dunes, we shot the location and both nodded to each other in appreciation of our gamble paying off. We then spoke to our pilot Ryan and said lets head south then home, as we made our way down the coast something happened, Paul can barely contain himself, he’s just waving his arm and pointing down “Scott, Scott, Scott!!! Down, look down!”, I look over and this gorgeous half moon shaped sand dune just appears from nowhere. It was so out of place in relation to the rest of the landscape, like mother nature had just created the most stunning sand dune possible then placed it hidden away for Paul and I to find.

I haven’t got to the really cool bit yet, so after shooting this mind blowing sand dune, we get back to our motel that night and load up the images, I go straight to the sequence of this stunning half moon dune and start looking at the images, I zoom in 50% and suddenly spot tracks, it’s kangaroo tracks! This perfect set of Kangaroo tracks is cutting into my composition and up the spine of the sand dune. I couldn’t believe it, the chances of all those things lining up were incredibly rare and it’s why I love photography so much. Yes it’s skill and creativity, but it has equal doses of luck.

How do you keep yourself inspired?

The Salt Farms of Useless Loop Shark Bay, Western Australia

I get much of my inspiration from the amazing, kind-hearted and adventurous landscape photographers I’ve made friends with along the way. It’s so cool in this amazing field we’re in, the community is a place you can draw many things from and inspiration is available everywhere. Beyond that I gain much inspiration from the people who have come before me, I read a lot and attempt to piece together the past as it helps pave the road to my future in this craft.

What are your aerial photography goals for 2017?

Arteries of coastal floodplains pump across the land, Carnarvon, Western Australia

Push the aerial genre to new heights, pardon the pun! I love aerial photography, I am well and truly hooked. I look at 2017 as my chance to challenge myself within this genre, I enjoy story telling via my aerial imagery and look forward to sharing that this year.

Behind the Scenes

This is the Hughes 500 Helicopter with all the doors taken off that was used for the flight over the Southern Alps of New Zealand. Huge thanks to Michael from Mountain Helicopters Fox Glacier!

The below video was shot when I snagged my favorite image to date. It gives you a great idea of the feverish pace at which you are taking images while shooting aerials in a plane.  

Articles: Digital Photography Review (dpreview.com)

 
Comments Off on Take flight over Australia: aerial photos by Scott McCook

Posted in Uncategorized


Improve Your Photos with the Very Best Photo Editing Apps

12 Jan

We snap photos so fine, we don’t need editing apps … but every now and then a photo needs a touch of sharpening, or a cooling filter, or a clip art robot, just to spruce it up.

Who are we kidding? We’re obsessed with editing apps. And so are you – we asked!

Read along to see our favorite editing apps, and the favorites of all of our followers.

You’ll be a pro editor in no time, whether you snap perfect pics or not.

(…)
Read the rest of Improve Your Photos with the Very Best Photo Editing Apps (638 words)


© laurel for Photojojo, 2017. |
Permalink |
No comment |
Add to
del.icio.us

Post tags:


Photojojo

 
Comments Off on Improve Your Photos with the Very Best Photo Editing Apps

Posted in Equipment